T-Pot介绍
T-Pot是一个集所有功能于一身的、可选择分布式的多构架(amd64,arm64)蜜罐平台,支持20多个蜜罐和很多可视化选项,使用弹性堆栈、动画实时攻击地图和许多安全工具来进一步改善欺骗体验。GitHub - telekom-security/tpotce: 🍯 T-Pot - The All In One Multi Honeypot Platform 🐝
可能是当前更新最及时的蜜罐系统了。

安装
发现需要编译安装,为了安全,不要在自己工作、学习的机器上安装,可以先装一个虚拟机,然后在虚拟机里安装。虚拟机安装debian见:Debian12 安装留档@Virtual Box_firmware-12.5.0-amd64-dvd-1.iso-CSDN博客
安装方法1
创建自己的iso ,个人实践不需要,只要按照方法2安装就行了。
git clone https://github.com/telekom-security/tpotce

cd tpotce

makeiso.sh
创建好光盘后用这个光盘安装即可。
安装方法2
先安装好debian系统,然后在有sudo权限的个人账户下安装:
git clone https://github.com/telekom-security/tpotce
cd tpotce/iso/installer/
./install.sh
若github速度慢,可以使用--depth选项
git clone --depth https://github.com/telekom-security/tpotce
顺利的话前面3句就安装好了。如果不顺利,再根据报错解决问题。 以下步骤都是踩坑经历,可以忽略,一直到“开始使用”章节即可。
可以使用gitcode镜像:
git clone https://gitcode.com/telekom-security/tpotce
安装的东西可真不少... 整个过程耗时较长,尤其是国内。
也可以自动化安装
自动化安装需要把配置文件tpotce/iso/installer/tpot.conf.dist的dist去掉,安装的时候加上auto选项
git clone https://github.com/telekom-security/tpotce
cd tpotce/iso/installer/
cp tpot.conf.dist tpot.conf
./install.sh --type=auto --conf=tpot.conf
开始安装后,安装程序进行检测,若符合条件,就会显示:
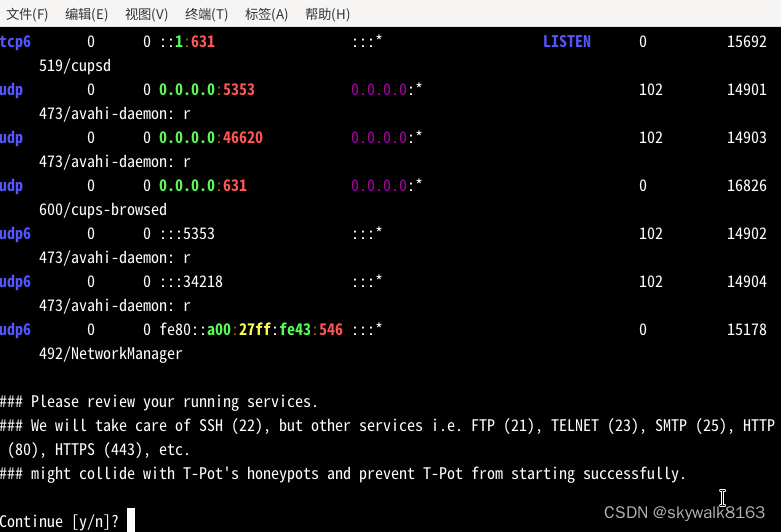
ssh端口保护起来了,但其它端口都没有动。按确定键下一步。
checking https://hub.docker.com 这里报错,需要修改代码
修改myREMOTESITES="https://hub.docker.com https://github.com https://pypi.python.org https://debian.org https://listbot.sicherheitstacho.eu" 修改成
myREMOTESITES="https://mirror.baidubce.com https://github.com https://pypi.python.org https://debian.org https://listbot.sicherheitstacho.eu"
然后就是设置web的用户名和密码
用户名:testtpot 密码 123
设好之后选择安装包,(第一次选了MINI,后来选了第一项Hive),后面就是漫长的安装过程。如果选全部,大约需要100G空间。(实践最终硬盘占用带系统是11G空间。)
最后安装完成后,系统需要重启。
重启后端口开放:631 34801 64295
安装过程中发现/opt/tpot克隆失败,将github改成gitcode
myREMOTESITES="https://mirror.baidubce.com https://gitcode.com https://pypi.python.org https://debian.org https://listbot.sicherheitstacho.eu"
安装到最后出现提示
TASK [Change SSH Port to 64295 (AlmaLinux, Debian, Fedora, Raspbian, Rocky, Ubuntu)] ***
fatal: [127.0.0.1]: FAILED! => {"changed": false, "msg": "Destination /etc/ssh/sshd_confi
g does not exist !", "rc": 257}
PLAY RECAP *********************************************************************
127.0.0.1 : ok=22 changed=12 unreachable=0 failed=1 skipped=2
rescued=0 ignored=0
### Something went wrong with the Playbook, please review the output and / or install_tpot.log for clues.
### Aborting.
感觉爱是没有安装成功。
重新安装openssh-server ,终于能继续安装下去了,显示
### Playbook was successful.


### Choose your T-Pot type:
### (H)ive   - T-Pot Standard / HIVE installation.
###            Includes also everything you need for a distributed setup with sensors.
### (S)ensor - T-Pot Sensor installation.
###            Optimized for a distributed installation, without WebUI, Elasticsearch and
 Kibana.
### (M)obile - T-Pot Mobile installation.
###            Includes everything to run T-Pot Mobile (available separately).
最后终于安装成功:
### Done. Please reboot and re-connect via SSH on tcp/64295.
提示:
 ✔ mailoney Pulled                                                                      5125.4s
 ✔ fatt Pulled                                                                            10.8s

### Please review for possible honeypot port conflicts.
### While SSH is taken care of, other services such as
### SMTP, HTTP, etc. might prevent T-Pot from starting.

[sudo] skywalk 的密码:
Active Internet connections (only servers)
Proto Recv-Q Send-Q Local Address           Foreign Address         State       User       Inode      PID/Program name
tcp        0      0 0.0.0.0:64295           0.0.0.0:*               LISTEN      0          140763     40997/sshd: /usr/sb
tcp6       0      0 :::64295                :::*                    LISTEN      0          140774     40997/sshd: /usr/sb
udp        0      0 0.0.0.0:68              0.0.0.0:*                           0          13192      401/dhclient

### Done. Please reboot and re-connect via SSH on tcp/64295.
重启后发现这回终于安装成功了,所有的端口都出来了:
netstat -an |more
Active Internet connections (servers and established)
Proto Recv-Q Send-Q Local Address           Foreign Address         State
tcp        0      0 0.0.0.0:2404            0.0.0.0:*               LISTEN
tcp        0      0 0.0.0.0:5432            0.0.0.0:*               LISTEN
tcp        0      0 0.0.0.0:465             0.0.0.0:*               LISTEN
tcp        0      0 0.0.0.0:5555            0.0.0.0:*               LISTEN
tcp        0      0 0.0.0.0:443             0.0.0.0:*               LISTEN
tcp        0      0 0.0.0.0:445             0.0.0.0:*               LISTEN
tcp        0      0 0.0.0.0:1433            0.0.0.0:*               LISTEN
tcp        0      0 0.0.0.0:27017           0.0.0.0:*               LISTEN
tcp        0      0 0.0.0.0:110             0.0.0.0:*               LISTEN
tcp        0      0 0.0.0.0:80              0.0.0.0:*               LISTEN
tcp        0      0 0.0.0.0:81              0.0.0.0:*               LISTEN
tcp        0      0 0.0.0.0:1080            0.0.0.0:*               LISTEN
tcp        0      0 0.0.0.0:42              0.0.0.0:*               LISTEN
tcp        0      0 0.0.0.0:20              0.0.0.0:*               LISTEN
tcp        0      0 0.0.0.0:21              0.0.0.0:*               LISTEN
tcp        0      0 0.0.0.0:22              0.0.0.0:*               LISTEN
tcp        0      0 0.0.0.0:23              0.0.0.0:*               LISTEN
tcp        0      0 0.0.0.0:25              0.0.0.0:*               LISTEN
tcp        0      0 0.0.0.0:1025            0.0.0.0:*               LISTEN
tcp        0      0 0.0.0.0:8443            0.0.0.0:*               LISTEN
tcp        0      0 0.0.0.0:3306            0.0.0.0:*               LISTEN
tcp        0      0 0.0.0.0:6379            0.0.0.0:*               LISTEN
tcp        0      0 0.0.0.0:135             0.0.0.0:*               LISTEN
tcp        0      0 0.0.0.0:143             0.0.0.0:*               LISTEN
tcp        0      0 0.0.0.0:11112           0.0.0.0:*               LISTEN
tcp        0      0 0.0.0.0:1883            0.0.0.0:*               LISTEN
tcp        0      0 0.0.0.0:64294           0.0.0.0:*               LISTEN
tcp        0      0 0.0.0.0:64295           0.0.0.0:*               LISTEN
tcp        0      0 0.0.0.0:64297           0.0.0.0:*               LISTEN
tcp        0      0 127.0.0.1:64303         0.0.0.0:*               LISTEN
tcp        0      0 127.0.0.1:64299         0.0.0.0:*               LISTEN
tcp        0      0 127.0.0.1:64298         0.0.0.0:*               LISTEN
tcp        0      0 0.0.0.0:10001           0.0.0.0:*               LISTEN
tcp        0      0 0.0.0.0:5900            0.0.0.0:*               LISTEN
tcp        0      0 0.0.0.0:9200            0.0.0.0:*               LISTEN
tcp        0      0 0.0.0.0:993             0.0.0.0:*               LISTEN
tcp        0      0 0.0.0.0:995             0.0.0.0:*               LISTEN
tcp        0      0 0.0.0.0:5060            0.0.0.0:*               LISTEN
tcp        0      0 0.0.0.0:50100           0.0.0.0:*               LISTEN
tcp        0      0 0.0.0.0:8080            0.0.0.0:*               LISTEN
tcp        0      0 0.0.0.0:631             0.0.0.0:*               LISTEN
tcp        0      0 0.0.0.0:587             0.0.0.0:*               LISTEN
tcp        0      0 0.0.0.0:2575            0.0.0.0:*               LISTEN
tcp        0      0 0.0.0.0:1723            0.0.0.0:*               LISTEN
整个系统安装好之后占用空间11G,系统负载还是比较高的 load average: 114.00, 53.68, 23.78
开始使用
安装好重启之后,使用安装时设置的用户来登录。SSH使用原来的系统账户登录,T-Pot使用 tpot这个用户名登录,其它都用<WEB_USER>用户名登录。
登录ssh
用系统用户名和密码登录
ssh -l username -p 64294 ipaddress浏览器登录
https://ipaddress:64297
用户名是装机时设定的web_user ,比如testtpot,密码123
登录之后的web界面:

还没有受到攻击的攻击地图:
说图片违规了,那就删掉好了,具体大家可以看看官网的图片,就是一张世界地图,可以看到攻击的来源等图像信息。
执行deploy
发现64297还没有启动。
于是登录到64294 ,然后执行deploy.sh
提示
# Was a T-Pot SENSOR installed? (y/n): y
# Enter the remote username T-Pot SENSOR was installed with: skywa
# Enter the IP/domain name of the SENSOR: 192.168.1.21
# Has a SSH key been deployed to the SENSOR? (y/n): y
# Enter the IP/domain name of this HIVE: 192.168.1.21
# The following SENSOR credentials have been created:
# New SENSOR username: sensor-loathsome-referent
# New SENSOR passowrd: wh
BECOME password:
123456
然后有报错:
独立启动
There is not much to do except to login and check via dps.sh if all services and honeypots are starting up correctly and login to Kibana and / or Geoip Attack Map to monitor the attacks.
问题是根本就没有见到dps.sh文件啊!
第一次启动
另外T-Pot使用了Hive
Hive是基于Hadoop的数据仓库工具。可以用于存储在Hadoop集群中的HDFS文件数据集进行数据整理、特殊查询和分析处理。
使用docker启动
命令:docker-compose up
看看能否启动
总结
T-Pot是一个比较全面的蜜罐系统,最低需要11G硬盘空间,2G内存,1核cpu,这个配置是实践成功过的。但是即使在3G内存4核cpu下,还是有些服务会内存不够而退出。所以最终使用的时候还是建议按官网的硬件需求来:
| T-Pot Type | RAM | Storage | Description |
|---|---|---|---|
| Hive | 16GB | 256GB SSD | As a rule of thumb, the more sensors & data, the more RAM and storage is needed. |
T-Pot的安装,只需要三句话即可,git clone 下载代码,进入目录,然后执行.install.sh 。但是有时候可能会比较坎坷,主要碰到如下几个问题:
- 1 官网git clone就失败,可以用--depth 1参数解决
- 2 安装时需要再次git (git clone --origin origin https://github.com/telekom-security/tpotce /home/skywalk/tpotce)的时候可能失败 ,解决方法是第一步的时候要本地git下载,而不要采用在其它机器git然后cp到本地的方法,那样可能导致这步出错
- 3 docker慢以至于无法完成安装。用加速镜像,并耐心等待。加速镜像需要修改install.sh源码,找到myREMOTESITES变量,将docker.com换成镜像地址:
myREMOTESITES="https://mirror.baidubce.com https://github.com https://pypi.python.org https://debian.org https://listbot.sicherheitstacho.eu"
- 4 一定要用T-Pot的新版本,老版本会有各种各样的问题。比如gitcode网站的T-Pot就更新不及时,安装会失败。
调试
debian apt安装软件需要插cd
安装软件的时候提示——更换介质:请把标有xxx的盘片插入驱动器/media/cdrom 再按回车键
解决方法:打开/etc/apt/sources.list文件 ,把第一行“deb cdrom”去掉即可。
不明白为什么设计成没有cdrom就卡住....
install的时候报错:Aborting. Debian bookworm is not supported
晕啊,debian12就是bookworm ,难道非要降到11 bullseye版本吗?
听话,用debian11
但是官网明明说12.5是可以的啊!百思不得其解。看到作者说“For now this is intentional.” 也就是特意的?
到install.sh文件里,找到这句,把下面的exit注释掉
echo “Aborting. Debian $myLSB is not supported."
# exit
ps:T-Pot最新版本已经没有这个问题了,用老版本才会踩坑。
安装好后么有/opt/tpot目录
这不是白装了么? 原来是安装的时候就提示docker有问题,会安装失败。
checking https://hub.docker.com 这里报错,需要修改install.sh的代码
修改myREMOTESITES="https://hub.docker.com https://github.com https://pypi.python.org https://debian.org https://listbot.sicherheitstacho.eu" 修改成
myREMOTESITES="https://mirror.baidubce.com https://github.com https://pypi.python.org https://debian.org https://listbot.sicherheitstacho.eu"
好了,能安装下去了,但是还是有报错
克隆报错unexpected disconnect while reading sideband packet
正克隆到/opt/tpot
错误:预期仍然需要476个字节的正文
fetch-pack :unexpected disconnect while reading sideband packet
致命错误:过早的文件结束符(EOF)
致命错误:fetch-pack 无效的index-pack
将install.sh文件中的github改为gitcode
myREMOTESITES="https://mirror.baidubce.com https://gitcode.com https://pypi.python.org https://debian.org https://listbot.sicherheitstacho.eu"
成功装上!
但是随之而来的问题是:gitcode站的版本不是最新的。会有其它问题,所以最终还是要用回github.com。不过只要刚开始本地就是用git clone 下载的github官网最新版本,那么这里就不会遇到问题。
重复安装的时候报错
修改install.sh文件内容
一、报错不能重复安装Installer can only be executed once.
将判断不能重复安装里面的exit语句注释
if [ -s "$myTPOT_INSTALL_LOG" ];
  then
    echo "Aborting. Installer can only be executed once."
    # exit
fi
二、 报错已经有tsec用户安装程序退出
两种方法,1 删除tsec用户,使用命令:userdel tsec
2 代码里找到判断语句,注释掉exit语句。我用了方法1 。
老版本会有这个问题,新版本没有该问题。
安装完重启tpot后没有64294、64295和64297端口的服务
服务根本没有起来啊
咋办呢? 也根本没有看见dps.sh 文件啊,怎么检查所有服务和蜜罐是否正常启动呢?
也许是要用tsec用户登录?
原来就是没有安装成功,所以服务也没有起来。重新安装,安装结束没有报错才是真的安装好了。
安装到最后提示报错Destination /etc/ssh/sshd_config does not exist
TASK [Change SSH Port to 64295 (AlmaLinux, Debian, Fedora, Raspbian, Rocky, Ubuntu)] ***
fatal: [127.0.0.1]: FAILED! => {"changed": false, "msg": "Destination /etc/ssh/sshd_config does not exist !", "rc": 257}

PLAY RECAP *********************************************************************
127.0.0.1                  : ok=22   changed=3    unreachable=0    failed=1    skipped=2    rescued=0    ignored=0

### Something went wrong with the Playbook, please review the output and / or install_tpo
t.log for clues.
### Aborting.
问题是发现/etc/ssh/sshd_config 这个文件是存在的啊。看错主机了,这个文件确实没有。
使用命令安装openssh-server软件
apt install openssh-server
安装好之后,这个sshd的服务就有了
执行deploy报错
Are you sure you want to continue connecting (yes/no/[fingerprint])? yes
fatal: [192.168.1.21]: UNREACHABLE! => {"changed": false, "msg": "Failed to connect to the host via ssh: Warning: Permanently added '[192.168.1.21]:64295' (ED25519) to the list of known hosts.\r\nskywalk@192.168.1.21: Permission denied (publickey,password).", "unreachable": true}

PLAY RECAP ******************************************************************************
192.168.1.21               : ok=0    changed=0    unreachable=1    failed=0    skipped=0    rescued=0    ignored=0
不太明白...
先不管deploy了。最终没有再去做deploy的操作。
install的时候报错sshd打不开
可能是以前安装之后对系统造成了影响。也可能是没有安装sshd服务,手动使用apt install openssh-server安装。
若还是有问题,可以使用uninstall.sh 恢复原环境试试(这还是tpot旧版本的问题,新版本没有该问题)。
tpot安装时报错过早的文件结束符(EOF)\n致命错误
TASK [Clone / Update T-Pot repository (All)] ***********************************
fatal: [127.0.0.1]: FAILED! => {"changed": false, "cmd": "/usr/bin/git clone --origin origin https://github.com/telekom-security/tpotce /home/skywalk/tpotce", "msg": "正克隆到 '/home/skywalk/tpotce'...\n错误:RPC 失败。curl 92 HTTP/2 stream 5 was not closed cleanly: CANCEL (err 8)\n错误:预期仍然需要 6547 个字节的正文\nfetch-pack: unexpected disconnect while reading sideband packet\n致命错误:过早的文件结束符(EOF)\n致命错误:fetch-pack:无效的 index-pack 输出", "rc": 128, "stderr": "正克隆到 '/home/skywalk/tpotce'...\n错误:RPC 失败。curl 92 HTTP/2 stream 5 was not closed cleanly: CANCEL (err 8)\n错误:预期仍然需要 6547 个字节的正文\nfetch-pack: unexpected disconnect while reading sideband packet\n致命错误:过早的文件结束符(EOF)\n致命错误:fetch-pack:无效的 index-pack 输出\n", "stderr_lines": ["正克隆到 '/home/skywalk/tpotce'...", "错误:RPC 失败。curl 92 HTTP/2 stream 5 was not closed cleanly: CANCEL (err 8)", "错误:预期仍然需要 6547 个字节的正文", "fetch-pack: unexpected disconnect while reading sideband packet", "致命错误:过早的文件结束符(EOF)", "致命错误:fetch-pack:无效的 index-pack 输出"], "stdout": "", "stdout_lines": []}
重新install.sh安装一次,报错变成
install.sh安装报错:curl 16 Error in the HTTP2 framing layer\n致命错误
TASK [Clone / Update T-Pot repository (All)] ***********************************
fatal: [127.0.0.1]: FAILED! => {"changed": false, "cmd": "/usr/bin/git ls-remote https://github.com/telekom-security/tpotce -h refs/heads/master", "msg": "错误:RPC 失败。curl 16 Error in the HTTP2 framing layer\n致命错误:在引用列表之后应该有一个 flush 包", "rc": 128, "stderr": "错误:RPC 失败。curl 16 Error in the HTTP2 framing layer\n致命错误:在引用列表之后应该有一个 flush 包\n", "stderr_lines": ["错误:RPC 失败。curl 16 Error in the HTTP2 framing layer", "致命错误:在引用列表之后应该有一个 flush 包"], "stdout": "", "stdout_lines": []}
加上这句变量
GIT_CURL_HTTP2=off git ls-remote https://github.com/telekom-security/tpotce -h refs/heads/master
再install.sh试试
还是不行
错误CANCEL (err 8)", "错误:预期仍然需要 3419 个字节的正文",
fatal: [127.0.0.1]: FAILED! => {"changed": false, "cmd": "/usr/bin/git clone --origin origin https://github.com/telekom-security/tpotce /home/skywalk/tpotce", "msg": "正克隆到 '/home/skywalk/tpotce'...\n错误:RPC 失败。curl 92 HTTP/2 stream 5 was not closed cleanly: CANCEL (err 8)\n错误:预期仍然需要 3419 个字节的正文\nfetch-pack: unexpected disconnect while reading sideband packet\n致命错误:过早的文件结束符(EOF)\n致命错误:fetch-pack:无效的 index-pack 输出", "rc": 128, "stderr": "正克隆到 '/home/skywalk/tpotce'...\n错误:RPC 失败。curl 92 HTTP/2 stream 5 was not closed cleanly: CANCEL (err 8)\n错误:预期仍然需要 3419 个字节的正文\nfetch-pack: unexpected disconnect while reading sideband packet\n致命错误:过早的文件结束符(EOF)\n致命错误:fetch-pack:无效的 index-pack 输出\n", "stderr_lines": ["正克隆到 '/home/skywalk/tpotce'...", "错误:RPC 失败。curl 92 HTTP/2 stream 5 was not closed cleanly: CANCEL (err 8)", "错误:预期仍然需要 3419 个字节的正文", "fetch-pack: unexpected disconnect while reading sideband packet", "致命错误:过早的文件结束符(EOF)", "致命错误:fetch-pack:无效的 index-pack 输出"], "stdout": "", "stdout_lines": []}
这样试试:git config --global core.autocrlf true
git config --global core.autocrlf false 都不行
有人说因为被墙的原因,再试试这样
git config --global http.lowSpeedLimit 0
git config --global http.lowSpeedTime 999999
再不行最大缓存也增加:
git config --global http.postBuffer 1024288000
git config --list 可以确认下缓存数值
不管用
禁用http2试试
git config --global http.version HTTP/1.1
不行
加入压缩
git config --global core.compression -1
不管用
加入--depth 1
下载的时候管用,安装的时候找不到写入的地方啊
最终解决方法:
重新git clone,重新install.sh安装,成功
将以太网线插上,从以太网走,以加速网速。同时重新git clone源码,且 git clone 的时候加上 --depth 1 参数,执行命令
git clone --depth 1 https://github.com/telekom-security/tpotce下载完源码后重新install.sh安装,这次就比较顺利
添加web账户:testtpot 123
这回安装成功了,前面git 的报错(过早的文件结束符(EOF)\n致命错误等)也没有了。
打开管理网页刷了一下就连不上了
怀疑内存少,增加内存。大约2G是极限,3G可能就比较好了。
另外也有可能是服务闪退了一下。整个系统的负载比较重,看来确实需要较好的设备才行。
好像有些服务报内存问题退出
解决方法,加大系统内存,尽量向手册写的官方配置看齐,比如内存16G 。


