编辑:OAK中国
首发:oakchina.cn
喜欢的话,请多多👍⭐️✍
内容可能会不定期更新,官网内容都是最新的,请查看首发地址链接。
Hello,大家好,这里是OAK中国,我是Ashely。
专注科技,专注分享。
这可能是我给大家发的最后一篇博客了,马上就要离开这里,追逐我的梦想了!Anyway,来看教程正文吧!
1.其他Yolo转换及使用教程请参考
2.检测类的yolo模型建议使用在线转换(地址),如果在线转换不成功,你再根据本教程来做本地转换。
▌.pt 转换为 .onnx
使用下列脚本(将脚本放到 YOLOv10 根目录中)将 pytorch 模型转换为 onnx 模型
若安装了blobconverter可直接转换成 blob
示例用法(默认使用 one2one ):
python export_onnx.py -w <path_to_model>.pt -imgsz 640
export_onnx.py :
usage: export_onnx.py [-h] -m INPUT_MODEL [-imgsz IMG_SIZE [IMG_SIZE ...]] [-op OPSET] [--max_det MAX_DET] [-n NAME] [-o OUTPUT_DIR] [-b] [-s] [-sh SHAVES] [-t {docker,blobconverter,local}]

Tool for converting Yolov8 models to the blob format used by OAK

optional arguments:
  -h, --help            show this help message and exit
  -m INPUT_MODEL, -i INPUT_MODEL, -w INPUT_MODEL, --input_model INPUT_MODEL
                        weights path (default: None)
  -imgsz IMG_SIZE [IMG_SIZE ...], --img-size IMG_SIZE [IMG_SIZE ...]
                        image size (default: [640, 640])
  -op OPSET, --opset OPSET
                        opset version (default: 12)
  --max_det MAX_DET     maximum number of detections per image (default: 300)
  --one2many            Use the 'one2many' branch as the 'head' output, otherwise 'one2one' (default: False)
  -n NAME, --name NAME  The name of the model to be saved, none means using the same name as the input model (default: None)
  -o OUTPUT_DIR, --output_dir OUTPUT_DIR
                        Directory for saving files, none means using the same path as the input model (default: None)
  -b, --blob            OAK Blob export (default: False)
  -s, --spatial_detection
                        Inference with depth information (default: False)
  -sh SHAVES, --shaves SHAVES
                        Inference with depth information (default: None)
  -t {docker,blobconverter,local}, --convert_tool {docker,blobconverter,local}
                        Which tool is used to convert, docker: should already have docker (https://docs.docker.com/get-docker/) and docker-py (pip install docker) installed; blobconverter: uses an online
                        server to convert the model and should already have blobconverter (pip install blobconverter); local: use openvino-dev (pip install openvino-dev) and openvino 2022.1 (
                        https://docs.oakchina.cn/en/latest /pages/Advanced/Neural_networks/local_convert_openvino.html#id2) to convert (default: blobconverter)
#!/usr/bin/env python3
# -*- coding:utf-8 -*-
import argparse
import json
import logging
import math
import sys
import time
import warnings
from io import BytesIO
from pathlib import Path
from zipfile import ZipFile, ZIP_LZMA

import torch
from torch import nn

warnings.filterwarnings("ignore")

FILE = Path(__file__).resolve()
ROOT = FILE.parents[0]
if str(ROOT) not in sys.path:
    sys.path.append(str(ROOT))  # add ROOT to PATH

from ultralytics.nn.modules import v10Detect, Detect
from ultralytics.nn.tasks import attempt_load_weights
from ultralytics.utils.tal import dist2bbox, make_anchors
from ultralytics.utils import ops
from ultralytics.utils.torch_utils import select_device

try:
    from rich import print
    from rich.logging import RichHandler

    logging.basicConfig(
        level="INFO",
        format="%(message)s",
        datefmt="[%X]",
        handlers=[
            RichHandler(
                rich_tracebacks=False,
                show_path=False,
            )
        ],
    )
except ImportError:
    logging.basicConfig(
        level="INFO",
        format="%(asctime)s\t%(levelname)s\t%(message)s",
        datefmt="[%X]",
    )


def v10postprocess(preds, max_det, nc=80):
    """
    对模型预测结果进行后处理。

    Args:
        preds (torch.Tensor): 模型的预测结果,形状为 (batch_size, num_boxes, 4 + num_classes)。
        max_det (int): 需要保留的最大检测框数量。
        nc (int): 类别数。

    Returns:
        boxes (torch.Tensor): 保留的检测框的坐标,形状为 (batch_size, max_det, 4)。
        scores (torch.Tensor): 保留的检测框的置信度,形状为 (batch_size, max_det)。
        labels (torch.Tensor): 保留的检测框的类别标签,形状为 (batch_size, max_det)。

    Notes:
        这个函数假设输入的 `preds` 张量的最后一个维度表示每个检测框的坐标和置信度。
    """
    assert 4 + nc == preds.shape[-1]

    # 分割预测结果为边界框坐标和置信度
    boxes, scores = preds.split([4, nc], dim=-1)

    # 选取每个预测结果中置信度最高的几个预测框
    max_scores = scores.amax(dim=-1)
    max_scores, index = torch.topk(max_scores, max_det, dim=-1)
    index = index.unsqueeze(-1)

    # 根据置信度最高的预测框的索引,获取对应的边界框和置信度
    boxes = torch.gather(boxes, dim=1, index=torch.cat([index for i in range(boxes.shape[-1])], dim=-1))
    scores = torch.gather(scores, dim=1, index=torch.cat([index for i in range(scores.shape[-1])], dim=-1))

    # 在所有预测结果中选取置信度最高的几个预测框
    scores, index = torch.topk(scores.flatten(1), max_det, dim=-1)

    # 计算类别标签
    labels = index - (index // nc) * nc
    index = (index // nc).unsqueeze(-1)

    # 根据索引获取保留的边界框
    boxes = boxes.gather(dim=1, index=torch.cat([index for i in range(boxes.shape[-1])], dim=-1))

    return boxes, scores, labels


class DetectV10(nn.Module):
    """YOLOv10 Detect head for detection models"""

    dynamic = False  # force grid reconstruction
    export = False  # export mode
    shape = None
    anchors = torch.empty(0)  # init
    strides = torch.empty(0)  # init
    max_det = -1

    def __init__(self, old_detect):
        super().__init__()
        self.nc = old_detect.nc  # number of classes
        self.nl = old_detect.nl  # number of detection layers
        self.reg_max = old_detect.reg_max  # DFL channels (ch[0] // 16 to scale 4/8/12/16/20 for n/s/m/l/x)
        self.no = old_detect.no  # number of outputs per anchor
        self.stride = old_detect.stride  # strides computed during build

        self.cv2 = old_detect.cv2
        self.cv3 = old_detect.cv3
        self.dfl = old_detect.dfl
        self.f = old_detect.f
        self.i = old_detect.i

        self.one2one_cv2 = old_detect.one2one_cv2
        self.one2one_cv3 = old_detect.one2one_cv3

    def decode_bboxes(self, bboxes, anchors):
        """Decode bounding boxes."""
        return dist2bbox(bboxes, anchors, xywh=False, dim=1)

    def inference(self, x):
        # Inference path
        shape = x[0].shape  # BCHW
        x_cat = torch.cat([xi.view(shape[0], self.no, -1) for xi in x], 2)
        if self.dynamic or self.shape != shape:
            self.anchors, self.strides = (x.transpose(0, 1) for x in make_anchors(x, self.stride, 0.5))
            self.shape = shape

        box, cls = x_cat.split((self.reg_max * 4, self.nc), 1)

        # dbox = dist2bbox(self.dfl(box), self.anchors.unsqueeze(0), xywh=False, dim=1) * self.strides
        dbox = self.decode_bboxes(self.dfl(box), self.anchors.unsqueeze(0)) * self.strides

        y = torch.cat((dbox, cls.sigmoid()), 1)
        return y

    def forward_feat(self, x, cv2, cv3):
        y = []
        for i in range(self.nl):
            y.append(torch.cat((cv2[i](x[i]), cv3[i](x[i])), 1))
        return y

    def forward(self, x):
        one2one = self.forward_feat([xi.detach() for xi in x], self.one2one_cv2, self.one2one_cv3)

        one2one = self.inference(one2one)

        assert self.max_det != -1

        boxes, scores, labels = v10postprocess(one2one.permute(0, 2, 1), self.max_det, self.nc)
        boxes /= torch.Tensor([x[0].shape[2] * 2**3, x[0].shape[3] * 2**3, x[0].shape[2] * 2**3, x[0].shape[3] * 2**3])

        return torch.cat([labels.unsqueeze(-1), labels.unsqueeze(-1), scores.unsqueeze(-1), boxes], dim=-1)
        # return torch.cat([boxes, scores.unsqueeze(-1), labels.unsqueeze(-1)], dim=-1)

    def bias_init(self):
        # Initialize Detect() biases, WARNING: requires stride availability
        m = self  # self.model[-1]  # Detect() module

        for a, b, s in zip(m.one2one_cv2, m.one2one_cv3, m.stride):  # from
            a[-1].bias.data[:] = 1.0  # box
            b[-1].bias.data[: m.nc] = math.log(5 / m.nc / (640 / s) ** 2)  # cls (.01 objects, 80 classes, 640 img)


class DetectV8(nn.Module):
    """YOLOv8 Detect head for detection models"""

    dynamic = False  # force grid reconstruction
    export = False  # export mode
    shape = None
    anchors = torch.empty(0)  # init
    strides = torch.empty(0)  # init

    def __init__(self, old_detect):
        super().__init__()
        self.nc = old_detect.nc  # number of classes
        self.nl = old_detect.nl  # number of detection layers
        self.reg_max = (
            old_detect.reg_max
        )  # DFL channels (ch[0] // 16 to scale 4/8/12/16/20 for n/s/m/l/x)
        self.no = old_detect.no  # number of outputs per anchor
        self.stride = old_detect.stride  # strides computed during build

        self.cv2 = old_detect.cv2
        self.cv3 = old_detect.cv3
        self.dfl = old_detect.dfl
        self.f = old_detect.f
        self.i = old_detect.i

    def forward(self, x):
        shape = x[0].shape  # BCHW

        for i in range(self.nl):
            x[i] = torch.cat((self.cv2[i](x[i]), self.cv3[i](x[i])), 1)

        box, cls = torch.cat([xi.view(shape[0], self.no, -1) for xi in x], 2).split(
            (self.reg_max * 4, self.nc), 1
        )
        box = self.dfl(box)
        cls_output = cls.sigmoid()
        # Get the max
        conf, _ = cls_output.max(1, keepdim=True)
        # Concat
        y = torch.cat([box, conf, cls_output], dim=1)
        # Split to 3 channels
        outputs = []
        start, end = 0, 0
        for i, xi in enumerate(x):
            end += xi.shape[-2] * xi.shape[-1]
            outputs.append(
                y[:, :, start:end].view(xi.shape[0], -1, xi.shape[-2], xi.shape[-1])
            )
            start += xi.shape[-2] * xi.shape[-1]

        return outputs

    def bias_init(self):
        # Initialize Detect() biases, WARNING: requires stride availability
        m = self  # self.model[-1]  # Detect() module

        for a, b, s in zip(m.cv2, m.cv3, m.stride):  # from
            a[-1].bias.data[:] = 1.0  # box
            b[-1].bias.data[: m.nc] = math.log(
                5 / m.nc / (640 / s) ** 2
            )  # cls (.01 objects, 80 classes, 640 img)


def parse_args():
    parser = argparse.ArgumentParser(
        description="Tool for converting Yolov8 models to the blob format used by OAK",
        formatter_class=argparse.ArgumentDefaultsHelpFormatter,
    )
    parser.add_argument(
        "-m",
        "-i",
        "-w",
        "--input_model",
        type=Path,
        required=True,
        help="weights path",
    )
    parser.add_argument(
        "-imgsz",
        "--img-size",
        nargs="+",
        type=int,
        default=[640, 640],
        help="image size",
    )  # height, width
    parser.add_argument("-op", "--opset", type=int, default=12, help="opset version")
    parser.add_argument("--max_det", default=300, help="maximum number of detections per image")
    parser.add_argument(
        "--one2many",
        action="store_true",
        help="Use the 'one2many' branch as the 'head' output, otherwise 'one2one'",
    )
    parser.add_argument(
        "-n",
        "--name",
        type=str,
        help="The name of the model to be saved, none means using the same name as the input model",
    )
    parser.add_argument(
        "-o",
        "--output_dir",
        type=Path,
        help="Directory for saving files, none means using the same path as the input model",
    )
    parser.add_argument(
        "-b",
        "--blob",
        action="store_true",
        help="OAK Blob export",
    )
    parser.add_argument(
        "-s",
        "--spatial_detection",
        action="store_true",
        help="Inference with depth information",
    )
    parser.add_argument(
        "-sh",
        "--shaves",
        type=int,
        help="Inference with depth information",
    )
    parser.add_argument(
        "-t",
        "--convert_tool",
        type=str,
        help="Which tool is used to convert, docker: should already have docker (https://docs.docker.com/get-docker/) and docker-py (pip install docker) installed; blobconverter: uses an online server to convert the model and should already have blobconverter (pip install blobconverter); local: use openvino-dev (pip install openvino-dev) and openvino 2022.1 ( https://docs.oakchina.cn/en/latest /pages/Advanced/Neural_networks/local_convert_openvino.html#id2) to convert",
        default="blobconverter",
        choices=["docker", "blobconverter", "local"],
    )

    args = parser.parse_args()
    args.input_model = args.input_model.resolve().absolute()
    if args.name is None:
        args.name = args.input_model.stem

    if args.output_dir is None:
        args.output_dir = args.input_model.parent

    args.img_size *= 2 if len(args.img_size) == 1 else 1  # expand

    if args.shaves is None:
        args.shaves = 5 if args.spatial_detection else 6

    return args


def export(input_model, img_size, output_model, opset, **kwargs):
    t = time.time()

    # Load PyTorch model
    device = select_device("cpu")
    # load FP32 model
    model = attempt_load_weights(input_model, device=device, inplace=True, fuse=True)
    labels = model.module.names if hasattr(model, "module") else model.names  # get class names
    labels = labels if isinstance(labels, list) else list(labels.values())

    nc = model.nc if hasattr(model, "nc") else model.model[-1].nc

    # check num classes and labels
    assert nc == len(labels), f"Model class count {nc} != len(names) {len(labels)}"

    # Replace with the custom Detection Head
    if kwargs.get("one2many", False):
        if isinstance(model.model[-1], (Detect)):
            model.model[-1] = DetectV8(model.model[-1])
            model.model[-1].export = True
    else:
        if isinstance(model.model[-1], (v10Detect)):
            print("Replacing model.model[-1] with DetectV10")

            model.model[-1] = DetectV10(model.model[-1])
            model.model[-1].export = True
            model.model[-1].max_det = kwargs.get("max_det", 300)

    num_branches = model.model[-1].nl

    # Input
    img = torch.zeros(1, 3, *img_size).to(device)  # image size(1,3,320,320) iDetection

    model.eval()
    model.float()
    model = model.fuse()

    model(img)  # dry runs

    # ONNX export
    try:
        import onnx

        print()
        logging.info("Starting ONNX export with onnx %s..." % onnx.__version__)
        output_list = ["output%s_yolov6r2" % (i + 1) for i in range(num_branches)] if kwargs.get("one2many", False) else ["output_yolov10"]
        with BytesIO() as f:
            torch.onnx.export(
                model,
                img,
                f,
                verbose=False,
                opset_version=opset,
                input_names=["images"],
                output_names=output_list,
            )

            # Checks
            onnx_model = onnx.load_from_string(f.getvalue())  # load onnx model
            onnx.checker.check_model(onnx_model)  # check onnx model

        try:
            import onnxsim

            logging.info("Starting to simplify ONNX...")
            onnx_model, check = onnxsim.simplify(onnx_model)
            assert check, "assert check failed"

        except ImportError:
            logging.warning(
                "onnxsim is not found, if you want to simplify the onnx, "
                + "you should install it:\n\t"
                + "pip install -U onnxsim onnxruntime\n"
                + "then use:\n\t"
                + f'python -m onnxsim "{output_model}" "{output_model}"'
            )
        except Exception:
            logging.exception("Simplifier failure")

        onnx.save(onnx_model, output_model)
        logging.info("ONNX export success, saved as:\n\t%s" % output_model)

    except Exception:
        logging.exception("ONNX export failure")

    if kwargs.get("one2many", False):
        # generate anchors and sides
        anchors = []

        # generate masks
        masks = dict()

        logging.info("anchors:\n\t%s" % anchors)
        logging.info("anchor_masks:\n\t%s" % masks)
        jsondata = {
            "nn_config": {
                "output_format": "detection",
                "NN_family": "YOLO",
                "input_size": f"{img_size[0]}x{img_size[1]}",
                "NN_specific_metadata": {
                    "classes": nc,
                    "coordinates": 4,
                    "anchors": anchors,
                    "anchor_masks": masks,
                    "iou_threshold": 0.3,
                    "confidence_threshold": 0.5,
                },
            },
            "mappings": {"labels": labels},
        }
    else:
        jsondata = {
            "nn_config": {
                "output_format": "detection",
                "NN_family": "mobilenet",
                "input_size": f"{img_size[0]}x{img_size[1]}",
                "confidence_threshold": 0.5,
            },
            "mappings": {"labels": labels},
        }


    export_json = output_model.with_suffix(".json")
    export_json.write_text(
        json.dumps(
            jsondata,
            indent=4,
        )
    )
    logging.info("Model data export success, saved as:\n\t%s" % export_json)

    # Finish
    logging.info("Export complete (%.2fs).\n" % (time.time() - t))


def convert(convert_tool, output_model, shaves, output_dir, name, **kwargs):
    t = time.time()

    export_dir: Path = output_dir.joinpath(name + "_openvino")
    export_dir.mkdir(parents=True, exist_ok=True)

    export_xml = export_dir.joinpath(name + ".xml")
    export_blob = export_dir.joinpath(name + ".blob")

    if convert_tool == "blobconverter":
        import blobconverter

        blob_path = blobconverter.from_onnx(
            model=str(output_model),
            data_type="FP16",
            shaves=shaves,
            use_cache=False,
            # version="2021.4",
            version="2022.1",
            output_dir=export_dir,
            optimizer_params=[
                "--scale=255",
                "--reverse_input_channel",
                "--use_new_frontend",
            ],
            download_ir=True,
        )
        with ZipFile(blob_path, "r", ZIP_LZMA) as zip_obj:
            for name in zip_obj.namelist():
                zip_obj.extract(
                    name,
                    export_dir,
                )
        blob_path.unlink()

    elif convert_tool == "docker":
        import docker

        export_dir = Path("/io").joinpath(export_dir.name)
        export_xml = export_dir.joinpath(name + ".xml")
        export_blob = export_dir.joinpath(name + ".blob")

        client = docker.from_env()
        image = client.images.pull("openvino/ubuntu20_dev", tag="2022.3.1")
        docker_output = client.containers.run(
            image=image.tags[0],
            command=f"bash -c \"mo -m {name}.onnx -n {name} -o {export_dir} --static_shape --reverse_input_channels --scale=255 --use_new_frontend && echo 'MYRIAD_ENABLE_MX_BOOT NO' | tee /tmp/myriad.conf >> /dev/null && /opt/intel/openvino/tools/compile_tool/compile_tool -m {export_xml} -o {export_blob} -ip U8 -VPU_NUMBER_OF_SHAVES {shaves} -VPU_NUMBER_OF_CMX_SLICES {shaves} -d MYRIAD -c /tmp/myriad.conf\"",
            remove=True,
            volumes=[
                f"{output_dir}:/io",
            ],
            working_dir="/io",
        )
        logging.info(docker_output.decode("utf8"))
    else:
        import subprocess as sp

        # OpenVINO export
        logging.info("Starting to export OpenVINO...")
        OpenVINO_cmd = "mo --input_model %s --output_dir %s --data_type FP16 --scale 255 --reverse_input_channel" % (
            output_model,
            export_dir,
        )
        try:
            sp.check_output(OpenVINO_cmd, shell=True)
            logging.info("OpenVINO export success, saved as %s" % export_dir)
        except sp.CalledProcessError:
            logging.exception("")
            logging.warning("OpenVINO export failure!")
            logging.warning("By the way, you can try to export OpenVINO use:\n\t%s" % OpenVINO_cmd)

        # OAK Blob export
        logging.info("Then you can try to export blob use:")
        blob_cmd = (
            "echo 'MYRIAD_ENABLE_MX_BOOT ON' | tee /tmp/myriad.conf"
            + "compile_tool -m %s -o %s -ip U8 -d MYRIAD -VPU_NUMBER_OF_SHAVES %s -VPU_NUMBER_OF_CMX_SLICES %s -c /tmp/myriad.conf"
            % (export_xml, export_blob, shaves, shaves)
        )
        logging.info("%s" % blob_cmd)

        logging.info(
            "compile_tool maybe in the path: /opt/intel/openvino/tools/compile_tool/compile_tool, if you install openvino 2022.1 with apt"
        )

    logging.info("Convert complete (%.2fs).\n" % (time.time() - t))


if __name__ == "__main__":
    args = parse_args()
    logging.info(args)
    print()
    output_model = args.output_dir / (args.name + ".onnx")

    export(output_model=output_model, **vars(args))
    if args.blob:
        convert(output_model=output_model, **vars(args))
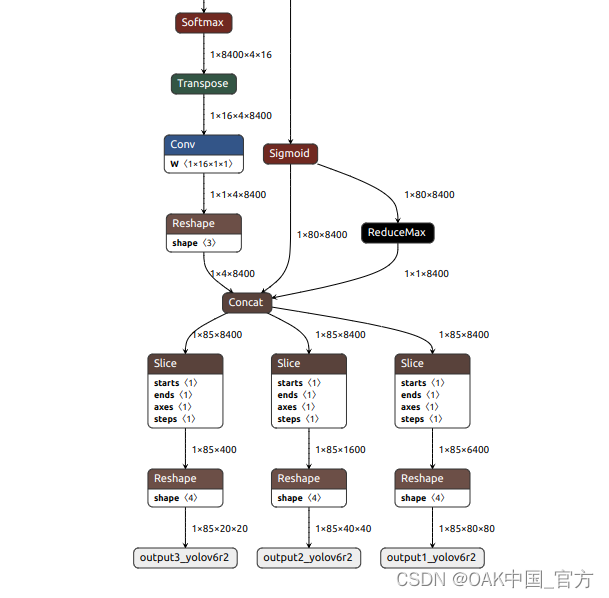
可以使用 Netron 查看模型结构:
one2one:
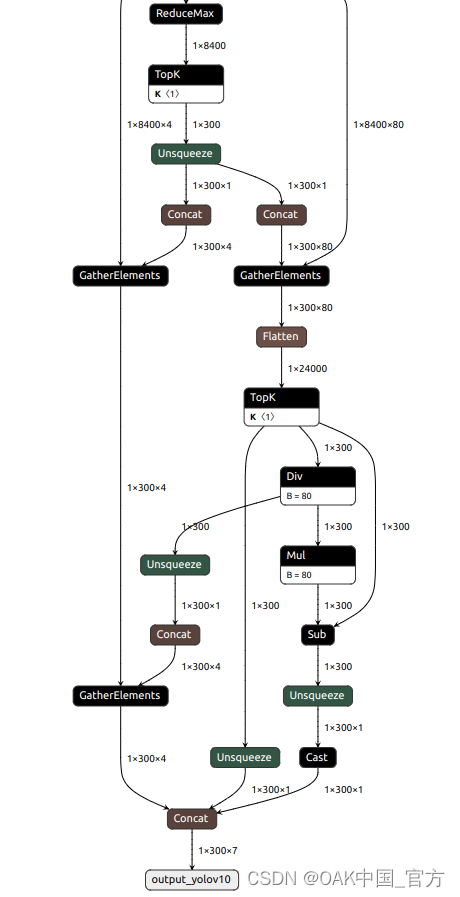
one2many:
▌转换
openvino 本地转换
onnx -> openvino
mo 是 openvino_dev 2022.1 中脚本,安装命令为
pip install openvino-dev
mo --input_model yolov10n.onnx --scale=255 --reverse_input_channel
openvino -> blob
compile_tool 是 OpenVINO Runtime 中脚本
<path>/compile_tool -m yolov10n.xml
-ip U8 -d MYRIAD
-VPU_NUMBER_OF_SHAVES 6
-VPU_NUMBER_OF_CMX_SLICES 6
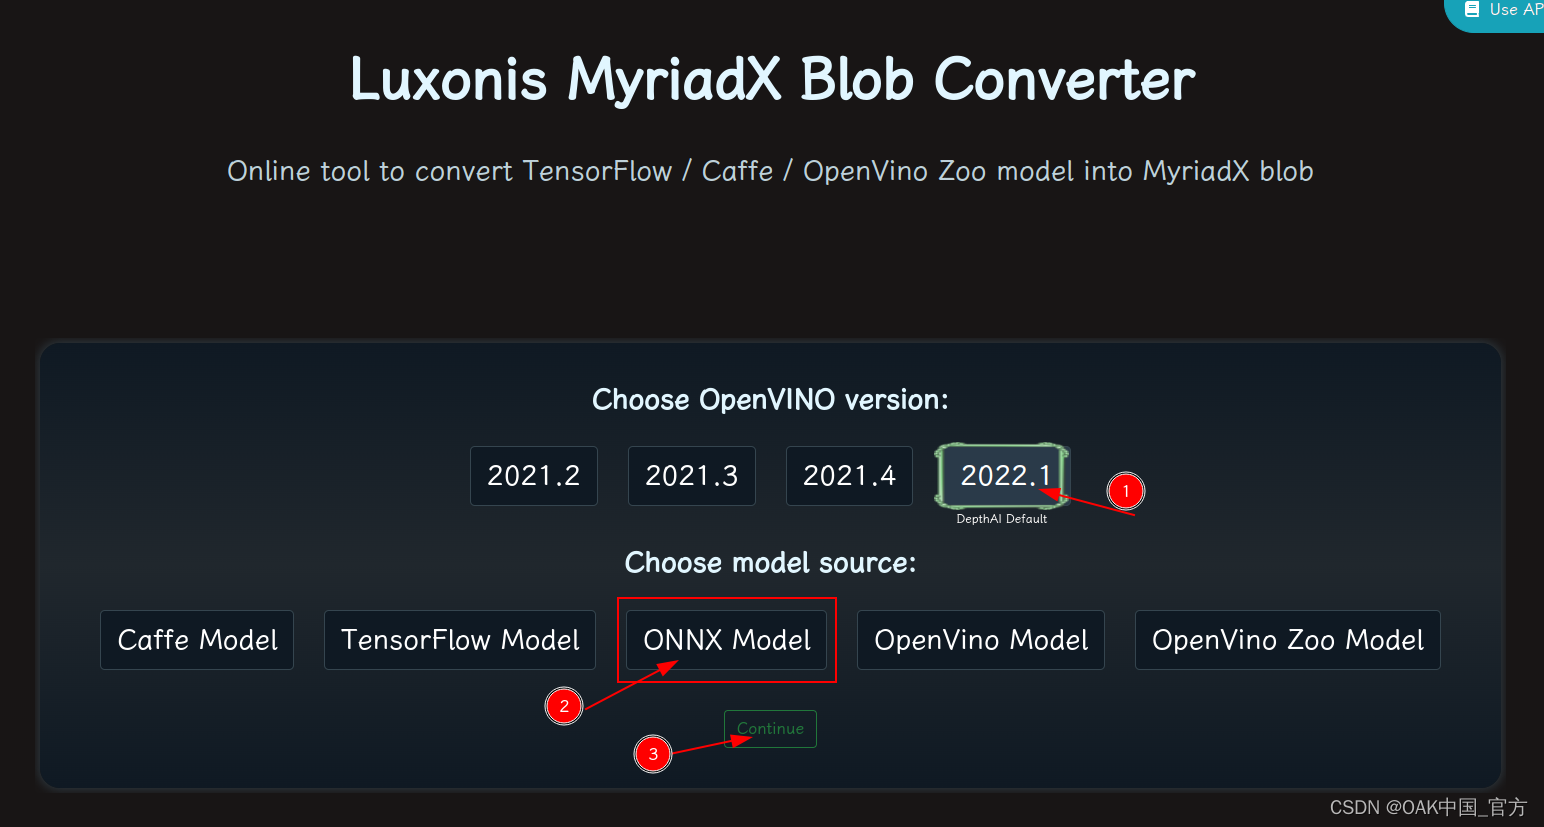
在线转换
blobconvert 网页:http://blobconverter.luxonis.com/
- 进入网页,按下图指示操作:
- 修改参数,转换模型:
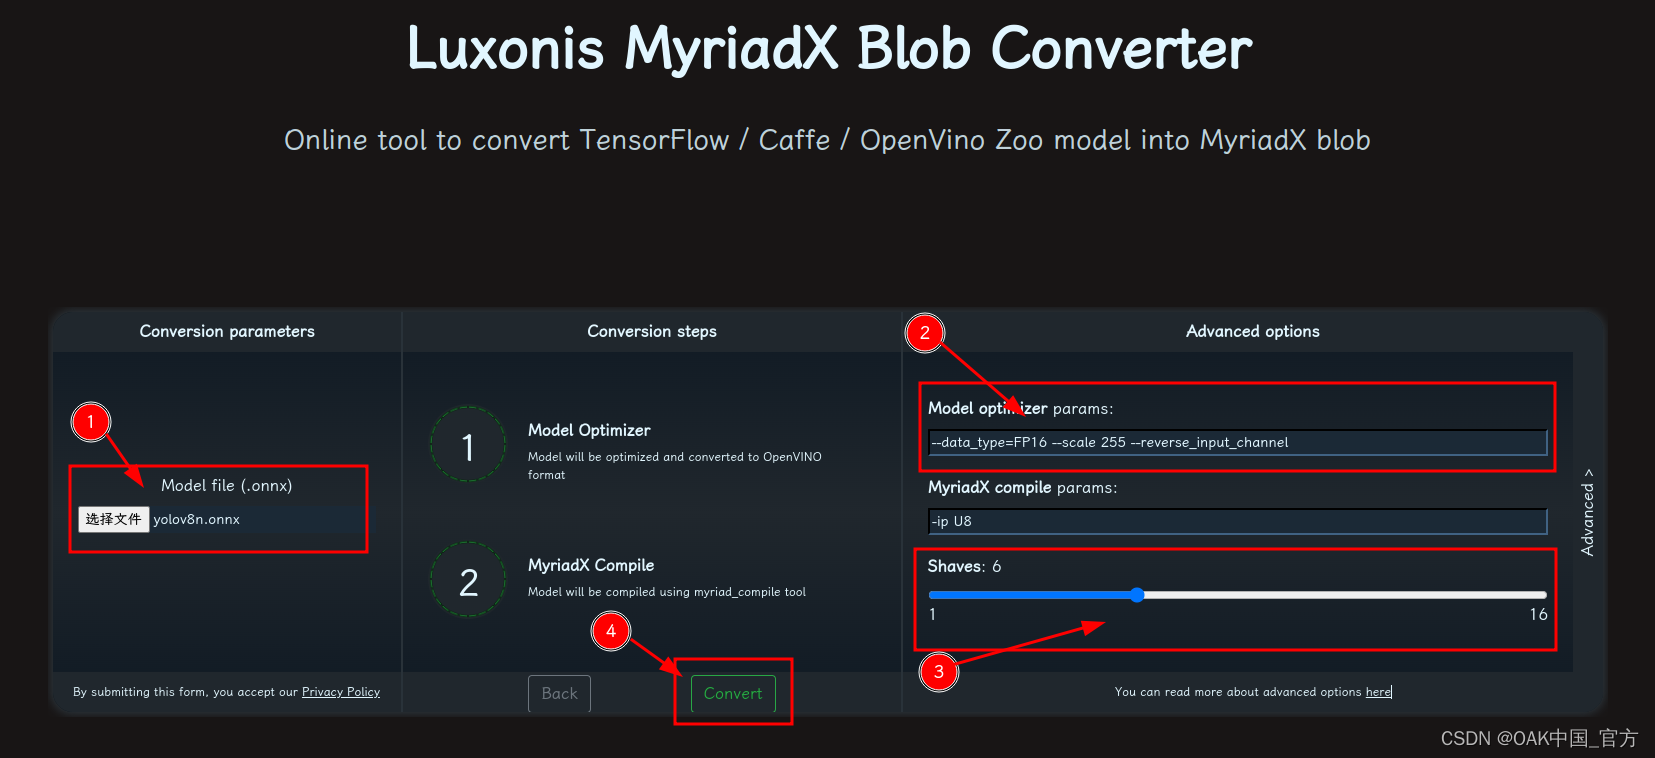
- 选择 onnx 模型
- 修改 optimizer_params 为 --data_type=FP16 --scale=255 --reverse_input_channel
- 修改 shaves 为 6
- 转换
blobconverter python 代码
blobconverter.from_onnx(
            "yolov10n.onnx",
            optimizer_params=[
                "--scale=255",
                "--reverse_input_channel",
            ],
            shaves=6,
        )
blobconvert cli
blobconverter --onnx yolov10n.onnx -sh 6 -o . --optimizer-params "scale=255 --reverse_input_channel"
▌DepthAI 示例
one2one
正确解码需要可配置的网络相关参数:
- setConfidenceThreshold – 置信度阈值,低于该阈值的对象将被过滤掉
# coding=utf-8
import cv2
import depthai as dai
import numpy as np

numClasses = 80
model = dai.OpenVINO.Blob("yolov10n.blob")
dim = next(iter(model.networkInputs.values())).dims
W, H = dim[:2]

labelMap = [
    # "class_1","class_2","..."
    "class_%s" % i
    for i in range(numClasses)
]

# Create pipeline
pipeline = dai.Pipeline()

# Define sources and outputs
camRgb = pipeline.create(dai.node.ColorCamera)
detectionNetwork = pipeline.create(dai.node.MobileNetDetectionNetwork)
xoutRgb = pipeline.create(dai.node.XLinkOut)
xoutNN = pipeline.create(dai.node.XLinkOut)

xoutRgb.setStreamName("image")
xoutNN.setStreamName("nn")

# Properties
camRgb.setPreviewSize(W, H)
camRgb.setResolution(dai.ColorCameraProperties.SensorResolution.THE_1080_P)
camRgb.setInterleaved(False)
camRgb.setColorOrder(dai.ColorCameraProperties.ColorOrder.BGR)

# Network specific settings
detectionNetwork.setBlob(model)
detectionNetwork.setConfidenceThreshold(0.5)

# Linking
camRgb.preview.link(detectionNetwork.input)
camRgb.preview.link(xoutRgb.input)
detectionNetwork.out.link(xoutNN.input)

# Connect to device and start pipeline
with dai.Device(pipeline) as device:
    # Output queues will be used to get the rgb frames and nn data from the outputs defined above
    imageQueue = device.getOutputQueue(name="image", maxSize=4, blocking=False)
    detectQueue = device.getOutputQueue(name="nn", maxSize=4, blocking=False)

    frame = None
    detections = []

    # nn data, being the bounding box locations, are in <0..1> range - they need to be normalized with frame width/height
    def frameNorm(frame, bbox):
        normVals = np.full(len(bbox), frame.shape[0])
        normVals[::2] = frame.shape[1]
        return (np.clip(np.array(bbox), 0, 1) * normVals).astype(int)

    def drawText(frame, text, org, color=(255, 255, 255), thickness=1):
        cv2.putText(
            frame, text, org, cv2.FONT_HERSHEY_SIMPLEX, 0.5, (0, 0, 0), thickness + 3, cv2.LINE_AA
        )
        cv2.putText(
            frame, text, org, cv2.FONT_HERSHEY_SIMPLEX, 0.5, color, thickness, cv2.LINE_AA
        )

    def drawRect(frame, topLeft, bottomRight, color=(255, 255, 255), thickness=1):
        cv2.rectangle(frame, topLeft, bottomRight, (0, 0, 0), thickness + 3)
        cv2.rectangle(frame, topLeft, bottomRight, color, thickness)

    def displayFrame(name, frame):
        color = (128, 128, 128)
        for detection in detections:
            bbox = frameNorm(
                frame, (detection.xmin, detection.ymin, detection.xmax, detection.ymax)
            )
            drawText(
                frame=frame,
                text=labelMap[detection.label],
                org=(bbox[0] + 10, bbox[1] + 20),
            )
            drawText(
                frame=frame,
                text=f"{detection.confidence:.2%}",
                org=(bbox[0] + 10, bbox[1] + 35),
            )
            drawRect(
                frame=frame,
                topLeft=(bbox[0], bbox[1]),
                bottomRight=(bbox[2], bbox[3]),
                color=color,
            )
        # Show the frame
        cv2.imshow(name, frame)

    while True:
        imageQueueData = imageQueue.tryGet()
        detectQueueData = detectQueue.tryGet()

        if imageQueueData is not None:
            frame = imageQueueData.getCvFrame()

        if detectQueueData is not None:
            detections = detectQueueData.detections

        if frame is not None:
            displayFrame("rgb", frame)

        if cv2.waitKey(1) == ord("q"):
            break
one2many
正确解码需要可配置的网络相关参数:
- setNumClasses – YOLO 检测类别的数量
- setIouThreshold – iou 阈值
- setConfidenceThreshold – 置信度阈值,低于该阈值的对象将被过滤掉
- 对象将被过滤掉
# coding=utf-8
import cv2
import depthai as dai
import numpy as np

numClasses = 80
model = dai.OpenVINO.Blob("yolov10n.blob")
dim = next(iter(model.networkInputs.values())).dims
W, H = dim[:2]

output_name, output_tenser = next(iter(model.networkOutputs.items()))
if "yolov6" in output_name:
    numClasses = output_tenser.dims[2] - 5
else:
    numClasses = output_tenser.dims[2] // 3 - 5

labelMap = [
    # "class_1","class_2","..."
    "class_%s" % i
    for i in range(numClasses)
]

# Create pipeline
pipeline = dai.Pipeline()

# Define sources and outputs
camRgb = pipeline.create(dai.node.ColorCamera)
detectionNetwork = pipeline.create(dai.node.YoloDetectionNetwork)
xoutRgb = pipeline.create(dai.node.XLinkOut)
xoutNN = pipeline.create(dai.node.XLinkOut)

xoutRgb.setStreamName("image")
xoutNN.setStreamName("nn")

# Properties
camRgb.setPreviewSize(W, H)
camRgb.setResolution(dai.ColorCameraProperties.SensorResolution.THE_1080_P)
camRgb.setInterleaved(False)
camRgb.setColorOrder(dai.ColorCameraProperties.ColorOrder.BGR)

# Network specific settings
detectionNetwork.setBlob(model)
detectionNetwork.setConfidenceThreshold(0.5)

# Yolo specific parameters
detectionNetwork.setNumClasses(numClasses)
detectionNetwork.setCoordinateSize(4)
detectionNetwork.setAnchors([])
detectionNetwork.setAnchorMasks({})
detectionNetwork.setIouThreshold(0.5)

# Linking
camRgb.preview.link(detectionNetwork.input)
camRgb.preview.link(xoutRgb.input)
detectionNetwork.out.link(xoutNN.input)

# Connect to device and start pipeline
with dai.Device(pipeline) as device:
    # Output queues will be used to get the rgb frames and nn data from the outputs defined above
    imageQueue = device.getOutputQueue(name="image", maxSize=4, blocking=False)
    detectQueue = device.getOutputQueue(name="nn", maxSize=4, blocking=False)

    frame = None
    detections = []

    # nn data, being the bounding box locations, are in <0..1> range - they need to be normalized with frame width/height
    def frameNorm(frame, bbox):
        normVals = np.full(len(bbox), frame.shape[0])
        normVals[::2] = frame.shape[1]
        return (np.clip(np.array(bbox), 0, 1) * normVals).astype(int)

    def drawText(frame, text, org, color=(255, 255, 255), thickness=1):
        cv2.putText(
            frame, text, org, cv2.FONT_HERSHEY_SIMPLEX, 0.5, (0, 0, 0), thickness + 3, cv2.LINE_AA
        )
        cv2.putText(
            frame, text, org, cv2.FONT_HERSHEY_SIMPLEX, 0.5, color, thickness, cv2.LINE_AA
        )

    def drawRect(frame, topLeft, bottomRight, color=(255, 255, 255), thickness=1):
        cv2.rectangle(frame, topLeft, bottomRight, (0, 0, 0), thickness + 3)
        cv2.rectangle(frame, topLeft, bottomRight, color, thickness)

    def displayFrame(name, frame):
        color = (128, 128, 128)
        for detection in detections:
            bbox = frameNorm(
                frame, (detection.xmin, detection.ymin, detection.xmax, detection.ymax)
            )
            drawText(
                frame=frame,
                text=labelMap[detection.label],
                org=(bbox[0] + 10, bbox[1] + 20),
            )
            drawText(
                frame=frame,
                text=f"{detection.confidence:.2%}",
                org=(bbox[0] + 10, bbox[1] + 35),
            )
            drawRect(
                frame=frame,
                topLeft=(bbox[0], bbox[1]),
                bottomRight=(bbox[2], bbox[3]),
                color=color,
            )
        # Show the frame
        cv2.imshow(name, frame)

    while True:
        imageQueueData = imageQueue.tryGet()
        detectQueueData = detectQueue.tryGet()

        if imageQueueData is not None:
            frame = imageQueueData.getCvFrame()

        if detectQueueData is not None:
            detections = detectQueueData.detections

        if frame is not None:
            displayFrame("rgb", frame)

        if cv2.waitKey(1) == ord("q"):
            break
▌参考资料
https://docs.oakchina.cn/en/latest/
https://www.oakchina.cn/selection-guide/
OAK中国
| OpenCV AI Kit在中国区的官方代理商和技术服务商
| 追踪AI技术和产品新动态
戳「+关注」获取最新资讯↗↗
