文章目录
- 关于Pen
- 改变Pen的宽度width和对齐方式Alignment
- 带线帽的线段
- 连接线条LineJoin
- 自定义虚线
- 用纹理填充线条
- 关于Brush
- HatchBrush阴影
- LinearGradientBrush线性渐变
- PathGradientBrush
详细示例Pen与Brush的属性与方法
关于Pen
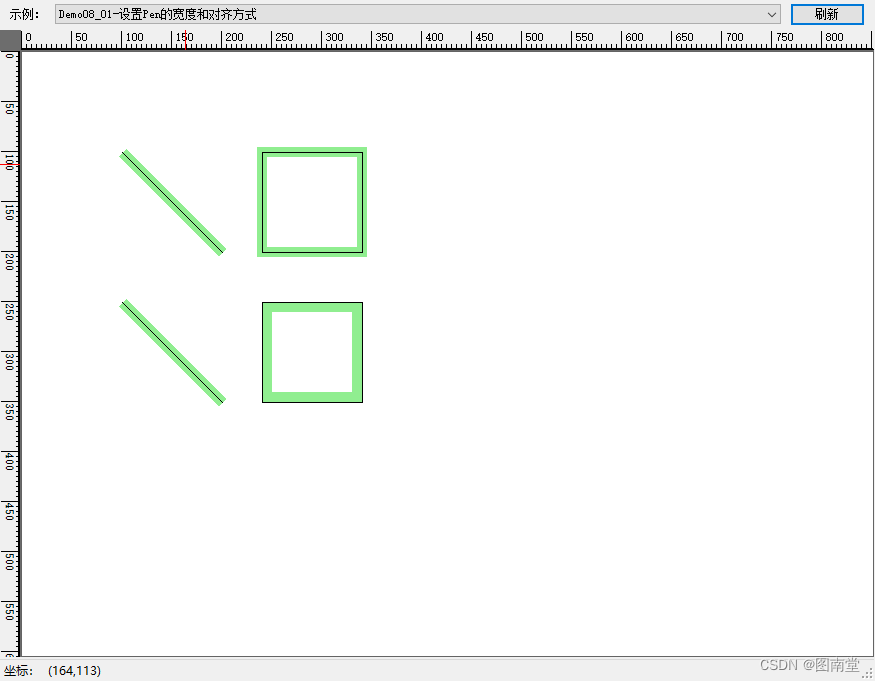
改变Pen的宽度width和对齐方式Alignment
可以通过构造函数,或修改Pen类的Width属性更改线宽。
线的理论宽度为0。绘制宽度为1个像素的线时,像素以理论线为中心。
Alignment虽然有5个枚举值,但只有Center和Insert会改变绘制线条的样式。设置另外3个时,也是按Center样式绘制。
设置为Inset时,可能产生不可预测的结果,有时按Inset绘制,有时按Center绘制。
Inset不能用于绘制复合线段,也不能用三角形破折号绘制虚线。
using (var blackPen = new Pen(Color.Black, 1))
using (var lightgreenPen = new Pen(Color.LightGreen))
{
    //改变笔宽
    lightgreenPen.Width = 10F;
    var linePt1 = new Point(100, 100);
    var linePt2 = new Point(200,200);
    e.Graphics.DrawLine(lightgreenPen, linePt1,linePt2);
    e.Graphics.DrawLine(blackPen, linePt1, linePt2);

    var rect = new Rectangle(240, 100, 100, 100);

    e.Graphics.DrawRectangle(lightgreenPen, rect);
    e.Graphics.DrawRectangle(blackPen, rect);

    e.Graphics.TranslateTransform(0, 150);

    //注意,除了Inset和Center,其它的绘制效果与Center一样
    lightgreenPen.Alignment = PenAlignment.Inset;

    e.Graphics.DrawLine(lightgreenPen, linePt1, linePt2);
    e.Graphics.DrawLine(blackPen, linePt1, linePt2);

    e.Graphics.DrawRectangle(lightgreenPen, rect);
    e.Graphics.DrawRectangle(blackPen, rect);
}
定义两个点和一个矩形,分别用两种方式绘制,区别Alginment不同值时的效果。
注意,左下角线条是按Center样式绘制的,而右下的矩形是在轮廓内部
带线帽的线段
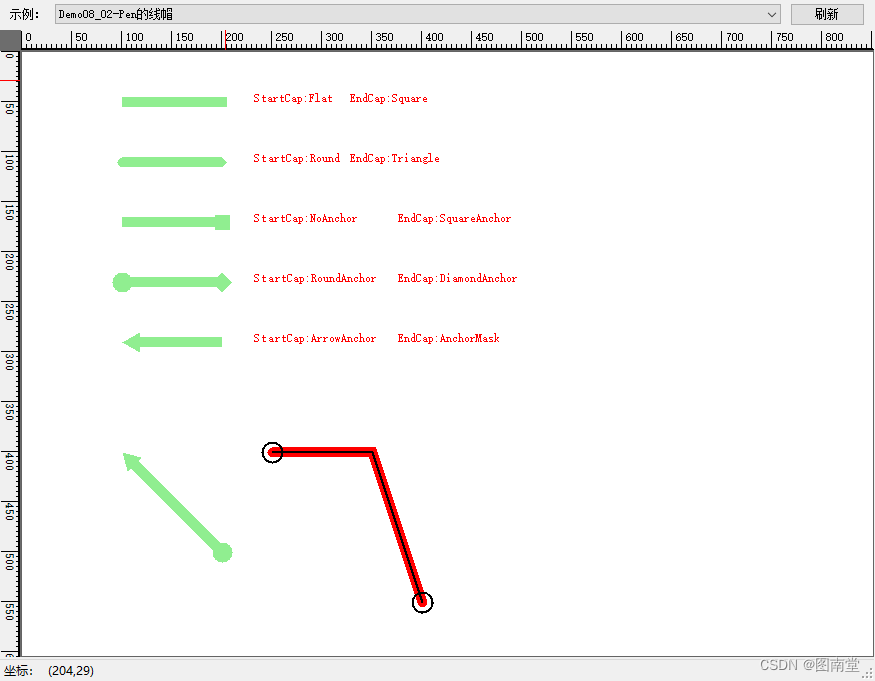
使用系统定义的线帽(LineCap枚举)与自定义线帽(CustomLineCap)绘制线段
using (var lightgreenPen = new Pen(Color.LightGreen,10))
{
    LineCap[] lineCaps = (LineCap[])Enum.GetValues(typeof(LineCap));
    lineCaps = lineCaps.Where(z => z != LineCap.Custom).ToArray();

    var pt1 = new Point(100, 50);
    var pt2 = new Point(200, 50);
    for (int i = 0; i < lineCaps.Length; i += 2)
    {
        lightgreenPen.StartCap = lineCaps[i];
        lightgreenPen.EndCap = lineCaps[i + 1];
        e.Graphics.DrawLine(lightgreenPen, pt1, pt2);
        e.Graphics.DrawString($"StartCap:{lineCaps[i]}\tEndCap:{lineCaps[i + 1]}", Font, Brushes.Red, 230, 40);
        e.Graphics.TranslateTransform(0, 60);
    }


    var lintPt1 = new Point(100, 100);
    var lintPt2 = new Point(200, 200);


    //设置线帽
    lightgreenPen.StartCap = LineCap.ArrowAnchor;
    lightgreenPen.EndCap = LineCap.RoundAnchor;
    e.Graphics.DrawLine(lightgreenPen, lintPt1, lintPt2);

    //自定义线帽
    GraphicsPath hPath = new GraphicsPath();
    hPath.AddEllipse(new Rectangle(-5, -5, 10, 10));
    // Create the outline for our custom end cap.

    // Construct the hook-shaped end cap.
    CustomLineCap HookCap = new CustomLineCap(null, hPath);

    // Set the start cap and end cap of the HookCap to be rounded.
    HookCap.SetStrokeCaps(LineCap.Round, LineCap.Round);

    // Create a pen and set end custom start and end
    // caps to the hook cap.
    Pen customCapPen = new Pen(Color.Black, 2);
    customCapPen.CustomStartCap = HookCap;
    customCapPen.CustomEndCap = HookCap;

    // Create a second pen using the start and end caps from
    // the hook cap.
    Pen capPen = new Pen(Color.Red, 10);
    LineCap startCap;
    LineCap endCap;
    HookCap.GetStrokeCaps(out startCap, out endCap);
    capPen.StartCap = startCap;
    capPen.EndCap = endCap;

    // Create a line to draw.
    Point[] points = { new Point(250, 100), new Point(350, 100),new Point(400, 250) };

    // Draw the lines.
    e.Graphics.DrawLines(capPen, points);
    e.Graphics.DrawLines(customCapPen, points);
}
绘制各种LineCap及自定线帽
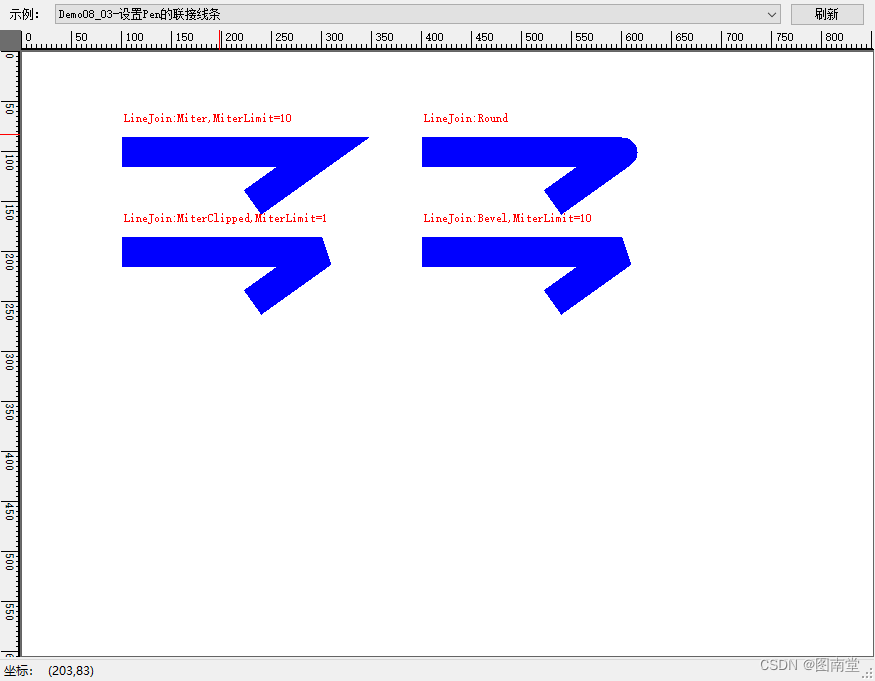
连接线条LineJoin
线条连接表示两条连续边的末端的连接样式。
注意不同的LineJoin也会影响路径的GetBounds带Pen参数时的结果。
using (var bluePen = new Pen(Color.Blue, 30))
{
    var linePts = new Point[]
    {
        new Point(100, 100),
        new Point(300, 100),
        new Point(230, 150)
    };
    float offset = 40f;
    e.Graphics.DrawLines(bluePen, linePts);
    e.Graphics.DrawString($"LineJoin:{bluePen.LineJoin},MiterLimit={bluePen.MiterLimit}", Font, Brushes.Red, linePts[0].X, linePts[0].Y- offset);

    e.Graphics.TranslateTransform(300, 0);
    bluePen.LineJoin = LineJoin.Round;
    e.Graphics.DrawLines(bluePen, linePts);
    e.Graphics.DrawString($"LineJoin:{bluePen.LineJoin}", Font, Brushes.Red, linePts[0].X, linePts[0].Y - offset);

    e.Graphics.TranslateTransform(0, 100);
    bluePen.LineJoin = LineJoin.Bevel;
    e.Graphics.DrawLines(bluePen, linePts);
    e.Graphics.DrawString($"LineJoin:{bluePen.LineJoin},MiterLimit={bluePen.MiterLimit}", Font, Brushes.Red, linePts[0].X, linePts[0].Y - offset);

    e.Graphics.TranslateTransform(-300, 0);
    bluePen.MiterLimit = 1;
    bluePen.LineJoin = LineJoin.MiterClipped;
    e.Graphics.DrawLines(bluePen, linePts);
    e.Graphics.DrawString($"LineJoin:{bluePen.LineJoin},MiterLimit={bluePen.MiterLimit}", Font, Brushes.Red, linePts[0].X, linePts[0].Y - offset);
}
定义三个点,使用不同的LineJoin和MiterLimit什绘制线段,查看转角的区别。
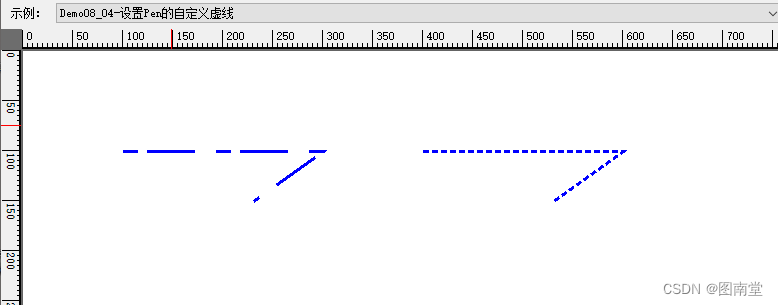
自定义虚线
通过设置Pen的DashPatten属性,为一个浮点型数组(非零正数,第1个设置破折号长度,第2个设置空格长度,第3个设置破折号长度,依此类推)。
using (var bluePen = new Pen(Color.Blue, 3))
{
    var linePts = new Point[]
    {
        new Point(100, 100),
        new Point(300, 100),
        new Point(230, 150)
    };
    //自定义虚线
    bluePen.DashPattern = new float[] { 5, 3, 16, 7 };
    e.Graphics.DrawLines(bluePen, linePts);

    e.Graphics.TranslateTransform(300, 0);
    bluePen.DashPattern = new float[] { 2,1};
    e.Graphics.DrawLines(bluePen, linePts);
}
分别定义两种虚线格式,绘制线段。
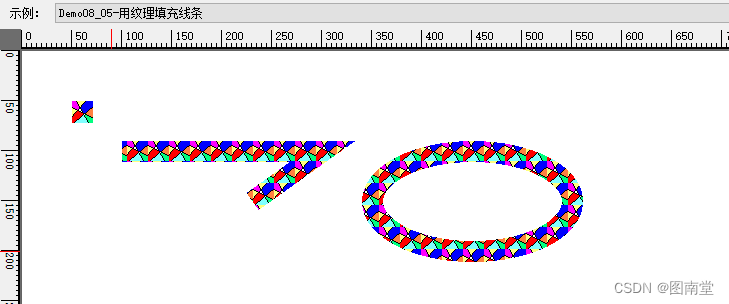
用纹理填充线条
使用纹理图案填充线条。
using(var bmp=new Bitmap("MyTexture.gif"))
using(var bBrush=new TextureBrush(bmp))
using (var texturePen = new Pen(bBrush, 21))
{
    var linePts = new Point[]
    {
        new Point(100, 100),
        new Point(300, 100),
        new Point(230, 150)
    };

    e.Graphics.DrawImage(bmp, 50, 50, bmp.Width, bmp.Height);

    e.Graphics.DrawLines(texturePen, linePts);

    e.Graphics.DrawEllipse(texturePen, new Rectangle(350, 100, 200, 100));
}
使用纹理填充线段和椭圆路径。
关于Brush
定义用于填充图形形状内部的对象,例如矩形、椭圆形、饼形、多边形和路径。
该类是抽象类,使用时请使用其派生类HatchBrush,LinearGradienBrush,PathGradienBrush,SolidBrush和TextureBrush。
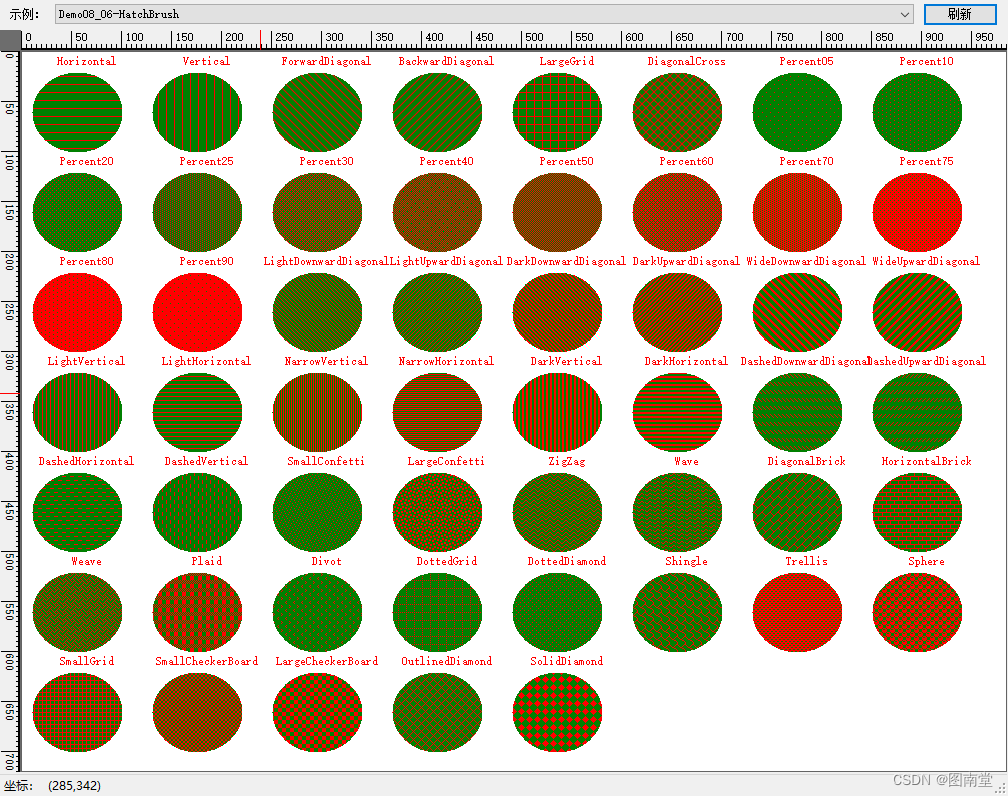
HatchBrush阴影
定义具有阴影样式、前景色和背景色的矩形画笔。
var rect = new Rectangle(10, 20, 90, 80);
//枚举所有HatchStyle
var hatchStyles = Enum.GetValues(typeof(HatchStyle)) as HatchStyle[];
hatchStyles = hatchStyles.Distinct().ToArray();
StringFormat format1 = new StringFormat(StringFormatFlags.NoClip);
format1.LineAlignment = StringAlignment.Center;
format1.Alignment = StringAlignment.Center;
for (int i=0;i<hatchStyles.Length;i++)
{
    var hatchStyle = hatchStyles[i];
    using (var hatchBrush = new HatchBrush(hatchStyle, //样式
                                           Color.Red, //前景色
                                           Color.Green))//背景色
    {
        var matrix = new Matrix();
        matrix.Translate((i % 8) * 120, (i / 8) * 100);
        e.Graphics.Transform = matrix;
        e.Graphics.DrawString($"{hatchStyle}", Font, Brushes.Red, new Point(65, 10), format1);
        //水平
        e.Graphics.FillEllipse(hatchBrush, rect);
    }
}
枚举所有HatchStyle,并一一绘制出来。
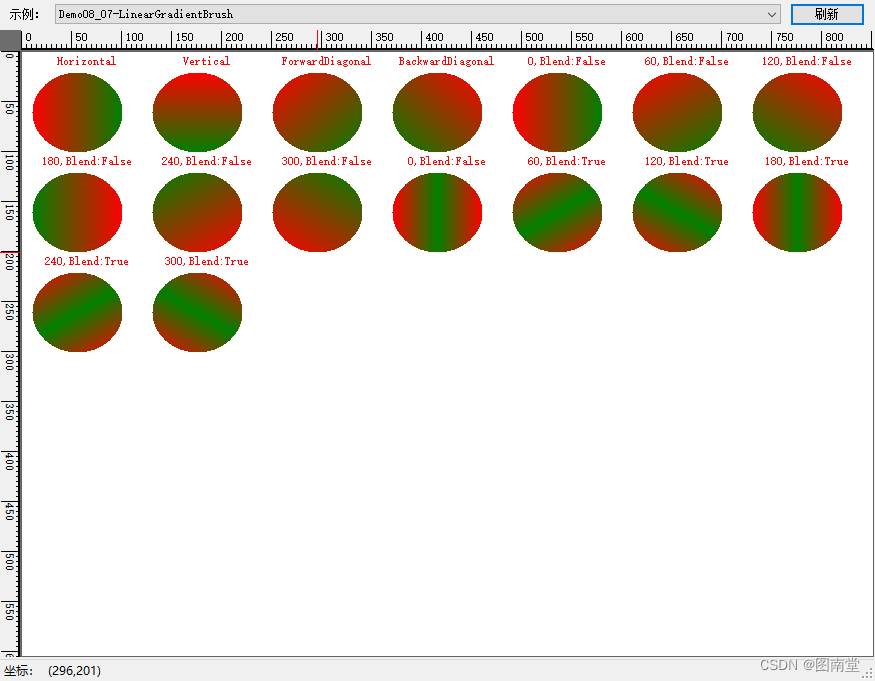
LinearGradientBrush线性渐变
具有线性渐变效果的画笔。
指定两点或矩形、LinearGradientMode样式或角度,还可以指定Blend属性。
var rect = new Rectangle(10, 20, 90, 80);
//枚举所有HatchStyle
var values = Enum.GetValues(typeof(LinearGradientMode)) as LinearGradientMode[];
StringFormat format1 = new StringFormat(StringFormatFlags.NoClip);
format1.LineAlignment = StringAlignment.Center;
format1.Alignment = StringAlignment.Center;
int i;
//测试不同的 LinearGradientMode
for (i = 0; i < values.Length; i++)
{
    var val = values[i];
    using (var hatchBrush = new LinearGradientBrush(rect,
                                           Color.Red,
                                           Color.Green,
                                           val))
    {
        var matrix = new Matrix();
        matrix.Translate((i % 7) * 120, (i / 7) * 100);
        e.Graphics.Transform = matrix;
        e.Graphics.DrawString($"{val}", Font, Brushes.Red, new Point(65, 10), format1);
        //水平
        e.Graphics.FillEllipse(hatchBrush, rect);
    }
}
Blend blend = new Blend();
blend.Positions = new float[] { 0.0f, 0.5f, 1.0f };
blend.Factors = new float[] { 0.0f, 1.0f, 0.0f };
//测试不两只的角度与Blend
for (int angle = 0; angle <720; angle += 60)
{
    var valAngle = angle % 360;
    using (var hatchBrush2 = new LinearGradientBrush(rect,
                               Color.Red,
                               Color.Green,
                               valAngle))
    {
        var matrix = new Matrix();
        matrix.Translate((i % 8) * 120, (i / 8) * 100);
        // 定义Blend数组

        if (angle >= 360)
        {
            // 应用Blend到线性渐变刷
            hatchBrush2.Blend = blend;
        }


        e.Graphics.Transform = matrix;
        e.Graphics.DrawString($"{valAngle},Blend:{angle>360}", Font, Brushes.Red, new Point(65, 10), format1);
        //水平
        e.Graphics.FillEllipse(hatchBrush2, rect);
    }
    i++;
}
绘制不同方式的渐变效果。
PathGradientBrush
从中心往边界渐变,边界可以是椭圆(圆)或指定多边形。
var rect = new Rectangle(10, 20, 150, 80);
//枚举所有HatchStyle
var values = Enum.GetValues(typeof(LinearGradientMode)) as LinearGradientMode[];
StringFormat format1 = new StringFormat(StringFormatFlags.NoWrap);
format1.LineAlignment = StringAlignment.Center;
format1.Alignment = StringAlignment.Center;

//绘制一个椭圆渐变
using (var path = new GraphicsPath())
{
    path.AddEllipse(rect);
    var pathGrBrush = new PathGradientBrush(path);
    pathGrBrush.CenterColor = Color.LightGreen;
    pathGrBrush.SurroundColors = new Color[] { Color.Green };
    e.Graphics.FillEllipse(pathGrBrush, rect);
}

//绘制一个五角星渐变
// Put the points of a polygon in an array.
Point[] points = {
                new Point(75, 0),
                new Point(100, 50),
                new Point(150, 50),
                new Point(112, 75),
                new Point(150, 150),
                new Point(75, 100),
                new Point(0, 150),
                new Point(37, 75),
                new Point(0, 50),
                new Point(50, 50)};

// Use the array of points to construct a path.
using (GraphicsPath path = new GraphicsPath())
{
    path.AddLines(points);

    // Use the path to construct a path gradient brush.
    PathGradientBrush pthGrBrush = new PathGradientBrush(path);

    // Set the color at the center of the path to red.
    pthGrBrush.CenterColor = Color.FromArgb(255, 255, 0, 0);

    // Set the colors of the points in the array.
    var colors = new Color[] {
            Color.FromArgb(255, 0, 0, 0),
            Color.FromArgb(255, 0, 255, 0),
            Color.FromArgb(255, 0, 0, 255),
            Color.FromArgb(255, 255, 255, 255),
            Color.FromArgb(255, 0, 0, 0),
            Color.FromArgb(255, 0, 255, 0),
            Color.FromArgb(255, 0, 0, 255),
            Color.FromArgb(255, 255, 255, 255),
            Color.FromArgb(255, 0, 0, 0),
            Color.FromArgb(255, 0, 255, 0)};

    pthGrBrush.SurroundColors = colors;
    e.Graphics.TranslateTransform(200, 50);
    // Fill the path with the path gradient brush.
    e.Graphics.FillPath(pthGrBrush, path);
}

//指定边界上的点
// Construct a path gradient brush based on an array of points.
PointF[] ptsF = {
    new PointF(0, 0),
    new PointF(160, 0),
    new PointF(160, 200),
    new PointF(80, 150),
    new PointF(0, 200)};

PathGradientBrush pBrush = new PathGradientBrush(ptsF);

// An array of five points was used to construct the path gradient
// brush. Set the color of each point in that array.
Color[] colors2 = {
    Color.FromArgb(255, 255, 0, 0),  // (0, 0) red
    Color.FromArgb(255, 0, 255, 0),  // (160, 0) green
    Color.FromArgb(255, 0, 255, 0),  // (160, 200) green
    Color.FromArgb(255, 0, 0, 255),  // (80, 150) blue
    Color.FromArgb(255, 255, 0, 0)}; // (0, 200) red

pBrush.SurroundColors = colors2;

// Set the center color to white.
pBrush.CenterColor = Color.White;

e.Graphics.TranslateTransform(0, 200);
// Use the path gradient brush to fill a rectangle.
e.Graphics.FillRectangle(pBrush, new Rectangle(0, 0, 160, 200));

// Create a path that consists of a single ellipse.
var path2 = new GraphicsPath();
path2.AddEllipse(0, 0, 200, 100);


//自定义路径渐变
// Create a path gradient brush based on the elliptical path.
PathGradientBrush pthGrBrush2 = new PathGradientBrush(path2);

// Set the color along the entire boundary to blue.
Color[] color = { Color.Blue };
pthGrBrush2.SurroundColors = color;

// Set the center color to aqua.
pthGrBrush2.CenterColor = Color.Aqua;
e.Graphics.TranslateTransform(220.0f, 0.0f);
// Use the path gradient brush to fill the ellipse.
e.Graphics.FillPath(pthGrBrush2, path2);

// Set the focus scales for the path gradient brush.
pthGrBrush2.FocusScales = new PointF(0.3f, 0.8f);

// Use the path gradient brush to fill the ellipse again.
// Show this filled ellipse to the right of the first filled ellipse.
e.Graphics.TranslateTransform(220.0f, 0.0f);
e.Graphics.FillPath(pthGrBrush2, path2);
绘制一个椭圆渐变,五角星渐变、多边形,即修改FocusScales时的渐变效果。