[OC]UI学习笔记
文章目录
- [OC]UI学习笔记
- 视图和视图层次结构
- CGRect
- UILabel
- UIButton
- UIView控件
- UIView的层级关系
- UIWindow
- 定时器和视图移动
- UISwitch
- 进度条和滑动条控件
- 步进器和分栏控件
- 警告对话框与等待指示器
- UITextField
视图和视图层次结构
Objective-C中的UI编程主要围绕视图(View)和视图层次结构展开。视图是通过UIKit框架提供的,它是用户界面的基本构建块,它们用于显示内容、响应用户交互等。
CGRect
CGRect是一个用于表示矩形的结构体,它由原点(origin)和尺寸(size)组成。其中原点(origin)也是一个结构体,包含坐标(CGFloat x, CGFloat y)。
对于CGRect来说,我们一般使用CGRectMake来进行CGRect的创建,其方法完整签名如下:
CGRect CGRectMake(CGFloat x, CGFloat y, CGFloat width, CGFloat height);
x:矩形的原点的x坐标。y:矩形的原点的y坐标。width:矩形的宽度。height:矩形的高度。
例如,以下代码创建了一个原点位于(50, 100),宽度为200,高度为300的矩形:
CGRect rect = CGRectMake(50, 100, 200, 300);
CGRect结构在UIKit框架中广泛使用,用于定义视图的位置和尺寸。通过使用CGRectMake函数,我们可以方便地创建和配置矩形。
UILabel
#import "ViewController.h"

@interface ViewController ()

@end

@implementation ViewController

-(void)createLabel {
    UILabel *l = [[UILabel alloc] init];
    l.frame = CGRectMake(100, 100, 160, 40);
    l.text = @"hello,world";

    //设置lable背景颜色
    l.backgroundColor = [UIColor redColor];
    //设置整体背景颜色
    self.view.backgroundColor = [UIColor blueColor];
    //设置字体大小, 默认为18
    l.font = [UIFont systemFontOfSize:24];

    //label高级选项
    //阴影设置
    l.shadowOffset = CGSizeMake(3, 3);//偏移量
    l.shadowColor = [UIColor grayColor];//颜色
    //对齐方式,默认左对齐
    l.textAlignment = NSTextAlignmentCenter; //设置居中
    //设置label文字显示的行数,如果此参数为0,则会根据字数自动分配行数。
    l.numberOfLines = 0;


    //添加到视图当中
    [self.view addSubview: l];
}
- (void)viewDidLoad {
    [super viewDidLoad];
    // 创建UILabel
    [self createLabel];
}

@end
UIButton
#import "ViewController.h"

@interface ViewController ()

@end

@implementation ViewController
- (void)createButton {
    UIButton *btn1 = [UIButton buttonWithType:UIButtonTypeRoundedRect];
    UIButton *btn2 = [UIButton buttonWithType:UIButtonTypeCustom];
    btn1.frame = CGRectMake(100, 100, 160, 40);
    btn2.frame = CGRectMake(100, 300, 160, 120);
    //按钮的标记值,用于区分按钮
    btn1.tag = 1;
    btn2.tag = 2;
    //使用图片作为按钮
    UIImage *i1 = [UIImage imageNamed:@"coverImg_auto_20245920537.png"];
    UIImage *i2 = [UIImage imageNamed:@"example_image.jpg"];
    [btn2 setImage:i1 forState:UIControlStateNormal];
    [btn2 setImage:i2 forState:UIControlStateHighlighted];
    [btn2 addTarget:self action:@selector(touchImage) forControlEvents:UIControlEventTouchUpInside];

    //参数1:显示在按钮上的文字,参数2:设置显示参数1时的状态
    [btn1 setTitle:@"按钮1" forState:UIControlStateNormal];//UIControlStateNormal——正常状态
    [btn1 setTitle:@"按下" forState:UIControlStateHighlighted];//UIControlStateHighlighted——被按下
    /*
     参数1: 调用函数的对象
     参数2: 函数,当程序满足参数3的事件类型,则执行该房啊发
     参数3: 事件处理的函数类型
     UIControlEventTouchUpInside——按下按钮弹回时,且鼠标还在按钮范围上时
     UIControlEventTouchUpOutside——按下按钮弹回时,且鼠标不在按钮范围上时
     */
    [btn1 addTarget:self action:@selector(pressBtn:) forControlEvents:UIControlEventTouchUpInside];
    //设置背景
    btn1.backgroundColor = [UIColor grayColor];
    //字体颜色
    [btn1 setTitleColor:[UIColor blueColor] forState:UIControlStateNormal];
    //字体大小
    btn1.titleLabel.font = [UIFont systemFontOfSize:12];

    [self.view addSubview:btn1];
    [self.view addSubview:btn2];
}
-(void)pressBtn: (UIButton*) btn {
    NSLog(@"%lu被按下",btn.tag);
}
-(void)touchImage {
    NSLog(@"你摸了摸小鹿");
}
- (void)viewDidLoad {
    [super viewDidLoad];
    // 创建UILabel
    [self createButton];
}

@end
UIView控件
UIView是iOS的绘图对象,是所有显示在屏幕上对象的基础类,它是是一个矩形对象,有背景颜色,层级关系。
下面展示了如何创建一个基本的UIView,并添加到视图控制器之中
#import <UIKit/UIKit.h>

@interface ViewController : UIViewController

@end

@implementation ViewController

- (void)viewDidLoad {
    [super viewDidLoad];

    // 创建一个视图
    UIView *view = [[UIView alloc] initWithFrame:CGRectMake(50, 100, 200, 200)];
    view.backgroundColor = [UIColor redColor];

    //将新建的子视图添加到父视图当中
    //1.将加入的视图添加到屏幕上
    //2.将视图作为父视图的子视图进行管理
    [self.view addSubview:view];

    //隐藏选项,默认为NO,即不做渲染
    view.hidden = NO;

    //设置透明度
    view.alpha = 0.5;//1为透明,0为不透明,0.5则为半透明

    //是否显示不透明
    view.opaque = NO;

    //从父视图的管理删除,不显示在屏幕之中
    [view removeFromSuperview];
}

@end
当view.opaque属性设置为YES时(也是该属性的默认值),表示该视图是不透明的。这意味着视图的背景色会完全覆盖其后面的任何内容,包括其他视图或父视图中的内容。当view.opaque属性设置为NO时,表示该视图是透明的。这意味着视图的背景色只会影响视图本身的可见区域,而不会遮挡其后面的内容。
UIView的层级关系
#import <UIKit/UIKit.h>

@interface ViewController : UIViewController

@end

@implementation ViewController

- (void)viewDidLoad {
    [super viewDidLoad];

    // 创建一个视图
    UIView *view1 = [[UIView alloc] initWithFrame:CGRectMake(50, 100, 200, 200)];
    view1.backgroundColor = [UIColor redColor];

    UIView *view2 = [[UIView alloc] initWithFrame:CGRectMake(75, 125, 200, 200)];
    view2.backgroundColor = [UIColor blueColor];

    UIView *view3 = [[UIView alloc] initWithFrame:CGRectMake(100, 150, 200, 200)];
    view3.backgroundColor = [UIColor greenColor];

    //哪一个视图先被添加到fushitu中,就默认先绘制哪一个子视图
    [self.view addSubview:view1];
    [self.view addSubview:view2];
    [self.view addSubview:view3];

    //将view3视图到最前面
    [self.view bringSubviewToFront:view3];
    //将view2视图调整到最后面
    [self.view sendSubviewToBack:view2];

    //subviews为view.self管理所有子窗口的数组,在最前面显示的在数组的最后,相反在最后面的则在数组的第一位
    UIView *front =  self.view.subviews[2];
    NSLog(@"%d",(front == view3));
    UIView *back = self.view.subviews[0];
    NSLog(@"%d",(back == view2));
}

@end
每个子视图的父视图有且仅有一个,我们可以使用view.superview来指代
UIWindow
UIWindow是一个特殊的UIView,它代表了应用程序的窗口,在整个程序之中有且只有一个UIWindow对象。你可以将它看作是应用程序的大窗户,用来展示应用的界面给用户看。
UIWindow的主要作用就是显示应用程序的界面。它是应用程序中所有视图的容器,相当于一个大的画布,用来放置按钮、文本、图像以及其他用户界面元素。
另外,UIWindow还管理了应用程序的视图控制器层次结构。视图控制器是用来管理和控制视图的对象,UIWindow负责将视图控制器的内容显示在屏幕上,并确保用户可以与之交互。
除了显示界面,UIWindow还承担了处理用户触摸和其他事件的任务。当用户点击屏幕或进行其他操作时,UIWindow会接收这些事件并将它们传递给正确的视图或视图控制器,以便应用程序可以做出相应的反应。
由于版本的更新,UIWindow被写在了SceneDelegate.m之中,且UIWindow`已经在程序自动给出,无需我们手动实现,
#import "SceneDelegate.h"

@interface SceneDelegate ()

@end

@implementation SceneDelegate


- (void)scene:(UIScene *)scene willConnectToSession:(UISceneSession *)session options:(UISceneConnectionOptions *)connectionOptions {
    //首先是对UIWindow对象创建视图控制器
    self.window.rootViewController = [[UIViewController alloc] init];
    //对UIWindow设置背景颜色
    self.window.backgroundColor = [UIColor orangeColor];
    //可以直接给window上添加视图
    UIView *view1 = [[UIView alloc] initWithFrame: CGRectMake(100, 100, 100, 50)];
    view1.backgroundColor = [UIColor blackColor];
    //当创建一个新的背景视图,然后将这个视图作为window的子视图,再让view1作为背景视图的子视图,就会有一个层级关系
    //当移动背景视图的时候,view1视图也会随着移动,子视图是参照父视图的坐标系
    UIView *backView = [[UIView alloc] initWithFrame: CGRectMake(100, 300, 200, 200)];
    backView.backgroundColor = [UIColor redColor];
    [backView addSubview: view1];
    //将view1视图添加到window上
    [self.window addSubview: backView];

    //打印不同视图的window属性:
    NSLog(@"%@", view1.window);
    NSLog(@"%@", backView.window);
    NSLog(@"%@", self.window);
    //可以看出,它们三个的window属性是同一个window

    //使window有效并显示在屏幕上
    [self.window makeKeyAndVisible];

}
//后面的方法省略。。。
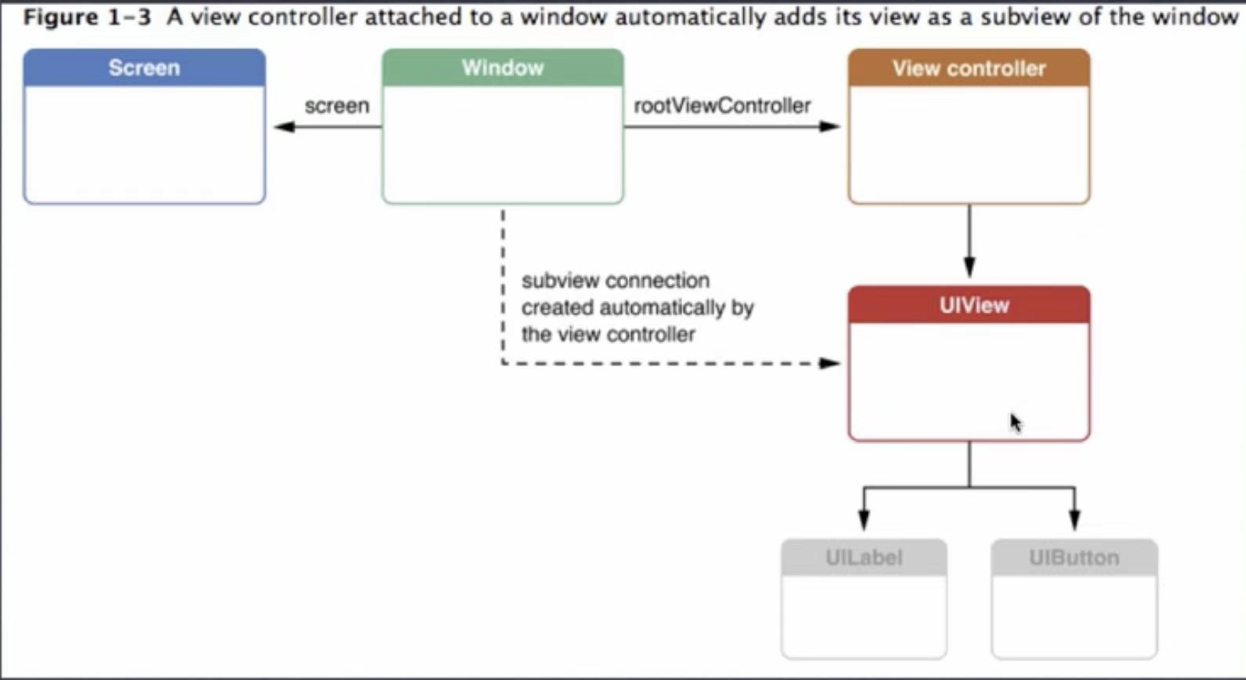
ViewController.h之中的viewDidLoad只在第一次加载显示视图的时候被调用,用于布局初始化视图。
实现视图切换
#import "JCViewViewController.h"

@interface JCViewViewController ()

@end

@implementation JCViewViewController

- (void)viewDidLoad {
    [super viewDidLoad];
    self.view.backgroundColor = [UIColor greenColor];
}

//当屏幕被点击时,调用该函数
- (void) touchesBegan:(NSSet<UITouch *> *)touches withEvent:(UIEvent *)event {
    /*
     使得当前的控制器消失
     参数1:使用切换动画效果
     参数2:切换介绍后功能调用(block操作),不需要则传入nil
     */
    [self dismissViewControllerAnimated:YES completion:nil];
}
---------------------------------------------------------------------
#import <UIKit/UIKit.h>
#import "JCViewViewController.h"
@interface ViewController : UIViewController

@end

@implementation ViewController


//在第一次加载被使用
- (void)viewDidLoad {
    [super viewDidLoad];
    self.view.backgroundColor = [UIColor redColor];

}

//当屏幕被点击时,调用该函数
- (void) touchesBegan:(NSSet<UITouch *> *)touches withEvent:(UIEvent *)event {
    JCViewViewController *vc = [[JCViewViewController alloc] init];


    /*
     显示一个新的视图控制器到屏幕上
     参数1:新的视图控制器对象
     参数2:使用切换动画效果
     参数3:切换介绍后功能调用,不需要则传入nil
     */
    [self presentViewController:vc animated:YES completion:nil];
}


//以下内容在每个视图显示时都会被调用

//当视图控制器的视图即将显示时,就会调用此函数
//视图显示分为:1.显示之前 2. 正在显示 3. 已经被隐藏
//参数:是否用动画切换后消失
-(void)viewWillAppear:(BOOL)animated {
    NSLog(@"即将显示");
}

//当视图显示到屏幕的瞬间调用此函数
//参数:是否用动画切换后消失 状态:已经显示在屏幕之上
-(void)viewDidAppear:(BOOL)animated{
    NSLog(@"正在显示");
}

//当视图控制器的视图即将消失的时候,调用此函数
//参数:表示是否用动画切换后消失
//当前状态:视图还是显示在屏幕上的
- (void) viewWillDisappear:(BOOL)animated {
    NSLog(@"视图即将消失");
}


//当前视图消失之后调用
//参数:是否用动画切换后消失 状态:视图已经消失在屏幕之上
-(void)viewDidDisappear:(BOOL)animated {
    NSLog(@"已经消失");
}
@end
定时器和视图移动
//ViewController.h
#import <UIKit/UIKit.h>

@interface ViewController : UIViewController

@property (nonatomic, strong) NSTimer *timer; // 声明计时器实例变量

@end
---------------------------------------------------------------------
//ViewController.m
#import <UIKit/UIKit.h>
#import "ViewController.h"
@interface ViewController ()

@end

@implementation ViewController

//在第一次加载被使用
- (void)viewDidLoad {
    [super viewDidLoad];

    UIButton *btn1 = [UIButton buttonWithType:UIButtonTypeRoundedRect];
    btn1.frame = CGRectMake(150, 100, 80, 40);
    [btn1 setTitle:@"计时启动键" forState:UIControlStateNormal];
    [btn1 addTarget:self action:@selector(start) forControlEvents:UIControlEventTouchUpInside];

    UIButton *btn2 = [UIButton buttonWithType:UIButtonTypeRoundedRect];
    btn2.frame = CGRectMake(150, 300, 80, 40);
    [btn2 setTitle:@"计时停止键" forState:UIControlStateNormal];
    [btn2 addTarget:self action:@selector(stop) forControlEvents:UIControlEventTouchUpInside];

    [self.view addSubview:btn1];
    [self.view addSubview:btn2];

    UIView *view = [[UIView alloc] initWithFrame:CGRectMake(20, 20, 75, 75)];
    view.backgroundColor = [UIColor greenColor];
    view.tag = 101;

    [self.view addSubview:view];
    [self.view sendSubviewToBack:view];
}


//当屏幕被点击时,调用该函数
-(void)start {
    /*
     参数一:调用计时器的间隔,以秒为单位
     参数二:调用函数的对象
     参数三:被调用的事件函数
     参数四:可以传入定时器之中,可以不传
     参数五:是否重复调用定时器操作
     */

    [self stop];//防止多个计时器同时开始,无法停止
    _timer = [NSTimer scheduledTimerWithTimeInterval:0.1 target:self selector:@selector(useTimer:) userInfo:@"bb" repeats:YES];
}

//可以传入NSTimer作为参数
-(void) useTimer:(NSTimer*) timer {
    UIView *view = [self.view viewWithTag:101];
    view.opaque = NO;
    view.frame = CGRectMake(view.frame.origin.x + 5, view.frame.origin.y + 5, 75, 75);

}

//停止计时器
-(void) stop {
    if (_timer != nil) {
        [_timer invalidate];//invalidate
        _timer = nil;
    }
}
@end
UISwitch
//ViewController.h
#import <UIKit/UIKit.h>

@interface ViewController : UIViewController
//定义一个开关控件
//可以进行状态的改变
//两种状态可以转换——开/关

@property (nonatomic, strong) UISwitch *s; // 声明UISwitch实例变量

@end
---------------------------------------------------------------------
#import <UIKit/UIKit.h>
#import "ViewController.h"
@interface ViewController ()

@end

@implementation ViewController

//在第一次加载被使用
- (void)viewDidLoad {
    [super viewDidLoad];

    //继承于UIView
    _s = [[UISwitch alloc] init];
    //UISwitch为苹果官方控件
    //宽高为默认属性,无法改变
    _s.frame = CGRectMake(100, 100, 20, 20);

    //两种都为设置开关的状态,YES为开
    [_s setOn:YES];
    _s.on = YES;

    //多了一个是否使用动画效果的参数
    [_s setOn:YES animated:YES];

    //设置开启状态的风格颜色
    [_s setOnTintColor:[UIColor purpleColor]];

    //修改按钮颜色
    [_s setThumbTintColor:[UIColor orangeColor]];


    //添加事件函数
    [_s addTarget:self action:@selector(click:) forControlEvents:UIControlEventValueChanged];
    [self.view addSubview:_s];
}

-(void)click:(UISwitch*) s {
    //on表示的是点击后的状态
    NSLog(@"按钮被点击");
    if (s.on == YES) {
        NSLog(@"@%按钮被打开",s);
    } else {
        NSLog(@"%@按钮被关闭!", s);
    }
}


@end
进度条和滑动条控件
//ViewController.h
#import <UIKit/UIKit.h>

@interface ViewController : UIViewController

//进度条——一般用来表示下载或者播放视频的进度
@property (nonatomic, strong) UIProgressView *progress; // 声明进度条实例变量

//滑动条——一般用来调整音量
@property (nonatomic, strong) UISlider *slider; // 声明滑动条实例变量
@end
---------------------------------------------------------------------
#import <UIKit/UIKit.h>
#import "ViewController.h"
@interface ViewController ()

@end

@implementation ViewController

//在第一次加载被使用
- (void)viewDidLoad {
    [super viewDidLoad];

    [self makeProgress];
    [self makeSlider];
}

-(void)makeProgress {
    _progress = [[UIProgressView alloc] init];

    //进度条直接继承于UIView,不能主动相应事件

    //进度条宽度不可改变
    _progress.frame = CGRectMake(50, 100, 300, 40);
    //设置颜色,默认蓝色
    _progress.progressTintColor = [UIColor redColor];
    _progress.trackTintColor = [UIColor blackColor];

    //设置进度条的进度 —— 范围0~1
    _progress.progress = 0.5;

    //设置风格特征
    _progress.progressViewStyle = UIProgressViewStyleDefault;

    [self.view addSubview:_progress];
}

-(void)makeSlider {
    _slider = [[UISlider alloc] init];

    //slider的宽度同样无法改变
    _slider.frame = CGRectMake(50, 200, 300, 40);

    //设置滑动条的最大/小值,可为负值
    _slider.maximumValue = 100;
    _slider.minimumValue = -100;

    //设置滑动条的值,该值为float,值不会超过范围
    _slider.value = 20;

    //设置左侧/右侧滑动条的背景颜色
    _slider.minimumTrackTintColor = [UIColor blueColor];
    _slider.maximumTrackTintColor = [UIColor greenColor];
    //设置滑块颜色
    _slider.thumbTintColor = [UIColor redColor];

    //滑动条可相应事件函数
    [_slider addTarget:self action:@selector(press) forControlEvents:UIControlEventValueChanged];

    [self.view addSubview:_slider];
}

//实现调节滑动条使得进度条随之改变
-(void)press {
    _progress.progress = (_slider.value - _slider.minimumValue) / (_slider.maximumValue - _slider.minimumValue);
    NSLog(@"value = %f", _slider.value);
}
@end
步进器和分栏控件
#import <UIKit/UIKit.h>
#import "ViewController.h"
@interface ViewController ()

@end

@implementation ViewController

//在第一次加载被使用
- (void)viewDidLoad {
    [super viewDidLoad];
    [self makeStepper];
    [self makeControl];
}

//步进器——按照一定数字调整数据
-(void)makeStepper {
    UIStepper *stepper = [[UIStepper alloc] initWithFrame:CGRectMake(100, 100, 300, 30)];//宽高固定不变

    //设置步进器的范围—— 0~100
    stepper.minimumValue = 0;
    stepper.maximumValue = 100;

    //设置初始值,默认为0
    stepper.value = 10;

    //设置步进值,默认为1
    stepper.stepValue = 10;

    //是否重复响应操作,若为NO即无法进行长按操作,只能点击
    stepper.autorepeat = YES;

    //是否将步进结果用事件函数响应,即长按不会给出事件响应
    stepper.continuous = YES;

    //添加时间函数
    [stepper addTarget:self action:@selector(useStepper:) forControlEvents:UIControlEventValueChanged];

    [self.view addSubview:stepper];
}
//分栏控制器
-(void)makeControl {
    UISegmentedControl* control = [[UISegmentedControl alloc]initWithFrame:CGRectMake(10, 200, 300, 40)];

    //添加按钮元素
    [control insertSegmentWithTitle:@"0元" atIndex:0 animated:NO];
    [control insertSegmentWithTitle:@"5元" atIndex:1 animated:NO];
    [control insertSegmentWithTitle:@"10元" atIndex:2 animated:NO];

    //默认索引设置
    control.selectedSegmentIndex = 0;

    [control addTarget:self action:@selector(click:) forControlEvents:UIControlEventValueChanged];

    [self.view addSubview:control];
}

-(void)useStepper:(UIStepper*) stepper{
    NSLog(@"stepper is using %lf",stepper.value);
}

-(void)click: (UISegmentedControl*) control{
    NSLog(@"%ld", (long)control.selectedSegmentIndex);
}
@end
警告对话框与等待指示器
#import <UIKit/UIKit.h>
#import "ViewController.h"
@interface ViewController ()

@end

@implementation ViewController

//在第一次加载被使用
- (void)viewDidLoad {
    [super viewDidLoad];
    self.view.backgroundColor = [UIColor blackColor];
    [self makeAlertViewAndActivity];
}

//警告对话框
-(void)makeAlertViewAndActivity {
    for (int i = 0; i < 2; i++) {
        UIButton *btn = [UIButton buttonWithType:UIButtonTypeRoundedRect];
        btn.frame = CGRectMake(150, 100 + i * 100, 100, 40);

        if(i == 0) {
            [btn setTitle:@"警告对话框" forState:UIControlStateNormal];
        } else {
            [btn setTitle:@"等待指示器" forState:UIControlStateNormal];
        }

        btn.tag = 101 + i;

        [btn addTarget:self action:@selector(press:) forControlEvents:UIControlEventTouchUpInside];
        [self.view addSubview:btn];
    }

}

-(void)press:(UIButton*)btn {
    if(btn.tag == 101) {
        NSLog(@"11");
        /*
         参数1️⃣:对话框标题
         参数2️⃣:提示信息
         参数3️⃣:处理按钮事件的代理对象
         参数4️⃣:取消的按钮文字
         */
//        UIAlertView *view = [[UIAlertView alloc] initWithTitle:@"警告!!" message:@"电量不足,请充电" delegate:nil cancelButtonTitle:@"取消" otherButtonTitles:@"OK", nil];
//        //显示对话框
//        [view show];
//UIAlertView在iOS9.0已经被移除,我们使用UIAlertController来实现警告功能;


        //设置标题
        UIAlertController *alertController = [UIAlertController alertControllerWithTitle:@"警告!!" message:@"电量不足,请充电" preferredStyle:UIAlertControllerStyleAlert];
        //设置取消按钮,参数一:标题 参数二:按钮的风格
        UIAlertAction *cancelAction = [UIAlertAction actionWithTitle:@"取消" style:UIAlertActionStyleCancel handler:nil];

        UIAlertAction *okAction = [UIAlertAction actionWithTitle:@"OK" style:UIAlertActionStyleDefault handler:nil];

        [alertController addAction:cancelAction];
        [alertController addAction:okAction];


        //调用keyWindow方法获取应用程序的主窗口,rootViewController属性获取窗口的根视图控制器
        UIViewController *rootViewController = [[[UIApplication sharedApplication] keyWindow] rootViewController];
        //将controller显示在主界面上
        //参数一:是否动画效果
        //参数二:是否需要进行额外操作
        [rootViewController presentViewController:alertController animated:YES completion:nil];
    } else {
        //创建等待提示器
        NSLog(@"1");
        UIActivityIndicatorView * view1 = [[UIActivityIndicatorView alloc] initWithFrame:CGRectMake(100, 300, 80, 100)];
        //风格一共有大白,小白,小灰
        view1.activityIndicatorViewStyle = UIActivityIndicatorViewStyleMedium;

        //启动动画并显示
        [view1 startAnimating];

        [self.view addSubview:view1];
    }
}

//UIAlertViewDelegate协议之中的函数,当点击对话框时,调用此函数
//参数1️⃣:对话框本身
//参数2️⃣:按钮的索引
-(void)alertView:(UIAlertView *)alertView clickedButtonAtIndex:(NSInteger)buttonIndex {
    NSLog(@"%d",buttonIndex);//返回按钮个数
}

-(void)alertView:(UIAlertView *)alertView didDismissWithButtonIndex:(NSInteger)buttonIndex {
    NSLog(@"已经消失");
}

-(void)alertView:(UIAlertView *)alertView willDismissWithButtonIndex:(NSInteger)buttonIndex {
    NSLog(@"将要消失");
}
actionWithTitle:style:handler: 是 UIAlertController 类的方法之一,用于创建一个带有指定标题、风格和处理程序的 UIAlertAction 对象。
参数解析:
title:指定操作按钮的标题。style:指定操作按钮的样式,有以下几种可选值:UIAlertActionStyleDefault:默认样式,表示常规操作。UIAlertActionStyleCancel:取消样式,表示取消操作,通常放在警告框的底部。UIAlertActionStyleDestructive:破坏性样式,表示具有破坏性的操作,例如删除操作。
handler:指定一个回调处理程序(block),在用户点击操作按钮时执行的代码。可以在这个处理程序中实现相应的操作逻辑。
当用户点击这个取消按钮时,不会执行任何特定的操作,而仅仅是关闭警告框。
一般来说,取消按钮的作用是提供给用户一个取消当前操作的选项,点击取消按钮后,警告框会消失,不执行任何额外操作。
UITextField
//在第一次加载被使用
- (void)viewDidLoad {
    [super viewDidLoad];
    [self makeField];
}
//文本输出区域
//只能输入单行的文字
//继承于UIControl
-(void)makeField {
    _field = [[UITextField alloc] initWithFrame:CGRectMake(100, 100, 200, 50)];

    _field.text = @"用户名";
    //字体大小
    _field.font = [UIFont systemFontOfSize:15];
    //字体颜色
    _field.textColor = [UIColor redColor];

    //边框风格
    //UITextBorderStyleRoundedRect默认风格
    //UITextBorderStyleNone无边框风格
    //UITextBorderStyleLine边框风格
    //UITextBorderStyleBezel——bezel边框
    _field.borderStyle = UITextBorderStyleRoundedRect;

    //设置虚拟键盘格式
    //UIKeyboardTypeDefault默认风格
    //UIKeyboardTypeNamePhonePad字母和数字风格
    //UIKeyboardTypeNumberPad纯数字
    _field.keyboardType = UIKeyboardTypeNumberPad;

    //提示文字信息,当text为空显示此信息,浅灰色
    _field.placeholder = @"请输入...";

    //是否作为密码输入
    //若为YES则显示圆点
    _field.secureTextEntry = NO;

    [self.view addSubview:_field];

    self.field.delegate = self;
}

-(void) touchesBegan:(NSSet<UITouch *> *)touches withEvent:(UIEvent *)event {
    //点击空白处,虚拟键盘回收,不再作为第一响应者
    [self.field resignFirstResponder];
}

// 是否可以进行输入
- (BOOL)textFieldShouldBeginEditing(UITextField *)textField {
    return YES;
}

//是否可以结束输入
-(BOOL)textFieldShouldEndEditing:(UITextField *)textField {
    return YES;
}
// 当用户开始编辑UITextField时调用
- (void)textFieldDidBeginEditing:(UITextField *)textField {
    NSLog(@"正在编辑");
}

// 当用户结束编辑UITextField时调用
- (void)textFieldDidEndEditing:(UITextField *)textField {
    NSLog(@"结束编辑");
}
