译者导读
CNCF的毕业项目Open Policy Agent(OPA),
为策略决策需求提供了一个统一的框架与服务。它将策略决策从软件业务逻辑中解耦剥离,将策略定义、决策过程抽象为通用模型,实现为一个通用策略引擎,可适用于广泛的业务场景。
比如:判断某用户可以访问哪些资源、允许哪些子网对外访问、工作负载应该部署在哪个集群、容器能执行哪些操作系统功能、系统能在什么时间被访问。需要注意的是,OPA
本身是将策略决策和策略施行解耦,OPA
负责相应策略规则的评估,即决策过程,业务应用服务需要根据相应的策略评估结果执行后续操作,策略的施行是业务强相关,仍旧由业务应用来实现[1]。
这篇译文是笔者对博文《EXTERNALIZED AUTHORIZATION USING OPA AND SPRING
SECURITY》的汉化[2]。博文主要介绍基于 OPA 和 Spring Security 对Java
WEB应用进行外部访问控制的技术实践(在这里对博文的背景做一定的补充介绍:无论是云原生应用还是传统单体应用,都面临着 “失效的访问控制” 以及
“失效身份认证” 这两类漏洞的严峻风险。
这两类漏洞均“跻身”OWASP TOP10 2017以及OWASP TOP10
2021榜单,可谓“老大难”问题;并且,云原生应用带来了API应用接口爆发式增长、对策略设置的灵活性要求提高的挑战;面对这样的风险与挑战,
OPA可发挥其在业务场景“判断某用户可以访问哪些资源”的优势 ,帮客户缓解该问题)。
下面将进入译文部分。若读者朋友能够在阅读之后能收获对OPA技术思路的初步认识,甚至对OPA相似业务场景下能力和服务的研发有所助益,笔者将不胜荣幸。文中若有错漏之处,恳请读者朋友能帮忙指正。
前言
虽然OAuth2和OIDC已经成为访问控制的事实标准,流行度很广,但现有的访问控制标准(如XACML、UMA)难以落地甚至使用。因此开发人员继续推出自己的解决方案,但实现起来常常费时费力,增加了维护成本。
在本教程中,我们将探究 如何通过使用 Open Policy Agent 和 Spring Security
将决策外部化 以 简化访问控制 模块 。
一、目标
通常,任何公开 API
的服务都需要“身份认证”(authentication)和“访问控制”(authorization)。虽然这两个术语听起来很相似,但二者在安全的作用方面有着根本的不同。“身份认证”是确定身份的过程,“访问控制”是确定权限的过程。二者都是非常关键的主题,因为对它们的关注不足可致最常见的漏洞产生(参考OWASP
Top10),今天我们将 重点关注 “访问控制” 。
“访问控制”大致可以分为两类:粗粒度(如RBAC(Role-Based Access
Control,基于角色的访问控制))和细粒度(如ABAC(Attribute-Based Access
Control,基于属性的访问控制),也称为PBAC(Policy-Based Access Control,基于策略的访问控制))。
通常,在区域边界实施粗粒度访问控制策略,但更细粒度的访问控制策略是需要在服务级别实现和实施的。这导致服务的安全性难以被构建,并且安全策略与业务逻辑的紧密耦合,因此对开发人员的生产力产生负面影响。我们的目标是将访问控制外部化,这允许开发人员简单地实现核心业务功能并重用公共模块进行访问控制,同时访问策略变得集中,因此在更改策略时不需要更改单个服务的代码。
二、开放策略代理
开放策略代理(OPA) 是一个开源策略引擎,它提供了一个简单的 API 便于用户将策略决策委托给它。当服务需要做出策略决策时,它会查询 OPA
并提供结构化数据作为输入。OPA 根据策略和数据评估输入并生成输出,输出也可以是任意数据结构,不限于简单allow/deny响应。OPA 策略用称为
Rego 的高级声明性语言表示。更多关于 OPA 和 Rego 的信息可以在官方文档中找到。
1 运行
若要做演示,只需从GitHub 版本[3]下载 OPA 二进制文件并将其作为服务器运行即可:
./opa run --server
或者使用官方的 OPA Docker镜像运行:
docker run -p 8181:8181 openpolicyagent/opa run --server
2 策略
让我们创建一个名为policy.rego的文件并在其中编写一个简单的策略来拒绝所有请求:
package authz

default allow = false
我们将使用 Policy API 来创建和更新策略:
curl -X PUT --data-binary @policy.rego localhost:8181/v1/policies/authz
3 数据
通常,OPA 策略需要一些数据来做出决策,可以使用各种方法将这些数据加载到 OPA
中。使用哪种方法通常取决于数据的大小和更新的频率。此外,加载数据的方式决定了在编写策略时访问它的方式。通过策略决策请求发送的数据可通过输入变量进行访问。异步加载的数据始终通过数据变量进行访问。
对于我们的示例,我们将使用其中的两种方法。其中一部分数据作为输入,另一部分数据包含组织中用户的层次结构(如图1所示),我们将使用其 Data API 推送到
OPA。
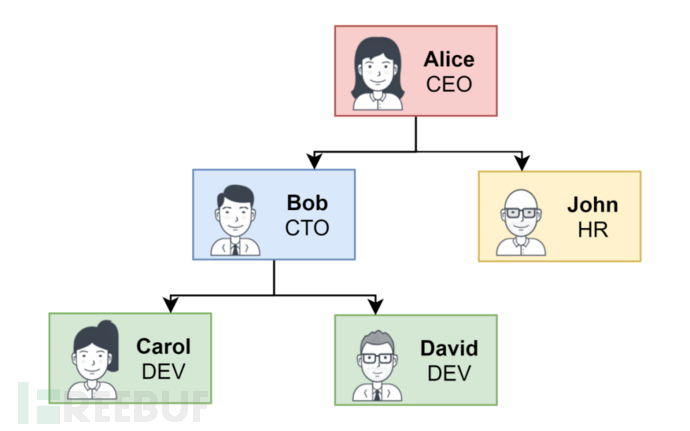 图
图
1 组织架构图
为此,我们创建一个名为data.json的文件,其内容如下:
[

{"name": "alice", "subordinates": ["bob", "john"]},

{"name": "bob", "subordinates": ["carol", "david"]},

{"name": "carol", "subordinates": []},

{"name": "david", "subordinates": []},

{"name": "john", "subordinates": []}

]
并将其加载到 OPA 中:
curl -X PUT -H "Content-Type: application/json" -d @data.json localhost:8181/v1/data/users
三、应用程序
现在我们需要构建一个服务,我们将为其进行访问控制。它将是一个简单的基于 Spring Boot 的 Web 应用程序,提供用于访问两种资源的
API:salaries(薪水)和documents(文档)。
1 依赖项
首先,我们添加必要的依赖项:
<dependency>

<groupId>org.springframework.boot</groupId>

<artifactId>spring-boot-starter-web</artifactId>

</dependency>

<dependency>

<groupId>org.springframework.boot</groupId>

<artifactId>spring-boot-starter-security</artifactId>

</dependency>

<dependency>

<groupId>org.springframework.boot</groupId>

<artifactId>spring-boot-starter-data-jpa</artifactId>

</dependency>

<dependency>

<groupId>com.h2database</groupId>

<artifactId>h2</artifactId>

<scope>runtime</scope>

</dependency>
2 Salary组件
接下来,我们创建一个实体类和标准的分层架构组件来表示Salary:
@Entity

public class Salary {


@Id

@GeneratedValue(strategy = GenerationType.IDENTITY)

private Long id;


@Column(unique = true)

private String username;

private double amount;


// getters, setters and overriden methods from UserDetails

}


@Repository

interface SalaryRepository extends CrudRepository<Salary, Long> {

Optional<Salary> findByUsername(String username);

}


@Service

public class SalaryService {


private final SalaryRepository repository;


public SalaryService(SalaryRepository repository) {

this.repository = repository;

}


public Salary getSalaryByUsername(String username) {

return repository.findByUsername(username)

.orElseThrow(() -> new ResponseStatusException(HttpStatus.NOT_FOUND));

}

}

@RestController

@RequestMapping("/salary")

public class SalaryController {

private final SalaryService service;


public SalaryController(SalaryService service) {

this.service = service;

}


@GetMapping("/{username}")

public Salary getSalary(@PathVariable String username) {

return service.getSalaryByUsername(username);

}

}
3 Document组
然后我们创建相同类型的类来表示Document:
@Entity

public class Document {


@Id

@GeneratedValue(strategy = GenerationType.IDENTITY)

private Long id;

private String content;

private String owner;


// getters and setters

}


@Repository

interface DocumentRepository extends CrudRepository<Document, Long> {

}


@Service

public class DocumentService {


private final DocumentRepository repository;


public DocumentService(DocumentRepository repository) {

this.repository = repository;

}


public Document getDocumentById(long id) {

return repository.findById(id)

.orElseThrow(() -> new ResponseStatusException(HttpStatus.NOT_FOUND));

}

}


@RestController

@RequestMapping("/document")

public class DocumentController {


private final DocumentService service;

public DocumentController(DocumentService service) {

this.service = service;

}


@GetMapping("/{id}")

public Document getDocument(@PathVariable long id) {

return service.getDocumentById(id);

}

}
4 初始化数据
我们需要一些数据,所以我们创建一个 SQL 脚本在启动时对其进行初始化:
-- salaries

INSERT INTO salary (username, amount) VALUES ('alice', 1000);

INSERT INTO salary (username, amount) VALUES ('bob', 800);

INSERT INTO salary (username, amount) VALUES ('carol', 600);

INSERT INTO salary (username, amount) VALUES ('david', 500);

INSERT INTO salary (username, amount) VALUES ('john', 900);


-- documents

INSERT INTO document (content, owner) VALUES ('Alice Document 1', 'alice');

INSERT INTO document (content, owner) VALUES ('Bob Document 1', 'bob');

INSERT INTO document (content, owner) VALUES ('Bob Document 2', 'bob');

INSERT INTO document (content, owner) VALUES ('David Document 1', 'david');

INSERT INTO document (content, owner) VALUES ('David Document 2', 'david');

INSERT INTO document (content, owner) VALUES ('Carol Document 1', 'carol');

INSERT INTO document (content, owner) VALUES ('John Document 1', 'john');
5 安全
我们的应用程序几乎准备就绪,剩下的就是对 Web 安全性进行配置。为了简单起见,我们将用户的凭据存储在内存中并基于 HTTP 协议进行基本的身份验证:
@Configuration

public class SecurityConfig extends WebSecurityConfigurerAdapter {


@Bean

public PasswordEncoder passwordEncoder() {

return PasswordEncoderFactories.createDelegatingPasswordEncoder();

}


@Override

protected void configure(AuthenticationManagerBuilder auth) throws Exception {

auth.inMemoryAuthentication()

.withUser("alice").password(passwordEncoder().encode("pass")).roles("CEO")

.and()

.withUser("bob").password(passwordEncoder().encode("pass")).roles("CTO")

.and()

.withUser("carol").password(passwordEncoder().encode("pass")).roles("DEV")

.and()

.withUser("david").password(passwordEncoder().encode("pass")).roles("DEV")

.and()

.withUser("john").password(passwordEncoder().encode("pass")).roles("HR");

}


@Override

protected void configure(HttpSecurity http) throws Exception {

http

.authorizeRequests()

.anyRequest().authenticated()

.and()

.formLogin().disable()

.httpBasic();

}

}
为了确保一切正常,我们可以运行应用程序并尝试发送几个请求:
> curl localhost:8080/salary/david

{"timestamp":"2020-10-30T00:00:00.000+00:00","status":401,"error":"Unauthorized","message":"","path":"/salary/david"}

> curl carol:pass@localhost:8080/salary/david

{"id":4,"username":"david","amount":500.0}
正如我们所料,该应用程序可以工作并且需要身份验证,但是由于缺乏访问控制的检查,任何用户都可以访问其他用户的工资。
四、访问控制
最后,当 OPA 服务器启动并且应用程序准备就绪时,我们可以继续实施访问控制。
1 使用 AccessDecisionVoter
Open Policy Agent 贡献者[为 Spring Security
提供了一个集成方式[4],它提供了](https://github.com/open-policy-
agent/contrib/tree/master/spring_authz)针对[AccessDecisionVoter](https://docs.spring.io/spring-
security/site/docs/current-
SNAPSHOT/api/org/springframework/security/access/AccessDecisionVoter.html)的简单实现,该实现使用
OPA 进行 API 授权决策。由于我们自己实现这个类很容易,并且我们可以更好地做实现,所以我们不会使用这个依赖。
我们需要实现AccessDecisionVoter接口,这将收集可能有助于决策的可用数据,将其发送给 OPA
进行评估,并根据结果,授予访问权限或拒绝访问。我们的实现会将经过身份验证的用户名、他们的权限列表、HTTP
方法和请求路径作为分段分隔的数组发送。将路径分割成段可以让我们在编写策略时更容易访问路径变量。此外,为了更清楚地了解发生了什么,我们将记录所有发送的请求和收到的响应:
public class OpaVoter implements AccessDecisionVoter<FilterInvocation> {


private static final String URI = "http://localhost:8181/v1/data/authz/allow";

private static final Logger LOG = LoggerFactory.getLogger(OpaVoter.class);


private final ObjectMapper objectMapper = new ObjectMapper();

private final RestTemplate restTemplate = new RestTemplate();


@Override

public boolean supports(ConfigAttribute attribute) {

return true;

}


@Override

public boolean supports(Class clazz) {

return FilterInvocation.class.isAssignableFrom(clazz);

}


@Override

public int vote(Authentication authentication, FilterInvocation filterInvocation, Collection<ConfigAttribute> attributes) {

String name = authentication.getName();

List<String> authorities = authentication.getAuthorities()

.stream()

.map(GrantedAuthority::getAuthority)

.collect(Collectors.toUnmodifiableList());

String method = filterInvocation.getRequest().getMethod();

String[] path = filterInvocation.getRequest().getRequestURI().replaceAll("^/|/$", "").split("/");


Map<String, Object> input = Map.of(

"name", name,

"authorities", authorities,

"method", method,

"path", path

);


ObjectNode requestNode = objectMapper.createObjectNode();

requestNode.set("input", objectMapper.valueToTree(input));

LOG.info("Authorization request:\n" + requestNode.toPrettyString());


JsonNode responseNode = Objects.requireNonNull(restTemplate.postForObject(URI, requestNode, JsonNode.class));

LOG.info("Authorization response:\n" + responseNode.toPrettyString());


if (responseNode.has("result") && responseNode.get("result").asBoolean()) {

return ACCESS_GRANTED;

} else {

return ACCESS_DENIED;

}

}

}
现在,我们可以使用Vector列表(包括我们的自定义投票器实现类Vector)定义 AccessDecisionManager的bean类,并配置
Spring Security 以使用它:
public class SecurityConfig extends WebSecurityConfigurerAdapter {


// ...


@Override

protected void configure(HttpSecurity http) throws Exception {

http

.authorizeRequests()

.anyRequest().authenticated()

.accessDecisionManager(accessDecisionManager())

.and()

.formLogin().disable()

.httpBasic();

}


@Bean

public AccessDecisionManager accessDecisionManager() {

List<AccessDecisionVoter<?>> decisionVoters = List.of(

new RoleVoter(), new AuthenticatedVoter(), new OpaVoter()

);

return new UnanimousBased(decisionVoters);

}

}
2 策略
由于我们只有一个拒绝所有请求的策略,因此无论哪个用户尝试请求薪水或任何用户,他们都会得到 403:
> curl alice:pass@localhost:8080/salary/alice

{"timestamp":"2020-10-30T00:00:00.000+00:00","status":403,"error":"Forbidden","message":"","path":"/salary/alice"}

> curl alice:pass@localhost:8080/salary/bob

{"timestamp":"2020-10-30T00:00:00.000+00:00","status":403,"error":"Forbidden","message":"","path":"/salary/bob"}
所以,是时候让我们看看 如何编写策略 了。让我们从最简单的开始,让用户访问他们的薪水。
为此,我们需要policy.rego通过添加以下内容进行更新:
allow {

some username

input.method == "GET"

input.path = ["salary", username]

input.name == username

}
现在,如果您没有忘记将策略更新推送到 OPA,所有用户都可以访问他们的薪水,但仍然无法访问其他人的薪水:
> curl alice:pass@localhost:8080/salary/alice

{"id":1,"username":"alice","amount":1000.0}

> curl alice:pass@localhost:8080/salary/bob

{"timestamp":"2020-10-30T00:00:00.000+00:00","status":403,"error":"Forbidden","message":"","path":"/salary/bob"}
那不是很棒吗?我们甚至不必重新启动我们的应用程序。
我们还可以添加基于角色的策略,例如,让具有 HR 角色的用户访问所有薪水:
allow {

input.method == "GET"

input.path = ["salary", _]

input.authorities[_] == "ROLE_HR"

}
现在具有此角色的用户可以访问所有用户的工资:
> curl john:pass@localhost:8080/salary/alice

{"id":1,"username":"alice","amount":1000.0}

> curl john:pass@localhost:8080/salary/david

{"id":4,"username":"david","amount":500.0}
到目前为止,在我们所有的策略中,我们都使用了输入数据,我们将尝试使用加载到 OPA 中的数据来编写策略。例如,我们可以让用户访问其直接下属的薪水:
allow {

some username, i

input.method == "GET"

input.path = ["salary", username]

data.users[i].name == input.name

data.users[i].subordinates[_] == username

}
用户现在可以访问其直接下属的薪水,但尚不支持刻画组织的完整层次结构:
> curl bob:pass@localhost:8080/salary/david

{"id":4,"username":"david","amount":500.0}

> curl alice:pass@localhost:8080/salary/bob

{"id":2,"username":"bob","amount":800.0}

> curl alice:pass@localhost:8080/salary/david

{"timestamp":"2020-10-30T00:00:00.000+00:00","status":403,"error":"Forbidden","message":"","path":"/salary/david"}
为了让用户能够访问所有级别下属的相关信息,我们需要编写更复杂的策略,幸运的是,Rego
通过提供大量有用的功能为我们创造了这个机会。由于我们的层次结构是一个图,我们的任务是为每个顶点找到可到达的顶点,我们可以使用具备该特殊功能的函数graph.reachable。使用某些功能可能需要对数据进行预处理,例如,在这种情况下,我们需要将数据“展平”,将其描绘为一张图,其中“用户”是“键”,“直接下属”是“值”,即:
{

"alice": ["bob", "john"],

"bob": ["carol", "david"],

"carol": [],

"david": [],

"john": []

}
Rego 允许我们定义支持数据自动迭代的规则,并生成可以像 JSON 对象一样访问的输出。
首先,我们添加一个规则来通过展平我们的数据来生成图:
users_graph[data.users[username].name] = edges {

edges := data.users[username].subordinates

}
接下来,我们添加一个规则,该规则将适当的函数应用到由前一个规则生成的图上,以获取每个用户的所有可达用户:
users_access[username] = access {

users_graph[username]

access := graph.reachable(users_graph, {username})

}
结果,我们得到如下所示的数据:
{

"alice": ["alice", "bob", "john", "carol", "david"],

"bob": ["bob", "carol", "david"],

"carol": ["carol"],

"david": ["david"],

"john": ["john"]

}
现在我们可以根据这些数据编写一个策略,因为它已经为用户提供了访问他们的薪水和直接下属的薪水的权限,我们可以删除之前的策略:
package authz


default allow = false


allow {

input.method == "GET"

input.path = ["salary", _]

input.authorities[_] == "ROLE_HR"

}


allow {

some username

input.method == "GET"

input.path = ["salary", username]

username == users_access[input.name][_]

}


users_graph[data.users[username].name] = edges {

edges := data.users[username].subordinates

}


users_access[username] = access {

users_graph[username]

access := graph.reachable(users_graph, {username})

}
让我们检查访问控制是否符合我们的策略:
> curl alice:pass@localhost:8080/salary/alice

{"id":1,"username":"alice","amount":1000.0}

> curl alice:pass@localhost:8080/salary/david

{"id":4,"username":"david","amount":500.0}

> curl david:pass@localhost:8080/salary/alice

{"timestamp":"2020-10-30T00:00:00.000+00:00","status":403,"error":"Forbidden","message":"","path":"/salary/alice"}

> curl john:pass@localhost:8080/salary/alice

{"id":1,"username":"alice","amount":1000.0}
3 使用注解
您可能已经注意到,当前我们所有的策略都只适用于获取工资,而“文档组件”被放在一边,没有用户仍然可以访问它们。问题是,当前存储在OPA中并从AccessDecisionVoter发送的数据可能不足以做出访问控制的决策。我们无法将所有数据加载到
OPA 中,因为数据可能是高度动态的或海量的,如果我们开始为AccessDecisionVoter的每个请求添加单独的逻辑,这个类的代码将造成一定的混乱度。
这个问题的一个解决方案可能是使用内置函数使OPA在评估期间提取数据。在实现边缘访问控制时,这可能是一个很好的解决方案,但由于我们现在正在服务本身中实现访问控制,因此我们更容易在最初将所有必要的数据发送到OPA,并将服务之间的请求数量降至最低。此外,我们可能希望对何时调用
OPA 有更多的控制权,而不是对每个请求都进行控制。
除了使用 Spring Security 提供的权限管理的投票器之外,另一种访问控制机制是使用 SpEL 表达式来实现 Web
和方法安全的能力。我们将通过一些支持表达式的注解在方法级进行应用。要开启全局性的基于方法的安全认证机制及相应的pre/post注解,我们需要将注解添加到一个配置文件中:
@EnableGlobalMethodSecurity(prePostEnabled = true)
我们可以通过实现PermissionEvaluator接口来使用常见的hasPermission()表达式,但这将使我们不得不使用这个接口的方法,相反,我们将利用表达式引用和使用任何SpringBean的方法的能力。让我们摆脱AccessDecisionVoter,创建一个用于表达式的组件:
@Component

public class OpaClient {


private static final String URI = "http://localhost:8181/v1/data/authz/allow";

private static final Logger LOG = LoggerFactory.getLogger(OpaClient.class);


private final ObjectMapper objectMapper = new ObjectMapper();

private final RestTemplate restTemplate = new RestTemplate();


public boolean allow(String action, Map<String, Object> resourceAttributes) {

Authentication authentication = SecurityContextHolder.getContext().getAuthentication();

if (authentication == null || !authentication.isAuthenticated() || action == null || resourceAttributes == null || resourceAttributes.isEmpty()) {

return false;

}


String name = authentication.getName();

List<String> authorities = authentication.getAuthorities()

.stream()

.map(GrantedAuthority::getAuthority)

.collect(Collectors.toUnmodifiableList());

Map<String, Object> subjectAttributes = Map.of(

"name", name,

"authorities", authorities

);


Map<String, Object> input = Map.of(

"subject", subjectAttributes,

"resource", resourceAttributes,

"action", action

);


ObjectNode requestNode = objectMapper.createObjectNode();

requestNode.set("input", objectMapper.valueToTree(input));

LOG.info("Authorization request:\n" + requestNode.toPrettyString());


JsonNode responseNode = Objects.requireNonNull(restTemplate.postForObject(URI, requestNode, JsonNode.class));

LOG.info("Authorization response:\n" + responseNode.toPrettyString());


return responseNode.has("result") && responseNode.get("result").asBoolean();

}

}
我们实现的组件只有一个方法,该方法将请求的操作和请求访问的资源的属性作为参数,并将所有这些数据与身份验证数据一起发送到 OPA
以供决策,方法的返回值是布尔型。
我们现在可以在SalaryService中使用@PreAuthroze注解:
@PreAuthorize("@opaClient.allow('read', T(java.util.Map).of('type', 'salary', 'user', #username))")

public Salary getSalaryByUsername(String username) {

return repository.findByUsername(username)

.orElseThrow(() -> new ResponseStatusException(HttpStatus.NOT_FOUND));

}
并在DocumentService中使用@PostAuthorize注解:
@PostAuthorize("@opaClient.allow('read', T(java.util.Map).of('type', 'document', 'owner', returnObject.owner))")

public Document getDocumentById(long id) {

return repository.findById(id)

.orElseThrow(() -> new ResponseStatusException(HttpStatus.NOT_FOUND));

}
只需调整以前的策略以适应新的数据格式,并为文档添加策略,例如,配置用户对文档的访问控制权限:
package authz


default allow = false


allow {

input.action == "read"

input.resource.type == "salary"

input.subject.authorities[_] == "ROLE_HR"

}


allow {

input.action == "read"

input.resource.type == "salary"

input.resource.user == users_access[input.subject.name][_]

}


allow {

input.action == "read"

input.resource.type == "document"

input.resource.owner == input.subject.name

}


users_graph[data.users[username].name] = edges {

edges := data.users[username].subordinates

}


users_access[username] = access {

users_graph[username]

access := graph.reachable(users_graph, {username})

}
注:为了便于读者朋友理解,笔者增补了图2的应用改造示意图以及图3的鉴权方案对比图。
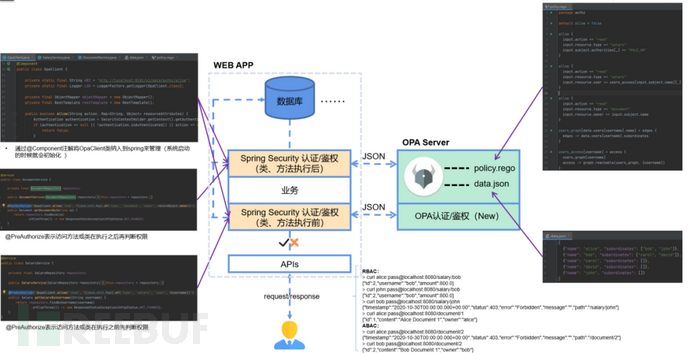 图
图
2 应用改造示意图
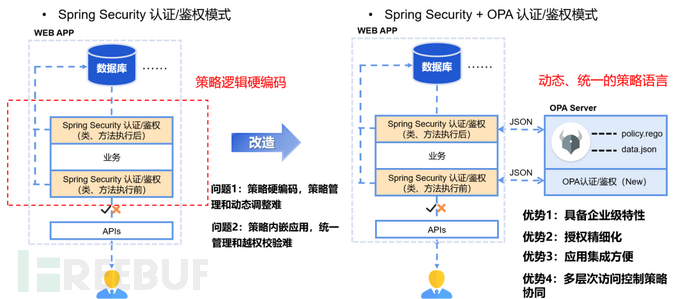 图
图
3 鉴权方案对比图
最后,让我们验证所做的工作对于Document组件和Salary组件生效:
> curl alice:pass@localhost:8080/salary/bob

{"id":2,"username":"bob","amount":800.0}

> curl john:pass@localhost:8080/salary/bob

{"id":2,"username":"bob","amount":800.0}

> curl bob:pass@localhost:8080/salary/john

{"timestamp":"2020-10-30T00:00:00.000+00:00","status":403,"error":"Forbidden","message":"","path":"/salary/john"}

> curl alice:pass@localhost:8080/document/1

{"id":1,"content":"Alice Document 1","owner":"alice"}

> curl alice:pass@localhost:8080/document/2

{"timestamp":"2020-10-30T00:00:00.000+00:00","status":403,"error":"Forbidden","message":"","path":"/document/2"}

> curl bob:pass@localhost:8080/document/2

{"id":2,"content":"Bob Document 1","owner":"bob"}
最后
对于从来没有接触过网络安全的同学,我们帮你准备了详细的学习成长路线图。可以说是最科学最系统的学习路线,大家跟着这个大的方向学习准没问题。

同时每个成长路线对应的板块都有配套的视频提供:


当然除了有配套的视频,同时也为大家整理了各种文档和书籍资料&工具,并且已经帮大家分好类了。

因篇幅有限,仅展示部分资料,有需要的小伙伴,可以【扫下方二维码】免费领取:


