文章目录
- 一、泛型算法
- 1.泛型算法的分类
- 2.迭代器分类
- 二、bind与lambda表达式
- 1.bind
- 2.lambda表达式
- 三、泛型算法的改进--ranges(c++20)
一、泛型算法
C++中的泛型算法是标准模板库(STL)的一部分(这里重点讨论 C++ 标准库中定义的算法,而非自定义的算法),它们能够对不同类型的数据执行操作,而不需要编写针对每种类型的特定代码。泛型算法之所以强大,是因为它们可以处理任何类型的数据,只要这些数据满足某些基本要求,比如迭代器支持。泛型算法通常使用模板来实现,这意味着它们可以在编译时自动适应传入的数据类型。泛型算法可以用于操作容器中的元素,而不需要关心容器的具体类型。
C++11标准中定义的泛型算法可参考《C++标准库》第二版这本书
-
为什么要引入泛型算法而不采用方法(容器中支持的方法)的形式?
泛型算法(Generic Algorithms)是一种编程范式,它允许算法的实现独立于数据类型,从而使得同一个算法可以应用于多种不同的数据类型。泛型算法的引入主要基于以下几个原因:
-
内建数据类型不支持方法:
内建的数据类型(如数组、基本数据类型等)并不支持方法的直接定义。泛型算法不需要关心数据存储的具体类型,从而可以应用于任何类型的容器或数据结构。
-
计算逻辑存在相似性:
很多算法在本质上是相似的,比如排序、搜索等。如果为每种数据类型都编写一个特定的算法实现,将会导致代码的重复和冗余。泛型算法通过抽象化算法的实现,使得相同的逻辑可以重用于不同的数据类型。
-
避免重复定义:
泛型算法可以用于多种数据类型,避免了为每种数据类型重复编写相同或类似的代码。这不仅减少了开发时间,还减少了出错的可能性。
-
提高代码的可重用性:
通过泛型算法,开发者可以创建高度可重用的代码,这些代码可以在不同的项目和应用程序中使用,而不需要针对每种数据类型进行修改。
-
简化维护和扩展:当算法需要修改或扩展时,泛型算法只需要修改一次,所有使用该算法的数据类型都会自动受益于这些更改。这使得维护和扩展变得更加简单和高效。
-
-
泛型算法如何实现支持多种类型:
使用迭代器作为算法与数据的桥梁。迭代器是一种设计模式,它提供了一种方式来顺序访问容器中的元素而不需要暴露容器的内部结构。
迭代器如何作为算法与数据结构之间的桥梁来实现泛型算法的步骤:
-
定义迭代器接口:迭代器通常具有几个基本操作,如
begin()(返回开始迭代的迭代器)、end()(返回结束迭代的迭代器,通常是一个不指向任何元素的迭代器)、next()(移动到下一个元素)和value()(获取当前元素的值)。这些操作是算法与数据结构交互的基础。 -
算法与迭代器解耦:泛型算法不直接操作数据结构中的元素,而是通过迭代器来访问和操作这些元素。这意味着算法的实现与数据结构的具体类型无关,算法只关心如何通过迭代器访问元素。
-
使用模板或泛型编程:在支持泛型编程的编程语言中(如C++),可以通过模板或泛型来定义算法。这些模板或泛型参数可以是任何类型的迭代器。
-
算法实现中的迭代器使用:在算法的实现中,使用迭代器接口来遍历容器中的元素。例如,一个简单的遍历算法可能如下所示:
//traverse 函数就可以正确地遍历从 begin 到 end 的所有元素,并在每次迭代中调用 process 函数来处理当前元素。 template<typename Iterator> void traverse(Iterator begin, Iterator end) { while (begin != end) { process(*begin); // 处理当前元素 begin.next(); // 移动到下一个元素 } } -
适配不同数据结构:不同的数据结构可以实现相同的迭代器接口,这样同一个算法就可以应用于不同的数据结构。例如,数组、链表、树等都可以提供符合迭代器接口的实现。
-
算法的泛化:通过迭代器,算法可以被泛化,使其能够处理任何提供相应迭代器的数据结构。这大大增强了算法的灵活性和重用性。
-
类型安全:使用迭代器和泛型编程还可以保证类型安全。编译器可以在编译时检查类型匹配,避免运行时错误。
C++的模板允许编译时计算,这意味着泛型算法可以在编译时进行类型检查和优化,从而减少运行时的开销。
-
简化算法实现:开发者可以专注于算法的逻辑实现,而不需要关心数据结构的细节,这简化了算法的编写和理解。
通过这种方式,泛型算法能够以一种类型无关的方式实现,从而支持多种数据类型。迭代器作为算法与数据结构之间的桥梁,使得算法能够以统一的方式处理不同的数据集合。
-
-
泛型算法通常来说设计都不复杂,但优化足够好
-
泛型算法库主要包括以下几个头文件:
-
<algorithm>:这是最常用的泛型算法库,包含了排序、搜索、复制、变换等基本操作。例如,std::sort、std::find、std::copy等。 -
<numeric>:这个头文件包含了一些数值算法,主要用于执行数值计算,如累加、乘积、最小/最大值查找等。例如,std::accumulate、std::inner_product等。 -
<ranges>:这是C++20中引入的新特性,提供了对范围(range)的支持,使得算法可以更自然地应用于各种范围对象。它提供了范围基的算法,如std::ranges::find、std::ranges::sort等,这些算法可以直接作用于std::ranges::range对象。
-
-
一些泛型算法与方法(容器中支持的方法)同名,实现功能类似,此时建议调用方法而非算法。
容器的成员函数通常针对特定容器进行了优化,因此可能比泛型算法更快。例如,
std::map::find利用了红黑树的特性,提供了对键值的快速查找,而std::find则需要遍历整个容器。std::vector中没有包含find方法,因为使用std::find已经达到很好的性能了。
1.泛型算法的分类
在C++中,泛型算法是标准模板库(STL)的一部分,它们提供了一种高效、灵活的方式来操作数据集合。这些算法通常与容器(如vector, list, array等)一起使用,并且可以对存储在这些容器中的数据执行各种操作。泛型算法按照它们执行的操作类型可以分为几个主要类别:
读算法:
读算法用于:给定迭代区间,遍历容器中的元素并进行计算(读取它们,但通常不修改它们)。
accumulatefindcount
-
accumulate:用于计算迭代器范围内所有元素的总和
详细内容可参考:https://en.cppreference.com/w/cpp/algorithm/accumulate
accumulate算法用于计算迭代器范围内所有元素的总和。它可以接受三个参数:迭代器范围的开始和结束,以及一个初始值。它会返回迭代器范围内所有元素的累加结果。也可以接受四个参数:迭代器范围的开始和结束,一个初始值以及被使用的二元函数对象(可以是函数指针、C++标准库中定义的函数,也可以是后续讨论的bind以及lambda表达式)。类模板一及其实现:
#include <numeric>

template< class InputIt, class T >
T accumulate( InputIt first, InputIt last, T init );
template<class InputIt, class T> constexpr // since C++20 T accumulate(InputIt first, InputIt last, T init) { for (; first != last; ++first) init = std::move(init) + *first; return init; }类模板二及其实现:
#include <numeric>

template< class InputIt, class T, class BinaryOp >
T accumulate( InputIt first, InputIt last, T init, BinaryOp op );
template<class InputIt, class T, class BinaryOperation> constexpr // since C++20 T accumulate(InputIt first, InputIt last, T init, BinaryOperation op) { for (; first != last; ++first) init = op(std::move(init), *first); return init; }示例:
#include <functional>
#include <iostream>
#include <numeric>
#include <string>
#include <vector>

int main()
{
    std::vector<int> v{1, 2, 3, 4, 5, 6, 7, 8, 9, 10};

    int sum = std::accumulate(v.begin(), v.end(), 0);
    int product = std::accumulate(v.begin(), v.end(), 1, std::multiplies<int>());

    auto dash_fold = [](std::string a, int b)
    {
        return std::move(a) + '-' + std::to_string(b);
    };

    std::string s = std::accumulate(std::next(v.begin()), v.end(),
                                    std::to_string(v[0]), // start with first element
                                    dash_fold);

    // Right fold using reverse iterators
    std::string rs = std::accumulate(std::next(v.rbegin()), v.rend(),
                                     std::to_string(v.back()), // start with last element
                                     dash_fold);

    std::cout << "sum: " << sum << '\n'
              << "product: " << product << '\n'
              << "dash-separated string: " << s << '\n'
              << "dash-separated string (right-folded): " << rs << '\n';
}
运行结果:
sum: 55 product: 3628800 dash-separated string: 1-2-3-4-5-6-7-8-9-10 dash-separated string (right-folded): 10-9-8-7-6-5-4-3-2-1 -
find:用于在迭代器指定的范围内搜索一个特定的值
详细内容可参考:https://en.cppreference.com/w/cpp/algorithm/find
find算法用于在迭代器指定的范围内搜索一个特定的值。它可以接受三个参数:迭代器范围的开始和结束,以及一个给定值。如果找到该值,它返回指向该值的迭代器;如果没有找到,它返回last迭代器。类模板及其实现:
#include <algorithm>

template< class InputIt, class T >
InputIt find( InputIt first, InputIt last, const T& value );
template<class InputIt, class T = typename std::iterator_traits<InputIt>::value_type> InputIt find(InputIt first, InputIt last, const T& value) { for (; first != last; ++first) if (*first == value) return first; return last; }示例:
#include <iostream> #include <vector> #include <algorithm> // 包含 find 函数 int main() { std::vector<int> v = {1, 2, 3, 4, 5}; auto it = std::find(v.begin(), v.end(), 3); if (it != v.end()) { std::cout << "Found: " << *it << std::endl; // 输出:Found: 3 } else { std::cout << "Value not found" << std::endl; } return 0; } -
count:用于计算迭代器范围内与给定值匹配的元素数量,并返回这个数量
详细内容可参考:https://en.cppreference.com/w/cpp/algorithm/count
count算法用于计算迭代器范围内与给定值匹配的元素数量。它可以接受三个参数:迭代器范围的开始和结束,以及一个给定值。返回值的个数。类模板参数及其实现:
#include <algorithm>

template< class InputIt, class T >
typename std::iterator_traits<InputIt>::difference_type
    count( InputIt first, InputIt last, const T& value );
template<class InputIt, class T = typename std::iterator_traits<InputIt>::value_type> typename std::iterator_traits<InputIt>::difference_type count(InputIt first, InputIt last, const T& value) { typename std::iterator_traits<InputIt>::difference_type ret = 0; for (; first != last; ++first) if (*first == value) ++ret; return ret; }示例:
#include <iostream>
#include <vector>
#include <algorithm> // 包含 count 函数

int main() {
    std::vector<int> v = {1, 2, 2, 3, 2, 4};
    auto count_of_two = std::count(v.begin(), v.end(), 2);
    std::cout << "Count of 2: " << count_of_two << std::endl; // 输出:Count of 2: 3
    return 0;
}
写算法:
写算法用于:给定迭代区间,遍历容器中的元素并进行修改。
单纯写操作: fill / fill_n/replace
读 + 写操作: transpose / copy / copy_if
注意:写算法一定要保证目标区间足够大
-
fill:用于使用给定值填充容器中指定范围内的所有元素
详细内容可查看:https://en.cppreference.com/w/cpp/algorithm/fill
fill算法用于使用给定值填充容器中指定范围内的所有元素。它可以接受三个参数:迭代器范围的开始和结束,以及一个给定值。没有返回值。类模板及其实现:
#include <algorithm>

template< class ForwardIt, class T >
void fill( ForwardIt first, ForwardIt last, const T& value );
template<class ForwardIt, class T = typename std::iterator_traits<ForwardIt>::value_type> void fill(ForwardIt first, ForwardIt last, const T& value) { for (; first != last; ++first) *first = value; }示例:
#include <iostream> #include <algorithm> // 包含 std::fill #include <vector> int main() { std::vector<int> v(5); // 创建一个有5个元素的vector std::fill(v.begin(), v.end(), 10); // 将所有元素设置为10 // 输出结果: 10 10 10 10 10 for (int elem : v) { std::cout << elem << " "; } return 0; } -
fill_n:
详细内容可查看:https://en.cppreference.com/w/cpp/algorithm/fill_n
fill_n用于将指定值赋给从first开始都得范围的前count个元素。它可以接受三个参数:迭代器范围的开始和元素的数量,以及一个给定值。如果count > 0 时返回指向最后赋值元素后一位置的迭代器,否则返回 first迭代器。类模板及其实现:
#include <algorithm>

template< class OutputIt, class Size, class T >
OutputIt fill_n( OutputIt first, Size count, const T& value );
template<class OutputIt, class Size, class T = typename std::iterator_traits<OutputIt>::value_type> OutputIt fill_n(OutputIt first, Size count, const T& value) { for (Size i = 0; i < count; i++) *first++ = value; return first; }示例:
#include <iostream> #include <algorithm> // 包含 std::fill_n #include <vector> int main() { std::vector<int> v(5); // 创建一个有5个元素的vector std::fill_n(v.begin(), 3, 20); // 将前3个元素设置为20 // 输出结果: 20 20 20 0 0 for (int elem : v) { std::cout << elem << " "; } return 0; } -
replace:
详细内容可查看https://en.cppreference.com/w/cpp/algorithm/replace
std::replace用于以指定值替换范围内所有满足判定标准的元素。它可以接受四个参数:迭代器范围的开始和结束,要被替换的元素值与用作替换的值。无返回值。类模板及其实现:
#include <algorithm>

template< class ForwardIt, class T >
void replace( ForwardIt first, ForwardIt last,
              const T& old_value, const T& new_value );
template<class ForwardIt, class T = typename std::iterator_traits<ForwardIt>::value_type> void replace(ForwardIt first, ForwardIt last, const T& old_value, const T& new_value) { for (; first != last; ++first) if (*first == old_value) *first = new_value; }示例:
#include <algorithm> #include <array> #include <functional> #include <iostream> int main() { std::array<int, 10> s{5, 7, 4, 2, 8, 6, 1, 9, 0, 3}; // 将出现的所有 8 替换为 88。 std::replace(s.begin(), s.end(), 8, 88); // 将所有小于 5 的值替换为 55。 std::replace_if(s.begin(), s.end(), std::bind(std::less<int>(), std::placeholders::_1, 5), 55); } -
transform:变换操作
详细内容可查看:https://en.cppreference.com/w/cpp/algorithm/transform
std::transform用于遍历一个输入范围并将每个元素通过一个给定的函数或函数对象进行变换,然后将结果写入一个输出范围。std::transform可以用于实现各种变换操作,比如数学运算、逻辑操作或自定义的函数。类模板一及其实现:
#include <algorithm>

template< class InputIt, class OutputIt, class UnaryOp >
OutputIt transform( InputIt first1, InputIt last1,
                    OutputIt d_first, UnaryOp unary_op );
template<class InputIt, class OutputIt, class UnaryOp> constexpr //< C++20 起 OutputIt transform(InputIt first1, InputIt last1, OutputIt d_first, UnaryOp unary_op) { for (; first1 != last1; ++d_first, ++first1) *d_first = unary_op(*first1); return d_first; }类模板二及其实现:
#include <algorithm>

template< class InputIt1, class InputIt2,
          class OutputIt, class BinaryOp >
OutputIt transform( InputIt1 first1, InputIt1 last1, InputIt2 first2,
                    OutputIt d_first, BinaryOp binary_op );
template<class InputIt1, class InputIt2, class OutputIt, class BinaryOp> constexpr //< C++20 起 OutputIt transform(InputIt1 first1, InputIt1 last1, InputIt2 first2, OutputIt d_first, BinaryOp binary_op) { for (; first1 != last1; ++d_first, ++first1, ++first2) *d_first = binary_op(*first1, *first2); return d_first; }模板参数说明:
first1,last1: 输入范围的开始和结束迭代器。first2: 第二个输入范围的开始迭代器(仅在二元变换中使用)。result: 输出范围的开始迭代器。op: 一个一元或二元的操作符,用于对元素进行变换。
返回值:指向最后一个变换的元素的输出迭代器。
示例:
#include <algorithm> // 包含 std::transform
#include <vector>
#include <iostream>

int main() {
    std::vector<int> v(5); // 创建一个有5个元素的vector
    std::vector<int> m(5);
    std::fill(v.begin(), v.end(), 1); // 初始化所有元素为1

    // 将每个元素乘以2
    std::transform(v.begin(), v.end(), m.begin(), [](int x) { return x * 2; });

    // 输出结果: 2 2 2 2 2
    for (int elem : m) {
        std::cout << elem << " ";
    }
    return 0;
}
#include <algorithm> // 包含 std::transform #include <vector> #include <iostream> int main() { std::vector<int> v1(5); // 创建两个有5个元素的vector std::fill(v1.begin(), v1.end(), 1); // 初始化v1的所有元素为1 std::vector<int> v2(5); std::fill(v2.begin(), v2.end(), 2); // 初始化v2的所有元素为2 std::vector<int> result(5); // 创建一个用于存储结果的vector // 对v1和v2中的元素进行相加操作,结果存储在result中 std::transform(v1.begin(), v1.end(), v2.begin(), result.begin(), [](int x, int y) { return x + y; }); // 输出结果: 3 3 3 3 3 for (int elem : result) { std::cout << elem << " "; } return 0; } -
copy:从一个范围复制元素到另一个范围
详细内容可查看https://en.cppreference.com/w/cpp/algorithm/copy
std::copy用于从一个范围复制元素到另一个范围。它可以接受三个参数:迭代器范围的开始和结束,以及目标范围的起始。返回值为指向目标范围中最后复制元素的下个元素的输出迭代器。类模板及其实现:
#include <algorithm>

template< class InputIt, class OutputIt >
OutputIt copy( InputIt first, InputIt last,
               OutputIt d_first );
template<class InputIt, class OutputIt> OutputIt copy(InputIt first, InputIt last, OutputIt d_first) { for (; first != last; (void)++first, (void)++d_first) *d_first = *first; return d_first; }示例:
#include <algorithm> // 包含 std::copy #include <vector> #include <iostream> int main() { std::vector<int> source = {1, 2, 3, 4, 5}; std::vector<int> destination; std::copy(source.begin(), source.end(), std::back_inserter(destination)); // 输出复制后的结果 for (int elem : destination) { std::cout << elem << " "; } return 0; } // 输出结果: 1 2 3 4 5 -
copy_if
详细内容可参考https://zh.cppreference.com/w/cpp/algorithm/copy
std::copy_if用于从源范围复制满足特定条件的元素到目标范围。它将源范围内满足给定条件的每个元素复制到目标范围,并且可以返回一个迭代器,指向它放置最后一个元素的目标范围之后的位置。类模板为
#include <algorithm>

template< class InputIt, class OutputIt, class UnaryPred >
OutputIt copy_if( InputIt first, InputIt last,
                  OutputIt d_first, UnaryPred pred );
template<class InputIt, class OutputIt, class UnaryPred> OutputIt copy_if(InputIt first, InputIt last, OutputIt d_first, UnaryPred pred) { for (; first != last; ++first) if (pred(*first)) { *d_first = *first; ++d_first; } return d_first; }模板参数为
first、last:要复制的元素范围d_first:目标范围的起始pred:函数对象,用于判断要复制的元素是否满足条件
示例:
#include <algorithm> // 包含 std::copy_if
#include <vector>
#include <iostream>

bool isEven(int value) {
    return value % 2 == 0;
}

int main() {
    std::vector<int> source = {1, 2, 3, 4, 5, 6, 7, 8, 9, 10};
    std::vector<int> destination;

    // 复制源中的偶数到目标
    auto last = std::copy_if(source.begin(), source.end(), std::back_inserter(destination), isEven);

    // 输出复制的元素
    std::cout << "Even numbers: ";
    for (int num : destination) {
        std::cout << num << " ";
    }
    std::cout << std::endl;

    return 0;
}
// 输出结果: Even numbers: 2 4 6 8 10
排序算法:
排序算法用于对容器中的元素进行排序,改变输入序列中元素的顺序(容器中的元素需要支持大小判断)
- 排序:sort、unique
-
sort:排序
详细内容可查看:https://zh.cppreference.com/w/cpp/algorithm/sort
std::sort用于以指定排序方式(默认为非降序排序)排序范围中的元素。不保证维持相等元素的顺序(不稳定的)。类模板为:
#include <algorithm>

template< class RandomIt >
void sort( RandomIt first, RandomIt last );

template< class RandomIt, class Compare >
void sort( RandomIt first, RandomIt last, Compare comp );
模板参数说明:
first、last:要排序的元素范围comp:比较函数对象。如默认的非降序排序,在第一参数小于第二参数时返回true。
示例:
#include <algorithm>
#include <array>
#include <functional>
#include <iostream>

bool compare(int a, int b)
{
    return a < b;
}

int main()
{
    std::array<int, 10> s = {5, 7, 4, 2, 8, 6, 1, 9, 0, 3};

    auto print = [&s](const std::string  rem)
    {
        for (auto a : s)
            std::cout << a << ' ';
        std::cout << ":" << rem << '\n';
    };

    std::sort(s.begin(), s.end());
    print("用默认的 operator< 排序");

    std::sort(s.begin(), s.end(), std::greater<int>());
    print("用标准库比较函数对象排序");

    struct
    {
        bool operator()(int a, int b) const { return a < b; }
    }
    customLess;

    std::sort(s.begin(), s.end(), customLess);
    print("用自定义函数对象排序");


    std::sort(s.begin(), s.end(), [](int a, int b)
                                  {
                                      return a > b;
                                  });
    print("用 lambda 表达式排序");


    std::sort(s.begin(), s.end(), compare);
    print("用 自定义比较函数 排序");
}
运行结果:
0 1 2 3 4 5 6 7 8 9 :用默认的 operator< 排序 9 8 7 6 5 4 3 2 1 0 :用标准库比较函数对象排序 0 1 2 3 4 5 6 7 8 9 :用自定义函数对象排序 9 8 7 6 5 4 3 2 1 0 :用 lambda 表达式排序 0 1 2 3 4 5 6 7 8 9 :用 自定义比较函数 排序 -
unique:用于去除连续重复的元素
详细内容可查看:https://en.cppreference.com/w/cpp/algorithm/unique
std::unique用于去除连续重复的元素,并将所有未重复的元素移动到容器的前面,返回指向范围新结尾的尾后迭代器。如果想移除容器中所有重复元素,需要先排序在去重。调用unique之后通常跟随调用容器的erase成员函数来从容器中实际移除元素。类模板一及实现:
#include <algorithm>

template< class ForwardIt >
ForwardIt unique( ForwardIt first, ForwardIt last );
template<class ForwardIt> ForwardIt unique(ForwardIt first, ForwardIt last) { if (first == last) return last; ForwardIt result = first; while (++first != last) if (!(*result == *first) && ++result != first) *result = std::move(*first); return ++result; }类模板二及其实现:
#include <algorithm>

template< class ForwardIt, class BinaryPred >
ForwardIt unique( ForwardIt first, ForwardIt last, BinaryPred p );
template<class ForwardIt, class BinaryPredicate> ForwardIt unique(ForwardIt first, ForwardIt last, BinaryPredicate p) { if (first == last) return last; ForwardIt result = first; while (++first != last) if (!p(*result, *first) && ++result != first) *result = std::move(*first); return ++result; }模板参数说明:
first、last:要处理的元素范围p:若元素应被当作相等则返回true
示例:
#include <algorithm>
#include <iostream>
#include <vector>

int main()
{
    // 含有数个重复元素的 vector
    std::vector<int> v{1, 2, 1, 1, 3, 3, 3, 4, 5, 4};
    auto print = [&] (int id)
    {
        std::cout << "@" << id << ": ";
        for (int i : v)
            std::cout << i << ' ';
        std::cout << '\n';
    };
    print(1);

    // 移除相继(毗邻)的重复元素
    auto last = std::unique(v.begin(), v.end());
    // v 现在保有 {1 2 1 3 4 5 4 x x x},其中 x 不确定
    v.erase(last, v.end());
    print(2);

    // sort 后 unique 以移除所有重复
    std::sort(v.begin(), v.end()); // {1 1 2 3 4 4 5}
    print(3);

    last = std::unique(v.begin(), v.end());
    // v 现在保有 {1 2 3 4 5 x x},其中 x 不确定
    v.erase(last, v.end());
    print(4);
}
运行结果:
@1: 1 2 1 1 3 3 3 4 5 4
@2: 1 2 1 3 4 5 4
@3: 1 1 2 3 4 4 5
@4: 1 2 3 4 5
C++标准库中还有其他算法,诸如:
搜索算法:对容器中的元素进行搜索,
如:
binary_search:在已排序的容器中进行二分查找。集合算法:用于执行集合操作
set_union:计算两个集合的并集。set_intersection:计算两个集合的交集。数值算法:用于数值计算
inner_product:计算两个容器中相应元素乘积的累加。partial_sum:计算容器中元素的部分和。
2.迭代器分类
泛型算法使用迭代器实现元素访问。泛型算法中的迭代器分类是根据它们能够执行的操作来定义的,每种迭代器都提供了不同的功能和性能保证。

- 输入迭代器:可读,可递增,典型应用为 find 算法
- 输出迭代器:可写,可递增,典型应用为 copy 算法
- 前向迭代器:可读写,可递增,典型应用为 replace 算法
- 双向迭代器:可读写,可递增递减,典型应用为 reverse 算法
- 随机访问迭代器:可读写,可增减一个整数,典型应用为 sort 算法
一些算法会根据迭代器类别的不同引入相应的优化:如 distance 算法。
distance 算法可查看:https://zh.cppreference.com/w/cpp/iterator/distance
类模板:
#include <iterator>

template< class InputIt >
typename std::iterator_traits<InputIt>::difference_type
    distance( InputIt first, InputIt last );
namespace detail { template<class It> constexpr // C++17 起要求 typename std::iterator_traits<It>::difference_type do_distance(It first, It last, std::input_iterator_tag) { typename std::iterator_traits<It>::difference_type result = 0; while (first != last) { ++first; ++result; } return result; } template<class It> constexpr // C++17 起要求 typename std::iterator_traits<It>::difference_type do_distance(It first, It last, std::random_access_iterator_tag) { return last - first; } } // namespace detail template<class It> constexpr // C++17 起 typename std::iterator_traits<It>::difference_type distance(It first, It last) { return detail::do_distance(first, last, typename std::iterator_traits<It>::iterator_category()); }模板参数为
first:指向首元素的迭代器last:指向尾元素的迭代器返回两个迭代器之间所需的自增数
一些特殊的迭代器:
在C++中,迭代器是访问容器中元素的一种机制。除了普通的迭代器,还有一些特殊的迭代器,它们提供了特定的功能和用途:
-
插入迭代器:back_insert_iterator / front_insert_iterator / insert_iterator
-
back_insert_iterator:用于在容器末尾插入元素
详细内容可参考:https://zh.cppreference.com/w/cpp/iterator/back_insert_iterator
示例:
#include <vector> #include <iterator> std::vector<int> v; std::back_insert_iterator<std::vector<int>> it(std::back_inserter(v)); *it = 1; // 在v的末尾插入1 ++it; // 移动插入迭代器 *it = 2; // 在v的末尾插入2 -
front_insert_iterator:用于在容器的开头插入元素
详细内容可参考:https://en.cppreference.com/w/cpp/iterator/front_insert_iterator
示例:
#include <list> #include <iterator> std::list<int> lst; std::front_insert_iterator<std::list<int>> it(std::front_inserter(lst)); *it = 1; // 在lst的开头插入1 ++it; *it = 2; // 在lst的开头插入2 -
insert_iterator:用于在指定位置插入元素
详细内容可参考:https://zh.cppreference.com/w/cpp/iterator/insert_iterator
示例:
#include <vector>
#include <iterator>

std::vector<int> v = {1, 2, 3};
std::vector<int>::iterator pos = v.begin() + 1;
std::insert_iterator<std::vector<int>> it(std::inserter(v, pos));
*it = 4; // 在位置pos插入4
++it;
*it = 5; // 在位置pos之后插入5
-
-
流迭代器:istream_iterator / ostream_iterator
-
istream_iterator :用于从输入流读取元素
详细内容可参考:https://en.cppreference.com/w/cpp/iterator/istream_iterator
示例:
#include <iostream> #include <iterator> #include <sstream> int main() { std::istringstream str{"1 2 3 4 5"}; std::istream_iterator<int> x{str}; std::cout << *x << std::endl; //1 ++x; std::cout << *x << std::endl; //2 } -
ostream_iterator:用于向输出流写入元素
详细内容可参考:https://zh.cppreference.com/w/cpp/iterator/ostream_iterator
示例:
#include <iostream>
#include <iterator>
#include <algorithm>
#include <numeric>

int main()
{
    std::ostream_iterator<char> oo{std::cout};
    std::ostream_iterator<int> i1{std::cout, ", "};
    std::fill_n(i1, 5, -1);
    *oo++ = '\n';
}
运行结果:
-1, -1, -1, -1, -1, -
反向迭代器
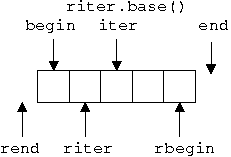
示例:
#include <iostream> #include <vector> #include <iterator> #include <numeric> int main() { std::vector<int> x{1, 2, 3, 4, 5}; std::copy(x.rbegin(), x.rend(), std::ostream_iterator<int>(std::cout, ", ")); //5,4,3,2,1 } -
移动迭代器:move_iterator
详细内容可参考:https://zh.cppreference.com/w/cpp/iterator/move_iterator
#include <algorithm>
#include <iomanip>
#include <iostream>
#include <iterator>
#include <ranges>
#include <string>
#include <string_view>
#include <vector>

void print(const std::string_view rem, const auto& v)
{
    std::cout << rem;
    for (const auto& s : v)
        std::cout << std::quoted(s) << ' ';
    std::cout << '\n';
};

int main()
{
    std::vector<std::string> v{"this", "_", "is", "_", "an", "_", "example"};
    print("vector 的旧内容:", v);
    std::string concat;
    for (auto begin = std::make_move_iterator(v.begin()),
              end = std::make_move_iterator(v.end());
         begin != end; ++begin)
    {
        std::string temp{*begin}; // moves the contents of *begin to temp
        concat += temp;
    }

    // 从 C++17 起引入了类模板实参推导,可以直接使用 std::move_iterator 的构造函数:
    // std::string concat = std::accumulate(std::move_iterator(v.begin()),
    //                                      std::move_iterator(v.end()),
    //                                      std::string());

    print("vector 的新内容:", v);
    print("拼接成字符串:", std::ranges::single_view(concat));
}
运行结果:
vector 的旧内容:"this" "_" "is" "_" "an" "_" "example"
vector 的新内容:"" "" "" "" "" "" ""
拼接成字符串:"this_is_an_example"
-
迭代器与哨兵(C++20):
哨兵(Sentinel)是C++20中引入的一个新概念,它提供了一种更灵活的方式来指定容器或序列的结束。哨兵可以是一个迭代器,也可以是任何可以与迭代器一起工作以表示范围结束的对象。
示例:假设有一个容器和一个哨兵,遍历这个容器直到哨兵指定的位置
#include <iostream>
#include <vector>

class Sentinel {
public:
    Sentinel(size_t limit) : limit_(limit) {}
    bool operator!=(const size_t& value) const { return value < limit_; }
private:
    size_t limit_;
};

int main() {
    std::vector<int> v = {1, 2, 3, 4, 5};
    Sentinel s(3); // 哨兵,表示遍历到第三个元素为止

    for (size_t i = 0; s != i; ++i) {
        std::cout << v[i] << " ";
    }
    // 输出结果: 1 2 3
    return 0;
}
Sentinel 类定义了一个哨兵,它在遍历达到限制值时停止。在 main 函数中,我们使用哨兵 s 来控制循环的结束条件。
并发算法(C++17 / C++20):
详细内容可参考:https://zh.cppreference.com/w/cpp/algorithm/execution_policy_tag_t
C++并发算法是C++17标准引入的一部分,旨在提供一种更简便的方式来并行化算法的执行。这些算法可以利用多核处理器的计算能力,提高程序的性能。这些并发策略定义在<execution>头文件中,并且与标准算法一起使用。下面介绍并发策略
-
std::execution::seq(C++17)这个策略指示算法以顺序方式执行,不进行并行化。这是默认的执行策略,即使不显式指定,算法也会以这种方式执行。
-
std::execution::par(C++17)这个策略指示算法以并行方式执行,但可能使用非顺序的内存访问。这意味着算法可能会在多个线程上同时执行,但不会保证对共享内存的访问顺序。
-
std::execution::par_unseq(C++17)这个策略指示算法以并行方式执行,并且可以完全忽略内存顺序。这是最激进的并行策略,算法可以在任何线程上执行任何操作,且不对内存访问顺序做任何保证。
-
std::execution::unseq(C++20)这个策略指示算法可以以未序列化的方式执行,但不一定并行。这意味着算法可能会重叠操作,但不会创建额外的线程。
注意:
在使用并行执行策略时,避免数据竞争和死锁是程序员的责任。
并发算法的使用需要编译器支持C++17或更高版本,并可能需要特定的编译器标志来启用并发支持。
如在Linux上需要加
-O3与-ltbb
示例:
#include <iostream>
#include <algorithm>
#include <chrono>
#include <random>
#include <ratio>
#include <vector>
#include <execution>

int main()
{
    std::random_device rd;

    std::vector<double> vals{10000000};
    for (auto& d : vals)
    {
        d = static_cast<double>(rd());
    }

    for (int i =0; i < 5; ++i)
    {
        using namespace std::chrono;
        std::vector<double> sorted{vals};
        const auto startTime = high_resolution_clock::now();
        std::sort(std::execution::par, sorted.begin(), sorted.end());
        const auto endTime = high_resolution_clock::now();
        std::cout << "Latency: "
                  << duration_cast<duration<double, std::milli>>(endTime - startTime).count()
                  << std::endl;
    }
}
二、bind与lambda表达式
在C++中,许多标准库算法允许通过传递可调用对象(Callable Objects)来自定义计算逻辑的细节。这些可调用对象可以是函数、lambda表达式、函数对象或任何可调用的模板实例。使用可调用对象提供了一种高度灵活的方式来定义算法的具体操作,而无需修改算法本身的实现。
以下是一些常见的C++算法,它们接受可调用对象作为参数:
std::for_eachstd::transformstd::accumulatestd::sortstd::copy_ifstd::remove_ifstd::find_if
如何定义可调用对象,有如下几种方式:
- 函数指针:概念直观,但定义位置受限(C++不支持在函数中定义函数)
- 类:功能强大,但书写麻烦
- bind :基于已有的逻辑灵活适配,但描述复杂逻辑时语法可能会比较复杂难懂,可能需要bind套bind
- lambda 表达式:小巧灵活,功能强大
1.bind
详细内容可参考:https://zh.cppreference.com/w/cpp/utility/functional/bind
在C++中,std::bind 是一个函数模板,它用于修改可调用对象的调用方式(通常称为绑定器),这个绑定器可以固定一个或多个参数,并且可以稍后与剩余的参数一起被调用。std::bind 定义在 <functional> 头文件中。
类模板定义:
#include <functional>

template< class F, class... Args >
/* unspecified */ bind( F&& f, Args&&... args );
模板参数说明:
-
f:可调用的对象(如函数、函数对象、lambda表达式)。 -
args:要绑定实参的列表,这里面可能会用到占位符如:
std::placeholders::_1,std::placeholders::_2等,用于在绑定时保留位置,这些占位符可以被后续调用时提供的参数替换,如:_1表示后续调用时传入的第一个参数
缺点:
-
调用
std::bind时,传入的参数会被复制,这可能会产生一些调用风险,如#include <functional> #include <iostream> void Myproc(int *ptr) { } auto fun() { int x; return std::bind(Myproc, &x); } int main() { auto ptr = fun(); //固定的参数为局部对象,有危险,可以尝试使用智能指针shared_ptr } -
可以使用
std::ref或std::cref避免复制的行为#include <functional> #include <iostream> void Proc(int& x) { ++x; } int main() { int x = 0; auto b = std::bind(Proc, std::ref(x)); b(); std::cout << x << std::endl; //1,若不加std::ref,则返回0 }
示例1:使用占位符
#include <functional>
#include <iostream>

int reduce(int a, int b) {
    return a - b;
}

int main() {
    using namespace std::placeholders;
    // 绑定函数reduce和占位符_1, _2
    auto reducer_1 = std::bind(reduce, 10, _1);
    auto reducer_2 = std::bind(reduce, _1, 10);
    auto reducer_3 = std::bind(reduce, _1, _2);

    std::cout << reducer_1(20) << " " << reducer_2(20) << " " << reducer_3(5, 3) << std::endl;
    return 0;
}
运行结果:
-10 10 2
示例2:绑定成员函数
#include <functional>
#include <iostream>

class Counter {
public:
    int count() const { return count_; }
    void increment() { ++count_; }
private:
    int count_ = 0;
};

int main() {
    Counter c;
    auto boundIncrement = std::bind(&Counter::increment, &c);
    boundIncrement(); // 调用Counter的increment成员函数
    std::cout << c.count() << std::endl; // 输出: 1
    return 0;
}
示例3:绑定lambda表达式
#include <functional>
#include <iostream>

int main() {
    auto add = [](int a, int b) { return a + b; };
    auto addFive = std::bind(add, std::placeholders::_1, 5);
    std::cout << addFive(3) << std::endl; // 输出: 8
    return 0;
}
std::bind_front(C++20引入):std::bind 的简化形式
详细内容可参考:https://en.cppreference.com/w/cpp/utility/functional/bind_front
2.lambda表达式
详细内容可参考:https://zh.cppreference.com/w/cpp/language/lambda
参考书籍:《C++ Lambda Story》
C++ lambda 表达式是一种便捷的匿名函数语法,允许你在需要时快速定义一个函数对象,而无需显式定义一个完整的函数或函数对象类。自C++11标准引入lambda表达式以来,它们在后续的C++标准中得到了持续的更新和增强。
- C++11 引入 lambda 表达式
- C++14 支持初始化捕获、泛型 lambda
- C++17 引入 constexpr lambda , *this 捕获
- C++20 引入 concepts ,模板 lambda
lambda 表达式会被编译器翻译成类进行处理
这个用C++ Insights来分析。
lambda表达式定义了一个匿名函数,并且可以捕获一定范围内的变量。语法形式如下:
[caputer list] (parameters) mutable throw() -> return type{ statement }
各部分介绍:
caputer list是捕获列表。在C++规范中也称为lambda导入器,捕获列表总是出现在lambda函数的开始处。实际上,[]是Lambda引出符。编译器根据该引出符判断接下来的代码是否是lambda函数,捕获列表能够捕捉上下文中的变量以供lambda函数使用。parameters是参数列表。与普通函数的参数列表一致。如果不需要参数传递,则可以连同括号“()”一起省略。mutable关键字。默认情况下Lambda函数总是一个const函数,mutable可以取消其常量性。加上mutable关键字后,可以修改传递进来的拷贝,在使用该修饰符时,参数列表不可省略(即使参数为空)。throw是异常说明。用于Lamdba表达式内部函数抛出异常。return type是返回值类型。 追踪返回类型形式声明函数的返回类型。我们可以在不需要返回值的时候也可以连同符号”->”一起省略。此外,在返回类型明确的情况下,也可以省略该部分,让编译器对返回类型进行推导。statement是Lambda表达式的函数体。内容与普通函数一样,不过除了可以使用参数之外,还可以使用所有捕获的变量。
注意:可以忽略参数列表和返回类型,但必须永远包含捕获列表和函数体
lambda 表达式的基本组成部分:
-
参数与函数体
Lambda表达式可以有零个或多个参数,并包含一个由花括号
{}包围的函数体。如:[](int x, int y) { return x + y; } -
返回类型
Lambda的返回类型可以显式指定,也可以由编译器根据函数体推断。如果函数体中只有一个返回语句,并且没有其他语句,编译器可以自动推断返回类型。
[](int x, int y) -> int { return x + y; } -
捕获:针对函数体中使用的局部自动对象进行捕获
-
值捕获
值捕获意味着捕获的变量通过值传递给lambda表达式,即在lambda表达式中创建了这些变量的副本。因此,lambda表达式中使用的是这些变量的副本,而不是原始变量本身。
void func()
{
	size_t v1 = 42;//局部变量
	//将 v1 拷贝到名为 f 的可调用对象
	auto f = [v1]{return v1;};
	v1 = 0;
	auto j = f();//j为42;f保存了我们创建它时 v1 的拷贝
}
由于被捕获变量的值是在创建时拷贝,因此随后对其求改不会影响到 lambda 内对应的值。
-
引用捕获
引用捕获意味着捕获的变量通过引用传递给lambda表达式,即lambda表达式中使用的是原始变量的引用,这意味着可以在lambda内部修改这些变量的值。
void func1() { size_t v1 = 42;//局部变量 //对象 f2 包含 v1 的引用 auto f2 = [&v1]{return v1;}; v1 = 0; auto j = f2();//j为0;f2保存v1的引用,而非拷贝 }引用捕获和返回引用有着相同的问题和局限。如果我们采用引用方式捕获一个变量,就必须确保被引用的对象在 lambda 执行的时候是存在的。lambda 捕获的都是局部变量,这些变量在函数结束后就不复存在了。如果 lambda 可能在函数结束后执行,捕获的引用指向的局部变量已经消失,造成未定义行为。
-
混合捕获
混合捕获允许在同一个lambda表达式中同时使用值捕获和引用捕获。
-
隐式捕获与显示捕获
除了显式的列出我们希望使用的来自所在函数的变量之外,还可以让编译器根据 lambda 体中的代码来推断我们要使用哪些变量。为了指示编译器推断捕获列表,应在捕获列表中写一个
&或者=。&告诉编译器采用捕获引用方式,=则表示采用值捕获方式。//sz为隐式捕获,值捕获方式 wc = find_if(words.begin(), words.end(), [=](const string &s) { return s.size() >= sz; });如果我们希望对一部分变量采用值捕获,对其他变量采用引用捕获,可以混合使用隐式捕获和显式捕获:
void biggies(vecotr<string> &words, vecotr<string>::size_type sz, ostream &os = cout, char c =' '){
	//其他处理与前例一样
	//os隐式捕获,引用捕获方式;c显示捕获,值捕获方式
	for_each(words.begin(), words.end(), [&,c](const string &s){
				os << s << c;
			});
	//os显式捕获,引用捕获方式;c隐式捕获,值捕获方式
	for_each(words.begin(), words.end(), [=,&os](const string &s){
				os << s << c;
			});
}
当我们混合使用了隐式捕获和显式捕获时,捕获列表中的第一个元素必须是一个 & 或 =。此符号指定了默认捕获方式为引用或值。
当混合使用隐式捕获和显示捕获时,显示捕获的变量必须使用与隐式捕获不同的方式。即,如果隐式捕获是引用方式(使用了&)则显式捕获命名变量必须采用值方式,因此不能在其名字前使用 & 。类似的,如果隐式捕获采用的是值方式(使用了=),则显式捕获命名变量必须采用引用方式,即,在名字前使用&。
-
this 捕获(类与结构体中用到,其中
*this捕获为 C++17 中引入的)在C++中,
this捕获是lambda表达式中的一种特殊捕获形式,它允许将当前对象的指针(this指针)传递给lambda表达式。这在成员函数中特别有用,因为它们通常需要访问或修改类的状态。当在类的成员函数中定义lambda表达式时,可以使用
[*this]或[this]来捕获this指针。这允许lambda表达式访问类的成员变量和成员函数。[*this]:通过值捕获整个对象的副本。这通常用于创建线程安全的lambda表达式,因为它捕获了对象的一个独立副本。[this]:通过引用捕获this指针。这允许lambda表达式访问原始对象的状态,但不会创建对象的副本。
示例1:通过引用捕获this指针
class MyClass {
public:
    int value;

    void memberFunction() {
        // 使用this指针访问类的成员
        auto lambda = [this] {
            value += 10; // 直接修改类的成员变量
        };
        lambda(); // 执行lambda表达式
    }
};
示例2:通过值捕获整个对象的副本
class MyClass { public: int value; void memberFunction() { // 捕获对象的副本 auto lambda = [*this] { value += 10; // 修改对象副本的成员变量 }; lambda(); // 执行lambda表达式 } };lambda通过值捕获了整个MyClass对象的副本。这意味着lambda内部对value的修改不会影响原始对象的状态。注意:
在多线程环境中,通过值捕获对象(使用
[*this])可以提供线程安全性,因为每个线程操作的是对象的独立副本。 -
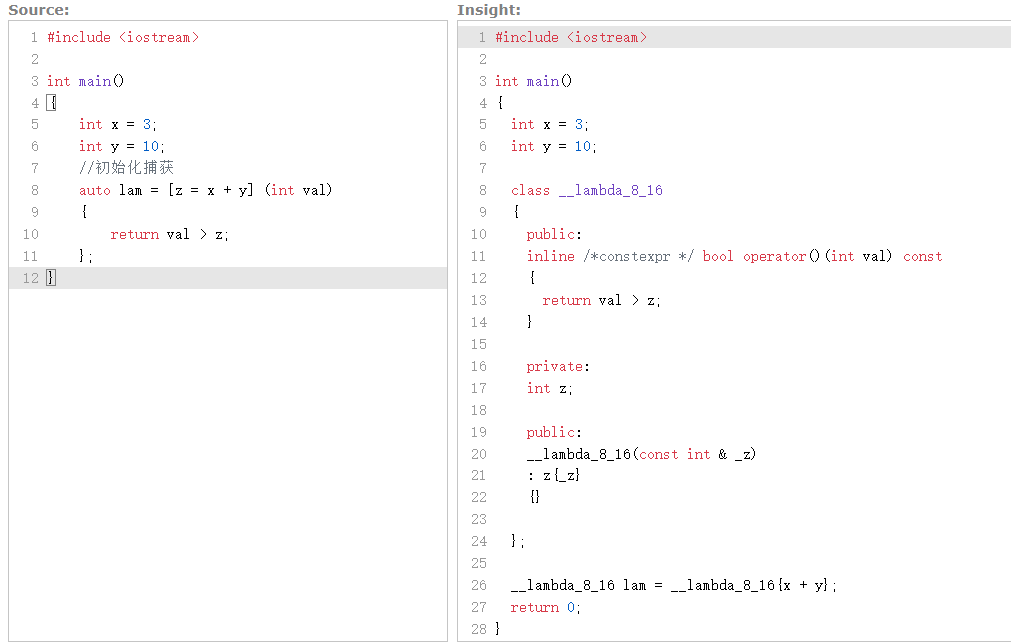
初始化捕获(C++14)
允许在捕获列表中初始化变量,而不需要在外部作用域中预先定义它们。
示例1:
#include <iostream>

int main()
{
    std::string a = "hello";
    //初始化捕获
    auto lam = [y = std::move(a)] ()
    {
    	std::cout << y << std::endl;
    };
    std::cout << a << std::endl;
    lam();
}
示例2:
#include <iostream>

int main()
{
    int x = 3;
    int y = 10;
    //初始化捕获
    auto lam = [z = x + y] (int val)
    {
    	return val > z;
    };
}
构造一个对象z用于lambda表达式,这个对象会用值捕获的 x + y来初始化。
-
-
说明符
-
mutable
mutable说明符用于lambda表达式,允许在const上下文中修改捕获的变量。通常,捕获的变量如果是通过值捕获的,那么它们在const函数中不能被修改。但是,如果lambda表达式声明为mutable,即使在const成员函数中,也可以修改这些捕获的变量。示例:
int main() { int value = 10; auto lambda = [value] (int val) mutable { value += 5; return val > value; }; lambda(5); } -
constexpr(C++17)
constexpr说明符用于lambda表达式,允许该lambda表达式在constexpr上下文中使用。constexpr函数或变量必须在编译时就能确定其值,因此它们可以用于常量表达式。从C++17开始,lambda表达式也可以声明为constexpr,这意味着它们的执行结果可以在编译时计算。示例:
int main() { auto lam = [](int val) constexpr { return val + 1; }; constexpr int val = lam(100); } -
consteval (C++20)
当
consteval用于lambda表达式时,它表明该lambda表达式旨在作为编译时常量表达式执行,并且其执行结果应在编译时确定。
-
lambda表达式的深入应用:
-
捕获时计算( C++14 )
在C++14中,可以在捕获列表中直接初始化变量,这被称为捕获时计算。这意味着可以在捕获时直接对变量进行计算,而不需要在外部作用域中预先定义它们。
-
即调用函数表达式( Immediately-Invoked Function Expression, IIFE )
lambda表达式创建后并立即执行
#include <iostream> int main() { int x = 3; int y = 10; //初始化捕获 const auto val = [z = x + y] (l) { return z; }(); } -
使用 auto 避免复制( C++14 )
在C++14中,你可以在参数列表中使用
auto关键字,这样lambda表达式将尝试避免创建参数的副本int main() { auto lam = [](auto x) { return x + 1; }; }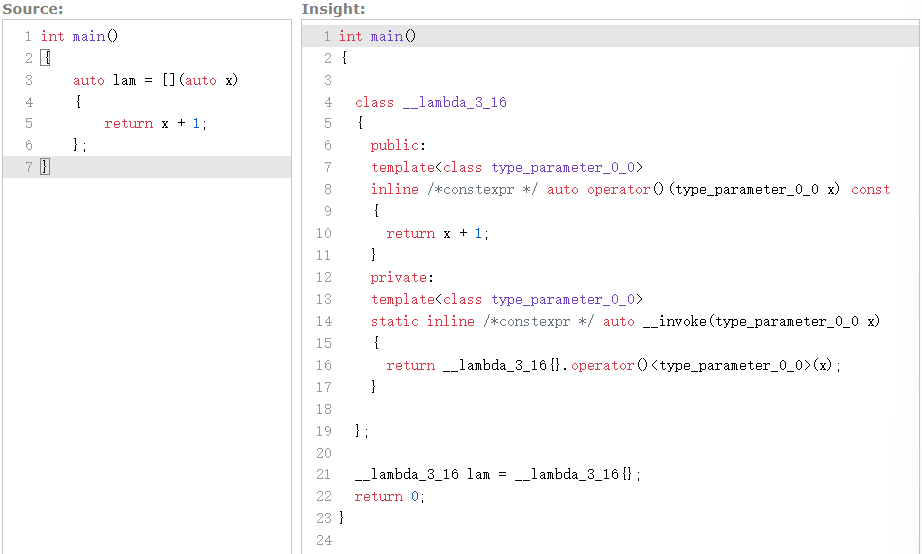
-
Lifting( C++14 )一种技巧,参数列表中使用
auto关键字,会被编译器定义成模板参数,因此,可传入不同类型参数,且调用对应的fun()函数。示例:
#include <iostream> #include <functional> #include <map> auto fun(int val) { return val + 1; } auto fun(double val) { return val + 1; } int main() { auto lam = [](auto x) { return fun(x); }; std::cout << fun(3) << std::endl; //4 std::cout << fun(3.5) << std::endl; //4.5 } -
递归调用( C++14 )
Lambda表达式可以递归地调用自身,只要它们捕获了自身或者通过其他方式在函数体内是可访问的。
示例:
#include <iostream>

int main()
{
    auto factorial = [](int n)
    {
        auto f_impl = [](int n, const auto& impl) ->int
        {
            return n > 1 ? n * impl(n-1, impl) : 1;
        };
        return f_impl(n, f_impl);
    };

}
编译器可以翻译成:
#include <iostream>

int main()
{

  class __lambda_5_22
  {
    public:
    inline int operator()(int n) const
    {

      class __lambda_7_23
      {
        public:
        template<class type_parameter_0_0>
        inline int operator()(int n, const type_parameter_0_0 & impl) const
        {
          return n > 1 ? n * impl(n - 1, impl) : 1;
        }

        /* First instantiated from: insights.cpp:11 */
        #ifdef INSIGHTS_USE_TEMPLATE
        template<>
        inline int operator()<__lambda_7_23>(int n, const __lambda_7_23 & impl) const
        {
          return n > 1 ? n * impl.operator()(n - 1, impl) : 1;
        }
        #endif

        private:
        template<class type_parameter_0_0>
        static inline int __invoke(int n, const type_parameter_0_0 & impl)
        {
          return __lambda_7_23{}.operator()<type_parameter_0_0>(n, impl);
        }
        public:
        // inline /*constexpr */ __lambda_7_23(__lambda_7_23 &&) noexcept = default;

      };

      __lambda_7_23 f_impl = __lambda_7_23(__lambda_7_23{});
      return f_impl.operator()(n, f_impl);
    }

    using retType_5_22 = int (*)(int);
    inline operator retType_5_22 () const noexcept
    {
      return __invoke;
    };

    private:
    static inline int __invoke(int n)
    {
      return __lambda_5_22{}.operator()(n);
    }

    public:
    // inline /*constexpr */ __lambda_5_22(__lambda_5_22 &&) noexcept = default;

  };

  __lambda_5_22 factorial = __lambda_5_22(__lambda_5_22{});
  return 0;
}
三、泛型算法的改进–ranges(c++20)
C++20 引入了 ranges 库,这是一个对标准库中的泛型算法的重大改进。ranges 库提供了一种新的方式来处理序列,特别是容器,使得代码更简洁、更安全、更易于理解。
-
使用容器而非迭代器作为输入
在 C++20 之前,标准库算法通常需要迭代器来指定容器的开始和结束。ranges 库允许直接传递整个容器作为参数,从而简化了代码。
通过 std::ranges::dangling 避免返回无效的迭代器
在某些情况下,算法可能返回一个迭代器,该迭代器在某些操作后(如容器的重新分配)变得无效。C++20 引入了
std::ranges::dangling类型,用于明确表示返回的是一个可能无效的迭代器。示例:
#include <ranges> #include <vector> #include <iostream> int main() { std::vector<int> v = {1, 2, 3, 4, 5}; auto is_even = std::ranges::views::transform([](int x) { return x % 2 == 0; }); auto evens = v | is_even; for (auto e : evens) { std::cout << (e ? "even" : "odd") << '\n'; } } -
从类型上区分迭代器与哨兵
ranges 库强化了迭代器和哨兵(sentinel)的概念,迭代器用于遍历元素,而哨兵用于表示范围的结束。这使得算法的接口更加清晰。
-
引入映射概念,简化代码编写
ranges 库引入了
std::ranges::views::transform,它允许对序列中的每个元素应用一个函数,并创建一个新的视图(view)来表示变换后的结果,而不是复制整个序列。 -
引入 view ,灵活组织程序逻辑
views 是 ranges 库的核心概念之一,它们是对原始序列的一种抽象表示,可以透明地应用变换和组合操作。views 是懒加载的,这意味着它们所代表的操作直到真正需要结果时才会执行。
示例:
#include <ranges>
#include <vector>
#include <iostream>

int main() {
    std::vector<int> v = {1, 2, 3, 4, 5};
    auto squared = std::ranges::views::transform(v, [](int x) { return x * x; });

    for (int sq : squared) {
        std::cout << sq << ' ';
    }
    std::cout << '\n';
}