文章目录
- 第一章、SpringBoot基础内容
- 一、Spring和SpringBoot
- 1、Spring介绍
- 2、SpringBoot介绍
- 二、SpringBoot2入门操作
- 1、在线构建
- 2、idea构建
- 三、浅谈自动装配的原理
- 第二章、SpringBoot核心功能
- 一、配置文件
- 1、配置文件介绍
- 2、语法规则
- 3、数据类型
- 4、案例使用
- 二、WEB开发
- 1、静态资源文件
- 2、请求参数处理
- (1)注解
- (2)其他的情况
- 3、Thymeleaf整合
- 4、日志和profile
- 三、整合MyBatis
- 四、单元测试
- 五、整合Redis
- 第三章、综合案例
- 一、表结构
- 二、项目环境创建
- 三、代码生成
- 四、整合SpringSecurity
- 五、整合静态资源
第一章、SpringBoot基础内容
前置基础内容要求:
- 熟悉SpringFramework的基本应用
- 掌握Maven的基本应用
- 具备了SSM的应用能力
- 对于第三方的组件redis、MyBatisPlus等最好有应用基础
环境要求:
- JDK8
- Maven3.6.x 及以上版本
一、Spring和SpringBoot
1、Spring介绍
Spring是一个开源的Java开发框架,是由Rod Johnson创建的。它提供了一种简化Java开发的方式,通过提供一系列的组件和工具来帮助开发者构建高效、可扩展的应用程序。
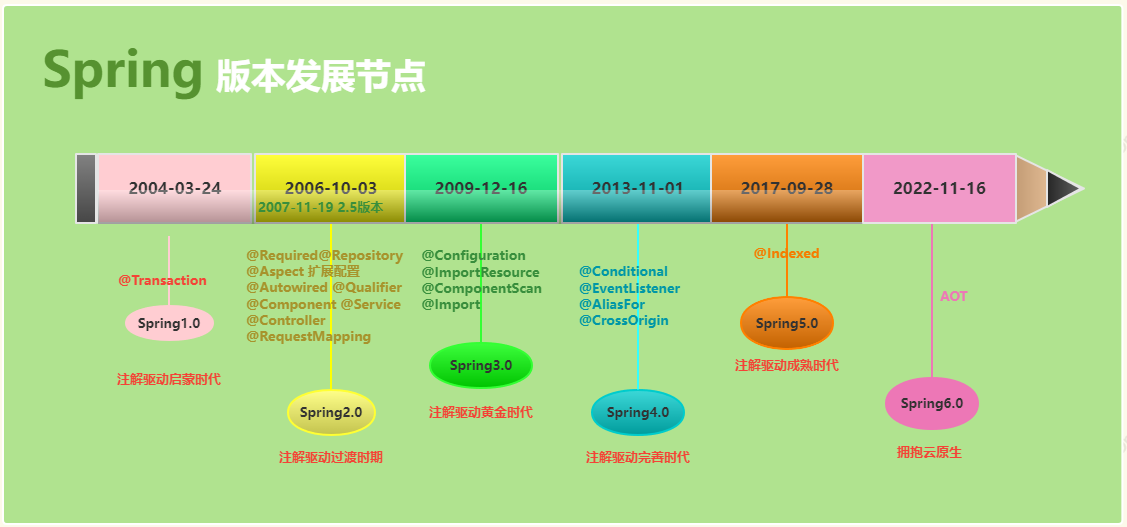
spring官网地址:https://spring.io/
2、SpringBoot介绍
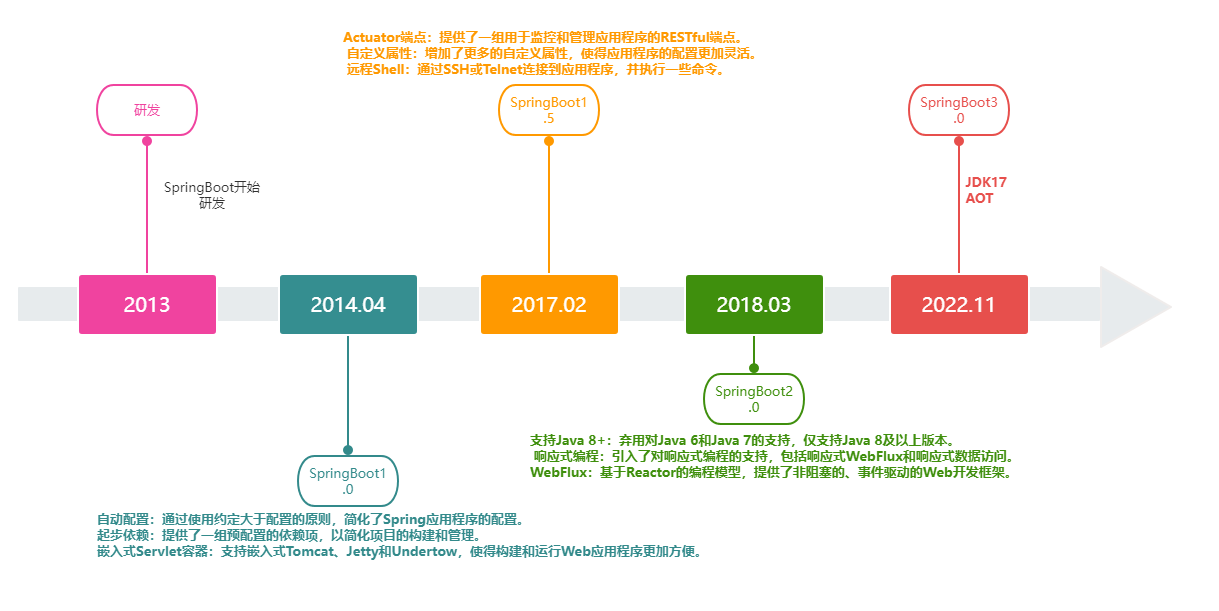
Spring Boot 是由 Pivotal 团队提供的全新框架,其设计目的是用来简化新 Spring 应用的初始搭建以及开发过程。该框架使用了特定的方式来进行配置,从而使开发人员不再需要定义样板化的配置。简单来说,就是 Spring Boot 其实不是什么新的框架,它默认配置了很多框架的使用方式,就像 Maven 整合了所有的 Jar 包,Spring Boot 整合了所有的框架。
二、SpringBoot2入门操作
1、在线构建
https://start.spring.io/
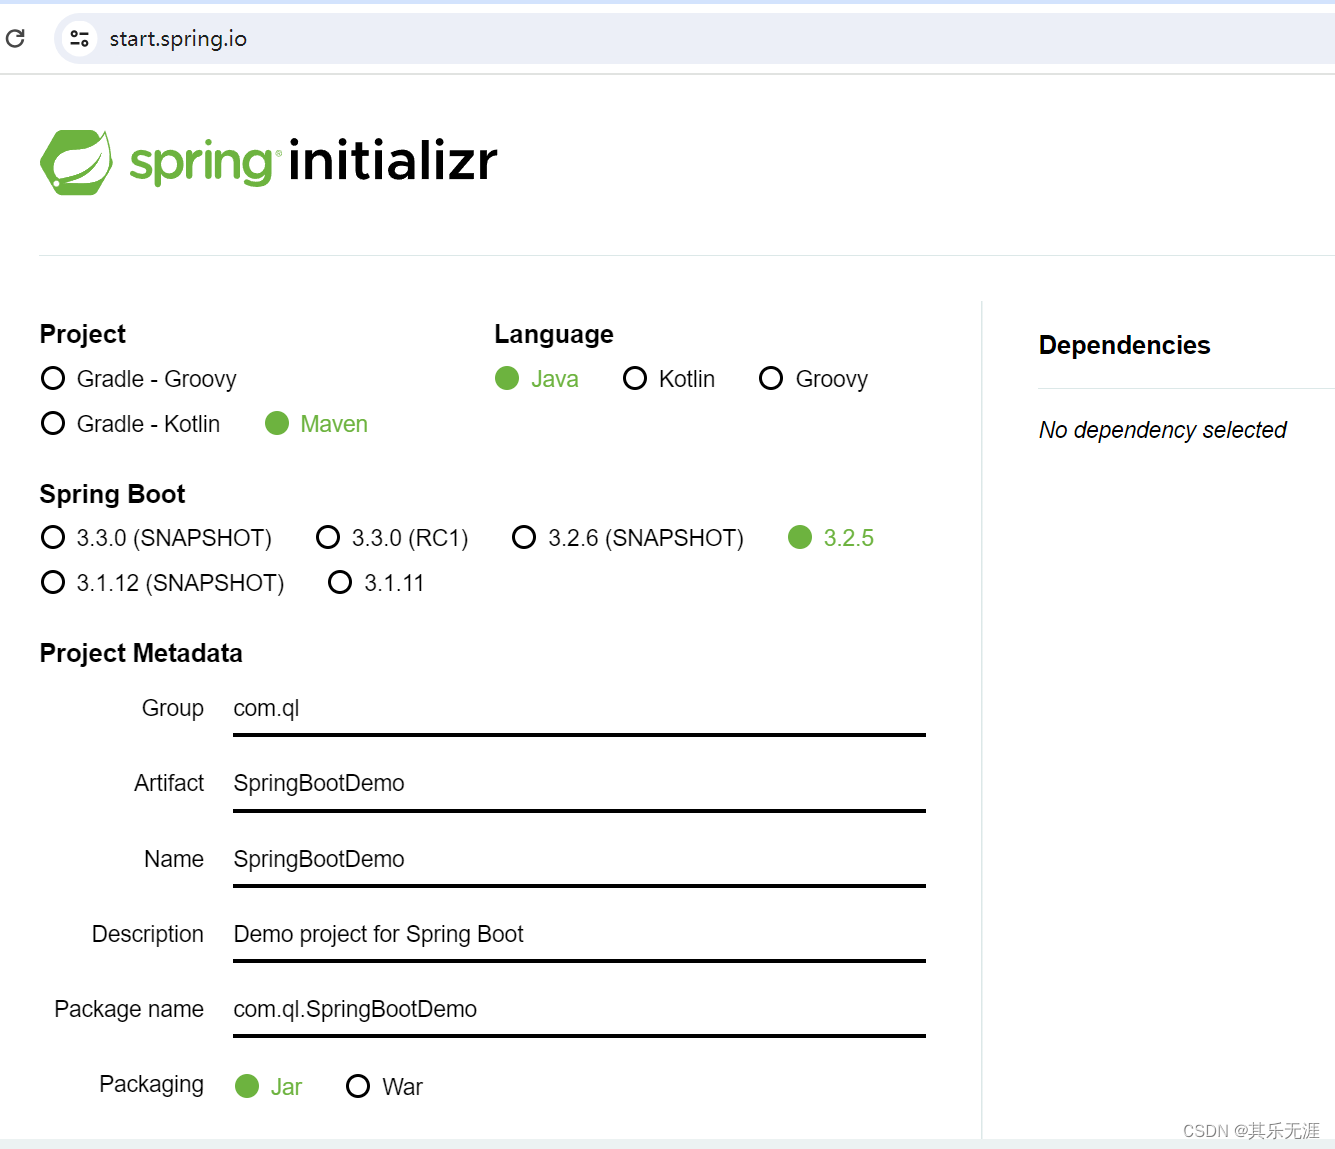
指定相关的项目信息、然后生成我们的项目代码并解压导入到idea。我们就可以通过启动类来启动我们的第一个Web项目。
2、idea构建
上面的方式需要在官网生成,对于开发并不是很友好,这时我们可以通过IDEA来帮助我们快速的构建Web项目,https://start.aliyun.com/

下一步:指定SpringBoot的版本和需要初始关联的依赖,当然我们也可以在项目创建后再单独的指定相关的依赖
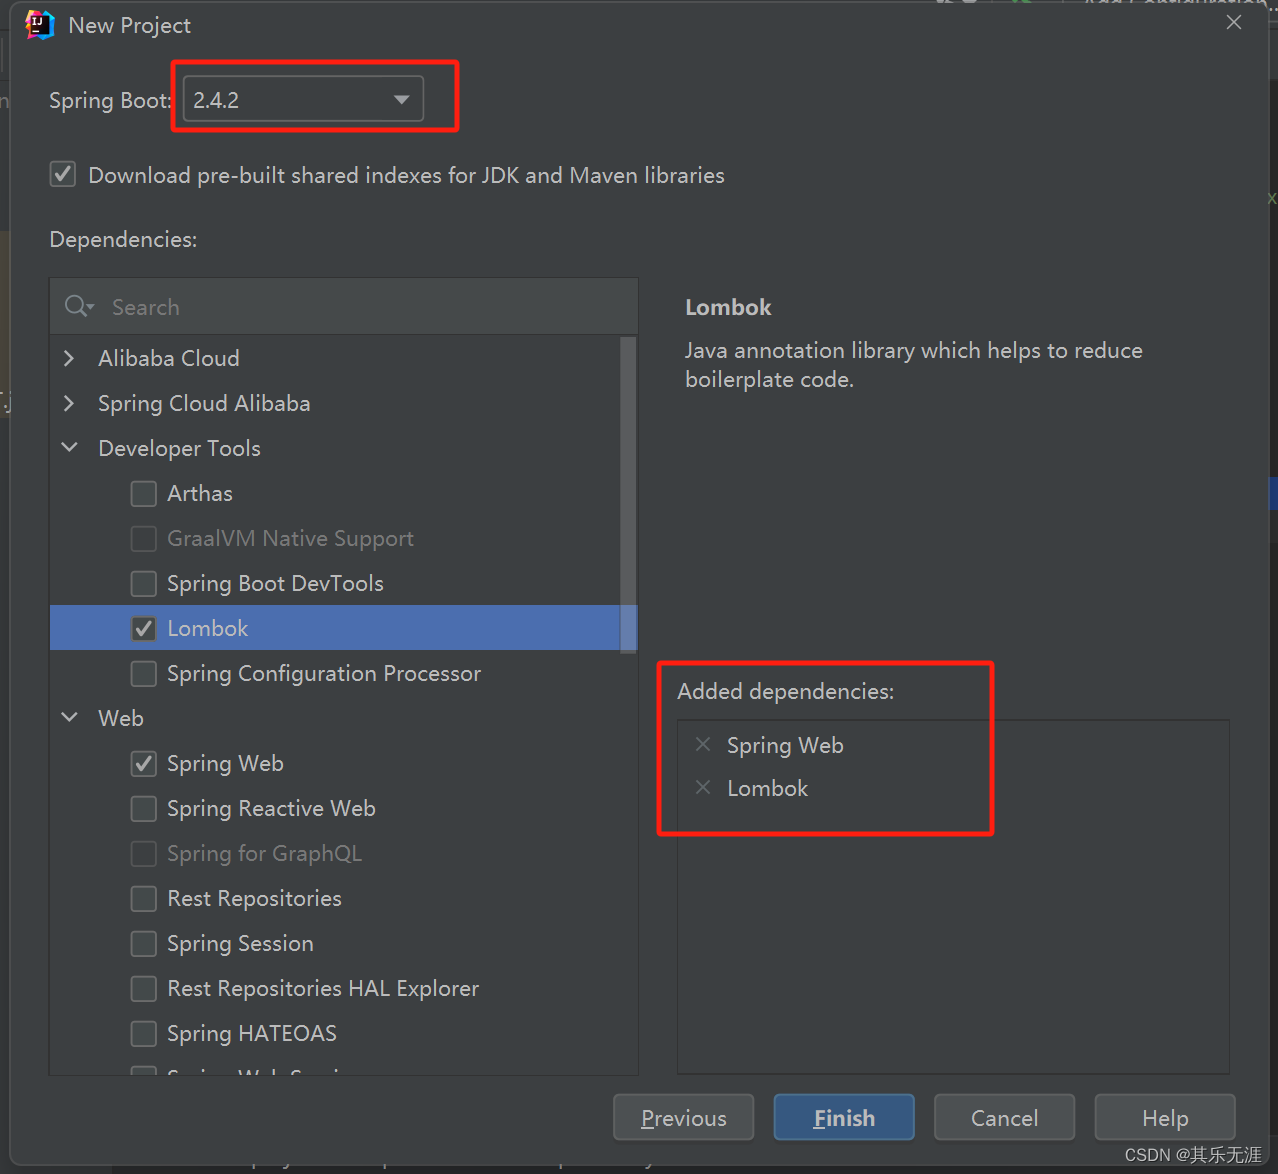
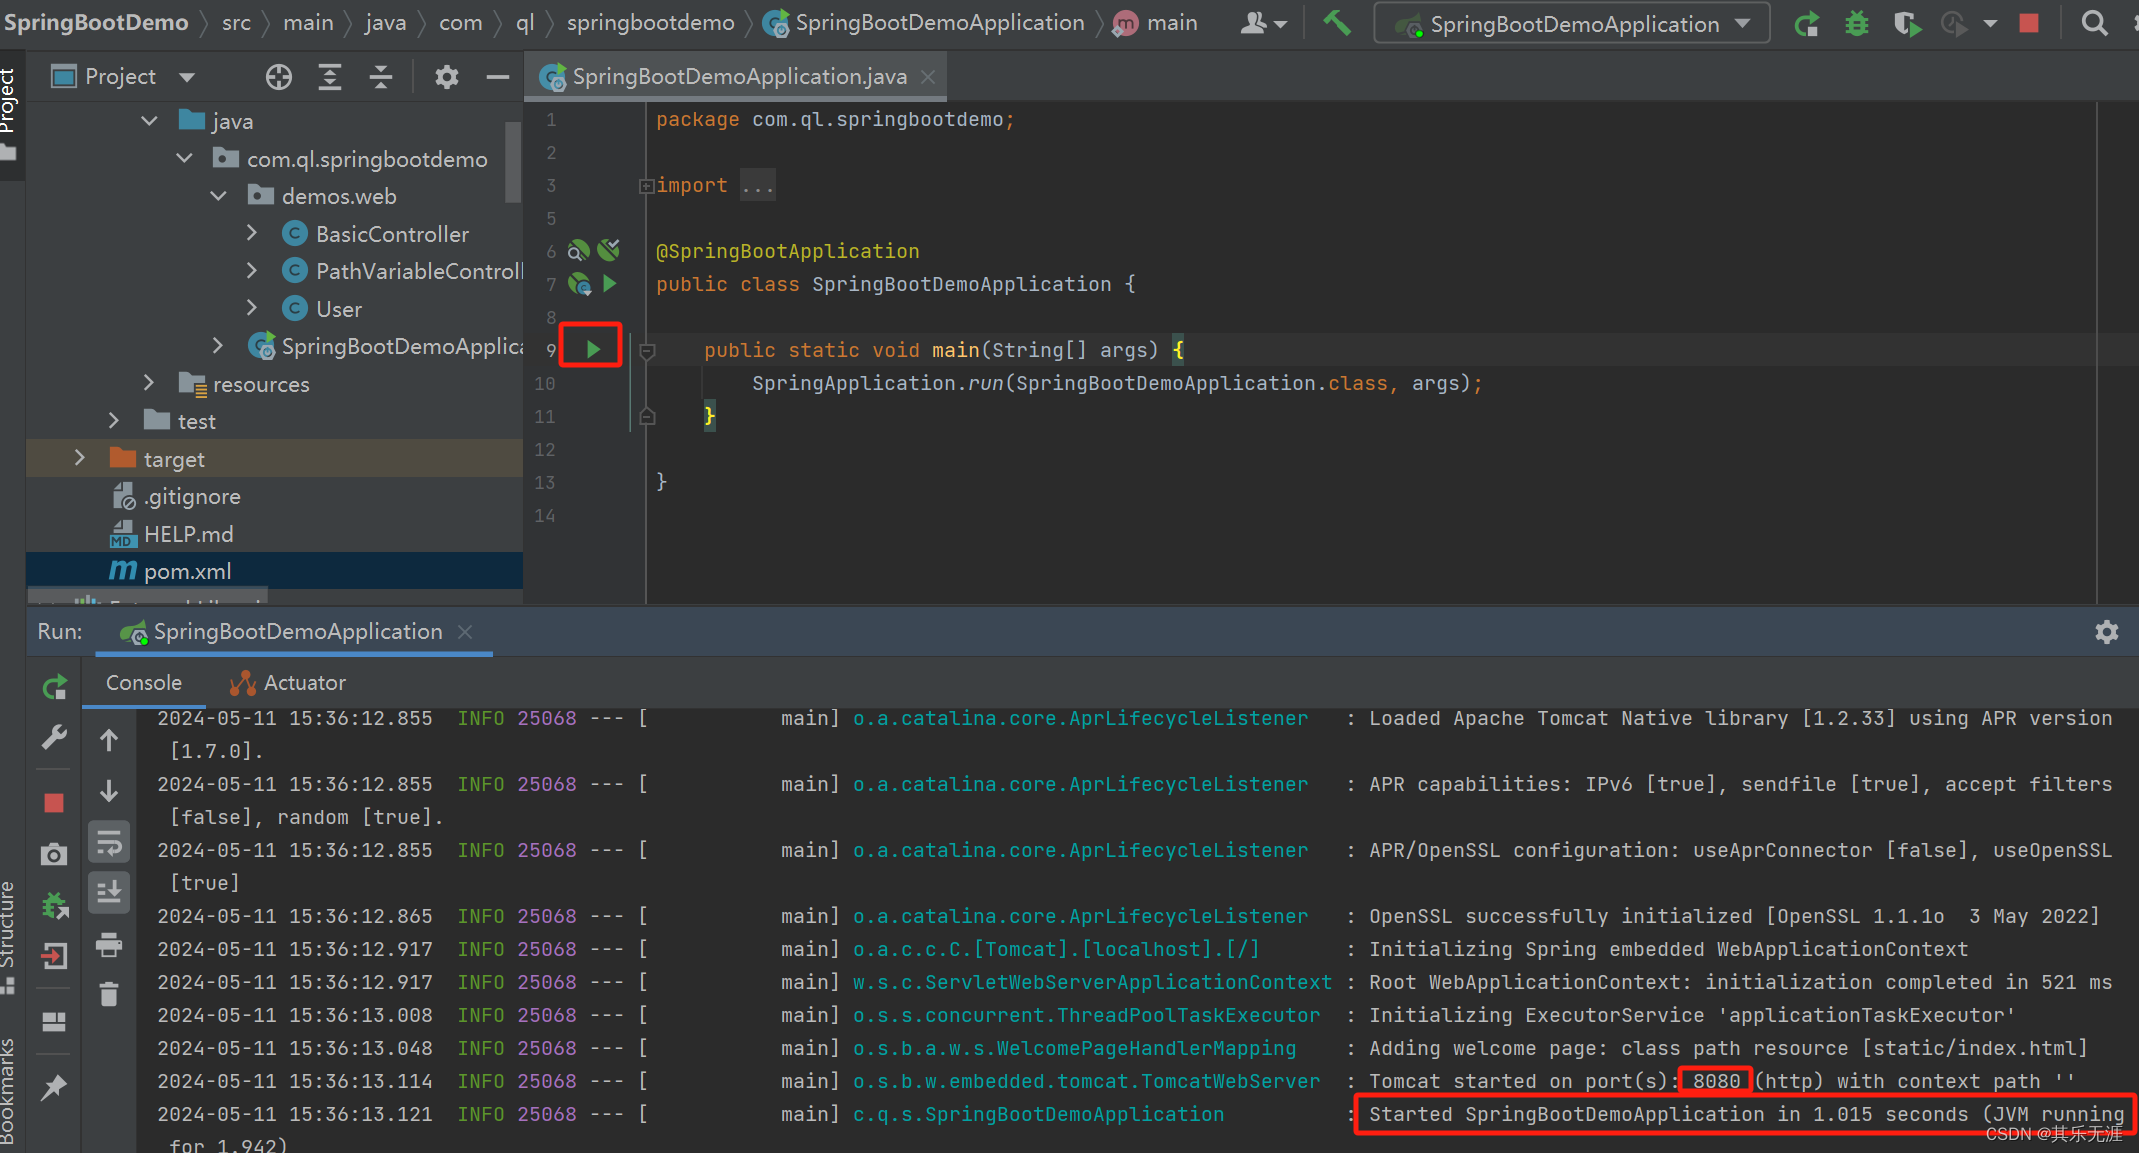
创建好项目后。我们可以直接运行启动类来启动项目:
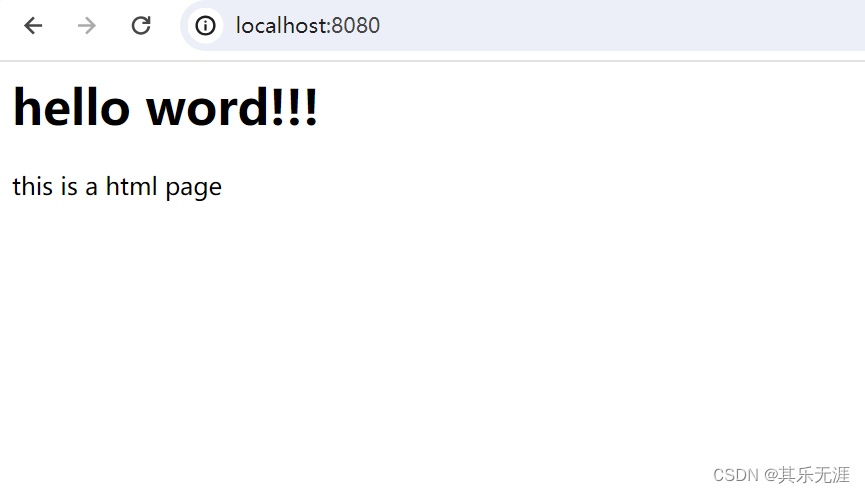
然后在地址栏中:http://localhost:8080
三、浅谈自动装配的原理
/**
 * @SpringBootApplication:是自动装配的关键
 *   是一个组合注解:
 *   @SpringBootConfiguration:@Configuration 也就是说我们的这个启动类本质上就是一个Java配置类
 *   @EnableAutoConfiguration:这个自动装配的注解 META-INF/spring.factories 中需要自动配置的Java类
 *   @ComponentScan:指定扫描路径,当前没有指定要扫描的路径。那么会加载当前启动类所在的包及其子包下的所有的@Component注解修饰的Java类
 *
 */
@SpringBootApplication
public class SpringBootDemoApplication {

    public static void main(String[] args) {
        // 本质上其实就是完成了Spring容器的初始化操作
        ApplicationContext run = SpringApplication.run(SpringBootDemoApplication.class, args);
        //System.out.println("run.getBean(BasicController.class) = " + run.getBean(BasicController.class));
        //System.out.println("run.getBean(StudentController.class) = " + run.getBean(StudentController.class));
        //ApplicationContext ac1 = new ClassPathXmlApplicationContext("");
        //ApplicationContext ac2 = new AnnotationConfigApplicationContext(SpringBootDemoApplication.class);
    }

}
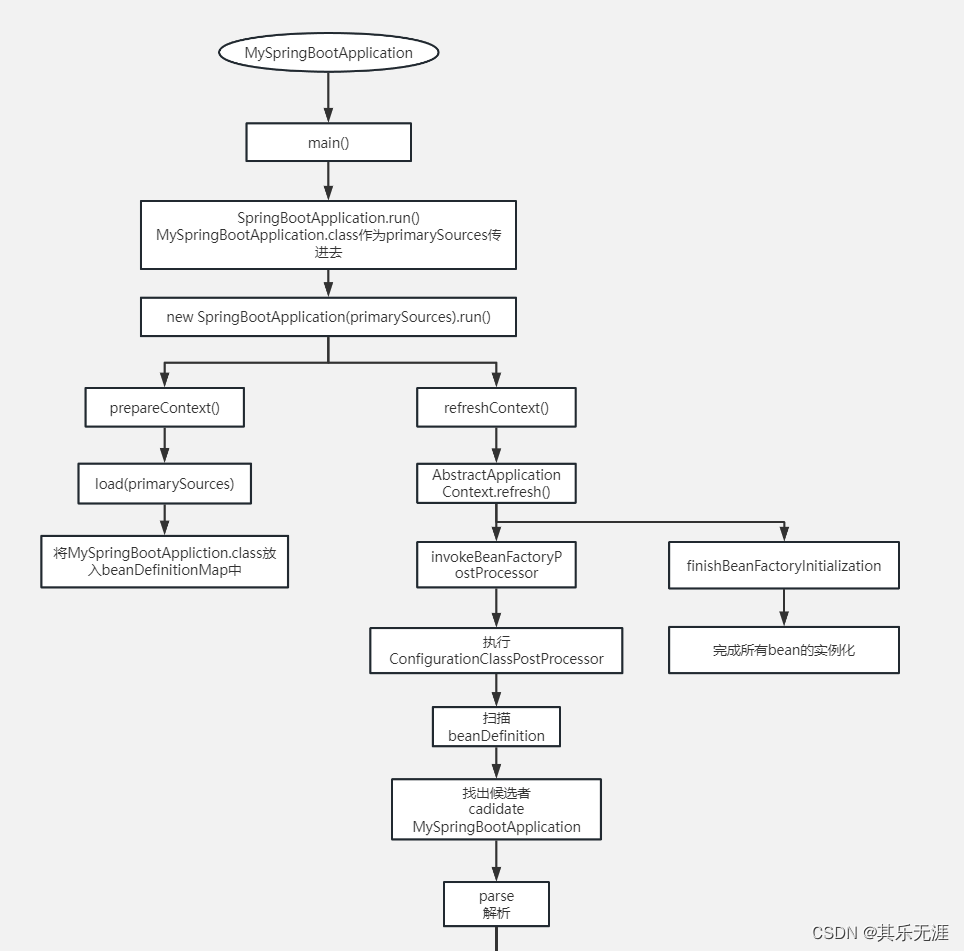
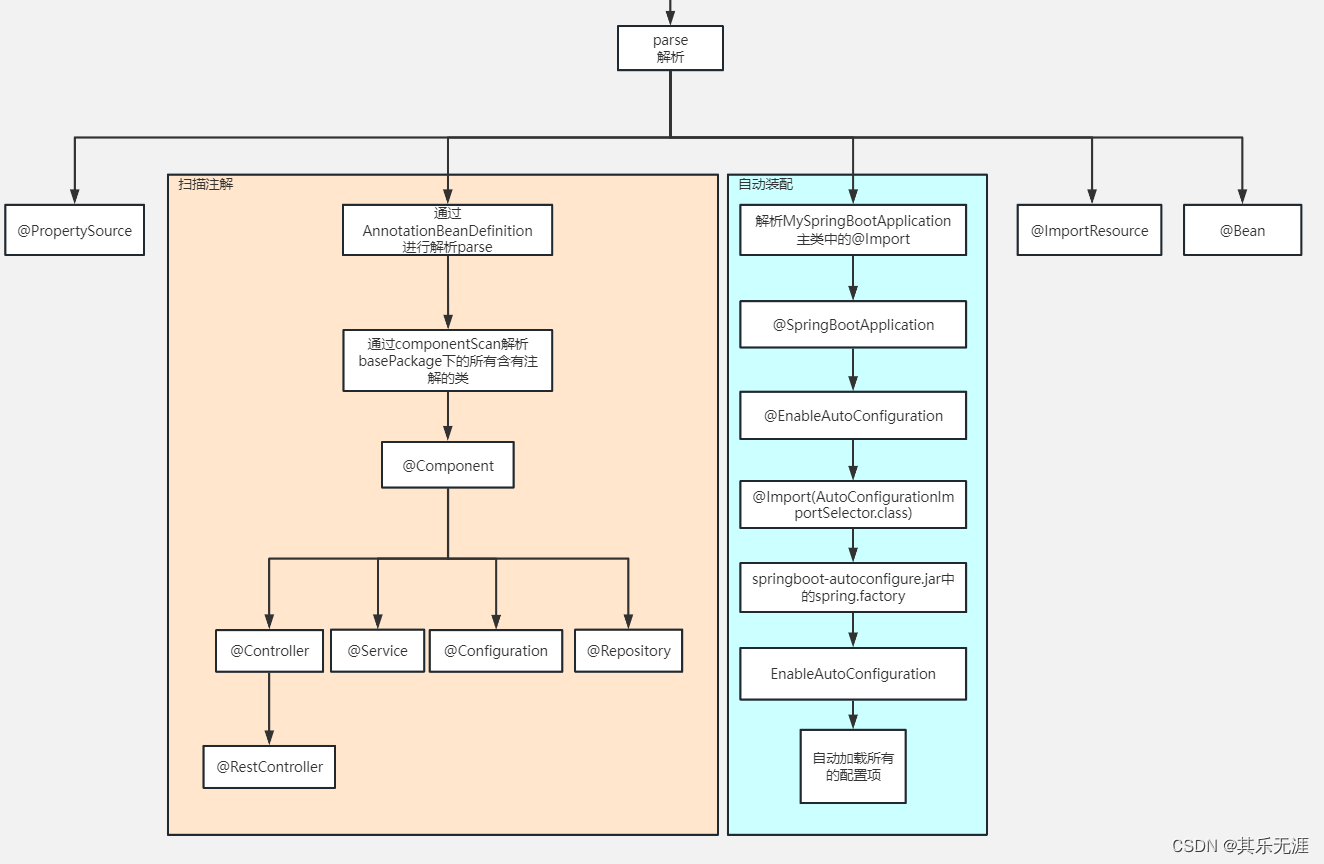
自动装配就是把别人(官方)写好的config配置类加载到spring容器,然后根据这个配置类生成一些项目需要的bean对象。
在@SpringBootApplication注解里的@EnableAutoConfiguration用@Import注解导入了AutoConfigurationImportSelector.class类,这个类的selectImports方法会扫描我们类路径下的一个spring.factories文件(里面装的是很多官方写好的自动配置类的全限定名),然后返回这些类的名字。
第二章、SpringBoot核心功能
一、配置文件
在SpringBoot项目中的配置文件有两种使用方式
- properties:默认提供的,以键值对的方式使用(key=value)
- yaml:是一中标记语言,推荐使用的方式
1、配置文件介绍
yml是 “YAML Ain’t Markup Language”(YAML 不是一种标记语言)的递归缩写。在开发的这种语言时,YAML 的意思其实是:“Yet Another Markup Language”(仍是一种标记语言)。
非常适合用来做以数据为中心的配置文件。
2、语法规则
在使用 yml配置配置信息的时候我们需要注意对应的规则:
- key: value, value和
:之间需要有空格 - 区分大小写
- 使用
缩进表示层级关系,缩进的空格数不重要,只要相同的元素左对齐即可 #表示注释- 字符串不需要
"或者'包裹,如果要加,''与""表示字符串内容会被转义/不转义
3、数据类型
在 yml中我们可以配置的数据类型很多 字面量、对象、数组都是支持的。只是在使用的时候需要注意对应的使用方式即可
字面量:单个的、不可再分的值。date、boolean、string、number、null
k: v
对象:键值对的集合。map、hash、set、object
行内写法:  k: {k1:v1,k2:v2,k3:v3}
#或
k:
  k1: v1
  k2: v2
  k3: v3
数组:有序的数据。array、list、queue
行内写法:  k: [v1,v2,v3]
#或者
k:
 - v1
 - v2
 - v3
4、案例使用
定义对应的Bean对象
@ConfigurationProperties(prefix = "person")
@Component
@Data
@ToString
public class Person {

    private String userName;
    private String address;
    private Integer age;
    private Date birth;
    private Boolean boss;
    private List<String> hobbys;
    private Map<String,Object> map;
    private Dept dept;
    private Map<String,Dept> allDepts;

}

@Component
@Data
public class Dept {

    private Integer deptId;
    private String deptName;
}
在对应的 yml中配置
person:
    userName: "其\n哥"
    address: '内蒙古\n呼市'
    age: 18
    birth: 2024/07/24 14:12:12 # 设置默认格式的日期时间就不需要提供转换器
    boss: true
    map:
        k1: v1
        k2: v2
        k3: v3
    #hobbys: [篮球,足球,羽毛球]
    hobbys:
        - 篮球
        - 足球
        - 羽毛球
    dept:
        deptId: 1
        deptName: 行政部
    all-depts:
        k1:
            deptId: 1
            deptName: 行政部
        k2:
            deptId: 2
            deptName: 开发部
        k3:
            deptId: 3
            deptName: 销售部
#    dept: {departId:111,departName:销售部}
#    map: {k1:v1,k2:v2,k3:v3}
为了有提示信息。我们需要在pom.xml中添加相关的属性依赖
   <dependency>
       <groupId>org.springframework.boot</groupId>
       <artifactId>spring-boot-configuration-processor</artifactId>
       <optional>true</optional>
   </dependency>
二、WEB开发
1、静态资源文件
在web项目开发中,静态资源文件也是一份非常重要的内容。在SpringBoot默认提供了这几个目录可以存放我们的静态资源文件
- static
- public
- resources
- META-INF/resources
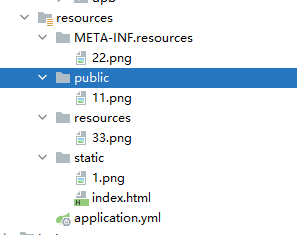
客户端提交相关的请求。服务器接收到请求后是会先找我们的controller看是否能够处理。如果不能处理就会去对应的静态资源目录下查找是否有合适的资源。如果静态资源处理器也处理不了。那么就响应404页面。
为了更好的区分静态资源文件和动态请求。我们可以给静态资源文件的访问加上一个统一的前缀。
# 给系统访问的静态资源添加统一的前缀
spring:
    mvc:
        static-path-pattern: /res/**
如果我们需想使用自定义的目录来存储静态资源文件。这时我们可以通过如下的配置来指定。
# 给系统访问的静态资源添加统一的前缀
spring:
    mvc:
        static-path-pattern: /res/**
    web: # 自定义静态资源文件存储的路径
        resources:
            static-locations: [classpath:/abc]
2、请求参数处理
(1)注解
在控制器中我们接收客户端传递的相关的请求数据的时候。可以通过各种注解来快捷的接收相关的信息
- @PathVariable: 获取请求路径中的参数(请求路径中类似/{path} 参数)
- @RequestHeader:获取请求头中的参数
- @RequestAttribute:获取Request作用域中的参数
- @RequestParam:获取请求路径中的参数(问号?后面的参数)
- @MatrixVariable:矩阵变量
- @CookieValue:获取请求头中的Cookie 信息
- @RequestBody:获取请求体中的数据 需要通过post方式提交
对应的案例代码
/**
 * 控制器
 */
@RestController
public class ParamController {

    /**
     * @PathVariable 路径变量
     * @param id
     * @param name
     * @return
     */
    @GetMapping({"/fun1/{id}/name/{name}"})
    public Map<String,Object> fun1(@PathVariable("id") Integer id
            , @PathVariable("name") String name
            , @PathVariable Map<String,Object> pv){
        Map<String,Object> map = new HashMap<>();
        map.put("id",id);
        map.put("name",name);
        map.put("pv",pv);
        return map;
    }

    /**
     * @RequestParam 获取请求路径中的参数,就是获取请求头中的参数
     * @param id
     * @param name
     * @param rp
     * @return
     */
    @GetMapping({"/fun2"})
    public Map<String,Object> fun2(@RequestParam(name = "id",required = true,defaultValue = "1") Integer id
            ,@RequestParam(name = "name") String name
            ,@RequestParam Map<String,String> rp){
        Map<String,Object> map = new HashMap<>();
        map.put("id",id);
        map.put("name",name);
        map.put("rp",rp);
        return map;
    }

    @RequestMapping({"/fun3"})
    public Map<String,Object> fun3(@RequestHeader("User-Agent") String userAgent
    , @RequestHeader HttpHeaders headers
    ,@RequestHeader Map<String,Object> rh){
        Map<String,Object> map = new HashMap<>();
        map.put("userAgent",userAgent);
        map.put("headers",headers);
        map.put("rh",rh);
        return map;
    }

    @RequestMapping({"/fun4"})
    public Map<String,Object> fun4(@CookieValue("ACTIVITI_REMEMBER_ME") String cookie
        ,@CookieValue("ACTIVITI_REMEMBER_ME") Cookie cookie1){
        Map<String,Object> map = new HashMap<>();
        map.put("cookie",cookie);
        map.put("cookie1",cookie1);
        return map;
    }

    @PostMapping({"/fun5"})
    public Map<String,Object> fun4(@RequestBody String content){
        Map<String,Object> map = new HashMap<>();
        map.put("content",content);
        return map;
    }

    /**
     * 矩阵变量:SpringBoot中默认是关闭 矩阵变量
     * /user/query;id=1;name=ql,zhangsan,lisi
     * @return
     */
    @GetMapping({"/fun6/{path}"})
    public Map<String,Object> fun6(@MatrixVariable("id") Integer id
    ,@MatrixVariable("name") List<String> name,@PathVariable("path") String path){
        Map<String,Object> map = new HashMap<>();
        map.put("id",id);
        map.put("name",name);
        map.put("path",path);
        return map;
    }
}
表单post方式处理
@Controller
public class RequestController {

    @GetMapping("/ra/fun1")
    public String fun1(Model model){
        model.addAttribute("msg1","第一个信息");
        model.addAttribute("msg2","第二个信息");
        return "forward:/success";
    }
    @ResponseBody
    @GetMapping("/success")
    public Map<String,Object> fun2(@RequestAttribute String msg1, @RequestAttribute String msg2){
        Map<String,Object> map = new HashMap<>();
        map.put("msg1",msg1);
        map.put("msg2",msg2);
        return map;
    }
}
在SpringBoot中默认是关闭对矩阵变量的支持的。需要放开的话添加如下的配置:
@Configuration
public class WebConfig implements WebMvcConfigurer {

    @Override
    public void configurePathMatch(PathMatchConfigurer configurer) {
        UrlPathHelper urlPathHelper = new UrlPathHelper();
        urlPathHelper.setRemoveSemicolonContent(false); // 解除对 矩阵变量的限制
        configurer.setUrlPathHelper(urlPathHelper);
    }
}
(2)其他的情况
在上面介绍的注解后我们还可以通过如下的方式来出:
- 原生的HttpServletRequest 和 HttpServletResponse来处理
- 然后我们还可以通过自定义的对象来处理
3、Thymeleaf整合
在SpringBoot项目中常用的前端模板框架Thymeleaf。我们介绍下如何整合。
添加相关的依赖
<dependency>
    <groupId>org.springframework.boot</groupId>
    <artifactId>spring-boot-starter-thymeleaf</artifactId>
</dependency>
添加 thymeleaf的配置信息
spring.thymeleaf.enabled=true
# 模板编码
spring.thymeleaf.encoding=UTF-8
# 要被排除在解析之外的视图名称列表,⽤逗号分隔
spring.thymeleaf.excluded-view-names=
# 要运⽤于模板之上的模板模式。另⻅ StandardTemplate-ModeHandlers( 默认值: HTML5)
spring.thymeleaf.mode=HTML5
# 在构建 URL 时添加到视图名称前的前缀(默认值: classpath:/templates/ )
spring.thymeleaf.prefix=classpath:/templates/
# 在构建 URL 时添加到视图名称后的后缀(默认值: .html )
spring.thymeleaf.suffix=.html
# 应用服务 WEB 访问端口
server.port=8080
然后创建 templates目录。项目相关的动态模板文件我们都放在这个目录中。然后创建 user.html页面,需要使用 thymeleaf的标签我们需要在头部引入下面的文件
<html xmlns="http://www.w3.org/1999/xhtml"
      xmlns:th="http://www.thymeleaf.org">
完整的页面内容
<!DOCTYPE html>
<html xmlns="http://www.w3.org/1999/xhtml"
      xmlns:th="http://www.thymeleaf.org">
<head>
    <meta charset="UTF-8">
    <title>Title</title>
</head>
<body>
    <h1>这是第一个Thymeleaf的模板页面</h1>
    <label>获取传递的信息:</label><br>
    <span th:text="${msg1}"></span><br>
    <span th:text="${msg2}"></span><br>
</body>
</html>
然后定义对应的控制器和数据的绑定操作
@Controller
public class UserController {

    @GetMapping("/user/query")
    public String query(Model model, Map map){
        model.addAttribute("msg1","thymeleaf的第一个数据666");
        map.put("msg2","thymeleaf的第二个数据999");
        return "user";
    }
}
4、日志和profile
SpringBoot支持Java Util Logging、Log4J、Log4J2 和Logback 作为日志框架,无论使用哪种日志框架,SpringBoot已为当前使用的日志框架的控制台输出及文件输出做好了配置,默认情况下,SpringBoot使用Logback 作为日志框架
配置日志级别:
server:
  port: 8080
spring:
  thymeleaf:
    prefix: classpath:/templates/
    suffix: .html
logging: # 配置日志
  level:
    root: info # 记录所有的日志信息
    #org.springframework.web: debug
  file:
    name: d:/myapp.log
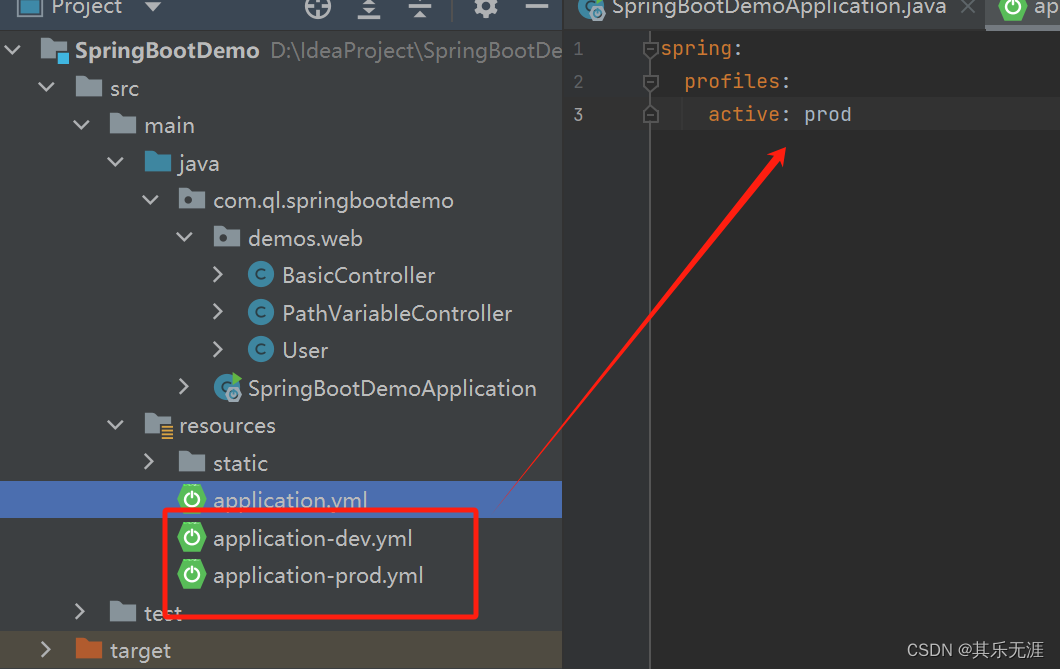
profile 主要针对的就是不同环境下的不同配置信息的支持。那么我们可以全局的使用application-{profile}.yml
三、整合MyBatis
SpringBoot整合MyBatis的操作,首先创建相关的表结构
CREATE TABLE `t_user` (
  `id` int(11) NOT NULL AUTO_INCREMENT,
  `name` varchar(30) DEFAULT NULL,
  `age` int(11) DEFAULT NULL,
  PRIMARY KEY (`id`)
) ENGINE=InnoDB AUTO_INCREMENT=3 DEFAULT CHARSET=utf8mb4
然后添加MyBatis和MySQL的依赖信息
        <!-- MyBatis的依赖 -->
        <dependency>
            <groupId>org.mybatis.spring.boot</groupId>
            <artifactId>mybatis-spring-boot-starter</artifactId>
            <version>2.2.0</version>
        </dependency>
        <!-- MySql 的依赖 -->
        <dependency>
            <groupId>mysql</groupId>
            <artifactId>mysql-connector-java</artifactId>
        </dependency>
然后在 application.yml中添加数据源的配置信息和MyBatis的相关配置信息
spring:
  profiles:
    active: prod
  # 配置JDBC的连接信息
  datasource:
    url: jdbc:mysql://localhost:3306/springboot-learn?serverTimezone=UTC&useUnicode=true&characterEncoding=utf-8
    driver-class-name: com.mysql.cj.jdbc.Driver
    username: root
    password: root
mybatis:
  type-aliases-package: com.ql.springbootdemo.entity
  mapper-locations: classpath:mapper/**.xml
然后做MyBatis的应用配置。创建对应的实体对象
@Data
public class User {
    private Integer id;
    private String name;
    private Integer age;
}
创建对应的Mapper接口
public interface UserMapper {

    public List<User> queryList();
}
然后创建Mapper接口对应的映射文件
<?xml version="1.0" encoding="UTF-8" ?>
<!DOCTYPE mapper
        PUBLIC "-//mybatis.org//DTD Mapper 3.0//EN"
        "http://mybatis.org/dtd/mybatis-3-mapper.dtd">
<mapper namespace="com.ql.springbootdemo.mapper.UserMapper">
    <select id="queryList" resultType="User">
        select * from t_user
    </select>
</mapper>
需要在SpringBoot项目的启动类中通过@MapperScan注解来指的自定义的Mapper接口的位置
@SpringBootApplication
@MapperScan(basePackages = {"com.ql.springbootdemo.mapper"})
public class SpringBootDemoApplication {

    public static void main(String[] args) {
        SpringApplication.run(SpringBootDemoApplication.class, args);
    }

}
创建Service层和Controller
@Service
public class UserServiceImpl implements IUserService {

    @Autowired
    private UserMapper userMapper;

    @Override
    public List<User> queryList() {
        return userMapper.queryList();
    }
}
@RestController
public class UserController2 {

    @Autowired
    private IUserService userService;

    @GetMapping("/user/list")
    public List<User> list(){
        return userService.queryList();
    }
}
然后就可以启动服务测试访问:
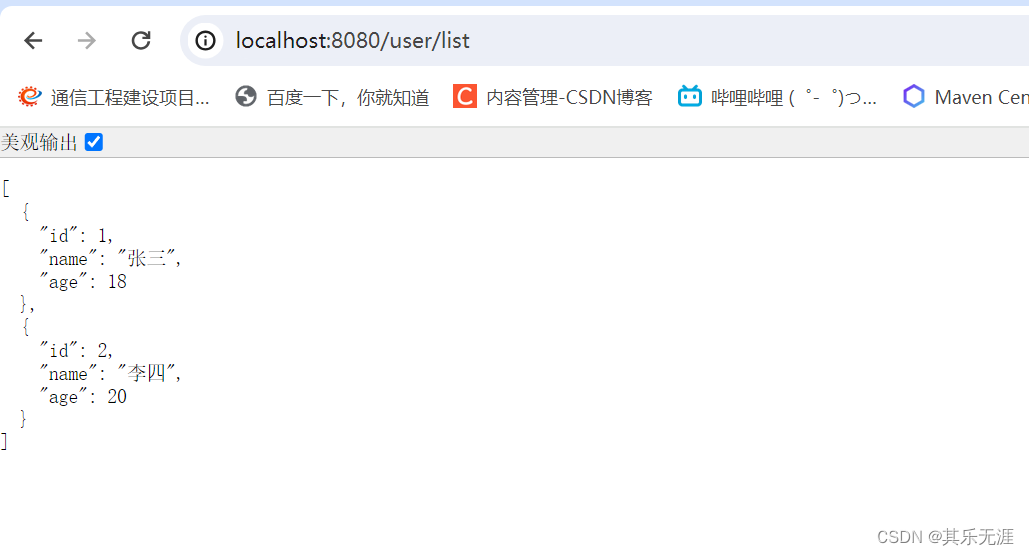
通过访问效果可以看到整合操作完成
四、单元测试
单元测试(unit testing),是指对软件中的最小可测试单元进行检查和验证的过程就叫单元测试。
单元测试是开发者或者测开人员编写的一小段代码,用于检验被测代码的一个很小的、很明确的(代码) 功能是否正确。执行单元测试就是为了证明某段代码的执行结果是否符合我们的预期。如果测试结果符合我们的预期,称之为测试通过,否则就是测试未通过(或者叫测试失败)。
首先需要添加相关的依赖
<dependency>
    <groupId>org.springframework.boot</groupId>
    <artifactId>spring-boot-starter-test</artifactId>
    <scope>test</scope>
</dependency>
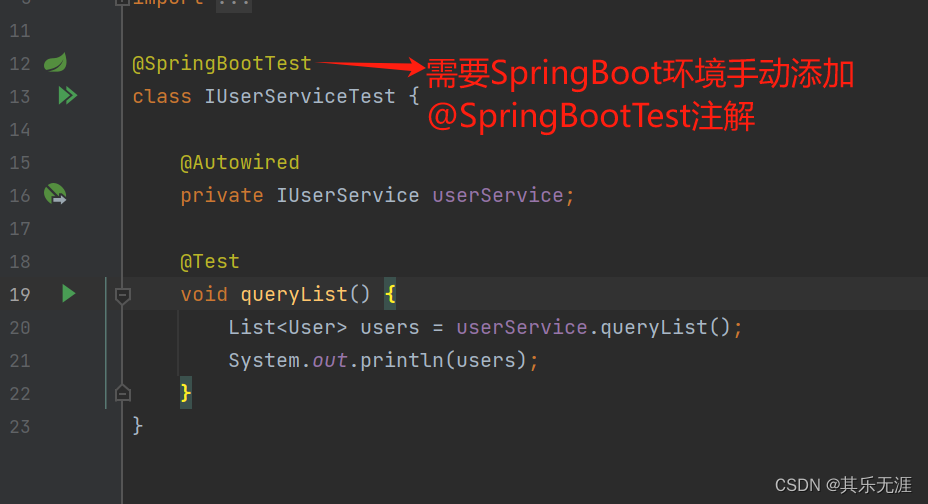
然后可以通过脚手架工具生成的测试类来处理
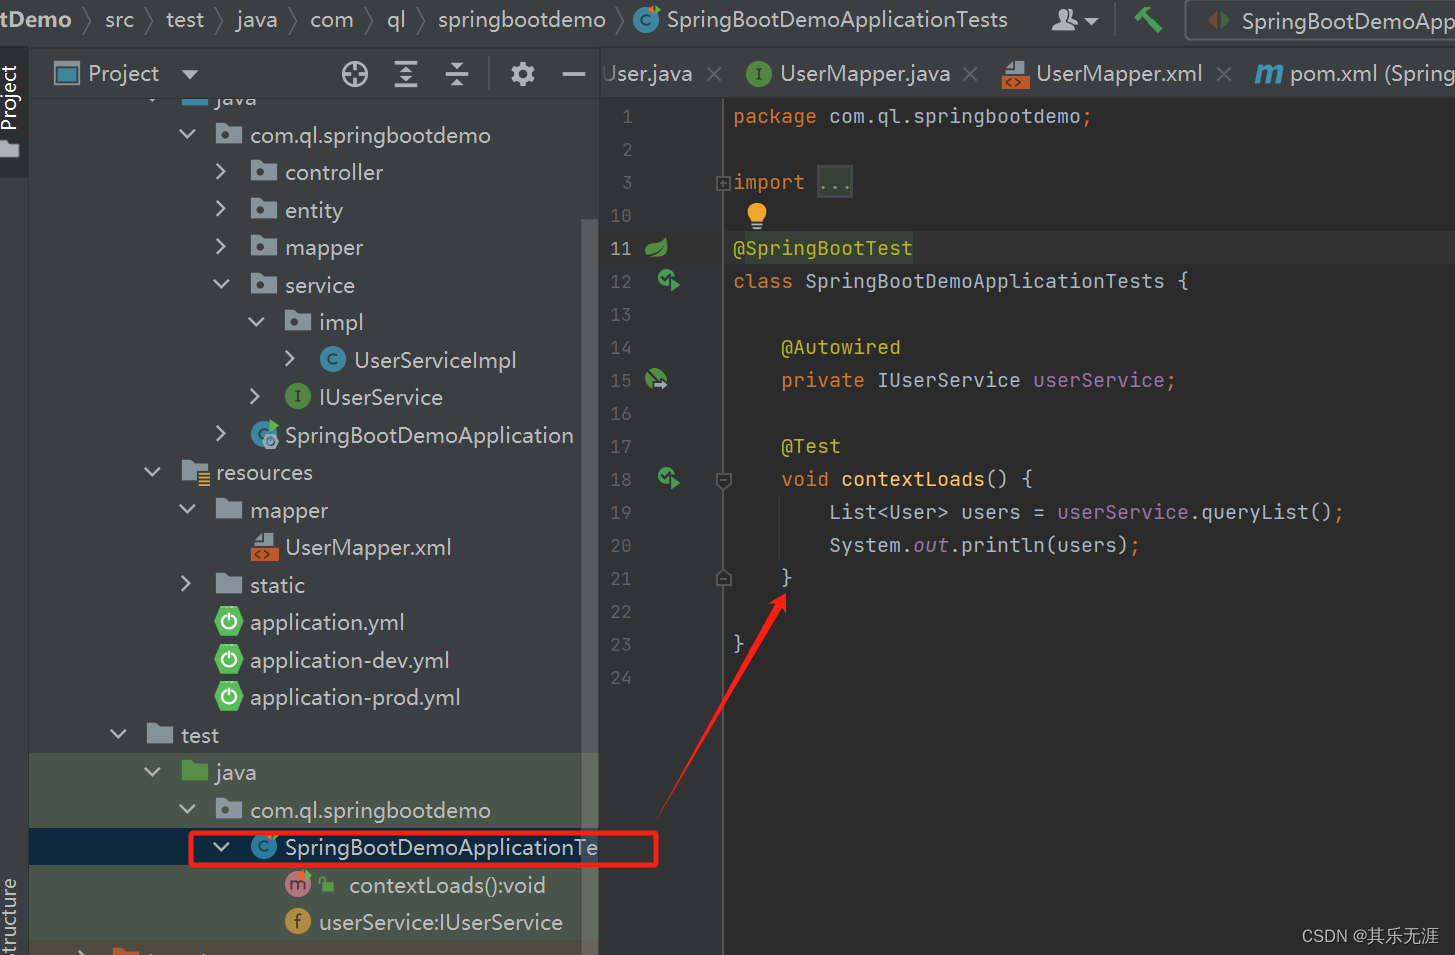
然后我们也可以通过idea 工具针对我们需要单元测试的方法获取类动态的生成需要测试的测试类
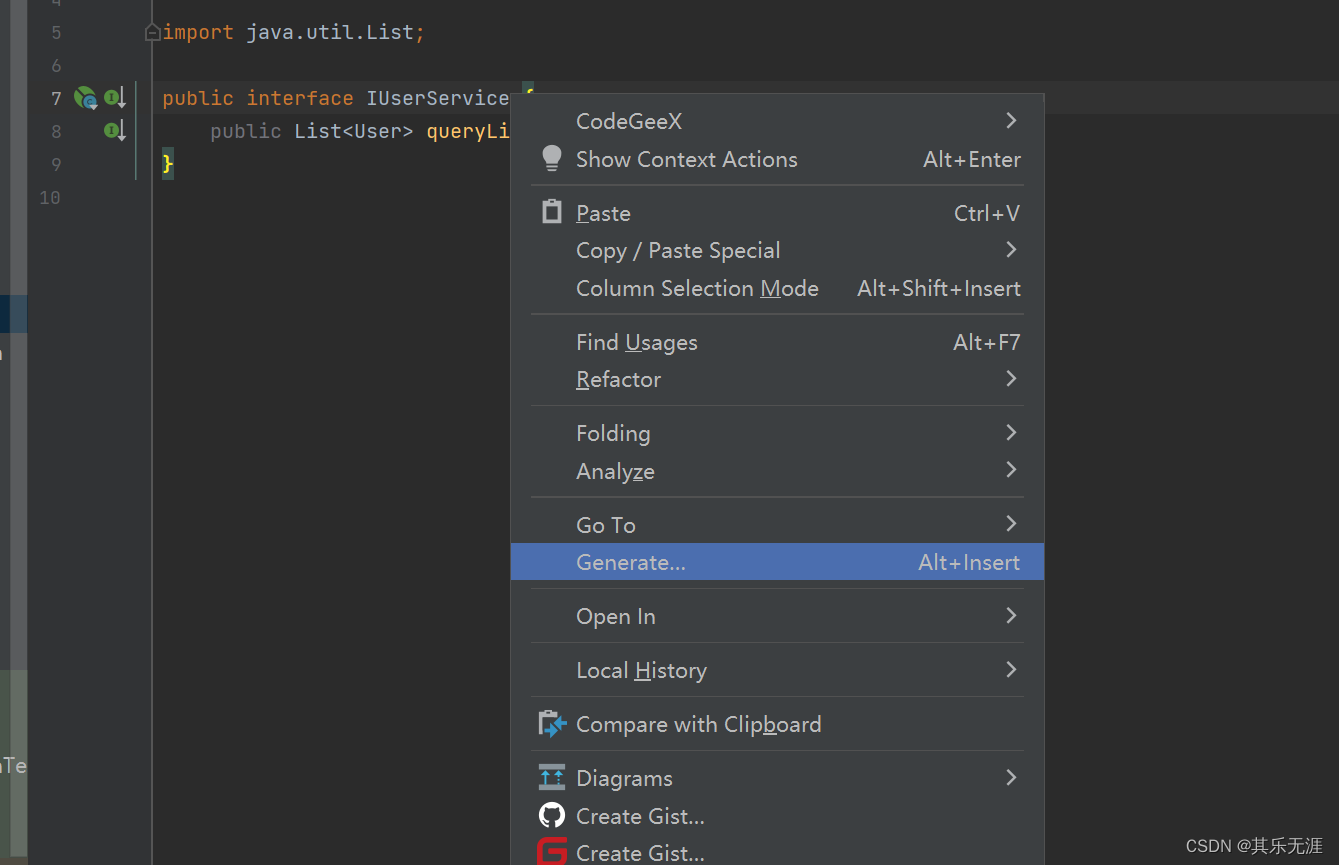
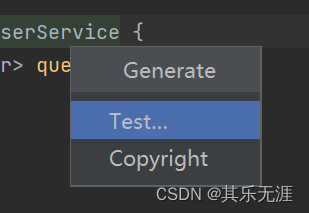
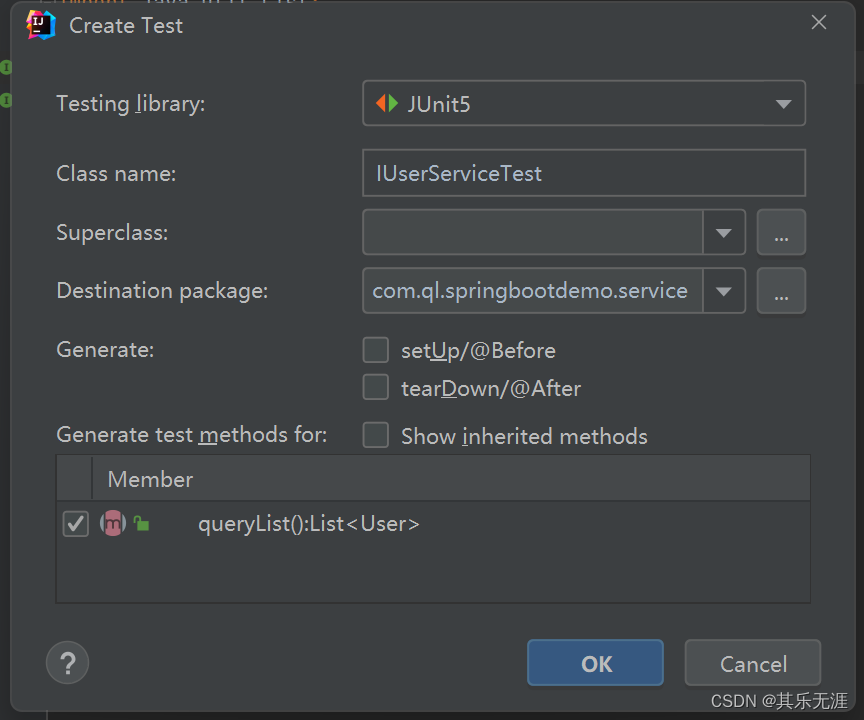
五、整合Redis
Redis的客户端之前使用的是Jedis。不过现在基本很少使用了。我们直接整合 SpringDataRedis来使用。先添加依赖:
<!-- 添加SpringDataRedis的依赖 -->
<dependency>
    <groupId>org.springframework.boot</groupId>
    <artifactId>spring-boot-starter-data-redis</artifactId>
</dependency>
<!--redis附加包,因为Springboot 2.0 中redis客户端使用了Lettue, 其依赖于commons, 所以加入以上(似乎Jedis依然可以使用.)-->
<dependency>
    <groupId>org.apache.commons</groupId>
    <artifactId>commons-pool2</artifactId>
</dependency>
然后添加对应的配置信息
spring:
  redis:
  	# redis链接地址
    host: 127.0.0.1
    # redis链接端口
    port: 6379
    # redis链接密码
    password:
    # redis连接池
    lettuce:
      pool:
      	# 最大链接数
        max-active: 8
        # 最大建立链接等待时间,-1为无限制
        max-wait: -1
        # 最大空闲数
        max-idle: 8
        # 最小空闲数
        min-idle: 0
      # 关闭超时时间,在关闭客户端链接之前等待任务处理完成的最长时间,在这之后,无论任务是否执行完成,都会被执行器关闭
      shutdown-timeout: 100
    database: 2         # 使用Redis中的第三个分区,默认是0
配置完以上两个步骤,就可以使用redis了,spring-data-redis默认提供RedisTemplate<Object,Object> 和StringRedisTemplate<String,String> 工具,其中RedisTemplate<Object,Object> 就是键值都是Object类型,而StringRedisTemplate<String,String> 就是键值都是String类型。
@SpringBootTest
class SpringBootDemo03RedisApplicationTests {

    @Autowired
    RedisTemplate redisTemplate;

    @Autowired
    StringRedisTemplate stringRedisTemplate;

    @Test
    void contextLoads() {
        stringRedisTemplate.opsForValue().set("k1","springBoot整合测试");
        String k1 = stringRedisTemplate.opsForValue().get("k1");
        System.out.println("k1 = " + k1);
    }

}
第三章、综合案例
接下来我们通过一个综合案例来给大家消化下前面介绍的内容:
- SpringBoot
- MySQL
- SpringSecurity
- Thymeleaf
- HPlus
一、表结构
用户表:SYS_USER
CREATE TABLE `sys_user` (
  `user_id` bigint NOT NULL AUTO_INCREMENT,
  `username` varchar(50) NOT NULL COMMENT '用户名',
  `password` varchar(100) DEFAULT NULL COMMENT '密码',
  `email` varchar(100) DEFAULT NULL COMMENT '邮箱',
  `mobile` varchar(100) DEFAULT NULL COMMENT '手机号',
  `status` tinyint DEFAULT NULL COMMENT '状态  0:禁用   1:正常',
  `create_time` datetime DEFAULT NULL COMMENT '创建时间',
  PRIMARY KEY (`user_id`),
  UNIQUE KEY `username` (`username`)
)
二、项目环境创建
创建一个基础的SpringBoot项目,并添加相关的依赖。
   <dependencies>
        <dependency>
            <groupId>org.springframework.boot</groupId>
            <artifactId>spring-boot-starter-security</artifactId>
        </dependency>
        <dependency>
            <groupId>org.springframework.boot</groupId>
            <artifactId>spring-boot-starter-thymeleaf</artifactId>
        </dependency>
        <dependency>
            <groupId>org.springframework.boot</groupId>
            <artifactId>spring-boot-starter-web</artifactId>
        </dependency>
        <dependency>
            <groupId>org.thymeleaf.extras</groupId>
            <artifactId>thymeleaf-extras-springsecurity5</artifactId>
        </dependency>

        <dependency>
            <groupId>org.projectlombok</groupId>
            <artifactId>lombok</artifactId>
            <optional>true</optional>
        </dependency>
        <dependency>
            <groupId>org.springframework.boot</groupId>
            <artifactId>spring-boot-starter-test</artifactId>
            <scope>test</scope>
        </dependency>
        <dependency>
            <groupId>org.springframework.security</groupId>
            <artifactId>spring-security-test</artifactId>
            <scope>test</scope>
        </dependency>
        <dependency>
            <groupId>org.mybatis.spring.boot</groupId>
            <artifactId>mybatis-spring-boot-starter</artifactId>
            <version>2.3.0</version>
        </dependency>
        <dependency>
            <groupId>mysql</groupId>
            <artifactId>mysql-connector-java</artifactId>
        </dependency>
    </dependencies>
添加相关的配置信息 application.yml
server:
  port: 8086
spring:
  thymeleaf:
    suffix: .html
    prefix: classpath:/templates/
    enabled: true
    encoding: UTF-8
  datasource:
    url: jdbc:mysql://localhost:3306/demo?serverTimezone=UTC&useUnicode=true&characterEncoding=utf-8
    driver-class-name: com.mysql.cj.jdbc.Driver
    username: root
    password: 123456
mybatis:
  mapper-locations: classpath:/mapper/**.xml
在启动类中添加Mapper接口的路径
@MapperScan(basePackages = {"com.ql.boot.mapper"})
@SpringBootApplication
public class SpringBootDemo03Application {

    public static void main(String[] args) {
        SpringApplication.run(SpringBootDemo03Application.class, args);
    }

}
三、代码生成
针对用户的增删改查的操作我们可以通过MyBatis的代码生成器来快速的生成相关的代码。先创建对应的配置文件
<?xml version="1.0" encoding="UTF-8"?>
<!DOCTYPE generatorConfiguration
        PUBLIC "-//mybatis.org//DTD MyBatis Generator Configuration 1.0//EN"
        "http://mybatis.org/dtd/mybatis-generator-config_1_0.dtd">

<generatorConfiguration>
    <!-- 数据库的驱动包路径 -->
    <classPathEntry location="C:\Users\dpb\.m2\repository\mysql\mysql-connector-java\8.0.19\mysql-connector-java-8.0.19.jar" />

    <context id="DB2Tables" targetRuntime="MyBatis3">
        <!-- 去掉生成文件中的注释 -->
        <commentGenerator>
            <property name="suppressAllComments" value="true" />
        </commentGenerator>
        <!-- 数据库链接URL、用户名、密码 -->
        <jdbcConnection driverClass="com.mysql.jdbc.Driver"
                        connectionURL="jdbc:mysql://localhost:3306/demo?serverTimezone=UTC&useUnicode=true&characterEncoding=utf-8&nullCatalogMeansCurrent=true"
                        userId="root"
                        password="123456">
        </jdbcConnection>
        <!-- <jdbcConnection driverClass="oracle.jdbc.driver.OracleDriver"
              connectionURL="jdbc:oracle:thin:@localhost:1521:XE"
              userId="car"
              password="car">
      </jdbcConnection>  -->

        <javaTypeResolver >
            <property name="forceBigDecimals" value="false" />
        </javaTypeResolver>
        <!-- 生成模型的包名和位置 当前项目下 .\-->
        <javaModelGenerator targetPackage="com.ql.boot.entity" targetProject="d:\SpringBootDemo">
            <!-- 是否在当前路径下新加一层schema,eg:fase路径com.oop.eksp.user.model, true:com.oop.eksp.user.model.[schemaName] -->
            <property name="enableSubPackages" value="false" />
            <property name="trimStrings" value="true" />
        </javaModelGenerator>
        <!-- 生成的映射文件包名和位置 -->
        <sqlMapGenerator targetPackage="mapper"  targetProject="d:\SpringBootDemo">
            <property name="enableSubPackages" value="false" />
        </sqlMapGenerator>
        <!-- 生成DAO的包名和位置 -->
        <javaClientGenerator type="XMLMAPPER" targetPackage="com.ql.boot.mapper"  targetProject="d:\SpringBootDemo">
            <property name="enableSubPackages" value="false" />
        </javaClientGenerator>


        <table  tableName="sys_user" domainObjectName="SysUser" schema="demo"></table>

    </context>
</generatorConfiguration>
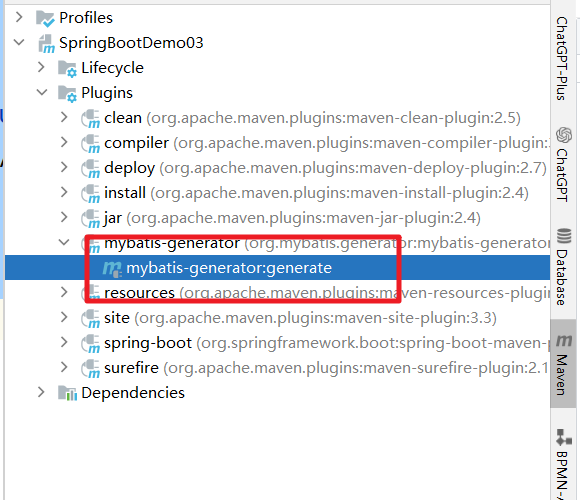
然后添加MyBatis generator的插件
<plugin>
    <groupId>org.mybatis.generator</groupId>
    <artifactId>mybatis-generator-maven-plugin</artifactId>
    <version>1.3.2</version>
    <configuration>
        <!--关联上面的配置文件 -->
        <configurationFile>src/main/resources/generator-cfg.xml</configurationFile>
        <verbose>true</verbose>
        <overwrite>true</overwrite>
    </configuration>
    <executions>
        <execution>
            <id>Generate MyBatis Artifacts</id>
            <goals>
                <goal>generate</goal>
            </goals>
        </execution>
    </executions>
    <dependencies>
        <dependency>
            <groupId>org.mybatis.generator</groupId>
            <artifactId>mybatis-generator-core</artifactId>
            <version>1.3.2</version>
        </dependency>
    </dependencies>
</plugin>
然后通过Maven插件快速生成
四、整合SpringSecurity
我们先创建认证的实现service
package com.ql.boot.service.impl;

import com.ql.boot.entity.SysUser;
import com.ql.boot.service.ISysUserService;
import org.springframework.beans.factory.annotation.Autowired;
import org.springframework.security.core.authority.SimpleGrantedAuthority;
import org.springframework.security.core.userdetails.User;
import org.springframework.security.core.userdetails.UserDetails;
import org.springframework.security.core.userdetails.UserDetailsService;
import org.springframework.security.core.userdetails.UsernameNotFoundException;
import org.springframework.stereotype.Service;
import org.springframework.util.StringUtils;

import java.util.ArrayList;
import java.util.List;

@Service
public class UserDetailsServiceImpl implements UserDetailsService {

    @Autowired
    private ISysUserService userService;

    /**
     * 认证逻辑的处理
     * @param username 认证的账号
     * @return
     * @throws UsernameNotFoundException
     */
    @Override
    public UserDetails loadUserByUsername(String username) throws UsernameNotFoundException {
        System.out.println("----------开始认证--------" + username);
        UserDetails userDetails = null;
        if(!StringUtils.isEmpty(username)){
            // 做账号验证
            SysUser user = new SysUser();

            user.setUsername(username);
            List<SysUser> list = userService.query(user);
            if(list != null && list.size() == 1){
                SysUser sysUser = list.get(0);
                List<SimpleGrantedAuthority> authorities = new ArrayList<>();
                authorities.add(new SimpleGrantedAuthority("ROLE_ADMIN"));
                // 说明账号是存在的
                userDetails = new User(sysUser.getUsername()
                        ,sysUser.getPassword()
                        ,true
                        ,true
                        ,true
                        ,true
                        ,authorities);
            }
        }
        return userDetails;
    }
}
同时创建对应的查询方法
@Service
public class SysUserServiceImpl implements ISysUserService {

    @Autowired
    private SysUserMapper mapper;

    /**
     * 根据用户条件查询用户信息
     * @param user
     * @return
     */
    @Override
    public List<SysUser> query(SysUser user) {
        SysUserExample example = new SysUserExample();
        SysUserExample.Criteria criteria = example.createCriteria();
        if(user != null){
            if(!user.getUsername().isEmpty()){
                // 根据账号查询信息
                criteria.andUsernameEqualTo(user.getUsername());
            }
        }

        List<SysUser> sysUsers = mapper.selectByExample(example);
        return sysUsers;
    }
}
然后创建SpringSecurity的配置类
@Configuration
@EnableWebSecurity
public class SpringSecurityConfig extends WebSecurityConfigurerAdapter {

    @Autowired
    private UserDetailsService userDetailsService;

    @Override
    protected void configure(AuthenticationManagerBuilder auth) throws Exception {
        // 关联自定义的认证service 还有绑定密码加密器
        auth.userDetailsService(userDetailsService)
                .passwordEncoder(new BCryptPasswordEncoder());
    }

    @Override
    protected void configure(HttpSecurity http) throws Exception {
        http.authorizeRequests()
                .antMatchers("/login.html","/css/**","/js/**","/img/**","/fonts/**","/docs/**")
                .permitAll()
                .antMatchers("/**")
                .hasAnyRole("ADMIN")
                .anyRequest()
                .authenticated()
                // 登录
                .and()
                .formLogin()
                .loginPage("/login.html")
                .loginProcessingUrl("/loginUrl") // 登录表单提交的认证地址
                .defaultSuccessUrl("/home.html")
                .permitAll()
                .and()
                .logout()
                .and()
                .csrf().disable()
                // 针对 布局内嵌禁用放开
                .headers().frameOptions().disable()
        ;
    }

    public static void main(String[] args) {
        BCryptPasswordEncoder encoder = new BCryptPasswordEncoder();
        System.out.println(encoder.encode("123"));
    }
}
五、整合静态资源
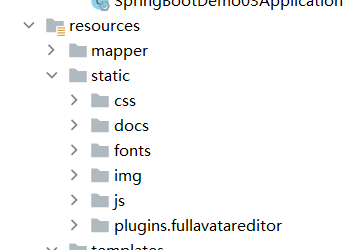
页面展示这块我们通过HPlus来处理。分别拷贝相关的静态资源文件存储在static目录中
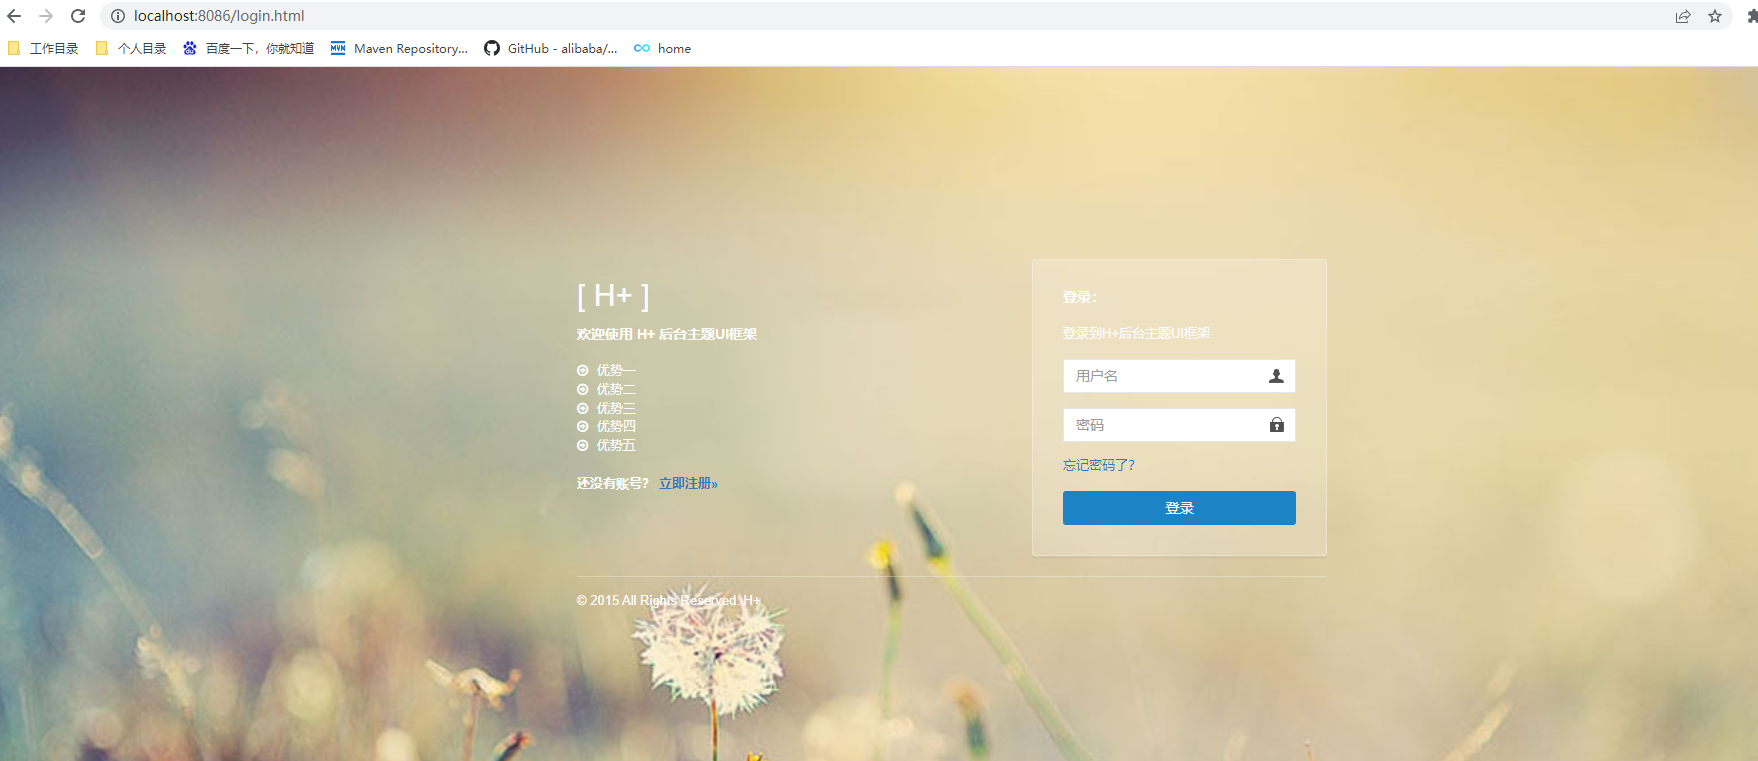
创建对应的登录页面 login.html页面


![[图解]SysML和EA建模住宅安全系统-03](https://img-blog.csdnimg.cn/direct/dbdcc9c861b14081a38c87d04ed81874.png)
