redis简介:
在pandas一文有详细使用方法(一文教会pandas-CSDN博客),具体可视化软件有redisstudio等。它是一个由 Salvatore Sanfilippo 写的 key-value 存储系统,是跨平台的非关系型数据库。

Redis 是一个开源的使用 ANSI C 语言编写、遵守 BSD 协议、支持网络、可基于内存、分布式、可选持久性的键值对(Key-Value)存储数据库,并提供多种语言的 API。
Redis 通常被称为数据结构服务器,因为值(value)可以是字符串(String)、哈希(Hash)、列表(list)、集合(sets)和有序集合(sorted sets)等类型。
在命令行中启动redis:
redis-cli.exe启动不了的时候重启服务:
redis-serverredis事务:
Redis 事务可以一次执行多个命令, 并且带有以下三个重要的保证:
-
批量操作在发送 EXEC 命令前被放入队列缓存。
-
收到 EXEC 命令后进入事务执行,事务中任意命令执行失败,其余的命令依然被执行。
-
在事务执行过程,其他客户端提交的命令请求不会插入到事务执行命令序列中。
一个事务从开始到执行会经历以下三个阶段:
-
开始事务。
-
命令入队。
-
执行事务。
如果你想在服务器上运行你随时写的代码,可以将代码写入 Redis 数据库,然后在远程服务器上读取并执行这些代码,通常涉及以下步骤:
-
序列化代码:将代码转换为一种可以存储在 Redis 中的格式,通常是字符串格式。
-
写入 Redis:将序列化后的代码存储在 Redis 数据库中。
-
读取代码:从 Redis 数据库中读取存储的代码。
-
反序列化代码:将读取到的字符串格式代码转换回可执行的格式。
-
执行代码:在安全的环境中执行这些代码。
假设你有一段代码:
# 一段函数
def my_function():
    print("This is my function running!")

# 将其convert为字符串:
code_str = inspect.getsource(my_function)


# 一段可执行程序
import inspect
code = '''
a=1
if a>1:
    print("Hello, World!")
else:
    print('error')
'''

r.set('code_snippet', code)

# 一个文件
with open('macd_test.py', 'r') as file:
    file_content = file.read()

r.set('python_file_content', file_content)
然后将这个字符串存储在 Redis 中。
import redis

# 连接到 Redis
r = redis.Redis(host='127.0.0.1', port=6379, db=8)

# 将代码存储为 Redis 字符串
r.set('my_function_code', code_str)
在远程服务器上,授权 Redis远程连接权限并读取这个字符串。
# 读取代码
code_str = r.get('my_function_code').decode('utf-8')
反序列化代码,用 exec 或 eval 函数来执行字符串形式的代码:
# 反序列化并执行代码
exec(code_str)
得到运行结果:

这种方式是在你完全信任前提下可以这么做:
-
使用
exec或eval执行从外部源(如 Redis)读取的代码极其危险,因为这可能导致代码注入和安全漏洞。 -
如果必须执行从外部存储读取的代码,请确保代码来源是可信的,并且执行环境是安全的。
-
考虑使用其他方法来存储和执行代码,例如将代码存储在文件系统中,并通过安全的 API 调用来触发代码执行。
在大多数情况下是不会将可执行代码存储在 Redis 中。如果确实需要远程执行代码,通常会有一个专门的服务或 API 来处理代码的执行。
redis 事务的相关命令:
| 序号 | 命令及描述 |
|---|---|
| 1 | DISCARD |
| 2 | EXEC |
| 3 | MULTI |
| 4 | UNWATCH |
| 5 | WATCH key [key ...] |
redis连接:
---------
redis服务器:
---------
redis GEO:
---------
redis stream:
---------
redis分区:
---------
redis管道技术:
---------
-------------------------------------------------------------------------------------------------------------------------
exec function
The exec function in Python is used to execute a string or code object as Python code. It's one of the three ways to execute code in Python, along with eval and compile. The exec function is particularly useful for dynamically executing code at runtime.

Here's how exec works:

exec(source, globals=None, locals=None, /)

source: This is the code to be executed. It can be a string, a code object, or anything that compile would accept.
globals: This is an optional dictionary that supplies the global namespace for the code being executed. If omitted or None, the dictionary of the current global namespace is used.
locals: This is an optional dictionary that supplies the local namespace for the code being executed. If omitted or None, the dictionary of the current local namespace is used.
When you call exec(code_str, {'self': your_class_instance}), here's what happens:

The code_str is the Python code that you want to execute. This code should be a well-formed Python statement or a block of statements.
The {'self': your_class_instance} dictionary is used to provide a local namespace for the code being executed. In this case, you're mapping the keyword self to an instance of YourClass. This is important because when you're executing a method's code, you need to provide the instance (self) on which the method is being called.
Here are some key points about how exec operates:

The code in code_str is executed as if it were the body of a function. This means that any assignments or variable declarations will be local to the namespace provided in locals.
If code_str contains function or class definitions, they will be added to the globals namespace (or the locals namespace if globals is not provided).
If code_str contains expressions that return values (like function calls), exec will return a tuple containing those values. If there are no expressions, exec will return None.
Security note: Be very cautious when using exec, especially if the code to be executed comes from an untrusted source. Untrusted code can execute arbitrary Python code and potentially lead to security vulnerabilities. Always validate and sanitize any user input before using it with exec.

In your code, the exec statement is used to dynamically execute the method calc_indicator on the instance your_class_instance. This is a rare use case for exec, and it's typically done for more advanced scenarios like dynamically modifying or creating methods at runtime.
setattr function
The setattr function is an built-in function in Python that is used to set an attribute value on an object. It takes three arguments:

obj: The object on which to set the attribute.
name: The name of the attribute, as a string.
value: The value to set the attribute to.
Here are some basic usage examples of setattr:

class MyClass:
    def __init__(self, value):
        self.value = value

# Create an instance of MyClass
my_instance = MyClass(10)

# Use setattr to set an attribute
setattr(my_instance, 'new_attribute', 20)  # Equivalent to my_instance.new_attribute = 20

# Print the newly set attribute
print(my_instance.new_attribute)  # Output: 20

# Use setattr to modify an existing attribute
setattr(my_instance, 'value', 30)  # Equivalent to my_instance.value = 30

# Print the modified attribute
print(my_instance.value)  # Output: 30

A key feature of setattr is that it allows U to specify the attribute name as a string, which means U can dynamically decide the attribute name using variables:

attribute_name = 'dynamic_attribute'
attribute_value = 'Dynamic value'

# Dynamically set the attribute
setattr(my_instance, attribute_name, attribute_value)

# Print the dynamically set attribute
print(getattr(my_instance, attribute_name))  # Output: Dynamic value
实现远程服务器与本地代码交互需要用到上面两个点,本地代码不考虑引用平台上类定义属性或方法时可以不用到,但是如果要用到就需要借助 exec和setattr处理工具
本地我在数据库节点8上写了一段计算快均线和慢均线的简单赋值逻辑,将其作为字符串set给key:code_snippet
# example:
code = '''
def calc_indicator1(self) -> None:
    slow_ma = self.kline_generator.producer.sma(self.params_map.slow_period, array=True)
    fast_ma = self.kline_generator.producer.sma(self.params_map.fast_period, array=True)

    self.state_map.slow_ma, self.pre_slow_ma = slow_ma[-1], slow_ma[-2]
    self.state_map.fast_ma, self.pre_fast_ma = fast_ma[-1], fast_ma[-2]
'''

redis.set('code_snippet', code)
远程服务器上写了一个加载请求数据函数get_respose:
    def get_respose(self):
        """fastapi"""
        # 发送 GET 请求
        # response = requests.get(self.url)
        # if response.status_code == 200:
        #     # 打印响应内容
        #     self.output("Data received:", response.text)
        # else:
        #     self.output(f"Error: {response.status_code}")

        """redis"""
        redis = StrictRedis(host=self.host, port=self.port, db=self.db)
        try:
            code_str = redis.get('code_snippet').decode('utf-8')
            return code_str
        except:
            self.output('error of calc_indicator!')
            return
然后通过定义一个计算指标calc_indicator函数:
    def calc_indicator(self) -> None:
        """计算指标数据"""
        code_str = self.get_respose()

        exec(code_str)

        match = re.search('def (\\w+)', code_str)

        var_name = str(match.group().split(' ')[1])
        self.output(f"变量名称{var_name}")

        exec('setattr(self, '+'\''+ var_name +'\''+', locals()[\''+var_name+'\'])')

        exec('self.'+var_name+'(self)')
这样的话就可以做到实时在本地修改指标计算逻辑或下单规则或整个策略逻辑去操作平台上运行的策略(运行结果):
![]()
修改过程中可以引入time函数使策略逻辑修改完成再运行。合理运用try-except捕捉Error可以让程序不至于崩溃。
time.sleep(100)fastap简介:
是一个用于构建 API 的现代、快速(高性能)的 web 框架,专为在 Python 中构建 RESTful API 而设计。
FastAPI 使用 Python 3.8+ 并基于标准的 Python 类型提示。
FastAPI 建立在 Starlette 和 Pydantic 之上,利用类型提示进行数据处理,并自动生成API文档。
FastAPI 于 2018 年 12 月 5 日发布第一版本,以其易用性、速度和稳健性在开发者中间迅速流行起来。FastAPI 支持异步编程,可在生产环境中运行。
FastAPI 特点
-
高性能: 基于Starlette和Pydantic,利用异步(asynchronous)编程,提供出色的性能。
-
自动文档生成: 自动生成交互式API文档,支持Swagger UI和ReDoc,让API的理解和测试更加直观。
-
类型注解支持: 利用Python的类型提示,提供更严格的输入验证和更好的代码提示。
-
异步支持: 支持异步请求处理,使得处理IO密集型任务更加高效。
FastAPI 适用场景
-
构建API后端: 用于构建RESTful API,支持前后端分离的Web应用。
-
微服务架构: 可以作为微服务的后端框架,支持快速开发和部署。
-
数据处理API: 适用于处理数据,接收和返回JSON数据。
-
实时通信: 支持WebSocket,适用于实时通信场景。
fastapi安装:
# 安装 FastAPI 很简单,这里我们使用 pip 命令来安装。
pip install fastapi
# 另外我们还需要一个 ASGI 服务器,生产环境可以使用 Uvicorn 或者 Hypercorn:
pip install "uvicorn[standard]"
main.py
在pycharm里面edit一个demo:main.py
# // main.py
from typing import Union # 导入 Union 类型,用于支持多种数据类型的参数注解

from fastapi import FastAPI

app = FastAPI() # 创建一个 FastAPI 应用的实例,用于定义和管理应用的各个组件,包括路由。

"""
该路由操作使用 @app.get("/") 装饰器,当用户通过 HTTP GET 请求访问根路径时,
将执行 read_root 函数。函数返回一个包含 {"Hello": "World"} 的字典,
这个字典会被 FastAPI 自动转换为 JSON 格式并返回给用户
"""

@app.get("/") # 定义根路径 / 的路由操作
def read_root():
    return {"Hello": "World"}


"""
该路由操作使用 @app.get("/items/{item_id}") 装饰器,当用户通过 HTTP GET 请求访问/items/{item_id} 路径时,将执行 read_item 函数。
函数接受两个参数:
item_id --是路径参数,指定为整数类型。
q -- 是查询参数,指定为字符串类型或空(None)。
函数返回一个字典,包含传入的 item_id 和 q 参数。
q 参数通过 Union[str, None] 表示可以是字符串类型或空,这样就允许在请求中不提供 q 参数。
"""

@app.get("/items/{item_id}") # 定义带路径参数和查询参数的路由操作
def read_item(item_id: int, q: Union[str, None] = None):
    return {"item_id": item_id, "q": q}
在命令行中先进入mian.py主目录,运行以下命令以启动应用:
uvicorn main:app --reload打开浏览器并访问 127.0.0.1:8000就能够看到 FastAPI 自动生成的交互式文档,并在根路径 ("/") 返回的 JSON 响应。

用浏览器访问127.0.0.1:8000/items/5?q=good good study, day day up!将会有以下 JSON 响应:

FastAPI 文档
FastAPI 提供了内置的交互式 API 文档,能够轻松了解和测试 API 的各个端点。
这个文档是自动生成的,基于 OpenAPI 规范,支持 Swagger UI 和 ReDoc 两种交互式界面。
在运行 FastAPI 应用时,Uvicorn 同时启动了交互式 API 文档服务。
默认情况下可以通过访问FastAPI - Swagger UI来打开 Swagger UI 风格的文档:

Swagger UI 提供了一个直观的用户界面,用于浏览 API 的各个端点、查看请求和响应的结构,并支持直接在文档中进行 API 请求测试。通过 Swagger UI可以轻松理解每个路由操作的输入参数、输出格式和请求示例。
或者通过FastAPI - ReDoc来打开 ReDoc 风格的文档:清晰简洁的外观能够以可读性强的方式查看 API 的描述、请求和响应。
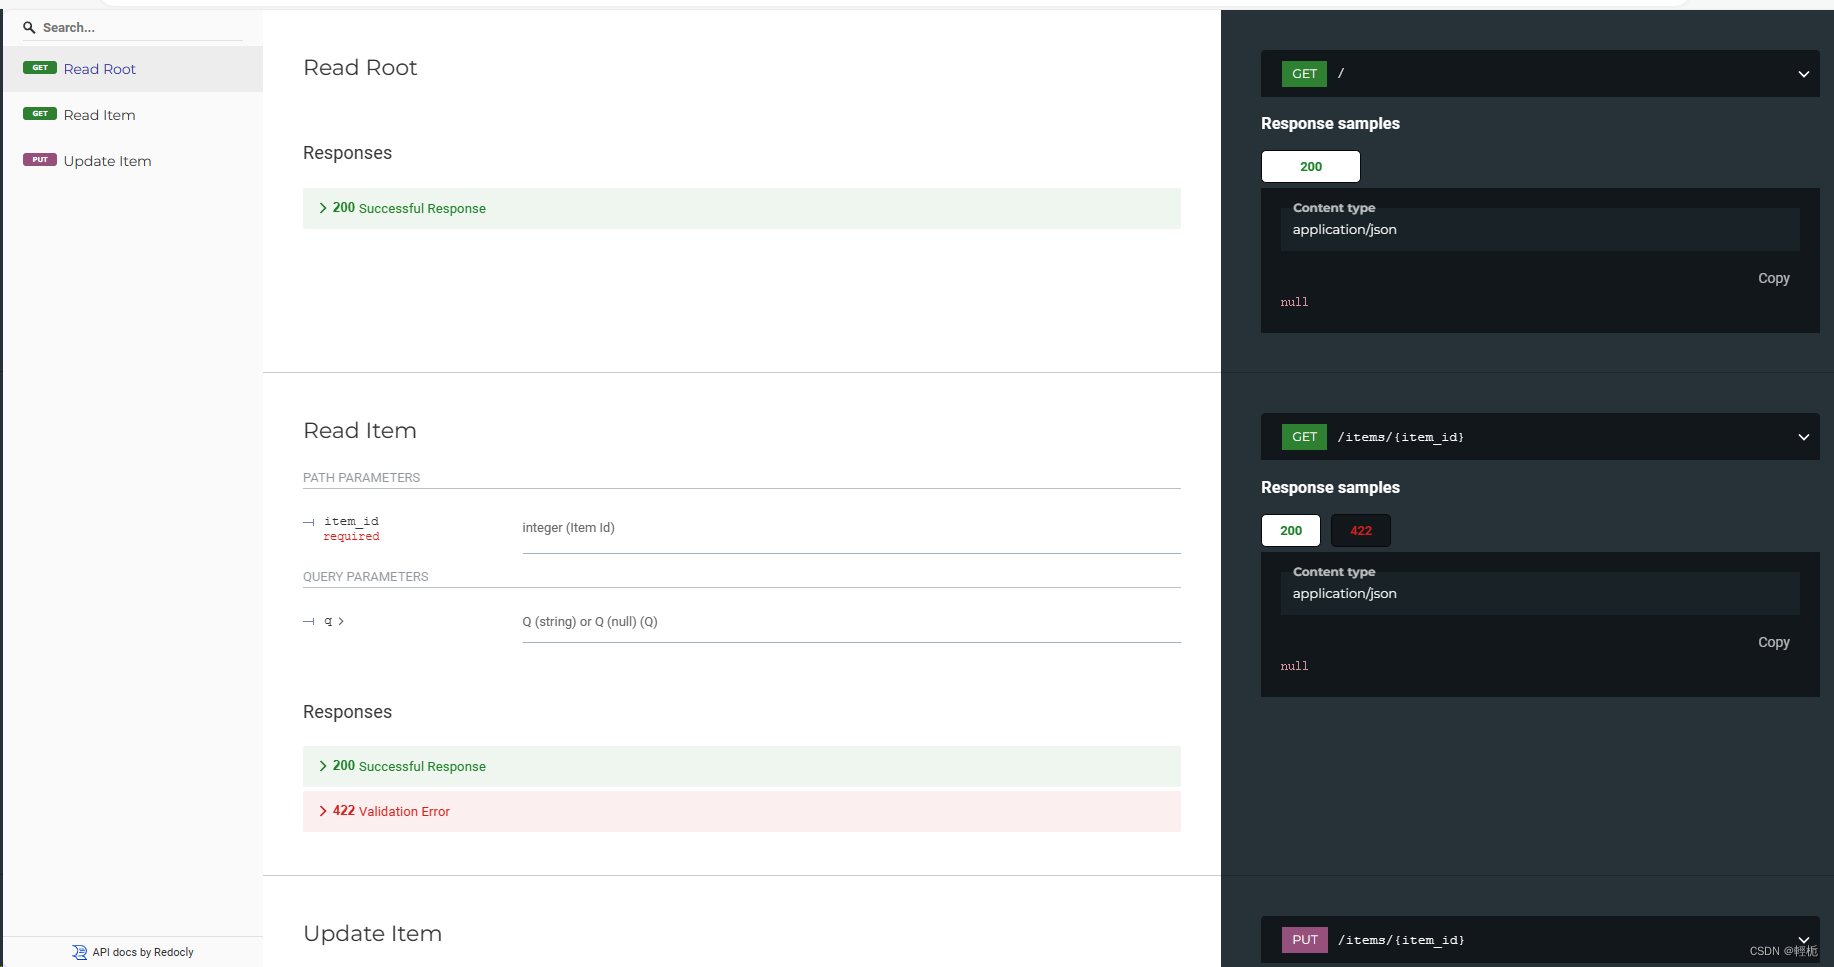
交互式文档的优势
-
实时更新: 交互式文档会实时更新,反映出应用代码的最新更改。
-
自动验证: 输入参数的类型和格式会得到自动验证,降低了错误的可能性。
-
便于测试: 可以直接在文档中进行 API 请求测试,避免使用其他工具。
自动更新:


