软件要求:Ubuntu 20.04 ros的noetic版本,我是在虚拟机vitrualbox上运行的
这几天在学ROS,跟着赵虚左老师过了一遍之后,感觉还是有很多不懂的地方,xtdrone上仿真跟着文档走了一遍,好像没学到什么东西,所以我决定想办法自己搭建一个仿真平台,至少实现定位和路径规划的功能。
定位的话,这里我想用vins-fusion来做,奈何网上的资料太少了,完全不知道该从何下手,经过几天的查找资料,我目前算是解决了这个问题。
VINS-Fusion的安装
这里跟着这个教程走就行vins-fusion环境配置、安装与测试-CSDN博客,最后在数据集上测试通过代表安装完成,vins-fusion可以在自己的工作空间下面安装。
Gazebo的搭建
这里我们跟着赵虚左老师的视频【Autolabor初级教程】ROS机器人入门_哔哩哔哩_bilibili,最后会得到一个类似这样的机器人
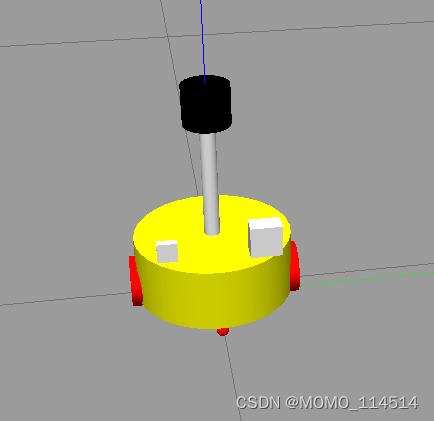
我们将原camera的位置往左移一点,然后在注释掉原carema,在原camera的位置加上IMU,它会发布名称叫imu/data的消息
<robot name="my_sensors" xmlns:xacro="http://wiki.ros.org/xacro">
    <gazebo reference="camera">
            <material>Gazebo/Bule</material>
            <gravity>true</gravity>
            <sensor name="imu_sensor" type="imu">
            <always_on>true</always_on>
            <update_rate>100</update_rate>
            <visualize>true</visualize>
            <topic>__default_topic__</topic>
            <plugin filename="libgazebo_ros_imu_sensor.so" name="imu_plugin">
                <topicName>imu/data</topicName>
                <bodyName>imu_base</bodyName>
                <updateRateHZ>100.0</updateRateHZ>
                <gaussianNoise>0.01</gaussianNoise>
                <xyzOffset>0 0 0</xyzOffset>
                <rpyOffset>0 0 0</rpyOffset>
                <frameName>imu_base</frameName>
            </plugin>
            <pose>0 0 0 0 0 0</pose>
        </sensor>
        </gazebo>
</robot>
由于vins-fusion除了imu还需要双目相机,所以图上那个比较大的方块就是我加上的双目相机,代码如下:
<?xml version="1.0"?>
<!-- 摄像头相关的 xacro 文件 -->
<robot xmlns:xacro="http://wiki.ros.org/xacro">
    <!-- 摄像头属性 -->
    <xacro:property name="camera_length" value="0.025" /> <!-- 摄像头长度(x) -->
    <xacro:property name="camera_width" value="0.04" /> <!-- 摄像头宽度(y) -->
    <xacro:property name="camera_height" value="0.04" /> <!-- 摄像头高度(z) -->
    <xacro:property name="camera_x" value="0.06" /> <!-- 摄像头安装的x坐标 -->
    <xacro:property name="camera_y" value="0.06" /> <!-- 摄像头安装的y坐标 -->
    <xacro:property name="camera_z" value="${base_link_length / 2 + camera_height / 2}" /> <!-- 摄像头安装的z坐标:底盘高度 / 2 + 摄像头高度 / 2  -->
    <xacro:property name="camera_m" value="0.01" /> <!-- 摄像头质量 -->

    <!-- 摄像头关节以及link -->
    <link name="double_camera">
        <visual>
            <geometry>
                <box size="${camera_length} ${camera_width} ${camera_height}" />
            </geometry>
            <origin xyz="0.0 0.0 0.0" rpy="0.0 0.0 0.0" />
            <material name="black" />
        </visual>
        <collision>
            <geometry>
                <box size="${camera_length} ${camera_width} ${camera_height}" />
            </geometry>
            <origin xyz="0.0 0.0 0.0" rpy="0.0 0.0 0.0" />
        </collision>
        <xacro:Box_inertial_matrix m="${camera_m}" l="${camera_length}" w="${camera_width}" h="${camera_height}" />

    </link>

    <joint name="double_camera2base_link" type="fixed">
        <parent link="base_link" />
        <child link="double_camera" />
        <origin xyz="${camera_x} ${camera_y} ${camera_z}" />
    </joint>

    <!-- camera left joints and links -->
    <joint name="left_joint" type="fixed">
      <origin xyz="0 0 0" rpy="0 0 0" />
      <parent link="double_camera" />
      <child link="stereo_left_frame" />
    </joint>
    <link name="stereo_left_frame"/>

    <joint name="left_optical_joint" type="fixed">
      <origin xyz="0 0 0" rpy="${-pi/2} 0 ${-pi/2}" />
      <parent link="stereo_left_frame" />
      <child link="stereo_left_optical_frame" />
    </joint>
    <link name="stereo_left_optical_frame"/>

    <!-- camera right joints and links -->
    <joint name="right_joint" type="fixed">
      <origin xyz="0 -0.07 0" rpy="0 0 0" />
      <parent link="double_camera" />
      <child link="stereo_right_frame" />
    </joint>
    <link name="stereo_right_frame"/>

    <joint name="right_optical_joint" type="fixed">
      <origin xyz="0 0 0" rpy="${-pi/2} 0 ${-pi/2}" />
      <parent link="stereo_right_frame" />
      <child link="stereo_right_optical_frame" />
    </joint>
    <link name="stereo_right_optical_frame"/>

    <!-- stereo camera -->
    <gazebo reference="double_camera">
      <sensor type="multicamera" name="stereocamera">
        <material>Gazebo/Blue</material>
        <always_on>true</always_on>
        <update_rate>30</update_rate>
        <visualize>1</visualize>

        <camera name="left">
          <pose>0 0 0 0 0 0</pose>
          <horizontal_fov>1.047</horizontal_fov>
          <image>
            <width>640</width>
            <height>360</height>
            <!-- format>L_UINT8</format -->
            <format>R8G8B8</format>
          </image>
          <clip>
            <near>0.1</near>
            <far>100</far>
          </clip>
        </camera>

        <camera name="right">
          <pose>0 -0.07 0 0 0 0</pose>
          <horizontal_fov>1.047</horizontal_fov>
          <image>
            <width>640</width>
            <height>360</height>
            <!-- format>L_UINT8</format -->
            <format>R8G8B8</format>
          </image>
          <clip>
            <near>0.1</near>
            <far>100</far>
          </clip>
        </camera>

        <plugin name="stereo_camera_controller" filename="libgazebo_ros_multicamera.so">
          <cameraName>stereocamera</cameraName>
          <alwaysOn>true</alwaysOn>
          <updateRate>30</updateRate>
          <cameraName>stereocamera</cameraName>
          <imageTopicName>image_raw</imageTopicName>
          <cameraInfoTopicName>camera_info</cameraInfoTopicName>
          <frameName>camera_link_optical</frameName>
          <baseline>0.07</baseline>
          <distortion_k1>0.0</distortion_k1>
          <distortion_k2>0.0</distortion_k2>
          <distortion_k3>0.0</distortion_k3>
          <distortion_t1>0.0</distortion_t1>
          <distortion_t2>0.0</distortion_t2>
        </plugin>
      </sensor>
    </gazebo>
</robot>
OK,现在我们已经安装好了IMU和双目相机。
VINS-Fusion参数更改
在/VINS-Fusion/config/vi_car/vi_car.yaml(因为我们用的是小车,无人机去改config里面另外的文件),我们需要修改它的imu和image的topic,从这个
imu_topic: "/imu0"
image0_topic: "/cam0/image_raw"
image1_topic: "/cam1/image_raw"
output_path: "/home/tong/output/"
改成你自己的topic
imu_topic: "/imu/data"
image0_topic: "/stereocamera/right/image_raw"
image1_topic: "/stereocamera/left/image_raw"
output_path: "/home/tong/output/"
OK,现在启动VINS-Fusion(记得rosrun你刚才修改的vi_car文件)
roslaunch vins vins_rviz.launch
rosrun vins vins_node ~/你自己的workspace/src/VINS-Fusion/config/vi_car/vi_car.yaml
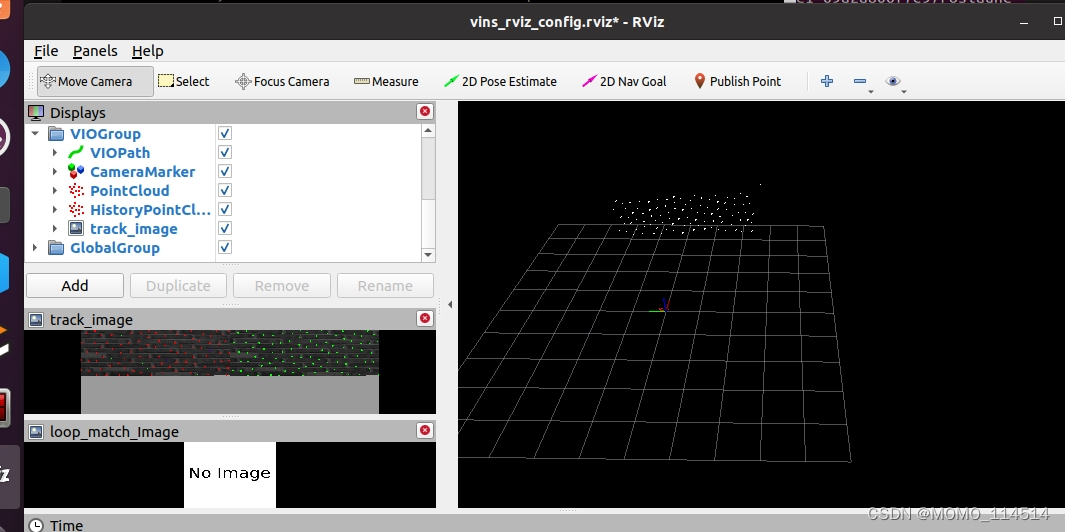
可以看到目前是已经跑通的状态,但是现在移动小车就会发现,轨迹很不准确,这是因为相机的内参和外参还没改 。
相机的内参和外参更改
在我们刚才修改的vi_car.yaml文件中,我们会找到这个:
cam0_calib: "cam0_mei.yaml"
cam1_calib: "cam1_mei.yaml"
说明我们要修改这两个文件,这两个文件正好就在vi_car.yaml的目录下。
打开仿真环境,使用rostopic list
可以看到有这些

通过 /stereocamera/left/camera_info 和 /stereocamera/right/camera_info 话题查看相机内参, 由于是仿真环境, 所以左右目外参理论上是一样的

通过这个内参更改那两个文件,这是这个文件的含义:
#######################################################################
#                      Calibration Parameters                         #
#######################################################################
# These are fixed during camera calibration. Their values will be the #
# same in all messages until the camera is recalibrated. Note that    #
# self-calibrating systems may "recalibrate" frequently.              #
#                                                                     #
# The internal parameters can be used to warp a raw (distorted) image #
# to:                                                                 #
#   1. An undistorted image (requires D and K)                        #
#   2. A rectified image (requires D, K, R)                           #
# The projection matrix P projects 3D points into the rectified image.#
#######################################################################

# The image dimensions with which the camera was calibrated. Normally
# this will be the full camera resolution in pixels.

# 高 ,单位:像素
uint32 height
# 宽 ,单位:像素
uint32 width


# The distortion parameters, size depending on the distortion model.
# For "plumb_bob", the 5 parameters are: (k1, k2, t1, t2, k3).
# 畸变参数
float64[] D

# Intrinsic camera matrix for the raw (distorted) images.
# 未做去畸变处理图像的内参
#     [fx  0 cx]
# K = [ 0 fy cy]
#     [ 0  0  1]
# Projects 3D points in the camera coordinate frame to 2D pixel
# coordinates using the focal lengths (fx, fy) and principal point
# (cx, cy).
float64[9]  K # 3x3 row-major matrix

# Rectification matrix (stereo cameras only)
# 仅用于立体相机,通常是多目相机
# 用于极线对齐
# A rotation matrix aligning the camera coordinate system to the ideal
# stereo image plane so that epipolar lines in both stereo images are
# parallel.
float64[9]  R # 3x3 row-major matrix

# Projection/camera matrix
# 投影矩阵:去畸变,修正后世界坐标系下的三维坐标点投影到像素坐标系下的二维点
#     [fx'  0  cx' Tx]
# P = [ 0  fy' cy' Ty]
#     [ 0   0   1   0]
# By convention, this matrix specifies the intrinsic (camera) matrix
#  of the processed (rectified) image. That is, the left 3x3 portion
#  is the normal camera intrinsic matrix for the rectified image.
# It projects 3D points in the camera coordinate frame to 2D pixel
#  coordinates using the focal lengths (fx', fy') and principal point
#  (cx', cy') - these may differ from the values in K.
# 单目相机,tx=ty=0
# For monocular cameras, Tx = Ty = 0. Normally, monocular cameras will
#  also have R = the identity and P[1:3,1:3] = K.
# 双目相机
# For a stereo pair, the fourth column [Tx Ty 0]' is related to the
#  position of the optical center of the second camera in the first
#  camera's frame. We assume Tz = 0 so both cameras are in the same
#  stereo image plane. The first camera always has Tx = Ty = 0. For
#  the right (second) camera of a horizontal stereo pair, Ty = 0 and
#  Tx = -fx' * B, where B is the baseline between the cameras.
# Given a 3D point [X Y Z]', the projection (x, y) of the point onto
#  the rectified image is given by:
#  [u v w]' = P * [X Y Z 1]'
#         x = u / w
#         y = v / w
#  This holds for both images of a stereo pair.
float64[12] P # 3x4 row-major matrix
外参的通过ROS的TF坐标变换来获取,打开rviz,添加tf,如图所示

通过以下命令查看左, 右目相机与IMU的外参
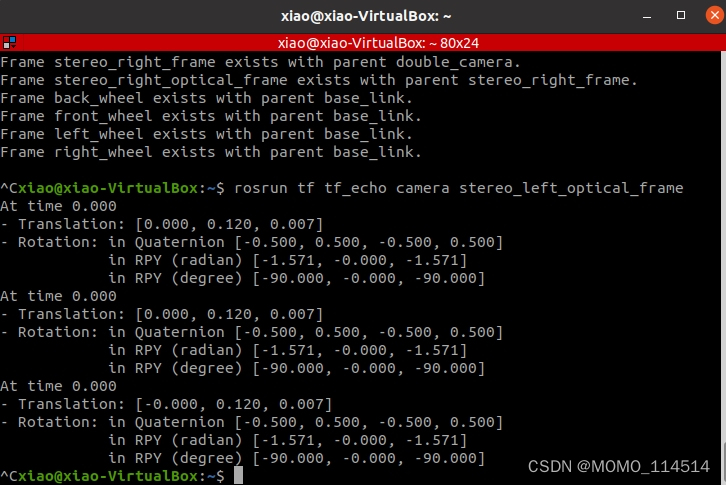
这里我参考gazebo仿真跑VINS-Fusion双目视觉惯性SLAM_gazebo双目相机xzcro-CSDN博客,之所以用camera,是因为我当时把imu放到原camera的位置了,我也没改名字,外参的话,Translation的偏移量,下面第一个Q是四元数,可以搜一下如何使用四元数得到相机的外参矩阵,在vi_car中修改,这样的话,我们的VINS-Fusion算是彻底跑通了。
