文章目录
- AMS
- ActivityStack
- startActivity流程
- startActivityMayWait
- startActivityUncheckedLocked
- startActivityLocked(ActivityRecord r, boolean newTask, boolean doResume, boolean keepCurTransition)
- resumeTopActivityLocked
- 参考
AMS是个用于管理Activity和其它组件运行状态的系统进程。
AMS
AMS在系统启动的时候,创建一个线程循环处理客户端的请求。AMS会向ServiceManager注册多种Binder Server:“activity”、“meminfo”、“cpuinfo”等。
AMS启动过程:
/*frameworks/base/services/java/com/android/server/SystemServer.java*/
 public static void main(String[] args) {
      ...
        // This used to be its own separate thread, but now it is
        // just the loop we run on the main thread.
        ServerThread thr = new ServerThread();
        thr.initAndLoop();
    }
/*frameworks/base/services/java/com/android/server/SystemServer.java*/
public void run() {
     …
     Slog.i(TAG, "Activity Manager");
     context = ActivityManagerService.main(factoryTest); //启动AMS
     …
     ActivityManagerService.setSystemProcess(); //向Service Manager注册
     …
}
AMS提供了一个static main函数,通过它可以轻松启动AMS,通过setSystemProcess把这个重要系统服务注册到ServiceManager。
//frameworks/base/services/java/com/android/server/am/ActivityManagerService.java
   public static final Context main(int factoryTest) {
        AThread thr = new AThread();//AMS线程
        thr.start();//启动
		//这个线程执行在system server上,通过thr.mService判断AMS启动是否成功。如果成功,返回system server,否则一直等待。如果出错,就无力回天,空处理。
        synchronized (thr) {
            while (thr.mService == null) {
                try {
                    thr.wait();
                } catch (InterruptedException e) {
                }
            }
        }

        ActivityManagerService m = thr.mService;
        mSelf = m;
        ActivityThread at = ActivityThread.systemMain();
        mSystemThread = at;
        Context context = at.getSystemContext();
        context.setTheme(android.R.style.Theme_Holo);
        m.mContext = context;
        m.mFactoryTest = factoryTest;
        m.mIntentFirewall = new IntentFirewall(m.new IntentFirewallInterface());

        m.mStackSupervisor = new ActivityStackSupervisor(m, context, thr.mLooper);

        m.mBatteryStatsService.publish(context);
        m.mUsageStatsService.publish(context);
        m.mAppOpsService.publish(context);

		//唤醒
        synchronized (thr) {
            thr.mReady = true;
            thr.notifyAll();
        }

        m.startRunning(null, null, null, null);

        return context;
    }
这里一个wait & notify配对使用,让system server确保AMS启动成功,它自己再接着执行。这么做的原因无它,就是system server需要依赖于AMS。
将AMS注册到ServiceManager之后,它还注册了一系列和进程管理相关的服务:
    public static void setSystemProcess() {
        try {
            ActivityManagerService m = mSelf;
            ServiceManager.addService("activity", m, true);//AMS的主业
            ServiceManager.addService("meminfo", new MemBinder(m));//内存使用情况
            …//其他服务省略
    }
要了解AMS提供的所有功能,可以查看IActivityManager.java文件。
可以把这些接口进行分类:
- 组件状态管理:例如startActivity、startService
- 组件状态查询:例如getServices
- Task相关:例如removeSubTask
- 其它:查询运行时信息,例如getMemoryInfo
ActivityStack
/*frameworks/base/services/java/com/android/server/am/ActivityManagerService.java*/
public static final Context main(int factoryTest) {/*main()函数是启动AMS的入口*/
     …
     ActivityManagerService m = thr.mService;
     …
     m.mMainStack = new ActivityStack(m, context, true, thr.mLooper);/*生成ActivityStack对象*/
     …
}
ActivityStack是管理当前系统所有activity状态的一个数据结构。
它里面有个enum 叫做ActivityState :
enum ActivityState {
       INITIALIZING, //正在初始化
       RESUMED,     //恢复
       PAUSING,     //正在暂停
       PAUSED,      //已经暂停
       STOPPING,    //正在停止
       STOPPED,     //已经停止
       FINISHING,   //正在完成
       DESTROYING,  //正在销毁
       DESTROYED    //已经销毁
    }
ActivityStack除了管理状态,还有一系列不同功能的ArrayList成员变量,它们都是ActivityRecord,用来记录每个activity的runtime信息:
startActivity流程
startActivity()用来启动一个Activity,它有可能启动当前进程的Activity,也有可能启动其它进程的Activity。当通过Intent匹配到目标对象,如果目标对象的进程已经启动,那么AMS就会通知这个进程加载并运行这个activity。如果进程没有启动,AMS就会先启动进程,再让进程运行目标activity。
/*frameworks/base/services/java/com/android/server/am/ActivityManagerService.java*/
    public final int startActivity(IApplicationThread caller, String callingPackage,
           Intent intent, String resolvedType, IBinder resultTo,
           String resultWho, int requestCode, int startFlags,
           String profileFile, ParcelFileDescriptor profileFd, Bundle options) {
        return startActivityAsUser(caller, callingPackage, intent, resolvedType,
                          result To, resultWho, requestCode, startFlags,
                           profileFile, profileFd, options,UserHandle.getCallingUserId());
    }
startActivityAsUser比startActivity多了一个userId参数,用来表示调用者的用户ID,通过Binder机制的getCallingUid获得。
    public final int startActivityAsUser(IApplicationThread caller, String calling Package,
          Intent intent, String resolvedType, IBinder resultTo,
          String resultWho, int requestCode, int startFlags, String profileFile,
          ParcelFileDescriptor profileFd, Bundle options, int userId ){
      enforceNotIsolatedCaller("startActivity");
      userId = handleIncomingUser(Binder.getCallingPid(), Binder.getCallingUid(), userId,
            false, true, "startActivity", null);
      return mMainStack.startActivityMayWait(caller,-1,callingPackage,intent, resolvedType,
            resultTo, resultWho, requestCode, startFlags, profileFile, profileFd,
            null, null, options, userId);/*这个函数是ActivityStack提供的*/
    }
startActivityAsUser的重点是做权限检查。
startActivityMayWait
startActivityMayWait的工作:
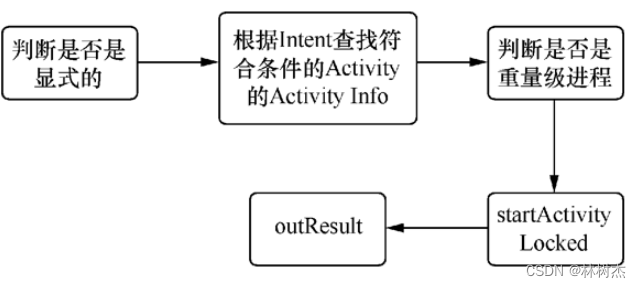
这个过程中,可能会“wait”,具体如流程图:
接着调用的是startActivityLocked,它有两个重载函数:
final int startActivityLocked(IApplicationThread caller,
            Intent intent, String resolvedType,
            Uri[] grantedUriPermissions,
            int grantedMode, ActivityInfo aInfo, IBinder resultTo,
            String resultWho, int requestCode,
            int callingPid, int callingUid, boolean onlyIfNeeded,
            boolean componentSpecified, ActivityRecord[] outActivity) {
        int err = START_SUCCESS;
        ProcessRecord callerApp = null;
        if (caller != null) {
            callerApp = mService.getRecordForAppLocked(caller);
            if (callerApp != null) {
                callingPid = callerApp.pid;
                callingUid = callerApp.info.uid;
            } else {
                Slog.w(TAG, "Unable to find app for caller " + caller
                      + " (pid=" + callingPid + ") when starting: "
                      + intent.toString());
                err = START_PERMISSION_DENIED;
            }
        }
        if (err == START_SUCCESS) {
            Slog.i(TAG, "START {" + intent.toShortString(true, true, true, false)
                    + "} from pid " + (callerApp != null ? callerApp.pid : callingPid));
        }
        ActivityRecord sourceRecord = null;
        ActivityRecord resultRecord = null;
        if (resultTo != null) {
            int index = indexOfTokenLocked(resultTo);
            if (DEBUG_RESULTS) Slog.v(
                TAG, "Will send result to " + resultTo + " (index " + index + ")");
            if (index >= 0) {
                sourceRecord = mHistory.get(index);
                if (requestCode >= 0 && !sourceRecord.finishing) {
                    resultRecord = sourceRecord;
                }
            }
        }
        int launchFlags = intent.getFlags();
        if ((launchFlags&Intent.FLAG_ACTIVITY_FORWARD_RESULT) != 0
                && sourceRecord != null) {
            // Transfer the result target from the source activity to the new
            // one being started, including any failures.
            if (requestCode >= 0) {
                return START_FORWARD_AND_REQUEST_CONFLICT;
            }
            resultRecord = sourceRecord.resultTo;
            resultWho = sourceRecord.resultWho;
            requestCode = sourceRecord.requestCode;
            sourceRecord.resultTo = null;
            if (resultRecord != null) {
                resultRecord.removeResultsLocked(
                    sourceRecord, resultWho, requestCode);
            }
        }
        if (err == START_SUCCESS && intent.getComponent() == null) {
            // We couldn't find a class that can handle the given Intent.
            // That's the end of that!
            err = START_INTENT_NOT_RESOLVED;
        }
        if (err == START_SUCCESS && aInfo == null) {
            // We couldn't find the specific class specified in the Intent.
            // Also the end of the line.
            err = START_CLASS_NOT_FOUND;
        }
        if (err != START_SUCCESS) {
            if (resultRecord != null) {
                sendActivityResultLocked(-1,
                    resultRecord, resultWho, requestCode,
                    Activity.RESULT_CANCELED, null);
            }
            mDismissKeyguardOnNextActivity = false;
            return err;
        }
        final int perm = mService.checkComponentPermission(aInfo.permission, callingPid,
                callingUid, aInfo.applicationInfo.uid, aInfo.exported);
        if (perm != PackageManager.PERMISSION_GRANTED) {
            if (resultRecord != null) {
                sendActivityResultLocked(-1,
                    resultRecord, resultWho, requestCode,
                    Activity.RESULT_CANCELED, null);
            }
            mDismissKeyguardOnNextActivity = false;
            String msg;
            if (!aInfo.exported) {
                msg = "Permission Denial: starting " + intent.toString()
                        + " from " + callerApp + " (pid=" + callingPid
                        + ", uid=" + callingUid + ")"
                        + " not exported from uid " + aInfo.applicationInfo.uid;
            } else {
                msg = "Permission Denial: starting " + intent.toString()
                        + " from " + callerApp + " (pid=" + callingPid
                        + ", uid=" + callingUid + ")"
                        + " requires " + aInfo.permission;
            }
            Slog.w(TAG, msg);
            throw new SecurityException(msg);
        }
        if (mMainStack) {
            if (mService.mController != null) {
                boolean abort = false;
                try {
                    // The Intent we give to the watcher has the extra data
                    // stripped off, since it can contain private information.
                    Intent watchIntent = intent.cloneFilter();
                    abort = !mService.mController.activityStarting(watchIntent,
                            aInfo.applicationInfo.packageName);
                } catch (RemoteException e) {
                    mService.mController = null;
                }

                if (abort) {
                    if (resultRecord != null) {
                        sendActivityResultLocked(-1,
                            resultRecord, resultWho, requestCode,
                            Activity.RESULT_CANCELED, null);
                    }
                    // We pretend to the caller that it was really started, but
                    // they will just get a cancel result.
                    mDismissKeyguardOnNextActivity = false;
                    return START_SUCCESS;
                }
            }
        }
        ActivityRecord r = new ActivityRecord(mService, this, callerApp, callingUid,
                intent, resolvedType, aInfo, mService.mConfiguration,
                resultRecord, resultWho, requestCode, componentSpecified);
        if (outActivity != null) {
            outActivity[0] = r;
        }
        if (mMainStack) {
            if (mResumedActivity == null
                    || mResumedActivity.info.applicationInfo.uid != callingUid) {
                if (!mService.checkAppSwitchAllowedLocked(callingPid, callingUid, "Activity start")) {
                    PendingActivityLaunch pal = new PendingActivityLaunch();
                    pal.r = r;
                    pal.sourceRecord = sourceRecord;
                    pal.grantedUriPermissions = grantedUriPermissions;
                    pal.grantedMode = grantedMode;
                    pal.onlyIfNeeded = onlyIfNeeded;
                    mService.mPendingActivityLaunches.add(pal);
                    mDismissKeyguardOnNextActivity = false;
                    return START_SWITCHES_CANCELED;
                }
            }

            if (mService.mDidAppSwitch) {
                // This is the second allowed switch since we stopped switches,
                // so now just generally allow switches.  Use case: user presses
                // home (switches disabled, switch to home, mDidAppSwitch now true);
                // user taps a home icon (coming from home so allowed, we hit here
                // and now allow anyone to switch again).
                mService.mAppSwitchesAllowedTime = 0;
            } else {
                mService.mDidAppSwitch = true;
            }

            mService.doPendingActivityLaunchesLocked(false);
        }

        err = startActivityUncheckedLocked(r, sourceRecord,
                grantedUriPermissions, grantedMode, onlyIfNeeded, true);
        if (mDismissKeyguardOnNextActivity && mPausingActivity == null) {
            // Someone asked to have the keyguard dismissed on the next
            // activity start, but we are not actually doing an activity
            // switch...  just dismiss the keyguard now, because we
            // probably want to see whatever is behind it.
            mDismissKeyguardOnNextActivity = false;
            mService.mWindowManager.dismissKeyguard();
        }
        return err;
    }
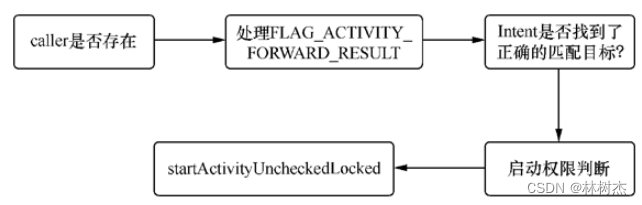
这里确保调用者本身的进程是存在的,否则返回START_PERMISSION_DENIED。这种情况出现在调用者被系统杀死,crash等。
FLAG_ACTIVITY_FORWARD_RESULT这个FLAG有跨越传递的作用,比如Activity1正常启动了Activity2,而当Activity2启动Activity3时使用了这个标志,那么当Activity3调用setResult时,result并不会像一般情况中那样传递给Activity2,而是传递给最初的Activity1。
startActivityUncheckedLocked
这个方法先拿到Intent中的FLAG,然后处理FLAG_ACTIVITY_NO_USER_ACTION,这个FLAG表示来电、闹钟等非用户主动触发的Activity事件。
这里处理了很多FLAG,例如LAUNCH_SINGLE_INSTANCE、LAUNCH_SINGLE_TASK这些,这里暂时不展开。
startActivityLocked(ActivityRecord r, boolean newTask, boolean doResume, boolean keepCurTransition)
    private final void startActivityLocked(ActivityRecord r, boolean newTask,
            boolean doResume, boolean keepCurTransition) {
     ...
        if (doResume) {
            resumeTopActivityLocked(null);
        }
    }
这里是启动activity的最后一站了,是AMS启动activity的关键。如果activity不是在新task中启动,那么程序要找出目标activity位于那个已有的task中。找到之后,如果它当前对用户不可见,就将它加入mHistory中,并在WMS中注册,但是不启动它。
接着将这个activity放在stack的最顶层:
mHistory.add(addPos, r);
r.putInHistory();
r.frontOfTask = newTask;
接下来,如果不是AMS的第一个activity,即mHistory > 0,则执行切换动画。
一个activity的UI能否显示,有个关键是WMS中必须有档案可查,就是appToken,它在startActivity中添加的:
mService.mWindowManager.addAppToken(
       addPos, r.appToken, r.task.taskId, r.info.screenOrientation, r.fullscreen);
activity有affinity特性的,它们更亲近affinity相符的task,关键地方在于FLAG是否有FLAG_ACTIVITY_RESET_TASK_IF_NEEDED。
Android源码中有很多函数都有locked标志,提醒开发者必须保证它们的线程安全。
到这里startActivity分析完毕了,但是activity的启动流程还没完。
resumeTopActivityLocked
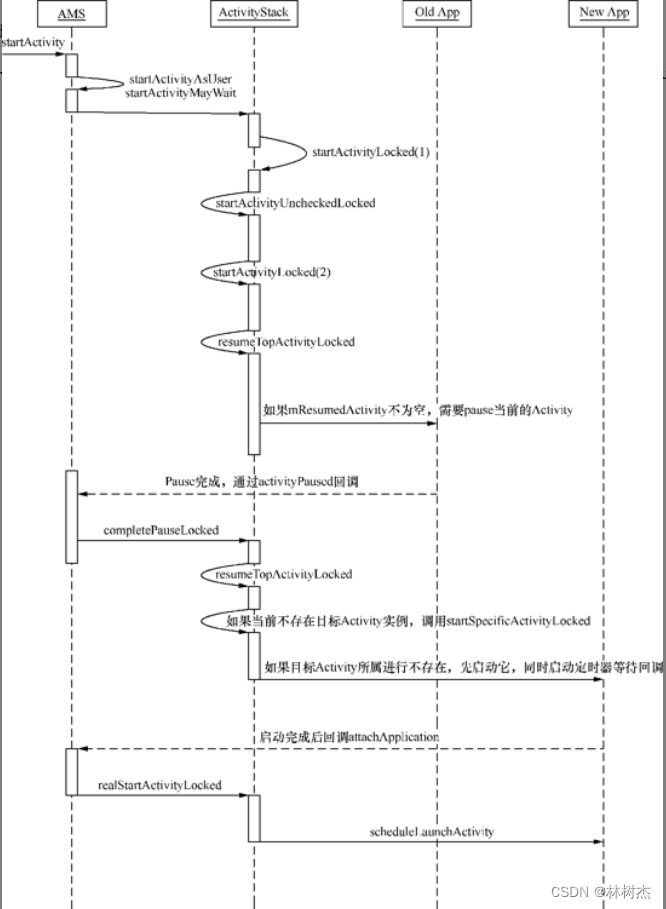
AMS会继续调用resumeTopActivityLocked来恢复最上层的Activity,并pause之前的Activity,并且在Activity切换的过程中还要首先展示切换动画,然后两个新旧Activity还会向WMS分别申请和释放Surface,最终将它们显示/不显示在屏幕上。
  int i = mHistory.size()-1;//所有Activity的数量
  while (i >= 0) {
      ActivityRecord r = mHistory.get(i);
      if (!r.finishing && r != notTop && okToShow(r)) {
          return r;
      }
      i--;
  }
  return null;
这里处理ActivityRecord。
resumeTopActivityLocked执行后面的时候,可以正式启动目标activity了,但是有两种情况,一种是目标activity所属的进程已经在运行,一种是没有运行。
前者我们可以通知WMS这个Activity已经具备显示条件了:
mService.mWindowManager.setAppVisibility(next.appToken, true);
更新一系列全局变量,如果有等待启动的对象,就会通过:
next.app.thread.scheduleResumeActivity(next.appToken, mService.isNextTransitionForward());
告知目标线程要resume指定的activity。
后者的情况复杂些,会通过startSpecificActivityLocked启动进程,接着调用一系列和startActivity长得差不多的函数,最终调用zygote来fork一个新的进程:
Process.ProcessStartResult startResult =
           Process.start("<strong>android.app.ActivityThread</strong>", app.processName, uid, uid, gids,
                        debugFlags,app.info.targetSdkVersion, null, null);
可以看出,一个进程启动的时候,实际上会加载ActivityThread。
那么新启动的进程什么时候启动activity呢?
进程启动后要通知AMS,AMS会预留一段时间等待回调。这个在不同设备上有所差异,有的10s,有的300s。如果进程指定时间内没有完成attachApplication回调,那么AMS就认为异常了。如果进程完成了attachApplication回调,AMS就会判断当前是不是有Activity在等待这个进程启动。是的话,调用realStartActivityLocked继续之前的任务。
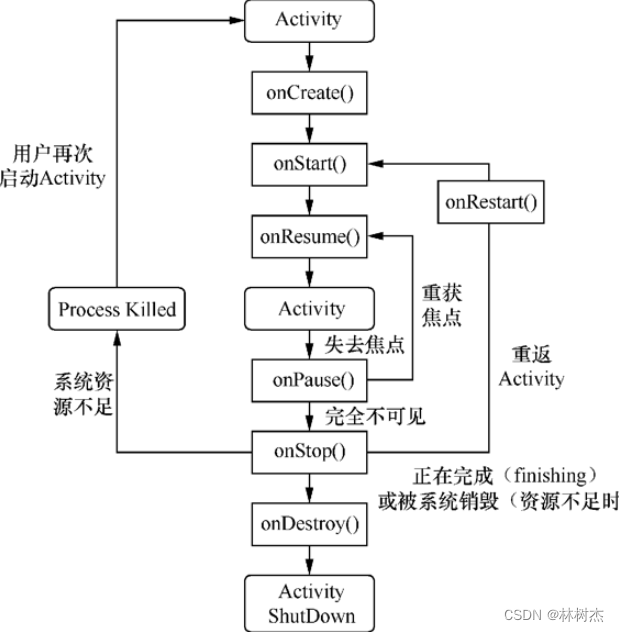
接着就是activity的生命周期了,onCreate,onStart,onResume等,并且在WMS和SurfaceFlinger的配合下,目标Activity描述的UI界面会显示在屏幕。
startActivity流程才算真正完成。
参考
《深入理解Android内核设计思想》