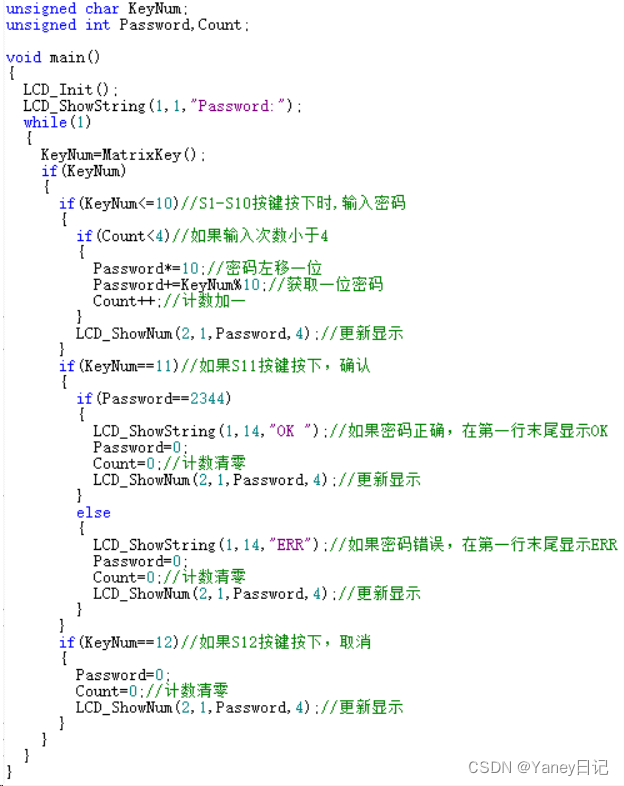
xmlns:syncfusion="http://schemas.syncfusion.com/wpf"
xmlns:stencil="clr-namespace:Syncfusion.UI.Xaml.Diagram.Stencil;assembly=Syncfusion.SfDiagram.WPF"当我们进入syncfusion的diagram中,可以看到,一个非常炫酷的例子

不仅实现了上方的工具栏同时还有下方的模板栏和画布。
如何实现相同的效果呢
1.注册密钥
syncfusion在使用时需要密钥,首先在visual studio里下生成一个新的wpf工程,加入下面这六个nuget包,看名字就知道第一个是许可证相关的,没有这个你就没法声明许可证密钥。

,然后现在,在mainwindow.xaml.cs文件中修改代码。
1.加入
using Syncfusion.UI.Xaml.Diagram;//引用
using Syncfusion.UI.Xaml.Diagram.Layout;//布局管理功能引用
using Syncfusion.UI.Xaml.Diagram.Stencil;//符号库引用
2.在初始化之前加入Syncfusion.Licensing.SyncfusionLicenseProvider.RegisterLicense("你申请的许可证密钥");一定要在初始化之前加入。
关于密钥的申请,这篇文章很清楚:
安装和使用_syncfusion的密钥-CSDN博客
using System.Text;
using System.Windows;
using System.Windows.Controls;
using System.Windows.Data;
using System.Windows.Documents;
using System.Windows.Input;
using System.Windows.Media;
using System.Windows.Media.Imaging;
using System.Windows.Navigation;
using System.Windows.Shapes;
using Syncfusion.UI.Xaml.Diagram;//引用
using Syncfusion.UI.Xaml.Diagram.Layout;//布局管理功能引用
using Syncfusion.UI.Xaml.Diagram.Stencil;//符号库引用

namespace syncfusion_24_4_9_demo1
{
    /// <summary>
    /// Interaction logic for MainWindow.xaml
    /// </summary>
    public partial class MainWindow : Window
    {
        public MainWindow()
        {
            Syncfusion.Licensing.SyncfusionLicenseProvider.RegisterLicense("你申请的许可证密钥");
            InitializeComponent();
        }
    }
}
接下来就能愉快的进行syncfusion的使用了
2.在mainwindow.xaml 的窗口定义部分添加两行代码
xmlns:syncfusion="http://schemas.syncfusion.com/wpf"
xmlns:stencil="clr-namespace:Syncfusion.UI.Xaml.Diagram.Stencil;assembly=Syncfusion.SfDiagram.WPF"
xmlns:syncfusion:引入了syncfusion命名空间,允许在XAML中使用Syncfusion控件库。xmlns:stencil:引入了stencil命名空间,用于在XAML中使用Stencil相关的功能。
效果如下面所示
<Window x:Class="syncfusion_24_4_9_demo1.MainWindow"
        xmlns="http://schemas.microsoft.com/winfx/2006/xaml/presentation"
        xmlns:x="http://schemas.microsoft.com/winfx/2006/xaml"
        xmlns:d="http://schemas.microsoft.com/expression/blend/2008"
        xmlns:mc="http://schemas.openxmlformats.org/markup-compatibility/2006"
        xmlns:local="clr-namespace:syncfusion_24_4_9_demo1"
        xmlns:syncfusion="http://schemas.syncfusion.com/wpf"
        xmlns:stencil="clr-namespace:Syncfusion.UI.Xaml.Diagram.Stencil;assembly=Syncfusion.SfDiagram.WPF"
        mc:Ignorable="d"
        Title="MainWindow" Height="450" Width="800">
3.定义窗口的资源
在窗口的资源中定义一个资源字典,先把basicshapes.xaml这个资源字典加入当前资源字典,然后定义node的样式,connector的样式,symbol的样式,然后定义了一个数据模板,用来统一标题。
注:style-样式,只是统一控件的某些属性,templete-模板,则是相当于在原有控件基础上改变内部结构和行为。
<Window.Resources>
    <!--定义资源字典和样式-->
    <ResourceDictionary>
        <ResourceDictionary.MergedDictionaries>
            <!--初始化形状-->
            <ResourceDictionary Source="/Syncfusion.SfDiagram.Wpf;component/Resources/BasicShapes.xaml" />
        </ResourceDictionary.MergedDictionaries>
        <Style TargetType="syncfusion:Node">
            <!--定义目标类型为node的风格-->
            <Setter Property="ShapeStyle">
                <!--内容模板-->
                <Setter.Value>
                    <Style TargetType="Path">
                        <Setter Property="Fill" Value="Blue"></Setter>
                        <Setter Property="Stretch" Value="Fill"></Setter>
                    </Style>
                </Setter.Value>
            </Setter>
        </Style>

        <!--Style for Connector-->
        <Style TargetType="syncfusion:Connector">
            <!--定义connector的风格-->
            <Setter Property="ConnectorGeometryStyle">
                <!--形状定义-->
                <Setter.Value>
                    <Style TargetType="Path">
                        <Setter Property="Stroke" Value="Black"  />
                        <!--stroke是轮廓-->
                        <Setter Property="StrokeThickness" Value="1" />
                    </Style>
                </Setter.Value>
            </Setter>
            <Setter Property="TargetDecoratorStyle">
                <!--目标描述定义-->
                <Setter.Value>
                    <Style TargetType="Path">
                        <!--路径-->
                        <Setter Property="Stroke" Value="#4f4f4f"  />
                        <Setter Property="Stretch" Value="Fill" />
                        <Setter Property="Fill" Value="#4f4f4f"  />
                        <Setter Property="StrokeThickness" Value="1" />
                    </Style>
                </Setter.Value>
            </Setter>
        </Style>

        <!--Symbol类型定义-->
        <Style TargetType="stencil:Symbol">
            <Setter Property="Width" Value="50"/>
            <Setter Property="Height" Value="50"/>
            <Setter Property="Padding" Value="3" />
            <Setter Property="BorderThickness" Value="1" />
            <Setter Property="Background" Value="Transparent" />
            <Setter Property="BorderBrush" Value="Transparent" />
            <Setter Property="Margin" Value="4"></Setter>
        </Style>
        <DataTemplate x:Key="TitleTemplate">
            <TextBlock x:Name="HeaderText" Text="{Binding}" FontSize="15" FontWeight="SemiBold"  Foreground="#2b579a" />
        </DataTemplate>
    </ResourceDictionary>
</Window.Resources>
4.定义页面
首先把页面划分成两行,第一行放工具栏,这个直接把sfdiagramribbon拖进来就好了,放在第一行,第二行再分成两列,第一列设置成自动宽度,第二列设置成*,因为左边的模板栏可以收缩到页面最左边,所以要设置成auto,这样缩进的时候占据的空间也会相应的收缩,右边画布设置成*,就是要在左边模板栏收缩的时候,右边也能自动占据空间。
 <Grid>
     <Grid.RowDefinitions>
         <RowDefinition Height="Auto"/>
         <RowDefinition Height="*"/>
     </Grid.RowDefinitions>
     <syncfusion:SfDiagramRibbon x:Name="DiagramRibbon" Grid.Row="0" DataContext="{Binding ElementName=Diagram}"/>


     <Grid Grid.Row="1">
         <Grid.ColumnDefinitions>
             <ColumnDefinition Width="auto"/>
             <ColumnDefinition Width="*"/>
         </Grid.ColumnDefinitions>
         <Grid Grid.Column="0">
             <Grid Background="White">
                 <stencil:Stencil x:Name="stencil"
                          Grid.Column="0"
                          Grid.Row="1"
                          ExpandMode="ZeroOrMore"
                          BorderBrush="#dfdfdf"
                          BorderThickness="1" Title="Shapes" TitleTemplate="{StaticResource TitleTemplate}">
                     <stencil:Stencil.Resources>
                         <ResourceDictionary>
                             <ResourceDictionary.MergedDictionaries>
                                 <!--初始化形状-->
                                 <ResourceDictionary Source="/Syncfusion.SfDiagram.Wpf;component/Resources/BasicShapes.xaml" />
                             </ResourceDictionary.MergedDictionaries>
                         </ResourceDictionary>
                     </stencil:Stencil.Resources>
                     <stencil:Stencil.SymbolSource>
                         <syncfusion:SymbolCollection>
                             <!--Define the DiagramElement- Node-->
                             <syncfusion:NodeViewModel x:Name="node"
                                               Key="Nodes"
                                               UnitHeight="70"
                                               UnitWidth="100"
                                               OffsetX="100"
                                               OffsetY="100"
                                               Shape="{StaticResource Rectangle}">
                             </syncfusion:NodeViewModel>
                             <!--Define the DiagramElement- Connector-->
                             <syncfusion:ConnectorViewModel SourcePoint="100,100"
                                                    Key="Connectors"
                                                    TargetPoint="200,200" />
                             <!--Define the DiagramElement- Group-->
                             <syncfusion:GroupViewModel Key="Groups">
                                 <!--Creates the Groupable Nodes-->
                                 <syncfusion:GroupViewModel.Nodes>
                                     <syncfusion:NodeCollection>
                                         <syncfusion:NodeViewModel UnitHeight="70"
                                                           ID="srcnode"
                                                           OffsetX="0"
                                                           OffsetY="300"
                                                           UnitWidth="100"
                                                           Shape="{StaticResource Rectangle}">
                                         </syncfusion:NodeViewModel>
                                         <syncfusion:NodeViewModel UnitHeight="70"
                                                           ID="tarnode"
                                                           OffsetX="100"
                                                           OffsetY="500"
                                                           UnitWidth="100"
                                                           Shape="{StaticResource Rectangle}">
                                         </syncfusion:NodeViewModel>
                                     </syncfusion:NodeCollection>
                                 </syncfusion:GroupViewModel.Nodes>
                                 <!--Creates the Groupable Connectors-->
                                 <syncfusion:GroupViewModel.Connectors>
                                     <syncfusion:ConnectorCollection>
                                         <syncfusion:ConnectorViewModel SourceNodeID="srcnode"
                                                                TargetNodeID="tarnode" />
                                     </syncfusion:ConnectorCollection>
                                 </syncfusion:GroupViewModel.Connectors>
                             </syncfusion:GroupViewModel>
                         </syncfusion:SymbolCollection>
                     </stencil:Stencil.SymbolSource>

                     <stencil:Stencil.Categories>
                         <stencil:StencilCategoryCollection>
                             <!--Specify the basic shapes category with title and resource key-->
                             <stencil:StencilCategory Title="Basic Shapes" Keys="{StaticResource BasicShapes}"/>
                         </stencil:StencilCategoryCollection>
                     </stencil:Stencil.Categories>

                     <stencil:Stencil.SymbolGroups>
                         <stencil:SymbolGroups>
                             <!--Separate groups based on the key-->
                             <stencil:SymbolGroupProvider MappingName="Key" />
                         </stencil:SymbolGroups>
                     </stencil:Stencil.SymbolGroups>

                 </stencil:Stencil>
             </Grid>
         </Grid>
         <syncfusion:SfDiagram x:Name="Diagram" Constraints="Undoable,Default" Grid.Column="1">
             <syncfusion:SfDiagram.Theme>
                 <syncfusion:OfficeTheme/>
             </syncfusion:SfDiagram.Theme>
             <syncfusion:SfDiagram.Nodes>
                 <syncfusion:NodeCollection/>
             </syncfusion:SfDiagram.Nodes>
             <syncfusion:SfDiagram.Connectors>
                 <syncfusion:ConnectorCollection/>
             </syncfusion:SfDiagram.Connectors>
             <syncfusion:SfDiagram.Groups>
                 <syncfusion:GroupCollection/>
             </syncfusion:SfDiagram.Groups>
             <syncfusion:SfDiagram.SnapSettings>
                 <syncfusion:SnapSettings SnapConstraints="All"/>
             </syncfusion:SfDiagram.SnapSettings>
             <syncfusion:SfDiagram.HorizontalRuler>
                 <syncfusion:Ruler Orientation="Horizontal"/>
             </syncfusion:SfDiagram.HorizontalRuler>
             <syncfusion:SfDiagram.VerticalRuler>
                 <syncfusion:Ruler Orientation="Vertical"/>
             </syncfusion:SfDiagram.VerticalRuler>
         </syncfusion:SfDiagram>
     </Grid>
 </Grid>