MySQL介绍和安装
文章目录
- MySQL介绍和安装
- 1.MySQL介绍
- 2.MySQL安装
- 2.1 主机初始化
- 2.1.1 设置网卡名和ip地址
- 2.1.2 配置镜像源
- 2.1.3 关闭防火墙
- 2.1.4 禁用SELinux
- 2.1.5 设置时区
- 2.2 包安装
- 2.2.1 Rocky和CentOS 安装 MySQL
- 2.2.2 Ubuntu 安装 MySQL
- 2.3 二进制安装安装MySQL
- 2.3.1 安装相关包
- 2.3.2 用户和组
- 2.3.3 准备程序文件
- 2.3.4 准备环境变量
- 2.3.5 准备配置文件
- 2.3.6 生成数据库文件,并提取root密码
- 2.3.7 准备服务脚本和启动
- 2.3.8 修改口令
- 2.3.9 测试登录
- 2.3.10 一键安装MySQL二进制包的脚本
- 2.4 源码安装
- 2.4.1 安装相关依赖包
- 2.4.2 做准备用户和数据目录
- 2.4.3 准备数据库目录
- 2.4.4 源码编译安装
- 2.4.4.1 下载并解压缩源码包
- 2.4.4.2 源码编译安装MySQL
- 2.4.5 准备环境变量
- 2.4.6 生成数据库文件
- 2.4.7 准备配置文件
- 2.4.8 准备启动脚本并启动服务
- 2.4.9 修改口令
- 2.4.10 登录测试
- 2.4.11 一键安装MySQL源码编译的脚本
1.MySQL介绍

MySQL是一个流行的开源关系型数据库管理系统,广泛应用于Web应用程序开发中。MySQL最初由瑞典公司MySQL AB开发,现在由Oracle公司持有和维护。MySQL支持多种操作系统,包括Linux、Windows和Mac OS等。
以下是MySQL的一些特点和优势:
- 开源免费:MySQL是开源软件,可以免费使用,这使得它成为许多开发者和组织的首选数据库管理系统。
- 跨平台性:MySQL支持多种操作系统,包括各种Linux发行版、Windows和Mac OS等,使其能够在不同的环境中运行。
- 高性能:MySQL是一个高性能的数据库管理系统,能够处理大量数据和高并发请求。
- 可靠性:MySQL具有良好的稳定性和可靠性,能够保证数据的安全性和完整性。
- 易于使用:MySQL的语法简单易懂,容易学习和使用,适合各种规模的应用程序开发。
- 支持标准SQL:MySQL遵循SQL(Structured Query Language)标准,与其他数据库系统兼容,开发者可以轻松迁移和管理数据。
- 丰富的功能:MySQL提供了许多功能丰富的工具和插件,如存储过程、触发器、视图等,可以满足各种复杂的数据库需求。
总的来说,MySQL是一个强大、稳定且易于使用的关系型数据库管理系统,适用于各种规模的应用程序开发,特别是Web应用程序开发。
2.MySQL安装
2.1 主机初始化
2.1.1 设置网卡名和ip地址
Rocky 9和CentOS Stream 9:
# Rocky 9和CentOS Stream 9默认支持修改网卡名。
[root@rocky9 ~]# grep 'plugins' /etc/NetworkManager/NetworkManager.conf
#plugins=keyfile,ifcfg-rh
# 因为网卡命名方式默认是keyfile,默认不支持修改网卡名,既然官方已经默认是keyfile那这里就不去更改网卡名了。

[root@rocky9 ~]# ETHNAME=`ip addr | awk -F"[ :]" '/^2/{print $3}'`

[root@rocky9 ~]# nmcli con delete ${ETHNAME} && nmcli connection add type ethernet con-name ${ETHNAME} ifname ${ETHNAME} ipv4.method manual ipv4.address "172.31.0.9/21" ipv4.gateway "172.31.0.2" ipv4.dns "223.5.5.5,180.76.76.76" autoconnect yes && nmcli con reload && nmcli con up ${ETHNAME}
# 172.31.0.9/21中172.31.0.9是ip地址,21是子网位数;172.31.0.2是网关地址;223.5.5.5, 180.76.76.76都是DNS,根据自己的需求修改。

[root@rocky9 ~]# ip addr
1: lo: <LOOPBACK,UP,LOWER_UP> mtu 65536 qdisc noqueue state UNKNOWN group default qlen 1000
    link/loopback 00:00:00:00:00:00 brd 00:00:00:00:00:00
    inet 127.0.0.1/8 scope host lo
       valid_lft forever preferred_lft forever
    inet6 ::1/128 scope host
       valid_lft forever preferred_lft forever
2: ens160: <BROADCAST,MULTICAST,UP,LOWER_UP> mtu 1500 qdisc mq state UP group default qlen 1000
    link/ether 00:0c:29:37:62:95 brd ff:ff:ff:ff:ff:ff
    altname enp3s0
    inet 172.31.0.9/21 brd 172.31.7.255 scope global noprefixroute ens160
       valid_lft forever preferred_lft forever
    inet6 fe80::51ca:fd5d:3552:677d/64 scope link noprefixroute
       valid_lft forever preferred_lft forever
# 可以看到ip地址已修改。
Rocky 8、CentOS Stream 8和CentOS 7:
# Rocky 8、CentOS Stream 8和CentOS 7支持修改网卡名。
[root@rocky8 ~]# grep 'plugins' /etc/NetworkManager/NetworkManager.conf
#plugins=ifcfg-rh
# 因为网卡命名方式默认是ifcfg-rh,支持修改网卡名。

# 修改网卡名称配置文件
[root@rocky8 ~]# sed -ri.bak '/^GRUB_CMDLINE_LINUX=/s@"$@ net.ifnames=0 biosdevname=0"@' /etc/default/grub
[root@rocky8 ~]# grub2-mkconfig -o /boot/grub2/grub.cfg
Generating grub configuration file ...
done

# 修改网卡文件名
[root@rocky8 ~]# ETHNAME=`ip addr | awk -F"[ :]" '/^2/{print $3}'`
[root@rocky8 ~]# mv /etc/sysconfig/network-scripts/ifcfg-${ETHNAME} /etc/sysconfig/network-scripts/ifcfg-eth0

[root@rocky8 ~]# shutdown -r now


[root@rocky8 ~]# nmcli dev
DEVICE  TYPE      STATE      CONNECTION
eth0    ethernet  connected  Wired connection 1
lo      loopback  unmanaged  --
# 可以看到CONNECTION的名字是Wired connection 1,要改名才可以下面设置。

[root@rocky8 ~]# ETHNAME=`ip addr | awk -F"[ :]" '/^2/{print $3}'`

[root@rocky8 ~]# nmcli connection modify "Wired connection 1" con-name ${ETHNAME}
[root@rocky8 ~]# nmcli dev
DEVICE  TYPE      STATE      CONNECTION
eth0    ethernet  connected  eth0
lo      loopback  unmanaged  --

# 修改ip地址
[root@rocky8 ~]# nmcli con delete ${ETHNAME} && nmcli connection add type ethernet con-name ${ETHNAME} ifname ${ETHNAME} ipv4.method manual ipv4.address "172.31.0.8/21" ipv4.gateway "172.31.0.2" ipv4.dns "223.5.5.5,180.76.76.76" autoconnect yes && nmcli con reload && nmcli dev up eth0
# 172.31.0.8/21中172.31.0.8是ip地址,21是子网位数;172.31.0.2是网关地址;223.5.5.5, 180.76.76.76都是DNS,根据自己的需求修改。

[root@rocky8 ~]# ip addr
1: lo: <LOOPBACK,UP,LOWER_UP> mtu 65536 qdisc noqueue state UNKNOWN group default qlen 1000
    link/loopback 00:00:00:00:00:00 brd 00:00:00:00:00:00
    inet 127.0.0.1/8 scope host lo
       valid_lft forever preferred_lft forever
    inet6 ::1/128 scope host
       valid_lft forever preferred_lft forever
2: eth0: <BROADCAST,MULTICAST,UP,LOWER_UP> mtu 1500 qdisc mq state UP group default qlen 1000
    link/ether 00:0c:29:6f:65:d3 brd ff:ff:ff:ff:ff:ff
    altname enp3s0
    altname ens160
    inet 172.31.0.8/21 brd 172.31.7.255 scope global noprefixroute eth0
       valid_lft forever preferred_lft forever
    inet6 fe80::e9c9:aa93:4a58:2cc2/64 scope link noprefixroute
       valid_lft forever preferred_lft forever
# 重启系统后可以看到网卡名已经修改成eth0,ip地址也已修改。
Ubuntu:
# Ubuntu先启用root用户,并设置密码
raymond@ubuntu2204:~$ cat set_root_login.sh
#!/bin/bash

read -p "请输入密码: " PASSWORD
echo ${PASSWORD} |sudo -S sed -ri 's@#(PermitRootLogin )prohibit-password@\1yes@' /etc/ssh/sshd_config
sudo systemctl restart sshd
sudo -S passwd root <<-EOF
${PASSWORD}
${PASSWORD}
EOF

raymond@ubuntu2204:~$ bash set_root_login.sh
请输入密码: 123456
[sudo] password for raymond: New password: Retype new password: passwd: password updated successfully

raymond@ubuntu2204:~$ rm -rf set_root_login.sh

# 使用root登陆,修改网卡名
root@ubuntu2204:~# sed -ri.bak '/^GRUB_CMDLINE_LINUX=/s@"$@net.ifnames=0 biosdevname=0"@' /etc/default/grub
root@ubuntu2204:~# grub-mkconfig -o /boot/grub/grub.cfg
Sourcing file `/etc/default/grub'
Sourcing file `/etc/default/grub.d/init-select.cfg'
Generating grub configuration file ...
Found linux image: /boot/vmlinuz-5.15.0-88-generic
Found initrd image: /boot/initrd.img-5.15.0-88-generic
Warning: os-prober will not be executed to detect other bootable partitions.
Systems on them will not be added to the GRUB boot configuration.
Check GRUB_DISABLE_OS_PROBER documentation entry.
done

# Ubuntu 20.04设置ip地址
root@ubuntu2004:~# cat > /etc/netplan/00-installer-config.yaml <<-EOF
network:
  version: 2
  renderer: networkd
  ethernets:
    eth0:
      dhcp4: no
      dhcp6: no
      addresses: [172.31.0.20/21]
      gateway4: 172.31.0.2
      nameservers:
        addresses: [223.5.5.5, 180.76.76.76]
EOF
# 说明:Ubuntu20.04网卡配置文件是00-installer-config.yaml;172.31.0.20/21中172.31.0.20是ip地址,21是子网位数;172.31.0.2是网关地址;223.5.5.5, 180.76.76.76都是DNS,根据自己的需求修改。

# Ubuntu 18.04设置ip地址
root@ubuntu1804:~# cat > /etc/netplan/01-netcfg.yaml <<-EOF
network:
  version: 2
  renderer: networkd
  ethernets:
    eth0:
      dhcp4: no
      dhcp6: no
      addresses: [172.31.0.18/21]
      gateway4: 172.31.0.2
      nameservers:
        addresses: [223.5.5.5, 180.76.76.76]
EOF
# 说明:Ubuntu18.04网卡配置文件是01-netcfg.yaml;172.31.0.18/21中172.31.0.18是ip地址,21是子网位数;172.31.0.2是网关地址;223.5.5.5, 180.76.76.76都是DNS,根据自己的需求修改。

root@ubuntu2004:~# shutdown -r now

root@ubuntu2004:~# ip addr
1: lo: <LOOPBACK,UP,LOWER_UP> mtu 65536 qdisc noqueue state UNKNOWN group default qlen 1000
    link/loopback 00:00:00:00:00:00 brd 00:00:00:00:00:00
    inet 127.0.0.1/8 scope host lo
       valid_lft forever preferred_lft forever
    inet6 ::1/128 scope host
       valid_lft forever preferred_lft forever
2: eth0: <BROADCAST,MULTICAST,UP,LOWER_UP> mtu 1500 qdisc fq_codel state UP group default qlen 1000
    link/ether 00:0c:29:e5:98:6f brd ff:ff:ff:ff:ff:ff
    inet 172.31.0.20/21 brd 172.31.7.255 scope global eth0
       valid_lft forever preferred_lft forever
    inet6 fe80::20c:29ff:fee5:986f/64 scope link
       valid_lft forever preferred_lft forever
# 重启系统后可以看到网卡名已经修改成eth0,ip地址也已修改。

# Ubuntu 22.04设置ip地址
root@ubuntu2204:~# cat > /etc/netplan/00-installer-config.yaml <<-EOF
network:
  version: 2
  renderer: networkd
  ethernets:
    eth0:
      dhcp4: no
      dhcp6: no
      addresses: [172.31.0.22/21]
      routes:
        - to: default
          via: 172.31.0.2
      nameservers:
        addresses: [223.5.5.5, 180.76.76.76]
EOF
# 说明:Ubuntu 22.04网卡配置文件是00-installer-config.yaml;172.31.0.22/21中172.31.0.22是ip地址,21是子网位数;172.31.0.2是网关地址,Ubuntu 22.04设置网关地址的方法发生了改变,参考上面的方法;223.5.5.5, 180.76.76.76都是DNS,根据自己的需求修改。

root@ubuntu2204:~# shutdown -r now

# 重启后使用新设置的ip登陆
root@ubuntu2204:~# ip addr
1: lo: <LOOPBACK,UP,LOWER_UP> mtu 65536 qdisc noqueue state UNKNOWN group default qlen 1000
    link/loopback 00:00:00:00:00:00 brd 00:00:00:00:00:00
    inet 127.0.0.1/8 scope host lo
       valid_lft forever preferred_lft forever
    inet6 ::1/128 scope host
       valid_lft forever preferred_lft forever
2: eth0: <BROADCAST,MULTICAST,UP,LOWER_UP> mtu 1500 qdisc fq_codel state UP group default qlen 1000
    link/ether 00:0c:29:a7:be:f2 brd ff:ff:ff:ff:ff:ff
    altname enp2s1
    altname ens33
    inet 172.31.0.22/21 brd 172.31.7.255 scope global eth0
       valid_lft forever preferred_lft forever
    inet6 fe80::20c:29ff:fea7:bef2/64 scope link
       valid_lft forever preferred_lft forever
# 重启系统后可以看到网卡名已经修改成eth0,ip地址也已修改。
2.1.2 配置镜像源
Rocky 8和9:
MIRROR=mirrors.sjtug.sjtu.edu.cn
sed -i.bak -e 's|^mirrorlist=|#mirrorlist=|g' -e 's|^#baseurl=http://dl.rockylinux.org/$contentdir|baseurl=https://'${MIRROR}'/rocky|g' /etc/yum.repos.d/[Rr]ocky*.repo

dnf clean all && dnf makecache
CentOS Stream 9:
cat update_mirror.pl
#!/usr/bin/perl

use strict;
use warnings;
use autodie;

# 要修改镜像源,请去修改url变量!
my $url = 'mirrors.aliyun.com';
my $mirrors = "https://$url/centos-stream";

if (@ARGV < 1) {
    die "Usage: $0 <filename1> <filename2> ...\n";
}

while (my $filename = shift @ARGV) {
    my $backup_filename = $filename . '.bak';
    rename $filename, $backup_filename;

    open my $input, "<", $backup_filename;
    open my $output, ">", $filename;

    while (<$input>) {
        s/^metalink/# metalink/;

        if (m/^name/) {
            my (undef, $repo, $arch) = split /-/;
            $repo =~ s/^\s+|\s+$//g;
            ($arch = defined $arch ? lc($arch) : '') =~ s/^\s+|\s+$//g;

            if ($repo =~ /^Extras/) {
                $_ .= "baseurl=${mirrors}/SIGs/\$releasever-stream/extras" . ($arch eq 'source' ? "/${arch}/" : "/\$basearch/") . "extras-common\n";
            } else {
                $_ .= "baseurl=${mirrors}/\$releasever-stream/$repo" . ($arch eq 'source' ? "/" : "/\$basearch/") . ($arch ne '' ? "${arch}/tree/" : "os") . "\n";
            }
        }

        print $output $_;
    }
}

rpm -q perl &> /dev/null || { echo -e "\\033[01;31m "安装perl工具,请稍等..."\033[0m";yum -y install perl ; }

perl ./update_mirror.pl /etc/yum.repos.d/centos*.repo

dnf clean all && dnf makecache
CentOS Stream 8:
MIRROR=mirrors.aliyun.com
sed -i.bak -e 's|^mirrorlist=|#mirrorlist=|g' -e 's|^#baseurl=http://mirror.centos.org/$contentdir|baseurl=https://'${MIRROR}'/centos|g' /etc/yum.repos.d/CentOS-*.repo

dnf clean all && dnf makecache
CentOS 7:
MIRROR=mirrors.aliyun.com
sed -i.bak -e 's|^mirrorlist=|#mirrorlist=|g' -e 's|^#baseurl=http://mirror.centos.org|baseurl=https://'${MIRROR}'|g' /etc/yum.repos.d/CentOS-*.repo

yum clean all && yum makecache
Ubuntu 22.04和20.04:
MIRROR=mirrors.aliyun.com
OLD_MIRROR=`sed -rn "s@^deb http(.*)://(.*)/ubuntu/? $(lsb_release -cs) main.*@\2@p" /etc/apt/sources.list`

sed -i.bak 's/'${OLD_MIRROR}'/'${MIRROR}'/g' /etc/apt/sources.list

apt update
Ubuntu 18.04:
MIRROR=mirrors.aliyun.com
OLD_MIRROR=`sed -rn "s@^deb http(.*)://(.*)/ubuntu/? $(lsb_release -cs) main.*@\2@p" /etc/apt/sources.list`

sed -i.bak 's/'${OLD_MIRROR}'/'${MIRROR}'/g' /etc/apt/sources.list

SECURITY_MIRROR=`sed -rn "s@^deb http(.*)://(.*)/ubuntu $(lsb_release -cs)-security main.*@\2@p" /etc/apt/sources.list`

sed -i.bak 's/'${SECURITY_MIRROR}'/'${MIRROR}'/g' /etc/apt/sources.list

apt update
2.1.3 关闭防火墙
# Rocky和CentOS
systemctl disable --now firewalld

# CentOS 7
systemctl disable --now NetworkManager

# Ubuntu
systemctl disable --now ufw
2.1.4 禁用SELinux
#CentOS
setenforce 0
sed -i 's#SELINUX=enforcing#SELINUX=disabled#g' /etc/selinux/config

#Ubuntu
Ubuntu没有安装SELinux,不用设置
2.1.5 设置时区
ln -sf /usr/share/zoneinfo/Asia/Shanghai /etc/localtime
echo 'Asia/Shanghai' >/etc/timezone

#Ubuntu还要设置下面内容
cat >> /etc/default/locale <<-EOF
LC_TIME=en_DK.UTF-8
EOF
2.2 包安装
2.2.1 Rocky和CentOS 安装 MySQL
在Rocky 8/9或CentOS 8/9上安装mysql8
[root@rocky9 ~]# yum list mysql --showduplicates
Last metadata expiration check: 0:01:08 ago on Mon 19 Feb 2024 01:16:44 PM CST.
Available Packages
mysql.x86_64                                          8.0.32-1.el9_2                                           appstream

[root@rocky9 ~]# yum -y install mysql

[root@rocky9 ~]# systemctl enable --now mysqld

[root@rocky9 ~]# ls /var/lib/mysql
 auto.cnf        client-cert.pem      ibdata1         mysql.ibd            mysqlx.sock.lock     server-key.pem
 binlog.000001   client-key.pem       ibtmp1          mysql.sock           performance_schema   sys
 binlog.index   '#ib_16384_0.dblwr'  '#innodb_redo'   mysql.sock.lock      private_key.pem      undo_001
 ca-key.pem     '#ib_16384_1.dblwr'  '#innodb_temp'   mysql_upgrade_info   public_key.pem       undo_002
 ca.pem          ib_buffer_pool       mysql           mysqlx.sock          server-cert.pem

[root@rocky9 ~]# mysql -V
mysql  Ver 8.0.32 for Linux on x86_64 (Source distribution)

[root@rocky9 ~]# systemctl status mysqld
● mysqld.service - MySQL 8.0 database server
     Loaded: loaded (/usr/lib/systemd/system/mysqld.service; enabled; preset: disabled)
     Active: active (running) since Mon 2024-02-19 13:19:25 CST; 17min ago
    Process: 12376 ExecStartPre=/usr/libexec/mysql-check-socket (code=exited, status=0/SUCCESS)
    Process: 12398 ExecStartPre=/usr/libexec/mysql-prepare-db-dir mysqld.service (code=exited, status=0/SUCCESS)
   Main PID: 12473 (mysqld)
     Status: "Server is operational"
      Tasks: 39 (limit: 10840)
     Memory: 480.1M
        CPU: 7.273s
     CGroup: /system.slice/mysqld.service
             └─12473 /usr/libexec/mysqld --basedir=/usr

Feb 19 13:19:18 rocky9 systemd[1]: Starting MySQL 8.0 database server...
Feb 19 13:19:18 rocky9 mysql-prepare-db-dir[12398]: Initializing MySQL database
Feb 19 13:19:25 rocky9 systemd[1]: Started MySQL 8.0 database server.

[root@rocky9 ~]# mysql
Welcome to the MySQL monitor.  Commands end with ; or \g.
Your MySQL connection id is 8
Server version: 8.0.32 Source distribution

Copyright (c) 2000, 2023, Oracle and/or its affiliates.

Oracle is a registered trademark of Oracle Corporation and/or its
affiliates. Other names may be trademarks of their respective
owners.

Type 'help;' or '\h' for help. Type '\c' to clear the current input statement.

mysql> status
--------------
mysql  Ver 8.0.32 for Linux on x86_64 (Source distribution)

Connection id:		8
Current database:
Current user:		root@localhost
SSL:			Not in use
Current pager:		stdout
Using outfile:		''
Using delimiter:	;
Server version:		8.0.32 Source distribution
Protocol version:	10
Connection:		Localhost via UNIX socket
Server characterset:	utf8mb4
Db     characterset:	utf8mb4
Client characterset:	utf8mb4
Conn.  characterset:	utf8mb4
UNIX socket:		/var/lib/mysql/mysql.sock
Binary data as:		Hexadecimal
Uptime:			1 min 12 sec

Threads: 2  Questions: 5  Slow queries: 0  Opens: 120  Flush tables: 3  Open tables: 36  Queries per second avg: 0.069
--------------

mysql> show databases;
+--------------------+
| Database           |
+--------------------+
| information_schema |
| mysql              |
| performance_schema |
| sys                |
+--------------------+
4 rows in set (0.00 sec)

mysql> exit
Bye
在CentOS7上安装mysql
# centos7上镜像源默认没有mysql的安装包,需要添加镜像源,需要安装mysql哪个版本就添加那个镜像源
# 下面是mysql 8.0镜像仓库
[root@centos7 ~]# cat > /etc/yum.repos.d/mysql.repo <<EOF
[mysql]
baseurl=https://mirrors.tuna.tsinghua.edu.cn/mysql/yum/mysql-8.0-community-el7-x86_64/
gpgcheck=0
EOF

# 下面是mysql 5.7镜像仓库
cat > /etc/yum.repos.d/mysql.repo <<EOF
[mysql]
baseurl=https://mirrors.tuna.tsinghua.edu.cn/mysql/yum/mysql-5.7-community-el7-x86_64/
gpgcheck=0
EOF

[root@centos7 ~]# yum makecache

[root@centos7 ~]# yum list mysql-community-server --showduplicates
Loaded plugins: fastestmirror
Repository 'mysql' is missing name in configuration, using id
Loading mirror speeds from cached hostfile
Available Packages
mysql-community-server.x86_64                                     8.0.11-1.el7                                     mysql
mysql-community-server.x86_64                                     8.0.12-1.el7                                     mysql
mysql-community-server.x86_64                                     8.0.13-1.el7                                     mysql
mysql-community-server.x86_64                                     8.0.14-1.el7                                     mysql
mysql-community-server.x86_64                                     8.0.15-1.el7                                     mysql
mysql-community-server.x86_64                                     8.0.16-1.el7                                     mysql
mysql-community-server.x86_64                                     8.0.16-2.el7                                     mysql
mysql-community-server.x86_64                                     8.0.17-1.el7                                     mysql
mysql-community-server.x86_64                                     8.0.18-1.el7                                     mysql
mysql-community-server.x86_64                                     8.0.19-1.el7                                     mysql
mysql-community-server.x86_64                                     8.0.20-1.el7                                     mysql
mysql-community-server.x86_64                                     8.0.21-1.el7                                     mysql
mysql-community-server.x86_64                                     8.0.22-1.el7                                     mysql
mysql-community-server.x86_64                                     8.0.23-1.el7                                     mysql
mysql-community-server.x86_64                                     8.0.24-1.el7                                     mysql
mysql-community-server.x86_64                                     8.0.25-1.el7                                     mysql
mysql-community-server.x86_64                                     8.0.26-1.el7                                     mysql
mysql-community-server.x86_64                                     8.0.27-1.el7                                     mysql
mysql-community-server.x86_64                                     8.0.28-1.el7                                     mysql
mysql-community-server.x86_64                                     8.0.30-1.el7                                     mysql
mysql-community-server.x86_64                                     8.0.31-1.el7                                     mysql
mysql-community-server.x86_64                                     8.0.32-1.el7                                     mysql
mysql-community-server.x86_64                                     8.0.33-1.el7                                     mysql
mysql-community-server.x86_64                                     8.0.34-1.el7                                     mysql
mysql-community-server.x86_64                                     8.0.35-1.el7                                     mysql
mysql-community-server.x86_64                                     8.0.36-1.el7                                     mysq

[root@centos7 ~]# yum -y install mysql-community-server

[root@centos7 ~]# systemctl enable --now mysqld

[root@centos7 ~]# mysql -V
mysql  Ver 8.0.36 for Linux on x86_64 (MySQL Community Server - GPL)

[root@centos7 ~]#  systemctl status mysqld
● mysqld.service - MySQL Server
   Loaded: loaded (/usr/lib/systemd/system/mysqld.service; enabled; vendor preset: disabled)
   Active: active (running) since Mon 2024-02-19 21:35:54 CST; 31s ago
     Docs: man:mysqld(8)
           http://dev.mysql.com/doc/refman/en/using-systemd.html
  Process: 1190 ExecStartPre=/usr/bin/mysqld_pre_systemd (code=exited, status=0/SUCCESS)
 Main PID: 1256 (mysqld)
   Status: "Server is operational"
   CGroup: /system.slice/mysqld.service
           └─1256 /usr/sbin/mysqld

Feb 19 21:35:49 centos7 systemd[1]: Starting MySQL Server...
Feb 19 21:35:54 centos7 systemd[1]: Started MySQL Server.

# 获取mysql 5.7初始密码
[root@centos7 ~]# grep password /var/log/mysqld.log
2024-02-19T13:35:51.231450Z 6 [Note] [MY-010454] [Server] A temporary password is generated for root@localhost: e/Xs+K?ko6/h
#

# 修改mysql密码
[root@centos7 ~]# mysqladmin -uroot -p'e/Xs+K?ko6/h' password 123456
mysqladmin: [Warning] Using a password on the command line interface can be insecure.
Warning: Since password will be sent to server in plain text, use ssl connection to ensure password safety.
mysqladmin: unable to change password; error: 'Your password does not satisfy the current policy requirements'
# 上面报错提示密码太简单

[root@centos7 ~]# mysqladmin -uroot -p'e/Xs+K?ko6/h' password Raymond@2024
mysqladmin: [Warning] Using a password on the command line interface can be insecure.
Warning: Since password will be sent to server in plain text, use ssl connection to ensure password safety.

[root@centos7 ~]# mysql -uroot -p'Raymond@2024'
mysql: [Warning] Using a password on the command line interface can be insecure.
Welcome to the MySQL monitor.  Commands end with ; or \g.
Your MySQL connection id is 12
Server version: 8.0.36 MySQL Community Server - GPL

Copyright (c) 2000, 2024, Oracle and/or its affiliates.

Oracle is a registered trademark of Oracle Corporation and/or its
affiliates. Other names may be trademarks of their respective
owners.

Type 'help;' or '\h' for help. Type '\c' to clear the current input statement.

mysql> status
--------------
mysql  Ver 8.0.36 for Linux on x86_64 (MySQL Community Server - GPL)

Connection id:		12
Current database:
Current user:		root@localhost
SSL:			Not in use
Current pager:		stdout
Using outfile:		''
Using delimiter:	;
Server version:		8.0.36 MySQL Community Server - GPL
Protocol version:	10
Connection:		Localhost via UNIX socket
Server characterset:	utf8mb4
Db     characterset:	utf8mb4
Client characterset:	utf8mb4
Conn.  characterset:	utf8mb4
UNIX socket:		/var/lib/mysql/mysql.sock
Binary data as:		Hexadecimal
Uptime:			5 min 36 sec

Threads: 2  Questions: 11  Slow queries: 0  Opens: 140  Flush tables: 3  Open tables: 56  Queries per second avg: 0.032
--------------

mysql> show databases;
+--------------------+
| Database           |
+--------------------+
| information_schema |
| mysql              |
| performance_schema |
| sys                |
+--------------------+
4 rows in set (0.01 sec)

mysql> exit
Bye
2.2.2 Ubuntu 安装 MySQL
root@ubuntu2204:~# apt-cache madison mysql-server
mysql-server | 8.0.36-0ubuntu0.22.04.1 | https://mirrors.aliyun.com/ubuntu jammy-updates/main amd64 Packages
mysql-server | 8.0.36-0ubuntu0.22.04.1 | https://mirrors.aliyun.com/ubuntu jammy-security/main amd64 Packages
mysql-server | 8.0.28-0ubuntu4 | https://mirrors.aliyun.com/ubuntu jammy/main amd64 Packages

root@ubuntu2204:~# apt -y install mysql-server

root@ubuntu2204:~# systemctl enable --now mysql

root@ubuntu2204:~# mysql -V
mysql  Ver 8.0.36-0ubuntu0.22.04.1 for Linux on x86_64 ((Ubuntu))

root@ubuntu2204:~# systemctl status mysql
● mysql.service - MySQL Community Server
     Loaded: loaded (/lib/systemd/system/mysql.service; enabled; vendor preset: enabled)
     Active: active (running) since Mon 2024-02-19 13:55:51 CST; 2min 53s ago
   Main PID: 3200 (mysqld)
     Status: "Server is operational"
      Tasks: 37 (limit: 2178)
     Memory: 365.5M
        CPU: 2.352s
     CGroup: /system.slice/mysql.service
             └─3200 /usr/sbin/mysqld

Feb 19 13:55:51 ubuntu2204 systemd[1]: Starting MySQL Community Server...
Feb 19 13:55:51 ubuntu2204 systemd[1]: Started MySQL Community Server.

root@ubuntu2204:~# mysql
Welcome to the MySQL monitor.  Commands end with ; or \g.
Your MySQL connection id is 8
Server version: 8.0.36-0ubuntu0.22.04.1 (Ubuntu)

Copyright (c) 2000, 2024, Oracle and/or its affiliates.

Oracle is a registered trademark of Oracle Corporation and/or its
affiliates. Other names may be trademarks of their respective
owners.

Type 'help;' or '\h' for help. Type '\c' to clear the current input statement.

mysql> status
--------------
mysql  Ver 8.0.36-0ubuntu0.22.04.1 for Linux on x86_64 ((Ubuntu))

Connection id:		8
Current database:
Current user:		root@localhost
SSL:			Not in use
Current pager:		stdout
Using outfile:		''
Using delimiter:	;
Server version:		8.0.36-0ubuntu0.22.04.1 (Ubuntu)
Protocol version:	10
Connection:		Localhost via UNIX socket
Server characterset:	utf8mb4
Db     characterset:	utf8mb4
Client characterset:	utf8mb4
Conn.  characterset:	utf8mb4
UNIX socket:		/var/run/mysqld/mysqld.sock
Binary data as:		Hexadecimal
Uptime:			3 min 9 sec

Threads: 2  Questions: 5  Slow queries: 0  Opens: 119  Flush tables: 3  Open tables: 38  Queries per second avg: 0.026
--------------

mysql> show databases;
+--------------------+
| Database           |
+--------------------+
| information_schema |
| mysql              |
| performance_schema |
| sys                |
+--------------------+
4 rows in set (0.01 sec)

mysql> exit
Bye
2.3 二进制安装安装MySQL
2.3.1 安装相关包
# CentOS 7
yum -y install libaio perl-Data-Dumper

# Rocky 9要启用devel镜像仓库
dnf config-manager --set-enabled devel

# 或者添加Rocky 9的devel镜像仓库
MIRROR=mirrors.sjtug.sjtu.edu.cn
cat > /etc/yum.repos.d/devel.repo <<-EOF
[devel]
name=devel
baseurl=https://${MIRROR}/rocky/\$releasever/devel/\$basearch/os/
gpgcheck=1
gpgkey=file:///etc/pki/rpm-gpg/RPM-GPG-KEY-Rocky-\$releasever
EOF

# CentOS 9要安装epel源
yum -y install epel-release
MIRROR=mirrors.aliyun.com
sed -i.bak -e 's|^metalink=|#metalink=|g' -e 's|^#baseurl=https://download.example/pub/epel|baseurl=https://'${MIRROR}'/epel|g' /etc/yum.repos.d/epel*.repo
dnf config-manager --set-disabled epel-cisco-openh264
dnf makecache


# Rocky 8/9和CentOS 8/9
yum -y install libaio perl-Data-Dumper ncurses-compat-libs

# ubuntu
apt update
apt -y install numactl libaio-dev libtinfo5
2.3.2 用户和组
useradd -s /sbin/nologin -r mysql
2.3.3 准备程序文件
MySQL二进制包下载,去“https://www.mysql.com/”网站下载,选择“DOWNLOADS”。
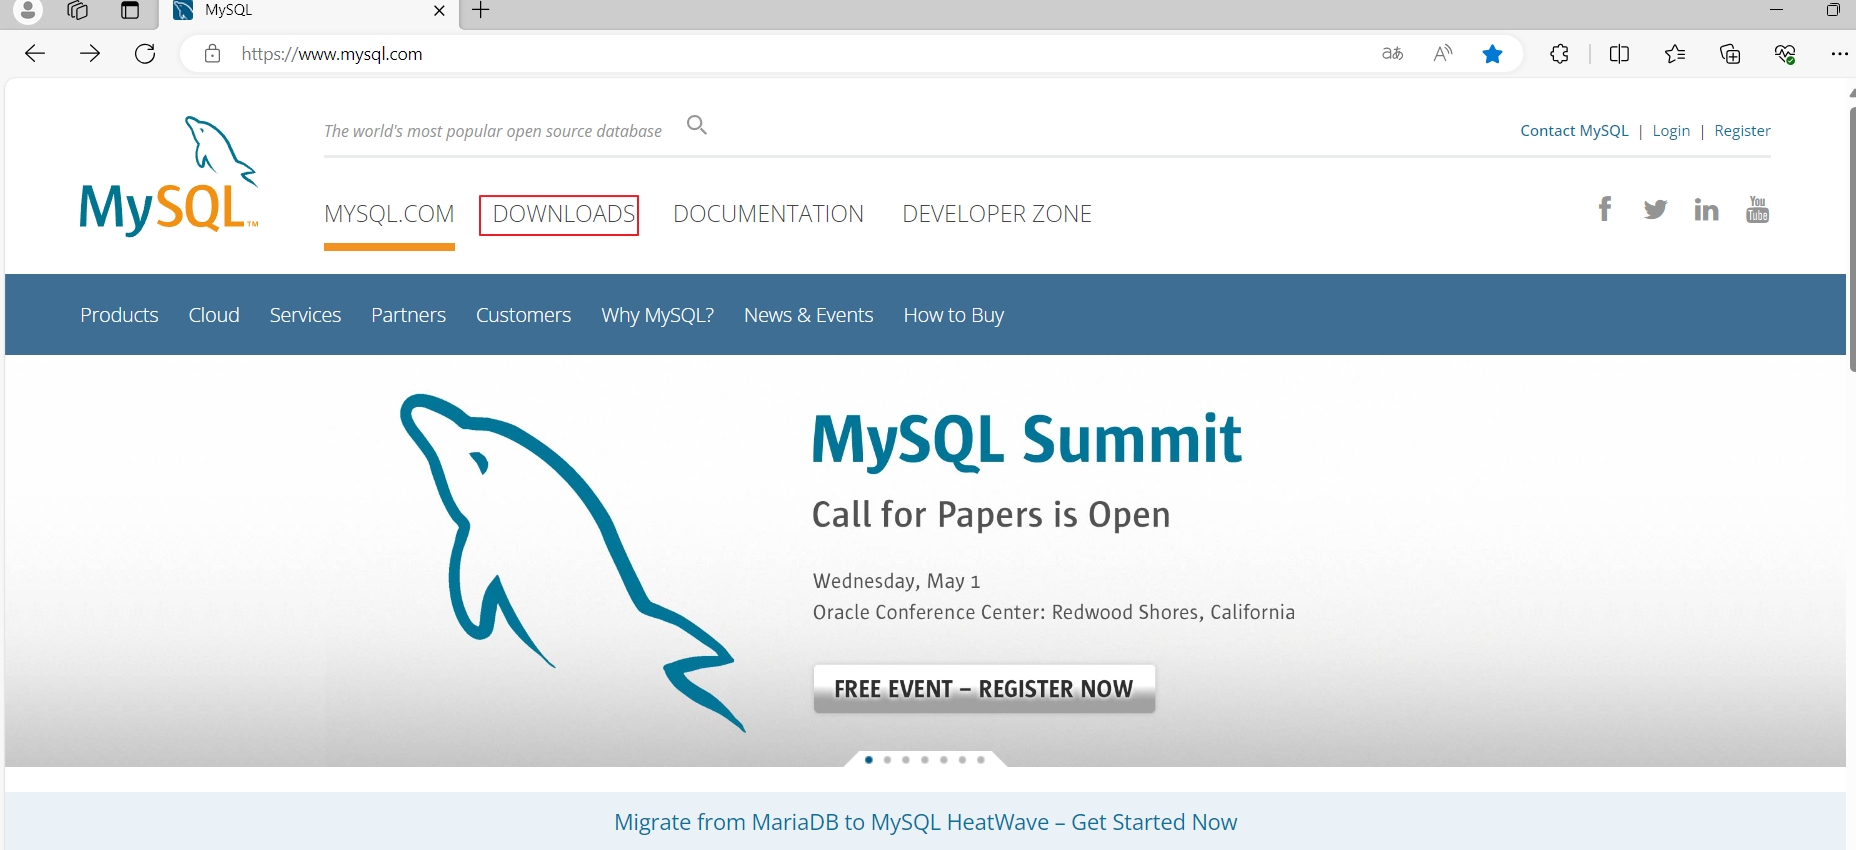
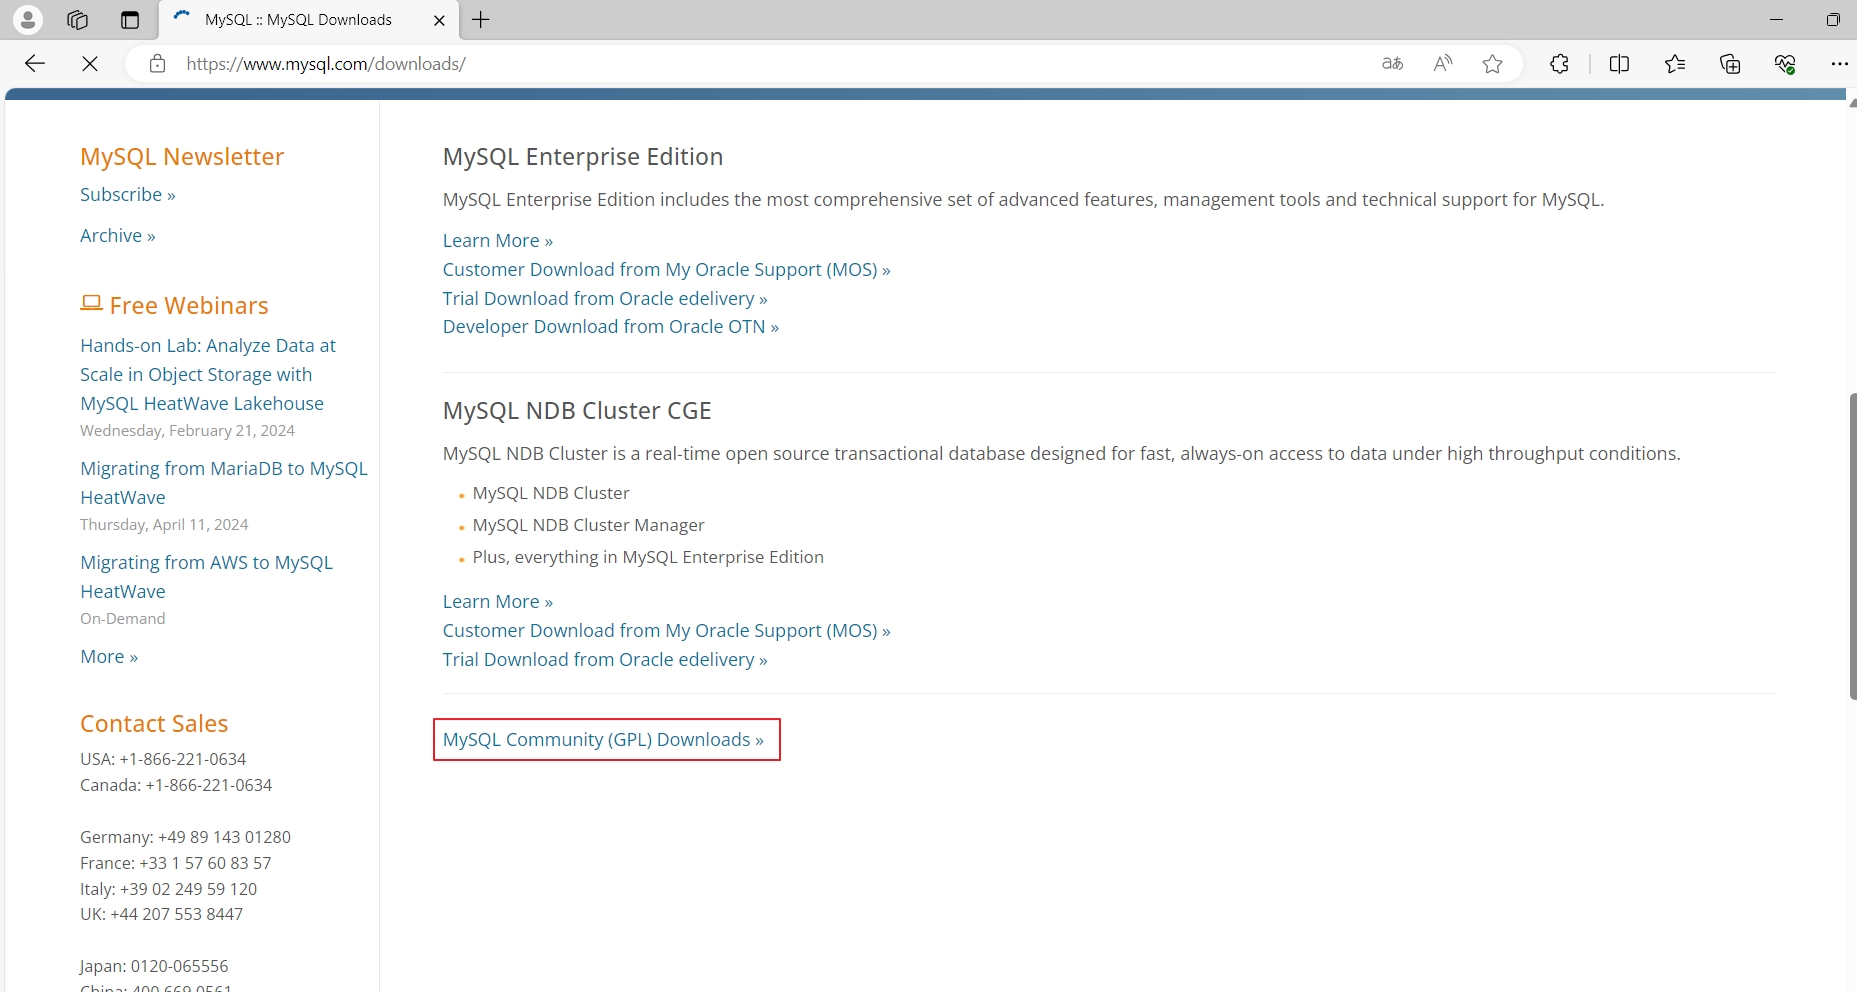
在弹出的网页,选择“MySQL Community (GPL) Downloads”。
然后选择“MySQL Community Server”。

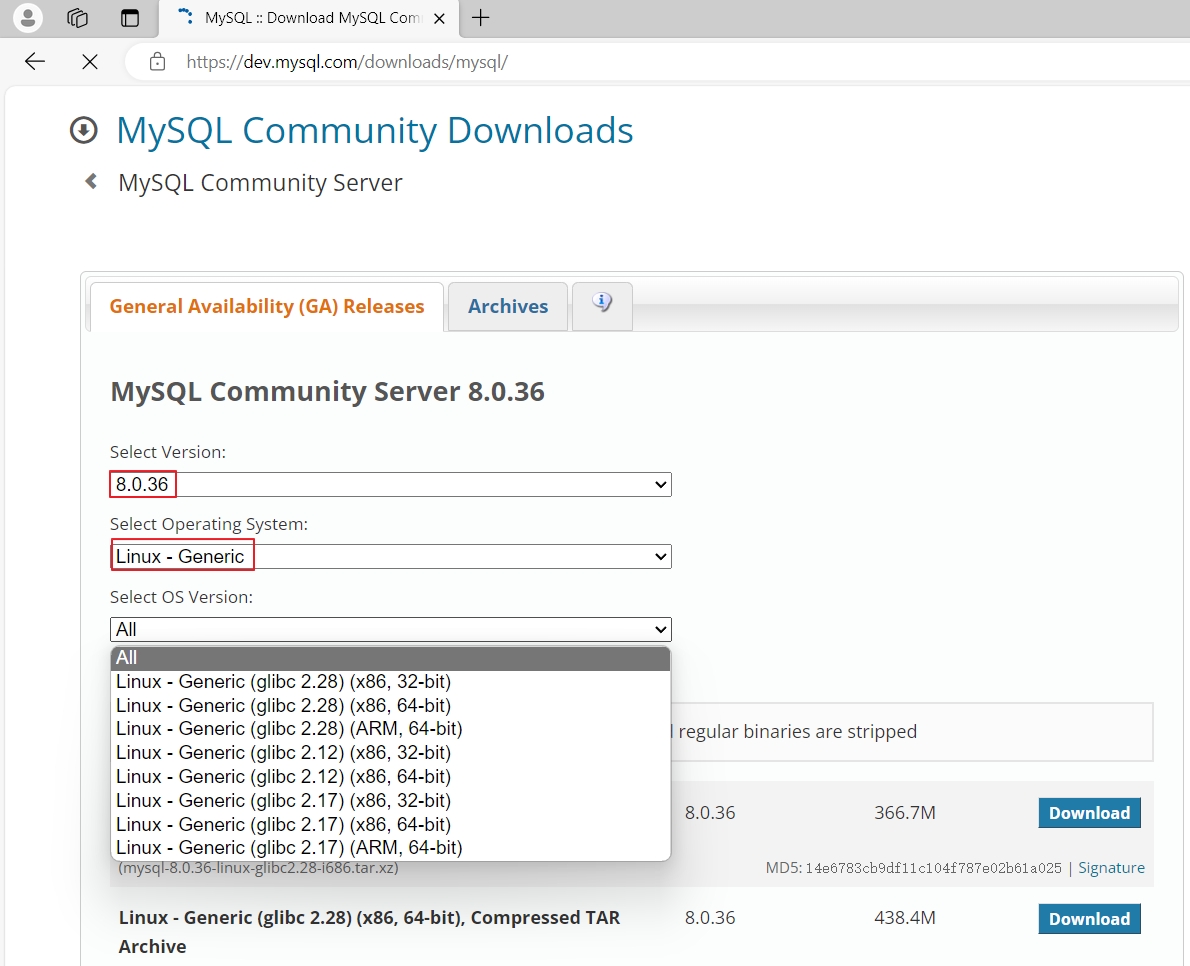
然后版本选择“8.0.36”,操作系统选择“Linux-Generic”,下面的系统版本有3个,分别是“glibc 2.8、glibc 2.12、glibc 2.17”,这个根据系统的glibc版本下载。
[root@rocky9-2 ~]# dnf info glibc
Last metadata expiration check: 0:40:41 ago on Mon 19 Feb 2024 03:00:12 PM CST.
Installed Packages
Name         : glibc
Version      : 2.34 # 可以看到Rocky 9的glibc版本是2.34
Release      : 83.el9.7
Architecture : x86_64
Size         : 5.9 M
Source       : glibc-2.34-83.el9.7.src.rpm
Repository   : @System
From repo    : anaconda
Summary      : The GNU libc libraries
URL          : http://www.gnu.org/software/glibc/
License      : LGPLv2+ and LGPLv2+ with exceptions and GPLv2+ and GPLv2+ with exceptions and BSD and Inner-Net and ISC
             : and Public Domain and GFDL
Description  : The glibc package contains standard libraries which are used by
             : multiple programs on the system. In order to save disk space and
             : memory, as well as to make upgrading easier, common system code is
             : kept in one place and shared between programs. This particular package
             : contains the most important sets of shared libraries: the standard C
             : library and the standard math library. Without these two libraries, a
             : Linux system will not function.

Available Packages
Name         : glibc
Version      : 2.34
Release      : 83.el9.7
Architecture : i686
Size         : 1.9 M
Source       : glibc-2.34-83.el9.7.src.rpm
Repository   : baseos
Summary      : The GNU libc libraries
URL          : http://www.gnu.org/software/glibc/
License      : LGPLv2+ and LGPLv2+ with exceptions and GPLv2+ and GPLv2+ with exceptions and BSD and Inner-Net and ISC
             : and Public Domain and GFDL
Description  : The glibc package contains standard libraries which are used by
             : multiple programs on the system. In order to save disk space and
             : memory, as well as to make upgrading easier, common system code is
             : kept in one place and shared between programs. This particular package
             : contains the most important sets of shared libraries: the standard C
             : library and the standard math library. Without these two libraries, a
             : Linux system will not function.

[root@rocky8 ~]# dnf info glibc
Last metadata expiration check: 1:10:37 ago on Mon 19 Feb 2024 03:29:28 PM CST.
Installed Packages
Name         : glibc
Version      : 2.28 # 可以看到Rocky 8的glibc版本是2.28
Release      : 236.el8_9.7
Architecture : x86_64
Size         : 6.4 M
Source       : glibc-2.28-236.el8_9.7.src.rpm
Repository   : @System
From repo    : anaconda
Summary      : The GNU libc libraries
URL          : http://www.gnu.org/software/glibc/
License      : LGPLv2+ and LGPLv2+ with exceptions and GPLv2+ and GPLv2+ with exceptions and BSD and Inner-Net and ISC
             : and Public Domain and GFDL
Description  : The glibc package contains standard libraries which are used by
             : multiple programs on the system. In order to save disk space and
             : memory, as well as to make upgrading easier, common system code is
             : kept in one place and shared between programs. This particular package
             : contains the most important sets of shared libraries: the standard C
             : library and the standard math library. Without these two libraries, a
             : Linux system will not function.

Available Packages
Name         : glibc
Version      : 2.28
Release      : 236.el8_9.7
Architecture : i686
Size         : 2.0 M
Source       : glibc-2.28-236.el8_9.7.src.rpm
Repository   : baseos
Summary      : The GNU libc libraries
URL          : http://www.gnu.org/software/glibc/
License      : LGPLv2+ and LGPLv2+ with exceptions and GPLv2+ and GPLv2+ with exceptions and BSD and Inner-Net and ISC
             : and Public Domain and GFDL
Description  : The glibc package contains standard libraries which are used by
             : multiple programs on the system. In order to save disk space and
             : memory, as well as to make upgrading easier, common system code is
             : kept in one place and shared between programs. This particular package
             : contains the most important sets of shared libraries: the standard C
             : library and the standard math library. Without these two libraries, a
             : Linux system will not function.

[root@centos7 ~]# yum info glibc
Loaded plugins: fastestmirror
Repository 'mysql' is missing name in configuration, using id
Loading mirror speeds from cached hostfile
Installed Packages
Name        : glibc
Arch        : x86_64
Version     : 2.17 # 可以看到CentOS 7的glibc版本是2.17
Release     : 326.el7_9
Size        : 13 M
Repo        : installed
From repo   : anaconda
Summary     : The GNU libc libraries
URL         : http://www.gnu.org/software/glibc/
License     : LGPLv2+ and LGPLv2+ with exceptions and GPLv2+
Description : The glibc package contains standard libraries which are used by
            : multiple programs on the system. In order to save disk space and
            : memory, as well as to make upgrading easier, common system code is
            : kept in one place and shared between programs. This particular package
            : contains the most important sets of shared libraries: the standard C
            : library and the standard math library. Without these two libraries, a
            : Linux system will not function.

Available Packages
Name        : glibc
Arch        : i686
Version     : 2.17
Release     : 326.el7_9
Size        : 4.3 M
Repo        : updates/7/x86_64
Summary     : The GNU libc libraries
URL         : http://www.gnu.org/software/glibc/
License     : LGPLv2+ and LGPLv2+ with exceptions and GPLv2+
Description : The glibc package contains standard libraries which are used by
            : multiple programs on the system. In order to save disk space and
            : memory, as well as to make upgrading easier, common system code is
            : kept in one place and shared between programs. This particular package
            : contains the most important sets of shared libraries: the standard C
            : library and the standard math library. Without these two libraries, a
            : Linux system will not function.

root@ubuntu2204:~# ldd --version
ldd (Ubuntu GLIBC 2.35-0ubuntu3.6) 2.35 # 可以看到Ubuntu 22.04的glibc版本是2.35
Copyright (C) 2022 Free Software Foundation, Inc.
This is free software; see the source for copying conditions.  There is NO
warranty; not even for MERCHANTABILITY or FITNESS FOR A PARTICULAR PURPOSE.
Written by Roland McGrath and Ulrich Drepper.

raymond@ubuntu2004:~$ ldd --version
ldd (Ubuntu GLIBC 2.31-0ubuntu9.9) 2.31 # 可以看到Ubuntu 20.04的glibc版本是2.31
Copyright (C) 2020 Free Software Foundation, Inc.
This is free software; see the source for copying conditions.  There is NO
warranty; not even for MERCHANTABILITY or FITNESS FOR A PARTICULAR PURPOSE.
Written by Roland McGrath and Ulrich Drepper.

raymond@ubuntu1804:~$ ldd --version
ldd (Ubuntu GLIBC 2.27-3ubuntu1.4) 2.27 # 可以看到Ubuntu 18.04的glibc版本是2.27
Copyright (C) 2018 Free Software Foundation, Inc.
This is free software; see the source for copying conditions.  There is NO
warranty; not even for MERCHANTABILITY or FITNESS FOR A PARTICULAR PURPOSE.
Written by Roland McGrath and Ulrich Drepper.
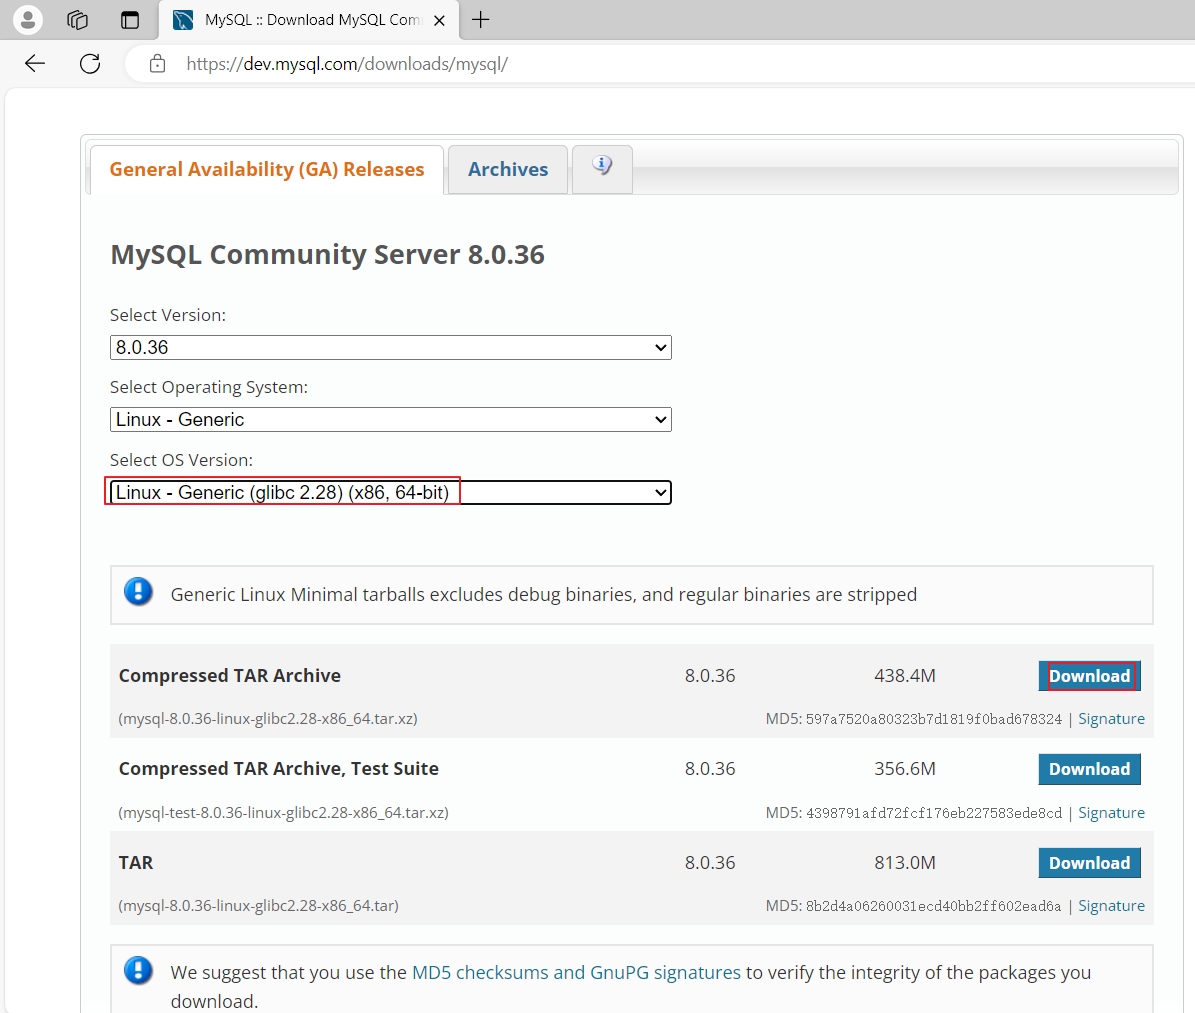
根据操作系统的glibc版本去下载相应的安装包,这里系统版本选择“Linux - Generic (glibc 2.28) (x86, 64-bit)”,然后选择下面的“mysql-8.0.36-linux-glibc2.28-x86_64.tar.xz”包后面的“Download”进行下载。
# mysql 8.0.36 glibc2.28包
https://cdn.mysql.com//Downloads/MySQL-8.0/mysql-8.0.36-linux-glibc2.28-x86_64.tar.xz

# mysql 8.0.36 glibc2.12包
https://cdn.mysql.com//Downloads/MySQL-8.0/mysql-8.0.36-linux-glibc2.12-x86_64.tar.xz

# mysql 8.0.36 glibc2.17包
https://cdn.mysql.com//Downloads/MySQL-8.0/mysql-8.0.36-linux-glibc2.17-x86_64.tar.xz

# mysql 5.7.44 glibc2.12包
https://cdn.mysql.com/archives/mysql-5.7/mysql-5.7.44-linux-glibc2.12-x86_64.tar.gz

cd /usr/local/src/
wget https://cdn.mysql.com//Downloads/MySQL-8.0/mysql-8.0.36-linux-glibc2.28-x86_64.tar.xz

tar xf mysql-8.0.36-linux-glibc2.28-x86_64.tar.xz -C  /usr/local

ln -s /usr/local/mysql-8.0.36-linux-glibc2.28-x86_64/ /usr/local/mysql

chown -R  mysql.mysql /usr/local/mysql/
2.3.4 准备环境变量
echo 'PATH=/usr/local/mysql/bin/:$PATH' > /etc/profile.d/mysql.sh
. /etc/profile.d/mysql.sh
2.3.5 准备配置文件
cat > /etc/my.cnf <<-EOF
[mysqld]
server-id=1
log-bin
datadir=/data/mysql
socket=/data/mysql/mysql.sock
log-error=/data/mysql/mysql.log
pid-file=/data/mysql/mysql.pid

[client]
socket=/data/mysql/mysql.sock
EOF
2.3.6 生成数据库文件,并提取root密码
mkdir -pv /data/mysql

chown -R  mysql.mysql /data/mysql

# /data/mysql  会自动生成,但是/data/必须事先存在
# --initialize会生成一个初始化密码,--initialize-insecure生成空密码,两种方式任选一种
mysqld --initialize --user=mysql --datadir=/data/mysql

grep password /data/mysql/mysql.log
2024-02-19T12:04:58.932138Z 6 [Note] [MY-010454] [Server] A temporary password is generated for root@localhost: aupYu;uhJ9&y
# aupYu;uhJ9&y就是初始化密码

# 生成空密码的root用户
mysqld --initialize-insecure --user=mysql --datadir=/data/mysql
2.3.7 准备服务脚本和启动
# Rocky 9和CentOS 9默认没有chkconfig包,需要安装
yum -y install chkconfig

cp /usr/local/mysql/support-files/mysql.server /etc/init.d/mysqld

# Rocky和CentOS
chkconfig --add mysqld

# Ubuntu
update-rc.d -f mysqld defaults

cat > /lib/systemd/system/mysqld.service <<-EOF
[Unit]
Description=mysql database server
After=network.target

[Service]
Type=notify
PrivateNetwork=false
Type=forking
Restart=no
TimeoutSec=5min
IgnoreSIGPIPE=no
KillMode=process
GuessMainPID=no
RemainAfterExit=yes
SuccessExitStatus=5 6
ExecStart=/etc/init.d/mysqld start
ExecStop=/etc/init.d//mysqld stop
ExecReload=/etc/init.d/mysqld reload

[Install]
WantedBy=multi-user.target
Alias=mysqld.service
EOF

systemctl daemon-reload && systemctl enable --now mysqld
2.3.8 修改口令
# 如果使用的是空密码,就不需要修改口令
awk '/temporary password/{print $NF}' /data/mysql/mysql.log
aupYu;uhJ9&y

mysqladmin -uroot -p'aupYu;uhJ9&y' password 123456
2.3.9 测试登录
[root@rocky9-2 src]# mysql -uroot -p123456
Welcome to the MySQL monitor.  Commands end with ; or \g.
Your MySQL connection id is 8
Server version: 8.0.36 MySQL Community Server - GPL

Copyright (c) 2000, 2024, Oracle and/or its affiliates.

Oracle is a registered trademark of Oracle Corporation and/or its
affiliates. Other names may be trademarks of their respective
owners.

Type 'help;' or '\h' for help. Type '\c' to clear the current input statement.

mysql> status
--------------
mysql  Ver 8.0.36 for Linux on x86_64 (MySQL Community Server - GPL)

Connection id:		8
Current database:
Current user:		root@localhost
SSL:			Not in use
Current pager:		stdout
Using outfile:		''
Using delimiter:	;
Server version:		8.0.36 MySQL Community Server - GPL
Protocol version:	10
Connection:		Localhost via UNIX socket
Server characterset:	utf8mb4
Db     characterset:	utf8mb4
Client characterset:	utf8mb4
Conn.  characterset:	utf8mb4
UNIX socket:		/data/mysql/mysql.sock
Binary data as:		Hexadecimal
Uptime:			3 min 49 sec

Threads: 2  Questions: 5  Slow queries: 0  Opens: 120  Flush tables: 3  Open tables: 36  Queries per second avg: 0.021
--------------

mysql> show databases;
+--------------------+
| Database           |
+--------------------+
| information_schema |
| mysql              |
| performance_schema |
| sys                |
+--------------------+
4 rows in set (0.00 sec)

mysql> exit
Bye
2.3.10 一键安装MySQL二进制包的脚本
Shell脚本源码地址:
Gitee:https://gitee.com/raymond9/shell
Github:https://github.com/raymond999999/shell
可以去上面的Gitee或Github代码仓库拉取脚本。
# install_mysql_binary_v2_1.sh脚本创建了密码是123456。
[root@rocky9 ~]# cat install_mysql_binary_v2_1.sh
#!/bin/bash
#
#************************************************************************************************************
#Author:        Raymond
#QQ:            88563128
#Date:          2024-02-19
#FileName:      install_mysql_binary_v2_1.sh
#URL:           raymond.blog.csdn.net
#Description:   install_mysql_binary for CentOS 7 & CentOS Stream 8/9 & Ubuntu 18.04/20.04/22.04 & Rocky 8/9
#Copyright (C): 2024 All rights reserved
#************************************************************************************************************
SRC_DIR=/usr/local/src
COLOR="echo -e \\033[01;31m"
END='\033[0m'

# mysql 8.0.36 glibc2.28包下载地址:"https://cdn.mysql.com//Downloads/MySQL-8.0/mysql-8.0.36-linux-glibc2.28-x86_64.tar.xz"
# mysql 8.0.36 glibc2.12包下载地址:"https://cdn.mysql.com//Downloads/MySQL-8.0/mysql-8.0.36-linux-glibc2.12-x86_64.tar.xz"
# mysql 8.0.36 glibc2.17包下载地址:"https://cdn.mysql.com//Downloads/MySQL-8.0/mysql-8.0.36-linux-glibc2.17-x86_64.tar.xz"
# mysql 5.7.44 glibc2.12包下载地址:"https://cdn.mysql.com/archives/mysql-5.7/mysql-5.7.44-linux-glibc2.12-x86_64.tar.gz"

DATA_DIR=/data/mysql
MYSQL_URL=https://cdn.mysql.com//Downloads/MySQL-8.0/
MYSQL_FILE='mysql-8.0.36-linux-glibc2.28-x86_64.tar.xz'
MYSQL_ROOT_PASSWORD=123456

os(){
    OS_ID=`sed -rn '/^NAME=/s@.*="([[:alpha:]]+).*"$@\1@p' /etc/os-release`
    OS_RELEASE_VERSION=`sed -rn '/^VERSION_ID=/s@.*="?([0-9]+)\.?.*"?@\1@p' /etc/os-release`
}

check_file(){
    cd  ${SRC_DIR}
    if [ ${OS_ID} == "CentOS" -o ${OS_ID} == "Rocky" ] &> /dev/null;then
        rpm -q wget &> /dev/null || { ${COLOR}"安装wget工具,请稍等..."${END};yum -y install wget &> /dev/null; }
    fi
    if [ ! -e ${MYSQL_FILE} ];then
        ${COLOR}"缺少${MYSQL_FILE}文件"${END}
        ${COLOR}'开始下载MySQL二进制安装包'${END}
        wget ${MYSQL_URL}${MYSQL_FILE} || { ${COLOR}"MySQL二进制安装包下载失败"${END}; exit; }
    else
        ${COLOR}"${MYSQL_FILE}文件已准备好"${END}
    fi
}

install_mysql(){
    [ -d /usr/local/mysql ] && { ${COLOR}"MySQL数据库已存在,安装失败"${END};exit; }
    ${COLOR}"开始安装MySQL数据库..."${END}
    ${COLOR}'开始安装MySQL依赖包'${END}
    if [ ${OS_ID} == "Rocky" -a ${OS_RELEASE_VERSION} == 9 ];then
        MIRROR=mirrors.sjtug.sjtu.edu.cn
        if [ `grep -R "\[devel\]" /etc/yum.repos.d/*.repo` ];then
            dnf config-manager --set-enabled devel
        else
            cat > /etc/yum.repos.d/devel.repo <<-EOF
[devel]
name=devel
baseurl=https://${MIRROR}/rocky/\$releasever/devel/\$basearch/os/
gpgcheck=1
gpgkey=file:///etc/pki/rpm-gpg/RPM-GPG-KEY-Rocky-\$releasever
EOF
        fi
    fi
    if [ ${OS_ID} == "CentOS" -a ${OS_RELEASE_VERSION} == 9 ];then
        yum -y install epel-release  &> /dev/null
        MIRROR=mirrors.aliyun.com
        sed -i.bak -e 's|^metalink=|#metalink=|g' -e 's|^#baseurl=https://download.example/pub/epel|baseurl=https://'${MIRROR}'/epel|g' /etc/yum.repos.d/epel*.repo
        dnf config-manager --set-disabled epel-cisco-openh264
        dnf makecache  &> /dev/null
    fi
    if [ ${OS_RELEASE_VERSION} == 8 -o ${OS_RELEASE_VERSION} == 9 ];then
        yum -y install libaio perl-Data-Dumper ncurses-compat-libs &> /dev/null
    elif [[ ${OS_RELEASE_VERSION} == 7 ]];then
        yum -y install libaio perl-Data-Dumper &> /dev/null
    else
        apt update &> /dev/null;apt -y install numactl libaio-dev libtinfo5 &> /dev/null
    fi
    id mysql &> /dev/null || { useradd -s /sbin/nologin -r  mysql ; ${COLOR}"创建mysql用户"${END}; }
    tar xf ${MYSQL_FILE} -C /usr/local/
    MYSQL_DIR=`echo ${MYSQL_FILE}| sed -nr 's/^(.*[0-9]).*/\1/p'`
    ln -s  /usr/local/${MYSQL_DIR} /usr/local/mysql

    chown -R mysql.mysql /usr/local/mysql/
    echo 'PATH=/usr/local/mysql/bin/:$PATH' > /etc/profile.d/mysql.sh
    . /etc/profile.d/mysql.sh
    cat > /etc/my.cnf <<-EOF
[mysqld]
server-id=1
log-bin
datadir=${DATA_DIR}
socket=${DATA_DIR}/mysql.sock
log-error=${DATA_DIR}/mysql.log
pid-file=${DATA_DIR}/mysql.pid

[client]
socket=${DATA_DIR}/mysql.sock
EOF
    [ -d ${DATA_DIR} ] || mkdir -p ${DATA_DIR} &> /dev/null
    chown -R  mysql.mysql ${DATA_DIR}
    mysqld --initialize --user=mysql --datadir=${DATA_DIR}
    if [ ${OS_ID} == "CentOS" -o ${OS_ID} == "Rocky" ] &> /dev/null;then
        rpm -q chkconfig &> /dev/null || { ${COLOR}"安装chkconfig包,请稍等..."${END};yum -y install chkconfig &> /dev/null; }
    fi
    cp /usr/local/mysql/support-files/mysql.server  /etc/init.d/mysqld
    if [ ${OS_ID} == "CentOS" -o ${OS_ID} == "Rocky" ] &> /dev/null;then
        chkconfig --add mysqld
    else
        update-rc.d -f mysqld defaults
    fi
    cat > /lib/systemd/system/mysqld.service <<-EOF
[Unit]
Description=mysql database server
After=network.target

[Service]
Type=notify
PrivateNetwork=false
Type=forking
Restart=no
TimeoutSec=5min
IgnoreSIGPIPE=no
KillMode=process
GuessMainPID=no
RemainAfterExit=yes
SuccessExitStatus=5 6
ExecStart=/etc/init.d/mysqld start
ExecStop=/etc/init.d//mysqld stop
ExecReload=/etc/init.d/mysqld reload

[Install]
WantedBy=multi-user.target
Alias=mysqld.service
EOF
    systemctl daemon-reload
    systemctl enable --now mysqld &> /dev/null
    [ $? -ne 0 ] && { ${COLOR}"数据库启动失败,退出!"${END};exit; }
    MYSQL_OLDPASSWORD=`awk '/A temporary password/{print $NF}' ${DATA_DIR}/mysql.log`
    mysqladmin  -uroot -p${MYSQL_OLDPASSWORD} password ${MYSQL_ROOT_PASSWORD} &>/dev/null
    ${COLOR}"MySQL数据库安装完成"${END}
}

main(){
    os
    check_file
    install_mysql
}

main

# install_mysql_binary_v2_2.sh脚本创建的是空密码。
[root@rocky9 ~]# cat install_mysql_binary_v2_2.sh
#!/bin/bash
#
#************************************************************************************************************
#Author:        Raymond
#QQ:            88563128
#Date:          2024-02-19
#FileName:      install_mysql_binary_v2_2.sh
#URL:           raymond.blog.csdn.net
#Description:   install_mysql_binary for CentOS 7 & CentOS Stream 8/9 & Ubuntu 18.04/20.04/22.04 & Rocky 8/9
#Copyright (C): 2024 All rights reserved
#************************************************************************************************************
SRC_DIR=/usr/local/src
COLOR="echo -e \\033[01;31m"
END='\033[0m'

# mysql 8.0.36 glibc2.28包下载地址:"https://cdn.mysql.com//Downloads/MySQL-8.0/mysql-8.0.36-linux-glibc2.28-x86_64.tar.xz"
# mysql 8.0.36 glibc2.12包下载地址:"https://cdn.mysql.com//Downloads/MySQL-8.0/mysql-8.0.36-linux-glibc2.12-x86_64.tar.xz"
# mysql 8.0.36 glibc2.17包下载地址:"https://cdn.mysql.com//Downloads/MySQL-8.0/mysql-8.0.36-linux-glibc2.17-x86_64.tar.xz"
# mysql 5.7.44 glibc2.12包下载地址:"https://cdn.mysql.com/archives/mysql-5.7/mysql-5.7.44-linux-glibc2.12-x86_64.tar.gz"

DATA_DIR=/data/mysql
MYSQL_URL=https://cdn.mysql.com//Downloads/MySQL-8.0/
MYSQL_FILE='mysql-8.0.36-linux-glibc2.28-x86_64.tar.xz'

os(){
    OS_ID=`sed -rn '/^NAME=/s@.*="([[:alpha:]]+).*"$@\1@p' /etc/os-release`
    OS_RELEASE_VERSION=`sed -rn '/^VERSION_ID=/s@.*="?([0-9]+)\.?.*"?@\1@p' /etc/os-release`
}

check_file(){
    cd  ${SRC_DIR}
    if [ ${OS_ID} == "CentOS" -o ${OS_ID} == "Rocky" ] &> /dev/null;then
        rpm -q wget &> /dev/null || { ${COLOR}"安装wget工具,请稍等..."${END};yum -y install wget &> /dev/null; }
    fi
    if [ ! -e ${MYSQL_FILE} ];then
        ${COLOR}"缺少${MYSQL_FILE}文件"${END}
        ${COLOR}'开始下载MySQL二进制安装包'${END}
        wget ${MYSQL_URL}${MYSQL_FILE} || { ${COLOR}"MySQL二进制安装包下载失败"${END}; exit; }
    else
        ${COLOR}"${MYSQL_FILE}文件已准备好"${END}
    fi
}

install_mysql(){
    [ -d /usr/local/mysql ] && { ${COLOR}"MySQL数据库已存在,安装失败"${END};exit; }
    ${COLOR}"开始安装MySQL数据库..."${END}
    ${COLOR}'开始安装MySQL依赖包'${END}
    if [ ${OS_ID} == "Rocky" -a ${OS_RELEASE_VERSION} == 9 ];then
        MIRROR=mirrors.sjtug.sjtu.edu.cn
        if [ `grep -R "\[devel\]" /etc/yum.repos.d/*.repo` ];then
            dnf config-manager --set-enabled devel
        else
            cat > /etc/yum.repos.d/devel.repo <<-EOF
[devel]
name=devel
baseurl=https://${MIRROR}/rocky/\$releasever/devel/\$basearch/os/
gpgcheck=1
gpgkey=file:///etc/pki/rpm-gpg/RPM-GPG-KEY-Rocky-\$releasever
EOF
        fi
    fi
    if [ ${OS_ID} == "CentOS" -a ${OS_RELEASE_VERSION} == 9 ];then
        yum -y install epel-release  &> /dev/null
        MIRROR=mirrors.aliyun.com
        sed -i.bak -e 's|^metalink=|#metalink=|g' -e 's|^#baseurl=https://download.example/pub/epel|baseurl=https://'${MIRROR}'/epel|g' /etc/yum.repos.d/epel*.repo
        dnf config-manager --set-disabled epel-cisco-openh264
        dnf makecache  &> /dev/null
    fi
    if [ ${OS_RELEASE_VERSION} == 8 -o ${OS_RELEASE_VERSION} == 9 ];then
        yum -y install libaio perl-Data-Dumper ncurses-compat-libs &> /dev/null
    elif [[ ${OS_RELEASE_VERSION} == 7 ]];then
        yum -y install libaio perl-Data-Dumper &> /dev/null
    else
        apt update &> /dev/null;apt -y install numactl libaio-dev libtinfo5 &> /dev/null
    fi
    id mysql &> /dev/null || { useradd -s /sbin/nologin -r  mysql ; ${COLOR}"创建mysql用户"${END}; }
    tar xf ${MYSQL_FILE} -C /usr/local/
    MYSQL_DIR=`echo ${MYSQL_FILE}| sed -nr 's/^(.*[0-9]).*/\1/p'`
    ln -s  /usr/local/${MYSQL_DIR} /usr/local/mysql

    chown -R mysql.mysql /usr/local/mysql/
    echo 'PATH=/usr/local/mysql/bin/:$PATH' > /etc/profile.d/mysql.sh
    . /etc/profile.d/mysql.sh
    cat > /etc/my.cnf <<-EOF
[mysqld]
server-id=1
log-bin
datadir=${DATA_DIR}
socket=${DATA_DIR}/mysql.sock
log-error=${DATA_DIR}/mysql.log
pid-file=${DATA_DIR}/mysql.pid

[client]
socket=${DATA_DIR}/mysql.sock
EOF
    [ -d ${DATA_DIR} ] || mkdir -p ${DATA_DIR} &> /dev/null
    chown -R  mysql.mysql ${DATA_DIR}
    mysqld --initialize-insecure --user=mysql --datadir=${DATA_DIR}
    if [ ${OS_ID} == "CentOS" -o ${OS_ID} == "Rocky" ] &> /dev/null;then
        rpm -q chkconfig &> /dev/null || { ${COLOR}"安装chkconfig包,请稍等..."${END};yum -y install chkconfig &> /dev/null; }
    fi
    cp /usr/local/mysql/support-files/mysql.server  /etc/init.d/mysqld
    if [ ${OS_ID} == "CentOS" -o ${OS_ID} == "Rocky" ] &> /dev/null;then
        chkconfig --add mysqld
    else
        update-rc.d -f mysqld defaults
    fi
    cat > /lib/systemd/system/mysqld.service <<-EOF
[Unit]
Description=mysql database server
After=network.target

[Service]
Type=notify
PrivateNetwork=false
Type=forking
Restart=no
TimeoutSec=5min
IgnoreSIGPIPE=no
KillMode=process
GuessMainPID=no
RemainAfterExit=yes
SuccessExitStatus=5 6
ExecStart=/etc/init.d/mysqld start
ExecStop=/etc/init.d//mysqld stop
ExecReload=/etc/init.d/mysqld reload

[Install]
WantedBy=multi-user.target
Alias=mysqld.service
EOF
    systemctl daemon-reload
    systemctl enable --now mysqld &> /dev/null
    [ $? -ne 0 ] && { ${COLOR}"数据库启动失败,退出!"${END};exit; }
    ${COLOR}"MySQL数据库安装完成"${END}
}

main(){
    os
    check_file
    install_mysql
}

main
2.4 源码安装
建议:内存6G以上,否则编译时可能会出错,这里设置的4C8G。
2.4.1 安装相关依赖包
# Rocky 8和CentOS 8要启用powertools镜像仓库
dnf config-manager --set-enabled powertools

# 或者添加Rocky 8的powertools镜像仓库
cat > /etc/yum.repos.d/PowerTools.repo <<-EOF
[PowerTools]
name=PowerTools
baseurl=https://mirrors.sjtug.sjtu.edu.cn/rocky/\$releasever/PowerTools/\$basearch/os/
gpgcheck=1
gpgkey=file:///etc/pki/rpm-gpg/RPM-GPG-KEY-rockyofficial
EOF

# 或者添加CentOS 8的powertools镜像仓库
cat > /etc/yum.repos.d/PowerTools.repo <<-EOF
[PowerTools]
name=PowerTools
baseurl=https://mirrors.aliyun.com/centos/\$stream/PowerTools/\$basearch/os/
gpgcheck=1
gpgkey=file:///etc/pki/rpm-gpg/RPM-GPG-KEY-centosofficial
EOF

# Rocky 8/9和CentOS 8/9
yum -y install gcc gcc-c++ cmake ncurses ncurses-devel bison openssl-devel rpcgen

# Rocky 9要启用devel镜像仓库
dnf config-manager --set-enabled devel

# 或者添加Rocky 9的devel镜像仓库
MIRROR=mirrors.sjtug.sjtu.edu.cn
cat > /etc/yum.repos.d/devel.repo <<-EOF
[devel]
name=devel
baseurl=https://${MIRROR}/rocky/\$releasever/devel/\$basearch/os/
gpgcheck=1
gpgkey=file:///etc/pki/rpm-gpg/RPM-GPG-KEY-Rocky-\$releasever
EOF

# CentOS 9要启用crb镜像仓库
dnf config-manager --set-enabled crb

# 或者添加Rocky 9的devel镜像仓库
MIRROR=mirrors.aliyun.com
cat > /etc/yum.repos.d/crb.repo <<-EOF
[crb]
name=crb
baseurl=https://${MIRROR}/centos-stream/\$releasever-stream/CRB/\$basearch/os
gpgcheck=1
gpgkey=file:///etc/pki/rpm-gpg/RPM-GPG-KEY-centosofficial
EOF

# Rocky 8/9和CentOS 8/9
yum -y install gcc-toolset-12-gcc gcc-toolset-12-gcc-c++ gcc-toolset-12-binutils gcc-toolset-12-annobin-annocheck gcc-toolset-12-annobin-plugin-gcc libtirpc-devel

# CentOS 7
yum -y install gcc gcc-c++ ncurses ncurses-devel libaio-devel openssl openssl-devel
yum -y install centos-release-scl
yum -y install devtoolset-11-gcc devtoolset-11-gcc-c++ devtoolset-11-binutils


# Ubuntu
apt -y install build-essential cmake bison libncurses5-dev libssl-dev pkg-config
2.4.2 做准备用户和数据目录
useradd -r -s /sbin/nologin -d /data/mysql mysql
2.4.3 准备数据库目录
mkdir -p /data/mysql
chown mysql.mysql /data/mysql
2.4.4 源码编译安装
编译安装说明
利用cmake编译,而利用传统方法,cmake的重要特性之一是其独立于源码(out-of-source)的编译功能,即编译工作可以在另一个指定的目录中而非源码目录中进行,这可以保证源码目录不受任何一次编译的影响,因此在同一个源码树上可以进行多次不同的编译,如针对于不同平台编译
编译选项:https://dev.mysql.com/doc/refman/5.7/en/source-configuration-options.html
2.4.4.1 下载并解压缩源码包
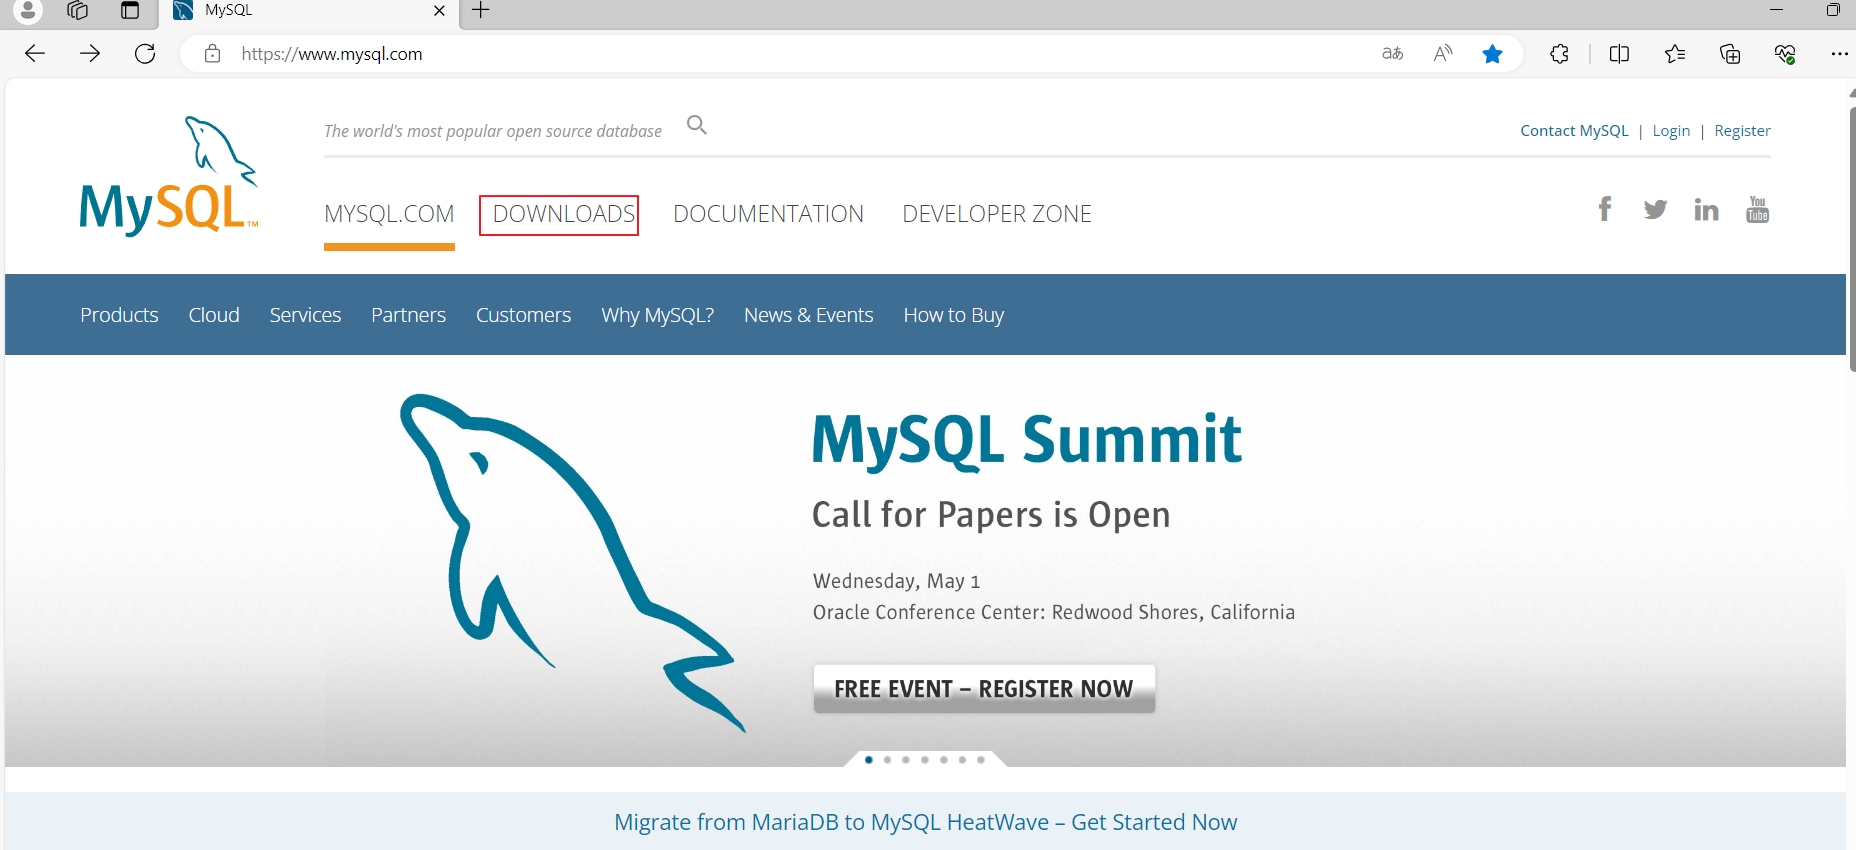
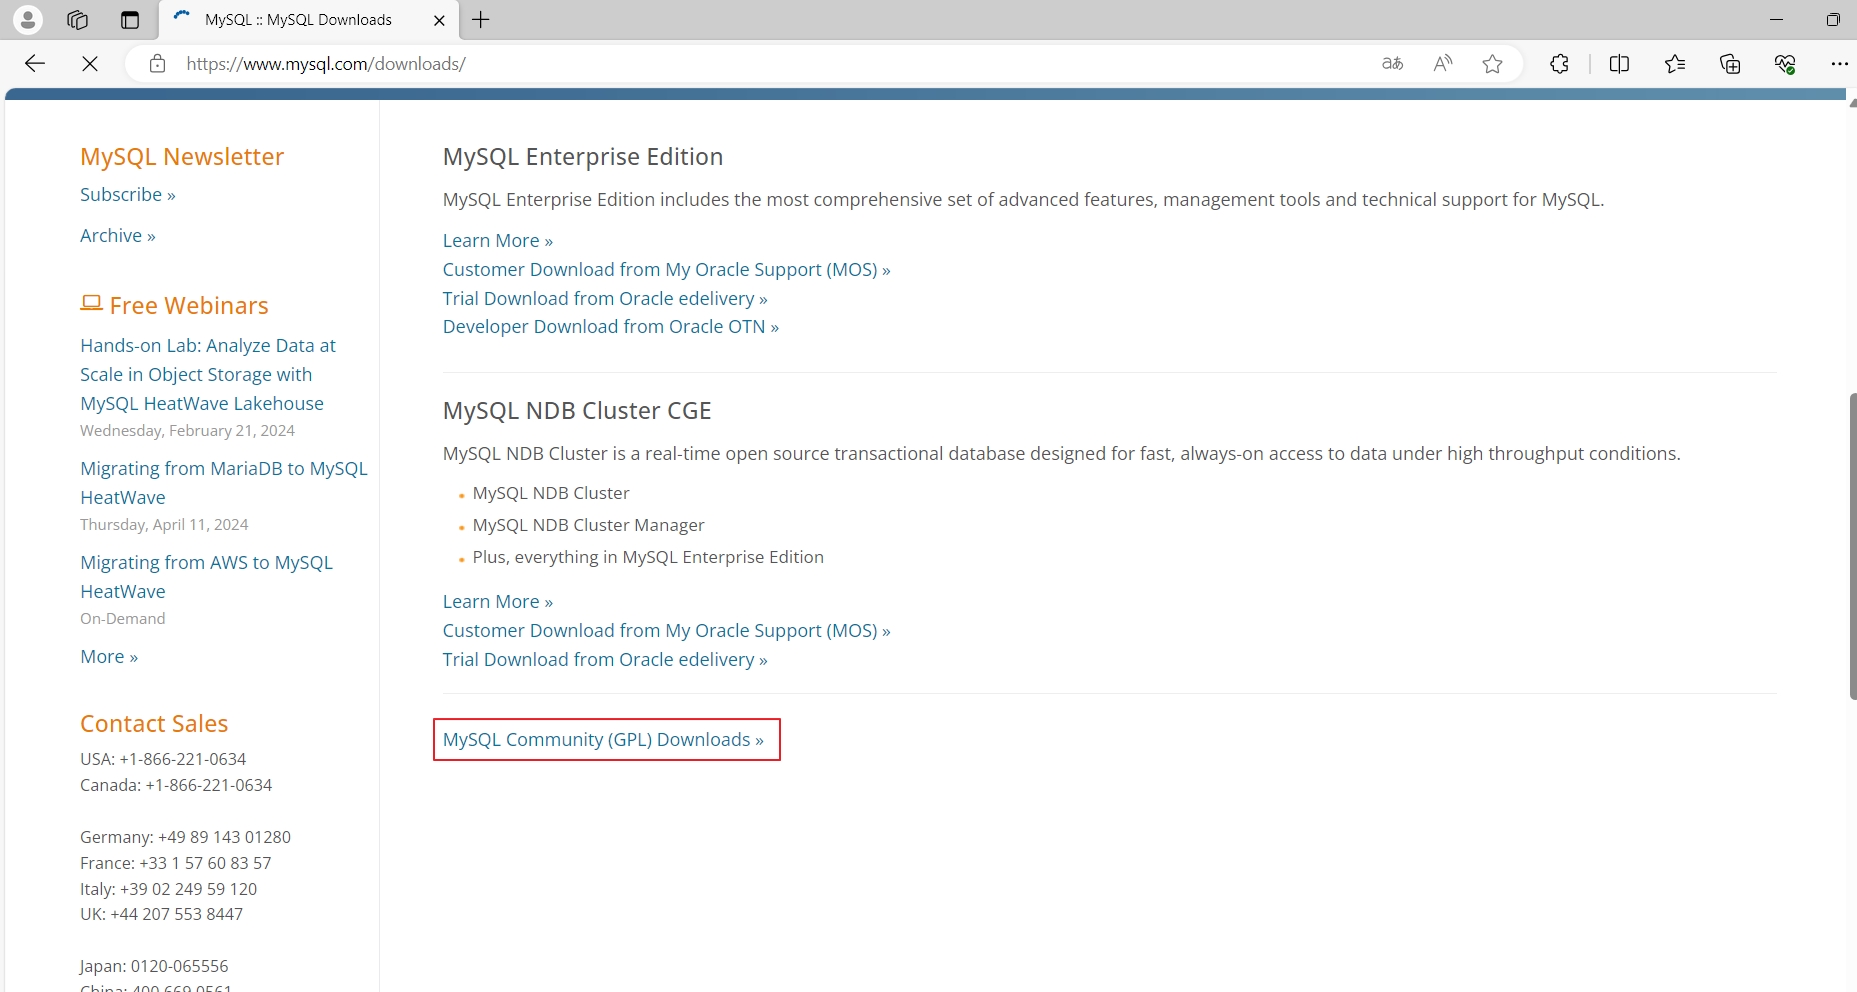
MySQL源码包下载,去“https://www.mysql.com/”网站下载,选择“DOWNLOADS”。
在弹出的网页,选择“MySQL Community (GPL) Downloads”。
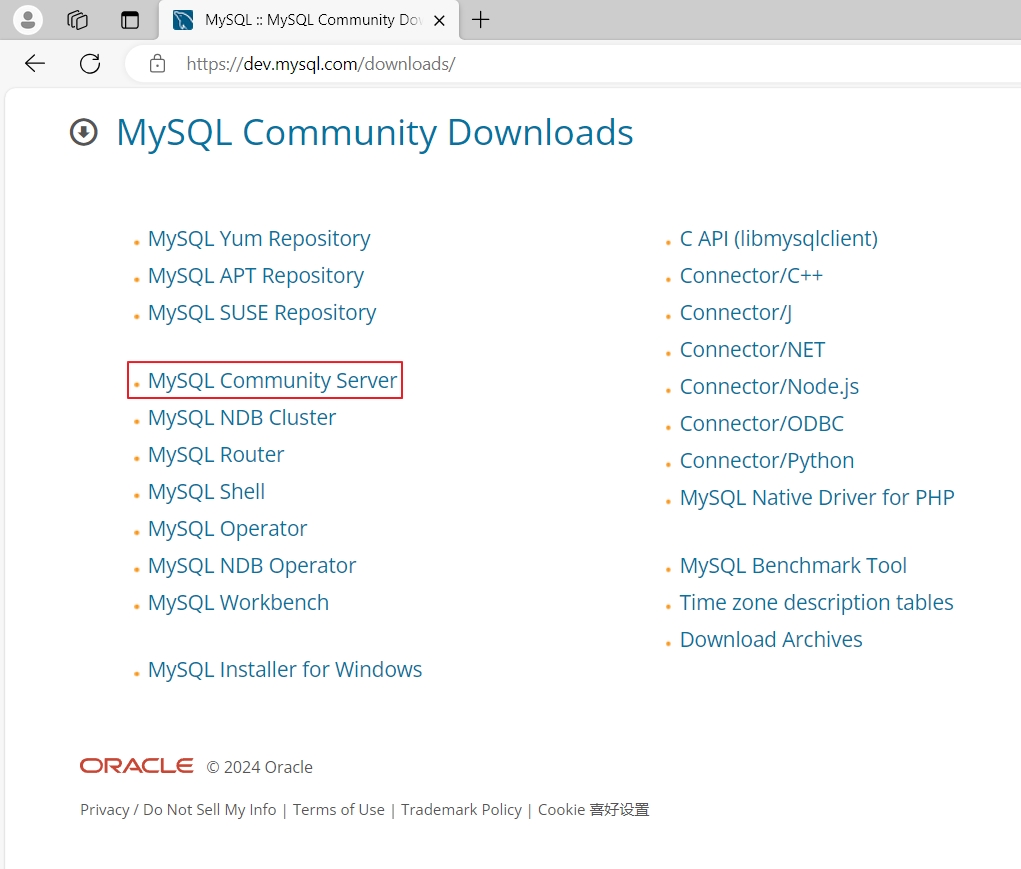
然后选择“MySQL Community Server”。
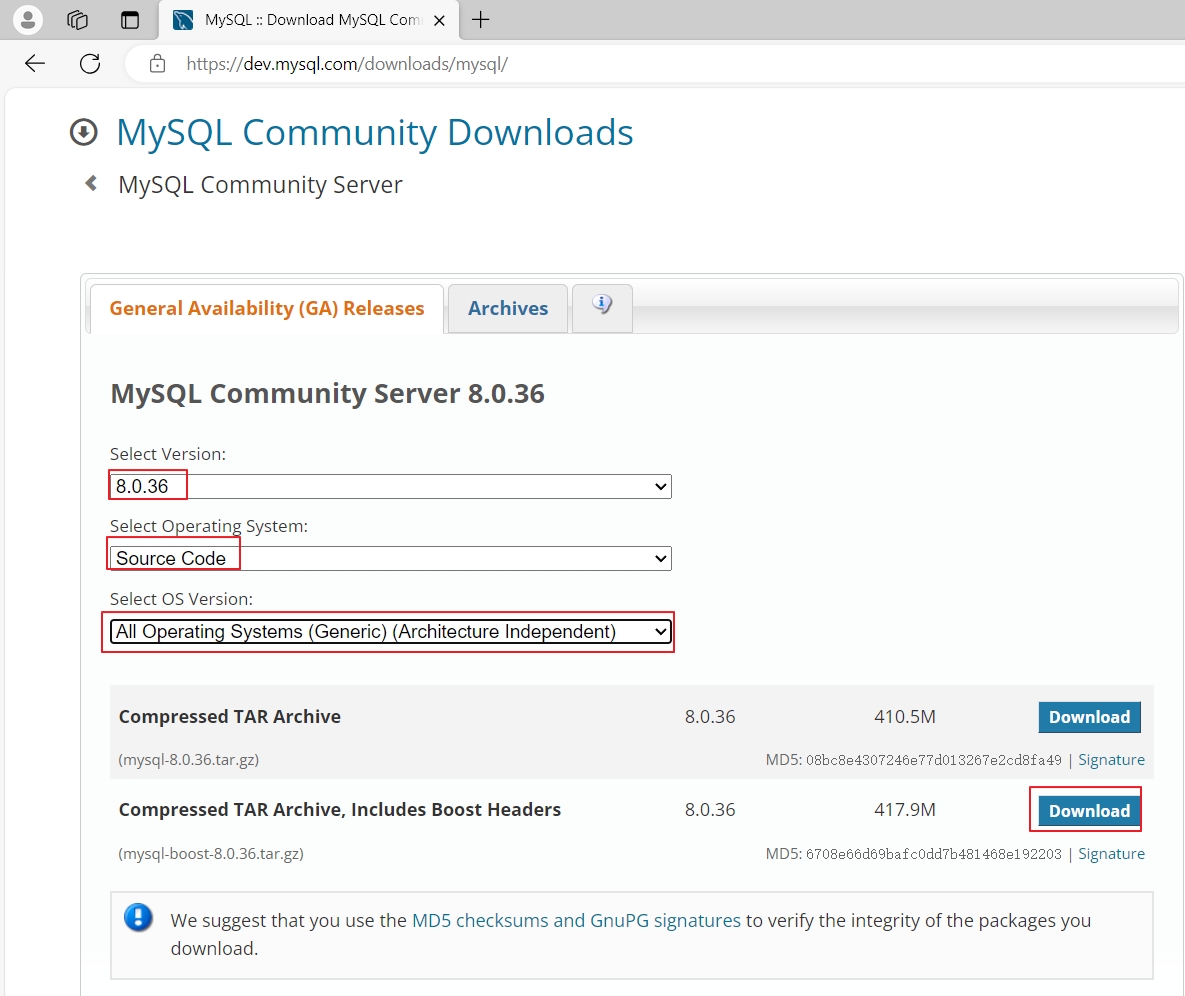
然后版本选择“8.0.36”,操作系统选择“Source Code”,系统版本选择“All Operating Systems (Generic) (Architecture Independent)”,然后选择下面的“mysql-boost-8.0.36.tar.gz”包后面的“Download”进行下载。
cd /usr/local/src/

wget https://cdn.mysql.com//Downloads/MySQL-8.0/mysql-boost-8.0.36.tar.gz

tar xvf mysql-boost-8.0.36.tar.gz
2.4.4.2 源码编译安装MySQL
MySQL cmake 一些常用的参数解释
-DCMAKE_INSTALL_PREFIX - MySQL 的安装目录
-DMYSQL_USER - MySQL 启动的用户名称,默认为 mysql
-DMYSQL_UNIX_ADDR - Unix socket 文件路径
-DSYSCONFDIR - 配置文件目录
-DSYSTEMD_PID_DIR - PID 文件存储路径
-DDEFAULT_CHARSET - 默认字符集
-DDEFAULT_COLLATION - 校验字符
-DWITH_INNOBASE_STORAGE_ENGINE - 是否安装 innodb 存储引擎 - 参数:1 or 0
-DWITH_ARCHIVE_STORAGE_ENGINE - 是否安装 archive 存储引擎 - 参数:1 or 0
-DWITH_BLACKHOLE_STORAGE_ENGINE - 是否安装 blackhole 存储引擎 - 参数:1 or 0
-DWITH_PERFSCHEMA_STORAGE_ENGINE - 是否安装 perfschema 存储引擎 - 参数:1 or 0
-DMYSQL_DATADIR - MySQL 数据存储路径
-DWITH_BOOST - 指定 boost 目录,需要下载的源码包包含 boost
-DFORCE_INSOURCE_BUILD - 强制编译,centos 9 版本不建议编译,所以需要加参数强行编译 - 参数:1 or 0
-DWITH_SYSTEMD - 是否 systemctl 管理 - 参数:1 or 0
-DMYSQL_TCP_PORT - MySQL 默认端口
-DWITH_SSL - 是否支持 ssl - 参数:yes or no
-DENABLED_LOCAL_INFILE - 是否开启 load data infile 命令 - 参数:1 or 0
cd mysql-8.0.36

cmake \
-DCMAKE_INSTALL_PREFIX=/apps/mysql \
-DMYSQL_UNIX_ADDR=/data/mysql/mysql.sock \
-DSYSCONFDIR=/etc \
-DSYSTEMD_PID_DIR=/apps/mysql \
-DDEFAULT_CHARSET=utf8  \
-DDEFAULT_COLLATION=utf8_general_ci \
-DWITH_INNOBASE_STORAGE_ENGINE=1 \
-DWITH_ARCHIVE_STORAGE_ENGINE=1 \
-DWITH_BLACKHOLE_STORAGE_ENGINE=1 \
-DWITH_PERFSCHEMA_STORAGE_ENGINE=1 \
-DMYSQL_DATADIR=/data/mysql/ \
-DWITH_BOOST=/usr/local/src/mysql-8.0.36/boost/boost_1_77_0/ \
-DFORCE_INSOURCE_BUILD=1 \
-DWITH_SYSTEMD=1

# 编译完成后会有类似如下的输出
Wextra -Wformat-security -Wvla -Wundef -Wmissing-format-attribute -Wwrite-strings -Wjump-misses-init -Wstringop-truncation -Wmissing-include-dirs
-- CMAKE_CXX_FLAGS: -std=c++17 -fno-omit-frame-pointer -ftls-model=initial-exec -B/opt/rh/gcc-toolset-12/root/usr/bin  -O2 -g -Wall -Wextra -Wformat-security -Wvla -Wundef -Wmissing-format-attribute -Woverloaded-virtual -Wcast-qual -Wimplicit-fallthrough=5 -Wstringop-truncation -Wsuggest-override -Wmissing-include-dirs -Wextra-semi -Wlogical-op
-- CMAKE_CXX_FLAGS_DEBUG: -DSAFE_MUTEX -DENABLED_DEBUG_SYNC -g
-- CMAKE_CXX_FLAGS_RELWITHDEBINFO: -ffunction-sections -fdata-sections -O2 -g -DNDEBUG -g1
-- CMAKE_CXX_FLAGS_RELEASE: -ffunction-sections -fdata-sections -O3 -DNDEBUG
-- CMAKE_CXX_FLAGS_MINSIZEREL: -ffunction-sections -fdata-sections -Os -DNDEBUG
-- CMAKE_C_LINK_FLAGS:
-- CMAKE_CXX_LINK_FLAGS:  -Wl,--copy-dt-needed-entries
-- CMAKE_EXE_LINKER_FLAGS
-- CMAKE_MODULE_LINKER_FLAGS
-- CMAKE_SHARED_LINKER_FLAGS
-- Configuring done
-- Generating done
-- Build files have been written to: /usr/local/src/mysql-8.0.36

make -j 4 && make install
提示:如果出错,执行rm -f CMakeCache.txt
CentOS Stream 9报错处理
CMake Error at configure.cmake:336 (MESSAGE):
  No mysys timer support detected!
Call Stack (most recent call first):
  CMakeLists.txt:1570 (INCLUDE)


-- Configuring incomplete, errors occurred!
# 在CentOS Stream 9上安装出现“No mysys timer support detected!”报错,在网上看了说需要降版本,最后看网上别人用的mysql-boost-8.0.30.tar.gz包编译安装成功,就换了这个包就正常了,经测试8.0.36和8.0.35都不行,别的版本自己测试。

cd ..
rm -rf mysql-*
wget https://cdn.mysql.com/archives/mysql-8.0/mysql-boost-8.0.30.tar.gz

tar xvf mysql-boost-8.0.30.tar.gz
cd mysql-8.0.30

cmake \
-DCMAKE_INSTALL_PREFIX=/apps/mysql \
-DMYSQL_UNIX_ADDR=/data/mysql/mysql.sock \
-DSYSCONFDIR=/etc \
-DSYSTEMD_PID_DIR=/apps/mysql \
-DDEFAULT_CHARSET=utf8  \
-DDEFAULT_COLLATION=utf8_general_ci \
-DWITH_INNOBASE_STORAGE_ENGINE=1 \
-DWITH_ARCHIVE_STORAGE_ENGINE=1 \
-DWITH_BLACKHOLE_STORAGE_ENGINE=1 \
-DWITH_PERFSCHEMA_STORAGE_ENGINE=1 \
-DMYSQL_DATADIR=/data/mysql/ \
-DWITH_BOOST=/usr/local/src/mysql-8.0.30/boost/boost_1_77_0/ \
-DFORCE_INSOURCE_BUILD=1 \
-DWITH_SYSTEMD=1

make -j 4 && make install
CentOS 7报错处理
CMake Warning at CMakeLists.txt:82 (MESSAGE):
  Please use cmake3 rather than cmake on this platform


-- Please install cmake3 (yum install cmake3)
CMake Error at CMakeLists.txt:112 (CMAKE_MINIMUM_REQUIRED):
  CMake 3.5.1 or higher is required.  You are running version 2.8.12.2


-- Configuring incomplete, errors occurred!
# CentOS 7如果使用镜像源的cmake会提示CMake版本低,需要安装CMake 3.5.1或更高版本。

# 去“https://cmake.org/download/”网址下载cmake源码包

cd ..
wget https://github.com/Kitware/CMake/releases/download/v3.29.0-rc1/cmake-3.29.0-rc1.tar.gz

tar xvf cmake-3.29.0-rc1.tar.gz
cd cmake-3.29.0-rc1

./configure

make -j 4 && make install

/usr/local/bin/cmake --version
cmake version 3.29.0-rc1

CMake suite maintained and supported by Kitware (kitware.com/cmake).

ln -s /usr/local/bin/cmake /usr/bin/

cd ../mysql-8.0.36/
cmake \
-DCMAKE_INSTALL_PREFIX=/apps/mysql \
-DMYSQL_UNIX_ADDR=/data/mysql/mysql.sock \
-DSYSCONFDIR=/etc \
-DSYSTEMD_PID_DIR=/apps/mysql \
-DDEFAULT_CHARSET=utf8  \
-DDEFAULT_COLLATION=utf8_general_ci \
-DWITH_INNOBASE_STORAGE_ENGINE=1 \
-DWITH_ARCHIVE_STORAGE_ENGINE=1 \
-DWITH_BLACKHOLE_STORAGE_ENGINE=1 \
-DWITH_PERFSCHEMA_STORAGE_ENGINE=1 \
-DMYSQL_DATADIR=/data/mysql/ \
-DWITH_BOOST=/usr/local/src/mysql-8.0.36/boost/boost_1_77_0/ \
-DFORCE_INSOURCE_BUILD=1 \
-DWITH_SYSTEMD=1

make -j 4 && make install
2.4.5 准备环境变量
echo 'PATH=/apps/mysql/bin:$PATH' > /etc/profile.d/mysql.sh
. /etc/profile.d/mysql.sh

chown -R mysql.mysql /apps/mysql/
2.4.6 生成数据库文件
# /data/mysql  会自动生成,但是/data/必须事先存在
# --initialize会生成一个初始化密码,--initialize-insecure生成空密码,两种方式任选一种
mysqld --initialize --user=mysql --datadir=/data/mysql

# 生成空密码的root用户
mysqld --initialize-insecure --user=mysql --basedir=/apps/mysql --datadir=/data/mysql
2024-02-20T09:17:01.743685Z 0 [System] [MY-013169] [Server] /apps/mysql/bin/mysqld (mysqld 8.0.36) initializing of server in progress as process 40844
2024-02-20T09:17:01.744786Z 0 [Warning] [MY-013242] [Server] --character-set-server: 'utf8' is currently an alias for the character set UTF8MB3, but will be an alias for UTF8MB4 in a future release. Please consider using UTF8MB4 in order to be unambiguous.
2024-02-20T09:17:01.744791Z 0 [Warning] [MY-013244] [Server] --collation-server: 'utf8mb3_general_ci' is a collation of the deprecated character set UTF8MB3. Please consider using UTF8MB4 with an appropriate collation instead.
2024-02-20T09:17:01.751821Z 1 [System] [MY-013576] [InnoDB] InnoDB initialization has started.
2024-02-20T09:17:02.022545Z 1 [System] [MY-013577] [InnoDB] InnoDB initialization has ended.
2024-02-20T09:17:03.631560Z 6 [Warning] [MY-010453] [Server] root@localhost is created with an empty password ! Please consider switching off the --initialize-insecure option.
2.4.7 准备配置文件
cat > /etc/my.cnf <<EOF
[mysqld]
user=mysql
basedir=/apps/mysql/
datadir=/data/mysql
port=3306
socket=/data/mysql/mysql.sock
pid-file=/data/mysql/mysql.pid

[mysqld_safe]
log-error=/data/mysql/mysql.log

[client]
port=3306
socket=/data/mysql/mysql.sock
EOF
2.4.8 准备启动脚本并启动服务
cp /apps/mysql/usr/lib/systemd/system/mysqld.service /lib/systemd/system/

# Ubuntu没有mysqld.service,需要单独写配置文件
cat > /lib/systemd/system//mysqld.service  <<EOF
# Copyright (c) 2015, 2023, Oracle and/or its affiliates.
#
# This program is free software; you can redistribute it and/or modify
# it under the terms of the GNU General Public License, version 2.0,
# as published by the Free Software Foundation.
#
# This program is also distributed with certain software (including
# but not limited to OpenSSL) that is licensed under separate terms,
# as designated in a particular file or component or in included license
# documentation.  The authors of MySQL hereby grant you an additional
# permission to link the program and your derivative works with the
# separately licensed software that they have included with MySQL.
#
# This program is distributed in the hope that it will be useful,
# but WITHOUT ANY WARRANTY; without even the implied warranty of
# MERCHANTABILITY or FITNESS FOR A PARTICULAR PURPOSE.  See the
# GNU General Public License, version 2.0, for more details.
#
# You should have received a copy of the GNU General Public License
# along with this program; if not, write to the Free Software
# Foundation, Inc., 51 Franklin St, Fifth Floor, Boston, MA 02110-1301  USA
#
# systemd service file for MySQL forking server
#

[Unit]
Description=MySQL Server
Documentation=man:mysqld(8)
Documentation=http://dev.mysql.com/doc/refman/en/using-systemd.html
After=network-online.target
Wants=network-online.target
After=syslog.target

[Install]
WantedBy=multi-user.target

[Service]
User=mysql
Group=mysql

Type=notify

# Disable service start and stop timeout logic of systemd for mysqld service.
TimeoutSec=0

# Execute pre and post scripts as root
# hence, + prefix is used

# Needed to create system tables
ExecStartPre=+/apps/mysql/bin/mysqld_pre_systemd

# Start main service
ExecStart=/apps/mysql/bin/mysqld $MYSQLD_OPTS

# Use this to switch malloc implementation
EnvironmentFile=-/etc/sysconfig/mysql

# Sets open_files_limit
LimitNOFILE = 10000

Restart=on-failure

RestartPreventExitStatus=1

# Set enviroment variable MYSQLD_PARENT_PID. This is required for restart.
Environment=MYSQLD_PARENT_PID=1

PrivateTmp=false
EOF

systemctl daemon-reload && systemctl enable mysqld --now
2.4.9 修改口令
mysqladmin -u root -p password 123456
Enter password:
mysqladmin: [Warning] Using a password on the command line interface can be insecure.
Warning: Since password will be sent to server in plain text, use ssl connection to ensure password safety.
2.4.10 登录测试
mysql -uroot -p123456
mysql: [Warning] Using a password on the command line interface can be insecure.
Welcome to the MySQL monitor.  Commands end with ; or \g.
Your MySQL connection id is 9
Server version: 8.0.36 Source distribution

Copyright (c) 2000, 2024, Oracle and/or its affiliates.

Oracle is a registered trademark of Oracle Corporation and/or its
affiliates. Other names may be trademarks of their respective
owners.

Type 'help;' or '\h' for help. Type '\c' to clear the current input statement.

mysql> status
--------------
mysql  Ver 8.0.36 for Linux on x86_64 (Source distribution)

Connection id:		9
Current database:
Current user:		root@localhost
SSL:			Not in use
Current pager:		stdout
Using outfile:		''
Using delimiter:	;
Server version:		8.0.36 Source distribution
Protocol version:	10
Connection:		Localhost via UNIX socket
Server characterset:	utf8mb3
Db     characterset:	utf8mb3
Client characterset:	utf8mb4
Conn.  characterset:	utf8mb4
UNIX socket:		/data/mysql/mysql.sock
Binary data as:		Hexadecimal
Uptime:			5 min 12 sec

Threads: 2  Questions: 9  Slow queries: 0  Opens: 130  Flush tables: 3  Open tables: 46  Queries per second avg: 0.028
--------------

mysql> show databases;
+--------------------+
| Database           |
+--------------------+
| information_schema |
| mysql              |
| performance_schema |
| sys                |
+--------------------+
4 rows in set (0.00 sec)

mysql> exit
Bye
2.4.11 一键安装MySQL源码编译的脚本
Shell脚本源码地址:
Gitee:https://gitee.com/raymond9/shell
Github:https://github.com/raymond999999/shell
可以去上面的Gitee或Github代码仓库拉取脚本。
[root@rocky9 ~]# cat install_mysql_source.sh
#!/bin/bash
#
#************************************************************************************************************
#Author:        Raymond
#QQ:            88563128
#Date:          2024-02-25
#FileName:      install_mysql_source.sh
#URL:           raymond.blog.csdn.net
#Description:   install_mysql_source for CentOS 7 & CentOS Stream 8/9 & Ubuntu 18.04/20.04/22.04 & Rocky 8/9
#Copyright (C): 2024 All rights reserved
#************************************************************************************************************
SRC_DIR=/usr/local/src
INSTALL_DIR=/apps/mysql
DATA_DIR=/data/mysql
COLOR="echo -e \\033[01;31m"
END='\033[0m'

MYSQL_URL='https://cdn.mysql.com//Downloads/MySQL-8.0/'
MYSQL_FILE='mysql-boost-8.0.36.tar.gz'

#cmake下载地址:”https://github.com/Kitware/CMake/releases/download/v3.29.0-rc1/cmake-3.29.0-rc1.tar.gz“,请提前下载。
CMAKE_FILE=cmake-3.29.0-rc1.tar.gz

CPUS=`lscpu |awk '/^CPU\(s\)/{print $2}'`
MYSQL_ROOT_PASSWORD=123456

os(){
    OS_ID=`sed -rn '/^NAME=/s@.*="([[:alpha:]]+).*"$@\1@p' /etc/os-release`
    OS_RELEASE_VERSION=`sed -rn '/^VERSION_ID=/s@.*="?([0-9]+)\.?.*"?@\1@p' /etc/os-release`
}

check_file(){
    cd  ${SRC_DIR}
    if [ ${OS_ID} == "CentOS" -o ${OS_ID} == "Rocky" ] &> /dev/null;then
        rpm -q wget &> /dev/null || { ${COLOR}"安装wget工具,请稍等..."${END};yum -y install wget &> /dev/null; }
    fi
    if [ ! -e ${MYSQL_FILE} ];then
        ${COLOR}"缺少${MYSQL_FILE}文件"${END}
        ${COLOR}'开始下载MySQL源码包'${END}
        wget ${MYSQL_URL}${MYSQL_FILE} || { ${COLOR}"MySQL源码包下载失败"${END}; exit; }
    else
        ${COLOR}"${MYSQL_FILE}相关文件已准备好"${END}
    fi
    if [ ${OS_ID} == "CentOS" -a ${OS_RELEASE_VERSION} == 7 ];then
        if [ ! -e ${CMAKE_FILE} ];then
            ${COLOR}"缺少${CMAKE_FILE}文件,请把文件放到${SRC_DIR}目录下"${END}
        else
            ${COLOR}"${CMAKE_FILE}相关文件已准备好"${END}
        fi
    fi
}

install_mysql(){
    [ -d ${INSTALL_DIR} ] && { ${COLOR}"MySQL数据库已存在,安装失败"${END};exit; }
    ${COLOR}"开始安装MySQL数据库..."${END}
    ${COLOR}'开始安装MySQL依赖包'${END}
    if [ ${OS_ID} == "Rocky" -a ${OS_RELEASE_VERSION} == 8 ];then
        MIRROR=mirrors.sjtug.sjtu.edu.cn
        if [ `grep -R "\[powertools\]" /etc/yum.repos.d/*.repo` ];then
            dnf config-manager --set-enabled powertools
        else
            cat > /etc/yum.repos.d/PowerTools.repo <<-EOF
[PowerTools]
name=PowerTools
baseurl=https://${MIRROR}/rocky/\$releasever/PowerTools/\$basearch/os/
gpgcheck=1
gpgkey=file:///etc/pki/rpm-gpg/RPM-GPG-KEY-rockyofficial
EOF
        fi
    fi
    if [ ${OS_ID} == "CentOS" -a ${OS_RELEASE_VERSION} == 8 ];then
        MIRROR=mirrors.aliyun.com
        if [ `grep -R "\[powertools\]" /etc/yum.repos.d/*.repo` ];then
            dnf config-manager --set-enabled powertools
        else
            cat > /etc/yum.repos.d/PowerTools.repo <<-EOF
[PowerTools]
name=PowerTools
baseurl=https://${MIRROR}/centos/\$stream/PowerTools/\$basearch/os/
gpgcheck=1
gpgkey=file:///etc/pki/rpm-gpg/RPM-GPG-KEY-centosofficial
EOF
        fi
    fi
    if [ ${OS_ID} == "Rocky" -a ${OS_RELEASE_VERSION} == 9 ];then
        MIRROR=mirrors.sjtug.sjtu.edu.cn
        if [ `grep -R "\[devel\]" /etc/yum.repos.d/*.repo` ];then
            dnf config-manager --set-enabled devel
        else
            cat > /etc/yum.repos.d/devel.repo <<-EOF
[devel]
name=devel
baseurl=https://${MIRROR}/rocky/\$releasever/devel/\$basearch/os/
gpgcheck=1
gpgkey=file:///etc/pki/rpm-gpg/RPM-GPG-KEY-Rocky-\$releasever
EOF
        fi
    fi
    if [ ${OS_ID} == "CentOS" -a ${OS_RELEASE_VERSION} == 9 ];then
        MIRROR=mirrors.aliyun.com
        if [ `grep -R "\[crb\]" /etc/yum.repos.d/*.repo` ];then
            dnf config-manager --set-enabled crb
        else
            cat > /etc/yum.repos.d/crb.repo <<-EOF
[crb]
name=crb
baseurl=https://${MIRROR}/centos-stream/\$releasever-stream/CRB/\$basearch/os
gpgcheck=1
gpgkey=file:///etc/pki/rpm-gpg/RPM-GPG-KEY-centosofficial
EOF
        fi
    fi
    if [ ${OS_ID} == "CentOS" -o ${OS_ID} == "Rocky" ] &> /dev/null;then
        if [ ${OS_RELEASE_VERSION} == 7 ];then
            yum -y install gcc gcc-c++ ncurses ncurses-devel libaio-devel openssl openssl-devel &> /dev/null
            yum -y install centos-release-scl &> /dev/null
            yum -y install devtoolset-11-gcc devtoolset-11-gcc-c++ devtoolset-11-binutils &> /dev/null
		else
            yum -y install gcc gcc-c++ cmake ncurses ncurses-devel bison openssl-devel rpcgen gcc-toolset-12-gcc gcc-toolset-12-gcc-c++ gcc-toolset-12-binutils gcc-toolset-12-annobin-annocheck gcc-toolset-12-annobin-plugin-gcc libtirpc-devel &> /dev/null
        fi
	else
        apt -y install build-essential cmake bison libncurses5-dev libssl-dev pkg-config
    fi
    id mysql &> /dev/null || { useradd -r -s /sbin/nologin -d ${DATA_DIR} mysql ; ${COLOR}"创建mysql用户"${END}; }
    [ -d ${INSTALL_DIR} ] || mkdir -p ${DATA_DIR} &> /dev/null
    chown -R mysql.mysql ${DATA_DIR}

    if [ ${OS_ID} == "CentOS" -a ${OS_RELEASE_VERSION} == 7 ];then
        tar xf ${CMAKE_FILE}
        CMAKE_DIR=`echo ${CMAKE_FILE}| sed -nr 's/^(.*[0-9]).*/\1/p'`
        cd ${CMAKE_DIR}
        ./configure
        make -j ${CPUS} && make install
        ln -s /usr/local/bin/cmake /usr/bin/
    fi

    cd  ${SRC_DIR}
    tar xf ${MYSQL_FILE}
    MYSQL_DIR=`echo ${MYSQL_FILE}| sed -nr 's/^(.*[0-9]).*/\1/p' | cut -d"-" -f 1,3`
    cd ${MYSQL_DIR}

    cmake \
    -DCMAKE_INSTALL_PREFIX=${INSTALL_DIR} \
    -DMYSQL_UNIX_ADDR=${DATA_DIR}/mysql.sock \
    -DSYSCONFDIR=/etc \
    -DSYSTEMD_PID_DIR=${INSTALL_DIR} \
    -DDEFAULT_CHARSET=utf8  \
    -DDEFAULT_COLLATION=utf8_general_ci \
    -DWITH_INNOBASE_STORAGE_ENGINE=1 \
    -DWITH_ARCHIVE_STORAGE_ENGINE=1 \
    -DWITH_BLACKHOLE_STORAGE_ENGINE=1 \
    -DWITH_PERFSCHEMA_STORAGE_ENGINE=1 \
    -DMYSQL_DATADIR=${DATA_DIR}\
    -DWITH_BOOST=/usr/local/src/${MYSQL_DIR}/boost/boost_1_77_0/ \
    -DFORCE_INSOURCE_BUILD=1 \
    -DWITH_SYSTEMD=1
    make -j ${CPUS} && make install
    [ $? -eq 0 ] && ${COLOR}"MariaDB编译安装成功"${END} ||  { ${COLOR}"MariaDB编译安装失败,退出!"${END};exit; }

	echo 'PATH='${INSTALL_DIR}'/bin:$PATH' > /etc/profile.d/mysql.sh
    .  /etc/profile.d/mysql.sh
	chown -R mysql.mysql ${INSTALL_DIR}

    mysqld --initialize-insecure --user=mysql --basedir=${INSTALL_DIR} --datadir=${DATA_DIR}

    cat > /etc/my.cnf <<EOF
[mysqld]
user=mysql
basedir=${INSTALL_DIR}
datadir=${DATA_DIR}
port=3306
socket=${DATA_DIR}l/mysql.sock
pid-file=${DATA_DIR}/mysql.pid

[mysqld_safe]
log-error=${DATA_DIR}/mysql.log

[client]
port=3306
socket=${DATA_DIR}/mysql.sock
EOF
    if [ ${OS_ID} == "CentOS" -o ${OS_ID} == "Rocky" ] &> /dev/null;then
        cp ${INSTALL_DIR}/usr/lib/systemd/system/mysqld.service /lib/systemd/system/
    else
        cat > /lib/systemd/system//mysqld.service  <<EOF
# Copyright (c) 2015, 2023, Oracle and/or its affiliates.
#
# This program is free software; you can redistribute it and/or modify
# it under the terms of the GNU General Public License, version 2.0,
# as published by the Free Software Foundation.
#
# This program is also distributed with certain software (including
# but not limited to OpenSSL) that is licensed under separate terms,
# as designated in a particular file or component or in included license
# documentation.  The authors of MySQL hereby grant you an additional
# permission to link the program and your derivative works with the
# separately licensed software that they have included with MySQL.
#
# This program is distributed in the hope that it will be useful,
# but WITHOUT ANY WARRANTY; without even the implied warranty of
# MERCHANTABILITY or FITNESS FOR A PARTICULAR PURPOSE.  See the
# GNU General Public License, version 2.0, for more details.
#
# You should have received a copy of the GNU General Public License
# along with this program; if not, write to the Free Software
# Foundation, Inc., 51 Franklin St, Fifth Floor, Boston, MA 02110-1301  USA
#
# systemd service file for MySQL forking server
#

[Unit]
Description=MySQL Server
Documentation=man:mysqld(8)
Documentation=http://dev.mysql.com/doc/refman/en/using-systemd.html
After=network-online.target
Wants=network-online.target
After=syslog.target

[Install]
WantedBy=multi-user.target

[Service]
User=mysql
Group=mysql

Type=notify

# Disable service start and stop timeout logic of systemd for mysqld service.
TimeoutSec=0

# Execute pre and post scripts as root
# hence, + prefix is used

# Needed to create system tables
ExecStartPre=+${INSTALL_DIR}/bin/mysqld_pre_systemd

# Start main service
ExecStart=${INSTALL_DIR}/bin/mysqld $MYSQLD_OPTS

# Use this to switch malloc implementation
EnvironmentFile=-/etc/sysconfig/mysql

# Sets open_files_limit
LimitNOFILE = 10000

Restart=on-failure

RestartPreventExitStatus=1

# Set enviroment variable MYSQLD_PARENT_PID. This is required for restart.
Environment=MYSQLD_PARENT_PID=1

PrivateTmp=false
EOF
    fi
    systemctl daemon-reload
    systemctl enable --now mysqld &> /dev/null
    [ $? -ne 0 ] && { ${COLOR}"数据库启动失败,退出!"${END};exit; }
    ${COLOR}"MySQL数据库安装完成"${END}
}

main(){
    os
    check_file
    install_mysql
}

main

