六 SpringBoot 项目搭建
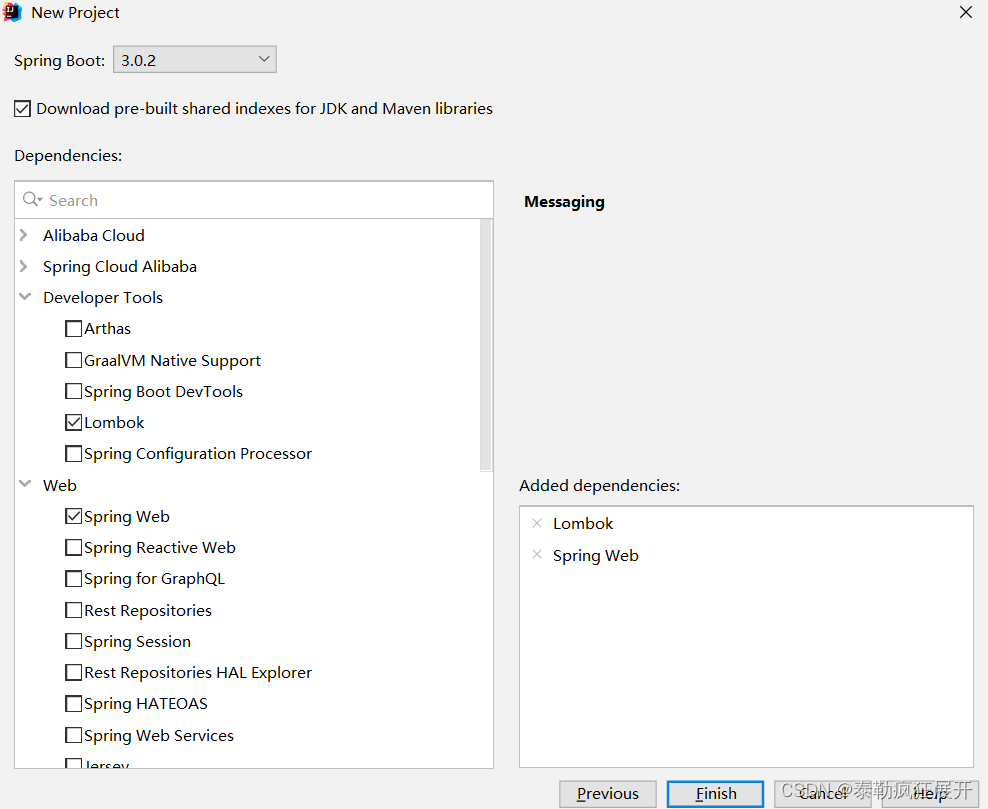
1 创建项目
spring2.X版本在2023年11月24日停止维护,而Spring3.X版本不支持JDK8,JDK11,最低支持JDK17,目前阿里云还是支持创建Spring2.X版本的项目
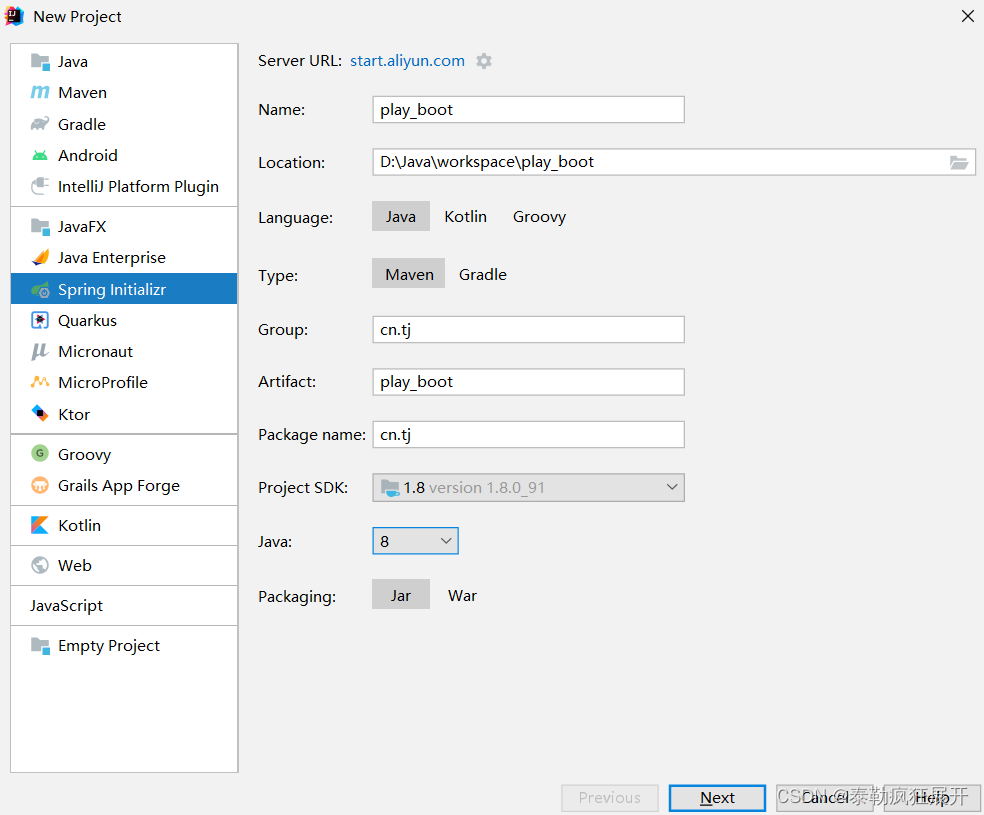
2 修改所需依赖版本 – pom
<?xml version="1.0" encoding="UTF-8"?>
<project xmlns="http://maven.apache.org/POM/4.0.0" xmlns:xsi="http://www.w3.org/2001/XMLSchema-instance"
         xsi:schemaLocation="http://maven.apache.org/POM/4.0.0 https://maven.apache.org/xsd/maven-4.0.0.xsd">
    <modelVersion>4.0.0</modelVersion>
    <parent>
        <groupId>org.springframework.boot</groupId>
        <artifactId>spring-boot-starter-parent</artifactId>
        <version>2.3.3.RELEASE</version>
        <relativePath/>
    </parent>
    <groupId>cn.tj</groupId>
    <artifactId>play_boot</artifactId>
    <version>0.0.1-SNAPSHOT</version>
    <name>play_boot</name>
    <description>play_boot</description>
    <properties>
        <java.version>8</java.version>
    </properties>
    <dependencies>
        <!-- spring boot Web 包 -->
        <dependency>
            <groupId>org.springframework.boot</groupId>
            <artifactId>spring-boot-starter-web</artifactId>
        </dependency>
        <!-- spring boot Test 包 -->
        <dependency>
            <groupId>org.springframework.boot</groupId>
            <artifactId>spring-boot-starter-test</artifactId>
            <scope>test</scope>
        </dependency>
        <!-- Lombok -->
        <dependency>
            <groupId>org.projectlombok</groupId>
            <artifactId>lombok</artifactId>
            <scope>provided</scope>
        </dependency>
    </dependencies>
    <build>
        <plugins>
            <plugin>
                <groupId>org.springframework.boot</groupId>
                <artifactId>spring-boot-maven-plugin</artifactId>
                <configuration>
                    <excludes>
                        <exclude>
                            <groupId>org.projectlombok</groupId>
                            <artifactId>lombok</artifactId>
                        </exclude>
                    </excludes>
                </configuration>
            </plugin>
        </plugins>
    </build>
</project>
3 配置数据库连接池
① 添加依赖
<!--此处不需设置版本,父工程已经规定好了-->
<dependency>
    <groupId>mysql</groupId>
    <artifactId>mysql-connector-java</artifactId>
    <scope>runtime</scope>
</dependency>
② application.properties 文件配置4要素 – 小改(可在对应的DataSourceProperties文件中获取配置前缀)
# 不同版本对应不同的路径
spring.datasource.driver-class-name=com.mysql.cj.jdbc.Driver
spring.datasource.url=jdbc:mysql:///play_boot?serverTimezone=GMT%2B8
spring.datasource.username=root
spring.datasource.password=root
③ 测试 此时会报NoSuchBeanDefinitionException错误,springboot实际上并没有帮我们创建这个Bean对象,这是因为@ConditionalOnClass 注解没有找到必需的类 javax.transaction.TransactionManager,此时将事务注解添加即可
// 错误信息
// @ConditionalOnClass did not find required class 'javax.transaction.TransactionManager' (OnClassCondition)
@SpringBootTest
class Play_bootApplicationTests {
    @Autowired
    private DataSource dataSource;
    @Test
    void testLoad(){
    	// Hikari连接池是springboot自带的,接下来要配置Druid 连接池
    	// HikariDataSource (null) 此时值不为null,只是显示为null(表示此刻没有配置)
        System.out.println(dataSource);
    }
}
④ 导入事务依赖,上面的测试可正常运行
<!-- Spring JDBC 和 TX -->
<dependency>
    <groupId>org.springframework.boot</groupId>
    <artifactId>spring-boot-starter-jdbc</artifactId>
</dependency>
⑤ 配置 Druid 连接池,添加依赖即可,Spring Boot 的自动配置中含有 DataSourceAutoConfiguration 配置类,会先检查容器中是否已经有连接池对象,有就用,没有则会使用默认的连接池(Hikari),此时通过 dataSource.getClass() 方法即可获取当前的连接池对象,com.alibaba.druid.spring.boot.autoconfigure.DruidDataSourceWrapper,springboot会自动帮我们装配DataSource 对象
<!-- druid -->
<dependency>
    <groupId>com.alibaba</groupId>
    <artifactId>druid-spring-boot-starter</artifactId>
    <version>1.1.21</version>
</dependency>
4 集成 MyBatis
集成 MyBatis 所需要的SqlSessionFactory 在springboot中会自动装配,而SqlSessionFactory 所需要的数据源,已经配置完了,此时需要配置的是实体类的别名(mapper映射文件编译后在同一文件夹中,故不需要配置)
① 导入依赖
<!-- Mybatis 集成到 SpringBoot 中的依赖 -->
<dependency>
    <groupId>org.mybatis.spring.boot</groupId>
    <artifactId>mybatis-spring-boot-starter</artifactId>
    <version>1.3.1</version>
</dependency>
② application.properties 中配置实体类别名
mybatis.type-aliases-package=cn.tj.play_boot.domain
③ 测试 SqlSessionFactory 是否成功创建
@SpringBootTest
class Play_bootApplicationTests {
    @Autowired
    private DataSource dataSource;
    @Autowired
    private SqlSessionFactory sqlSessionFactory;
    @Test
    void testLoad(){
        //System.out.println(dataSource.getClass());
        System.out.println(sqlSessionFactory);
        // org.apache.ibatis.session.defaults.DefaultSqlSessionFactory@799ed4e8
    }
}
④ 配置Mapper对象,扫描 Mapper 接口只要在配置类上贴个注解 @MapperScan 并指定扫描的包路径即可生成所有的mapper实体类。
@SpringBootApplication
@MapperScan("cn.tj.play_boot.mapper")
public class Play_bootApplication {
    public static void main(String[] args) {
        SpringApplication.run(Play_bootApplication.class, args);
    }
}
⑤ 测试时报错 The server time zone 数据库连接池连接失败短时间内会多次链接,这个错误出现的原因是没有设置时区
@SpringBootTest
class Play_bootApplicationTests {
    @Autowired
    private DataSource dataSource;
    @Autowired
    private SqlSessionFactory sqlSessionFactory;
    @Autowired
    private DepartmentMapper departmentMapper;
    @Test
    void testLoad(){
        //System.out.println(dataSource.getClass());
        //System.out.println(sqlSessionFactory);
        System.out.println(departmentMapper.selectAll());
    }
}
⑥ application.properties 中配置日志,设定日志级别
logging.level.cn.tj.play_boot.mapper=trace
⑦ 配置事务,导入事务依赖后,于service层贴上@Service注解,主启动类的注解就会找到他(service层的方法上含有事务注解@Transactional),直接测试即可
@SpringBootTest
class Play_bootApplicationTests {
    @Autowired
    private DataSource dataSource;
    @Autowired
    private SqlSessionFactory sqlSessionFactory;
    @Autowired
    private DepartmentMapper departmentMapper;
    @Autowired
    private DepartmentService departmentService;
    @Test
    void testLoad(){
        //System.out.println(dataSource.getClass());
        //System.out.println(sqlSessionFactory);
        //System.out.println(departmentMapper.selectAll());
        System.out.println(departmentService.listAll());
        // 查看对象类型真实对象说明没加事务,代理对象说明加事务了
        System.out.println(departmentService.getClass());
        // class cn.tj.play_boot.service.impl.DepartmentServiceImpl$$EnhancerBySpringCGLIB$$418bef25
        // 该类型为代理对象,说明加事务了
        // class cn.tj.play_boot.service.impl.DepartmentServiceImpl
        // 该类型为真实对象,没加事务
        // class com.sun.proxy.$Proxy61 此为JDK动态代理对象
    }
}
⑧ application.properties 中配置代理对象,可将代理对象设置为JDK动态代理,默认为CGLIB动态代理
# 默认为true,改为false即可更换为JDK动态代理
spring.aop.proxy-target-class=false
⑨ 数据库以及实体类
# 数据库
CREATE TABLE `department` (
  `id` bigint(11) NOT NULL AUTO_INCREMENT,
  `name` varchar(50) DEFAULT NULL,
  `sn` varchar(50) DEFAULT NULL,
  PRIMARY KEY (`id`)
) ENGINE=InnoDB AUTO_INCREMENT=808 DEFAULT CHARSET=utf8;
// 实体类
@Data
public class Department {
    private Long id;
    private String name;
    private String sn;
}
// mapper接口
public interface DepartmentMapper {
    /*删除*/
    int deleteByPrimaryKey(Long id);
    /*增加*/
    int insert(Department record);
    /*根据id查询*/
    Department selectByPrimaryKey(Long id);
    /*查询所有*/
    List<Department> selectAll();
    /*修改*/
    int updateByPrimaryKey(Department record);
    /*查询总条数*/
    public int selectForCount(QueryObject qo);
    /*分页查询*/
    public List<Department> selectForList(QueryObject qo);
}
<!--mapper.xml-->
<?xml version="1.0" encoding="UTF-8" ?>
<!DOCTYPE mapper PUBLIC "-//mybatis.org//DTD Mapper 3.0//EN" "http://mybatis.org/dtd/mybatis-3-mapper.dtd" >
<mapper namespace="cn.tj.play_boot.mapper.DepartmentMapper" >
  <resultMap id="BaseResultMap" type="cn.tj.play_boot.domain.Department" >
    <id column="id" property="id" jdbcType="BIGINT" />
    <result column="name" property="name" jdbcType="VARCHAR" />
    <result column="sn" property="sn" jdbcType="VARCHAR" />
  </resultMap>
  <delete id="deleteByPrimaryKey" parameterType="java.lang.Long" >
    delete from department
    where id = #{id,jdbcType=BIGINT}
  </delete>
  <insert id="insert" parameterType="cn.tj.play_boot.domain.Department" useGeneratedKeys="true" keyProperty="id" >
    insert into department (name, sn)
    values (#{name,jdbcType=VARCHAR}, #{sn,jdbcType=VARCHAR})
  </insert>
  <update id="updateByPrimaryKey" parameterType="cn.tj.play_boot.domain.Department" >
    update department
    set name = #{name,jdbcType=VARCHAR},
      sn = #{sn,jdbcType=VARCHAR}
    where id = #{id,jdbcType=BIGINT}
  </update>
  <select id="selectByPrimaryKey" resultMap="BaseResultMap" parameterType="java.lang.Long" >
    select id, name, sn
    from department
    where id = #{id,jdbcType=BIGINT}
  </select>
  <select id="selectAll" resultMap="BaseResultMap" >
    select id, name, sn
    from department
  </select>
  <!--查询总条数-->
  <select id="selectForCount" resultType="int">
    SELECT count(*) from department
  </select>
  <!--分页查询部门-->
  <select id="selectForList" resultMap="BaseResultMap">
    SELECT * from  department limit #{start},#{pageSize}
  </select>
</mapper>
⑩ service层
// 接口
public interface DepartmentService {
    void delete(Long id);
    void save(Department department);
    Department get(Long id);
    List<Department> listAll();
    void update(Department department);
    /*分页查询*/
    PageResult<Department> query(QueryObject qo);
}
// 实现类
@Service
public class DepartmentServiceImpl implements DepartmentService {
    /*注入mapper*/
    @Autowired
    private DepartmentMapper departmentMapper;
    @Override
    public void delete(Long id) {
       departmentMapper.deleteByPrimaryKey(id);
    }
    // 事务注解
    @Transactional
    @Override
    public void save(Department department) {
       departmentMapper.insert(department);
    }
    @Override
    public Department get(Long id) {
        Department department = departmentMapper.selectByPrimaryKey(id);
        return department;
    }
    @Override
    public List<Department> listAll() {
        List<Department> departmentList = departmentMapper.selectAll();
        return departmentList;
    }
    @Override
    public void update(Department department) {
       departmentMapper.updateByPrimaryKey(department);
    }
    /*分页查询*/
    @Override
    public PageResult<Department> query(QueryObject qo) {
        //查询总条数
        int totalCount = departmentMapper.selectForCount(qo);
        if (totalCount==0){
            return new PageResult<>(qo.getCurrentPage(),qo.getPageSize(),0, Collections.emptyList());
        }
        //分页查询部门
        List<Department> departmentList = departmentMapper.selectForList(qo);
        //创建返回的分页对象
        PageResult<Department> pageResult=new PageResult<>(qo.getCurrentPage(),
                qo.getPageSize(),totalCount,departmentList);
        return pageResult;
    }
}
小结
springboot对持久层(1.2.3)及业务层(4.5.6)的优化
1.自动配置DataSource对象,配置4要素同时导入指定连接池依赖(starter启动器)即可自动替换所需要的连接池对象
2.自动配置SqlSessionFactory对象,配置指定实体类别名既可
3.通过MapperScan注解优化Mapper对象,指定好具体路径可自动生成Mapper接口代理类
4.不再扫描业务层对象
5.不再配置事物管理器对象
6.不再配置事务解析器对象
5 集成 Web
① 导入所需依赖
<!-- spring boot web 启动器(之前已添加了) -->
<dependency>
    <groupId>org.springframework.boot</groupId>
    <artifactId>spring-boot-starter-web</artifactId>
</dependency>
② application.properties 文件中修改端口号(浏览器端口默认80,地址中可省略书写端口号)
server.port=80
③ 于resources目录下创建static目录用来存放静态资源(原来位于webapp目录下的static目录),于resources目录下创建的templates模板目录用来存放模板(原来位于webapp目录下的WEB-INF目录中的views目录,类似WEB-INF不能直接访问),static相当于webapp这意味着路径中不需要输入static,但针对于静态资源需要放行的特点,以后拦截器要排除/static/**的路径,在application.properties中做了以下配置后,路径中就需要输入static了
// 告诉springboot访问静态资源路径以后都需要以/static/**开头
// 所有以 /static/ 开头的 URL 都会被映射到静态资源目录
spring.mvc.static-path-pattern=/static/**
6 集成Thymeleaf
① 导入所需依赖
<!-- 引入 Thymeleaf 依赖 -->
<dependency>
    <groupId>org.springframework.boot</groupId>
    <artifactId>spring-boot-starter-thymeleaf</artifactId>
</dependency>
② application.properties 文件中,配置Thymeleaf前缀(默认路径找templates目录,可省略)后缀(默认.html,可省略)model(默认HTML,可省略),编码集(默认UTF-8,可省略),缓存默认为true需要设置为false(开发阶段不建议打开缓存)
# 前缀
spring.thymeleaf.prefix=classpath:/templates/

# 后缀
spring.thymeleaf.suffix=.html

# model
spring.thymeleaf.mode=HTML

# model
spring.thymeleaf.mode=HTML

# 编码集
spring.thymeleaf.encoding=UTF-8

# 缓存
spring.thymeleaf.cache=false
③ controller层
@Controller
@RequestMapping("department")
public class DepartmentController {
    /*注入业务逻辑层对象*/
    @Autowired
    private DepartmentService departmentService;
    /*查询部门*/
    @RequestMapping("selectAll")
    public String selectAll(Model model){
        List<Department> departmentList = departmentService.listAll();
        model.addAttribute("departmentList",departmentList);
        return "department/list";
    }
    /*跳转到增加或修改页面*/
    @RequestMapping("input")
    public String input(Long id,Model model){
        /*根据id判断是否做修改*/
        if (id!=null){
            //根据id查询
            Department department = departmentService.get(id);
            //将部门对象存储到作用域
            model.addAttribute("department",department);
        }
        return "department/input";
    }
    /*保存增加或修改*/
    @RequestMapping("saveOrUpdate")
    public String saveOrUpdate(Department department){
        if (department.getId()!=null){
            //执行修改操作
            departmentService.update(department);
        }else {
            //执行增加操作
            departmentService.save(department);
        }
        //跳转查询
        return "redirect:/department/listAll";
    }
    /*删除部门*/
    @RequestMapping("delete")
    public String delete(Long id){
        departmentService.delete(id);
        return "redirect:/department/listAll";
    }
    /*分页查询部门*/
    @RequestMapping("listAll")
    public String listAll(Model model,
                          @RequestParam(value = "currentPage",required = false,defaultValue = "1") Integer currentPage,
                          @RequestParam(value = "pageSize",required = false,defaultValue = "2") Integer pageSize
                          /*参数value对应  required为false表示可以不传此参数  defaultValue表示不传参数时的默认值为何值*/
    ){
        QueryObject qo=new QueryObject();
        qo.setCurrentPage(currentPage);
        qo.setPageSize(pageSize);
        PageResult<Department> pageResult = departmentService.query(qo);
        model.addAttribute("pageResult",pageResult);
        return "department/list";
    }
}
④ html模板,访问http://localhost/department/input?id=801即可查询对应的部门信息(801为数据库中数据的id)
<!DOCTYPE html>
<html lang="en" xmlns:th="http://www.thymeleaf.org">
<head>
    <meta charset="UTF-8">
    <title>部门新增或者修改</title>
</head>
<body>
<h3>部门编辑</h3>
<form action="/department/saveOrUpdate" method="post">
    <input type="hidden" name="id" th:value="${department?.id}">
    <input type="text" name="name" placeholder="名称" th:value="${department.name}"><br/>
    <input type="text" name="sn" placeholder="缩写" th:value="${department.sn}"><br/>
    <input type="submit" value="提交">
</form>
</body>
</html>
小结
springboot对控制层的优化
1.前端文件存放位置更明确
2.不需再写扫描控制层
3.不需再写静态资源处理
4.不需再写MVC注解解析器
5.thymeleaf集成优化,小改即可
6.前端控制器不用自行配置了,路径默认为/






![C/C++语言实现简易通讯录 [含文件操作,循环双链表]](https://img-blog.csdnimg.cn/direct/bbc3b75cac5a424bbdb5d2c49e5c06a4.png)

![[机器学习]练习-KNN算法](https://img-blog.csdnimg.cn/direct/2c60f4dfbffd4815b1d39ab68827e28b.png)
