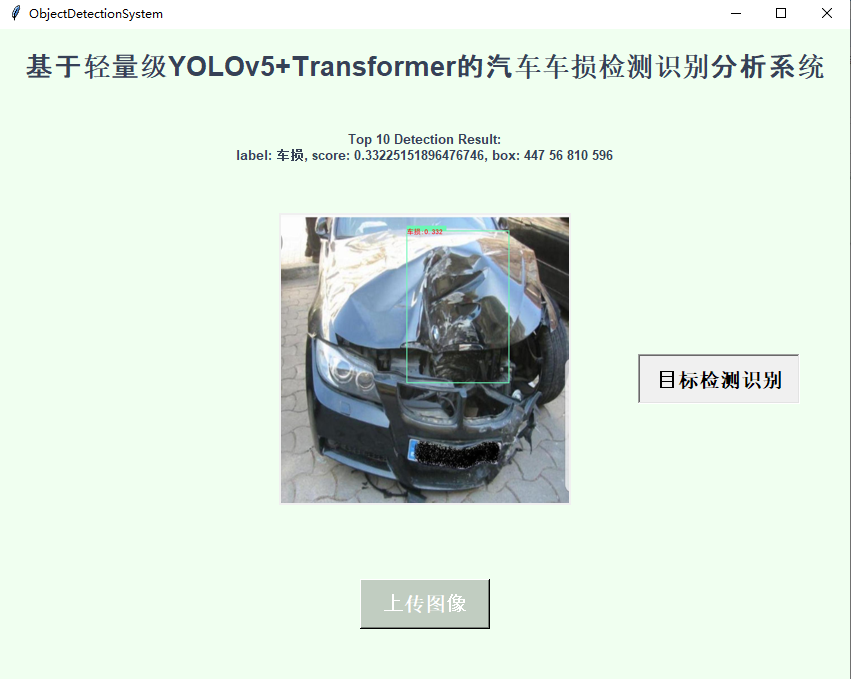
将传统NLP领域提出来的Transformer技术与yolo目标检测模型融合已经成为一种经典的做法,早在之前的很多论文里面就有这种组合应用的出现了,本文主要是借鉴前文的思路,开发基于yolov5+transformer的汽车车损检测识别模型,首先看下效果图:

改进融合的模型yaml文件如下:
#Parameters
nc: 1  # number of classes
depth_multiple: 0.33  # model depth multiple
width_multiple: 0.50  # layer channel multiple
anchors:
  - [10,13, 16,30, 33,23]  # P3/8
  - [30,61, 62,45, 59,119]  # P4/16
  - [116,90, 156,198, 373,326]  # P5/32


#Backbone
backbone:
  # [from, number, module, args]
  [[-1, 1, Conv, [64, 6, 2, 2]],  # 0-P1/2
   [-1, 1, Conv, [128, 3, 2]],  # 1-P2/4
   [-1, 3, C3, [128]],
   [-1, 1, Conv, [256, 3, 2]],  # 3-P3/8
   [-1, 6, C3, [256]],
   [-1, 1, Conv, [512, 3, 2]],  # 5-P4/16
   [-1, 9, C3, [512]],
   [-1, 1, Conv, [1024, 3, 2]],  # 7-P5/32
   [-1, 3, C3TR, [1024]],
   [-1, 1, SPPF, [1024, 5]],  # 9
  ]


#Head
head:
  [[-1, 1, Conv, [512, 1, 1]],
   [-1, 1, nn.Upsample, [None, 2, 'nearest']],
   [[-1, 6], 1, Concat, [1]],  # cat backbone P4
   [-1, 3, C3, [512, False]],  # 13

   [-1, 1, Conv, [256, 1, 1]],
   [-1, 1, nn.Upsample, [None, 2, 'nearest']],
   [[-1, 4], 1, Concat, [1]],  # cat backbone P3
   [-1, 3, C3, [256, False]],  # 17 (P3/8-small)

   [-1, 1, Conv, [256, 3, 2]],
   [[-1, 14], 1, Concat, [1]],  # cat head P4
   [-1, 3, C3, [512, False]],  # 20 (P4/16-medium)

   [-1, 1, Conv, [512, 3, 2]],
   [[-1, 10], 1, Concat, [1]],  # cat head P5
   [-1, 3, C3, [1024, False]],  # 23 (P5/32-large)

   [[17, 20, 23], 1, Detect, [nc, anchors]],  # Detect(P3, P4, P5)
  ]
主要是在BackBone部分加入了SwinTransformer模块,如下所示:

接下来看下数据集:

YOLO格式标注数据文件如下:

实例标注数据内容如下:
0 0.570801 0.273926 0.780273 0.413086
0 0.76416 0.705078 0.280273 0.253906
0 0.512695 0.652832 0.226562 0.157227
VOC格式标注数据文件如下:

实例标注数据内容如下所示:
<annotation>
    <folder>CarDamage</folder>
    <filename>1b19e1b4-e1b6-483c-967e-5a0d10c21567.jpg</filename>
    <source>
        <database>The CarDamage Database</database>
        <annotation>CarDamage</annotation>
        <image>CarDamage</image>
    </source>
    <owner>
        <name>YSHC</name>
    </owner>
    <size>
        <width>1024</width>
        <height>1024</height>
        <depth>3</depth>
    </size>
    <segmented>0</segmented>

    <object>
        <name>damage</name>
        <pose>Unspecified</pose>
        <truncated>0</truncated>
        <difficult>0</difficult>
        <bndbox>
            <xmin>307</xmin>
            <ymin>333</ymin>
            <xmax>720</xmax>
            <ymax>572</ymax>
        </bndbox>
    </object>

    <object>
        <name>damage</name>
        <pose>Unspecified</pose>
        <truncated>0</truncated>
        <difficult>0</difficult>
        <bndbox>
            <xmin>478</xmin>
            <ymin>723</ymin>
            <xmax>645</xmax>
            <ymax>872</ymax>
        </bndbox>
    </object>

</annotation>
默认执行100次的迭代计算,因为车损数据并没有获取很多,主要是实践整个流程,所以训练耗时并不多,接下来看下结果详情。
LABEL数据可视化如下所示:

混淆矩阵如下:

F1值曲线和PR曲线:

训练batch检测实例如下:

最后开发界面实现可视化推理应用。

上传待检测图像:

检测推理计算: