具体见:https://github.com/febobo/web-interview
11.元素可见区域
①offsetTop、scrollTop
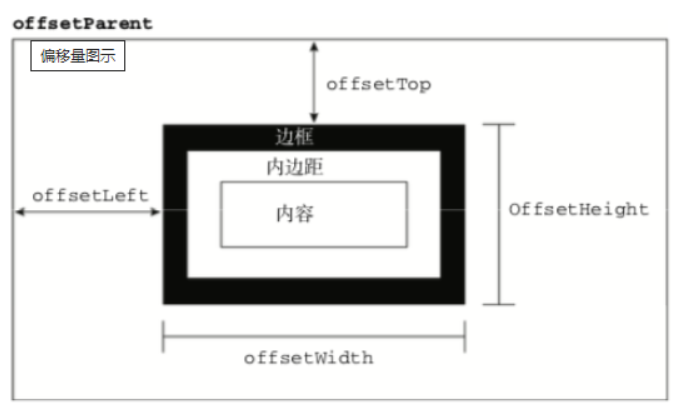
offsetTop,元素的上外边框至包含元素的上内边框之间的像素距离,其他offset属性如下图所示:
下面再来了解下clientWidth、clientHeight:
clientWidth:元素内容区宽度加上左右内边距宽度,即clientWidth = content + paddingclientHeight:元素内容区高度加上上下内边距高度,即clientHeight = content + padding
这里可以看到client元素都不包括外边距
最后,关于scroll系列的属性如下:
-
scrollWidth和scrollHeight主要用于确定元素内容的实际大小 -
scrollLeft和scrollTop属性既可以确定元素当前滚动的状态,也可以设置元素的滚动位置 -
- 垂直滚动
scrollTop > 0 - 水平滚动
scrollLeft > 0
- 垂直滚动
-
将元素的
scrollLeft和scrollTop设置为 0,可以重置元素的滚动位置 -
上述属性都是只读的,每次访问都要重新开始

判断页面触底我们需要先了解一下下面几个属性:
scrollTop:滚动视窗的高度距离window顶部的距离,它会随着往上滚动而不断增加,初始值是0,它是一个变化的值clientHeight:它是一个定值,表示屏幕可视区域的高度;scrollHeight:页面不能滚动时也是存在的,此时scrollHeight等于clientHeight。scrollHeight表示body所有元素的总长度(包括body元素自身的padding)
可视区域即我们浏览网页的设备肉眼可见的区域,如下图

在日常开发中,我们经常需要判断目标元素是否在视窗之内或者和视窗的距离小于一个值(例如 100 px),从而实现一些常用的功能,例如:
- 图片的懒加载
- 列表的无限滚动
- 计算广告元素的曝光情况
- 可点击链接的预加载
②实现方式
公式如下:
也就是元素距上外边框的距离 - 滚动视窗距window顶部的距离 ,是否超过了视窗高度。
el.offsetTop - document.documentElement.scrollTop <= viewPortHeight
代码实现:
function isInViewPortOfOne (el) {
    // viewPortHeight 兼容所有浏览器写法
    const viewPortHeight = window.innerHeight || document.documentElement.clientHeight || document.body.clientHeight
    const offsetTop = el.offsetTop
    const scrollTop = document.documentElement.scrollTop
    const top = offsetTop - scrollTop
    return top <= viewPortHeight
}
③getBoundingClientRect
返回值是一个 DOMRect对象,拥有left, top, right, bottom, x, y, width, 和 height属性
const target = document.querySelector('.target');
const clientRect = target.getBoundingClientRect();
console.log(clientRect);

// {
//   bottom: 556.21875,
//   height: 393.59375,
//   left: 333,
//   right: 1017,
//   top: 162.625,
//   width: 684
// }
属性对应的关系图如下所示:
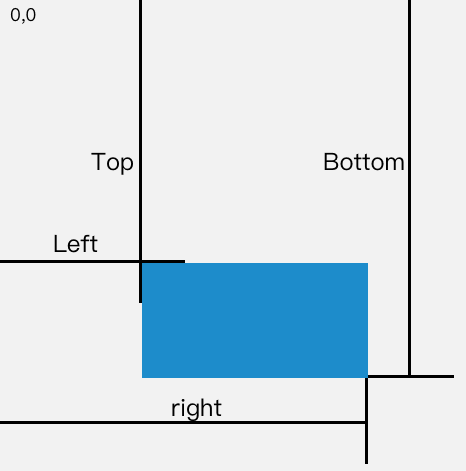
当页面发生滚动的时候,top与left属性值都会随之改变。
如果一个元素在视窗之内的话,那么它一定满足下面四个条件:
- top 大于等于 0
- left 大于等于 0
- bottom 小于等于视窗高度
- right 小于等于视窗宽度
实现代码如下:
function isInViewPort(element) {
  const viewWidth = window.innerWidth || document.documentElement.clientWidth;
  const viewHeight = window.innerHeight || document.documentElement.clientHeight;
  const {
    top,
    right,
    bottom,
    left,
  } = element.getBoundingClientRect();

  return (
    top >= 0 &&
    left >= 0 &&
    right <= viewWidth &&
    bottom <= viewHeight
  );
}
④Intersection Observer
Intersection Observer 即重叠观察者,从这个命名就可以看出它用于判断两个元素是否重叠,因为不用进行事件的监听,性能方面相比getBoundingClientRect 会好很多。
使用步骤主要分为两步:创建观察者和传入被观察者
创建观察者
const options = {
  // 表示重叠面积占被观察者的比例,从 0 - 1 取值,
  // 1 表示完全被包含
  threshold: 1.0,
  root:document.querySelector('#scrollArea') // 必须是目标元素的父级元素
};

const callback = (entries, observer) => { ....}

const observer = new IntersectionObserver(callback, options);
通过new IntersectionObserver创建了观察者 observer,传入的参数 callback 在重叠比例超过 threshold 时会被执行`
关于callback回调函数常用属性如下:
// 上段代码中被省略的 callback
const callback = function(entries, observer) {
    entries.forEach(entry => {
        entry.time;               // 触发的时间
        entry.rootBounds;         // 根元素的位置矩形,这种情况下为视窗位置
        entry.boundingClientRect; // 被观察者的位置举行
        entry.intersectionRect;   // 重叠区域的位置矩形
        entry.intersectionRatio;  // 重叠区域占被观察者面积的比例(被观察者不是矩形时也按照矩形计算)
        entry.target;             // 被观察者
    });
};
传入被观察者
通过 observer.observe(target) 这一行代码即可简单的注册被观察者
const target = document.querySelector('.target');
observer.observe(target);
案例
例子创建了一个十万个节点的长列表,当节点滚入到视窗中时,背景就会从红色变为黄色。
<body>
    <div class="container"></div>
</body>
    .container {
        display: flex;
        flex-wrap: wrap;
    }

    .target {
        margin: 5px;
        width: 20px;
        height: 20px;
        background: red;
    }
首先插入100000个div
	const container = document.querySelector(".container");

    // 插入 100000 个 <div class="target"></div>
    function createTargets() {
        const htmlString = new Array(100000)
            .fill('<div class="target"></div>')
            .join("");
        container.innerHTML= htmlString;
    }
判定target是否在视窗中,element是传入的target。
 function isInviewPort(element){
        const viewWidth = window.innerWidth || document.document.clientWidth;
        const viewHeigth = window.innerHeight || document.documentElement.clientWidth;
        const { top,right,bottom,left} = element.getBoundingClientRect();
        return top >= 0 && left >=0 && right <= viewWidth && bottom <= viewHeigth;
    }
绑定滑轮事件
 this.addEventListener('scroll',() =>{
        console.log("scroll!");
        const target = document.querySelectorAll('.target')
        for(const element of target){
            if(isInviewPort(element)){
                element.style =  "background-color:yellow"
            }else{
                 element.style =  "background-color:red"
			}
        }
    })
可以看到,没当滑动就会把所有target,依次传入isInviewPort,若在视窗中则改变颜色为黄色,否则改为红色。
通过上面的方法基本实现要求,但是有明显的卡顿,原因在于我们绑定了scroll事件,scroll事件伴随了大量的计算,会造成资源方面的浪费。
下面试试观察者的方法,首先创建一个观察者,然后给每个target进行绑定。
 const observer = new IntersectionObserver(getYellow, { threshold: 1.0 });
    const target = document.querySelectorAll('.target')
    for (const element of target) {
        observer.observe(element)
    }
最后使用getYellow回调函数实现对背景颜色改变。
 function getYellow(entries, observer) {
        for (const entry of entries) {
            let element = entry.target
            // console.log(element);
            if (isInviewPort(element)) {
                element.style = "background-color:yellow"
            } else {
                element.style = "background-color:red"
            }
        }

    }
还是有延迟,但是明显好很多。

![[Linux_IMX6ULL驱动开发]-基础驱动](https://img-blog.csdnimg.cn/direct/4ca5ef08cd2a4d67a7ef3c5327b843d7.png)


