Spring
- 1、简介:
- 2、第一个程序
- 2、set注入
- 2.1 简单数据类型
- 2.2测试
- 2.3 注入Properties
- 2.4 p命名空间注入
- 2.5 c命名空间注入
- 2.6 util注入
- 2.6 引入外部配置文件
1、简介:
自己的理解:spring其实就是一个容器,也可以说是一个框架,主要是控制反转和面向切面编程。
控制反转IOC:是一种思想,就是把new对象的权力交给了spring,也把两个对象之间关系的连接交给了别人。
依赖注入DI:是控制反转的一种实现方式,依赖就是指对象A和对象B之间的关系,注入就是就是一种方式将对象A和对象B关联起来。
依赖注入DI,又包括常见的两种方式:
第一种:set注入(执行set方法给属性赋值)
第二种:构造方法注入(执行构造方法给属性赋值)
注意术语:
OCP:开闭原则(开发原则)
DIP:依赖倒置原则(开发原则)
IoC:控制反转(一种思想,一种新型的设计模式)
DI:依赖注入(控制反转思想的具体实现方式)
2、第一个程序
首先建立一个空项目
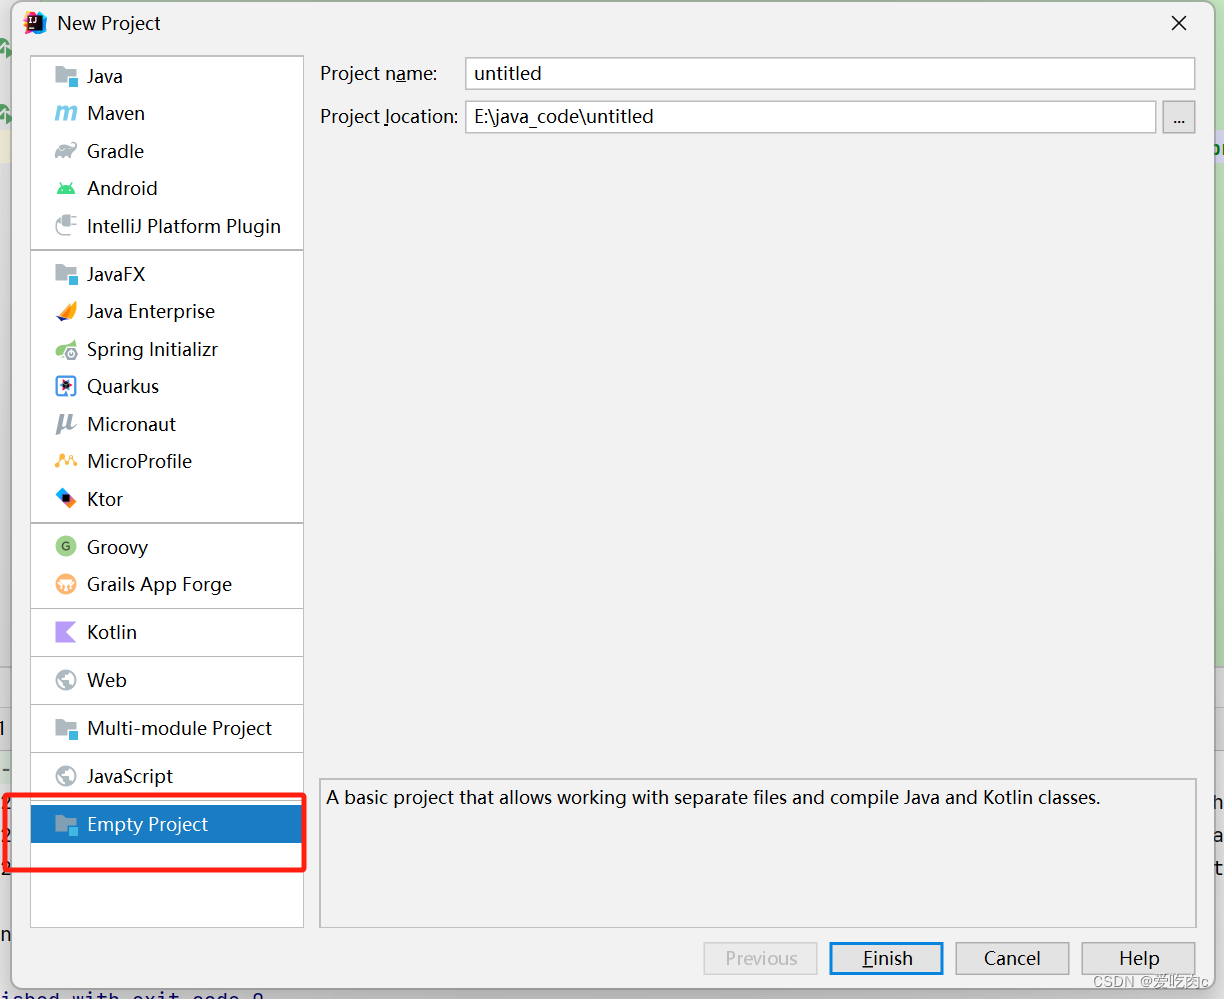
给该项目添加上jdk配置,即给该项目下的所有模块都进行了配置。
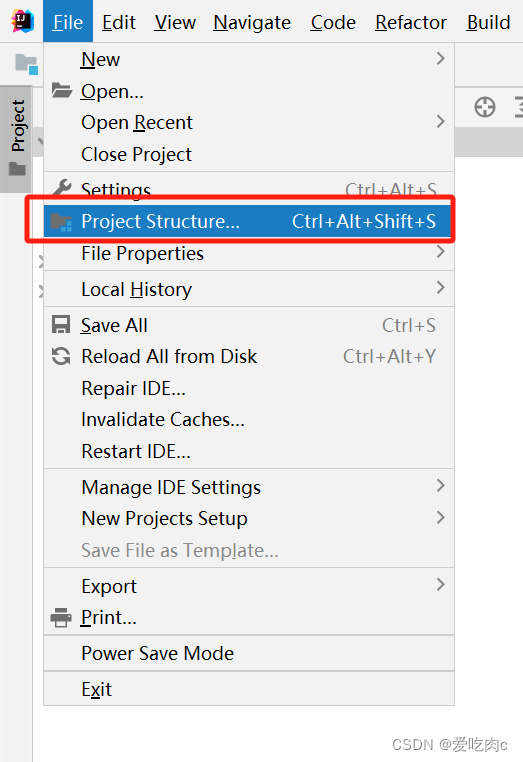
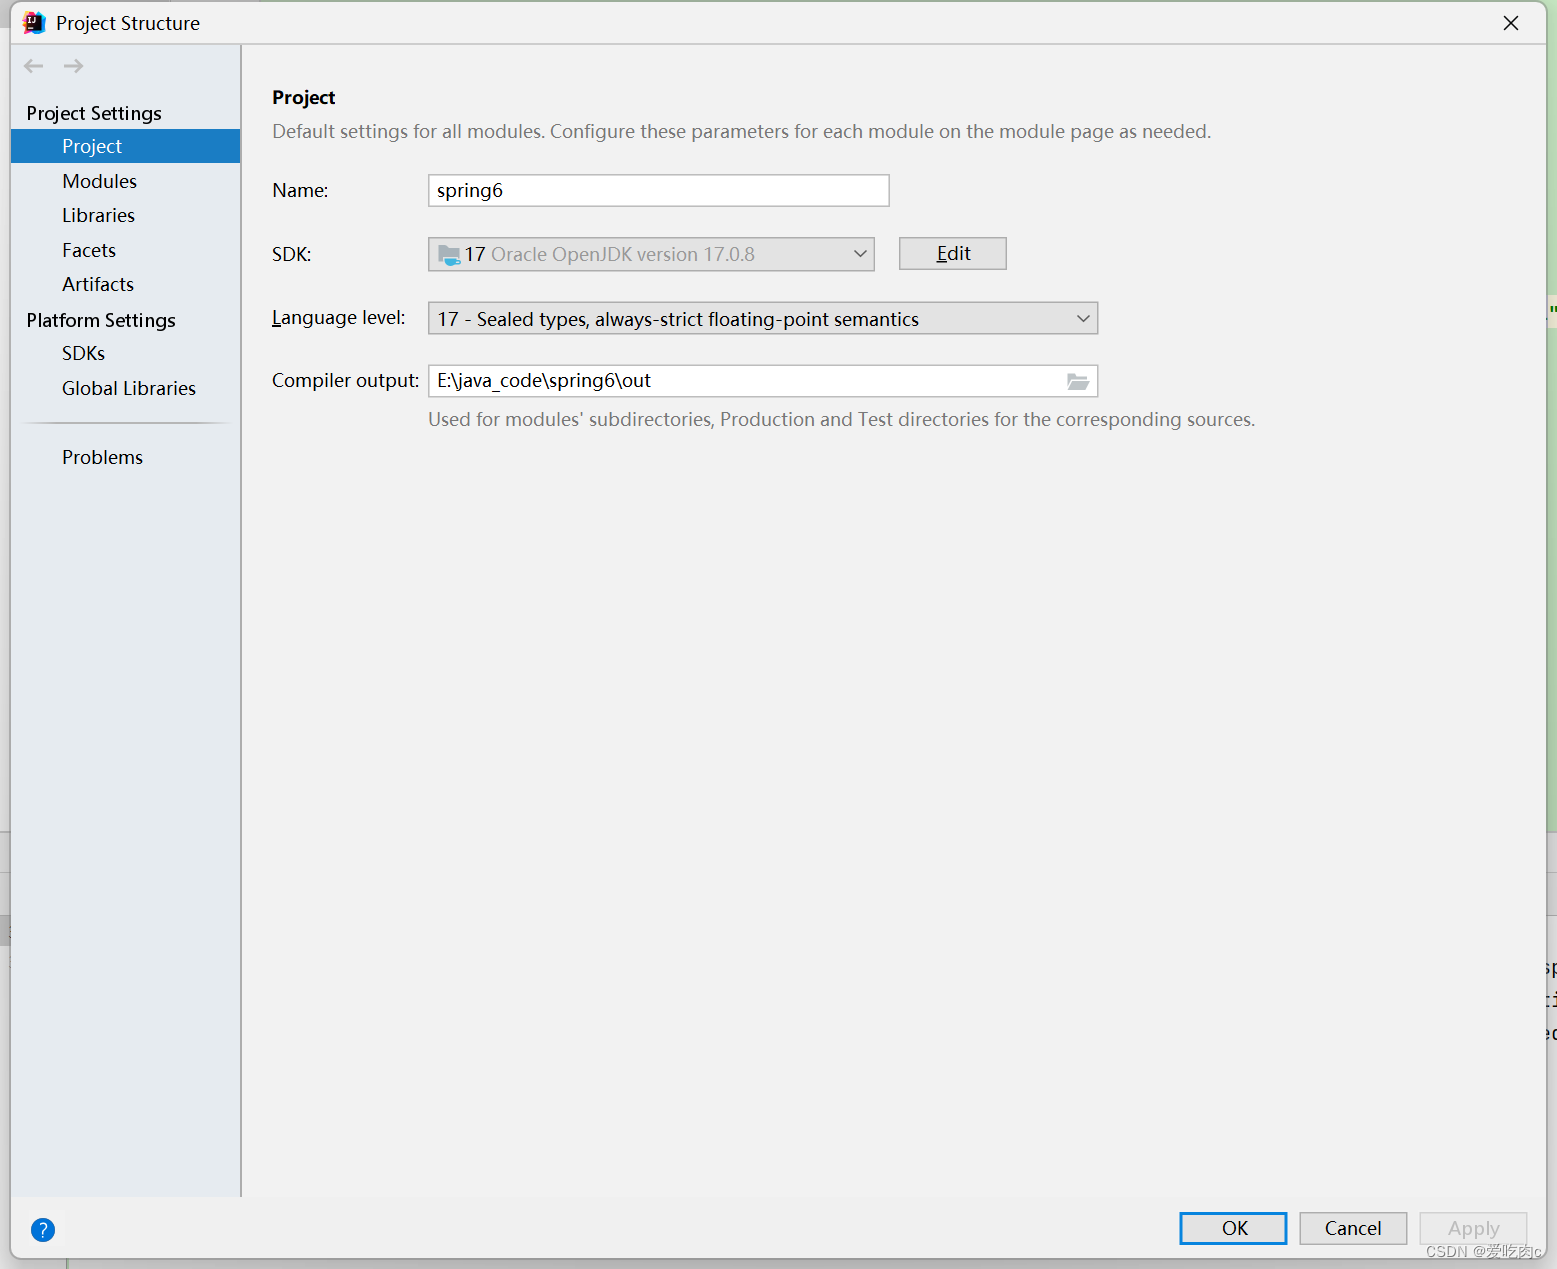
接着创建一个module模块
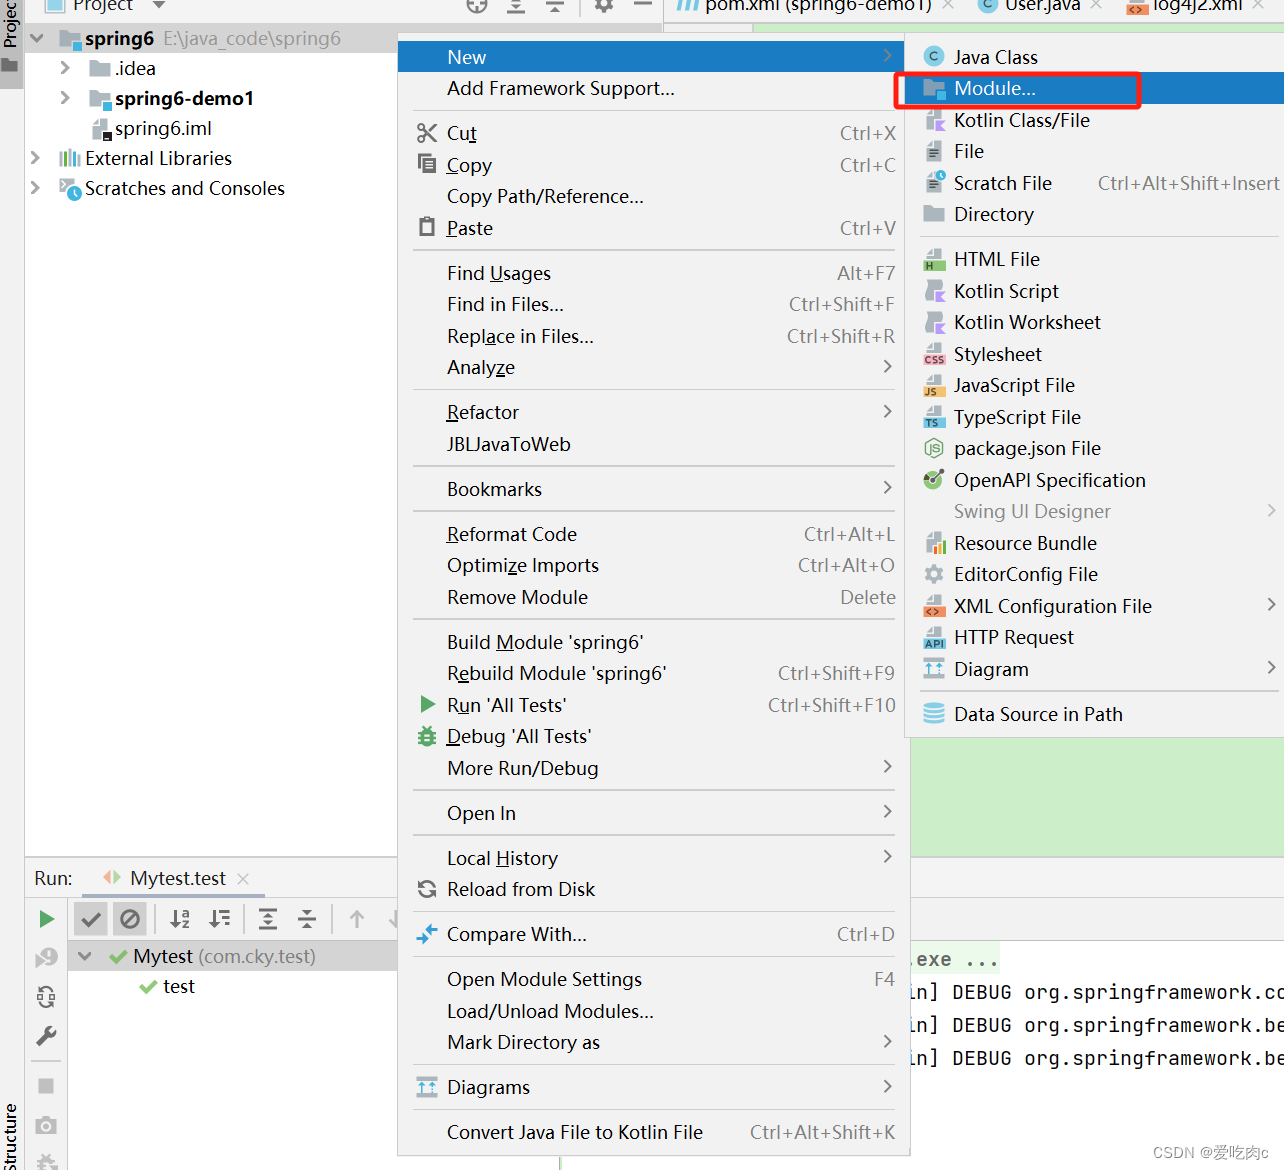
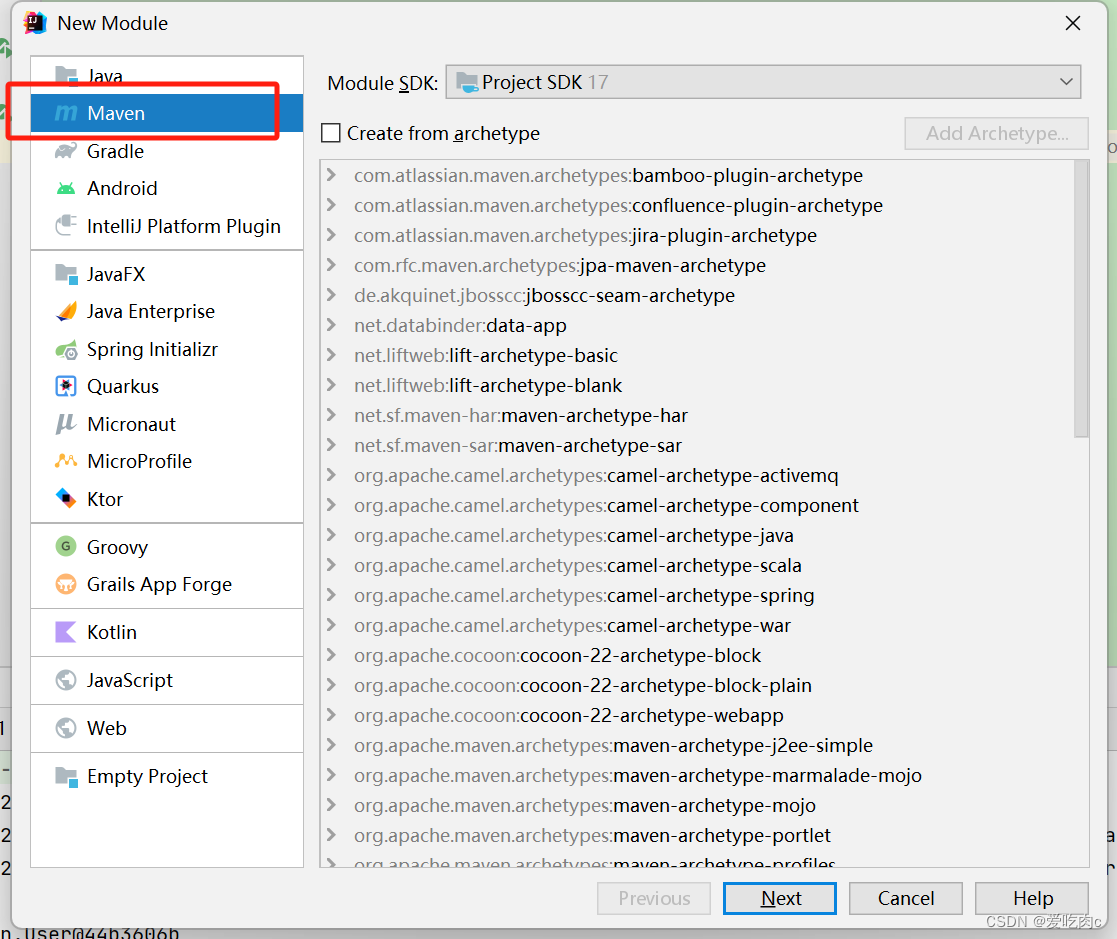
创建一个maven模块
在resoureces目录下配置spring xml文件配置,即在这里边进行依赖注入。
配置pom.xml(根据自己的需求)
<?xml version="1.0" encoding="UTF-8"?>
<project xmlns="http://maven.apache.org/POM/4.0.0"
         xmlns:xsi="http://www.w3.org/2001/XMLSchema-instance"
         xsi:schemaLocation="http://maven.apache.org/POM/4.0.0 http://maven.apache.org/xsd/maven-4.0.0.xsd">
    <modelVersion>4.0.0</modelVersion>

    <groupId>com.cky</groupId>
    <artifactId>spring6-demo1</artifactId>
    <version>1.0-SNAPSHOT</version>

    <properties>
        <maven.compiler.source>17</maven.compiler.source>
        <maven.compiler.target>17</maven.compiler.target>
    </properties>
    <dependencies>
        <dependency>
            <groupId>org.springframework</groupId>
            <artifactId>spring-context</artifactId>
            <version>6.1.5</version>
        </dependency>
        <!--log4j2的依赖-->
        <dependency>
            <groupId>org.apache.logging.log4j</groupId>
            <artifactId>log4j-core</artifactId>
            <version>2.19.0</version>
        </dependency>
        <dependency>
            <groupId>org.apache.logging.log4j</groupId>
            <artifactId>log4j-slf4j2-impl</artifactId>
            <version>2.19.0</version>
        </dependency>
        <dependency>
            <groupId>junit</groupId>
            <artifactId>junit</artifactId>
            <version>4.13.2</version>
            <scope>test</scope>
        </dependency>
    </dependencies>


</project>
我的项目目录:
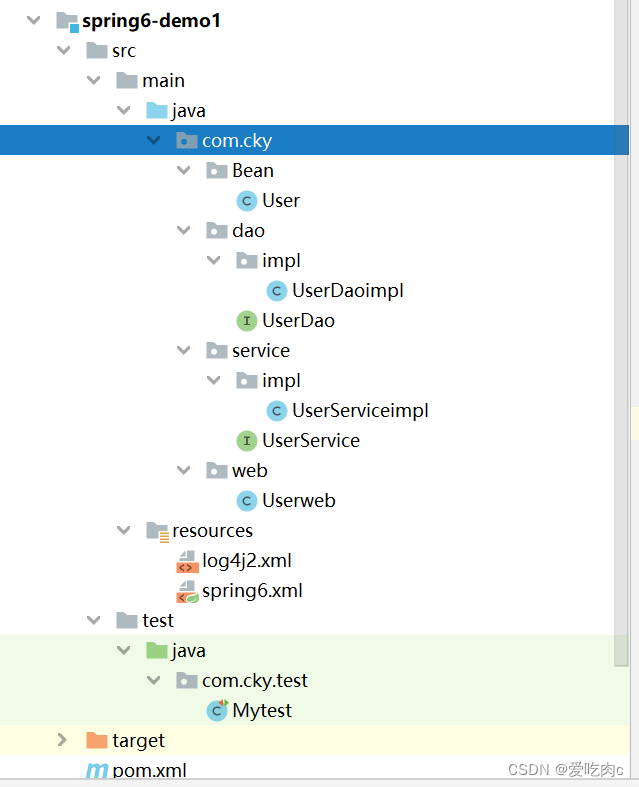
我的spring6.xml
<?xml version="1.0" encoding="UTF-8"?>
<beans xmlns="http://www.springframework.org/schema/beans"
       xmlns:xsi="http://www.w3.org/2001/XMLSchema-instance"
       xsi:schemaLocation="http://www.springframework.org/schema/beans http://www.springframework.org/schema/beans/spring-beans.xsd">
    <bean id="user" class="com.cky.Bean.User"></bean>
    <bean id="userDaoimpl" class="com.cky.dao.impl.UserDaoimpl"></bean>
    <bean id="userServiceimpl" class="com.cky.service.impl.UserServiceimpl">
        <property name="userDao" ref="userDaoimpl"></property>
    </bean>
    <bean id="userweb" class="com.cky.web.Userweb">
        <property name="userService" ref="userServiceimpl"></property>
    </bean>
</beans>
set注入
name是set方法后边的字母(第一个字母小写),ref是要注入bean的id。
set注入是先实例化对象,在注入
构造注入
通过测试得知,通过构造方法注入的时候:
● 可以通过下标 index
● 可以通过参数名 name
● 也可以不指定下标和参数名,可以类型自动推断。
Spring在装配方面做的还是比较健壮的。
构造注入是实例化对象的同时就进行了依赖注入。
2、set注入
2.1 简单数据类型
public static boolean isSimpleValueType(Class<?> type) {
		return (Void.class != type && void.class != type &&
				(ClassUtils.isPrimitiveOrWrapper(type) ||
				Enum.class.isAssignableFrom(type) ||
				CharSequence.class.isAssignableFrom(type) ||
				Number.class.isAssignableFrom(type) ||
				Date.class.isAssignableFrom(type) ||
				Temporal.class.isAssignableFrom(type) ||
				URI.class == type ||
				URL.class == type ||
				Locale.class == type ||
				Class.class == type));
	}
通过源码分析得知,简单类型包括:
● 基本数据类型
● 基本数据类型对应的包装类
● String或其他的CharSequence子类
● Number子类
● Date子类
● Enum子类
● URI
● URL
● Temporal子类
● Locale
● Class
● 另外还包括以上简单值类型对应的数组类型。
2.2测试
package com.cky.Bean;

public class People {
    private String name;

    public void setName(String name) {
        this.name = name;
    }

    @Override
    public String toString() {
        return "People{" +
                "name='" + name + '\'' +
                '}';
    }
}
package com.cky.Bean;

import java.util.Arrays;
import java.util.List;
import java.util.Map;
import java.util.Set;

public class User {
    private  Class aClass;
    private String[] names;
    private List<People> peoples;
    private Map<Integer,String> maps;
    private Set<String> sets;
    private String nulls;
    private String email;
    private String p;

    public void setP(String p) {
        this.p = p;
    }

    @Override
    public String toString() {
        return "User{" +
                "aClass=" + aClass +
                ", names=" + Arrays.toString(names) +
                ", peoples=" + peoples +
                ", maps=" + maps +
                ", sets=" + sets +
                ", nulls='" + nulls + '\'' +
                ", email='" + email + '\'' +
                ", p='" + p + '\'' +
                '}';
    }

    public void setEmail(String email) {
        this.email = email;
    }

    public void setNames(String[] names) {
        this.names = names;
    }

    public void setPeoples(List<People> peoples) {
        this.peoples = peoples;
    }

    public void setMaps(Map<Integer, String> maps) {
        this.maps = maps;
    }

    public void setSets(Set<String> sets) {
        this.sets = sets;
    }

    public void setNulls(String nulls) {
        this.nulls = nulls;
    }

    public void setaClass(Class aClass) {
        this.aClass = aClass;
    }

    public User(){
        System.out.println("无参构造执行了");
    }

}
<?xml version="1.0" encoding="UTF-8"?>
<beans xmlns="http://www.springframework.org/schema/beans"
       xmlns:xsi="http://www.w3.org/2001/XMLSchema-instance"
       xsi:schemaLocation="http://www.springframework.org/schema/beans http://www.springframework.org/schema/beans/spring-beans.xsd">
<!--    private  Class aClass;
    private String[] names;
    private List<People> peoples;
    private Map<Integer,String> maps;
    private Set<String> sets;
    private String nulls;
        private String email;-->
    <bean name="people1" class="com.cky.Bean.People">
        <property name="name" value="cui"></property>
    </bean>
    <bean name="people2" class="com.cky.Bean.People">
        <property name="name" value="cky"></property>
    </bean>
    <bean name="user" class="com.cky.Bean.User">
<!--     类   -->
        <property name="aClass" value="java.lang.String"></property>
<!--        数组-->
        <property name="names">
            <array>
                <value>a</value>
                <value>b</value>
            </array>
        </property>
<!--        list -->
        <property name="peoples">
            <list>
                <ref bean="people1"></ref>
                <ref bean="people2"></ref>
            </list>
        </property>
<!--        map-->
        <property name="maps">
            <map>
                <entry key="1" value="vui"></entry>
                <entry key="2" value="vui"></entry>
            </map>
        </property>
<!--        set-->
        <property name="sets">
            <set>
                <value>ni</value>
                <value>hao</value>
            </set>
        </property>
<!--        空第一种形式-->
<!--        <property name="nulls" value=""/>-->
<!--        第二种形式-->
        <property name="nulls">
        <value/>
        </property>
<!--        null-->
        <property name="email"><null/></property>
<!--        或者只是不赋值 也为null-->
        <property name="p">
<!--            特殊字符-->
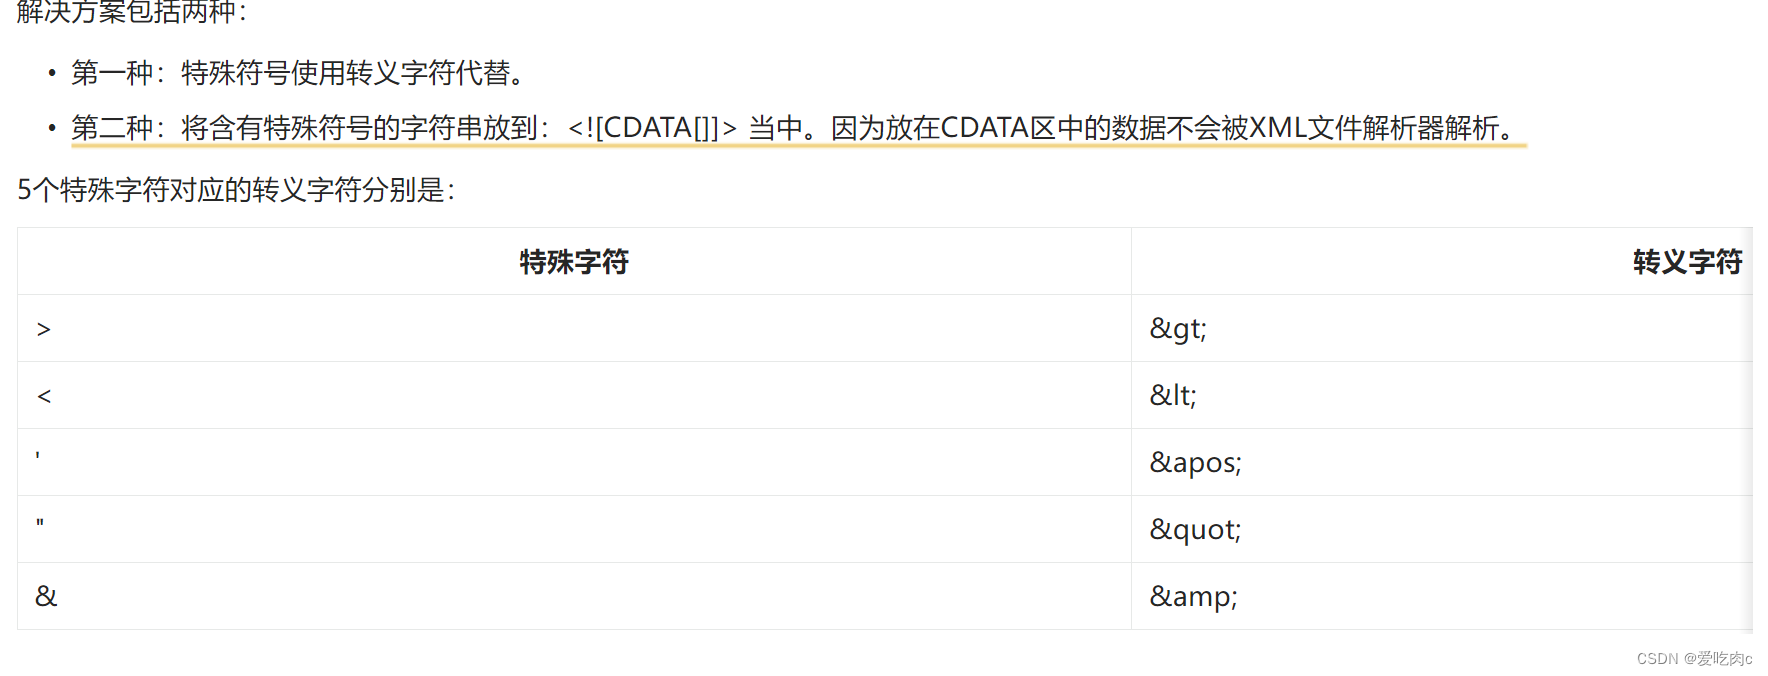
            <value><![CDATA[2 < 3]]></value>
        </property>

    </bean>
</beans>
package com.cky.test;

import com.cky.Bean.User;
import com.cky.web.Userweb;
import org.junit.Test;
import org.springframework.context.ApplicationContext;
import org.springframework.context.support.ClassPathXmlApplicationContext;

public class Mytest {
    @Test
    public void test(){
        //获取spring容器
        ApplicationContext applicationContext= new ClassPathXmlApplicationContext("spring6_1.xml");
        //获取对应的bean
        User userweb = applicationContext.getBean("user", User.class);
        System.out.println(userweb);

    }
}
User{aClass=class java.lang.String, names=[a, b], peoples=[People{name=‘cui’}, People{name=‘cky’}], maps={1=vui, 2=vui}, sets=[ni, hao], nulls=‘’, email=‘null’, p=‘2 < 3’}
2.3 注入Properties
package com.powernode.spring6.beans;

import java.util.List;
import java.util.Map;
import java.util.Properties;
import java.util.Set;

/**
 * @author 动力节点
 * @version 1.0
 * @className People
 * @since 1.0
 **/
public class People {

    private Properties properties;

    public void setProperties(Properties properties) {
        this.properties = properties;
    }

    //......

    @Override
    public String toString() {
        return "People{" +
                "properties=" + properties +
                ", addrs=" + addrs +
                ", phones=" + phones +
                ", names=" + names +
                '}';
    }
}
<?xml version="1.0" encoding="UTF-8"?>
<beans xmlns="http://www.springframework.org/schema/beans"
       xmlns:xsi="http://www.w3.org/2001/XMLSchema-instance"
       xsi:schemaLocation="http://www.springframework.org/schema/beans http://www.springframework.org/schema/beans/spring-beans.xsd">

    <bean id="peopleBean" class="com.powernode.spring6.beans.People">
        <property name="properties">
            <props>
                <prop key="driver">com.mysql.cj.jdbc.Driver</prop>
                <prop key="url">jdbc:mysql://localhost:3306/spring</prop>
                <prop key="username">root</prop>
                <prop key="password">123456</prop>
            </props>
        </property>
    </bean>
</beans>
2.4 p命名空间注入
本质是set注入,需要提供set方法。
<?xml version="1.0" encoding="UTF-8"?>
<beans xmlns="http://www.springframework.org/schema/beans"
       xmlns:xsi="http://www.w3.org/2001/XMLSchema-instance"
       xmlns:p="http://www.springframework.org/schema/p"
       xsi:schemaLocation="http://www.springframework.org/schema/beans http://www.springframework.org/schema/beans/spring-beans.xsd">
<bean id="peo" class="com.cky.Bean.People" p:name="cui"></bean>
</beans>
2.5 c命名空间注入
本质是构造注入,需要提供构造方法。
<?xml version="1.0" encoding="UTF-8"?>
<beans xmlns="http://www.springframework.org/schema/beans"
       xmlns:xsi="http://www.w3.org/2001/XMLSchema-instance"
       xmlns:c="http://www.springframework.org/schema/c"
       xsi:schemaLocation="http://www.springframework.org/schema/beans http://www.springframework.org/schema/beans/spring-beans.xsd">
<!--    <bean name="cat" class="com.cky.Bean.Cat" c:_0="k" c:_1="2"></bean>-->
<!--    或者-->
    <bean id="cat" class="com.cky.Bean.Cat" c:name="3" c:age="2"></bean>


</beans>
2.6 util注入
可以使得内容共享。
<?xml version="1.0" encoding="UTF-8"?>
<beans xmlns="http://www.springframework.org/schema/beans"
       xmlns:xsi="http://www.w3.org/2001/XMLSchema-instance"
       xmlns:util="http://www.springframework.org/schema/util"
       xsi:schemaLocation="http://www.springframework.org/schema/beans http://www.springframework.org/schema/beans/spring-beans.xsd
http://www.springframework.org/schema/util  http://www.springframework.org/schema/util/spring-util.xsd">
    <util:properties id="dogbean">
        <prop key="name">k</prop>
        <prop key="age">2</prop>
        <prop key="sex">男</prop>
    </util:properties>
    <bean name="dog1" class="com.cky.Bean.Dog">
        <property name="properties" ref="dogbean"></property>
    </bean>
    <bean name="dog2" class="com.cky.Bean.Dog">
        <property name="properties" ref="dogbean"></property>
    </bean>

</beans>
2.6 引入外部配置文件
比如数据源的driver,password,url等配置,我们想要配置到一个jdbc.properties
文件中,然后通过读取该配置文件的值,为我们的类赋值。
DataSource .java
package com.cky.Bean;

import java.io.PrintWriter;
import java.sql.Connection;
import java.sql.SQLException;
import java.sql.SQLFeatureNotSupportedException;
import java.util.logging.Logger;

public class DataSource implements javax.sql.DataSource {
    private String url;
    private String driver;
    private String password;
    private String username;

    @Override
    public String toString() {
        return "DataSource{" +
                "url='" + url + '\'' +
                ", driver='" + driver + '\'' +
                ", password='" + password + '\'' +
                ", username='" + username + '\'' +
                '}';
    }

    public void setUrl(String url) {
        this.url = url;
    }

    public void setDriver(String driver) {
        this.driver = driver;
    }

    public void setPassword(String password) {
        this.password = password;
    }

    public void setUsername(String username) {
        this.username = username;
    }

    @Override
    public Connection getConnection() throws SQLException {
        return null;
    }

    @Override
    public Connection getConnection(String username, String password) throws SQLException {
        return null;
    }

    @Override
    public PrintWriter getLogWriter() throws SQLException {
        return null;
    }

    @Override
    public void setLogWriter(PrintWriter out) throws SQLException {

    }

    @Override
    public void setLoginTimeout(int seconds) throws SQLException {

    }

    @Override
    public int getLoginTimeout() throws SQLException {
        return 0;
    }

    @Override
    public Logger getParentLogger() throws SQLFeatureNotSupportedException {
        return null;
    }

    @Override
    public <T> T unwrap(Class<T> iface) throws SQLException {
        return null;
    }

    @Override
    public boolean isWrapperFor(Class<?> iface) throws SQLException {
        return false;
    }
}
jdbc.properties
driver=com.mysql.cj.jdbc.Driver
url=jdbc:mysql//127.0.0.1:3306/spring
username=root
passwoed=123456
spring_pro.xml
<?xml version="1.0" encoding="UTF-8"?>
<beans xmlns="http://www.springframework.org/schema/beans"
       xmlns:xsi="http://www.w3.org/2001/XMLSchema-instance"
       xmlns:context="http://www.springframework.org/schema/context"
       xsi:schemaLocation="http://www.springframework.org/schema/beans http://www.springframework.org/schema/beans/spring-beans.xsd
http://www.springframework.org/schema/context http://www.springframework.org/schema/context/spring-context.xsd">
    <context:property-placeholder location="jdbc.properties"></context:property-placeholder>
    <bean id="datasource" class="com.cky.Bean.DataSource">
        <property name="driver" value="${driver}"></property>
        <property name="url" value="${url}"></property>
        <property name="password" value="${passwoed}"></property>
        <property name="username" value="${username}"></property>
    </bean>

</beans>
测试类
   @Test
    public void test4(){
        //获取spring容器
        ApplicationContext applicationContext= new ClassPathXmlApplicationContext("spring_pro.xml");
        DataSource datasource = applicationContext.getBean("datasource", DataSource.class);

        System.out.println(datasource);}

    }
DataSource{url=‘jdbc:mysql//127.0.0.1:3306/spring’, driver=‘com.mysql.cj.jdbc.Driver’, password=‘123456’, username=‘10945’}
注意,这里我们读取到的username是系统的名称,使用 ${} 会让我们先获取到的是 系统变量,所以最好加上前缀。
jdbc.driver=com.mysql.cj.jdbc.Driver
jdbc.url=jdbc:mysql//127.0.0.1:3306/spring
jdbc.username=root
jdbc.passwoed=123456


