SpringBoot默认静态资源访问方式
首先想到的就是可以通过SpringBoot通常访问静态资源的方式,当访问:项目根路径 + / + 静态文件名时,SpringBoot会依次去类路径下的四个静态资源目录下查找(默认配置)。

在资源文件resources目录下建立如下四个目录:
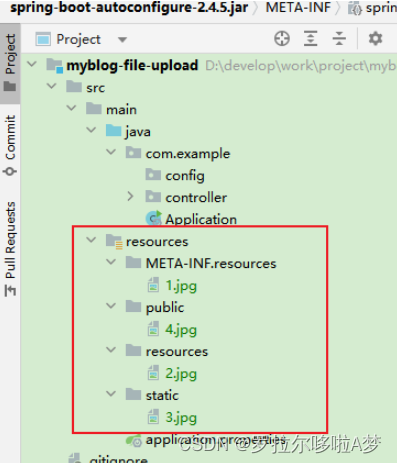
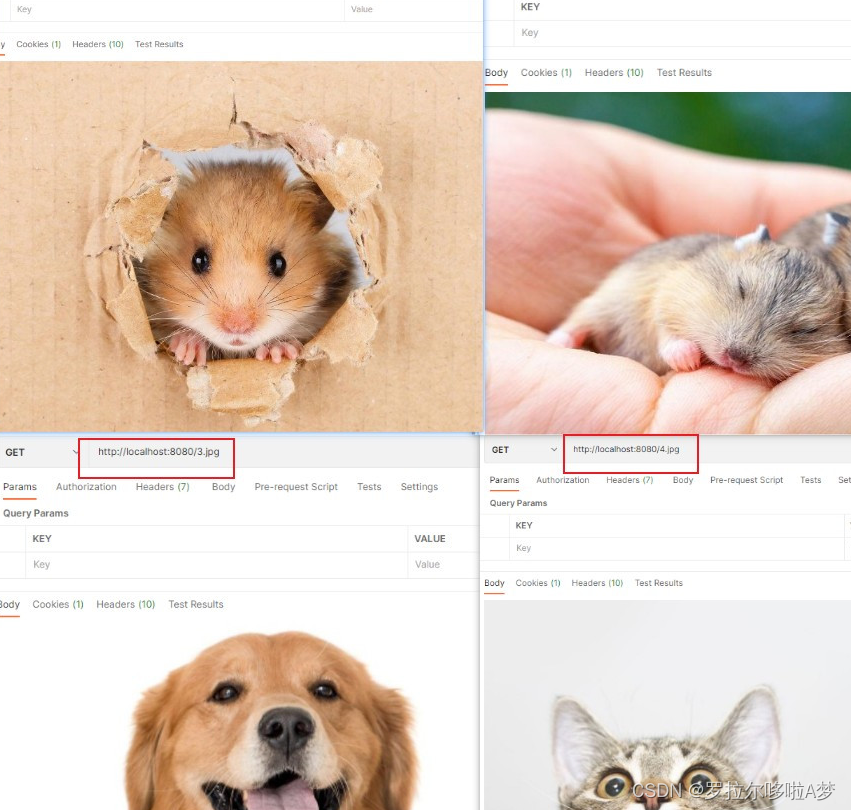
重启Spring boot,访问
http://localhost:8080/1.jpg
http://localhost:8080/2.jpg
http://localhost:8080/3.jpg
http://localhost:8080/4.jpg
上传的文件应该存储在哪?怎么访问?
1.文件存储在哪?
前文所说外部用户可通过url访问服务器资源文件resources目录下的静态资源,但若是将上传的文件都保存在resources相关目录下,将会导致后续打包过大,程序和代码不分离,无法查看等问题。
解决方案:文件上传到服务器某个目录,然后SpringBoot配置虚拟路径,映射到此目录。
2.怎么访问?
通过WebMvcConfigurer 的addResourceHandlers将匹配上虚拟路径的url映射到文件上传到服务器的目录,这样就可以通过url来获取服务器上的静态资源了。
示例代码
代码仓库github路径
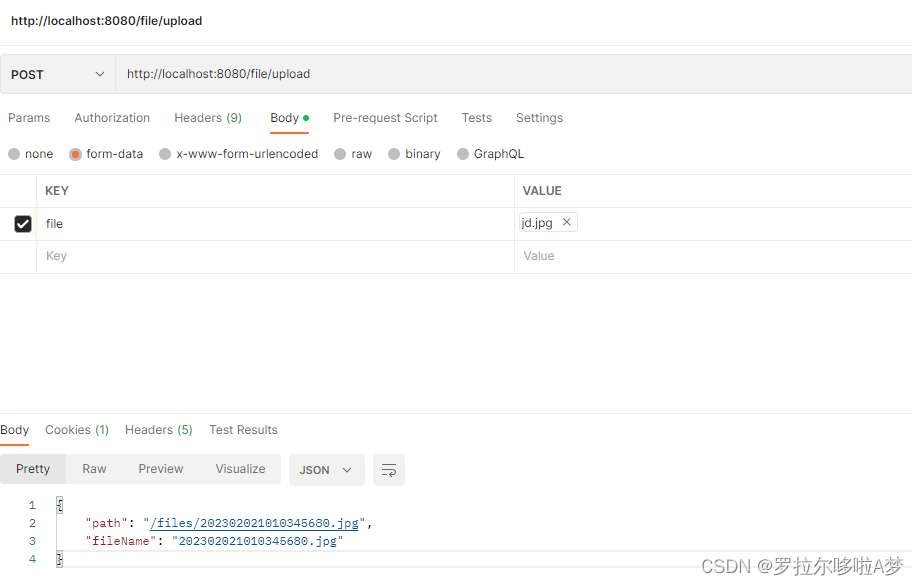
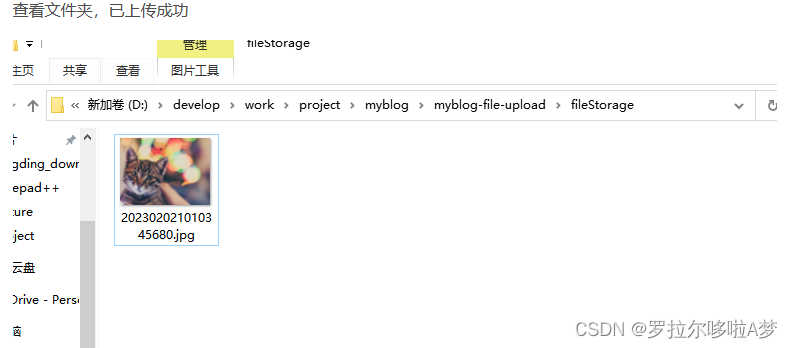
目标:windows本地测试,将文件上传到 D:\develop\work\project\myblog\myblog-file-upload\fileStorage 目录下,然后通过http://localhost:8080/files/文件名 访问。
配置类
@Configuration
public class WebMvcConfig implements WebMvcConfigurer {

    @Autowired
    FileServiceImpl fileService;

    @Override
    public void addResourceHandlers(ResourceHandlerRegistry registry) {
        //将匹配上/files/**虚拟路径的url映射到文件上传到服务器的目录,获取静态资源
        registry.addResourceHandler("/" + fileService.pathPattern + "/**").addResourceLocations("file:" + fileService.filePath);
        WebMvcConfigurer.super.addResourceHandlers(registry);
    }
}
controller
@RestController
@RequestMapping("/file")
public class FileController {

    @Autowired
    private FileServiceImpl fileService;

    @PostMapping("/upload")
    public FileUploadResponse upload(@RequestParam("file") MultipartFile file) {
        return fileService.upload(file);
    }
}
上传文件目录创建好后,主要通过 file.transferTo(new File(absolutePath)) 完成。
Service
@Slf4j
@Service
public class FileServiceImpl {

    //拦截的url,虚拟路径
    public String pathPattern = "files";

    //自己设置的目录
    private static final String fileDir = "fileStorage";

    //上传文件存放目录  =  工作目录绝对路径 + 自己设置的目录,也可以直接自己指定服务器目录
    //windows本地测试
    //绝对路径: D:\develop\work\project\myblog\myblog-file-upload\fileStorage\202302021010345680.jpg
    //System.getProperty("user.dir")   D:\develop\work\project\myblog\myblog-file-upload
    //fileDir                          fileStorage
    //fileName                         202302021010345680.jpg
    public String filePath = System.getProperty("user.dir") + File.separator + fileDir + File.separator;

    private static final AtomicInteger SUFFIX = new AtomicInteger(0);

    @Value(value = "${file.upload.suffix:jpg,jpeg,png,bmp,xls,xlsx,pdf}")
    private String fileUploadSuffix;

    public FileUploadResponse upload(MultipartFile file) {
        FileUploadResponse result = new FileUploadResponse();
        if (file.isEmpty()) {
            log.error("the file to be uploaded is empty");
            return result;
        }
        List<String> suffixList = Lists.newArrayList(fileUploadSuffix.split(","));

        try {
            //校验文件后缀
            String originalFilename = file.getOriginalFilename();
            String suffix = originalFilename.substring(originalFilename.lastIndexOf(".") + 1);
            if (!suffixList.contains(suffix)) {
                log.error("unsupported file format");
                return result;
            }

            //首次需生成目录
            File folder = new File(filePath);
            if (!folder.exists()) {
                folder.mkdirs();
            }

            String fileName = timeFormat(System.currentTimeMillis()) + SUFFIX.getAndIncrement() + "." + suffix;
            String absolutePath = filePath + fileName;
            log.info("absolutePath is {}", absolutePath);
            file.transferTo(new File(absolutePath));

            String separator = "/";
            String path = separator + pathPattern + separator + fileName;
            result.setPath(path);
            result.setFileName(fileName);
        } catch (Exception e) {
            log.error("the file upload error occurred. e ", e);
        }
        return result;
    }

    public static String timeFormat(Long time) {
        if (Objects.isNull(time)) {
            return null;
        }
        DateFormat sdf = new SimpleDateFormat("yyyyMMddHHmmssSSS");
        return sdf.format(time);
    }

}
测试
总结
其实这和最初的SpringBoot获取静态资源的方式又有点不一样,针对url做拦截,实际上resources目录下并没有files这个文件夹,它只是一个虚拟路径,通过映射转发到文件夹上传目录,在该目录下通过文件名去定位。
另外,如果有用nginx,也可以在其配置中设置转发。至此都是借鉴的Java实现文件上传到服务器本地,并通过url访问_java文件上传 后怎么访问-CSDN博客这位博主的内容·
后续添加补充
第一点是一个小坑,也就是System.getProperty("user.dir"),这个函数是一个 Java 中用于获取当前工作目录的方法。我本地运行出来确实是我项目的根目录,但是上到服务器,打出来的就是/,也就是linux的根目录,因此我决定以"/home/ec2-user/www/wwwroot/online_exam" 这种定值的方式取代System.getProperty("user.dir"),否则我的fileStorage目录就会建立在/这个目录下面,然后根据url访问就失效了。
第二点是我命名新文件的名字采用的是UUID的形式
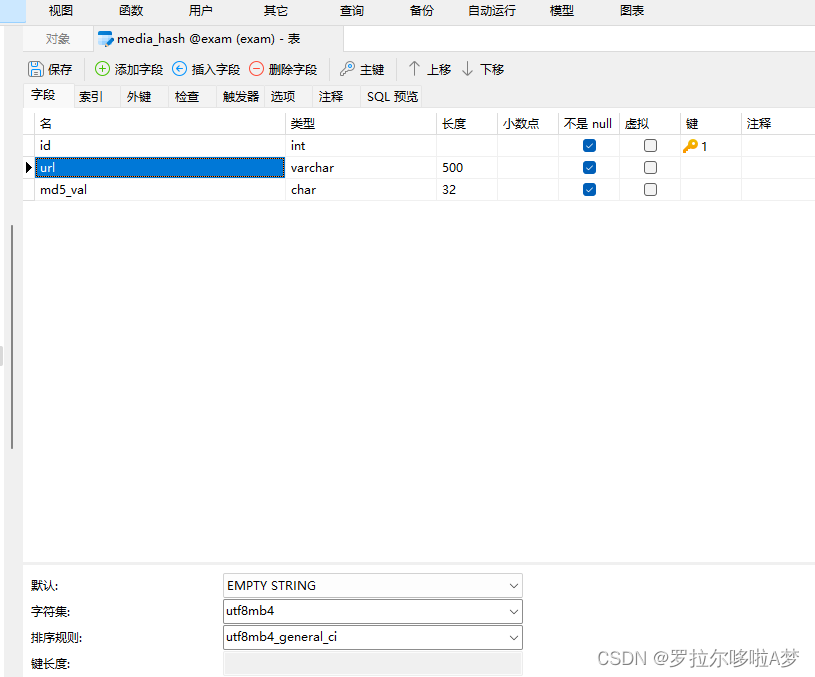
第三点是我添加了一个附件表,防止重复照片的存入消耗内存,毕竟不是存在三方文件系统上,自己买的系统还是省着点,而且还可以提升一丢丢的效率。
以下是我的代码,由于是在一个github开源项目改的,所有采用的是比较老的mybatis:
pom
        //下面工具类需要导入这两个依赖
        <dependency>
            <groupId>com.google.guava</groupId>
            <artifactId>guava</artifactId>
            <version>20.0</version>
        </dependency>
        <dependency>
            <groupId>commons-codec</groupId>
            <artifactId>commons-codec</artifactId>
            <version>1.15</version>
        </dependency>
controller
@RequestMapping("/api")
@RestController
public class CommonDataController {

    @Autowired
    private FileServiceImpl fileService;


    @PostMapping("/upload")
    public ApiResult upload(@RequestParam("file") MultipartFile file){
        return ApiResultHandler.success(fileService.upload(file));
    }
}
Fileservice
package com.exam.serviceimpl;

import com.exam.entity.MediaHash;
import com.exam.service.MediaHashService;
import com.exam.util.Md5Utils;
import com.exam.util.UUIDUtils;
import com.google.common.collect.Lists;
import lombok.extern.slf4j.Slf4j;
import org.springframework.beans.factory.annotation.Autowired;
import org.springframework.beans.factory.annotation.Value;
import org.springframework.stereotype.Service;
import org.springframework.web.multipart.MultipartFile;

import java.io.File;
import java.io.IOException;
import java.text.DateFormat;
import java.text.SimpleDateFormat;
import java.util.List;
import java.util.Objects;

@Slf4j
@Service
public class FileServiceImpl {

    @Autowired
    private MediaHashService mediaHashService;

    //拦截的url,虚拟路径
    public String pathPattern = "files";

    //自己设置的目录
    private static final String fileDir = "fileStorage";

    public String filePath = "/home/ec2-user/www/wwwroot/online_exam" + File.separator + fileDir + File.separator;

    @Value(value = "${file.upload.suffix:jpg,jpeg,png,bmp,xls,xlsx,pdf}")
    private String fileUploadSuffix;

    public String upload(MultipartFile multipartFile) {
        try {
            String md5Val = Md5Utils.md5(multipartFile.getInputStream());
            MediaHash mediaHash = mediaHashService.findOne(md5Val);
            if (Objects.nonNull(mediaHash)) {
                return mediaHash.getUrl();
            }
            String url = uploadTo(multipartFile);
            MediaHash pojo = new MediaHash();
            pojo.setUrl(url);
            pojo.setMd5Val(md5Val);
            mediaHashService.save(pojo);
            return url;
        } catch (IOException e) {
            log.error("upload file error : {}", e.getMessage(), e);
        }
        return "";
    }


    public String uploadTo(MultipartFile file) {
        String url = null;
        if (file.isEmpty()) {
            return "the file to be uploaded is empty";
        }
        List<String> suffixList = Lists.newArrayList(fileUploadSuffix.split(","));

        try {
            //校验文件后缀
            String originalFilename = file.getOriginalFilename();
            String suffix = originalFilename.substring(originalFilename.lastIndexOf(".") + 1);
            if (!suffixList.contains(suffix)) {
                return "unsupported file format";
            }

            //首次需生成目录
            File folder = new File(filePath);
            if (!folder.exists()) {
                folder.mkdirs();
            }

            String fileName = timeFormat(System.currentTimeMillis()) + UUIDUtils.lowerCaseNoSeparatorUUID() + "." + suffix;
            String absolutePath = filePath + fileName;
            file.transferTo(new File(absolutePath));

            String separator = "/";
            String path = separator + pathPattern + separator + fileName;
            url = "http://52.25.81.116:8080" + path;

        } catch (Exception e) {
            log.error("upload file error : {}", e.getMessage(), e);
        }
        return url;
    }

    public static String timeFormat(Long time) {
        if (Objects.isNull(time)) {
            return null;
        }
        DateFormat sdf = new SimpleDateFormat("yyyyMMddHHmmssSSS");
        return sdf.format(time);
    }


}
MediaHashService
package com.exam.serviceimpl;

import com.exam.entity.MediaHash;
import com.exam.mapper.MediaHashMapper;
import com.exam.service.MediaHashService;
import org.springframework.beans.factory.annotation.Autowired;
import org.springframework.stereotype.Service;

@Service
public class MediaHashImpl implements MediaHashService {

    @Autowired
    private MediaHashMapper mapper;

    @Override
    public MediaHash findOne(String md5Val) {
        return mapper.findOne(md5Val);
    }

    @Override
    public boolean save(MediaHash pojo) {
        return mapper.save(pojo);
    }
}


//就两个很简单的方法,一个根据md5Val查询MediaHash 对象,一个就是insert,就不贴mapper了
Md5Utils
package com.exam.util;


import org.apache.commons.codec.binary.Hex;

import java.io.FileNotFoundException;
import java.io.IOException;
import java.io.InputStream;
import java.nio.charset.StandardCharsets;
import java.security.MessageDigest;
import java.security.NoSuchAlgorithmException;


public class Md5Utils {

    private static final char[] HEX_DIGITS = {'0', '1', '2', '3', '4', '5', '6', '7', '8', '9', 'A', 'B', 'C', 'D', 'E', 'F'};

    static MessageDigest MD5 = null;

    static {
        try {
            MD5 = MessageDigest.getInstance("MD5");
        } catch (NoSuchAlgorithmException e) {
            e.printStackTrace();
        }
    }

    public static String md5(String plainText, String salt) {
        MD5.reset();
        MD5.update(plainText.getBytes(StandardCharsets.UTF_8));
        MD5.update(salt.getBytes());
        byte[] bytes = MD5.digest();

        int j = bytes.length;
        char[] str = new char[j * 2];
        int k = 0;
        for (byte b : bytes) {
            str[k++] = HEX_DIGITS[b >>> 4 & 0xf];
            str[k++] = HEX_DIGITS[b & 0xf];
        }
        return new String(str);
    }

    public static String md5(InputStream fileInputStream) {
        try {
            byte[] buffer = new byte[8192];
            int length;
            while ((length = fileInputStream.read(buffer)) != -1) {
                MD5.reset();
                MD5.update(buffer, 0, length);
            }
            return new String(Hex.encodeHex(MD5.digest()));
        } catch (FileNotFoundException e) {
            e.printStackTrace();
            return null;
        } catch (IOException e) {
            e.printStackTrace();
            return null;
        } finally {
            try {
                if (fileInputStream != null) {
                    fileInputStream.close();
                }
            } catch (IOException e) {
                e.printStackTrace();
            }
        }
    }

}
UUIDUtils
package com.exam.util;

import java.util.Random;
import java.util.UUID;


public final class UUIDUtils {

    public static String[] chars = new String[]{"a", "b", "c", "d", "e", "f", "g", "h", "i", "j", "k", "l", "m", "n",
            "o", "p", "q", "r", "s", "t", "u", "v", "w", "x", "y", "z", "0", "1", "2", "3", "4", "5", "6", "7", "8",
            "9", "A", "B", "C", "D", "E", "F", "G", "H", "I", "J", "K", "L", "M", "N", "O", "P", "Q", "R", "S", "T",
            "U", "V", "W", "X", "Y", "Z"};

    private UUIDUtils() {
    }

    /**
     * 生成小写的uuid
     */
    public static String lowerCaseUUID() {
        return UUID.randomUUID().toString().toLowerCase();
    }

    /**
     * 生成大写的uuid
     */
    public static String upperCaseUUID() {
        return lowerCaseUUID().toUpperCase();
    }

    /**
     * 生成小写没有分隔符的uuid
     */
    public static String lowerCaseNoSeparatorUUID() {
        return lowerCaseUUID().replace("-", "");
    }

    /**
     * 生成大写没有分隔符的uuid
     */
    public static String upperCaseNoSeparatorUUID() {
        return lowerCaseNoSeparatorUUID().toUpperCase();
    }

    /**
     * 生成短uuid
     */
    public static String shortUUID() {
        StringBuffer shortBuffer = new StringBuffer();
        String uuid = UUID.randomUUID().toString().replace("-", "");
        for (int i = 0; i < 8; i++) {
            String str = uuid.substring(i * 4, i * 4 + 4);
            int x = Integer.parseInt(str, 16);
            shortBuffer.append(chars[x % 0x3E]);
        }
        return shortBuffer.toString();
    }

    /**
     * 生成纯数字uuid
     */
    public static String numUUID(int length) {
        Random random = new Random();
        StringBuilder s = new StringBuilder();
        for (int i = 0; i < length; i++) {
            s.append(random.nextInt(9));
        }
        return s.toString();
    }

}
表结构

然后一个简单的上传接口就完成了。后续有需要可能会再次接入AWS的存储桶来进行文件存储,到时候在来继续写一篇博客

