假设后端返回的格式是这样子
{
  "menu": [
    {
      "path": "/admin",
      "name": "adminLayout",
      "redirect": "/admin/index",
      "componentPath": "/layout/admin/index.vue",
      "children": [
        {
          "path": "index",
          "name": "Index",
          "meta": {
            "title": "首页",
            "keepAlive": true,
            "requireAuth": true
          },
          "componentPath": "/views/index/index.vue"
        },
        {
          "path": "logic-flow",
          "name": "LogicFlow",
          "meta": {
            "title": "可视化拖拽",
            "keepAlive": true,
            "requireAuth": true
          },
          "componentPath": "/views/logic-flow/index.vue"
        },
        {
          "path": "custom-form",
          "name": "CustomForm",
          "meta": {
            "title": "自定义表单",
            "keepAlive": true,
            "requireAuth": true
          },
          "componentPath": "/views/custom-form/index.vue"
        },
        {
          "path": "big-screen",
          "name": "BigScreen",
          "meta": {
            "title": "可视化大屏",
            "keepAlive": true,
            "requireAuth": true
          },
          "componentPath": "/views/big-screen/index.vue"
        },
        {
          "path": "d3",
          "name": "D3",
          "meta": {
            "title": "D3",
            "keepAlive": true,
            "requireAuth": true
          },
          "componentPath": "/views/d3/index.vue"
        },
        {
          "path": "konva",
          "name": "Konva",
          "meta": {
            "title": "Konva",
            "keepAlive": true,
            "requireAuth": true
          },
          "componentPath": "/views/konva/index.vue"
        },
        {
          "path": "/function",
          "name": "Function",
          "redirect": "/function/index",
          "children": [
            {
              "path": "large-file-upload",
              "name": "LargeFileUpload",
              "meta": {
                "title": "LargeFileUpload",
                "keepAlive": true,
                "requireAuth": true
              },
              "componentPath": "/views/function/large-file-upload/index.vue"
            },
            {
              "path": "virtual-list",
              "name": "VirtualList",
              "meta": {
                "title": "VirtualList",
                "keepAlive": true,
                "requireAuth": true
              },
              "componentPath": "/views/function/virtual-list/index.vue"
            }
          ]
        }
      ]
    },
    {
      "path": "/data-chart",
      "name": "DataChart",
      "meta": {},
      "componentPath": "/views/big-screen/data-chart.vue"
    }
  ]
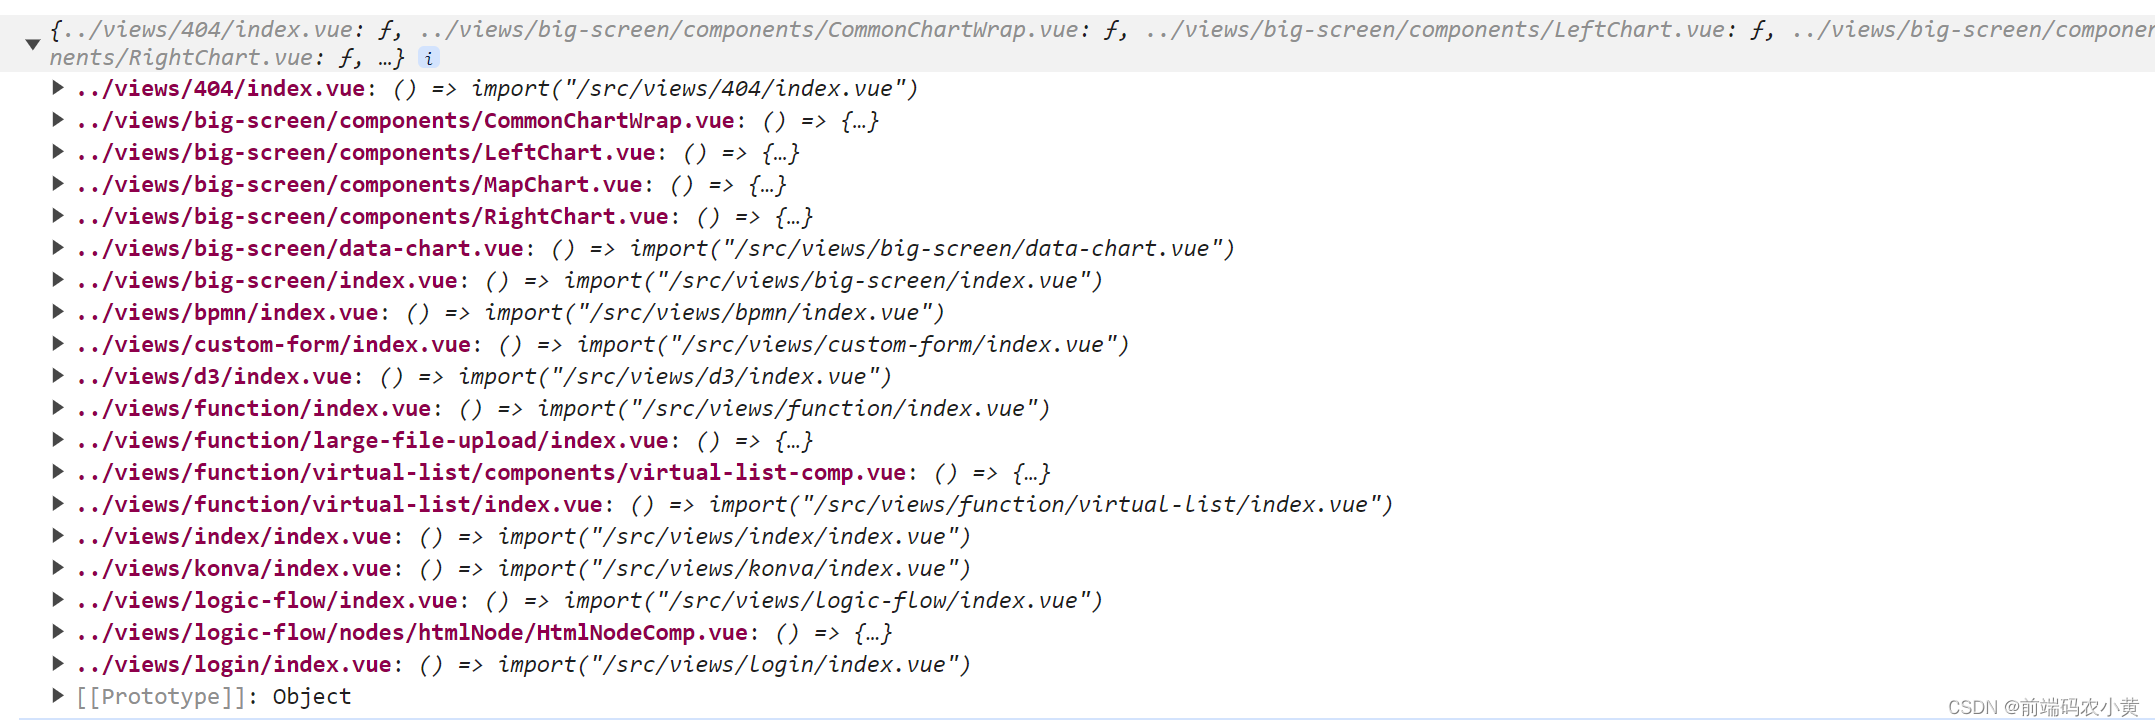
}在vite里主要使用到的方法是import.meta.glob,它能通过我们提供的路径动态引入相关的组件,如果我们传入了../views/**/**.vue,它返回的相关格式是这样子,这样的话就可以用过路径获取相关异步导入组件的函数了
完整代码如下(permission.ts):
import router from './index'
import { RouteRecordRaw } from 'vue-router'
import { useUserStore } from '@/store/modules/user'

const viewsModules = import.meta.glob('../views/**/**.vue')
const layoutModules = import.meta.glob('../layout/*/*.vue')

// 这个方法主要就是将componentPath转成异步引入函数component
const menuToRoutes = (menus: RouteRecordRaw[]) => {
  if (!menus || !menus.length) {
    return []
  }
  const routes: RouteRecordRaw[] = []
  menus.forEach((item: any) => {
    const meta = Object.assign({}, item.meta)
    let component
    if (item.componentPath) {
      // 如果找不到就给个404的组件
      component =
        viewsModules[`..${item.componentPath}`] ||
        layoutModules[`..${item.componentPath}`] ||
        viewsModules['../views/404/index.vue']
    }
    routes.push({
      meta,
      name: item.path,
      path: item.path,
      component: component,
      redirect: item.redirect,
      children: menuToRoutes(item.children),
    })
  })
  return routes
}

export const setupPermission = () => {
  router.beforeEach((to, from, next) => {
    const userStore = useUserStore()
    if (!userStore.menu.length) {
      // 获取路由
      // userStore.menu就是json里的menu字段
      userStore
        .setMenu()
        .then(() => {
          // 动态路由注册
          router.addRoute({
            path: '/',
            redirect: '/admin',
            children: menuToRoutes(userStore.menu),
          })
          next({ ...to, replace: true })
        })
        .catch(() => {
          next()
        })
    } else {
      next()
    }
  })
}
最后在main.js里调用一下setupPermission方法就行~
PS: 如果退出登录需要清除动态路由的话,因为现在vue-router没有提供可以直接清空的方法,所以可以考虑返回登录页后刷新一下界面来解决~

