1.线程特性
1.1线程优点
- 创建一个新线程的代价要比创建一个新进程小得多
- 与进程之间的切换相比,线程之间的切换需要操作系统做的工作要少很多
- 线程占用的资源要比进程少很多
- 能充分利用多处理器的可并行数量
- 在等待慢速I/O操作结束的同时,程序可执行其他的计算任务
- 计算密集型应用,为了能在多处理器系统上运行,将计算分解到多个线程中实现
- I/O密集型应用,为了提高性能,将I/O操作重叠。线程可以同时等待不同的I/O操作。
1.2线程缺点
- 性能损失
- 一个很少被外部事件阻塞的计算密集型线程往往无法与共它线程共享同一个处理器。如果计算密集型线程的数量比可用的处理器多,那么可能会有较大的性能损失,这里的性能损失指的是增加了额外的同步和调度开销,而可用的资源不变。
- 健壮性降低
- 编写多线程需要更全面更深入的考虑,在一个多线程程序里,因时间分配上的细微偏差或者因共享了不该共享的变量而造成不良影响的可能性是很大的,换句话说线程之间是缺乏保护的。
- 缺乏访问控制
- 进程是访问控制的基本粒度,在一个线程中调用某些OS函数会对整个进程造成影响。
- 编程难度提高
- 编写与调试一个多线程程序比单线程程序困难得多。
1.3线程异常
- 单个线程如果出现除零,野指针问题导致线程崩溃,进程也会随着崩溃
- 线程是进程的执行分支,线程出异常,就类似进程出异常,进而触发信号机制,终止进程,进程终止,该进程内的所有线程也就随即退出。
1.4线程用途
- 合理的使用多线程,能提高CPU密集型程序的执行效率
- 合理的使用多线程,能提高IO密集型程序的用户体验(如生活中我们一边写代码一边下载开发工具,就是多线程运行的一种表现)
2.编写代码理解多线程
首先我们创建一个Makefile编写如下代码:
mythread:mythread.cc
	g++ -o $@ $^ -std=c++11

.PHONY:clean
clean:
	rm -rf mythread
然后创建一个mythread.cc的c++源文件编写如下代码:
#include<iostream>
#include<pthread.h>
#include<unistd.h>
void * ThreadRoutine(void * arg)
{
while(true)
{
std::cout<<"I am a new pthread"<<std::endl;
sleep(1);
}
}
int main()
{
pthread_t tid;
pthread_create(&tid,nullptr,ThreadRoutine,nullptr);
while(true)
{
std::cout<<"I am a main pthread"<<std::endl;
sleep(1);
}
return 0;
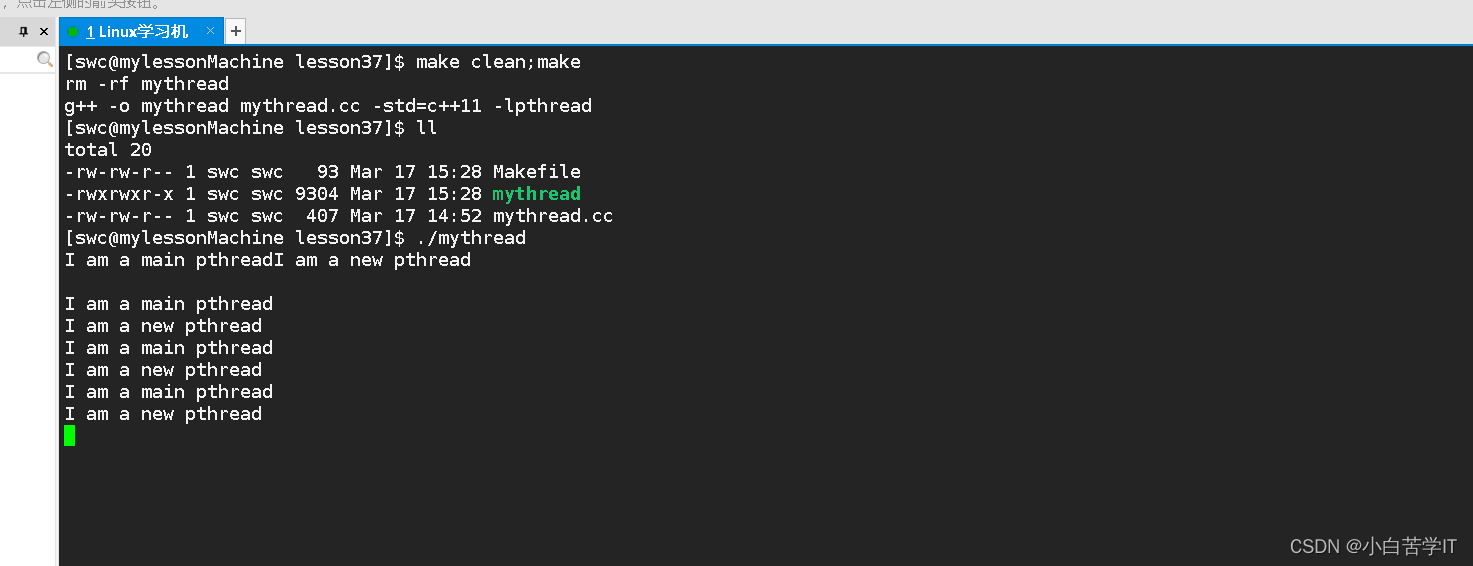
}然后编译运行发现报错了:
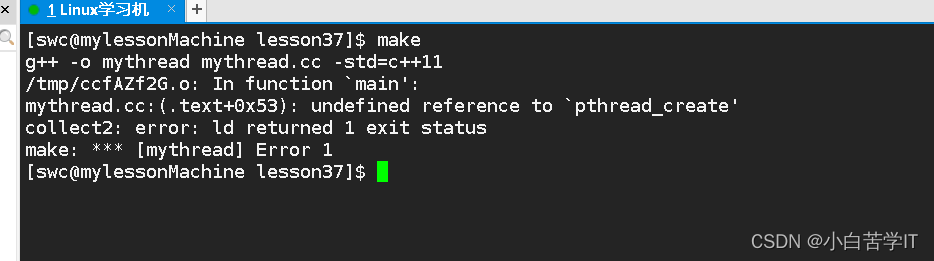
g++说不认识这个pthread_create这个接口,那么我们就需要来谈一个话题了,Linux有没有真正的线程呢?没有,内核中只有轻量级进程的概念,所以Linux操作系统只会提供轻量级进程创建的系统调用,不会直接提供线程创建的接口。
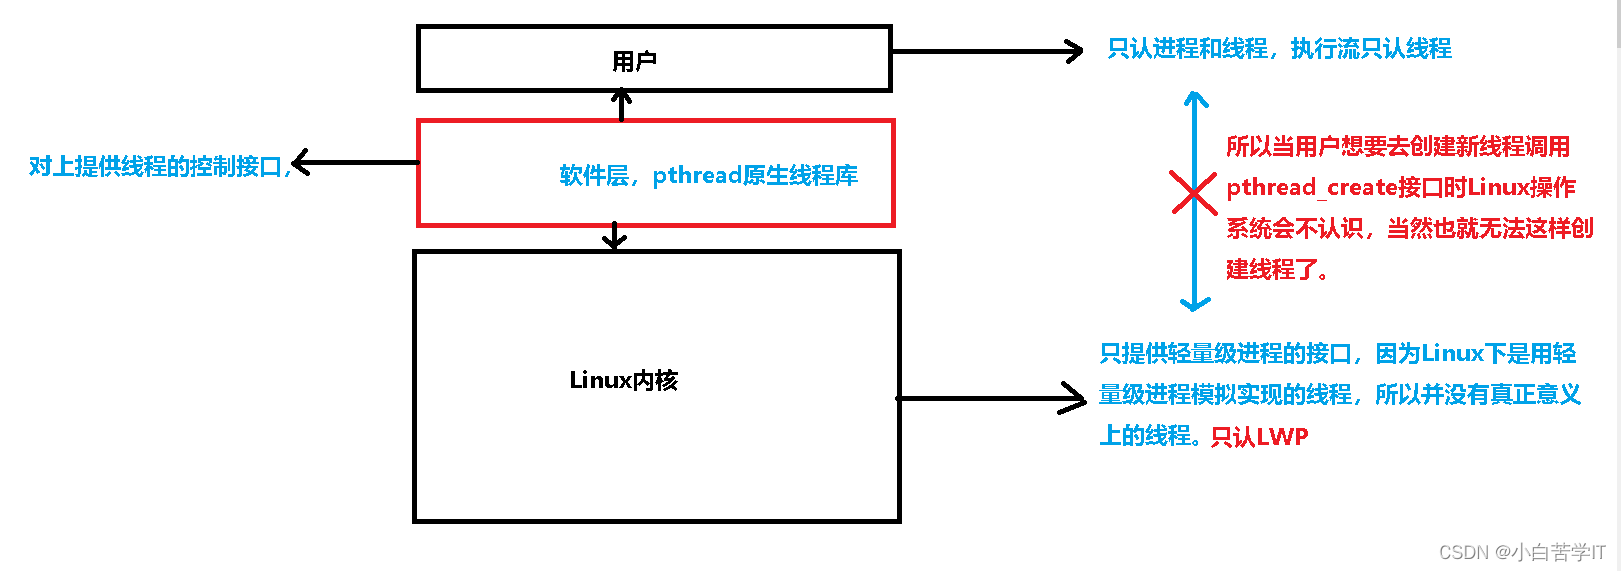
因为可能用户学习的操作系统中是有线程这个概念的,但是Linux内核只认轻量级进程LWP所以两者就无法达成共识,为了让用户认为自己创建的是线程,然后Linux操作系统认为创建的是轻量级进程,所以就有了中间的软件层,pthread原生线程库,这个库一般都是跟linux配套在一起的,所以不用担心用户因为没有这个pthread原生线程库而调用创建线程的接口而失败。但是又有人说了,为什么Linux非得用轻量级进程而不去实现线程,因为轻量级进程又不得不实现一个像pthread原生线程库这样的库,这不是多此一举吗?其实并不是这样的,用轻量级进程LWP模拟线程本就是Linux操作系统的一大亮点,而且中间有一层pthread原生线程库反而可以让接口层与实现层进行解耦,未来如果pthread原生线程库要是更新了也不会影响到Linux内核,比如说无论上层怎么更新同样可以是用同一版本的Linux内核,这样维护性的效率就大大提高了,这样的实现更符合软件工程。这个库我们是可以通过搜索该路径看到的:

所以上述代码报错的原因是找不到我们对应的库,所以我们将Makefile中的代码改为:
mythread:mythread.cc
	g++ -o $@ $^ -std=c++11 -lpthread

.PHONY:clean
clean:
	rm -rf mythread
运行结果:
我们可以查看一下链接的库:

此时两个线程就开始运行了。
下面我们对线程创建再进行扩展:
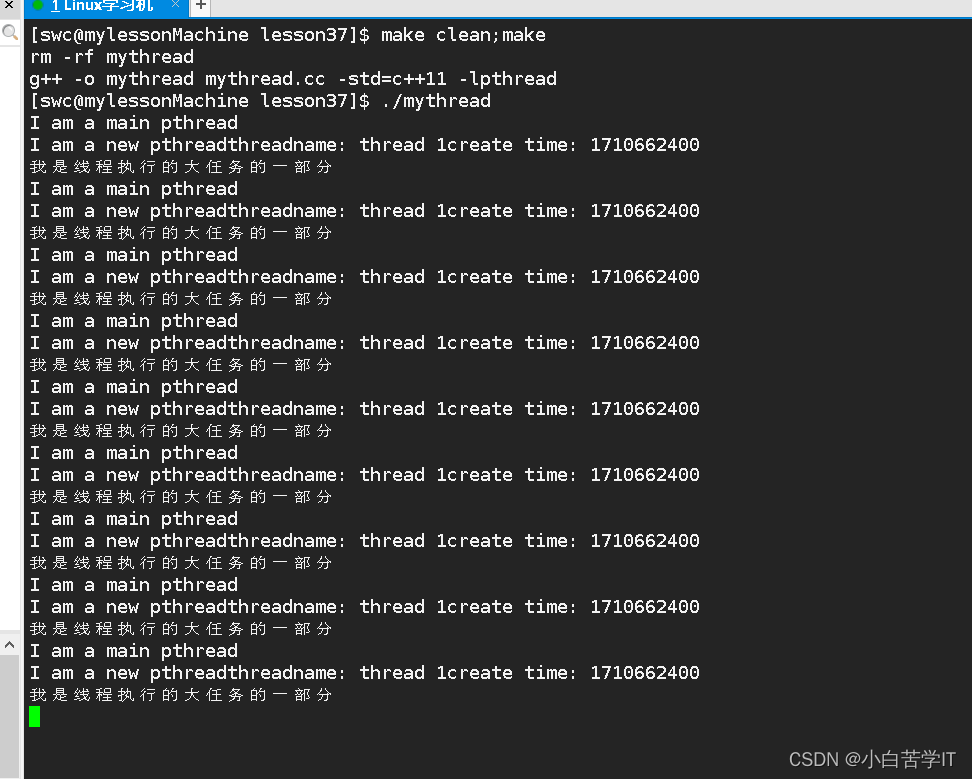
比如说我们如何给线程传参呢?如何传递线程创建的时间啊,执行的任务,线程名称
#include<iostream>
#include<pthread.h>
#include<unistd.h>
#include<string>
#include<functional>
#include<time.h>


using func_t = std::function<void()>;

class ThreadData
{
public:
    ThreadData(const std::string name,const uint64_t ctime,func_t f)
        :threadname(name),createtime(ctime),func(f)
        {}
public:
    std::string threadname;
    uint64_t createtime;
    func_t func;
};

void Print()
{
    std::cout<<"我是线程执行的大任务的一部分"<<std::endl;
}

void * ThreadRoutine(void * args)
{

   ThreadData *td = static_cast<ThreadData*>(args);
    while(true)
    {
        std::cout<<"I am a new pthread"<<"threadname: "<<td->threadname<<"create time: "<<td->createtime<<std::endl;
        td->func();
        sleep(1);
    }
}


int main()
{
    pthread_t tid;
    ThreadData * td = new ThreadData("thread 1",(uint64_t)time(nullptr),Print);
    pthread_create(&tid,nullptr,ThreadRoutine,td);

      while(true)
    {
        std::cout<<"I am a main pthread"<<std::endl;
        sleep(1);
    }
    return 0;
}
运行结果:
下面如何修改代码变成创建多线程呢?
#include<iostream>
#include<pthread.h>
#include<unistd.h>
#include<string>
#include<functional>
#include<time.h>
#include<vector>
const int threadnum = 5;
using func_t = std::function<void()>;
class ThreadData
{
public:
ThreadData(const std::string name,const uint64_t ctime,func_t f)
:threadname(name),createtime(ctime),func(f)
{}
public:
std::string threadname;
uint64_t createtime;
func_t func;
};
void Print()
{
std::cout<<"我是线程执行的大任务的一部分"<<std::endl;
}
void * ThreadRoutine(void * args)
{
ThreadData *td = static_cast<ThreadData*>(args);
while(true)
{
std::cout<<"I am a new pthread"<<"threadname: "<<td->threadname<<"create time: "<<td->createtime<<std::endl;
td->func();
sleep(1);
}
}
int main()
{
std::vector<pthread_t> pthreads;
for(int i = 0;i<threadnum;i++)
{
pthread_t tid;
char threadname[64];
snprintf(threadname,sizeof(threadname),"%s - %lu","thread",i+1);
ThreadData * td = new ThreadData(threadname,(uint64_t)time(nullptr),Print);
pthread_create(&tid,nullptr,ThreadRoutine,td);
pthreads.push_back(tid);
sleep(1);
}
while(true)
{
std::cout<<"I am a main pthread"<<std::endl;
sleep(1);
}
return 0;
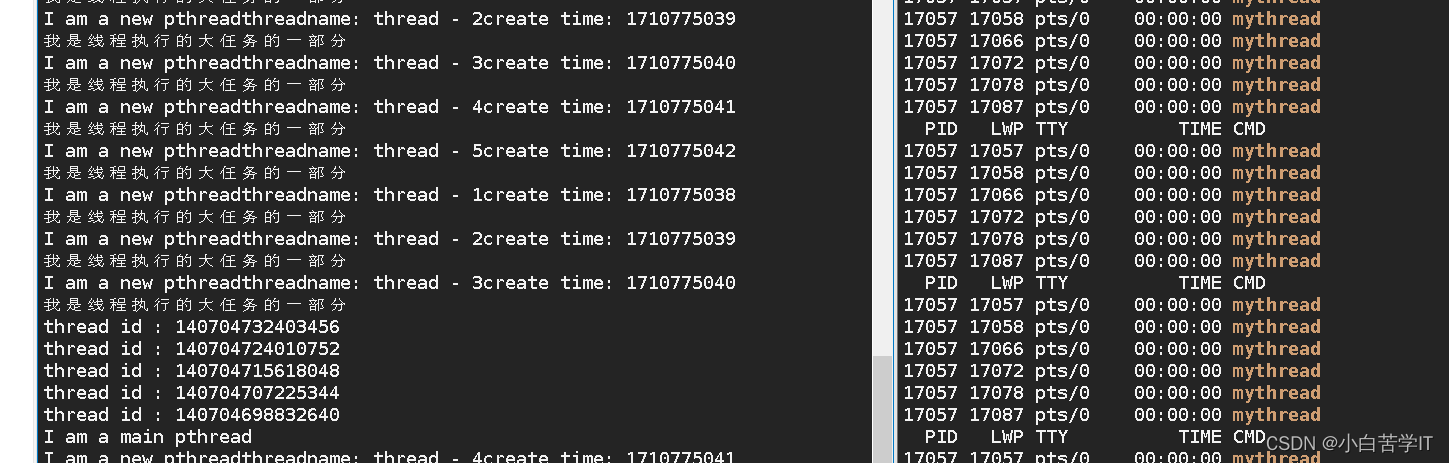
}把创建线程的代码放入for循环,然后将threaname都有不同的线程名称,而且将tid保存起来我们用到了vector.
下面我们运行一下:
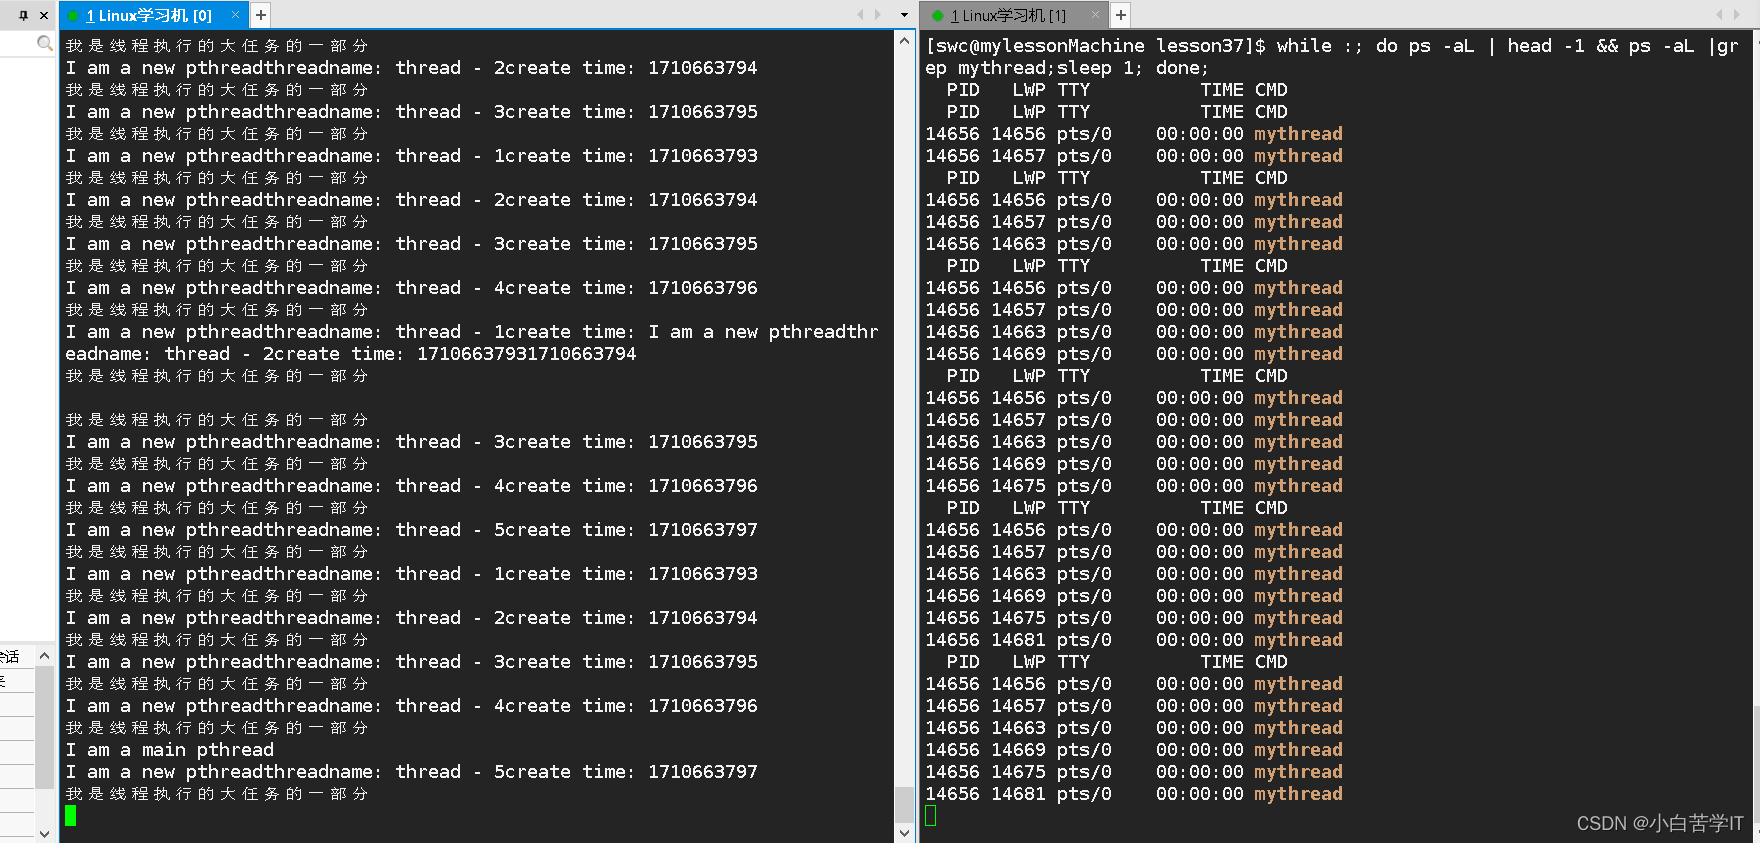
所以这里我们就创建5个新线程。
下面我们来研究两个问题:
1.线程的健壮性问题:当一个进程有多个线程时,只要有一个线程触发了异常,整个进程也会受到相应的影响。
比如说我们修改一个函数中的代码故意制造除零错误触发段错误来进行验证:
void * ThreadRoutine(void * args)
{
    int a = 10;
    ThreadData *td = static_cast<ThreadData*>(args);
    while(true)
    {
        std::cout<<"I am a new pthread"<<"threadname: "<<td->threadname<<"create time: "<<td->createtime<<std::endl;
        td->func();
        if(td->threadname=="thread - 4")
        {
            std::cout<<td->threadname<<" 触发了异常"<<std::endl;
            a/=0;
        }
        sleep(1);
    }
}
当线程名称为第四个的时候让其触发段错误,促使让操作系统发送8号信号让进程终止。

我们通过监视窗口可以看到,进程直接被终止了,说明一旦线程出现了异常,那么操作系统会给进程发信号让进程退出,那么进程都退了,线程自然也就退了。
2.观察一下thread id
#include<iostream>
#include<pthread.h>
#include<unistd.h>
#include<string>
#include<functional>
#include<time.h>
#include<vector>
const int threadnum = 5;
using func_t = std::function<void()>;
class ThreadData
{
public:
ThreadData(const std::string name,const uint64_t ctime,func_t f)
:threadname(name),createtime(ctime),func(f)
{}
public:
std::string threadname;
uint64_t createtime;
func_t func;
};
void Print()
{
std::cout<<"我是线程执行的大任务的一部分"<<std::endl;
}
void * ThreadRoutine(void * args)
{
int a = 10;
ThreadData *td = static_cast<ThreadData*>(args);
while(true)
{
std::cout<<"I am a new pthread"<<"threadname: "<<td->threadname<<"create time: "<<td->createtime<<std::endl;
td->func();
// if(td->threadname=="thread - 4")
// {
// std::cout<<td->threadname<<" 触发了异常"<<std::endl;
// a/=0;
// }
sleep(1);
}
}
int main()
{
std::vector<pthread_t> pthreads;
for(int i = 0;i<threadnum;i++)
{
pthread_t tid;
char threadname[64];
snprintf(threadname,sizeof(threadname),"%s - %lu","thread",i+1);
ThreadData * td = new ThreadData(threadname,(uint64_t)time(nullptr),Print);
pthread_create(&tid,nullptr,ThreadRoutine,td);
pthreads.push_back(tid);
sleep(1);
}
for(const auto &tid : pthreads)
{
std::cout<<"thread id : "<<tid<<std::endl;
}
while(true)
{
std::cout<<"I am a main pthread"<<std::endl;
sleep(1);
}
return 0;
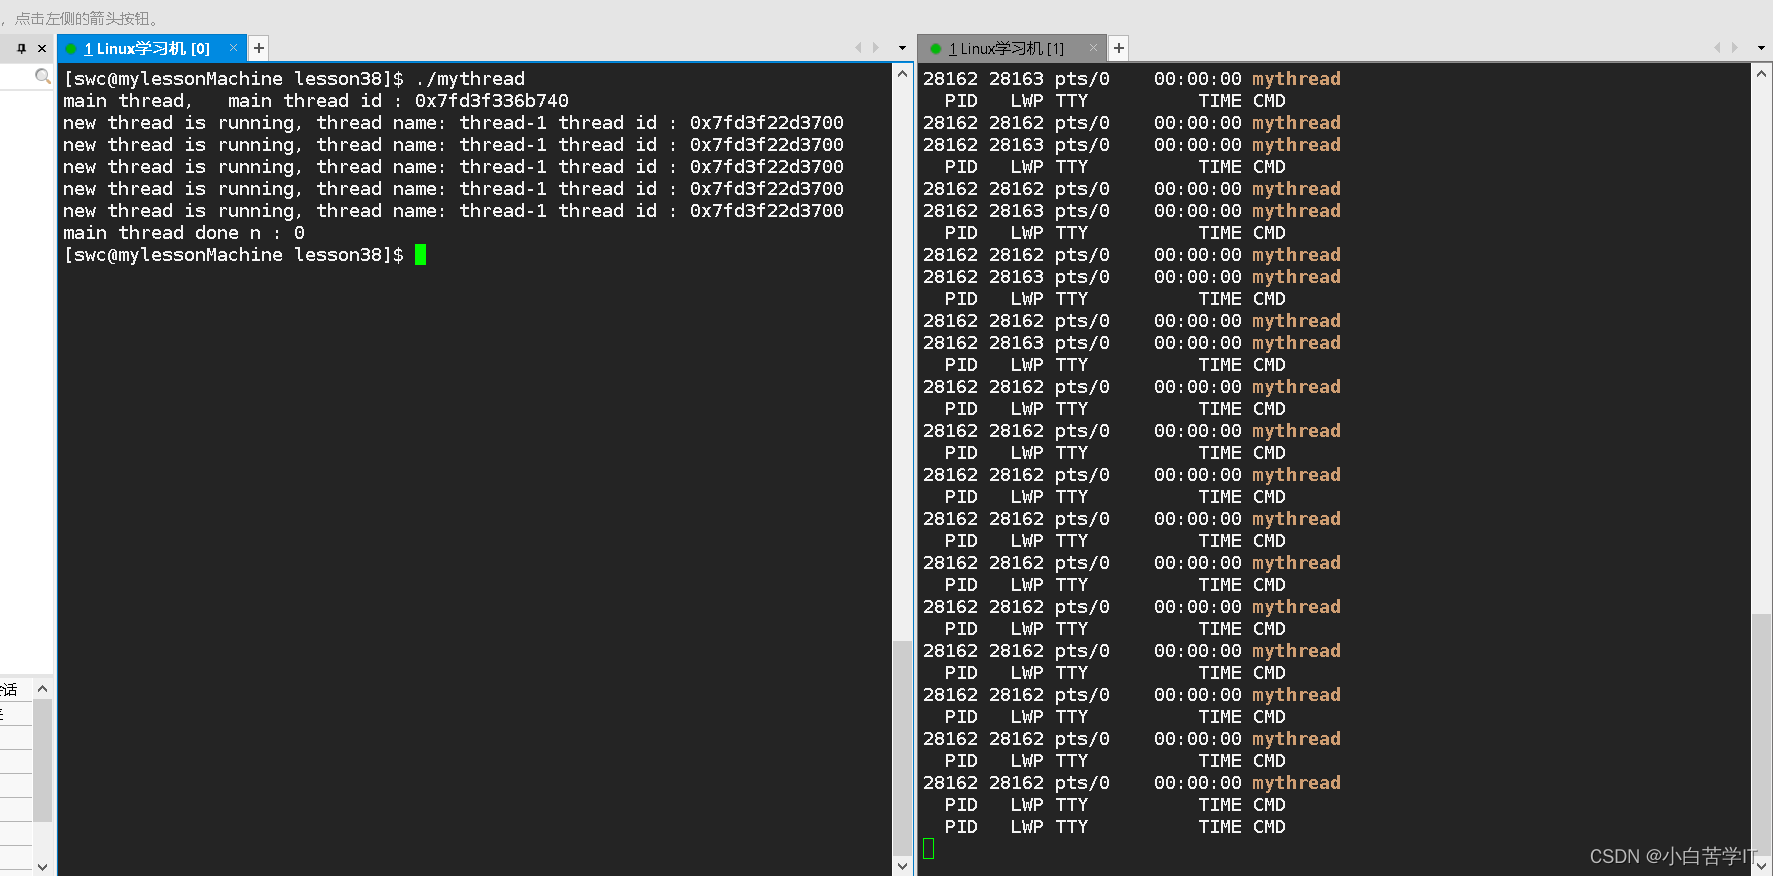
}在上述代码基础上添加一段打印tid的代码,运行结果:
那么这些thread id这么长的一段数字到底是什么意思呢,为了更清晰的理解这串数字,我们可以将其16进制打印出来。
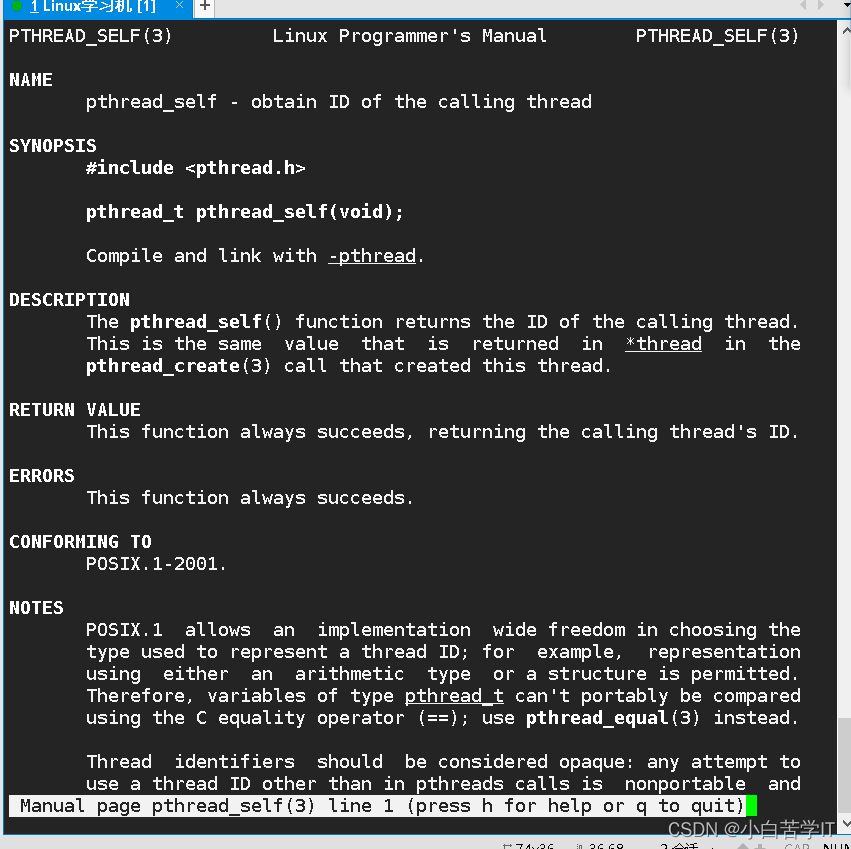
我们再来认识一个线程获取自身的id的一个接口:
然后再写一段代码:
#include<iostream>
#include<pthread.h>
#include<unistd.h>
#include<string>
#include<functional>
#include<time.h>
#include<vector>

std::string toHex(pthread_t tid)
{
    char id[64];
    snprintf(id,sizeof(id),"0x%lx",tid);
    return id;
}

void * threadRoutine(void * arg)
{
    usleep(1000);
    std::string name = static_cast<const char *>(arg);
    while(true)
    {
        std::cout<<"new thread is running, thread name: "<<name<<" thread id : "<<toHex(pthread_self())<<std::endl;
        sleep(1);
    }
}

int main()
{
    pthread_t tid;
    pthread_create(&tid,nullptr,threadRoutine,(void *)"thread-1");

    while(true)
    {
        std::cout<<"main thread, sub thread: "<<tid<<" main thread id : "<<toHex(pthread_self())<<std::endl;
        sleep(1);
    }
    return 0;
}
运行结果:
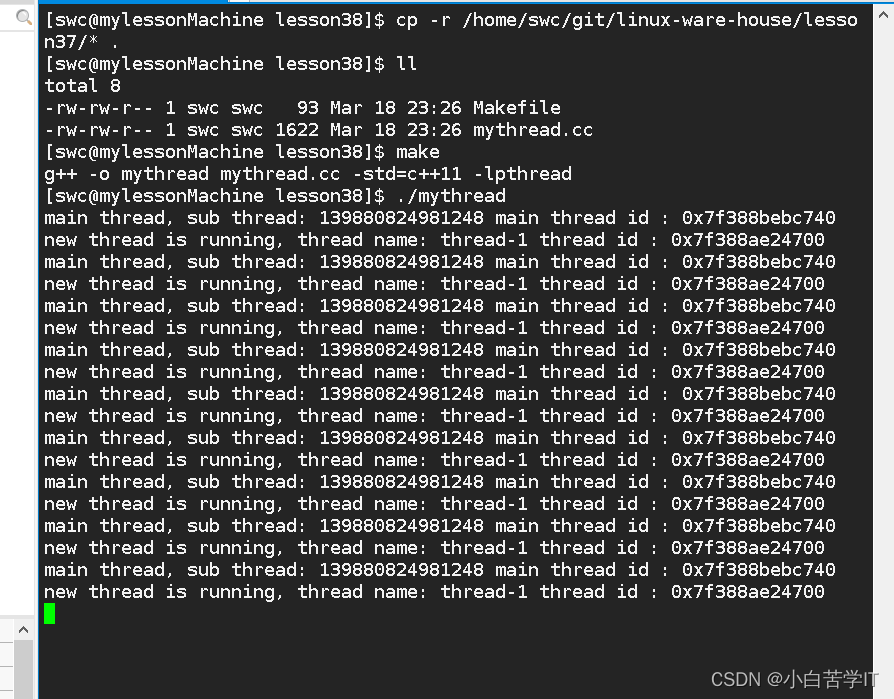
数字有这么长一串是因为我用的是64位系统的,然后这更像是一个地址,其实thread id的本质就是一个地址。
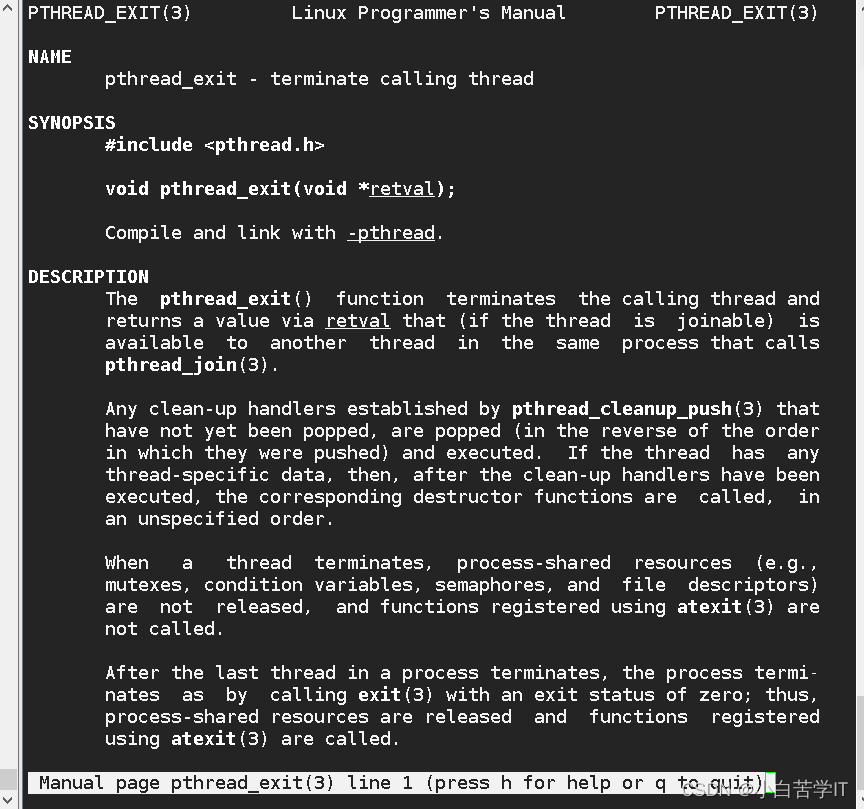
线程既然可以创建那么我们如何把它终止呢?我们继续来认识一个线程终止的接口:
需要通过传一个指针让线程终止,是不是呢?我们通过将新线程运行的函数修改成如下:
void * threadRoutine(void * arg)
{
    usleep(1000);
    std::string name = static_cast<const char *>(arg);
    int cnt = 5;
    while(cnt--)
    {
        std::cout<<"new thread is running, thread name: "<<name<<" thread id : "<<toHex(pthread_self())<<std::endl;
        sleep(1);
    }
    //return nullptr;
    pthread_exit(nullptr);
}
运行结果:

我们发现运行到后面就剩一个主线程了,说明新线程退出了。
下面我们来谈谈关于线程返回值的问题:
1.我们要获取返回值该如何获取呢?
2.线程在本质上其实就是Linux操作系统下的轻量级进程,那么当轻量级进程终止了,它的PCB会不会立即释放呢?
3.线程默认要被等待吗?是的,线程退出,没有等待会导致类似进程的僵尸问题。线程退出时如何获取新线程的返回值呢?
首先我们先认识一个接口:
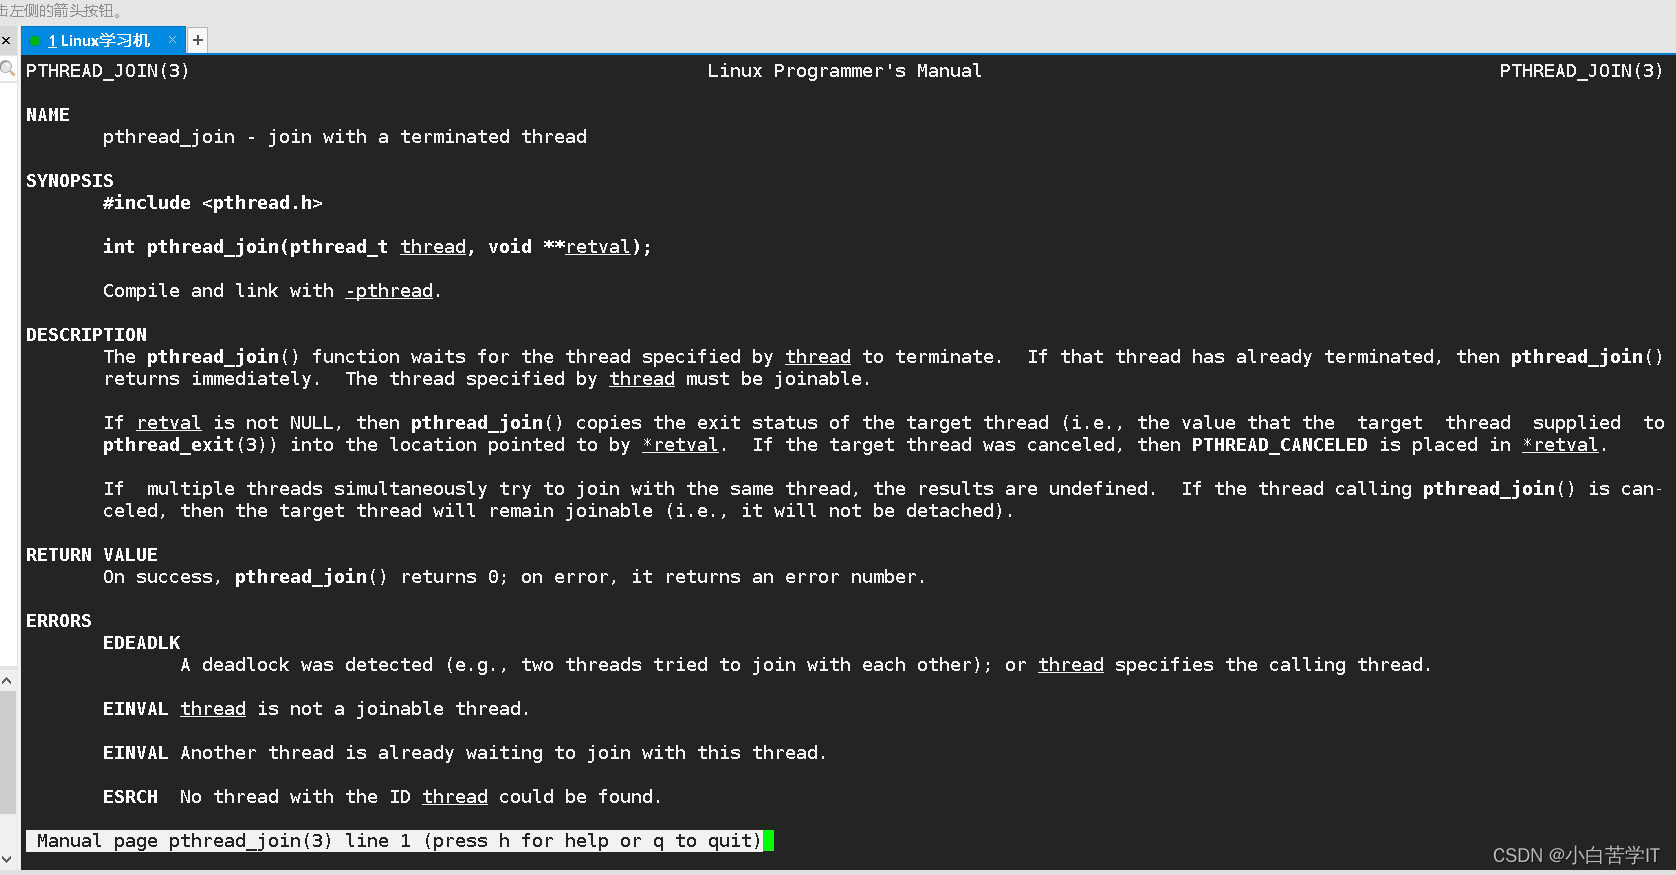
参数是thread id 和 一个二级指针,只要等待成功了,返回值就是0.
下面我们用这个线程等待的接口来进行测试:
#include<iostream>
#include<pthread.h>
#include<unistd.h>
#include<string>
#include<functional>
#include<time.h>
#include<vector>

std::string toHex(pthread_t tid)
{
    char id[64];
    snprintf(id,sizeof(id),"0x%lx",tid);
    return id;
}

void * threadRoutine(void * arg)
{
    usleep(1000);
    std::string name = static_cast<const char *>(arg);
    int cnt = 5;
    while(cnt--)
    {
        std::cout<<"new thread is running, thread name: "<<name<<" thread id : "<<toHex(pthread_self())<<std::endl;
        sleep(1);
    }
    return nullptr;
    // pthread_exit(nullptr);
}

int main()
{
    pthread_t tid;
    pthread_create(&tid,nullptr,threadRoutine,(void *)"thread-1");

    std::cout<<"main thread,  "<<" main thread id : "<<toHex(pthread_self())<<std::endl;
    sleep(10);

    int n = pthread_join(tid,nullptr);
    std::cout<<"main thread done"<<"n : "<<n<<std::endl;

    sleep(5);

    return 0;
}
运行结果:
我们看到最后的返回值是0,所以表示等待成功了。

如果我们要得到新线程的返回值,那么我们得到的也应该是void *,所以为了得到一个void*就需要传入一个void * * 。
那么下面我们来修改一下代码来证明一下:
#include<iostream>
#include<pthread.h>
#include<unistd.h>
#include<string>
#include<functional>
#include<time.h>
#include<vector>

std::string toHex(pthread_t tid)
{
    char id[64];
    snprintf(id,sizeof(id),"0x%lx",tid);
    return id;
}

void * threadRoutine(void * arg)
{
    usleep(1000);
    std::string name = static_cast<const char *>(arg);
    int cnt = 5;
    while(cnt--)
    {
        std::cout<<"new thread is running, thread name: "<<name<<" thread id : "<<toHex(pthread_self())<<std::endl;
        sleep(1);
    }

    return (void*)"thread-1 done";
    // return nullptr;
    // pthread_exit(nullptr);
}

int main()
{
    pthread_t tid;
    pthread_create(&tid,nullptr,threadRoutine,(void *)"thread-1");

    std::cout<<"main thread,  "<<" main thread id : "<<toHex(pthread_self())<<std::endl;
    void * ret = nullptr;
    int n = pthread_join(tid,&ret);
    std::cout<<"main thread done "<<"n : "<<n<<std::endl;

    std::cout<<"main get new thread return : "<< (const char *)ret<<std::endl;

    return 0;
}
运行结果:
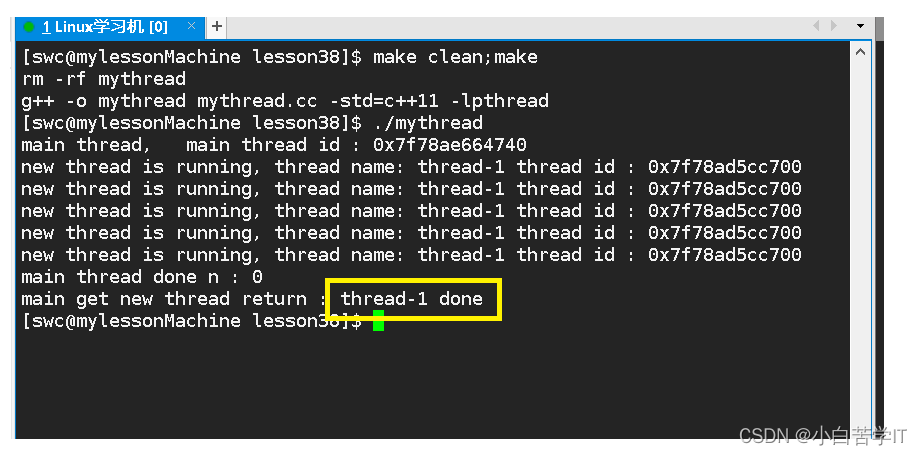
果然获取到了对应的返回值。
线程是可以被设置为分离状态的(可以理解为 该线程不受主线程的管控了),线程默认情况下是joinable的.
下面我们用代码来实现线程设置为分离状态,出现的现象也就是主线程等待新线程的返回值不成功:
#include<iostream>
#include<pthread.h>
#include<unistd.h>
#include<string>
#include<functional>
#include<time.h>
#include<vector>

std::string toHex(pthread_t tid)
{
    char id[64];
    snprintf(id,sizeof(id),"0x%lx",tid);
    return id;
}

void * threadRoutine(void * arg)
{
    pthread_detach(pthread_self());
    // usleep(1000);
    // std::string name = static_cast<const char *>(arg);
    int cnt = 5;
    while(cnt--)
    {
        std::cout<<"thread is running..."<<std::endl;
        sleep(1);
    }

    // return (void*)"thread-1 done";
    return nullptr;
    // pthread_exit(nullptr);
}

int main()
{
    pthread_t tid;
    pthread_create(&tid,nullptr,threadRoutine,(void *)"thread-1");
     sleep(1);
    // std::cout<<"main thread,  "<<" main thread id : "<<toHex(pthread_self())<<std::endl;
    int n = pthread_join(tid,nullptr);
    std::cout<<"main thread done "<<"n : "<<n<<std::endl;

    return 0;
}
运行结果:
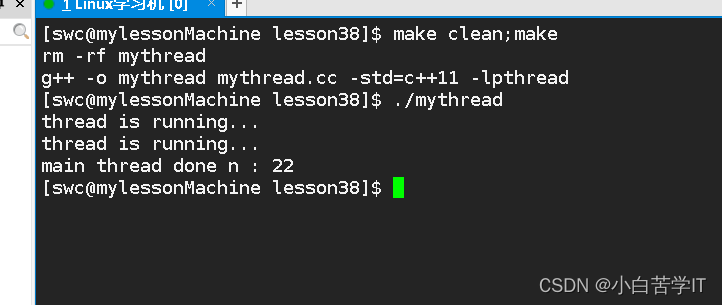
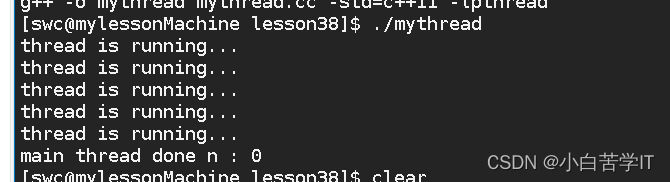
我们发现返回值n不在是0了,说明等待失败了。
当然也可以这样分离:
int main()
{
    pthread_t tid;
    pthread_create(&tid,nullptr,threadRoutine,(void *)"thread-1");
    sleep(1);

    pthread_detach(tid);
    // std::cout<<"main thread,  "<<" main thread id : "<<toHex(pthread_self())<<std::endl;
    int n = pthread_join(tid,nullptr);
    std::cout<<"main thread done "<<"n : "<<n<<std::endl;

    return 0;
}
把pthread_detach()这段代码放到这个位置,用主线程与新线程分离。
如果不分离,运行结果是这样的:
其实我们还有一种可以让线程退出的方式,那就是线程取消掉,用到接口pthread_cancel

下面我们运用这个接口来进行测试:
#include<iostream>
#include<pthread.h>
#include<unistd.h>
#include<string>
#include<functional>
#include<time.h>
#include<vector>

std::string toHex(pthread_t tid)
{
    char id[64];
    snprintf(id,sizeof(id),"0x%lx",tid);
    return id;
}

void * threadRoutine(void * arg)
{
    //pthread_detach(pthread_self());
    // usleep(1000);
    // std::string name = static_cast<const char *>(arg);
    int cnt = 5;
    while(cnt--)
    {
        std::cout<<"thread is running..."<<std::endl;
        sleep(1);
    }

    // return (void*)"thread-1 done";
    return nullptr;
    // pthread_exit(nullptr);
}

int main()
{
    pthread_t tid;
    pthread_create(&tid,nullptr,threadRoutine,(void *)"thread-1");
    sleep(5);

    //pthread_detach(tid);
    // std::cout<<"main thread,  "<<" main thread id : "<<toHex(pthread_self())<<std::endl;
    int n = pthread_cancel(tid);
    std::cout<<"main thread cancel done, "<<"n : "<<n<<std::endl;

    void * ret = nullptr;
    n = pthread_join(tid,&ret);
    std::cout<<"main thread join done,"<<" n : "<<n<<"thread return : "<<(int64_t)ret<<std::endl;
    return 0;
}
运行结果:
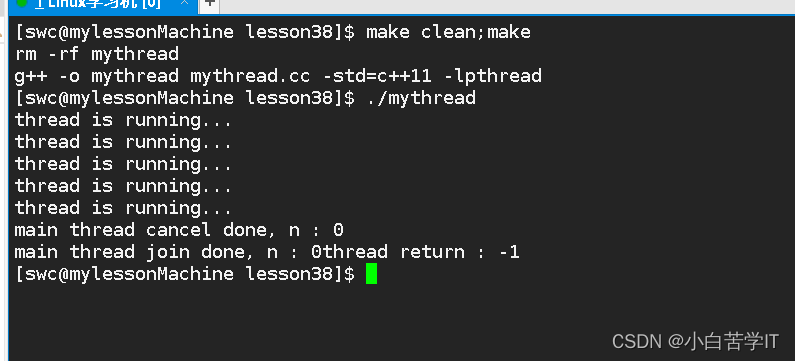
说明我们线程取消成功了,同时被join了,退出码是-1.
我们把线程分离加上去:
int main()
{
    pthread_t tid;
    pthread_create(&tid,nullptr,threadRoutine,(void *)"thread-1");
    sleep(5);

    pthread_detach(tid);
    // std::cout<<"main thread,  "<<" main thread id : "<<toHex(pthread_self())<<std::endl;
    int n = pthread_cancel(tid);
    std::cout<<"main thread cancel done, "<<"n : "<<n<<std::endl;

    void * ret = nullptr;
    n = pthread_join(tid,&ret);
    std::cout<<"main thread join done,"<<" n : "<<n<<"thread return : "<<(int64_t)ret<<std::endl;
    return 0;
}
运行结果就是:
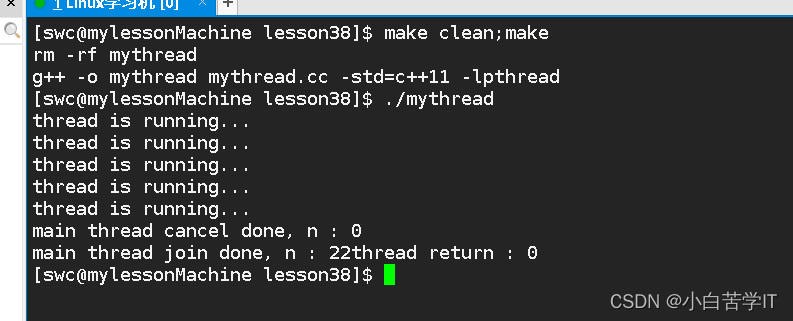
线程被分离了也是可以取消的,但是不能被join.