每个人都习惯了在终端中打印输出的程序,当新文本出现时,它会滚动,但这并不是您所能做的全部:您的程序可以为文本上色,上下左右移动光标,或者在以后要重新打印时清除屏幕的部分内容。这就是为什么像Git这样的程序可以实现其动态进度指示器,而Vim或Bash可以实现它们的编辑器,这些编辑器允许您修改已经显示的文本,而无需滚动终端。
原文:
Everyone is used to programs printing out output in a terminal that scrolls as new text appears, but that’s not all your can do: your program can color your text, move the cursor up, down, left or right, or clear portions of the screen if you are going to re-print them later. This is what lets programs like Git implement its dynamic progress indicators, and Vim or Bash implement their editors that let you modify already-displayed text without scrolling the terminal.
有一些库,例如 Readline,Jline 或 Python Prompt Toolkit,可以帮助您以各种编程语言来执行此操作,但您也可以自己执行此操作。这篇文章将探讨如何通过Python中的任何命令行计划控制终端的基础知识,以及您自己的代码如何直接利用终端所提供的所有特殊功能。
原文:
There are libraries like Readline, JLine, or the Python Prompt Toolkit that help you do this in various programming languages, but you can also do it yourself. This post will explore the basics of how you can control the terminal from any command-line program, with examples in Python, and how your own code can directly make use of all the special features the terminal has to offer.
About the Author: Haoyi is a software engineer, and the author of many open-source Scala tools such as the Ammonite REPL and the Mill Build Tool. If you enjoyed the contents on this blog, you may also enjoy Haoyi’s book Hands-on Scala Programming
大多数程序与Unix终端交互的方式是通过ANSI转义码。这些是你的程序为了给终端指令可以打印的特殊代码。不同的终端支持这些代码的不同子集,很难找到每个代码的“权威”列表。维基百科有一个合理的列表,其他网站也有。
原文:
The way that most programs interact with the Unix terminal is through ANSI escape codes. These are special codes that your program can print in order to give the terminal instructions. Various terminals support different subsets of these codes, and it’s difficult to find a “authoritative” list of what every code does. Wikipedia has a reasonable listing of them, as do many other sites.
尽管如此,编写使用ANSI转义码的程序是可能的,并且至少可以在Ubuntu或OS-X等常见Unix系统上工作(尽管不是Windows,我不会在这里讨论它,它是它自己的冒险!)。这篇文章将探索Ansi转义代码存在的基础,并演示如何使用它们来编写自己的交互式命令行:
原文:
Nevertheless, it’s possible to write programs that make use of ANSI escape codes, and at least will work on common Unix systems like Ubuntu or OS-X (though not Windows, which I won’t cover here and is its own adventure!).This post will explore the basics of what Ansi escape codes exist, and demonstrate how to use them to write your own interactive command-line from first principles.
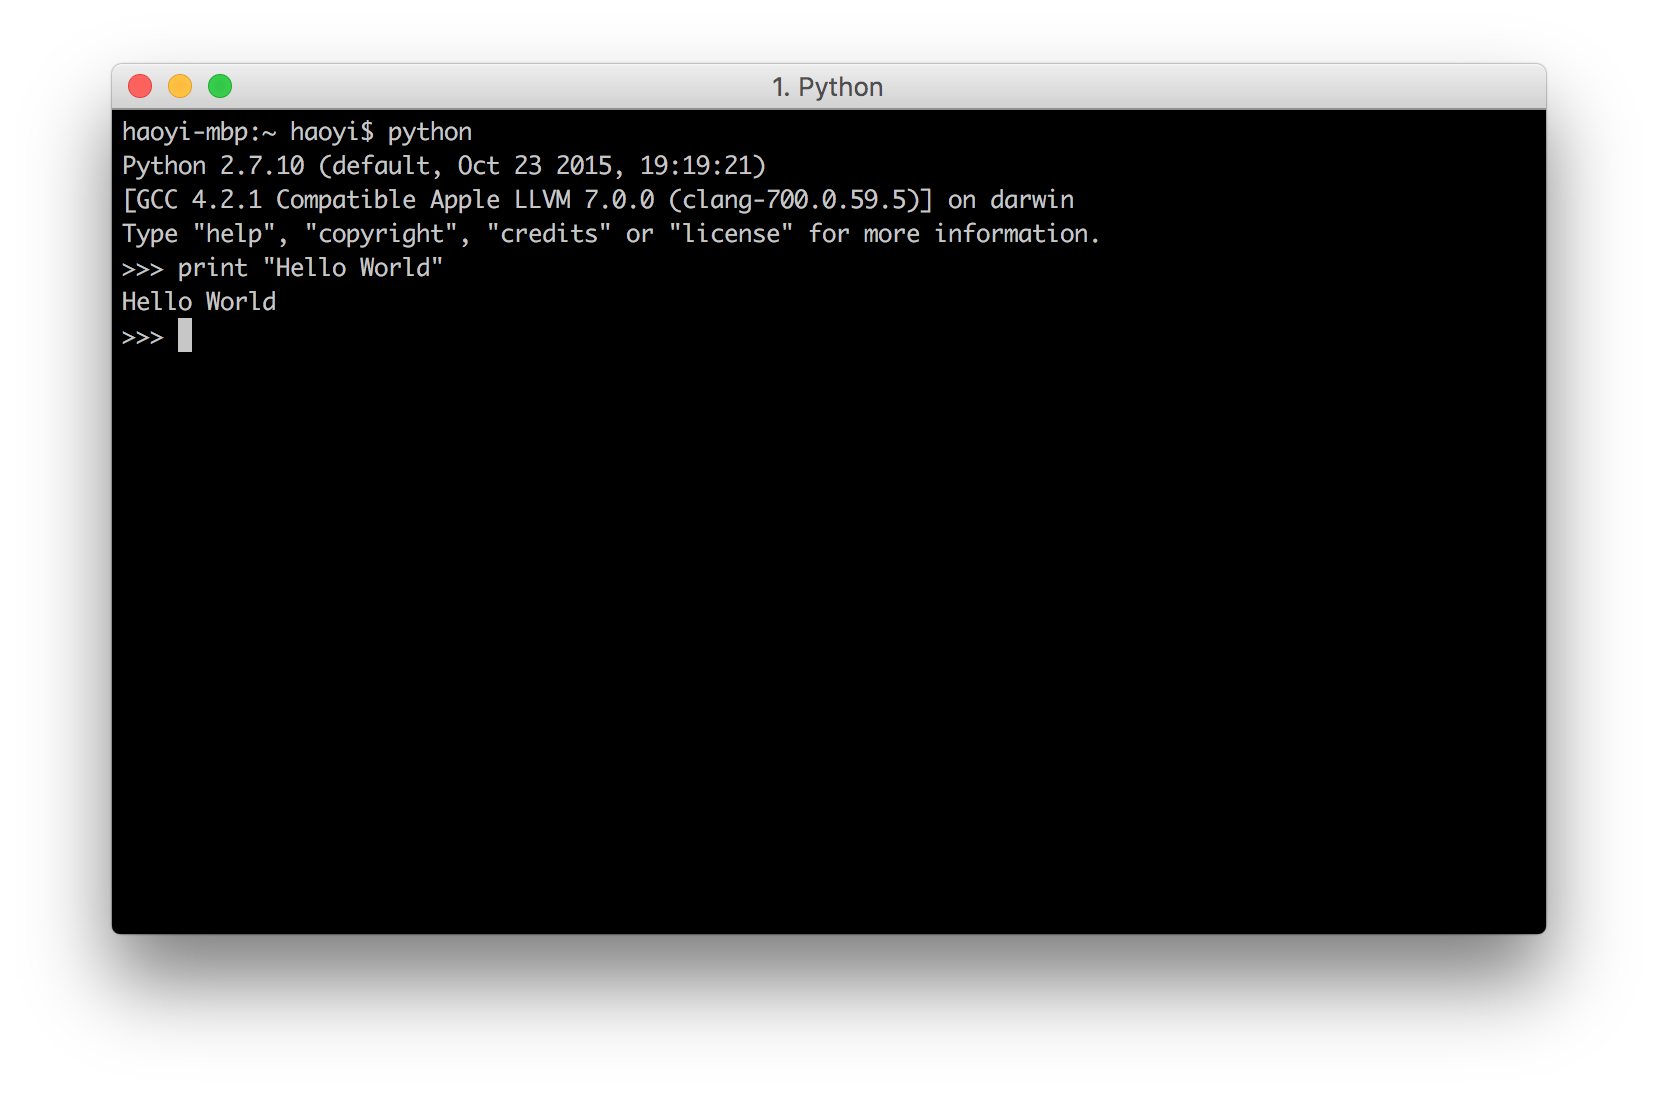
打开 python 命令行
首先,让我们从一个普通的Python提示符开始:
原文:
To begin with, let’s start off with a plain-old vanilla Python prompt:
富文本
最基本的Ansi转义码是用于呈现文本的转义码。这些工具可以让你为打印的文本添加颜色、背景色或其他装饰,但不要做任何花哨的事情。您打印的文本仍然会在终端的底部结束,并且仍然使您的终端滚动,只是现在它将是彩色文本而不是默认的黑/白配色方案您的终端。
原文:
The most basic Ansi escape codes are those involved in rendering text. These let you add decorations like Colors, Background Colors or other Decorations to your printed text, but don’t do anything fancy. The text you print will still end up at the bottom of the terminal, and still make your terminal scroll, just now it will be colored text instead of the default black/white color scheme your terminal has.
颜色
你可以对文本做的最基本的事情就是给它上色。Ansi的设置颜色的格式如下:
- Red:
\u001b[31m - Reset:
\u001b[0m
\u001b 字符是大多数Ansi转义开头的特殊字符;大多数语言都允许这种语法来表示特殊字符,例如Java,Python 和 Javascript 都允许 \u001b 语法。
The most basic thing you can do to your text is to color it. The Ansi colors all look like
- Red:
\u001b[31m- Reset:
\u001b[0mThis
\u001bcharacter is the special character that starts off most Ansi escapes; most languages allow this syntax for representing special characters, e.g. Java, Python and Javascript all allow the\u001bsyntax.
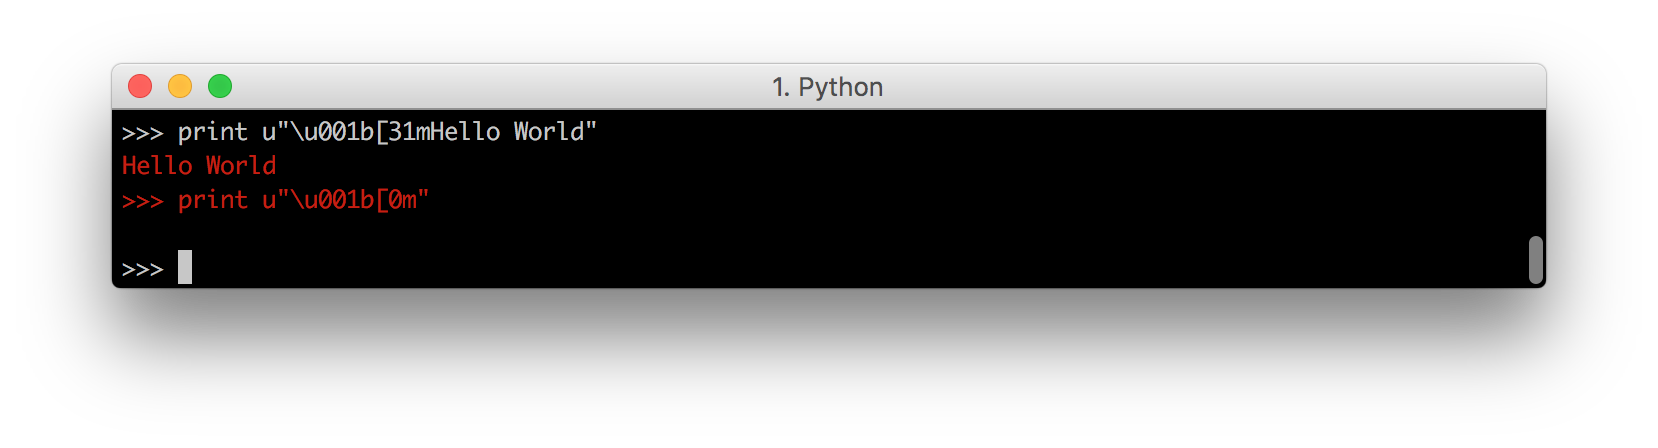
例如,下面打印字符串 "Hello World",并设置为其颜色为红色:
For example here is printing the string "Hello World", but red:
外链图片转存失败,源站可能有防盗链机制,建议将图片保存下来直接上传
请注意,我们需要在字符串前加上u 即。u"…" 以使其在 Python 2.7.10 中工作。这在Python 3或其他语言中是不必要的。
Note how we need to prefix the string with
ui.e.u"..."in order for this to work in Python 2.7.10. This is not necessary in Python 3 or in other languages.
看看从打印的Hello World开始的红色是如何溢出到>>>提示符的。事实上,我们在这个提示符中输入的任何代码也将被标记为红色,就像任何后续输出一样!这就是Ansi颜色的工作原理:一旦您打印出启用一种颜色的特殊代码,该颜色将永远保持下去,直到其他人打印出另一种颜色的代码,或者打印出Reset代码来清除它。
See how the red color, starting from the printed
Hello World, ends up spilling into the>>>prompt. In fact, any code we type into this prompt will also be colored red, as will any subsequent output! That is how Ansi colors work: once you print out the special code enabling a color, the color persists forever until someone else prints out the code for a different color, or prints out the Reset code to disable it.
我们可以通过打印上面的Reset代码来禁用它:
We can disable it by printing the Reset code above:
print u"\u001b[31mHelloWorld\u001b[0m"
我们可以看到提示又变白了。一般来说,您应该始终记住以Reset结束您打印的任何彩色字符串,以确保不会意外
为了避免这种情况,我们需要确保以Reset代码结束colored-string:
And we can see the prompt turns back white. In general, you should always remember to end any colored string you’re printing with a Reset, to make sure you don’t accidentally
To avoid this, we need to make sure we end our colored-string with the Reset code:
print u"\u001b[31mHelloWorld\u001b[0m"
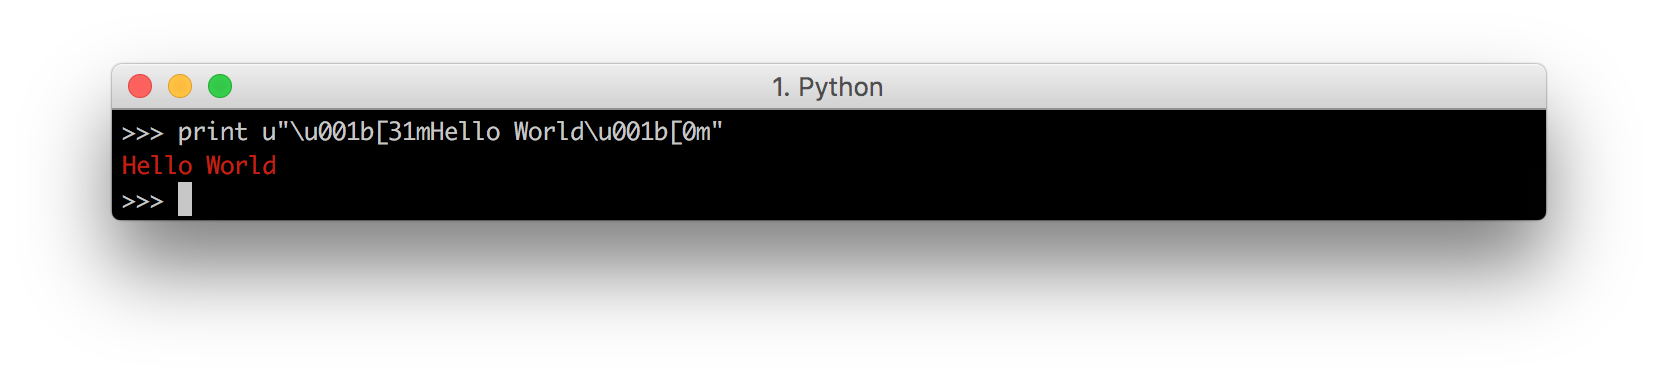
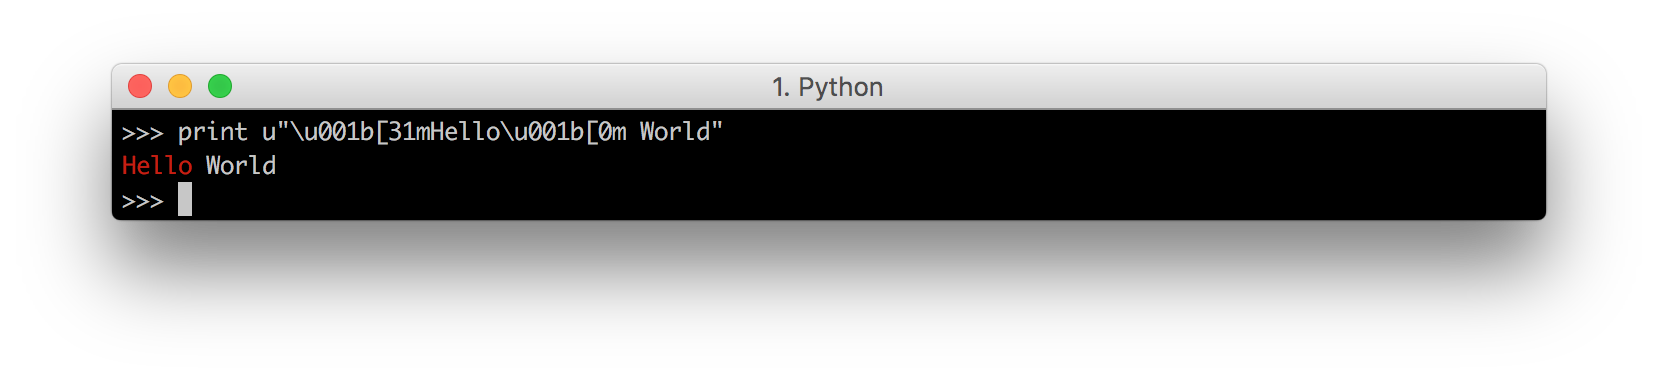
它在字符串打印后正确地重置颜色。你也可以在字符串的中间重置,使后半部分没有颜色:
Which propertly resets the color after the string has been printed. You can also Reset halfway through the string to make the second-half un-colored:
print u"\u001b[31mHello\u001b[0mWorld"
8色(8 Colors)
我们已经看到了Red和Reset是如何工作的。最基本的终端有8种不同的颜色:
We have seen how Red and Reset work. The most basic terminals have a set of 8 different colors:
- 黑色(Black):
\u001b[30m - 红色(Red):
\u001b[31m - 绿色(Green):
\u001b[32m - 黄色(Yellow):
\u001b[33m - 蓝色(Blue):
\u001b[34m - 红色(Magenta):
\u001b[35m - 青色(Cyan):
\u001b[36m - 白(White):
\u001b[37m - 重置(Reset):
\u001b[0m
我们可以通过打印每种颜色的一个字母,然后重置来演示:
Which we can demonstrate by printing one letter of each color, followed by a Reset:
print u"\u001b[30m A \u001b[31m B \u001b[32m C \u001b[33m D \u001b[0m"
print u"\u001b[34m E \u001b[35m F \u001b[36m G \u001b[37m H \u001b[0m"
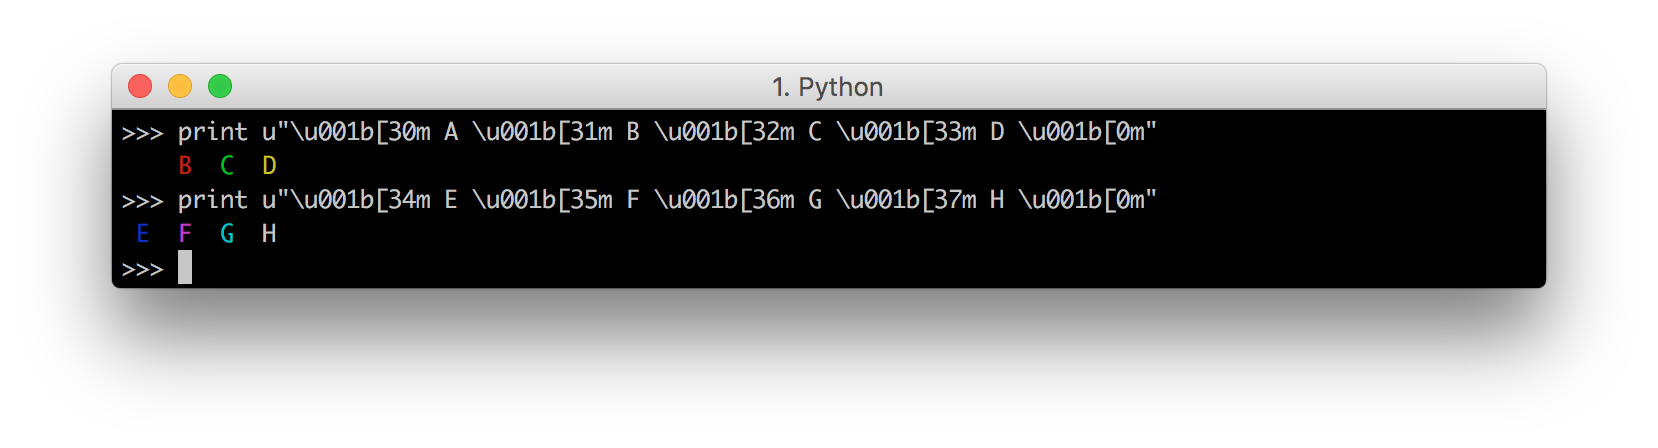
注意黑色的“A”在黑色的末端是完全看不见的,而白色的“H”看起来和普通文本一样。如果我们为我们的终端选择不同的配色方案,它将是相反的:
Note how the black
Ais totally invisible on the black terminal, while the whiteHlooks the same as normal text. If we chose a different color-scheme for our terminal, it would be the opposite:
print u"\u001b[30;1m A \u001b[31;1m B \u001b[32;1m C \u001b[33;1m D \u001b[0m"
print u"\u001b[34;1m E \u001b[35;1m F \u001b[36;1m G \u001b[37;1m H \u001b[0m"

黑色的“A”很明显,白色的“H”很难辨认。
With the black
Abeing obvious and the whiteHbeing hard to make out.
16 色(16 Colors)
大多数终端,除了基本的8种颜色外,还支持“明亮”或“粗体”颜色。它们都有自己的一组代码,反映了正常的颜色,但在它们的代码中有一个额外的’;1 ':
Most terminals, apart from the basic set of 8 colors, also support the “bright” or “bold” colors. These have their own set of codes, mirroring the normal colors, but with an additional
;1in their codes:
- Bright Black:
\u001b[30;1m - Bright Red:
\u001b[31;1m - Bright Green:
\u001b[32;1m - Bright Yellow:
\u001b[33;1m - Bright Blue:
\u001b[34;1m - Bright Magenta:
\u001b[35;1m - Bright Cyan:
\u001b[36;1m - Bright White:
\u001b[37;1m - Reset:
\u001b[0m
请注意,Reset是相同的:这是重置所有颜色和文本效果的重置代码。
Note that Reset is the same: this is the reset code that resets all colors and text effects.
我们可以打印出这些鲜艳的颜色,看看它们的效果:
We can print out these bright colors and see their effects:
你会发现,它们确实比基本的8种颜色要亮得多。即使是黑色的“A”现在也足够亮,可以在黑色背景上看到灰色,而白色的“H”现在甚至比默认的文本颜色更亮。
And see that they are, indeed, much brighter than the basic set of 8 colors. Even the black
Ais now bright enough to be a visible gray on the black background, and the whiteHis now even brighter than the default text color.
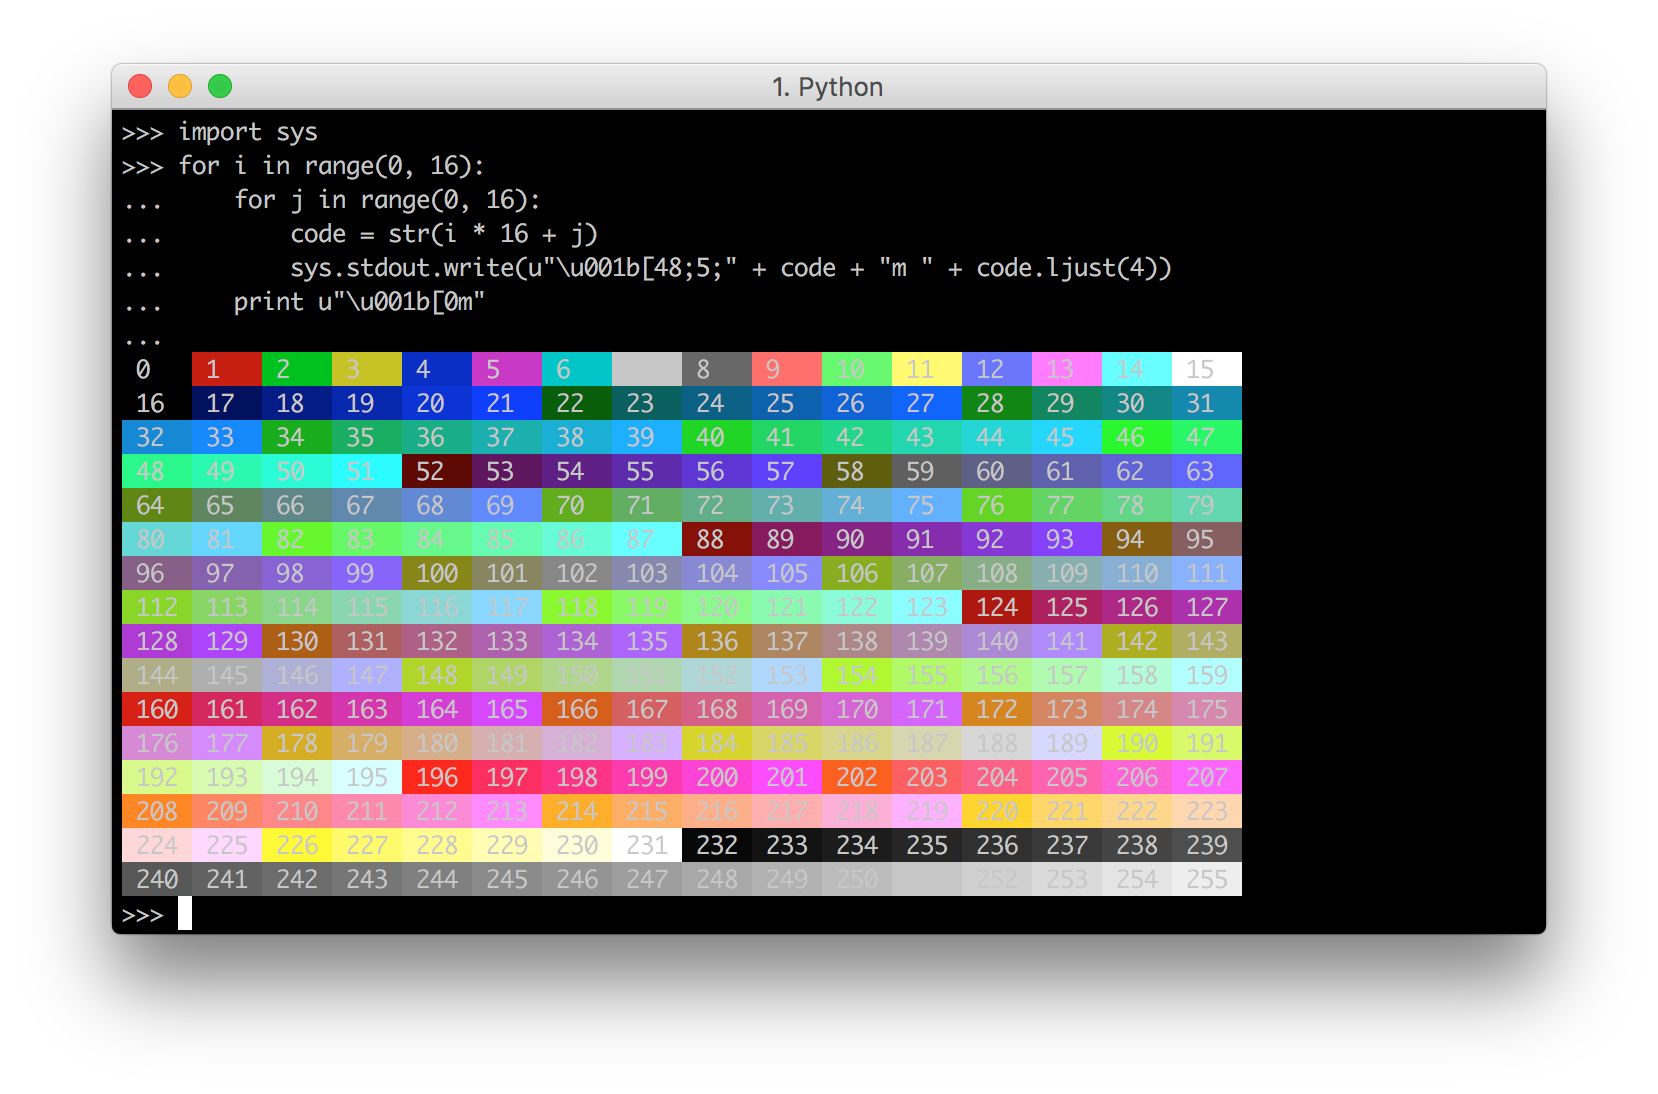
256 色 (256 Colors)
最后,在16种颜色之后,一些终端支持256种颜色的扩展颜色集。
Lastly, after the 16 colors, some terminals support a 256-color extended color set.
这些颜色使用如下格式:
These are of the form
\u001b[38;5;${ID}m
如下,可以打印出所有 256 颜色
import sys
for i in range(0, 16):
    for j in range(0, 16):
        code = str(i * 16 + j)
        sys.stdout.write(u"\u001b[38;5;" + code + "m " + code.ljust(4))
    print u"\u001b[0m"
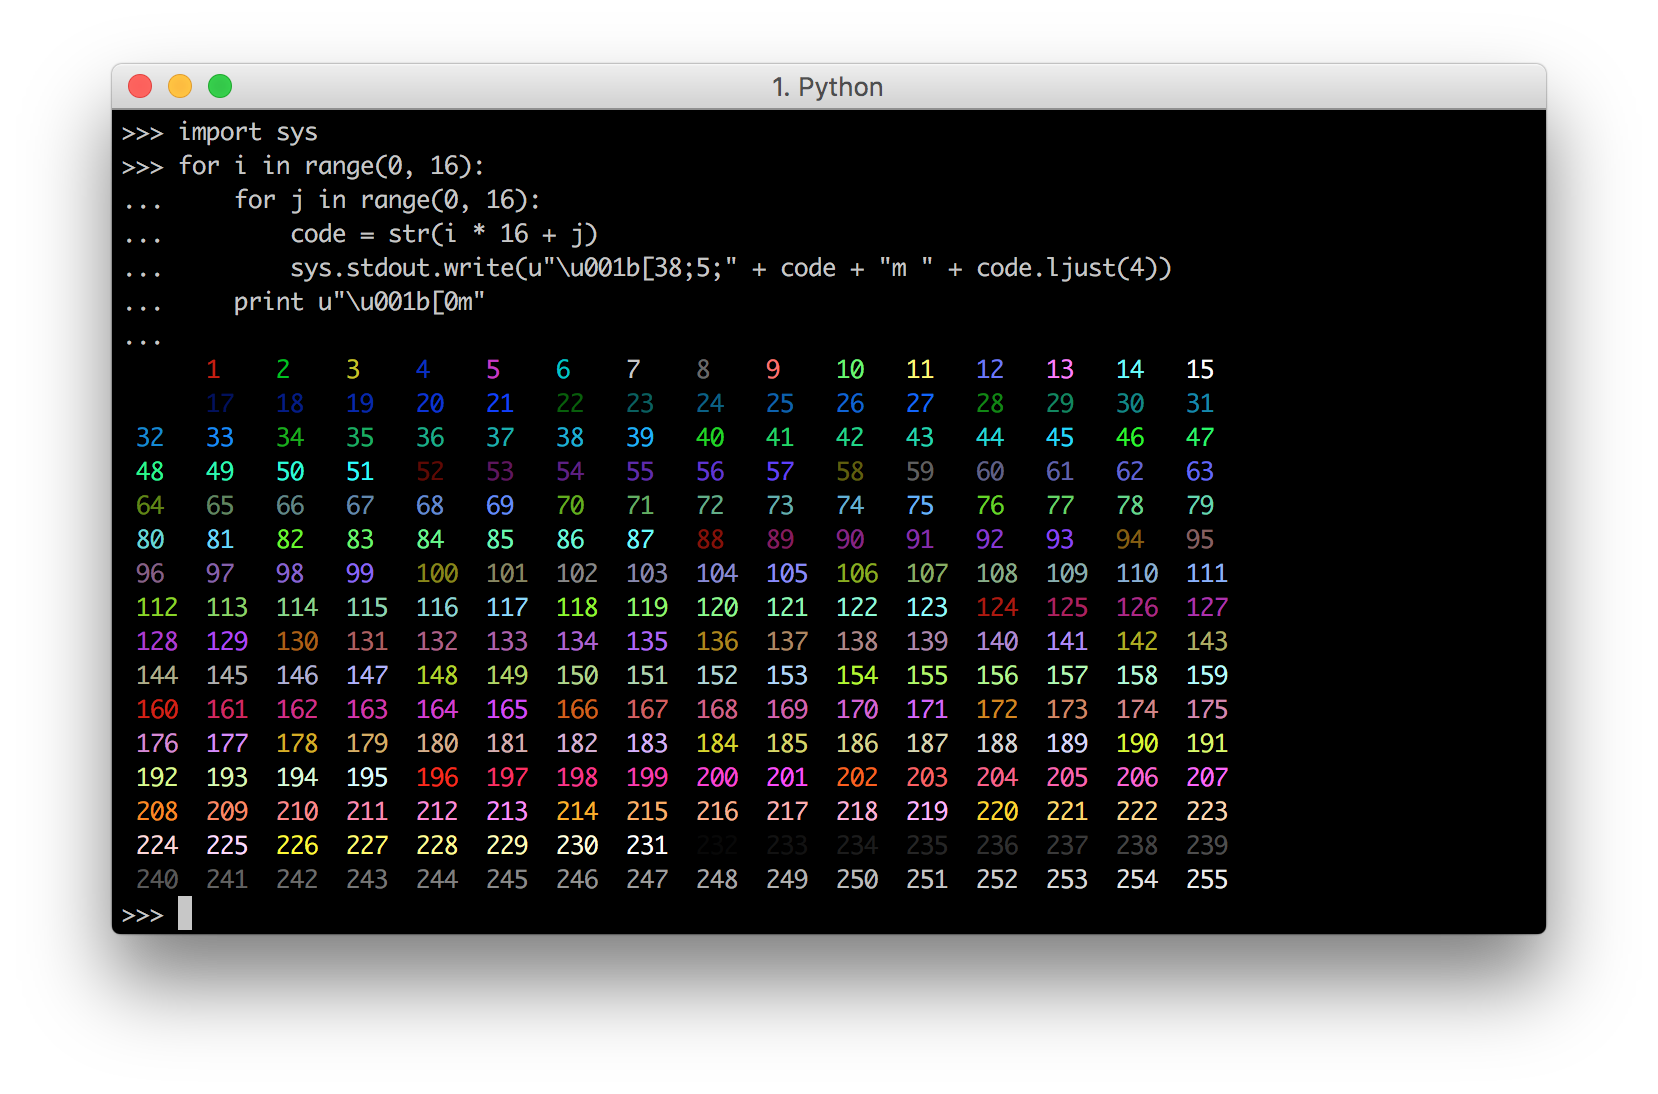
这里我们使用sys.stdout.write而不是print,这样我们就可以在同一行上打印多个项目,但除此之外,这是不言自明的。从0到255的每个代码对应一个特定的颜色。
Here we use
sys.stdout.writeinstead of
背景色(Background Colors)
Ansi转义码允许您设置文本背景的颜色,就像设置前景的颜色一样。例如,8种背景色对应代码:
The Ansi escape codes let you set the color of the text-background the same way it lets you set the color of the foregrond. For example, the 8 background colors correspond to the codes:
- Background Black:
\u001b[40m - Background Red:
\u001b[41m - Background Green:
\u001b[42m - Background Yellow:
\u001b[43m - Background Blue:
\u001b[44m - Background Magenta:
\u001b[45m - Background Cyan:
\u001b[46m - Background White:
\u001b[47m
光明的版本是:
With the bright versions being:
- Background Bright Black:
\u001b[40;1m - Background Bright Red:
\u001b[41;1m - Background Bright Green:
\u001b[42;1m - Background Bright Yellow:
\u001b[43;1m - Background Bright Blue:
\u001b[44;1m - Background Bright Magenta:
\u001b[45;1m - Background Bright Cyan:
\u001b[46;1m - Background Bright White:
\u001b[47;1m
重置操作:
And reset is the same:
- Reset:
\u001b[0m
可如下打印各种颜色并观察
We can print them out and see them work
print u"\u001b[40m A \u001b[41m B \u001b[42m C \u001b[43m D \u001b[0m"
print u"\u001b[44m A \u001b[45m B \u001b[46m C \u001b[47m D \u001b[0m"
print u"\u001b[40;1m A \u001b[41;1m B \u001b[42;1m C \u001b[43;1m D \u001b[0m"
print u"\u001b[44;1m A \u001b[45;1m B \u001b[46;1m C \u001b[47;1m D \u001b[0m"
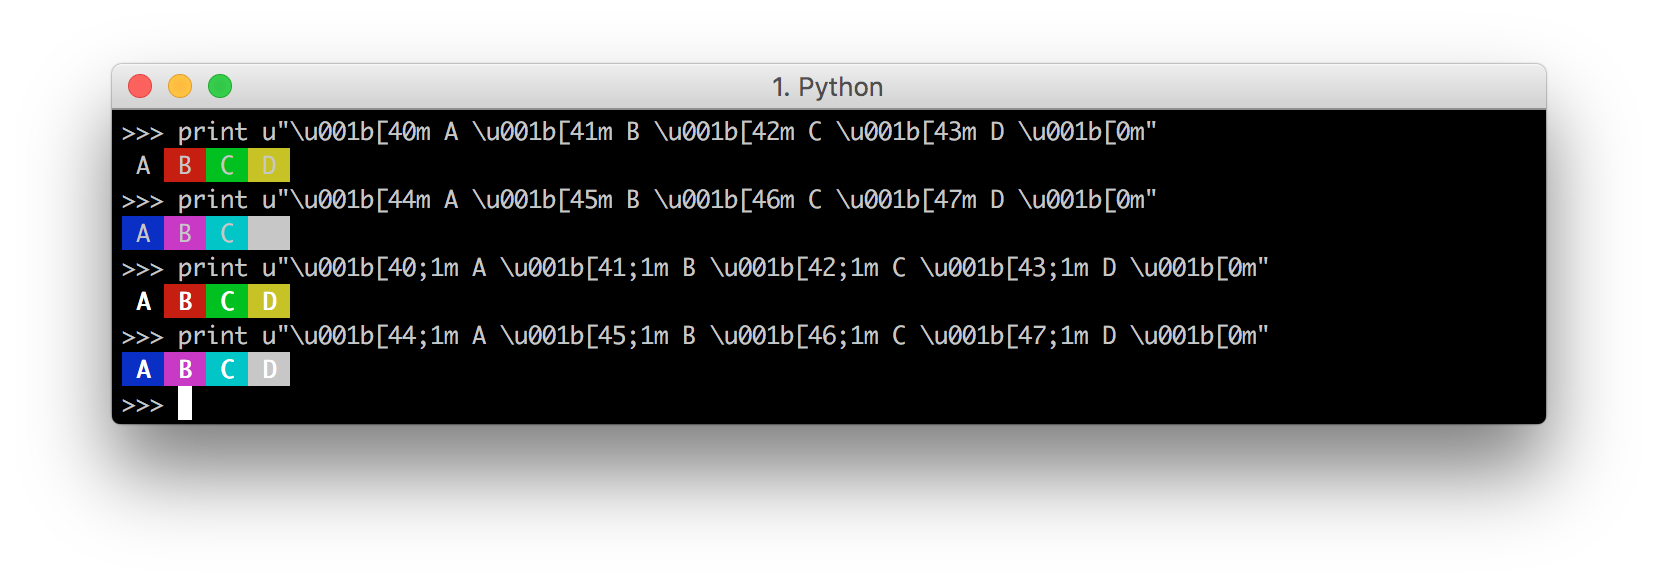
请注意,背景颜色的明亮版本不会改变背景,而是使“前景”文本更亮。这是不直观的,但这就是它的工作方式。
Note that the bright versions of the background colors do not change the background, but rather make the foreground text brighter. This is unintuitive but that’s just the way it works.
256色背景也可以工作:
256-colored backgrounds work too:
import sys
for i in range(0, 16):
    for j in range(0, 16):
        code = str(i * 16 + j)
        sys.stdout.write(u"\u001b[48;5;" + code + "m " + code.ljust(4))
    print u"\u001b[0m"
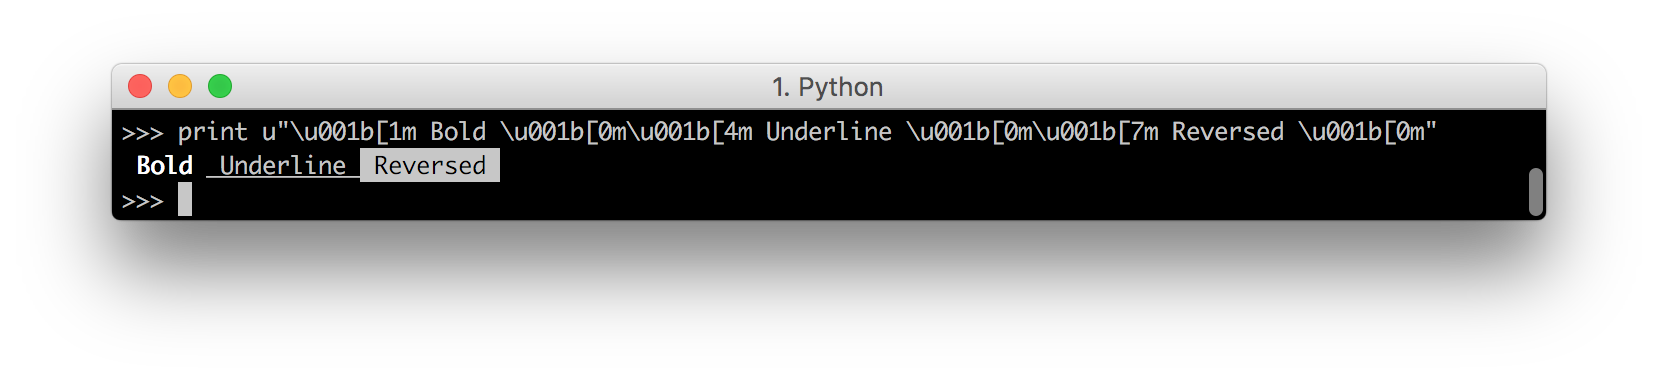
装饰(Decorations)
除了颜色和背景色之外,Ansi转义码还允许在文本上进行修饰:
Apart from colors, and background-colors, Ansi escape codes also allow decorations on the text:
- Bold:
\u001b[1m - Underline:
\u001b[4m - Reversed:
\u001b[7m
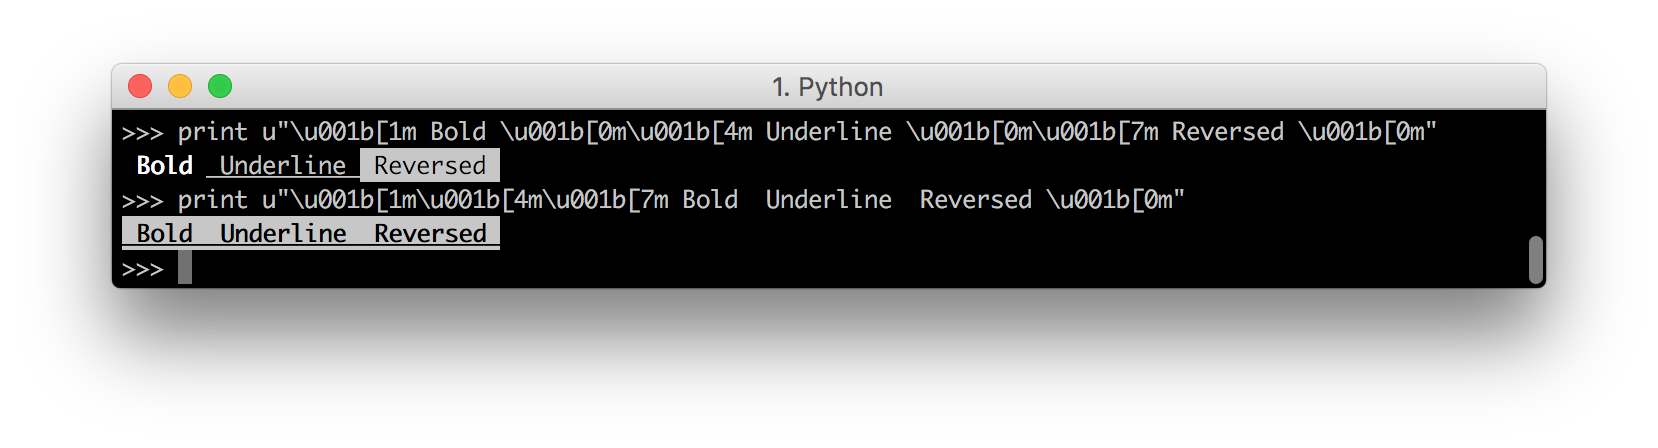
可以单独使用:
Which can be used individually:
print u"\u001b[1m BOLD \u001b[0m\u001b[4m Underline \u001b[0m\u001b[7m Reversed \u001b[0m"
或者一起组合使用
Or together
print u"\u001b[1m\u001b[4m\u001b[7m BOLD Underline Reversed \u001b[0m"
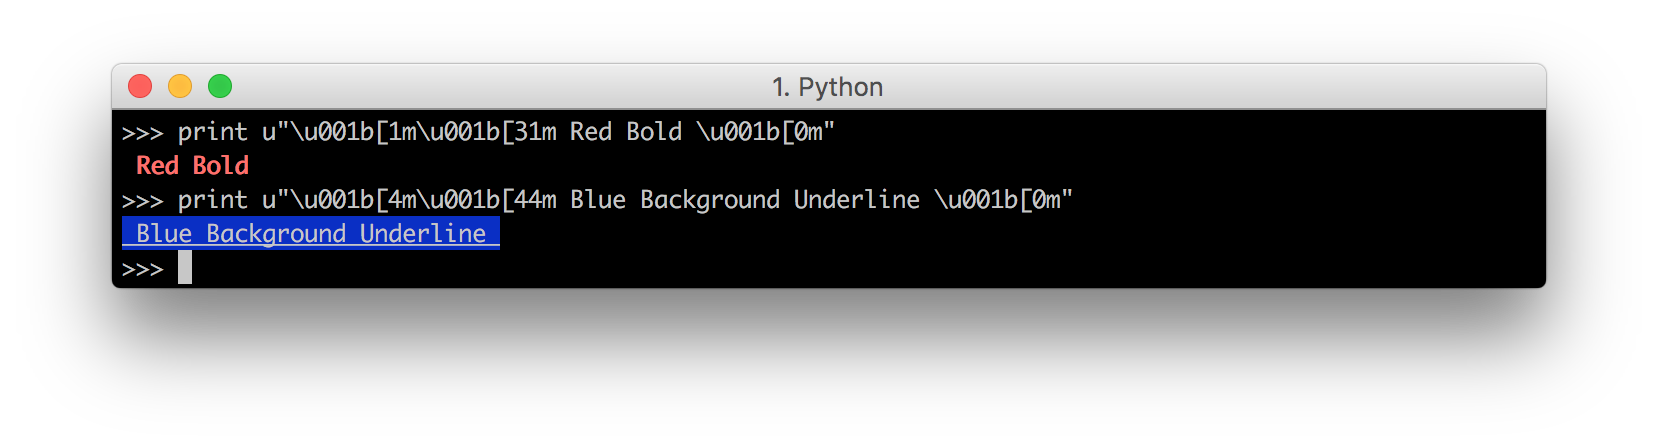
并且可以与前景和背景颜色一起使用:
And can be used together with foreground and background colors:
print u"\u001b[1m\u001b[31m Red Bold \u001b[0m"
print u"\u001b[4m\u001b[44m Blue Background Underline \u001b[0m"
光标导航(Cursor Navigation)
下一组Ansi转义码更加复杂:它们允许您在终端窗口周围移动光标,或者擦除部分窗口。这些是像Bash这样的程序使用的Ansi转义码,可以让您在输入命令中左右移动光标,以响应方向键。
The next set of Ansi escape codes are more complex: they allow you to move the cursor around the terminal window, or erase parts of it. These are the Ansi escape codes that programs like Bash use to let you move your cursor left and right across your input command in response to arrow-keys.
其中最基本的是将光标上下左右移动:
The most basic of these moves your cursor up, down, left or right:
- Up:
\u001b[{n}A - Down:
\u001b[{n}B - Right:
\u001b[{n}C - Left:
\u001b[{n}D
为了使用这些提示符,首先让我们建立一个“正常”Python提示符的基线。
To make use of these, first let’s establish a baseline of what the “normal” Python prompt does.
这里,我们添加了一个’ time.sleep(10) ',这样我们就可以看到它是如何工作的。我们可以看到,如果我们打印一些东西,它首先打印输出并将光标移动到下一行:
Here, we add a
time.sleep(10)just so we can see it in action. We can see that if we print something, first it prints the output and moves our cursor onto the next line:
import time
print "Hello I Am A Cow"; time.sleep(10)
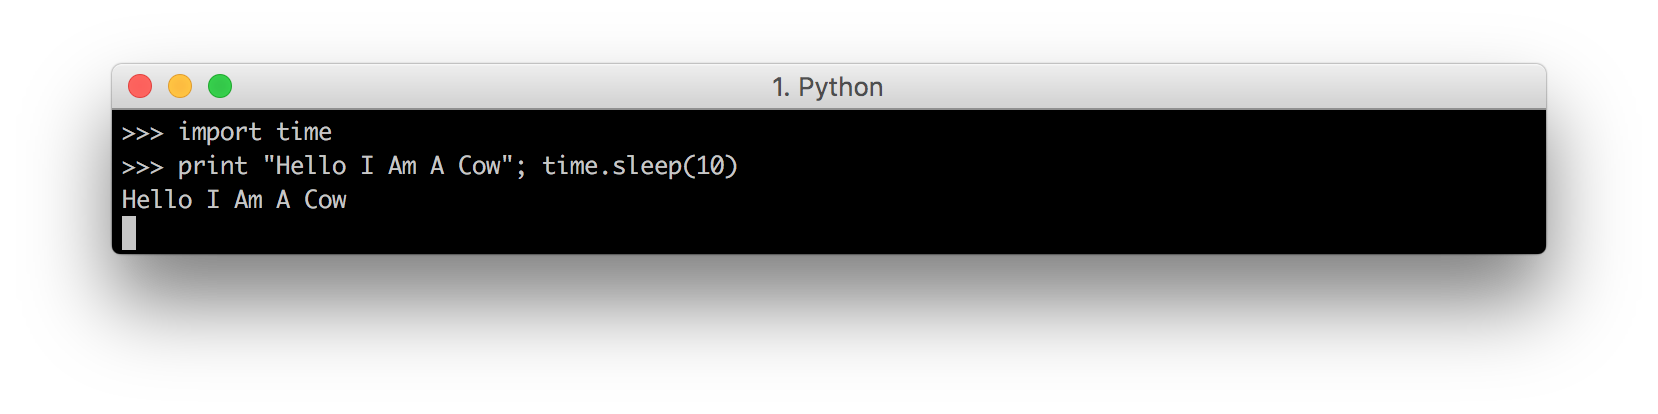
然后打印下一个提示,并将光标移到提示的右侧。
Then it prints the next prompt and moves our cursor to the right of it.
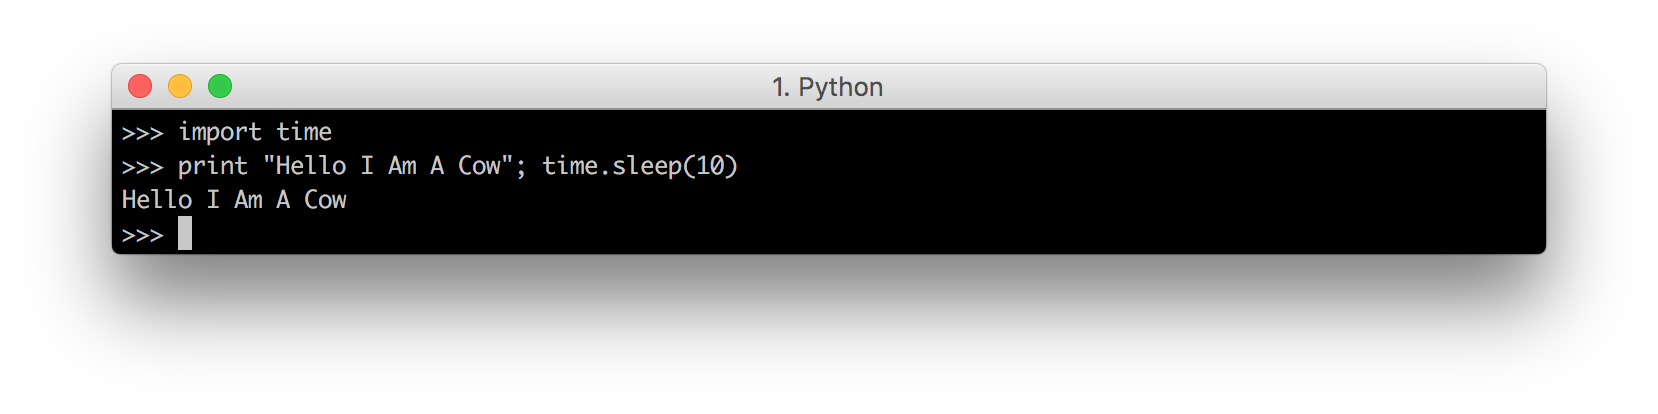
这就是光标所在位置的基线。我们能用这个做什么?
So that’s the baseline of where the cursor already goes. What can we do with this?
进度(Progress Indicator)
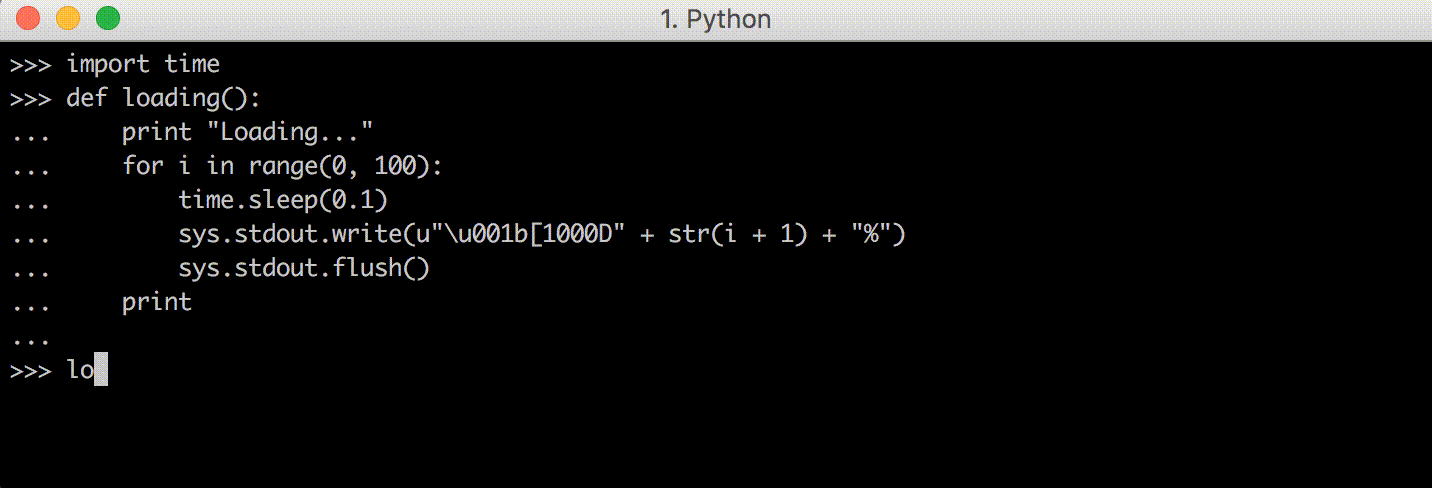
对于游标导航Ansi转义码,我们能做的最简单的事情就是做一个加载提示:
The easiest thing we can do with our cursor-navigation Ansi escape codes is to make a loading prompt:
import time, sys
def loading():
    print "Loading..."
    for i in range(0, 100):
        time.sleep(0.1)
        sys.stdout.write(u"\u001b[1000D" + str(i + 1) + "%")
        sys.stdout.flush()
    print

loading()
这将打印从’ 1% ‘到’ 100% ‘的文本,因为它使用’ stdout ‘,所以都在同一行上。“写”而不是“打印”。但是,在打印每个百分比之前,它首先打印’ \u001b[1000D ',这意味着“将光标向左移动1000个字符”。这将使它一直移动到屏幕的左侧,从而使打印的新百分比覆盖旧百分比。因此,在函数返回之前,我们看到加载百分比从“1%”无缝地改变为“100%”:
This prints the text from
1%to100%, all on the same line since it usesstdout.writerather than\u001b[1000D, which means "move cursor left by 1000 characters). This should move it all the way to the left of the screen, thus letting the new percentage that gets printed over-write the old one. Hence we see the loading percentage seamlessly changing from1%to100%before the function returns:
你可能很难想象光标在哪里移动,但我们可以很容易地放慢速度,并添加更多的“睡眠”,让代码显示给我们看:
It might be a bit hard to visualize in your head where the cursor is moving, but we can easily slow it down and add more
sleeps to make the code show us:
import time, sys
def loading():
    print "Loading..."
    for i in range(0, 100):
        time.sleep(1)
        sys.stdout.write(u"\u001b[1000D")
        sys.stdout.flush()
        time.sleep(1)
        sys.stdout.write(str(i + 1) + "%")
        sys.stdout.flush()
    print

loading()
在这里,我们将写“向左移动”转义代码的“写”与写进度百分比指示器的“写”分开。我们还在它们之间添加了1秒的休眠,让我们有机会看到光标“处于”状态,而不仅仅是最终结果:
Here, we split up the
writethat writes the “move left” escape code, from the write that writes the percentage progress indicator. We also added a 1 second sleep between them, to give us a chance to see the cursors “in between” states rather than just the end result:
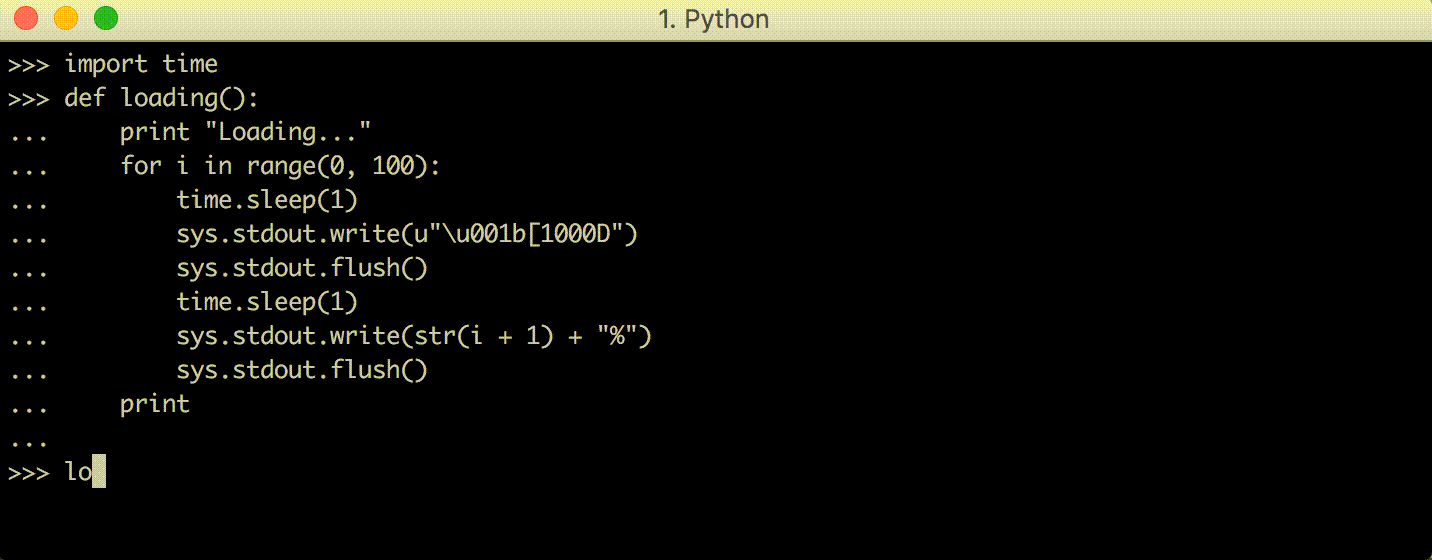
现在,我们可以看到光标向左移动到屏幕边缘,在新的打印百分比覆盖旧的百分比之前。
Now, we can see the cursor moving left to the edge of the screen, before the new printed percentage over-writes the old one.
ASCII进度条(ASCII Progress Bar)
现在我们知道了如何使用Ansi转义码来制作一个自我更新的进度条来控制终端,修改它变得相对容易,让它变得更漂亮,例如,在屏幕上有一个ASCII条:
Now that we know how to make a self-updating progress bar using Ansi escape codes to control the terminal, it becomes relatively easy to modify it to be fancier, e.g. having a ASCII bar that goes across the screen:
import time, sys
def loading():
    print "Loading..."
    for i in range(0, 100):
        time.sleep(0.1)
        width = (i + 1) / 4
        bar = "[" + "#" * width + " " * (25 - width) + "]"
        sys.stdout.write(u"\u001b[1000D" +  bar)
        sys.stdout.flush()
    print

loading()
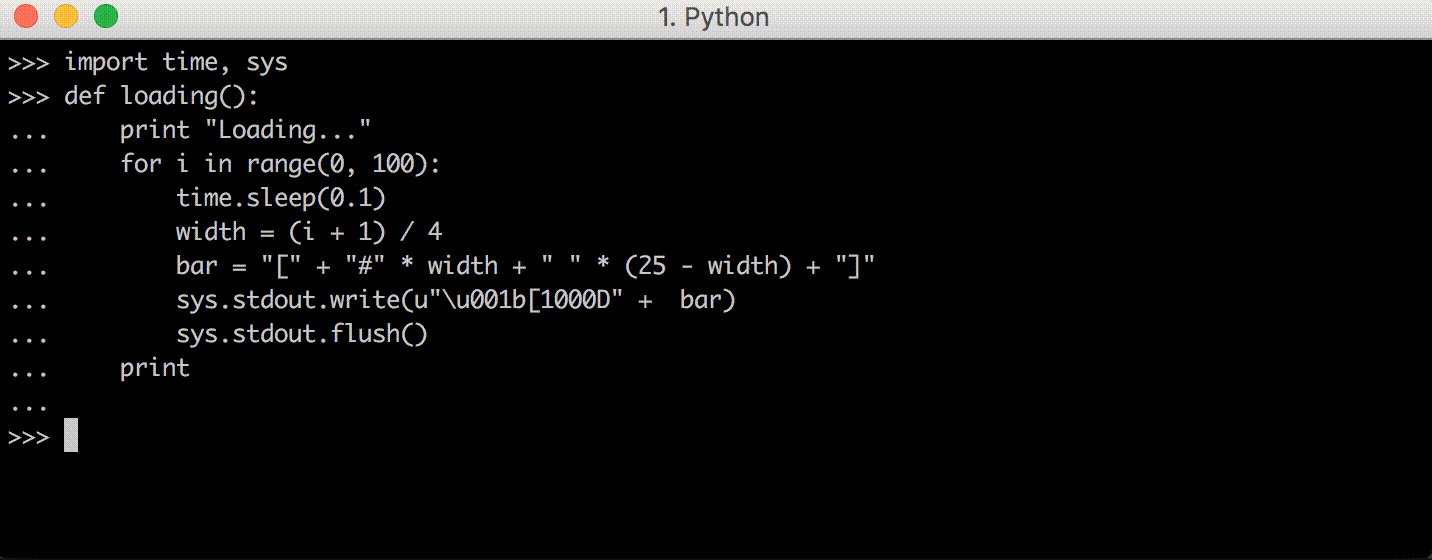
这与您所期望的一样:每次循环迭代,整个行都会被擦除,并绘制新版本的ASCII条。
This works as you would expect: every iteration of the loop, the entire row is erased and a new version of the ASCII bar is drawn.
我们甚至可以使用向上和向下光标移动,让我们一次绘制多个进度条:
We could even use the Up and Down cursor movements to let us draw multiple progress bars at once:
import time, sys, random
def loading(count):
    all_progress = [0] * count
    sys.stdout.write("\n" * count) # Make sure we have space to draw the bars
    while any(x < 100 for x in all_progress):
        time.sleep(0.01)
        # Randomly increment one of our progress values
        unfinished = [(i, v) for (i, v) in enumerate(all_progress) if v < 100]
        index, _ = random.choice(unfinished)
        all_progress[index] += 1

        # Draw the progress bars
        sys.stdout.write(u"\u001b[1000D") # Move left
        sys.stdout.write(u"\u001b[" + str(count) + "A") # Move up
        for progress in all_progress:
            width = progress / 4
            print "[" + "#" * width + " " * (25 - width) + "]"

loading()
在这个代码片段中,我们必须做一些之前没有做的事情:
- 确保我们有足够的空间来绘制进度条!这是通过在函数启动时写入’ “\n” * count '来完成的。这将创建一系列换行符,使终端滚动,确保在终端底部有精确的“count”空白行,以便在其上呈现进度条
- 模拟多个正在进行的事情与’ all_progress '数组,并有不同的插槽在该数组随机填充
- 使用Up ansi代码每次移动光标’ count ‘行,这样我们就可以每行打印’ count '进度条
In this snippet, we have to do several things we did not do earlier:
- Make sure we have enough space to draw the progress bars! This is done by writing
"\n" * countwhen the function starts. This creates a series of newlines that makes the terminal scroll, ensuring that there are exactlycountblank lines at the bottom of the terminal for the progress bars to be rendered on- Simulated multiple things in progress with the
all_progressarray, and having the various slots in that array fill up randomly- Used the Up ansi code to move the cursor
countlines up each time, so we can then print thecountprogress bars one per linee
效果如下:
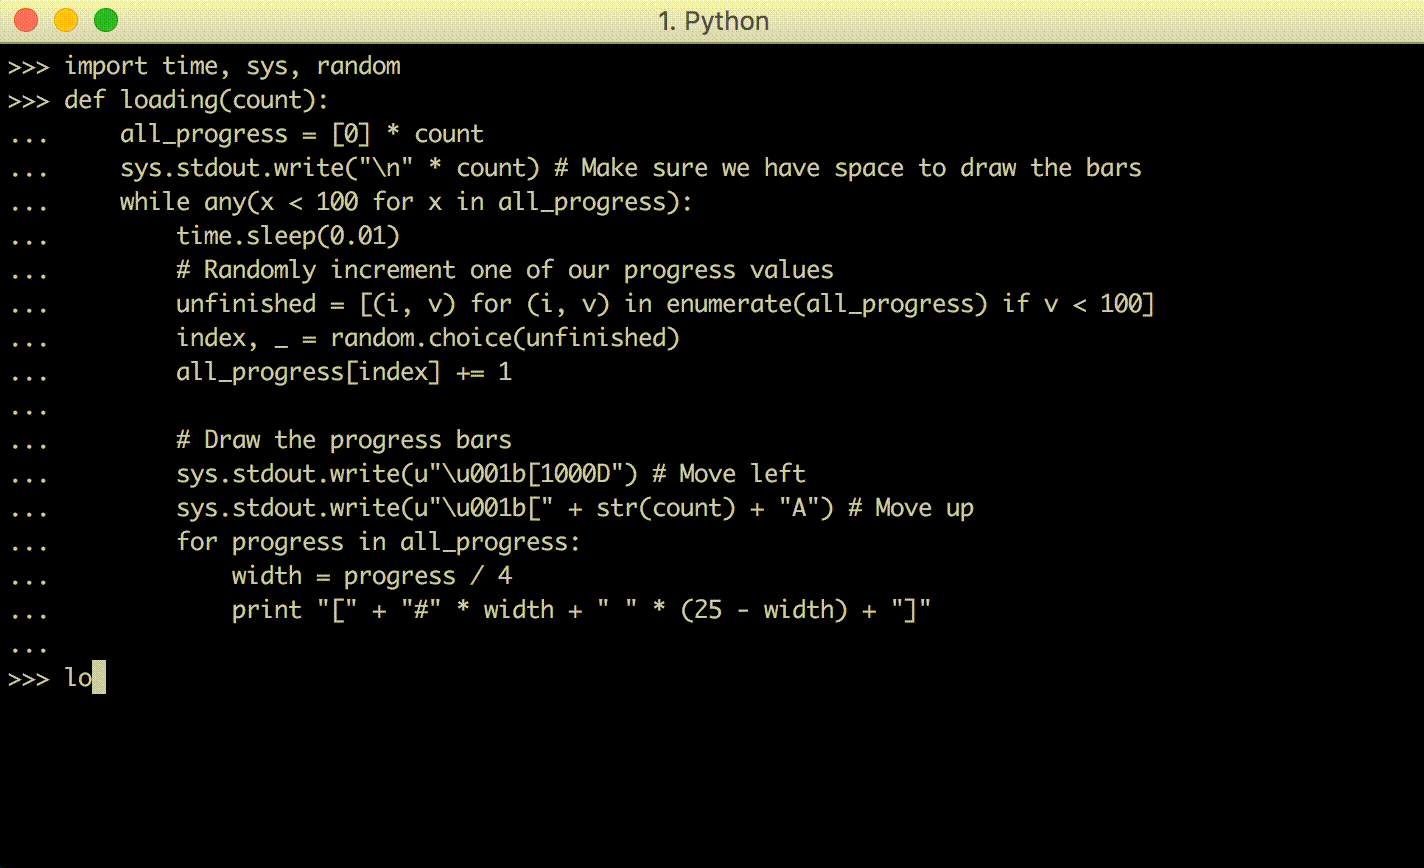
也许下次在编写并行下载大量文件的命令行应用程序时,或者在执行类似的并行任务时,可以编写类似的基于ansi -escape代码的进度条,这样用户就可以看到他们的命令是如何执行的。
Perhaps next time you are writing a command line application that’s downloading lots of files in parallel, or doing some similar kind of parallel task, you could write a similar Ansi-escape-code-based progress bar so the user can see how their command is progressing.
当然,到目前为止,所有这些进度提示都是假的:它们并没有真正监控任何任务的进度。尽管如此,它们演示了如何使用Ansi转义码在您编写的任何命令行程序中放置动态进度指示器,因此,当您“确实”有可以监视其进度的东西时,您现在可以在其上放置花哨的实时更新进度条。
Of course, all these progress prompts so far are fake: they’re not really monitoring the progress of any task. Nevertheless, they demonstrate how you can use Ansi escape codes to put a dynamic progress indicator in any command-line program you write, so when you do have something whose progress you can monitor, you now have the ability to put fancy live-updating progress bars on it.
编写命令行(Writing a Command Line)
使用Ansi转义码可以做的更奇特的事情之一是实现命令行。Bash、Python和Ruby都有自己的内置命令行,可以让您在提交命令执行之前输入命令并编辑其文本。虽然它看起来很特殊,但实际上这个命令行只是另一个通过Ansi转义码与终端交互的程序!既然我们知道如何使用Ansi转义码,我们也可以这样做,并编写自己的命令行。
One of the more fancy things you might do with Ansi escape codes is to implement a command-line. Bash, Python, Ruby, all have their own in-built command line that lets you type out a command and edit its text before submitting it for execution. While it may seem special, in reality this command line is just another program that interacts with the terminal via Ansi escape codes! Since we know how to use Ansi escape codes, we can do it too and write our own command line.
用户输入(User Input)
对于命令行,我们必须做的第一件事(到目前为止还没有做过)是获取用户输入。这可以用下面的代码完成:
The first thing we have to do with a command-line, which we haven’t done so far, is to take user input. This can be done with the following code:
import sys, tty
def command_line():
    tty.setraw(sys.stdin)
    while True:
        char = sys.stdin.read(1)
        if ord(char) == 3: # CTRL-C
            break;
        print ord(char)
        sys.stdout.write(u"\u001b[1000D") # Move all the way left
实际上,我们使用 setraw 来确保我们的原始字符输入直接进入我们的进程(没有回显或缓冲或任何东西),然后读取并回显我们看到的字符代码,直到出现’ 3 '(这是 CTRL-C,现有REPL的常用命令)。自从我们 tty.setraw print 不再将光标重置到左边,所以我们需要在每次print之后手动向左移动 \u001b[1000D 。
In effect, we use
setrawto make sure our raw character input goes straight into our process (without echoing or buffering or anything), and then reading and echoing the character-codes we see until3appears (which isCTRL-C, the common command for existing a REPL). Since we’ve turned ontty.setraw\u001b[1000Dafter each
如果你在Python提示符中运行这个(CTRL-C退出)并尝试键入一些字符,你会看到:
AZ‘65’‘90’,‘‘“Z”是“97”“122”- 事实上,从
32到126的每个字符都代表一个可打印字符 - (左,右,上,下)是(
27 91 68,27 91 67,27 91 65,27 91 66)。这可能因终端和操作系统的不同而有所不同。 - 输入是
13或10(不同的计算机不同),退格是127
If you run this in the Python prompt (
CTRL-Cto exit) and try hitting some characters, you will see that:
AtoZare65to90,atozare97to122In fact, every character from to
126represents a Printable Character(Left, Right, Up, Down) are (
27 91 68,27 91 67,27 91 65,27 91 66). This might vary based on your terminal and operating system.Enter is
13or10(it varies between computers), Backspace is127
因此,我们可以尝试创建第一个简单地回显用户输入的命令行:
- 当用户按下可打印字符时,打印该字符
- 当用户按下“Enter”键时,将此时的用户输入内容打印出来,再加一行,然后开始新的空输入。
- 当用户按退格键时,在光标所在的位置删除一个字符
- 当用户按下箭头键时,使用上面看到的Ansi转义码将光标向左或向右移动
Thus, we can try making our first primitive command line that simply echoes whatever the user typed:
- When the user presses a printable character, print it
- When the user presses Enter, print out the user input at that point, a new line, and start a new empty input.
- When a user presses Backspace, delete one character where-ever the cursor is
- When the user presses an arrow key, move the cursor Left or Right using the Ansi escape codes we saw above
这显然是大大简化了的;我们甚至还没有涵盖所有不同种类的ASCII字符,更不用说所有的Unicode的东西!然而,对于一个简单的概念验证来说,这已经足够了。
This is obviously greatly simplified; we haven’t even covered all the different kinds of ASCII characters that exist, nevermind all the Unicode stuff! Nevertheless it will be sufficient for a simple proof-of-concept.
基础命令行(A Basic Command Line)
首先,让我们先实现前两个特性:
- 当用户按下可打印字符时,打印该字符
- 当用户按下“Enter”键时,将此时的用户输入内容打印出来,再加一行,然后开始新的空输入。
To begin with, let’s first implement the first two features:
- When the user presses a printable character, print it
- When the user presses Enter, print out the user input at that point, a new line, and start a new empty input.
没有退格,没有键盘导航,这些都没有。那可以以后再说。
No Backspace, no keyboard navigation, none of that. That can come later.
它的代码看起来像这样:
The code for that comes out looking something like this:
import sys, tty

def command_line():
    tty.setraw(sys.stdin)
    while True: # loop for each line
    # Define data-model for an input-string with a cursor
        input = ""
        while True: # loop for each character
            char = ord(sys.stdin.read(1)) # read one char and get char code

            # Manage internal data-model
            if char == 3: # CTRL-C
                return
            elif 32 <= char <= 126:
                input = input + chr(char)
            elif char in {10, 13}:
                sys.stdout.write(u"\u001b[1000D")
                print "\nechoing... ", input
                input = ""

            # Print current input-string
            sys.stdout.write(u"\u001b[1000D")  # Move all the way left
            sys.stdout.write(input)
            sys.stdout.flush()
注意,我们如何使它工作 :
Note how we
And you can see it working:
正如我们所预料的那样,方向键不起作用,导致打印出奇怪的’ [D [A [C [B] '字符,这与我们上面看到的箭头键代码相对应。我们接下来会让它工作。不过,我们可以输入文本,然后按enter键提交。
As we’d expect, arrow keys don’t work and result in odd [D [A [C [B characters being printed, which correspond to the arrow key codes we saw above. We will get that working next. Nevertheless, we can enter text and then submit it with Enter.
将其粘贴到您自己的Python提示符中以尝试它!
Paste this into your own Python prompt to try it out!
光标导航(Cursor Navigation)
下一步是让用户使用方向键移动光标。这是Bash、Python和其他命令行默认提供的,但由于我们在这里实现自己的命令行,因此必须自己完成。我们知道箭头键左和右对应于字符代码’ 27 91 68 ‘,’ 27 91 67 ‘的序列,所以我们可以放入代码来检查这些并适当地移动光标’ index '变量
The next step would be to let the user move the cursor around using arrow-keys. This is provided by default for Bash, Python, and other command-lines, but as we are implementing our own command line here we have to do it ourselves. We know that the arrow keys Left and Right correspond to the sequences of character-codes
27 91 68,27 91 67, so we can put in code to check for those and appropiately move the cursorindexvariable
import sys, tty

def command_line():
    tty.setraw(sys.stdin)
    while True: # loop for each line
    # Define data-model for an input-string with a cursor
        input = ""
        index = 0
        while True: # loop for each character
            char = ord(sys.stdin.read(1)) # read one char and get char code

            # Manage internal data-model
            if char == 3: # CTRL-C
                return
            elif 32 <= char <= 126:
                input = input[:index] + chr(char) + input[index:]
                index += 1
            elif char in {10, 13}:
                sys.stdout.write(u"\u001b[1000D")
                print "\nechoing... ", input
                input = ""
                index = 0
            elif char == 27:
                next1, next2 = ord(sys.stdin.read(1)), ord(sys.stdin.read(1))
                if next1 == 91:
                    if next2 == 68: # Left
                        index = max(0, index - 1)
                    elif next2 == 67: # Right
                        index = min(len(input), index + 1)

            # Print current input-string
            sys.stdout.write(u"\u001b[1000D") # Move all the way left
            sys.stdout.write(input)
            sys.stdout.write(u"\u001b[1000D") # Move all the way left again
            if index > 0:
                sys.stdout.write(u"\u001b[" + str(index) + "C") # Move cursor too index
            sys.stdout.flush()
三个主要变化是:
- 我们现在维护一个
index变量。在此之前,光标总是在“输入”的右端,因为你不能使用方向键将其向左移动,并且新的输入总是附加在右端。现在,我们需要保持一个单独的“索引”,不一定在“输入”的末尾,当用户输入一个字符时,我们将它拼接到“输入”的正确位置。 - 我们检查“char == 27”,然后检查接下来的两个字符,以识别左和**右*箭头键,并增加/减少光标的“索引”(确保将其保持在“输入”字符串内)。
- 写完
input后,我们现在必须手动将光标向左移动,并向右移动光标index对应的正确字符数。在此之前,光标总是位于“输入”的最右侧,因为方向键不起作用,但现在光标可以在任何地方。
The three main changes are:
- We now maintain an
indexvariable. Previously, the cursor was always at the right-end of theinput, since you couldn’t use arrow keys to move it left, and new input was always appended at the right-end. Now, we need to keep a separateindexwhich is not necessarily at the end of theinput, and when a user enters a character we splice it into theinputin the correct location.- We check for
char == 27, and then also check for the next two characters to identify the Left and *Right arrow keys, and increment/decrement theindexof our cursor (making sure to keep it within theinputstring.- After writing the
input, we now have to manually move the cursor all the way to the left and move it rightward the correct number of characters corresponding to our cursorindex. Previously the cursor was always at the right-most point of ourinputbecause arrow keys didn’t work, but now the cursor could be anywhere.
As you can see, it works:
要使Home和End(或Fn-Left和Fn-Right)工作,以及类似bash的快捷方式(如Esc-f和Esc-B)工作,需要付出更多的努力,但原则上这些都没有什么困难:您只需要写下它们产生的代码序列,就像我们在本节开始时所做的那样(https://www.lihaoyi.com/post/BuildyourownCommandLinewithANSIescapecodes.html#writing-a-command-line),并使它们适当地改变我们的光标index。
It would take more effort to make Home and End (or Fn-Left and Fn-Right) work, as well as Bash-like shortcuts like Esc-f and Esc-B, but there’s nothing in principle difficult about those: you just need to write down the code-sequences they produce the same way we did at the start of this section, and make them change our cursor
indexappropriately.
删除(Deletion)
在我们的功能列表中,最后一件要实现的事情是删除:使用退格应该导致光标前面的一个字符消失,并将光标向左移动1。这可以通过插入如下代码
The last thing on our feature list to implement is deletion: using Backspace should cause one character before the cursor to disappear, and move the cursor left by 1. This can be done naively by inserting an
+ elif char == 127:
+     input = input[:index-1] + input[index:]
+     index -= 1
如上,在条件句中。它将在某种程度上起作用,但并不完全像预期的那样,效果如下:
Into our conditional. This works, somewhat, but not entirely as expected:
正如您所看到的,删除工作,在我删除字符后,当我按Enter提交时,它们不再向我返回。然而,即使我删除了它们,这些角色仍然坐在屏幕上!至少在它们被new字符覆盖之前是这样,正如上面例子中的第三行所示。
As you can see, the deletion works, in that after I delete the characters, they are no longer echoed back at me when I press Enter to submit. However, the characters are still sitting their on screen even as I delete them! At least until they are over-written with new characters, as can be seen in the third line in the above example.
问题是,到目前为止,我们从来没有真正清除过整行:我们总是假设新字符的字符串会更长,并覆盖它们,只是将新字符写在旧字符上。一旦我们可以删除字符,这就不再是真的了。
The problem is that so far, we have never actually cleared the entire line: we’ve always just written the new characters over the old characters, assuming that the string of new characters would be longer and over-write them. This is no longer true once we can delete characters.
修复方法是使用Clear Line Ansi转义码\u001b[0K,这是一组Ansi转义码之一,可以让您清除终端的各个部分:
- Clear Screen:
\u001b[{n}J清空屏幕n=0清除光标直到屏幕结束,n=1清除从光标到屏幕开始的位置n=2清除整个屏幕
- 清除行:
\u001b[{n}K清除当前行n=0清除从游标到行尾的内容n=1清除从游标到行首的位置n=2清除整行
A fix is to use the Clear Line Ansi escape code
\u001b[0K, one of a set of Ansi escape codes which lets you clear various portions of the terminal:
- Clear Screen :
\u001b[{n}Jclears the screenn=0clears from cursor until end of screen,n=1clears from cursor to beginning of screenn=2clears entire screen- Clear Line :
\u001b[{n}Kclears the current linen=0clears from cursor to end of linen=1clears from cursor to start of linen=2clears entire line
关键代码如下:
This particular code:
+ sys.stdout.write(u"\u001b[0K")
清除从光标到行尾的所有字符。这让我们确保当我们删除并重新打印较短的输入时,我们没有覆盖的任何“剩余”文本仍然从屏幕上被正确清除。
Clears all characters from the cursor to the end of the line. That lets us make sure that when we delete and re-print a shorter input after that, any “leftover” text that we’re not over-writing still gets properly cleared from the screen.
最后的代码看起来像:
The final code looks like:
import sys, tty

def command_line():
    tty.setraw(sys.stdin)
    while True: # loop for each line
    # Define data-model for an input-string with a cursor
        input = ""
        index = 0
        while True: # loop for each character
            char = ord(sys.stdin.read(1)) # read one char and get char code

            # Manage internal data-model
            if char == 3: # CTRL-C
                return
            elif 32 <= char <= 126:
                input = input[:index] + chr(char) + input[index:]
                index += 1
            elif char in {10, 13}:
                sys.stdout.write(u"\u001b[1000D")
                print "\nechoing... ", input
                input = ""
                index = 0
            elif char == 27:
                next1, next2 = ord(sys.stdin.read(1)), ord(sys.stdin.read(1))
                if next1 == 91:
                    if next2 == 68: # Left
                        index = max(0, index - 1)
                    elif next2 == 67: # Right
                        index = min(len(input), index + 1)
            elif char == 127:
                input = input[:index-1] + input[index:]
                index -= 1
            # Print current input-string
            sys.stdout.write(u"\u001b[1000D") # Move all the way left
            sys.stdout.write(u"\u001b[0K")    # Clear the line
            sys.stdout.write(input)
            sys.stdout.write(u"\u001b[1000D") # Move all the way left again
            if index > 0:
                sys.stdout.write(u"\u001b[" + str(index) + "C") # Move cursor too index
            sys.stdout.flush()
如果将其粘贴到命令行中,它就可以工作了!
And i you paste this into the command-line, it works!
在这一点上,值得放入一些 sys.stdout.flush();Time.sleep(0.2);在代码中,在每个sys.stdout之后。写一下,看看它是否有效。如果你这样做,你会看到这样的东西:
At this point, it’s worth putting some
sys.stdout.flush(); time.sleep(0.2);s into the code, after everysys.stdout.write, just to see it working. If you do that, you will see something like this:
很明显,每次你输入一个字符,
- 光标移动到行
sys.stdout.write(u"\u001b[1000D")的开始 - 一行被清除
sys.stdout.write(u"\u001b[0K") - 当前输入写入
sys.stdout.write(input) - 光标再次移动到行
sys.stdout.write(u"\u001b[1000D")的开头 - 将光标移动到正确的索引“sys.stdout”上。write(u"\u001b[" + str(index) + “C”) `
Where it is plainly obvious each time you enter a character,
- The cursor moves to the start of the line
sys.stdout.write(u"\u001b[1000D")- The line is cleared
sys.stdout.write(u"\u001b[0K")- The current input is written
sys.stdout.write(input)- The cursor is moved again to the start of the line
sys.stdout.write(u"\u001b[1000D")- The cursor is moved to the correct index
sys.stdout.write(u"\u001b[" + str(index) + "C")
通常,当您使用这段代码时,当调用.flush()时,这一切都会立即发生。然而,看到实际发生了什么仍然是有价值的,这样您就可以在它工作时理解它,并在它行为不正常时调试它!
Normally, when you are using this code, it all happens instantly when
.flush()is called. However, it is still valuable to see what is actually going on, so that you can understand it when it works and debug it when it misbehaves!
完整性?(Completeness?)
现在我们有了一个最小的命令行,我们自己用’ sys.stdin ‘实现了它。读取’和’ sys.stdout。,使用ANSI转义码来控制终端。它缺少了“标准”命令行提供的许多功能和热键,例如:
We now have a minimal command-line, implemented ourselves using
sys.stdin.readandsys.stdout.write, using ANSI escape codes to control the terminal. It is missing out a lot of functionality and hotkeys that “standard” command-lines provide, things like:
Alt-fto move one word rightAlt-bto move one word leftAlt-Backspaceto delete one word on the left- …many other command command-line hotkeys, some of which are listed here
目前还不够强大,无法处理多行输入字符串、单行输入字符串,这些字符串足够长,可以换行,或者向用户显示可定制的提示。
And currently isn’t robust enough to work with e.g. multi-line input strings, single-line input strings that are long enough to wrap, or display a customizable prompt to the user.
然而,实现对这些热键的支持和对各种边缘情况输入的健壮性只是更多的相同:选择一个不工作的用例,并找出内部逻辑和ANSI转义码的正确组合,以使终端的行为像我们期望的那样。
Nevertheless, implementing support for those hotkeys and robustness for various edge-case inputs is just more of the same: picking a use case that doesn’t work, and figuring out the right combination of internal logic and ANSI escape codes to make the terminal behave as we’d expect.
还有其他有用的终端命令;维基百科的转义码表是一个很好的清单(表中的CSI对应于我们代码中的\u001b),但这里有一些有用的:
There are other terminal commands that would come in useful; Wikipedia’s table of escape codes is a good listing (the CSI in that table corresponds to the
\u001bin our code) but here are some useful ones:
-
Up:
\u001b[{n}Amoves cursor up byn -
Down:
\u001b[{n}Bmoves cursor down byn -
Right:
\u001b[{n}Cmoves cursor right byn -
Left:
\u001b[{n}Dmoves cursor left byn -
Next Line:
\u001b[{n}Emoves cursor to beginning of linenlines down -
Prev Line:
\u001b[{n}Fmoves cursor to beginning of linenlines down -
Set Column:
\u001b[{n}Gmoves cursor to columnn -
Set Position:
\u001b[{n};{m}Hmoves cursor to rowncolumnm -
Clear Screen:
\u001b[{n}Jclears the screenn=0clears from cursor until end of screen,n=1clears from cursor to beginning of screenn=2clears entire screen
-
Clear Line :
\u001b[{n}Kclears the current linen=0clears from cursor to end of linen=1clears from cursor to start of linen=2clears entire line
-
Save Position:
\u001b[{s}saves the current cursor position -
Save Position:
\u001b[{u}restores the cursor to the last saved position
这些是在尝试控制光标和终端时可用的一些工具,它们可以用于各种各样的事情:实现终端游戏、命令行、文本编辑器(如Vim或Emacs)以及其他事情。虽然有时会混淆控制代码到底在做什么,但加上time.sleep。每个控制代码之后是睡眠。所以现在,让我们称之为“done”……
These are some of the tools you have available when trying to control the cursor and terminal, and can be used for all sorts of things: implementing terminal games, command-lines, text-editors like Vim or Emacs, and other things. Although it is sometimes confusing what exactly the control codes are doing, adding
time.sleeps after each control code. So for now, let’s call this “done”…
Customizing your Command Line
如果您已经做到了这一点,那么您已经完成了为输出着色、编写各种动态进度指示器以及最后使用Ansi转义码编写一个简短的命令行,该命令行将用户输入回显给它们。您可能会认为这三个任务的用处是按降序排列的:彩色输入很酷,但是当每种编程语言都有命令行时,谁还需要实现自己的命令行呢?有很多库,如Readline或JLine,可以为您做这些?
If you’ve reached this far, you’ve worked through colorizing your output, writing various dynamic progress indicators, and finally writing a small, bare-bones command line using Ansi escape codes that echoes user input back at them. You may think these three tasks are in descending order of usefulness: colored input is cool, but who needs to implement their own command-line when every programming language already has one? And there are plenty of libraries like Readline or JLine that do it for you?
事实证明,在2016年,仍然有重新实现您自己的命令行的有效用例。许多现有的命令行库不是很灵活,不能支持像语法高亮显示输入这样的基本用例。如果你想要在网页/桌面程序中常见的界面,比如下拉菜单或Shift-Left和Shift-Right来突出显示和选择程序的部分。
It turns out, that in 2016, there still are valid use cases for re-implementing your own command-line. Many of the existing command-line libraries aren’t very flexible, and can’t support basic use cases like syntax-highlighting your input. If you want interfaces common in web/desktop programs, like drop-down menus or
Shift-LeftandShift-Rightto highlight and select parts of your input, most existing implementations will leave you out of luck.
然而,现在我们有了自己的从头开始的实现,语法高亮显示就像在input 字符串上调用 syntax_highlight 函数一样简单,以便在打印字符串之前添加必要的颜色代码:
However, now that we have our own from-scratch implementation, syntax highlighting is as simple as calling a
syntax_highlightfunction on ourinputstring to add the necessary color-codes before printing it:
+            sys.stdout.write(syntax_highlight(input))
-            sys.stdout.write(input)
为了演示,我将使用一个虚拟语法高亮器来突出显示末尾的空白;这是许多程序员讨厌的。
To demonstrate I’m just going to use a dummy syntax highlighter that highlights trailing whitespace; something many programmers hate.
简单如下:
That’s as simple as:
def syntax_highlight(input):
   stripped = input.rstrip()
   return stripped + u"\u001b[41m" + " " *  (len(input) - len(stripped)) + u"\u001b[0m"
然后您就得到如下效果:
And there you have it!
同样,这是一个最小的示例,但您可以想象将这个syntax_highlight实现替换为pyments之类的东西,它可以在您将为其编写命令行的几乎任何编程语言上执行真正的语法高亮显示。就像这样,我们在几行Python代码中添加了可定制的语法高亮显示。不坏!
Again, this is a minimal example, but you could imagine swapping out this
syntax_highlightimplementation for something like Pygments, which can perform real syntax highlighting on almost any programming language you will be writing a command-line for. Just like that, we’ve added customizable syntax highlighting in just a few lines of Python code. Not bad!
下面是完整的代码,如果你想复制粘贴它自己试试:
The complete code below, if you want to copy-paste it to try it out yourself:
import sys, tty
def syntax_highlight(input):
    stripped = input.rstrip()
    return stripped + u"\u001b[41m" + " " *  (len(input) - len(stripped)) + u"\u001b[0m"

def command_line():
    tty.setraw(sys.stdin)
    while True: # loop for each line
        # Define data-model for an input-string with a cursor
        input = ""
        index = 0
        while True: # loop for each character
            char = ord(sys.stdin.read(1)) # read one char and get char code

            # Manage internal data-model
            if char == 3: # CTRL-C
                return
            elif 32 <= char <= 126:
                input = input[:index] + chr(char) + input[index:]
                index += 1
            elif char in {10, 13}:
                sys.stdout.write(u"\u001b[1000D")
                print "\nechoing... ", input
                input = ""
                index = 0
            elif char == 27:
                next1, next2 = ord(sys.stdin.read(1)), ord(sys.stdin.read(1))
                if next1 == 91:
                    if next2 == 68: # Left
                        index = max(0, index - 1)
                    elif next2 == 67: # Right
                        index = min(len(input), index + 1)
            elif char == 127:
                input = input[:index-1] + input[index:]
                index -= 1
            # Print current input-string
            sys.stdout.write(u"\u001b[1000D")
            sys.stdout.write(u"\u001b[0K")
            sys.stdout.write(syntax_highlight(input))
            sys.stdout.write(u"\u001b[1000D")
            if index > 0:
                sys.stdout.write(u"\u001b[" + str(index) + "C")
            sys.stdout.flush()
除了语法突出显示之外,现在我们有了自己的相对简单的diy命令行,整个可能性空间就打开了:创建下拉菜单只需要将光标导航到正确的位置并打印正确的内容。实现Shift-Left 和 Shift-Right 用于强调和选择文本只是一种识别正确的输入代码(27 91 49 59 50 68 和27 91 49 59 50 67 Mac-OSX / iTerm)和应用部分(背景色)(https://www.lihaoyi.com/post/BuildyourownCommandLinewithANSIescapecodes.html背景颜色)或(逆转)(https://www.lihaoyi.com/post/BuildyourownCommandLinewithANSIescapecodes.html)装饰片段之前印刷的颜色。
Apart from syntax-highlighting, now that we have our own relatively-simple DIY-command-line, a whole space of possibilities opens up: creating drop-down menus is just a matter of navigating the cursor into the right place and printing the right things. Implementing
Shift-LeftandShift-Rightto highlight and select text is just a matter of recognizing the correct input codes (27 91 49 59 50 68and27 91 49 59 50 67on Mac-OSX/iTerm) and applying some background color or reversing the colors for that snippet before printing.
它的实现可能很繁琐,但很简单:一旦熟悉了可以用来与终端交互的基本Ansi代码,您想要的任何特性都只是编写代码的问题。
It may be tedious to implement, but it’s all straightforward: once you’re familiar with the basic Ansi codes you can use to interact with the terminal, any feature you want is just a matter of writing the code to make it happen.
结论(Conclusion)
这种与命令行程序的“丰富”交互是大多数传统命令行程序和库所缺乏的。向Readline添加语法高亮显示肯定需要四行以上的代码!但是有了你自己的实现,一切皆有可能。
This sort of “rich” interaction to your command-line programs is something that most traditional command-line programs and libraries lack. Adding syntax highlighting to Readline would definitely take more than four lines of code! But with your own implementation, everything is possible.
最近,出现了一波新的命令行库,如Python Prompt Toolkit, Fish Shell和aminite Scala REPL(我自己的项目),它们提供了比传统的Readline/JLine基于命令行更丰富的命令行体验,具有语法突出显示输入和多行编辑等功能:
More recently, there are a new wave of command-line libraries like the Python Prompt Toolkit, the Fish Shell and the Ammonite Scala REPL (My own project) that provide a richer command-line experience than traditional Readline/JLine based command-lines, with features like syntax-highlighted input and multi-line editing:
桌面风格的“Shift-Left”/“Shift-Right”选择,ide风格的块缩进或缩进,使用“Tab”和“Shift-Tab”:
And desktop-style
Shift-Left/Shift-Rightselection, and IDE-style block-indenting or de-denting withTabandShift-Tab:
要构建这样的工具,您自己需要了解可以直接与终端进行交互的各种方法。虽然我们上面实现的最小命令行显然是不完整和不健壮的,但是充实大多数人期望命令行具有的几十个特性是直接的(如果乏味的话)。在此之后,您就可以与现有的库保持一致,并且可以自由地实现更多的功能和丰富的交互,而不是像Readline/Jline这样的现有库所提供的功能。
To build tools like that, you yourself need to understand the various ways you can directly interface with the terminal. While the minimal command-line we implemented above is obviously incomplete and not robust, it is straightforward (if tedious) to flesh out the few-dozen features most people expect a command-line to have. After that, you’re on par with what’s out there, and you are free to implement more features and rich interactions beyond what existing libraries like Readline/Jline provide.
也许你想为一种没有REPL的语言实现一个新的[REPL](https://en.wikipedia.org/wiki/Read -eval-print_loop) ?也许你想写一个更好的REPL来取代现有的REPL,用更丰富的功能和交互?也许你喜欢Python提示工具包为在Python中编写丰富的命令行提供的功能,并希望在Javascript中具有相同的功能?或者您已经决定实现自己的命令行文本编辑器,如[Vim](https://en.wikipedia.org/wiki/Vim_(text_editor)或Emacs,但更好?
Perhaps you want to implement a new REPL for a language that doesn’t have one? Perhaps you want to write a better REPL to replace an existing one, with richer features and interactions? Perhaps you like what the Python Prompt Toolkit provides for writing rich command-lines in Python, and want the same functionality in Javascript? Or perhaps you’ve decided to implement your own command-line text editor like Vim or Emacs, but better?
事实证明,学习足够多的Ansi转义码来实现您自己的富终端接口并不像最初看起来那么困难。使用相对较少的控制命令,您可以实现自己的丰富命令行界面,并为软件工程领域中相对落后的领域带来进步。
It turns out, learning enough about Ansi escape codes to implement your own rich terminal interface is not nearly as hard as it may seem initially. With a relatively small number of control commands, you can implement your own rich command-line interfaces, and bring progress to what has been a relatively backward field in the world of software engineering.
您是否发现自己需要在命令行程序中使用这些Ansi转义码?对什么?请在下面的评论中告诉我们!
Have you ever found yourself needing to use these Ansi escape codes as part of your command-line programs? What for? Let us know in the comments below!
原文: [Build your own Command Line with ANSI escape codes](Build your own Command Line with ANSI escape codes (lihaoyi.com))
本文虽然是使用 python 示例,但是很容易修改为 shell 或其他语言的实现。
例如 shell 中的实现
echo -e "\033[34;41mThis is blue text with red background\033[0m"