充分利用每一个监听者
需要充分利用每一个消费者,需要在配置文件中加上prefetch配置并设置为1
rabbitmq:
  listener:
    simple:
      prefetch: 1 # 每次只能获取一条消息,处理完成才能获取下一个消息
创建交换机和队列
创建队列
"fanout.queue1":队列的名称,这里是 “fanout.queue1”。false:指示队列是否是持久化的。如果设置为true,则表示队列会在 RabbitMQ 服务器重启后仍然存在。如果设置为false,则表示队列是非持久化的,即在 RabbitMQ 服务器重启后会被删除。false:指示队列是否是独占的。如果设置为true,则表示只有声明该队列的连接可以使用它。如果设置为false,则表示其他连接也可以使用该队列。true:指示队列是否会自动删除。如果设置为true,则表示当没有消费者连接到该队列时,队列会自动删除。如果设置为false,则表示队列不会自动删除。
import org.springframework.amqp.core.Queue;
import org.springframework.amqp.core.QueueBuilder;
import org.springframework.context.annotation.Bean;
import org.springframework.context.annotation.Configuration;

@Configuration
public class CreateFanoutQueue {
 	@Bean
    public Queue fanoutQueue1() {
        QueueBuilder.durable("fanout").build();
        return new Queue("fanout.queue1", false, false, true);
    }
}
创建交换机
name:交换机的名称。durable:指示交换机是否是持久化的。如果设置为true,则表示 RabbitMQ 服务器重启后仍然存在。如果设置为false,则表示交换机是非持久化的,即在 RabbitMQ 服务器重启后会被删除。在你的代码中,durable参数被设置为false,表示这个交换机是非持久化的。autoDelete:指示交换机是否是自动删除的。如果设置为true,则表示当没有与之绑定的队列时,交换机会自动删除。如果设置为false,则表示交换机不会自动删除。在你的代码中,autoDelete参数被设置为false,表示这个交换机不会自动删除。
@Configuration
public class CreateFanoutExchange {

    /**
     * 创建永久交换机,必须要设置是否自动删除
     *
     * @return Fanout类型交换机
     */
    @Bean
    public FanoutExchange fanoutExchange2() {
        return new FanoutExchange("bunny.fanout2", false, false);
    }
}
注解创建交换机和队列
bindings:用于定义队列和交换机之间的绑定关系。在你的代码中,通过@QueueBinding注解来定义了一个队列绑定。该绑定包括一个名为 “fanout.queue3” 的队列和一个名为 “bunny.fanout” 的交换机之间的绑定关系。value:用于指定队列的属性。在你的代码中,通过@Queue注解来指定了队列的名称为 “fanout.queue3”,并设置了durable = "true",表示该队列是持久化的。exchange:用于指定交换机的属性。在你的代码中,通过@Exchange注解来指定了交换机的名称为 “bunny.fanout”,类型为ExchangeTypes.FANOUT,并设置了durable = "true",表示该交换机是持久化的。
import lombok.extern.slf4j.Slf4j;
import org.springframework.amqp.core.ExchangeTypes;
import org.springframework.amqp.rabbit.annotation.Exchange;
import org.springframework.amqp.rabbit.annotation.Queue;
import org.springframework.amqp.rabbit.annotation.QueueBinding;
import org.springframework.amqp.rabbit.annotation.RabbitListener;
import org.springframework.stereotype.Component;

@Component
@Slf4j
public class FanoutListener {
    @RabbitListener(bindings = @QueueBinding(
            value = @Queue(name = "fanout.queue3", durable = "true"),
            exchange = @Exchange(name = "bunny.fanout", type = ExchangeTypes.FANOUT, durable = "true")
    ))
    public void listenFanoutQueue3(String message) {
        System.out.println("消费者3接收到Fanout消息:【" + message + "】");
    }
}
交换机类型与作用
- Fanout:广播,将消息交给所有绑定到交换机的队列。我们最早在控制台使用的正是 Fanout 交换机
- Direct:订阅,基于 RoutingKey(路由 key)发送给订阅了消息的队列
- Topic:通配符订阅,与 Direct 类似,只不过 RoutingKey 可以使用通配符
Fanout交换机
[!important]
- 接收publisher发送的消息
- 将消息按照规则路由到与之绑定的队列
- 不能缓存消息,路由失败,消息丢失
- FanoutExchange的会将消息路由到每个绑定的队列
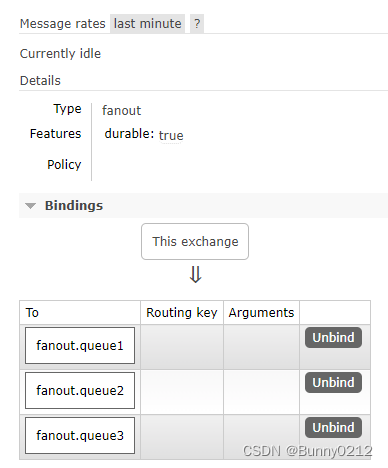
无特殊功能,当队列发送消息和接受消息时,只能发送到交换机, 交换机把消息发送给绑定过的所有队列, 订阅队列的消费者都能拿到消息。
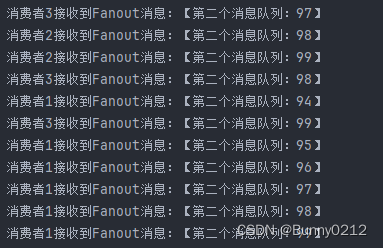
当我们给交换机绑定了三个队列,这三个队列收到消息即可完成消息监听和发送。
使用方式
- 创建两个队列,分别为
fanout.queue1和fanout.queue2

- 创建
bunny.fannout交换机。

- 绑定两个队列到交换机中。
Java创建队列和交换机
import lombok.extern.slf4j.Slf4j;
import org.springframework.amqp.core.ExchangeTypes;
import org.springframework.amqp.rabbit.annotation.Exchange;
import org.springframework.amqp.rabbit.annotation.Queue;
import org.springframework.amqp.rabbit.annotation.QueueBinding;
import org.springframework.amqp.rabbit.annotation.RabbitListener;
import org.springframework.stereotype.Component;

@Component
@Slf4j
public class FanoutListener {
    /**
     * 监听 消费者1 是否收到消息
     *
     * @param message 消息
     */
    @RabbitListener(queues = "fanout.queue1")
    public void listenFanoutQueue1(String message) {
        System.out.println("消费者1接收到Fanout消息:【" + message + "】");
    }

    /**
     * 监听 消费者2 是否收到消息
     *
     * @param message 消息
     */
    @RabbitListener(queues = "fanout.queue2")
    public void listenFanoutQueue2(String message) {
        System.out.println("消费者2接收到Fanout消息:【" + message + "】");
    }

    /**
     * 监听 消费者2 是否收到消息
     *
     * @param message 消息
     */
    @RabbitListener(bindings = @QueueBinding(
            value = @Queue(name = "fanout.queue3", durable = "true"),
            exchange = @Exchange(name = "bunny.fanout", type = ExchangeTypes.FANOUT, durable = "true")
    ))
    public void listenFanoutQueue3(String message) {
        System.out.println("消费者3接收到Fanout消息:【" + message + "】");
    }
}
Java发送消息
import org.junit.jupiter.api.Test;
import org.springframework.amqp.rabbit.core.RabbitTemplate;
import org.springframework.beans.factory.annotation.Autowired;
import org.springframework.boot.test.context.SpringBootTest;

@SpringBootTest
public class TestSendFanout {
    @Autowired
    RabbitTemplate rabbitTemplate;

    /**
     * 向队列发送消息 fanout.queue1
     */
    @Test
    void testSendFanout1() throws Exception {
        for (int i = 0; i < 100; i++) {
            rabbitTemplate.convertAndSend("bunny.fanout", null, "第二个消息队列:" + i);
        }
    }
}
Direct交换机
使用方式
[!important]
Direct交换机与Fanout交换机的差异
- Fanout交换机将消息路由给每一个与之绑定的队列
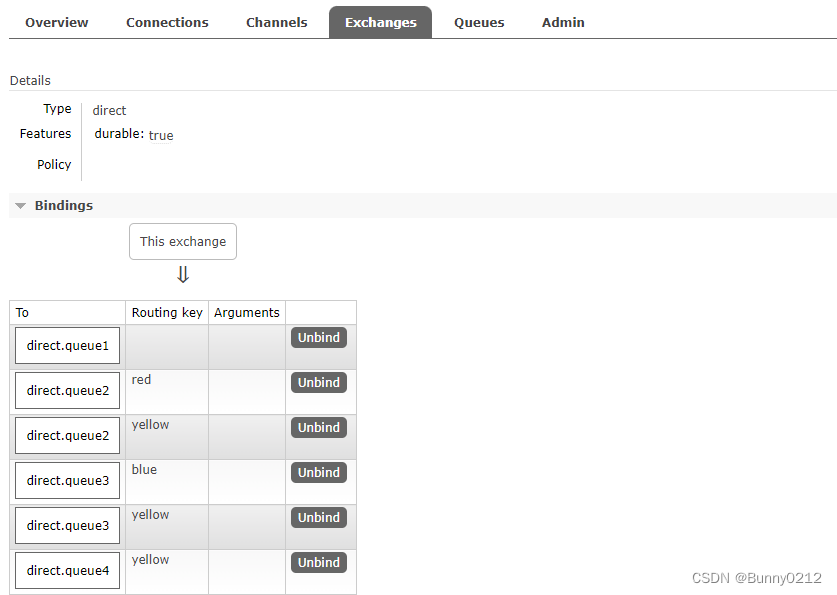
- Direct交换机根据RoutingKey判断路由给哪个队列
- 如果多个队列具有相同的RoutingKey,则与Fanout功能类似
Direct交换机发送消息时根据路由的key来发送的,而Fanout交换机是广播发送不设置路由的key

Java创建
import lombok.extern.slf4j.Slf4j;
import org.springframework.amqp.core.ExchangeTypes;
import org.springframework.amqp.rabbit.annotation.Exchange;
import org.springframework.amqp.rabbit.annotation.Queue;
import org.springframework.amqp.rabbit.annotation.QueueBinding;
import org.springframework.amqp.rabbit.annotation.RabbitListener;
import org.springframework.stereotype.Component;

@Component
@Slf4j
public class DirectListener {
    /**
     * * 监听者1
     * 创建队列 持久化的、不自动删除
     * 创建交换机 持久化的、不自动删除
     * 无接受的key
     *
     * @param message 接受消息
     */
    @RabbitListener(bindings = @QueueBinding(
            value = @Queue(name = "direct.queue1", durable = "true", autoDelete = "false"),
            exchange = @Exchange(name = "bunny.direct", type = ExchangeTypes.DIRECT, durable = "true", autoDelete = "false")
    ))
    public void listenDirectQueue1(String message) {
        System.out.println("消费者1接收到 Direct 消息:【" + message + "】");
    }

    /**
     * * 监听者2
     * 创建队列 持久化的、不自动删除
     * 创建交换机 持久化的、不自动删除
     * key包含 red 和 yellow
     *
     * @param message 接受消息
     */
    @RabbitListener(bindings = @QueueBinding(
            value = @Queue(name = "direct.queue2", durable = "true", autoDelete = "false"),
            exchange = @Exchange(name = "bunny.direct", type = ExchangeTypes.DIRECT, durable = "true", autoDelete = "false"),
            key = {"red", "yellow"}
    ))
    public void listenDirectQueue2(String message) {
        System.out.println("消费者2接收到 Direct key 为 {\"red\", \"yellow\"} 消息:【" + message + "】");
    }

    /**
     * * 监听者3
     * 创建队列 持久化的、不自动删除
     * 创建交换机 持久化的、不自动删除
     * key包含 blue 和 yellow
     *
     * @param message 接受消息
     */
    @RabbitListener(bindings = @QueueBinding(
            value = @Queue(name = "direct.queue3", durable = "true", autoDelete = "false"),
            exchange = @Exchange(name = "bunny.direct", type = ExchangeTypes.DIRECT, durable = "true", autoDelete = "false"),
            key = {"blue", "yellow"}
    ))
    public void listenDirectQueue3(String message) {
        System.out.println("消费者2接收到 Direct key 为 {\"blue\", \"yellow\"} 消息:【" + message + "】");
    }

    /**
     * * 监听者4
     * 创建队列 持久化的、不自动删除
     * 创建交换机 持久化的、不自动删除
     * key包含 yellow
     *
     * @param message 接受消息
     */
    @RabbitListener(bindings = @QueueBinding(
            value = @Queue(name = "direct.queue4", durable = "true", autoDelete = "false"),
            exchange = @Exchange(name = "bunny.direct", type = ExchangeTypes.DIRECT, durable = "true", autoDelete = "false"),
            key = "yellow"
    ))
    public void listenDirectQueue4(String message) {
        System.out.println("消费者2接收到 Direct key 为 \"yellow\" 消息:【" + message + "】");
    }
}
Java发送消息
import org.junit.jupiter.api.Test;
import org.springframework.amqp.rabbit.core.RabbitTemplate;
import org.springframework.beans.factory.annotation.Autowired;
import org.springframework.boot.test.context.SpringBootTest;

@SpringBootTest
public class TestSendDirect {
    @Autowired
    RabbitTemplate rabbitTemplate;

    /**
     * 发送黄色消息
     */
    @Test
    void testSendDirectYellow() throws Exception {
        for (int i = 0; i < 1000; i++) {
            rabbitTemplate.convertAndSend("bunny.direct", "yellow", "发送消息:" + i);
        }
    }

    /**
     * 发送红色消息
     */
    @Test
    void testSendDirectRed() throws Exception {
        for (int i = 0; i < 1000; i++) {
            rabbitTemplate.convertAndSend("bunny.direct", "red", "发送消息:" + i);
        }
    }

    /**
     * 发送蓝色消息
     */
    @Test
    void testSendDirectBlue() throws Exception {
        for (int i = 0; i < 1000; i++) {
            rabbitTemplate.convertAndSend("bunny.direct", "blue", "发送消息:" + i);
        }
    }
}
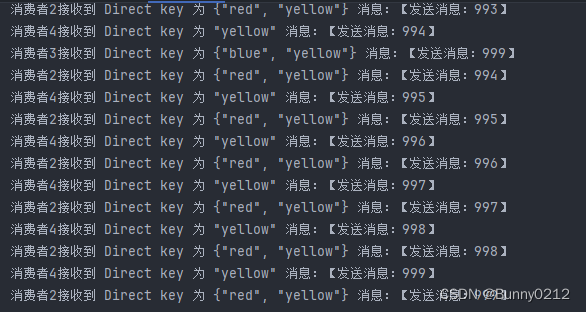
由于消费者1没有绑定任何key所以任何消息都没有接受到。
Topic交换机
使用方式
[!important]
Direct交换机与Topic交换机的差异?
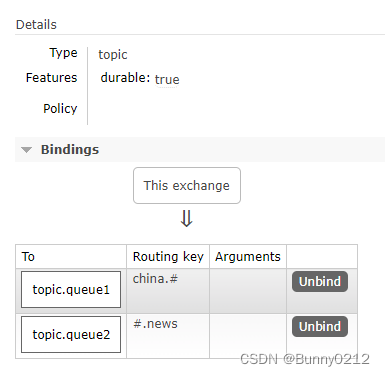
- Topic交换机接收的消息RoutingKey必须是多个单词,以
**.**分割- Topic交换机与队列绑定时的bindingKey可以指定通配符
#:代表0个或多个词*:代表1个词

Java创建
import lombok.extern.slf4j.Slf4j;
import org.springframework.amqp.core.ExchangeTypes;
import org.springframework.amqp.rabbit.annotation.Exchange;
import org.springframework.amqp.rabbit.annotation.Queue;
import org.springframework.amqp.rabbit.annotation.QueueBinding;
import org.springframework.amqp.rabbit.annotation.RabbitListener;
import org.springframework.stereotype.Component;

@Component
@Slf4j
public class TopicListener {
    /**
     * * 监听者1
     * 创建队列 持久化的、不自动删除
     * 创建交换机 持久化的、不自动删除
     * key为china.#
     *
     * @param message 接受消息
     */
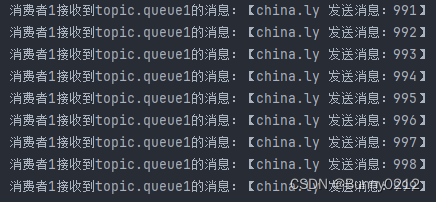
    @RabbitListener(bindings = @QueueBinding(
            value = @Queue(name = "topic.queue1"),
            exchange = @Exchange(name = "bunny.topic", type = ExchangeTypes.TOPIC),
            key = "china.#"
    ))
    public void listenTopicChina(String message) {
        System.out.println("消费者1接收到topic.queue1的消息:【" + message + "】");
    }

    /**
     * * 监听者1
     * 创建队列 持久化的、不自动删除
     * 创建交换机 持久化的、不自动删除
     * #.news
     *
     * @param message 接受消息
     */
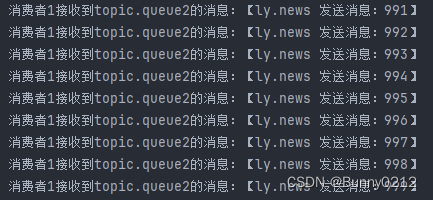
    @RabbitListener(bindings = @QueueBinding(
            value = @Queue(name = "topic.queue2"),
            exchange = @Exchange(name = "bunny.topic", type = ExchangeTypes.TOPIC),
            key = "#.news"
    ))
    public void listenTopicNews(String message) {
        System.out.println("消费者1接收到topic.queue2的消息:【" + message + "】");
    }
}
Java发送消息
import org.junit.jupiter.api.Test;
import org.springframework.amqp.rabbit.core.RabbitTemplate;
import org.springframework.beans.factory.annotation.Autowired;
import org.springframework.boot.test.context.SpringBootTest;

@SpringBootTest
public class TestSendTopic {
    @Autowired
    RabbitTemplate rabbitTemplate;

    /**
     * 发送消息 key 包含 china.# 的
     */
    @Test
    void testSendTopic1() throws Exception {
        for (int i = 0; i < 1000; i++) {
            rabbitTemplate.convertAndSend("bunny.topic", "china.ly", "china.ly 发送消息:" + i);
        }
    }

    /**
     * 发送消息 key 包含 #.news 的
     */
    @Test
    void testSendTopic2() {
        for (int i = 0; i < 1000; i++) {
            rabbitTemplate.convertAndSend("bunny.topic", "ly.news", "ly.news 发送消息:" + i);
        }
    }
}
消息持久化
为了提升性能,默认情况下MQ的数据都是在内存存储的临时数据,重启后就会消失。为了保证数据的可靠性,必须配置数据持久化,包括:
- 交换机持久化(在交换机类型与作用已解释)
- 队列持久化(在交换机类型与作用已解释)
- 消息持久化(本文介绍)
使用MessageBuilder创建使用调用方法setDeliveryMode,在里面设置持久化消息和非持久化消息
非持久化消息
setDeliveryMode(MessageDeliveryMode.NON_PERSISTENT)设置非持久化消息。
import org.junit.jupiter.api.Test;
import org.springframework.amqp.core.Message;
import org.springframework.amqp.core.MessageBuilder;
import org.springframework.amqp.core.MessageDeliveryMode;
import org.springframework.amqp.rabbit.core.RabbitTemplate;
import org.springframework.beans.factory.annotation.Autowired;
import org.springframework.boot.test.context.SpringBootTest;

import java.nio.charset.StandardCharsets;

@SpringBootTest
public class TestSendFanout {
    @Autowired
    RabbitTemplate rabbitTemplate;

    /**
     * * 发送数据非持久化
     * 向 bunny.fanout 发送消息
     */
    @Test
    void testSendFanout2() throws Exception {
        // 创建消息-非持久化消息
        Message message = MessageBuilder.withBody("hello world".getBytes(StandardCharsets.UTF_8))
                .setDeliveryMode(MessageDeliveryMode.NON_PERSISTENT).build();

        // 发送很多消息
        for (int i = 0; i < 1000000; i++) {
            rabbitTemplate.convertAndSend("bunny.fanout", null, message);
        }
    }
}
持久化消息
setDeliveryMode(MessageDeliveryMode.PERSISTENT)设置持久化消息。
import org.junit.jupiter.api.Test;
import org.springframework.amqp.core.Message;
import org.springframework.amqp.core.MessageBuilder;
import org.springframework.amqp.core.MessageDeliveryMode;
import org.springframework.amqp.rabbit.core.RabbitTemplate;
import org.springframework.beans.factory.annotation.Autowired;
import org.springframework.boot.test.context.SpringBootTest;

import java.nio.charset.StandardCharsets;

@SpringBootTest
public class TestSendFanout {
    @Autowired
    RabbitTemplate rabbitTemplate;

    @Test
    void testSendFanout3() throws Exception {
        // 创建消息-持久化消息
        Message message = MessageBuilder
                .withBody("hello".getBytes(StandardCharsets.UTF_8))
                .setDeliveryMode(MessageDeliveryMode.PERSISTENT)
                .build();

        // 发送很多消息
        for (int i = 0; i < 1000000; i++) {
            rabbitTemplate.convertAndSend("bunny.fanout", null, message);
        }
    }
}
惰性队列
惰性队列比其它队列性能好,速度快。
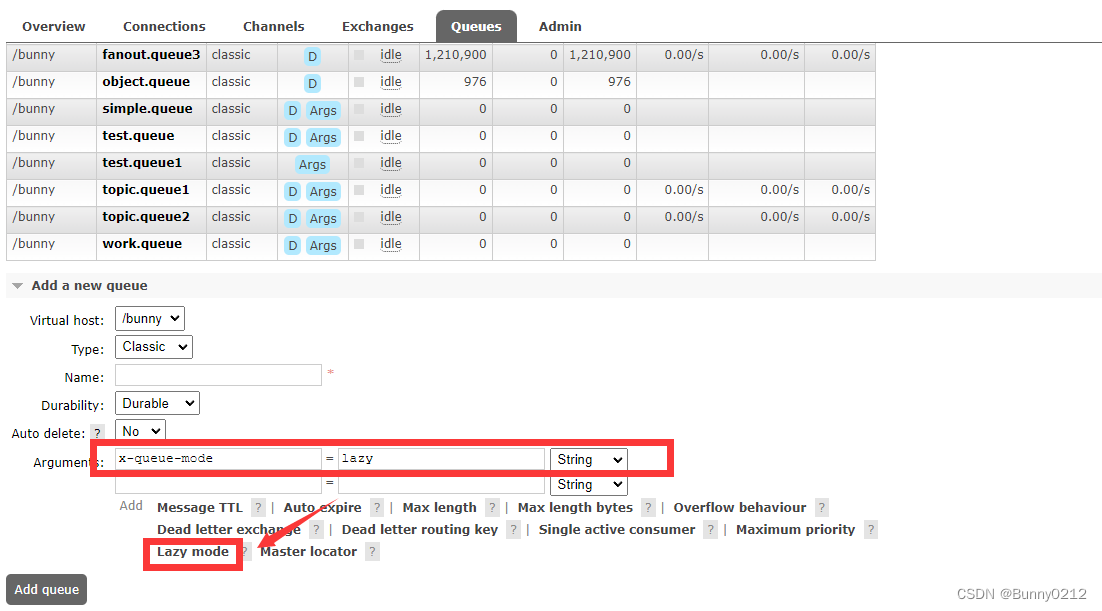
控制台操作
使用控制台添加惰性队列。
Java方式添加
不基于注解
使用IOC容器注入,使用属性名方式lazy()创建。
@Configuration
public class CreateLazyQueue {
    /**
     * 创建惰性队列
     *
     * @return 惰性队列
     */
    @Bean
    public Queue lazyQueue() {
        return QueueBuilder.durable("lazy.queue1").lazy().build();
    }
}
基于注解
也是比较常见的方式,这种也方便。
@Queue(name = "lazy.queue2", durable = "true", autoDelete = "false", arguments = @Argument(name = "x-queue-mode", value = "lazy"))
全部代码
import lombok.extern.slf4j.Slf4j;
import org.springframework.amqp.core.ExchangeTypes;
import org.springframework.amqp.rabbit.annotation.*;
import org.springframework.stereotype.Component;

@Component
@Slf4j
public class LazyListener {
    @RabbitListener(bindings = @QueueBinding(
            value = @Queue(name = "lazy.queue2", durable = "true", autoDelete = "false", arguments = @Argument(name = "x-queue-mode", value = "lazy")),
            exchange = @Exchange(name = "lazy.fanout", type = ExchangeTypes.FANOUT, durable = "true", autoDelete = "false")
    ))
    public void listenLazyQueue1(String message) {
        System.out.println("消费者1接收到 Lazy 消息:【" + message + "】");
    }
}
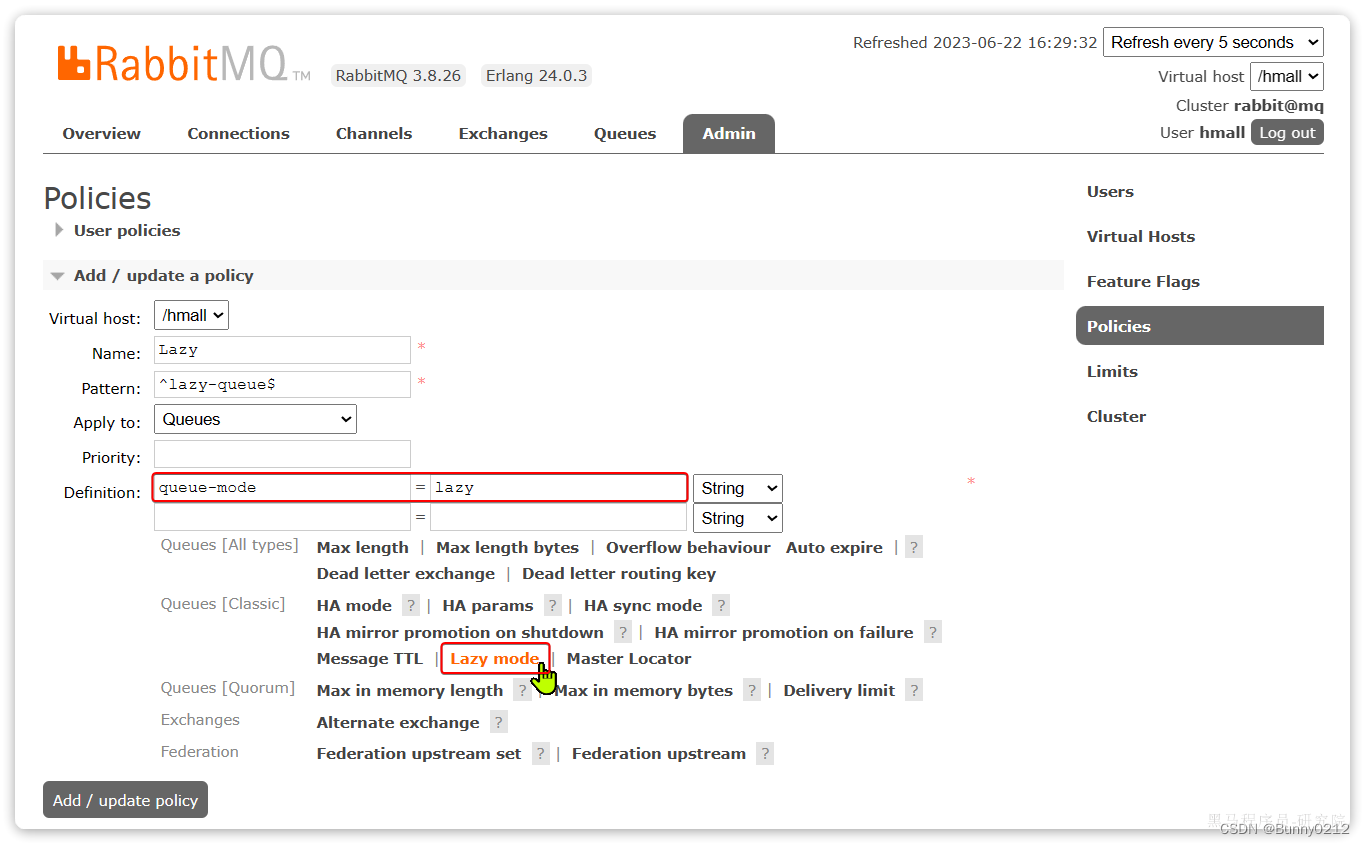
更新已有队列为lazy模式
对于已经存在的队列,也可以配置为lazy模式,但是要通过设置policy实现。
命令行方式
可以基于命令行设置policy
命令解读:
rabbitmqctl:RabbitMQ的命令行工具set_policy:添加一个策略Lazy:策略名称,可以自定义"^lazy-queue$":用正则表达式匹配队列的名字'{"queue-mode":"lazy"}':设置队列模式为lazy模式--apply-to queues:策略的作用对象,是所有的队列
rabbitmqctl set_policy Lazy "^lazy-queue$" '{"queue-mode":"lazy"}' --apply-to queues
控制台方式
消费者的可靠性
[!tip]
当RabbitMQ向消费者投递消息以后,需要知道消费者的处理状态如何。因为消息投递给消费者并不代表就一定被正确消费了,可能出现的故障有很多,比如:
- 消息投递的过程中出现了网络故障
- 消费者接收到消息后突然宕机
- 消费者接收到消息后,因处理不当导致异常
失败重试机制
当消费者出现异常后,消息会不断requeue(重入队)到队列,再重新发送给消费者。如果消费者再次执行依然出错,消息会再次requeue到队列,再次投递,直到消息处理成功为止。
极端情况就是消费者一直无法执行成功,那么消息requeue就会无限循环,导致mq的消息处理飙升,带来不必要的压力
spring:
  rabbitmq:
    listener:
      simple:
        retry:
          enabled: true # 开启消费者失败重试
          initial-interval: 1000ms # 初识的失败等待时长为1秒
          multiplier: 1 # 失败的等待时长倍数,下次等待时长 = multiplier * last-interval
          max-attempts: 3 # 最大重试次数
          stateless: true # true无状态;false有状态。如果业务中包含事务,这里改为false
Java中配置
当消息中出现异常时,自动转到错误交换机和错误队列中,方便开发和调试人员查看。
创建error.direct,设置key为error,队列为error.queue。
当然,如果在配置中没有设置错误机制这时某些配置也没有必要加载进来,当配置spring.rabbitmq.listener.simple.retry.enabled为true时才启用当前配置。
@ConditionalOnProperty(name = "spring.rabbitmq.listener.simple.retry.enabled", havingValue = "true")// 当开启错误重试这个配置才有效果
示例代码
import lombok.extern.slf4j.Slf4j;
import org.springframework.amqp.core.Binding;
import org.springframework.amqp.core.BindingBuilder;
import org.springframework.amqp.core.DirectExchange;
import org.springframework.amqp.core.Queue;
import org.springframework.amqp.rabbit.core.RabbitTemplate;
import org.springframework.amqp.rabbit.retry.MessageRecoverer;
import org.springframework.amqp.rabbit.retry.RepublishMessageRecoverer;
import org.springframework.boot.autoconfigure.condition.ConditionalOnProperty;
import org.springframework.context.annotation.Bean;
import org.springframework.context.annotation.Configuration;

@Configuration
@ConditionalOnProperty(name = "spring.rabbitmq.listener.simple.retry.enabled", havingValue = "true")// 当开启错误重试这个配置才有效果
@Slf4j
public class ErrorConfiguration {
    @Bean
    public MessageRecoverer republishMessageRecoverer(RabbitTemplate rabbitTemplate) {
        log.info("加载错误交换机");
        return new RepublishMessageRecoverer(rabbitTemplate, "error.direct", "error");
    }
}
只查看不做处理
如果只是想在MQ控制台中查看错误消息,并不需要监听错误消息,这时可以使用之前IOC注入方式配置。
创建交换机、队列,之后绑定设置需要传入的key。
import lombok.extern.slf4j.Slf4j;
import org.springframework.amqp.core.Binding;
import org.springframework.amqp.core.BindingBuilder;
import org.springframework.amqp.core.DirectExchange;
import org.springframework.amqp.core.Queue;
import org.springframework.amqp.rabbit.core.RabbitTemplate;
import org.springframework.amqp.rabbit.retry.MessageRecoverer;
import org.springframework.amqp.rabbit.retry.RepublishMessageRecoverer;
import org.springframework.boot.autoconfigure.condition.ConditionalOnProperty;
import org.springframework.context.annotation.Bean;
import org.springframework.context.annotation.Configuration;

@Configuration
@ConditionalOnProperty(name = "spring.rabbitmq.listener.simple.retry.enabled", havingValue = "true")// 当开启错误重试这个配置才有效果
@Slf4j
public class ErrorConfiguration {
    @Bean
    public DirectExchange errorMessageExchange() {
        return new DirectExchange("error.direct");
    }

    @Bean
    public Queue errorQueue() {
        return new Queue("error.queue", true);
    }

    @Bean
    public Binding errorBinding(Queue errorQueue, DirectExchange errorMessageExchange) {
        return BindingBuilder.bind(errorQueue).to(errorMessageExchange).with("error");
    }

    @Bean
    public MessageRecoverer republishMessageRecoverer(RabbitTemplate rabbitTemplate) {
        log.info("加载错误交换机");
        return new RepublishMessageRecoverer(rabbitTemplate, "error.direct", "error");
    }
}
测试配置
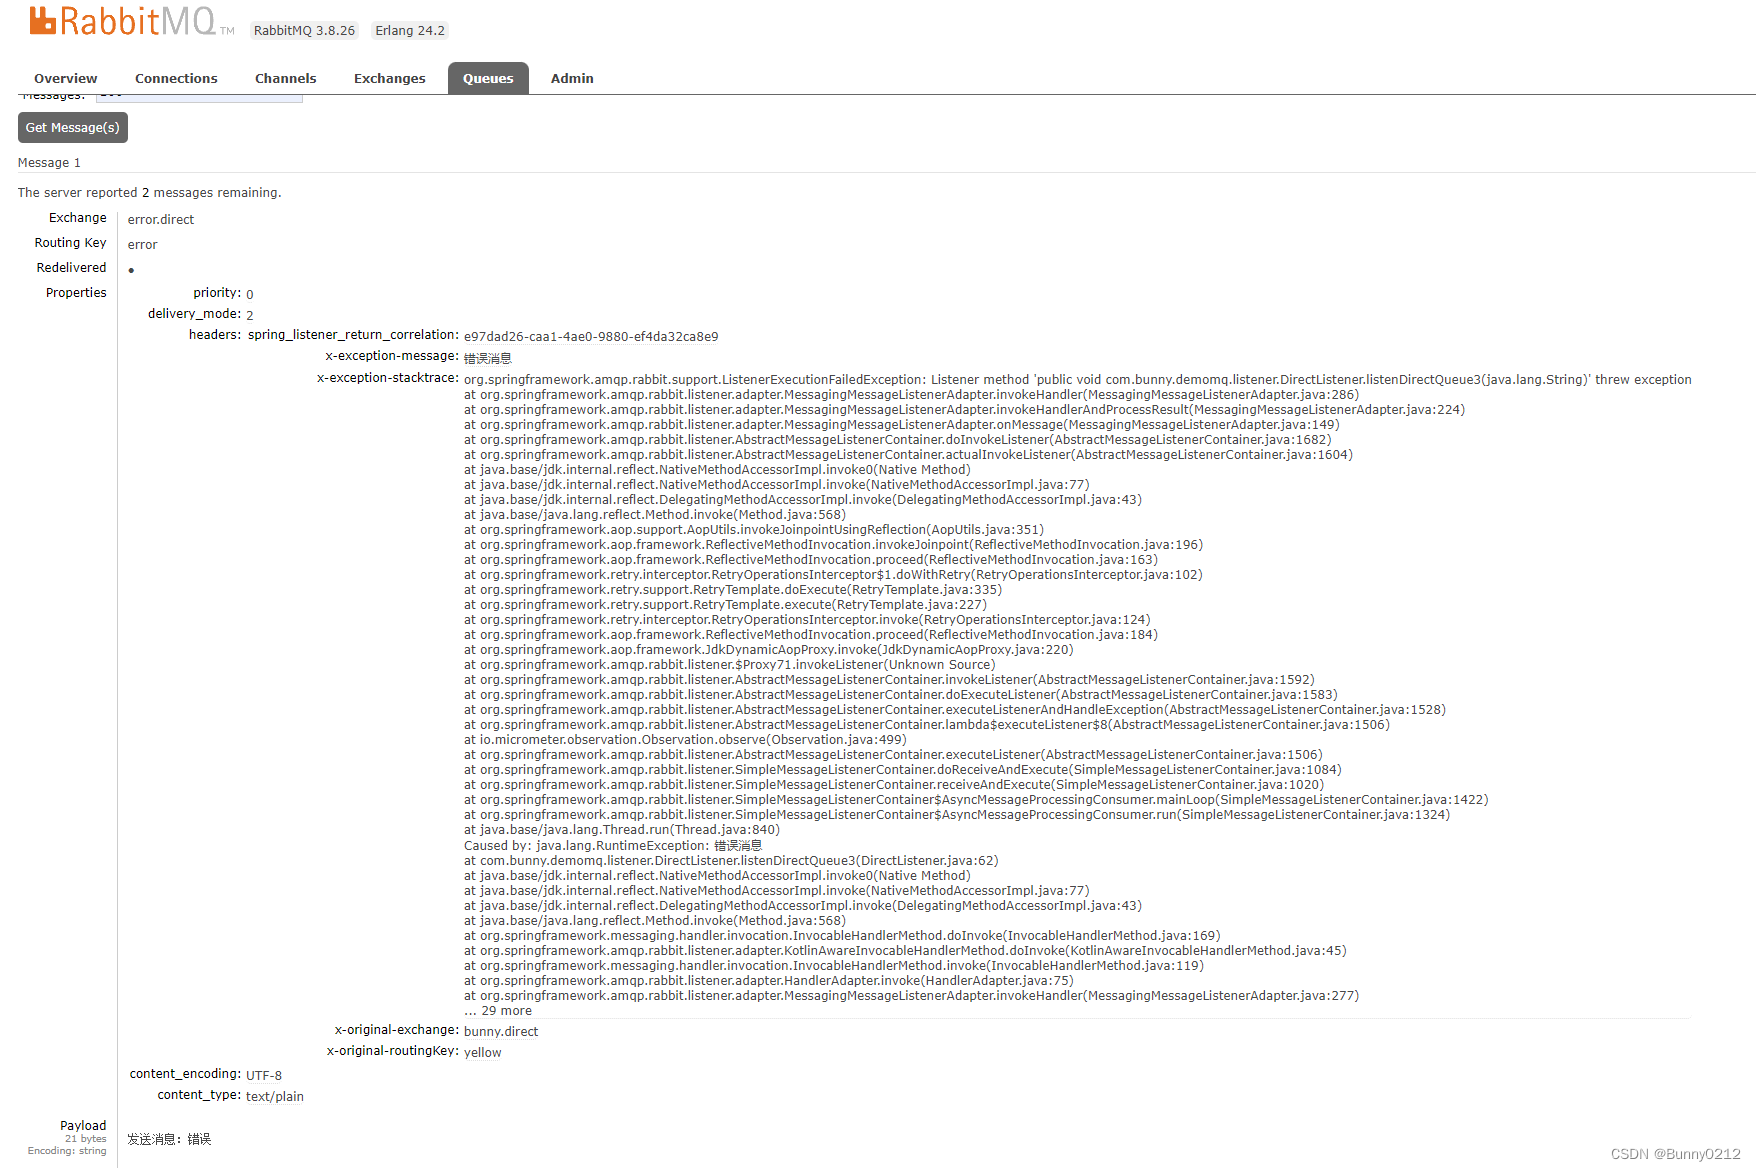
为了验证我们配置的是否有问题,可以在监听消息时手动抛出异常。
对消息进行错误测试,在消息中抛出异常。
/**
 * * 监听者3
 * 创建队列 持久化的、不自动删除
 * 创建交换机 持久化的、不自动删除
 * key包含 blue 和 yellow
 *
 * @param message 接受消息
 */
@RabbitListener(bindings = @QueueBinding(
        value = @Queue(name = "direct.queue3", durable = "true", autoDelete = "false"),
        exchange = @Exchange(name = "bunny.direct", type = ExchangeTypes.DIRECT, durable = "true", autoDelete = "false"),
        key = {"blue", "yellow"}
))
public void listenDirectQueue3(String message) {
    System.out.println("消费者3接收到 Direct key 为 {\"blue\", \"yellow\"} 消息:【" + message + "】");
    throw new RuntimeException("错误消息");
}
对消息进行监听处理
如果需要对错误队列进行监听并且做出相应处理,使用注解方式,可以直接创建并监听消息。
其中自动绑定了消息队列,和自动创建了错误交换机。
import lombok.extern.slf4j.Slf4j;
import org.springframework.amqp.core.ExchangeTypes;
import org.springframework.amqp.rabbit.annotation.Exchange;
import org.springframework.amqp.rabbit.annotation.Queue;
import org.springframework.amqp.rabbit.annotation.QueueBinding;
import org.springframework.amqp.rabbit.annotation.RabbitListener;
import org.springframework.stereotype.Component;

import java.time.LocalDateTime;

@Component
@Slf4j
public class ErrorListener {
    @RabbitListener(bindings = @QueueBinding(
            value = @Queue(name = "error.queue", durable = "true"),
            exchange = @Exchange(name = "error.direct", type = ExchangeTypes.DIRECT),
            key = "error"
    ))
    @RabbitListener(queues = "error.queue")
    public void listenError(String message) {
        System.out.println(LocalDateTime.now() + "收集错误队列-消费者接收到 error 消息:【" + message + "】");
    }
}

全部的配置
spring:
  application:
    name: demo-mq
  rabbitmq:
    host: 192.168.1.6 # 主机地址
    port: 5672 # 端口
    virtual-host: /bunny # 虚拟主机
    username: bunny # 用户名
    password: "02120212" # 密码
    listener:
      simple:
        prefetch: 1 # 每次只能获取一条消息,处理完成才能获取下一个消息
        acknowledge-mode: auto # 确认机制
        retry:
          enabled: true # 开启消费者失败重试
          initial-interval: 1000ms # 初始失败等待时长
          multiplier: 1 # 下次失败等待时间被树,下次等待时长 multiplier * last-interval
          max-attempts: 3 # 最大重试次数
          stateless: true # true 无状态 false 有状态。如果业务中包含事务,这里改为false
    connection-timeout: 1s # 设置mq连接超时时间
    template:
      retry:
        enabled: true # 开启超时重试机制
        initial-interval: 200ms # 失败后初始等待时间
        multiplier: 1 # 失败后下次等待时长倍数,发送消息失败不会走这个
        max-attempts: 3 # 最大重试次数
    publisher-confirm-type: none # 开启publisher confirm机制,并设置confirm类型
    publisher-returns: true # 开启publisher return机制
业务幂等性
什么事幂等性
幂等是一个数学概念,用函数表达式来描述是这样的:f(x) = f(f(x)),例如求绝对值函数。 在程序开发中,则是指同一个业务,执行一次或多次对业务状态的影响是一致的。例如:
- 根据id删除数据
- 查询数据
- 新增数据
但数据的更新往往不是幂等的,如果重复执行可能造成不一样的后果。比如:
- 取消订单,恢复库存的业务。如果多次恢复就会出现库存重复增加的情况
- 退款业务。重复退款对商家而言会有经济损失。
所以,我们要尽可能避免业务被重复执行。 然而在实际业务场景中,由于意外经常会出现业务被重复执行的情况,例如:
- 页面卡顿时频繁刷新导致表单重复提交
- 服务间调用的重试
- MQ消息的重复投递
生成消息唯一ID
SpringAMQP的MessageConverter自带了MessageID的功能,我们只要开启这个功能即可。 以Jackson的消息转换器为例:
@Bean
public MessageConverter messageConverter(){
    // 1.定义消息转换器
    Jackson2JsonMessageConverter jjmc = new Jackson2JsonMessageConverter();
    // 2.配置自动创建消息id,用于识别不同消息,也可以在业务中基于ID判断是否是重复消息
    jjmc.setCreateMessageIds(true);
    return jjmc;
}
延迟消息
对于超过一定时间未支付的订单,应该立刻取消订单并释放占用的库存。
像这种在一段时间以后才执行的任务,我们称之为延迟任务,而要实现延迟任务,最简单的方案就是利用MQ的延迟消息了。
在RabbitMQ中实现延迟消息也有两种方案:
- 死信交换机+TTL
- 延迟消息插件
基于死信队列虽然可以实现延迟消息,但是太麻烦了。因此RabbitMQ社区提供了一个延迟消息插件来实现相同的效果。
DelayExchange插件
官方文档说明
Scheduling Messages with RabbitMQ | RabbitMQ - Blog
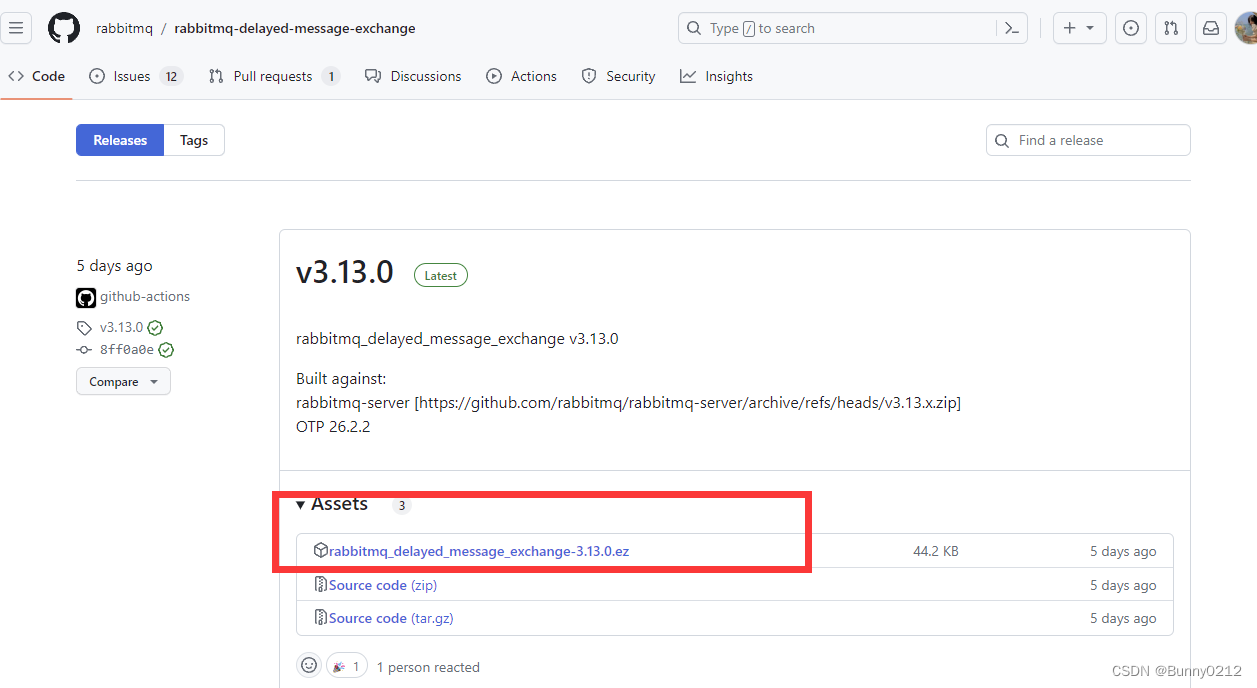
插件下载地址
GitHub - rabbitmq/rabbitmq-delayed-message-exchange: Delayed Messaging for RabbitMQ
安装延迟插件
找到RabbitMQ镜像插件位置。
docker inspect mq
# 或者执行
docker volume inspect mq-plugins
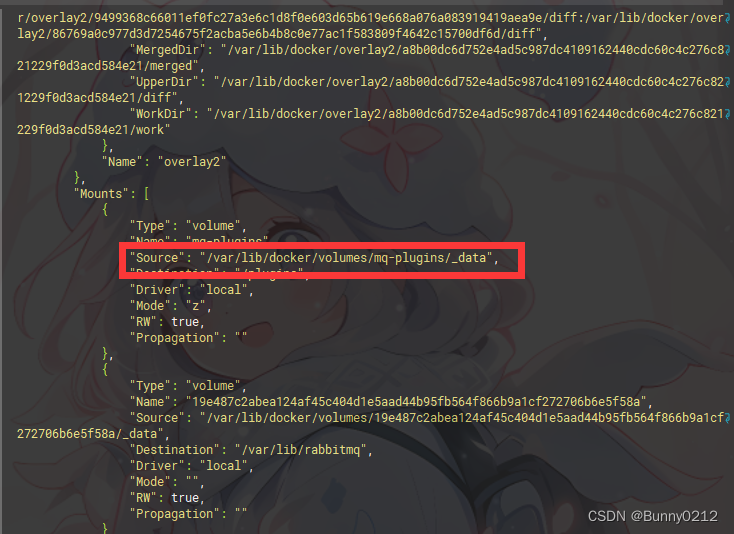
将插件拖入rabbitmq_delayed_message_exchange-3.8.17.8f537ac.ez

执行命令
rabbitmq_delayed_message_exchange是你的插件名称。
docker exec -it mq rabbitmq-plugins enable rabbitmq_delayed_message_exchange
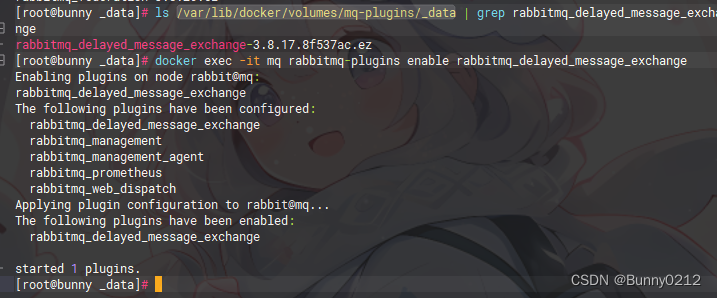
Java中使用
创建延迟消息,延迟消息如果很多而且延迟时间较长不建议使用MQ去处理这些消息,因为在内部会维护一个时钟,如果消息很大时间又长,对于系统资源消耗会很大。
如果时间很长可以使用Redis去处理这些内容。
不基于注解
使IOC容器方式创建延迟消息。
import lombok.extern.slf4j.Slf4j;
import org.springframework.amqp.core.DirectExchange;
import org.springframework.amqp.core.ExchangeBuilder;
import org.springframework.context.annotation.Bean;
import org.springframework.context.annotation.Configuration;

@Configuration
@Slf4j
public class CreateDirectExchange {
    /**
     * 创建延迟交换机
     *
     * @return 延迟交换机
     */
    @Bean
    public DirectExchange delayExchange() {
        return ExchangeBuilder.directExchange("delay.direct")
                .delayed()// 设置delay的属性为true
                .durable(true)// 持久化
                .build();
    }
}
基于注解
使用注解方式一次性创建交换机、队列、延迟消息。
import lombok.extern.slf4j.Slf4j;
import org.springframework.amqp.rabbit.annotation.Exchange;
import org.springframework.amqp.rabbit.annotation.Queue;
import org.springframework.amqp.rabbit.annotation.QueueBinding;
import org.springframework.amqp.rabbit.annotation.RabbitListener;
import org.springframework.stereotype.Component;

@Component
@Slf4j
public class DelayListener {
    @RabbitListener(bindings = @QueueBinding(
            value = @Queue(name = "delay.queue", durable = "true"),
            exchange = @Exchange(name = "delay.direct", delayed = "true"),
            key = "delay"
    ))
    public void listenDelay(String message) {
        System.out.println("消费者接收到 delay 消息:【" + message + "】");
    }
}
创建延迟消息会有独特的tag。

创建队列

发送延迟消息
import lombok.extern.slf4j.Slf4j;
import org.junit.jupiter.api.Test;
import org.springframework.amqp.rabbit.core.RabbitTemplate;
import org.springframework.beans.factory.annotation.Autowired;
import org.springframework.boot.test.context.SpringBootTest;

@SpringBootTest
@Slf4j
public class TestSendDelay {
    @Autowired
    RabbitTemplate rabbitTemplate;

    @Test
    void testSendDelay() throws Exception {
        rabbitTemplate.convertAndSend("delay.direct", "delay", "延迟消息", message -> {
            message.getMessageProperties().setDelayLong(5000L);
            return message;
        });
        log.info("延迟消息发送成功");
    }
}

