一 、SpringCloud项目简介
SpringCloud项目可划为三个角色,一个是服务的注册与发现中心(Eureka ),一个是服务的提供方(Provider),最后一个是服务的消费方(Consumer),首先我们要保证Eureka能够正常的运行,让Provider在Eureka上注册服务,然后Consumer就能够在Eureka上发现Provider服务,并可以通过RPC远程调用的方式对Provider服务进行调用,这就是一个简单的微服务结构模型。结构图如下所示:

二、构建项目相关目录
1.构建一个maven项目

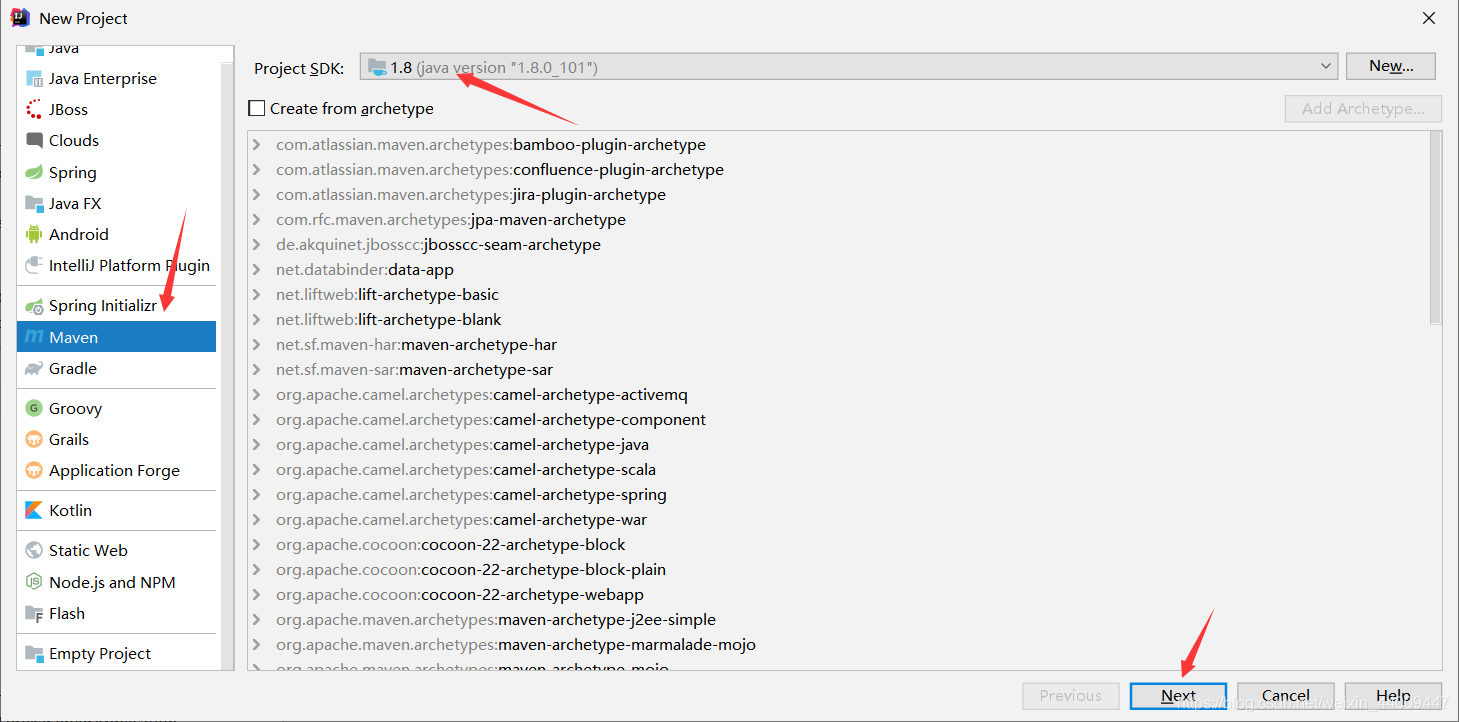
输入项目名称以及所在位置,这里我是用springcloud_demo作为项目名称:

删除新建项目下的src文件夹,因为我们只需要新建项目的架子,让其存放其他的子服务:

2.创建注册中心子模块:eureka-server

选择Spring Initializr:

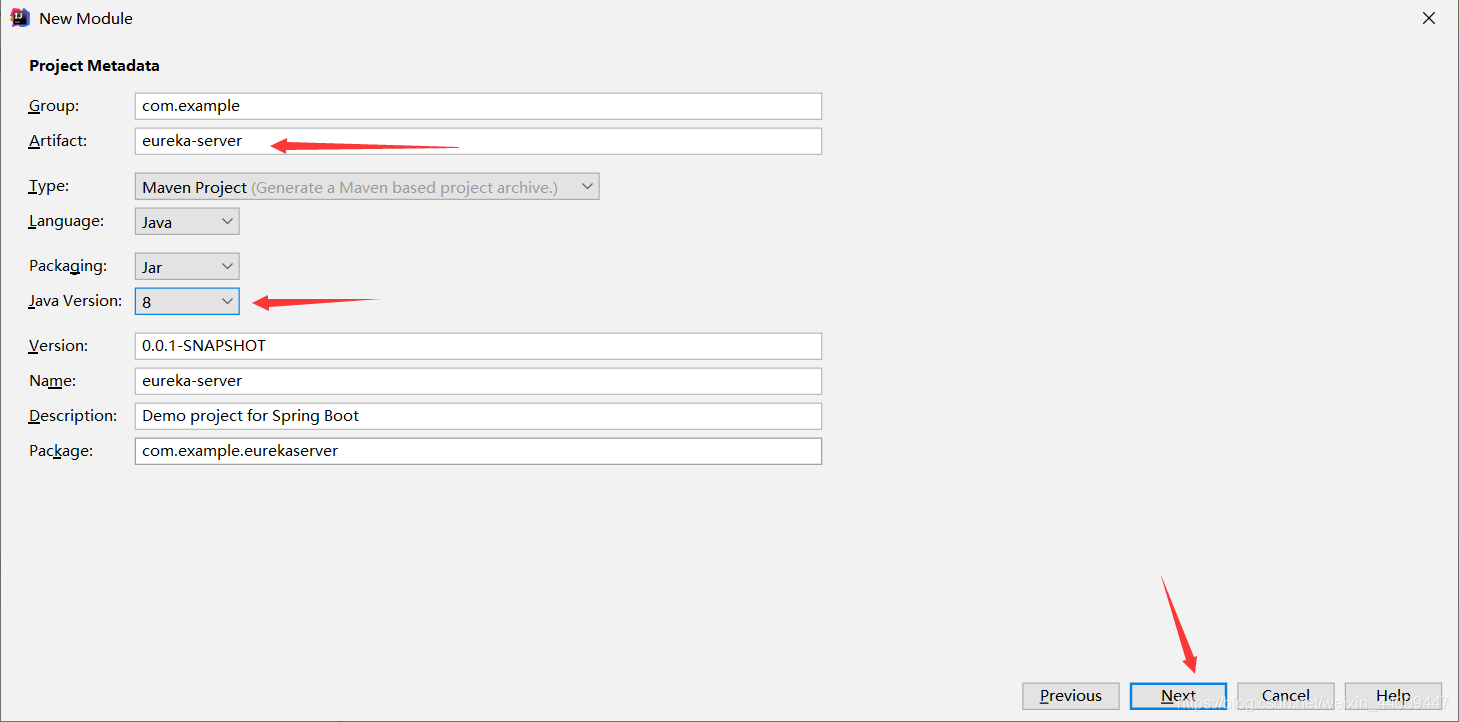
填写项目名称eureka-server,选择java版本,这里我选的是java8版本:
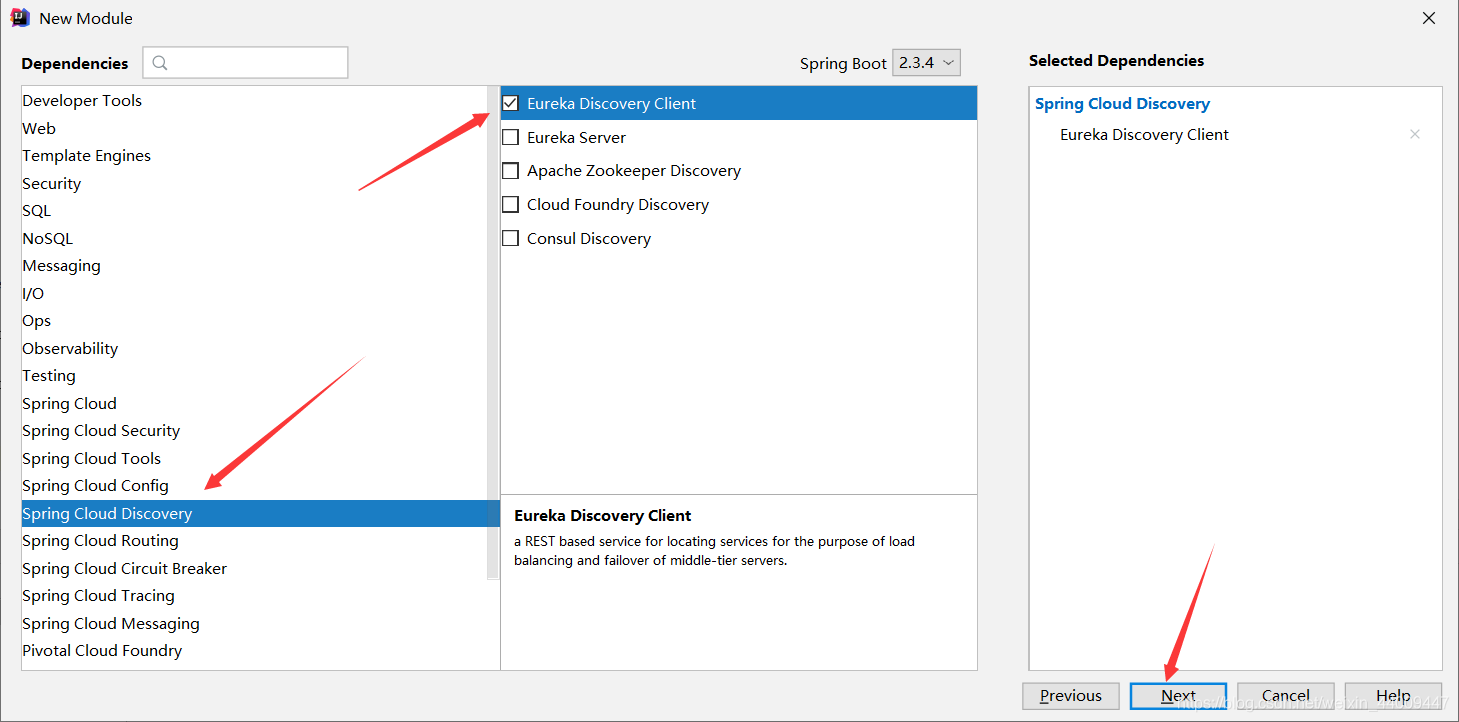
选择Spring Cloud Discovery,勾选Eureka Server:

确认子模块名称以及所在位置:

导入依赖:

创建成功效果图:

3.创建提供服务子模块:provider
除了Spring Cloud Discovery中勾选Eureka Discovery Client外,创建方式与创建eureka-server子模块方式一致
4.创建服务消费子模块:consumer
除了Spring Cloud Discovery中勾选Eureka Discovery Client外,创建方式与创建eureka-server子模块方式一致

三、服务调用
1.eureka-server子模块
在该启动类中加上@EnableEurekaServer注解,声明为注册中心:
package com.example.eurekaserver;

import org.springframework.boot.SpringApplication;
import org.springframework.boot.autoconfigure.SpringBootApplication;
import org.springframework.cloud.netflix.eureka.EnableEurekaClient;
import org.springframework.cloud.netflix.eureka.server.EnableEurekaServer;


//启动类标识
@SpringBootApplication
//声明为注册中心
@EnableEurekaServer
public class EurekaServerApplication {

    public static void main(String[] args) {
        SpringApplication.run(EurekaServerApplication.class, args);
    }

}把resources下的application.properties文件名改为application.yml(快捷键:shift+f6),并添加以下内容:
server:
  #运行端口
  port: 8888
eureka:
  instance:
    #注册ip
    hostname: localhost
  client:
    #禁止自己当做服务注册
    register-with-eureka: false
    #屏蔽注册信息
    fetch-registry: false
    #注册url
    serviceUrl:
      defaultZone: http://${eureka.instance.hostname}:${server.port}/eureka/
对应的pom.xml文件如下
<?xml version="1.0" encoding="UTF-8"?>
<project xmlns="http://maven.apache.org/POM/4.0.0" xmlns:xsi="http://www.w3.org/2001/XMLSchema-instance"
         xsi:schemaLocation="http://maven.apache.org/POM/4.0.0 https://maven.apache.org/xsd/maven-4.0.0.xsd">
    <modelVersion>4.0.0</modelVersion>
    <parent>
        <groupId>org.springframework.boot</groupId>
        <artifactId>spring-boot-starter-parent</artifactId>
        <version>2.3.3.RELEASE</version>
        <relativePath/> <!-- lookup parent from repository -->
    </parent>
    <groupId>com.example</groupId>
    <artifactId>eureka-server</artifactId>
    <version>0.0.1-SNAPSHOT</version>
    <name>eureka-server</name>
    <description>Demo project for Spring Boot</description>

    <properties>
        <java.version>1.8</java.version>
        <spring-cloud.version>Hoxton.SR7</spring-cloud.version>
    </properties>

    <dependencies>
        <dependency>
            <groupId>org.springframework.cloud</groupId>
            <artifactId>spring-cloud-starter-netflix-eureka-server</artifactId>
        </dependency>

        <dependency>
            <groupId>org.springframework.boot</groupId>
            <artifactId>spring-boot-starter-test</artifactId>
            <scope>test</scope>
            <exclusions>
                <exclusion>
                    <groupId>org.junit.vintage</groupId>
                    <artifactId>junit-vintage-engine</artifactId>
                </exclusion>
            </exclusions>
        </dependency>
    </dependencies>

    <dependencyManagement>
        <dependencies>
            <dependency>
                <groupId>org.springframework.cloud</groupId>
                <artifactId>spring-cloud-dependencies</artifactId>
                <version>${spring-cloud.version}</version>
                <type>pom</type>
                <scope>import</scope>
            </dependency>
        </dependencies>
    </dependencyManagement>

    <build>
        <plugins>
            <plugin>
                <groupId>org.springframework.boot</groupId>
                <artifactId>spring-boot-maven-plugin</artifactId>
            </plugin>
        </plugins>
    </build>

</project>
2.provider子模块
在该启动类中加上@EnableEurekaClient注解,声明为注册服务:
package com.example.provider;

import org.springframework.boot.SpringApplication;
import org.springframework.boot.autoconfigure.SpringBootApplication;
import org.springframework.cloud.netflix.eureka.EnableEurekaClient;
import org.springframework.cloud.netflix.eureka.server.EnableEurekaServer;

//启动类标识
@SpringBootApplication
//声明为注册服务
@EnableEurekaClient
public class ProviderApplication {

    public static void main(String[] args) {
        SpringApplication.run(ProviderApplication.class, args);
    }

}把resources下的application.properties文件名改为application.yml(快捷键:shift+f6),并添加以下内容:
eureka:
  client:
    serviceUrl:
      #服务注册地址
      defaultZone: http://localhost:8888/eureka/
server:
  #运行端口
  port: 8763
spring:
  application:
    #服务注册名称
name: service-provider新建controller包,并新建控制器类TestController示例:
package com.example.provider.controller;

import org.springframework.web.bind.annotation.RequestMapping;
import org.springframework.web.bind.annotation.RestController;

/**
 * @Description:服务端控制器
 */
@RequestMapping("test")
@RestController
public class TestController {

    @RequestMapping("getName")
    public String getName(){
        return "SpringCloud!";
    }
}
3.consumer子模块
在该启动类中加上@EnableEurekaClient注解,声明为注册服务:
package com.example.consumer;

import org.springframework.boot.SpringApplication;
import org.springframework.boot.autoconfigure.SpringBootApplication;
import org.springframework.cloud.client.loadbalancer.LoadBalanced;
import org.springframework.cloud.netflix.eureka.EnableEurekaClient;
import org.springframework.cloud.openfeign.EnableFeignClients;
import org.springframework.context.annotation.Bean;
import org.springframework.web.client.RestTemplate;

//启动类标识
@SpringBootApplication
//声明为注册服务
@EnableEurekaClient
//把调用注册子模块接口引入到Spring容器中(不加此注解会出现找不到@FeignClient修饰的接口)
@EnableFeignClients
public class ConsumerApplication {

    public static void main(String[] args) {
        SpringApplication.run(ConsumerApplication.class, args);
    }

    //把RestTemplate注入到Spring容器中(不然会找不到该RestTemplate类)
    @Bean
    @LoadBalanced
    RestTemplate restTemplate() {
        return new RestTemplate();
    }

}把resources下的application.properties文件名改为application.yml(快捷键:shift+f6),并添加以下内容:
eureka:
  client:
    serviceUrl:
      #服务注册地址
      defaultZone: http://localhost:8888/eureka/
server:
  #运行端口
  port: 8764
spring:
  application:
    #服务注册名称
name: service-consumer调用方式一:使用RestTemplate调用注册子模块接口方法
新建service包,并新建一个ConsumerService类:
package com.example.consumer.service;

import org.springframework.beans.factory.annotation.Autowired;
import org.springframework.stereotype.Service;
import org.springframework.web.client.RestTemplate;

/**
 * @Description:使用RestTemplate调用注册子模块接口方法
 */
@Service
public class ConsumerService {

    @Autowired
    private RestTemplate restTemplate;

    public String getName() {
        //调用子模块接口地址
        String name = restTemplate.getForObject("http://service-provider/test/getName", String.class);
        return name;
    }
}调用方式二:使用@FeignClient注解调用注册子模块接口方法
在service包下新建一个ConsumerService1类:
package com.example.consumer.service;

import org.springframework.cloud.openfeign.FeignClient;
import org.springframework.web.bind.annotation.GetMapping;

/**
 * @Description:使用@FeignClient注解调用注册子模块接口方法
 */
//注册子模块名称
@FeignClient(value = "service-provider")
public interface ConsumerService1 {

    //接口访问地址
    @GetMapping("test/getName")
    public String getName1();

}
创建启动类
package com.example.consumer;

import org.springframework.boot.SpringApplication;
import org.springframework.boot.autoconfigure.SpringBootApplication;
import org.springframework.cloud.client.loadbalancer.LoadBalanced;
import org.springframework.cloud.netflix.eureka.EnableEurekaClient;
import org.springframework.cloud.openfeign.EnableFeignClients;
import org.springframework.context.annotation.Bean;
import org.springframework.web.client.RestTemplate;

//启动类标识
@SpringBootApplication
//声明为注册服务
@EnableEurekaClient
//把调用注册子模块接口引入到Spring容器中(不加此注解会出现找不到@FeignClient修饰的接口)
@EnableFeignClients
public class ConsumerApplication {

    public static void main(String[] args) {
        SpringApplication.run(ConsumerApplication.class, args);
    }

    //把RestTemplate注入到Spring容器中(不然会找不到该RestTemplate类)
    @Bean
    @LoadBalanced
    RestTemplate restTemplate() {
        return new RestTemplate();
    }

}新建controller包,并新建控制器类ConsumerController:
package com.example.consumer.controller;

import com.example.consumer.service.ConsumerService;
import com.example.consumer.service.ConsumerService1;
import org.springframework.beans.factory.annotation.Autowired;
import org.springframework.web.bind.annotation.RequestMapping;
import org.springframework.web.bind.annotation.RestController;

/**
 * @Description:消费端控制器
 */
@RequestMapping("consumer")
@RestController
public class ConsumerController {

    @Autowired
    private ConsumerService consumerService;

    @Autowired
    private ConsumerService1 consumerService1;

    /**方式一:RestTemplate调用
     * @return
     */
    @RequestMapping("getName")
    public String getName(){
        return consumerService.getName();
    }

    /**
     * 方式二:@FeignClient调用
     * @return
     */
    @RequestMapping("getName1")
    public String getName1(){
        return consumerService1.getName1();
    }


}
4.服务网关
Spring Cloud的一个组件:zuul,它提供微服务的网关功能,即中转站,通过它提供的接口,可以转发不同的服务。它的作用就是进行路由转发、异常处理和过滤拦截。
4.1 创建gateway工程
创建一个名为 gateway 的工程,在其 pom.xml 中,加入如下依赖:
<dependencies>
        <dependency>
            <groupId>org.springframework.cloud</groupId>
            <artifactId>spring-cloud-starter-eureka</artifactId>
        </dependency>
        <dependency>
            <groupId>org.springframework.cloud</groupId>
            <artifactId>spring-cloud-starter-zuul</artifactId>
        </dependency>
</dependencies>
创建 Application 启动类,并增加 @EnableZuulProxy 注解:
@SpringBootApplication
@EnableEurekaClient
@EnableZuulProxy
public class Application {

    public static void main(String[] args) {
        SpringApplication.run(Application.class, args);
    }
}
最后添加 application.yml 配置文件,内容如下:
eureka:
  client:
    serviceUrl:
      defaultZone: http://localhost:8761/eureka/
server:
  port: 8080
spring:
  application:
    name: gateway
zuul:
  routes:
    api:
      path: /api/**
      serviceId: eurekaclient
我们可以看到,服务网关的配置多了几项,具体含义如下。
zuul.routes.api.path:指定请求基础地址,其中 API 可以是任何字符。
serviceId:转发到的服务 ID,也就是指定服务的 application.name,上述实例的含义表示只要包含 /api/ 的地址,都自动转发到 eurekaclient 的服务去。
然后我们启动服务注册中心、服务提供者、服务网关,访问地址:http://localhost:8080/api/index,我们可以看到和之前的界面完全一样。其实只要引入了 zuul,它就会自动帮我们实现反向代理和负载均衡。配置文件中的地址转发其实就是一个反向代理,那它如何实现负载均衡呢?
我们修改服务提供者的 Controller 如下:
RestController
public class HelloController {

    @Value("${server.port}")
    private int port;

    @RequestMapping("index")
    public String index(){
        return "Hello World!,端口:"+port;
    }
}重新启动。然后再修改服务提供者的端口为8673,再次启动它(切记:原先启动的不要停止),访问地址:http://localhost:8761,我们可以看到 eurekaclient 服务有两个地址:

再不断访问地址:http://localhost:8080/api/index,可以看到交替出现以下界面:


由此可以得出,当一个服务启动多个端口时,zuul 服务网关会依次请求不同端口,以达到负载均衡的目的。
4.2 服务拦截
前面我们提到,服务网关还有个作用就是接口的安全性校验,这个时候我们就需要通过 zuul 进行统一拦截,zuul 通过继承过滤器 ZuulFilter 进行处理,下面请看具体用法。
新建一个类 ApiFilter 并继承 ZuulFilter:
@Component
public class ApiFilter extends ZuulFilter {

    @Override
    public String filterType() {
        return "pre";
    }

    @Override
    public int filterOrder() {
        return 0;
    }

    @Override
    public boolean shouldFilter() {
        return true;
    }

    @Override
    public Object run() {
        //这里写校验代码
        return null;
    }
}
其中:
filterType 为过滤类型,可选值有 pre(路由之前)、routing(路由之时)、post(路由之后)、error(发生错误时调用)。
filterOrdery 为过滤的顺序,如果有多个过滤器,则数字越小越先执行
shouldFilter 表示是否过滤,这里可以做逻辑判断,true 为过滤,false 不过滤
run 为过滤器执行的具体逻辑,在这里可以做很多事情,比如:权限判断、合法性校验等。
下面,我们来做一个简单的安全验证:
@Override
    public Object run() {
        //这里写校验代码
        RequestContext context = RequestContext.getCurrentContext();
        HttpServletRequest request = context.getRequest();
        String token = request.getParameter("token");
        if(!"12345".equals(token)){
            context.setSendZuulResponse(false);
            context.setResponseStatusCode(401);
            try {
                context.getResponse().getWriter().write("token is invalid.");
            }catch (Exception e){}
        }
        return null;
    }
启动 gateway,在浏览器输入地址:http://localhost:8080/api/index,可以看到以下界面:

再通过浏览器输入地址:http://localhost:8080/api/index?token=12345,可以看到以下界面:

4.3 错误拦截
在一个大型系统中,服务是部署在不同的服务器下面的,我们难免会遇到某一个服务挂掉或者请求不到的时候,如果不做任何处理,服务网关请求不到会抛出500错误,对用户是不友好的。
我们为了提供用户的友好性,需要返回友好性提示,zuul 为我们提供了一个名叫 ZuulFallbackProvider 的接口,通过它我们就可以对这些请求不到的服务进行错误处理。
新建一个类 ApiFallbackProvider 并且实现 ZuulFallbackProvider 接口:
Component
public class ApiFallbackProvider implements ZuulFallbackProvider{

    @Override
    public String getRoute() {
        return "eurekaclient";
    }

    @Override
    public ClientHttpResponse fallbackResponse() {
        return new ClientHttpResponse() {
            @Override
            public HttpStatus getStatusCode() throws IOException {
                return HttpStatus.OK;
            }

            @Override
            public int getRawStatusCode() throws IOException {
                return 200;
            }

            @Override
            public String getStatusText() throws IOException {
                return "{code:0,message:\"服务器异常!\"}";
            }

            @Override
            public void close() {

            }

            @Override
            public InputStream getBody() throws IOException {
                return new ByteArrayInputStream(getStatusText().getBytes());
            }

            @Override
            public HttpHeaders getHeaders() {
                HttpHeaders headers = new HttpHeaders();
                headers.setContentType(MediaType.APPLICATION_JSON);
                return headers;
            }
        };
    }
其中,getRoute 方法返回要处理错误的服务名,fallbackResponse 方法返回错误的处理规则。
现在开始测试这部分代码,首先停掉服务提供者 eurekaclient,再重启 gateway,请求地址:http://localhost:8080/api/index?token=12345,即可出现以下界面:

5.服务异常处理
我们的服务最终是部署在服务器上,因为各种原因,服务难免会发生故障,那么其他服务去调用这个服务就会调不到,甚至会一直卡在那里,导致用户体验不好。针对这个问题,我们就需要对服务接口做错误处理,一旦发现无法访问服务,则立即返回并报错,我们捕捉到这个异常就可以以可读化的字符串返回到前端。
为了解决这个问题,业界提出了熔断器模型。
Hystrix 组件
SpringCloud 集成了 Netflix 开源的 Hystrix 组件,该组件实现了熔断器模型,它使得我们很方便地实现熔断器。
在实际项目中,一个请求调用多个服务是比较常见的,如果较底层的服务发生故障将会发生连锁反应。这对于一个大型项目是灾难性的。因此,我们需要利用 Hystrix 组件,当特定的服务不可用达到一个阈值(Hystrix 默认5秒20次),将打开熔断器,即可避免发生连锁反应。
代码实现
在 application.yml 中开启:
eureka:
  client:
    serviceUrl:
      defaultZone: http://localhost:8761/eureka/
server:
  port: 8081
spring:
  application:
    name: feign
#开启熔断器
feign:
  hystrix:
    enabled: true
新建一个类 ApiServiceError.java 并实现 ApiService:
@Component
public class ApiServiceError implements ApiService {

    @Override
    public String index() {
        return "服务发生故障!";
    }
}
然后在 ApiService 的注解中指定 fallback:
@FeignClient(value = "eurekaclient",fallback = ApiServiceError.class)
public interface ApiService {

    @RequestMapping(value = "/index",method = RequestMethod.GET)
    String index();
}
再创建 Controller 类:ApiController,加入如下代码:
@RestController
public class ApiController {

    @Autowired
    private ApiService apiService;

    @RequestMapping("index")
    public String index(){
        return apiService.index();
    }
}
测试熔断器
分别启动注册中心 、服务提供者 和服务消费者 ,然后访问:http://localhost:8081/index,可以看到顺利请求到接口:

然后停止 EurekaClient,再次请求,可以看到熔断器生效了:

6 配置中心
通过前面的例子我们可以看出,SpringCloud 有很多组件,使用每个组件都会创建一个工程,而每个工程都会有一个配置文件,并且有些配置是一样的。例如:在实际项目中,我们创建了用户和订单两个服务,这两个服务是同一个数据库,那么我们在这两个服务的配置文件都会配置相同的数据源,一旦我们的数据库地址发生改变(只是一种情况),用户和订单两个服务的配置文件都需要改,这还是只是两个服务,在一个大型系统(比如淘宝),将会有成千上万个服务,按照这种方式代价无疑是巨大的。
因此,产生了Spring Cloud Config 组件。Spring Cloud Config 是一个高可用的分布式配置中心,它支持将配置存放到内存(本地),也支持将其放到 Git 仓库进行统一管理
创建服务端
首先是服务端这块,首先创建一个注册中心,为了进行区分,创建一个springcloud-config-eureka的项目。 application.properties配置信息:
spring.application.name=springcloud-config-eureka

server.port=8000
## 表示是否将自己注册到Eureka Server,默认为true。
eureka.client.register-with-eureka=false
## 表示是否从Eureka Server获取注册信息,默认为true。
eureka.client.fetch-registry=false

## 设置与Eureka Server交互的地址,查询服务和注册服务都需要依赖这个地址。
eureka.client.serviceUrl.defaultZone=http://localhost:${server.port}/eureka/
启动类Application:
package com.pancm;

import org.springframework.boot.SpringApplication;
import org.springframework.boot.autoconfigure.SpringBootApplication;
import org.springframework.cloud.netflix.eureka.server.EnableEurekaServer;

/**
 *
* @Title: Application
* @Description:
* springcloud服务入口
  EnableEurekaServer 注解启动一个服务注册中心
 */
@SpringBootApplication
@EnableEurekaServer
public class Application {

   public static void main(String[] args) {
      SpringApplication.run(Application.class, args);
       System.out.println("注册中心服务启动...");
   }
}
创建配置中心
创建一个springcloud-config-server的项目。然后在application.properties配置文件添加如下配置:
spring.application.name=springcloud-config-server

server.port=9005

## 设置与Eureka Server交互的地址,查询服务和注册服务都需要依赖这个地址。
eureka.client.serviceUrl.defaultZone=http://localhost:8000/eureka/

## 读取本地文件
# spring.profiles.active=native


## 读取git的路径
# git仓库的地址
 spring.cloud.config.server.git.uri = https://github.com/xuwujing/springcloud-study-old/
# git仓库地址下的相对地址 多个用逗号","分割
 spring.cloud.config.server.git.search-paths = /springcloud-config/config-repo
# git仓库的账号
 spring.cloud.config.server.git.username =
# git仓库的密码
spring.cloud.config.server.git.password =如果想使用本地方式读取配置信息,那么只需将spring.cloud.config.server.git的配置改成spring.profiles.active=native,然后在resources路径下新增一个文件即可。
这里为了进行本地配置文件测试,新建一个configtest.properties配置文件,添加如下内容:
word=hello world启动类Application:
package com.pancm;


import org.springframework.boot.SpringApplication;
import org.springframework.boot.autoconfigure.SpringBootApplication;
import org.springframework.cloud.client.discovery.EnableDiscoveryClient;
import org.springframework.cloud.config.server.EnableConfigServer;
/**
 *
* @Title: Application
* @Description:
* 程序入口
* EnableDiscoveryClient: 启用服务注册与发现
  EnableConfigServer:    启用config配置中心
 */
@EnableDiscoveryClient
@EnableConfigServer
@SpringBootApplication
public class Application {

   public static void main(String[] args) {
      SpringApplication.run(Application.class, args);
      System.out.println("配置中心服务端启动成功!");
   }
}
创建客户端
我们新建一个springcloud-config-client的项目,用于做读取配置中心的配置。pom依赖还是和配置中心一样,不过需要新增一个配置,用于指定配置的读取。 创建一个bootstrap.properties文件,并添加如下信息:
# 获取配置文件的名称。
spring.cloud.config.name=configtest
# 获取配置的策略。
spring.cloud.config.profile=pro
# 获取配置文件的分支,默认是master。如果是是本地获取的话,则无用
spring.cloud.config.label=master
# 开启配置信息发现
spring.cloud.config.discovery.enabled=true
# 指定配置中心的service-id
spring.cloud.config.discovery.serviceId=springcloud-config-server
#  这个是设置与Eureka Server交互的地址,客户端的查询服务和注册服务都需要依赖这个地址
eureka.client.serviceUrl.defaultZone=http://localhost:8000/eureka/注:上面这些与spring-cloud相关的属性必须配置在bootstrap.properties中,config部分内容才能被正确加载。因为bootstrap.properties的相关配置会先于application.properties,而bootstrap.properties的加载也是先于application.properties。需要注意的是eureka.client.serviceUrl.defaultZone要配置在bootstrap.properties,不然客户端是无法获取配置中心参数的,会启动失败!
application.properties配置
spring.application.name=springcloud-config-client
server.port=9006
启动类Application:
package com.pancm;


import org.springframework.boot.SpringApplication;
import org.springframework.boot.autoconfigure.SpringBootApplication;
import org.springframework.cloud.client.discovery.EnableDiscoveryClient;

/**
 *
* @Title: Application
* @Description:
* 程序入口
* EnableDiscoveryClient 表示该项目就具有了服务注册的功能
 */
@EnableDiscoveryClient
@SpringBootApplication
public class Application {

   public static void main(String[] args) {
      SpringApplication.run(Application.class, args);
      System.out.println("配置中心客户端启动成功!");
   }
}
功能测试
(1)本地测试
首先我们把springcloud-config-server项目的application.properties配置文件添加spring.profiles.active=native配置,注释掉spring.cloud.config.server.git相关的配置,然后在src/main/resources目录下新建一个configtest.properties文件,然后在里面添加一个配置word=hello world。
添加完成之后,我们依次启动springcloud-config-eureka、springcloud-config-server、springcloud-config-client这三个项目。
在浏览器输入:http://localhost:9005/configtest-1.properties 查看该文件的配置信息。
注:配置文件的名称是configtest.properties,但是如果直接该名称的话是获取不到的,因为在配置文件名需要通过-来进行获取,如果配置文件名称没有-,那么添加了-之后,会自动进行匹配搜索。

调用客户端的接口,查看是否能够获取配置信息。在浏览器上输入:
http://localhost:9006//hello?name=pancm

(2)Git测试
在完成本地测试之后,我们把这个spring.profiles.active=native配置注释掉,解除spring.cloud.config.server.git相关的注释(账号和密码要填写真实的),然后在git仓库上建立一个config-repo 文件夹,新建configtest-pro.properties、configtest-dev.properties两个配置,这两个的配置分别是word=hello world174 和word=hello world258, 然后和configtest.properties配置文件一起上传到config-repo 文件夹中。

在浏览器输入:http://localhost:9005/configtest-dev.properties

在浏览器输入: http://localhost:9005/configtest-pro.properties

在浏览器输入:http://localhost:9005/configtest-1.properties

然后进行客户端接口调用测试,在浏览器输入:http://localhost:9006/hello?name=pancm

四、服务启动
1.首先启动eureka-server
找到该子模块的启动类,启动该模块:

在浏览器中输入:localhost:8888,出现Eureka注册中心管理页面:

2. 启动provider-server

刷新Eureka注册中心管理页面:

3.启动consumer-server

刷新Eureka注册中心管理页面:

4. 访问消费端接口
1.在浏览器中输入:http://localhost:8764/consumer/getName,成功得到返回结果:

2.在浏览器中输入:http://localhost:8764/consumer/getName1,成功得到返回结果:

资料来源
1 Spring Cloud入门-十分钟了解Spring Cloud-CSDN博客
2 SpringCloud从入门到精通(超详细文档一)_cuiqwei的博客-CSDN博客
3 使用Idea构建SpringCloud项目(图文详解+简单易懂)_idea springcloud-CSDN博客
4 从零搭建SpringCloud服务(史上最详细)
5 超详细SpringCloud入门Demo
6 SpringCloud学习系列之四-----配置中心(Config)使用详解_springcloud使用config-CSDN博客
7 SpringCloud学习系列之三----- 断路器(Hystrix)和断路器监控(Dashboard)-CSDN博客

