1.图像归一化和通道转换操作
a = np.arange(3*3*3).reshape(3,3,3).astype(np.uint8)
print(a)
function = transforms.ToTensor()#注意只能转换3维度的ndarray或者PIL的Image类型
c = function(a)
print(c)

'''
D:\anaconda3\python.exe E:\test\pythonProject\test.py
[[[ 0  1  2]
  [ 3  4  5]
  [ 6  7  8]]

 [[ 9 10 11]
  [12 13 14]
  [15 16 17]]

 [[18 19 20]
  [21 22 23]
  [24 25 26]]]
tensor([[[0.0000, 0.0118, 0.0235],
         [0.0353, 0.0471, 0.0588],
         [0.0706, 0.0824, 0.0941]],

        [[0.0039, 0.0157, 0.0275],
         [0.0392, 0.0510, 0.0627],
         [0.0745, 0.0863, 0.0980]],

        [[0.0078, 0.0196, 0.0314],
         [0.0431, 0.0549, 0.0667],
         [0.0784, 0.0902, 0.1020]]])

进程已结束,退出代码为 0
'''
注意: transforms.ToTensor()#注意只能转换3维度的ndarray或者PIL的Image类型的数据,源数据类型必须为uint8。
transforms.ToTensor()的作用是把RGB拆分为三通道R,G,B,然后再把每个数除以 255 归一化。
2.Normalize

a = np.arange(3*3*3).reshape(3,3,3).astype(np.float32)
b = torch.from_numpy(a)
trans1_5 = transforms.Normalize(mean=1,std=0.5)
trans3_3 = transforms.Normalize(mean=(1,2,3),std=(1,2,1))
print(a)
c = trans1_5(b)
d = trans3_3(b)
print(c)
print(d)


'''
D:\anaconda3\python.exe E:\test\pythonProject\test.py
[[[ 0.  1.  2.]
  [ 3.  4.  5.]
  [ 6.  7.  8.]]

 [[ 9. 10. 11.]
  [12. 13. 14.]
  [15. 16. 17.]]

 [[18. 19. 20.]
  [21. 22. 23.]
  [24. 25. 26.]]]
tensor([[[-2.,  0.,  2.],
         [ 4.,  6.,  8.],
         [10., 12., 14.]],

        [[16., 18., 20.],
         [22., 24., 26.],
         [28., 30., 32.]],

        [[34., 36., 38.],
         [40., 42., 44.],
         [46., 48., 50.]]])
tensor([[[-1.0000,  0.0000,  1.0000],
         [ 2.0000,  3.0000,  4.0000],
         [ 5.0000,  6.0000,  7.0000]],

        [[ 3.5000,  4.0000,  4.5000],
         [ 5.0000,  5.5000,  6.0000],
         [ 6.5000,  7.0000,  7.5000]],

        [[15.0000, 16.0000, 17.0000],
         [18.0000, 19.0000, 20.0000],
         [21.0000, 22.0000, 23.0000]]])

进程已结束,退出代码为 0

'''注意:transforms.Normalize() 转换的参数必须是float类型的tensor,当数据为3通道的时候输入的 MEAN和STD参数为列表或者三个数的元组时,是每个通道分别做上面公式的运算,从以上代码,以及打印数据可以看出来。
3.批标准化层
transforms.Normalize() transforms.Totensor()函数基本上都是在图像预处理阶段使用,他们都集成在 torchvision 这个库里面,而批标准化层一般在多层网络结构中都会使用它集成在 nn 模块里面,批标准化主要是为了解决梯度消失,加速收敛速度及稳定性的算法,经过批标准化,模型的形状是不变的,BatchNorm后是不改变输入的shape的;
nn.BatchNorm1d: N * d --> N * d
nn.BatchNorm2d: N * C * H * W -- > N * C * H * W
nn.BatchNorm3d: N * C * d * H * W --> N * C * d * H * W
我们常用的是 BatchNorm1d 和 BatchNorm2d,对于BatchNorm其主要参数为:
nn.BatchNorm1d(num_features, eps=1e-05, momentum=0.1, affine=True,track_running_stats=True, device=None, dtype=None)主要参数介绍:
num_features: 输入维度,也就是数据的特征维度;
eps: 是在分母上加的一个值,是为了防止分母为0的情况,让其能正常计算;
affine: 是仿射变化,将![]() 分别初始化为1和0;
分别初始化为1和0;
BatchNorm1d具体计算方式:


torch.var()函数的参数 unbiased 为 True 则执行样本方差,unbiased 为 False 则执行母体方差(书本上教学的方差,正常理解的方差)。torch.std(),为计算标准差。
(1)BatchNorm1d计算方式
t = torch.arange(6,dtype=torch.float32).view(2,3)
print("t",t)
print('----------------------------------')
me = t.mean(0)
print("t.mean",me)
print('----------------------------------')
print("t.var",t.var(0,False))#执行正常理解的方差
print('----------------------------------')
sq = torch.sqrt(t.var(0,False)+1e-5)
print("t.sqrt",sq)
print('----------------------------------')
x = (t-me)
print("t-me",x )
print('----------------------------------')
y = x/sq
print("x/sq",y )
print('----------------------------------')
bn1d = torch.nn.BatchNorm1d(3,1e-5,0.1,True,
                            True,None,None)
print("weight:",bn1d.weight,"\r\n","bias:",bn1d.bias)
print('----------------------------------')
bnout = bn1d(t)
print("bnout:",bnout)
print('----------------------------------')

'''
D:\anaconda3\python.exe E:\test\pythonProject\test.py
t tensor([[0., 1., 2.],
        [3., 4., 5.]])
----------------------------------
t.mean tensor([1.5000, 2.5000, 3.5000])
----------------------------------
t.var tensor([2.2500, 2.2500, 2.2500])
----------------------------------
t.sqrt tensor([1.5000, 1.5000, 1.5000])
----------------------------------
t-me tensor([[-1.5000, -1.5000, -1.5000],
        [ 1.5000,  1.5000,  1.5000]])
----------------------------------
x/sq tensor([[-1.0000, -1.0000, -1.0000],
        [ 1.0000,  1.0000,  1.0000]])
----------------------------------
weight: Parameter containing:
tensor([1., 1., 1.], requires_grad=True)
 bias: Parameter containing:
tensor([0., 0., 0.], requires_grad=True)
----------------------------------
bnout: tensor([[-1.0000, -1.0000, -1.0000],
        [ 1.0000,  1.0000,  1.0000]], grad_fn=<NativeBatchNormBackward0>)
----------------------------------

进程已结束,退出代码为 0
'''
注意: BatchNorm1d在模型训练模式的时候至少需要提供两组参数,在模型预测模式可以提供一组参数,在模型训练模式的时候至少需要提供两组参数组成2维的参数,因为训练的时候要根据两组参数来计算。BatchNorm1d平均值mean是按照列求的,目的是求这个批次的均值。
官方说明翻译:
将批量归一化应用于4D输入(具有额外通道维度的小批量2D输入),如论文《批量归一化:通过减少内部协变量偏移加速深度网络训练》中所述。
y = (x − E[x])/(√(Var[x] + ϵ))*γ + β
平均值和标准偏差是在小批量的每个维度上计算的,γ和β是大小为C的可学习参数向量(其中C是输入大小)。默认情况下,γ的元素设置为1,而β的元素则设置为0。在前向通道的训练时间,通过有偏估计器计算标准偏差,等效于torc.var(输入,无偏=False)。然而,存储在标准偏差移动平均值中的值是通过无偏估计器计算的,相当于torc.var(输入,无偏=True)。
同样在默认情况下,在训练过程中,该层保持对其计算的平均值和方差的估计,然后在评估过程中用于归一化。运行估计值保持0.1的默认动量。
如果track_running_stats设置为False,则该层不保持运行估计,而是在评估期间使用批统计信息。
笔记
这个动量论点不同于优化器类中使用的动量论点和动量的传统概念。从数学上讲,这里运行统计数据的更新规则是新的 = 1. −  推进力 × x + 推进力 × xt,其中x是估计的统计量,xt是新的观测值。
由于批处理规范化是在C维度上完成的,计算(N,H,W)切片的统计信息,因此称之为“空间批处理规范”是一个常见的术语。
(1)BatchNorm2d计算方式
t = torch.arange(2*3*3*3,dtype=torch.float32).view(2,3,3,3)#生成tensor数据
print("t",t)
bn1d = torch.nn.BatchNorm2d(3,1e-5,0.1,True,
                            True,None,None)
print("weight:",bn1d.weight,"\r\n","bias:",bn1d.bias)
print('----------------------------------')
bnout = bn1d(t)
print("bnout:",bnout)
print('----------------------------------')

#取出来第二通道数据
x = [9., 10., 11.,12., 13., 14.,15., 16., 17.,36., 37., 38.,39., 40., 41.,42., 43., 44.]
x = np.array(x)
mean = x.mean()
print("mean",mean)
out = (x-mean)/np.sqrt(x.var()+1e-5)
print("out",out.reshape(2,3,3))
# x.var()   这个是求方差
# x.std()   这个是求标准差
# print(x.std(),x.var())


'''
D:\anaconda3\python.exe E:\test\pythonProject\test.py
t tensor([[[[ 0.,  1.,  2.],
          [ 3.,  4.,  5.],
          [ 6.,  7.,  8.]],

         [[ 9., 10., 11.],
          [12., 13., 14.],
          [15., 16., 17.]],

         [[18., 19., 20.],
          [21., 22., 23.],
          [24., 25., 26.]]],


        [[[27., 28., 29.],
          [30., 31., 32.],
          [33., 34., 35.]],

         [[36., 37., 38.],
          [39., 40., 41.],
          [42., 43., 44.]],

         [[45., 46., 47.],
          [48., 49., 50.],
          [51., 52., 53.]]]])
weight: Parameter containing:
tensor([1., 1., 1.], requires_grad=True)
 bias: Parameter containing:
tensor([0., 0., 0.], requires_grad=True)
----------------------------------
bnout: tensor([[[[-1.2732, -1.2005, -1.1277],
          [-1.0550, -0.9822, -0.9094],
          [-0.8367, -0.7639, -0.6912]],

         [[-1.2732, -1.2005, -1.1277],
          [-1.0550, -0.9822, -0.9094],
          [-0.8367, -0.7639, -0.6912]],

         [[-1.2732, -1.2005, -1.1277],
          [-1.0550, -0.9822, -0.9094],
          [-0.8367, -0.7639, -0.6912]]],


        [[[ 0.6912,  0.7639,  0.8367],
          [ 0.9094,  0.9822,  1.0550],
          [ 1.1277,  1.2005,  1.2732]],

         [[ 0.6912,  0.7639,  0.8367],
          [ 0.9094,  0.9822,  1.0550],
          [ 1.1277,  1.2005,  1.2732]],

         [[ 0.6912,  0.7639,  0.8367],
          [ 0.9094,  0.9822,  1.0550],
          [ 1.1277,  1.2005,  1.2732]]]], grad_fn=<NativeBatchNormBackward0>)
----------------------------------
mean 26.5
out [[[-1.27321838 -1.20046305 -1.12770771]
  [-1.05495237 -0.98219704 -0.9094417 ]
  [-0.83668637 -0.76393103 -0.69117569]]

 [[ 0.69117569  0.76393103  0.83668637]
  [ 0.9094417   0.98219704  1.05495237]
  [ 1.12770771  1.20046305  1.27321838]]]

进程已结束,退出代码为 0
'''
以上代码的通道2,bn计算后的值和np按照公式计算出来的值一样。
注意:BatchNorm2d的均值是按照通道内所有数据求和除以个数得来的,比如(b,c,w,h),求通道一的均值,把 b 批次内所有通道1数据全部加起来除以个数求mean均值,其他通道类似,每个通道互不干扰。
4.Dropout
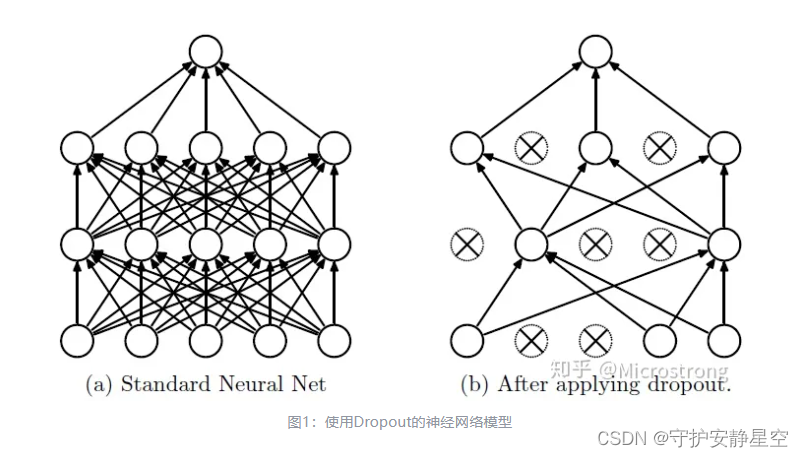
当一个复杂的前馈神经网络被训练在小的数据集时,容易造成过拟合。为了防止过拟合,可以通过阻止特征检测器的共同作用来提高神经网络的性能。Dropout会随机选取一些张量置为0,阻止梯度向后传播,是为了减少张量之间的依赖关系,让模型学到更多特征。
t = torch.arange(6,dtype=torch.float32).view(1,-1,3)
print(t)
dp = torch.nn.Dropout1d(0.5)
dpt = dp(t)
print(dpt)

'''
D:\anaconda3\python.exe E:\test\pythonProject\test.py
tensor([[[0., 1., 2.],
         [3., 4., 5.]]])
tensor([[[0., 2., 4.],
         [0., 0., 0.]]])

进程已结束,退出代码为 0
'''Dropout1d支持2维和3维输入 ,随机置0输入,不置0的输入变为,输入/Dropout1d概率 ,置0输入可以让梯度不往后面再进行传输。
t = torch.arange(27,dtype=torch.float32).view(1,3,3,3)
print(t)
dp = torch.nn.Dropout2d(0.5)
dpt = dp(t)
print(dpt)

'''
D:\anaconda3\python.exe E:\test\pythonProject\test.py
tensor([[[[ 0.,  1.,  2.],
          [ 3.,  4.,  5.],
          [ 6.,  7.,  8.]],

         [[ 9., 10., 11.],
          [12., 13., 14.],
          [15., 16., 17.]],

         [[18., 19., 20.],
          [21., 22., 23.],
          [24., 25., 26.]]]])
tensor([[[[ 0.,  2.,  4.],
          [ 6.,  8., 10.],
          [12., 14., 16.]],

         [[ 0.,  0.,  0.],
          [ 0.,  0.,  0.],
          [ 0.,  0.,  0.]],

         [[36., 38., 40.],
          [42., 44., 46.],
          [48., 50., 52.]]]])

进程已结束,退出代码为 0
'''
Dropout2d支持4维的输入(bach,c,w,h),随机置 0 某个通道 ,不置0的输入变为,输入/Dropout1d概率 ,置0输入可以让梯度不往后面再进行传输。
注意: Dropout 是在模型训练的时候才起作用,在模型预测的时候不起作用,BatchNorm在训练的时候会优化自己的参数,在预测模式时候保持权重和偏置参数不变,会使 输出数值 = 输入*weight + bias ,所以在不同使用场景要设置模型为不同的模式。
模型训练模式和预测模式调用以下函数改变状态:
model.train()#模型处于训练模式
model.eval()#模型处于预测模式
注意:模型训练模式和推理模式设置只影响 dropout层和BatchNorm层,对其他层没有影响,在训练模式的时候dropout层有效,在推理模式dropout层无效。BatchNorm层在训练模式按照公式计算,在推理模式直接用 输入*weight+bias = 输出 (具体参数计算上面代码和运行输出有相关示例),我们在做推理的时候需要设置 with torch.no_grad(): 不计算梯度 和 model.eval() 模型推理模式。图像预处理的相关转换都在 torchvision.transforms 这个模块里面。dropout和BatchNorm在torch.nn这个模块里面。


