目录
一、网页的状态页
1、状态页的基本配置
2、搭配验证模块使用
3、结合白名单使用
二、nginx 第三方模块
1、echo模块
1.1 编译安装echo模块
1.2 配置echo模块
三、nginx变量
1、内置变量
2、自定义变量
四、自定义图标
五、自定义访问日志
1、自定义日志格式
2、自定义 json 格式日志
3、日志分割脚本
六、nginx压缩功能
6.1 开启nginx压缩
6.2 开启nginx预压缩
七、https功能
7.1 https概念
7.2 配置自签名证书
一、网页的状态页
1、状态页的基本配置
基于nginx 模块 ngx_http_stub_status_module 实现,在编译安装nginx的时候需要添加编译参数 --with-http_stub_status_module,否则配置完成之后监测会是提示语法错误注意:状态页显示的是整个服务器的状态,而非虚拟主机的状态
nginx服务器配置:
[root@localhost ~]#vim /apps/nginx/conf.d/dh.conf
server {
   listen 80;
   server_name www.pc.com;
   root /opt;
   location /status {
        stub_status;
        }
}
[root@localhost ~]#nginx -s reload
客户端测试:

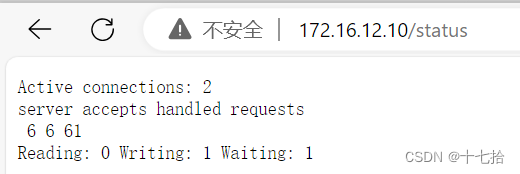
网页的状态页输出详解
Active connections: 2
server accepts handled requests
          2       2       56
 上面三个数字分别对应accepts(接收),handled(处理),requests(请求)三个值
Reading: 0 Writing: 1 Waiting: 1- Active connections:当前处于活动状态的客户端连接数,包括连接等待空闲连接数=reading+writing+waiting
- accepts:统计总值,Nginx自启动后已经接受的客户端请求的总数
- handled:统计总值,Nginx自启动后已经处理完成的客户端请求总数,通常等于accepts,除非有因worker_connections限制等被拒绝的连接
- requests:统计总值,Nginx自启动后客户端发来的总的请求数
- Reading:当前状态,正在读取客户端请求报文首部的连接的连接数,数值越大,说明排队现象严重,性能不足
- Writing:当前状态,正在向客户端发送响应报文过程中的连接数,数值越大,说明访问量很大
- Waiting:当前状态,正在等待客户端发出请求的空闲连接数,开启 keep-alive的情况下,这个值等于active – (reading+writing)
拓展:客户端如何只提取基本状态的accepts、handle、requests的总值?
[root@localhost ~]#curl 172.16.12.10/status 2>/dev/null | awk '/Reading/{print $2,$4,$6}'
2、搭配验证模块使用
为安全考虑,可以搭配验证模块一起使用,即需要使用用户和密码,才能打开网页状态页
nginx服务器配置:
#htpasswd命令生成密钥
[root@localhost ~]#yum install -y httpd-tools
[root@localhost ~]#htpasswd -c /mnt/.nginxuser dh
[root@localhost ~]#cat /mnt/.nginxuser
[root@localhost ~]#vim /apps/nginx/conf.d/dh.conf
server {
    listen 80;
    server_name  www.dh.com;
    root /opt/;
    location /status {
    stub_status;
    auth_basic  "welcome";
    auth_basic_user_file  /mnt/.nginxuser;
 }
}
[root@localhost ~]#nginx -s reload
客户端测试:
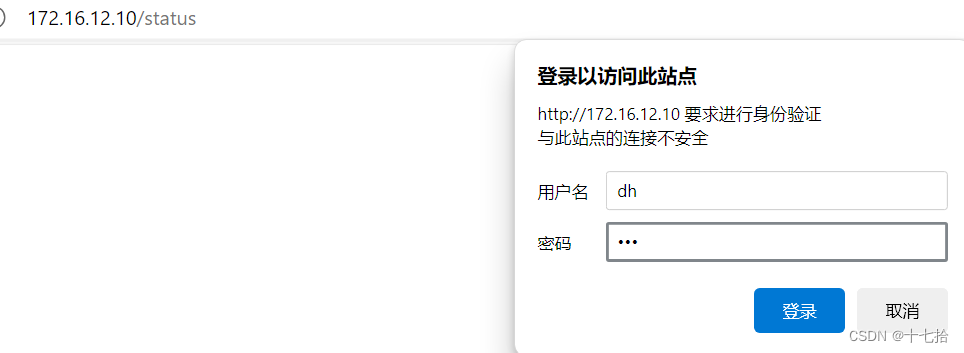
拓展:此时客户端如何再想只提取基本状态的accepts、handle、requests的总值?
[root@localhost ~]#curl http://dh:123@172.16.12.10/status 2>/dev/null | awk '/Reading/{print $2,$4,$6}'
3、结合白名单使用
为进一步安全考虑,只允许一个IP地址可查看网页状态页,其他都不被允许
nginx服务器配置:
[root@localhost ~]#vim /apps/nginx/conf.d/dh.conf
server {
    listen 80;
    server_name  www.dh.com;
    root /opt/;
    location /status {
    stub_status;
    auth_basic  "welcome";
    auth_basic_user_file  /mnt/.nginxuser;
    allow 172.16.12.1;
    deny all;
 }
}
[root@localhost ~]#nginx -s reload
客户端测试:


二、nginx 第三方模块
Nginx是一个高性能的HTTP和反向代理服务器,它的功能可以通过第三方模块进行扩展。可以通过源代码编译Nginx时进行包含,也可以通过Nginx的模块管理系统进行安装
1、echo模块
用于在nginx服务器上输出自定义内容的模块。通过使用echo模块,用户可以在nginx配置中编写自定义的响应内容,包括文本、变量和其他信息。这使得nginx服务器能够更加灵活地生成响应,以满足特定需求或动态生成内容
开源的echo模块下载网:https://github.com/openresty/echo-nginx-module1.1 编译安装echo模块
①先关闭 nginx,然后下载压缩包,并解压
[root@localhost ~]#systemctl stop nginx
[root@localhost ~]#yum install git -y      #安装git
[root@localhost ~]#cd /data
[root@localhost ~]#git clone https://github.com/openresty/echo-nginx-module.git
[root@localhost data]#unzip echo-nginx-module-master.zip
② 切换至nginx安装包目录,编译安装echo模块
[root@localhost data]#cd nginx-1.18.0/
[root@localhost nginx-1.18.0]# ./configure --help | grep add
[root@localhost nginx-1.18.0]#./configure --prefix=/apps/nginx --user=nginx --group=nginx --with-http_ssl_module --with-http_v2_module --with-http_realip_module --with-http_stub_status_module --with-http_gzip_static_module --with-pcre --with-stream --with-stream_ssl_module --with-stream_realip_module --add-module=/data/echo-nginx-module-master
[root@localhost nginx-1.18.0]# make && make install
[root@localhost nginx-1.18.0]# systemctl start nginx

1.2 配置echo模块
nginx服务器配置:
[root@localhost ~]#vim /apps/nginx/conf.d/dh.conf
server {
        listen 80;
        server_name www.dh.com;
        root /opt/;
        location /ip {
        echo "welcome,your ip addr: ";
        echo $remote_addr;
        }
}
[root@localhost ~]#nginx -s reload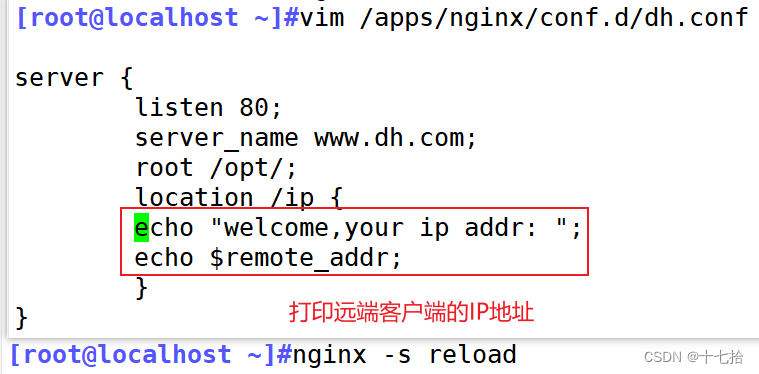
客户端测试:

三、nginx变量
1、内置变量
| 内置变量 | 说明 |
|---|---|
| $remote_addr; | 存放了客户端的地址,注意是客户端的公网IP |
| $args; | 变量中存放URL中的参数 |
| $document_root; | 保存了针对当前资源的请求系统的根目录,如:/apps/nginx/html |
| $document_uri; | 保存了当前请求中不包含参数的URI,注意是不包含请求的指令 |
| $host; | 存放了请求的host名称,服务端的地址 |
| $request_filename; | 当前请求的资源文件的磁盘路径,由root或alias指令与URI请求生成的文件绝对路径,如:/apps/nginx/html/main/index.html |
| $scheme; | 请求的协议,例如:http、https、ftp等 |
| $http_user_agent; | 客户端浏览器的详细信息 |
| $http_cookie; | 客户端的cookie信息 |
#补充

$proxy_add_x_forwarded_for
#此变量表示将客户端IP追加请求报文中X-Forwarded-For首部字段,多个IP之间用逗号分隔,如果请求中没有X-Forwarded-For,就使用$remote_addrthe “X-Forwarded-For” client request header field with the $remote_addr variable appended to it, separated by a comma. If the “X-Forwarded-For” field is not present in the client request header, the $proxy_add_x_forwarded_for variable is equal to the $remote_addr variable.
客户机    代理1     代理2     nginx服务器
$proxy_add_x_forwarded_for: 在代理1 上存的是  客户机的ip
$proxy_add_x_forwarded_for: 在代理2 上存的是  客户机的ip,代理1的ip            用逗号隔开
$proxy_add_x_forwarded_for: nginx  上存的是  客户机的ip,代理1的ip,代理2的ip

$args;
#变量中存放了URL中的参数,例如:http://www.kgc.org/main/index.do?id=20190221&partner=search
#返回结果为: id=20190221&partner=search    #存放的就是这个

select   *  from table  where id=20190221

$document_uri;
#保存了当前请求中不包含参数的URI,注意是不包含请求的指令,比
如:http://www.kgc.org/main/index.do?id=20190221&partner=search会被定义为/main/index.do
#返回结果为:/main/index.do

limit_rate 10240;
echo $limit_rate;
#如果nginx服务器使用limit_rate配置了显示网络速率,则会显示,如果没有设置, 则显示0

$remote_port;
#客户端请求Nginx服务器时随机打开的端口,这是每个客户端自己的端口

$remote_user;
#已经经过Auth Basic Module验证的用户名

$request_body_file;
#做反向代理时发给后端服务器的本地资源的名称

$request_method;
#请求资源的方式,GET/PUT/DELETE等

$request_uri;   https:// www.baidu.com/main/index.do?id=20190221&partner=search
#包含请求参数的原始URI,不包含主机名,相当于:$document_uri?$args,例如:/main/index.do?id=20190221&partner=search

$server_protocol;
#保存了客户端请求资源使用的协议的版本,例如:HTTP/1.0,HTTP/1.1,HTTP/2.0等

$server_addr;
#保存了服务器的IP地址

$server_name;
#请求的服务器的主机名

$server_port;
#请求的服务器的端口号

$http_<name>
#name为任意请求报文首部字段,表示记录请求报文的首部字段
arbitrary request header field; the last part of a variable name is the field name converted to lower case with dashes replaced by underscores
#用下划线代替横线
#示例: echo $http_User_Agent;

$cookie_<name>
#name为任意请求报文首部字部cookie的key名

$http_<name>
#name为任意请求报文首部字段,表示记录请求报文的首部字段,ame的对应的首部字段名需要为小写,如果有横线需要替换为下划线
arbitrary request header field; the last part of a variable name is the field
name converted to lower case with dashes replaced by underscores #用下划线代替横线
#示例:
echo $http_user_agent;
echo $http_host;

$sent_http_<name>
#name为响应报文的首部字段,name的对应的首部字段名需要为小写,如果有横线需要替换为下划线,此变量有问题
echo $sent_http_server;

$arg_<name>
#此变量存放了URL中的指定参数,name为请求url中指定的参数
#对比变量 $arg 是全部, 如果要id如下
echo $arg_id;
nginx服务器配置:
[root@localhost ~]#vim /apps/nginx/conf.d/dh.conf
server {
        listen 80;
        server_name www.dh.com;
        root /opt/;
location /main {
        index index.html;
        default_type text/html;
        echo "hello world,main-->";
        echo $remote_addr;
        echo $args;
        echo $arg_user;
        echo $document_root;
        echo $document_uri;
        echo $host;
        echo $http_user_agent;
        echo $http_cookie;
        echo $request_filename;
        echo $scheme;
        echo $scheme://$host$document_uri?$args;
        }
}
[root@localhost ~]#nginx -s reload
客户端测试:
[root@localhost ~]#curl 'http://172.16.12.10/main?user=dh&title=welcome'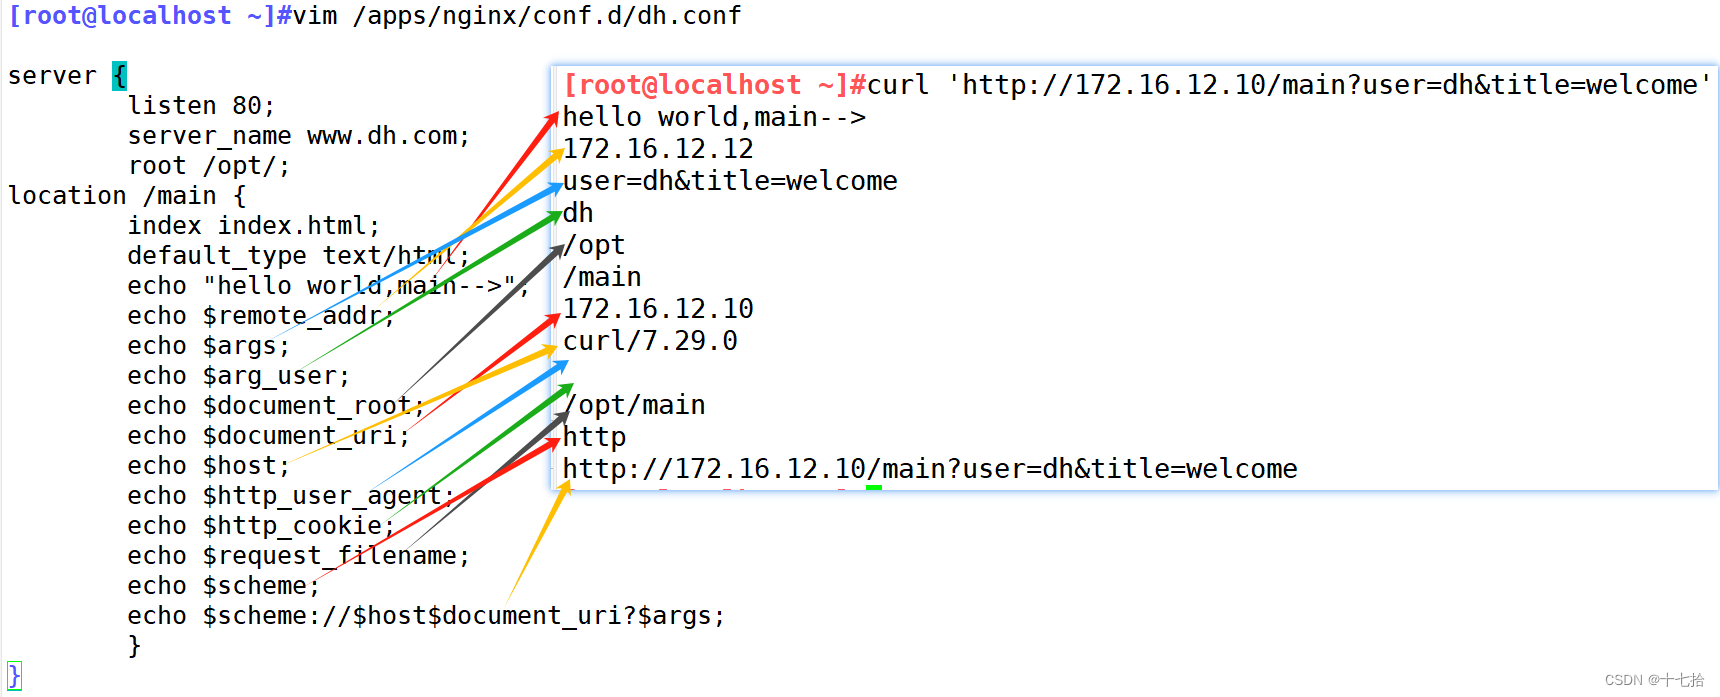
2、自定义变量
假如需要自定义变量名称和值,使用指令 set $variable value;
#语法格式
Syntax: set $variable value;
#$variable 是要定义或更新的变量名,value 是要分配给变量的值
Context: server, location, if
nginx服务器配置:
[root@localhost ~]#vim /apps/nginx/conf.d/dh.conf
server {
        listen 80;
        server_name www.dh.com;
        root /opt/;
        location /mnt {
        set $name yun;
        echo $name;
        set $my_port $server_port;    #将内置变量定义给自定义变量
        echo $my_port;
        }
}
[root@localhost ~]#nginx -s reload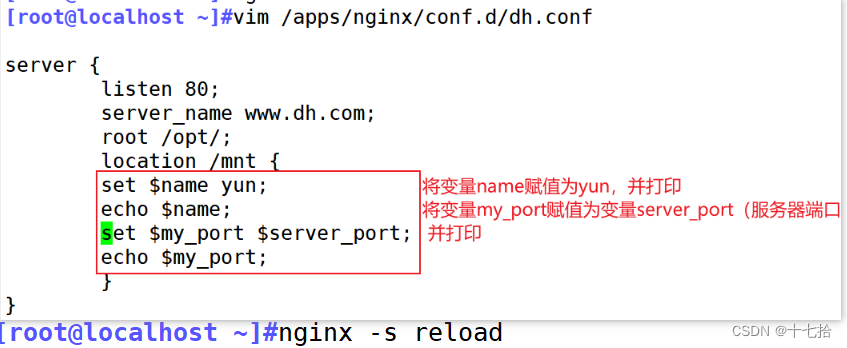
客户端测试:

四、自定义图标
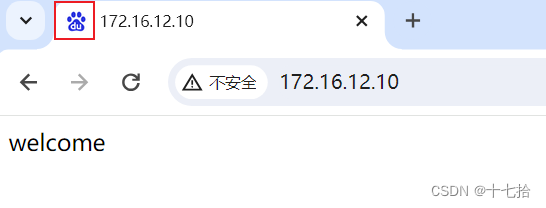
favicon.ico 文件是浏览器收藏网址时显示的图标,当客户端使用浏览器问页面时,浏览器会自己主动发起请求获取页面的favicon.ico文件,但是当浏览器请求的 favicon.ico 文件不存在时,服务器会记录404日志,而且浏览器也会显示404报错
nginx服务器配置:
[root@localhost conf.d]#cd /apps/nginx/html/
[root@localhost html]#echo "welcome" > index.html
[root@localhost html]#rm -rf /apps/nginx/conf.d/dh.conf
[root@localhost html]#wget www.baidu.com/favicon.ico
[root@localhost html]#nginx -s reload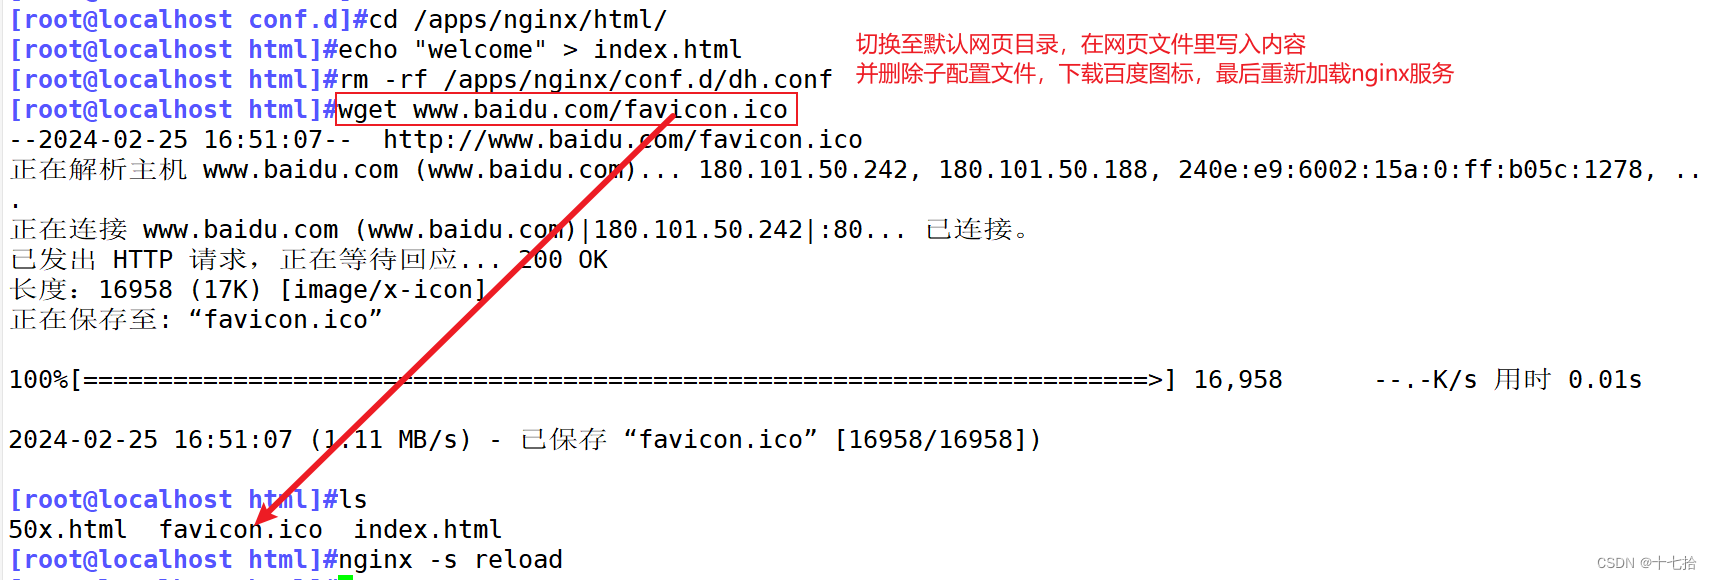
客户端测试:
五、自定义访问日志
1、自定义日志格式
访问日志是记录客户端即用户的具体请求内容信息,而在全局配置模块中的 error log 是记录 nginx服务器运行时的日志保存路径和记录日志的 level,因此两者是不同的,而且Nginx的错误日志一般只有一个,但是访问日志可以在不同 server 中定义多个,定义一个日志需要使用 access_log 指定日志的保存路径,使用 log_format 指定日志的格式,格式中定义要保存的具体日志内容。
访问日志由 ngx_http_log_module 模块实现
Syntax: access_log path [format [buffer=size] [gzip[=level]] (flush=time] [if=condition]];access_log off;
Defau1t:
access_log 1ogs/access.1og combined;
Context: http,server, location,if in location,limit_except
nginx服务器配置:
[root@localhost ~]#vim /apps/nginx/conf/nginx.conf
log_format  main  '$remote_addr - $remote_user [$time_local] "$request" '
                      '$status $body_bytes_sent "$http_referer" '
                      '"$http_user_agent" "$http_x_forwarded_for"'
                      '$server_name:$server_port';

log_format  test  '$remote_addr - $remote_user [$time_local] "$request" '
                      '$status $body_bytes_sent "$http_referer" '
                      '"$http_user_agent" "$http_x_forwarded_for"'
                      '$server_name:$server_port';

#格式可以定义多个,但只能启用一个
#注:如果开启 include 注意定义自配置文件与日志格式的上下关系,日志格式一定要在include 之前,否则会不生效
[root@localhost ~]#nginx -s reload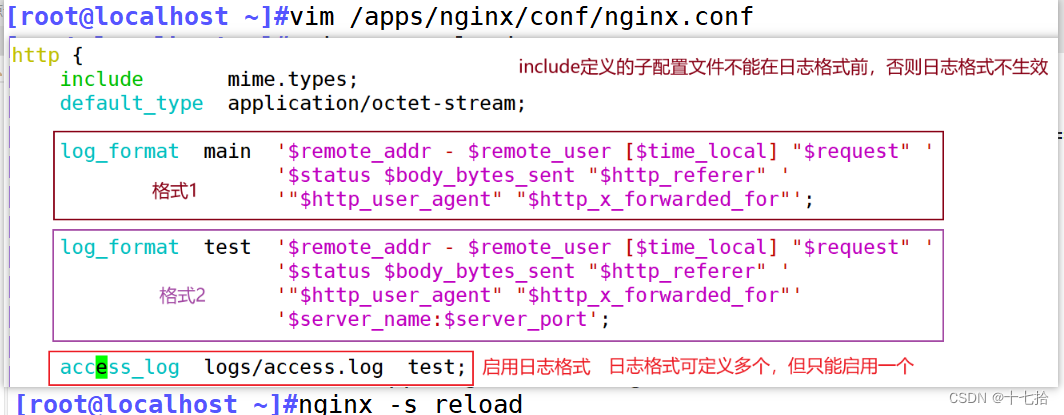
客户端访问:

服务端查看日志:
[root@localhost ~]#tailf /apps/nginx/logs/access.log![]()
拓展:如何提取日志中的状态码?
[root@localhost ~]#cat /apps/nginx/logs/access.log|tail -n 1|awk '{print $9}'
拓展:如何统计状态码个数?
[root@localhost ~]#cat /apps/nginx/logs/access.log|awk '{print $9}'|sort -n|uniq -c
拓展:如何统计远端客户端ip地址个数?
[root@localhost ~]#cat /apps/nginx/logs/access.log|awk '{print $1}'|sort -n|uniq -c
[root@localhost ~]#cat /apps/nginx/logs/access.log|awk '{a[$1]++};END{for (i in a){print i,a[i]}}'
2、自定义 json 格式日志
方便ELK收集日志
nginx服务器配置:
[root@localhost ~]#vim /apps/nginx/conf/nginx.conf
log_format access_json '{"@timestamp":"$time_iso8601",'
        '"host":"$server_addr",'
        '"clientip":"$remote_addr",'
        '"size":$body_bytes_sent,'
        '"responsetime":$request_time,'
        '"upstreamtime":"$upstream_response_time",'
        '"upstreamhost":"$upstream_addr",'
        '"http_host":"$host",'
        '"uri":"$uri",'
        '"xff":"$http_x_forwarded_for",'
        '"referer":"$http_referer",'
        '"tcp_xff":"$proxy_protocol_addr",'
        '"http_user_agent":"$http_user_agent",'
        '"status":"$status"}';
access_log logs/access.log access_json;
#格式可以定义多个,但只能启用一个
#注:如果开启 include 注意定义自配置文件与日志格式的上下关系,日志格式一定要在include 之前,否则会不生效
[root@localhost ~]#nginx -s reload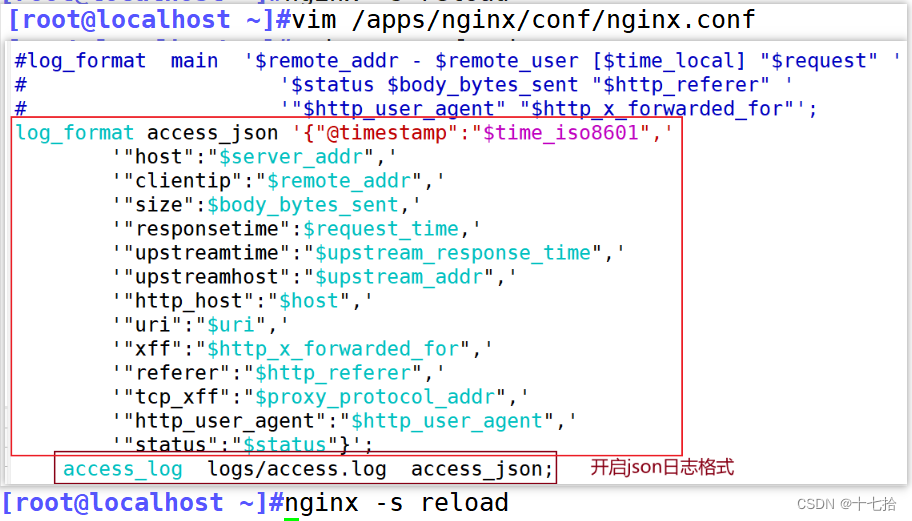
客户端访问:

服务端查看日志:
[root@localhost ~]#tailf /apps/nginx/logs/access.log
拓展:如何提取日志中的状态码?
[root@localhost ~]#cat /apps/nginx/logs/access.log|tail -n 1|sed -r 's/.*(status)":"(.*)"}.*/\2/'
拓展:如何统计状态码个数?
[root@localhost ~]#cat /apps/nginx/logs/access.log |sed -r 's/.*(status)":"(.*)"}.*/\2/'|sort -n|uniq -c
拓展:如何统计远端客户端ip地址个数?
[root@localhost ~]#cat /apps/nginx/logs/access.log|awk -F: '{print $7}'|sed -r 's/"(.*)",.*/\1/'|sort -n|uniq -c
3、日志分割脚本
[root@localhost ~]#vim /opt/fenge.sh
#!/bin/bash
# Filename: fenge.sh
day=$(date -d "-1 day" "+%Y%m%d")											#显示前一天的时间
logs_path="/apps/nginx"
pid_path="/apps/nginx/logs/nginx.pid"
[ -d $logs_path ] || mkdir -p $logs_path 									#创建日志文件目录
mv /apps/nginx/logs/access.log ${logs_path}/dh.com-access.log-$day	#移动并重命名日志文件
kill -USR1 $(cat $pid_path)													#重建新日志文件
find $logs_path -mtime +30 -exec rm -rf {} \;								#删除30天之前的日志文件
#find $logs_path -mtime +30 | xargs rm -rf

[root@localhost ~]#chmod +x /opt/fenge.sh
[root@localhost ~]#/opt/fenge.sh
[root@localhost ~]#ls /apps/nginx
[root@localhost ~]#ls /apps/nginx/logs/access.log

#设置周期计划任务
[root@localhost ~]#crontab -e
0 1 * * * /opt/fenge.sh
六、nginx压缩功能
支持对指定类型的文件进行压缩然后再传输给客户端,而且压缩还可以设置压缩比例,压缩后的文件大小将比源文件显著变小,这样有助于降低出口带宽的利用率,降低企业的IT支出,不过会占用相应的CPU资源。Nginx对文件的压缩功能是依赖于模块 ngx_http_gzip_module
#指令
#启用或禁用gzip压缩,默认关闭
gzip on | off;

#压缩比由低到高从1到9,默认为1
gzip_comp_level level;

#指令
#禁用IE6 gzip功能
gzip_disable "MSIE [1-6]\.";

#gzip压缩的最小文件,小于设置值的文件将不会压缩
gzip_min_length 1k;

#启用压缩功能时,协议的最小版本,默认HTTP/1.1
gzip_http_version 1.0 | 1.1;

#指定Nginx服务需要向服务器申请的缓存空间的个数和大小,平台不同,默认:32 4k或者16 8k;
gzip_buffers number size;

#指明仅对哪些类型的资源执行压缩操作;默认为gzip_types text/html,不用显示指定,否则出错
gzip_types mime-type ...;

#如果启用压缩,是否在响应报文首部插入“Vary: Accept-Encoding”,一般建议打开
gzip_vary on | off;

#预压缩,先压缩好,不用临时压缩,消耗cpu
gzip_static on | off;
6.1 开启nginx压缩
[root@localhost ~]#cd /apps/nginx/html/
[root@localhost html]#dd if=/dev/zero of=/apps/nginx/html/index.html count=1 bs=5M
[root@localhost html]#ll -h
此时未开启nginx压缩时,用客户端访问,并查看服务器日志及客户端浏览器的开发者工具(按快捷键F12)
可以看到客户端下载的网页文件大小非常大


nginx服务器配置:
[root@localhost ~]#vim /apps/nginx/conf.d/dh.conf
server {
        listen       80;
        server_name  www.dh.com;
        root         /apps/nginx/html;
        gzip on;
        gzip_comp_level 9;
        gzip_min_length 1k;
        gzip_vary on;
}
[root@localhost ~]#nginx -s reload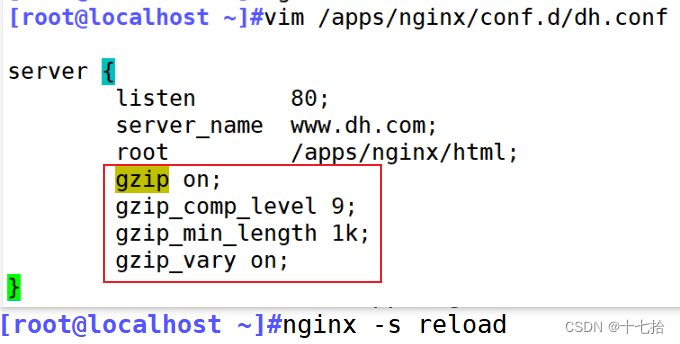
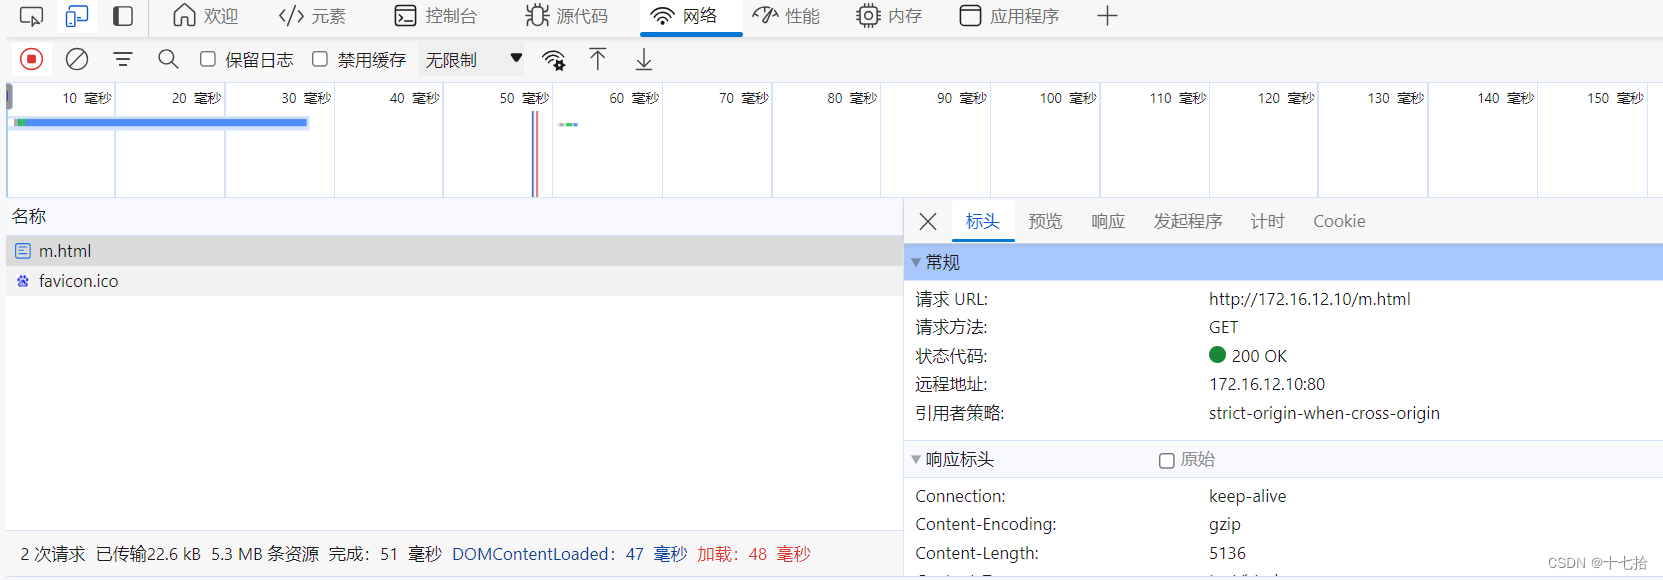
此时开启nginx压缩后,用客户端访问,并查看服务器日志及客户端浏览器的开发者工具(按快捷键F12)
可以看到客户端下载的网页文件大小被压缩了


6.2 开启nginx预压缩
gzip_static on | off 预压缩,先压缩好,不用临时压缩,消耗cpu
[root@localhost html]#gzip index.html
[root@localhost html]#mv index.html.gz  m.html.gz
nginx服务器配置:
[root@localhost ~]#nginx -V
[root@localhost ~]#vim /apps/nginx/conf.d/dh.conf
server {
        listen       80;
        server_name  www.dh.com;
        root         /apps/nginx/html;
        gzip on;
        gzip_comp_level 9;
        gzip_min_length 1k;
        gzip_vary on;
        gzip_static on;
}
[root@localhost ~]#nginx -s reload
客户端测试:

七、https功能
7.1 https概念
Web 网站的登录页面都是使用 https 加密传输的,加密数据以保障数据的安全,HTTPS 能够加密信息,以免敏感信息被第三方获取,所以很多银行网站或电子邮箱等等安全级别较高的服务都会采用HTTPS协议,HTTPS其实是有两部分组成:HTTP + SSL / TLS,也就是在HTTP上又加了一层处理加密信息的模块。服务端和客户端的信息传输都会通过TLS进行加密,所以传输的数据都是加密后的数据
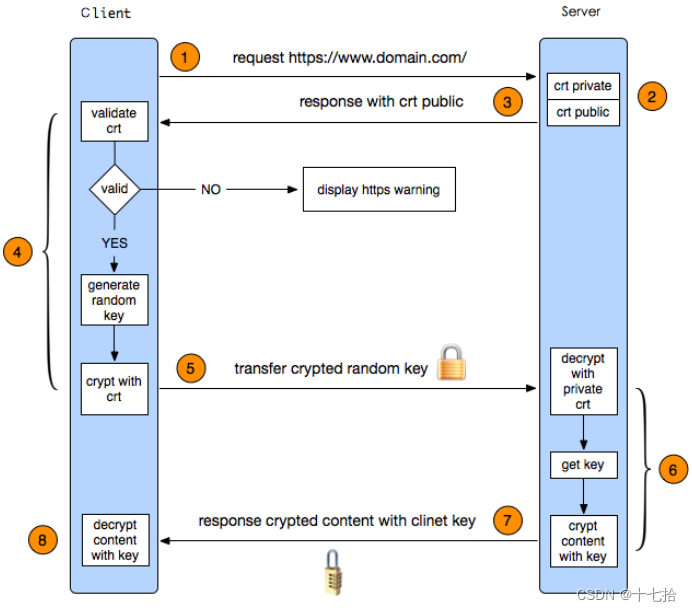
过程:
- 客户端发起HTTPS请求
用户在浏览器里输入一个 https 网址,然后连接到服务器的 443 端口
- 服务端的配置
采用HTTPS协议的服务器必须要有一套数字证书,可以自己制作,也可以向组织申请,区别就是自己颁发的证书需要客户端验证通过,才可以继续访问,而使用受信任的公司申请的证书则不会弹出提示页面。这套证书其实就是一对公钥和私钥
- 传送服务器的证书给客户端
证书里其实就是公钥,并且还包含了很多信息,如证书的颁发机构,过期时间等等
- 客户端解析验证服务器证书
这部分工作是由客户端的TLS来完成的,首先会验证公钥是否有效,比如:颁发机构,过期时间等等,如果发现异常,则会弹出一个警告框提示证书存在问题。如果证书没有问题,那么就生成一个随机值,然后用证书中公钥对该随机值进行非对称加密
- 客户端将加密信息传送服务器
这部分传送的是用证书加密后的随机值,目的就是让服务端得到这个随机值,以后客户端和服务端的通信就可以通过这个随机值来进行加感解密了
- 服务端解密信息
服务端将客户端发送过来的加密信息用服务器私钥解密后,得到了客户端传过来的随机值
- 服务器加密信息并发送信息
服务器将数据利用随机值进行对称加密,再发送给客户端
- 客户端接收并解密信息
客户端用之前生成的随机值解密服务段传过来的数据,于是获取了解密后的内容
7.2 配置自签名证书
nginx 的 https 功能基于模块 ngx_http_ssl_module 实现,因此如果是编译安装的nginx要使用参数 ngx_http_ssl_module 开启 ssl 功能,但是作为 nginx 的核心功能,yum安装的 nginx 默认就是开启的,编译安装的nginx需要指定编译参数 --with-http_ssl_module 开启

#指令
ssl on | off;
#为指定的虚拟主机配置是否启用ssl功能,此功能在1.15.0废弃,使用listen [ssl]替代
listen 443 ssl;

ssl_certificate /path/to/file;
#指向包含当前虚拟主机和CA的两个证书信息的文件,一般是crt文件

ssl_certificate_key /path/to/file;
#当前虚拟主机使用的私钥文件,一般是key文件

ssl_protocols [SSLv2] [SSLv3] [TLSv1] [TLSv1.1] [TLSv1.2];
#支持ssl协议版本,早期为ssl现在是TLS,默认为后三个

ssl_session_cache off | none | [builtin[:size]] [shared:name:size];
#配置ssl缓存
 off: #关闭缓存
 none:  #通知客户端支持ssl session cache,但实际不支持
 builtin[:size]:#使用OpenSSL内建缓存,为每worker进程私有
 [shared:name:size]:#在各worker之间使用一个共享的缓存,需要定义一个缓存名称和缓存空间大小,一兆可以存储4000个会话信息,多个虚拟主机可以使用相同的缓存名称

ssl_session_timeout time;
#客户端连接可以复用ssl session cache中缓存的有效时长,默认5m
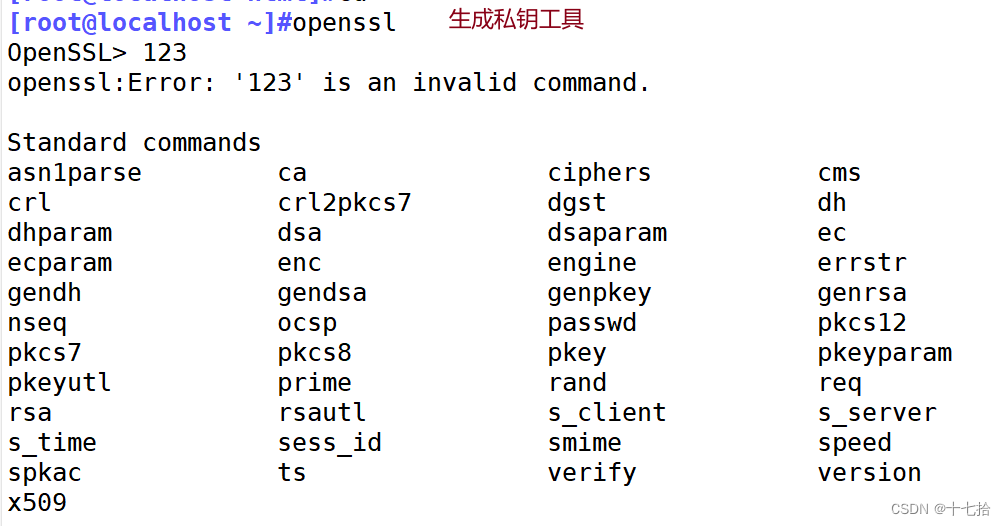
OpenSSL:
一个开源的密码库,它提供了一系列的加密和解密功能,包括对称加密、非对称加密、哈希函数、数字证书等。OpenSSL的命令行工具可以用来生成密钥对、生成证书请求、签发证书、加密和解密文件等
nginx服务器配置:
[root@localhost ~]#cd /opt/ssl/
[root@localhost ssl]#vim certificate.sh
#自签名证书脚本
CA_SUBJECT="/O=dh/CN=ca.dh.com"
SUBJECT="/C=CN/ST=js/L=nj/O=dh/CN=www.dh.com"
SERIAL=34
EXPIRE=202002
FILE=dh.com

openssl req  -x509 -newkey rsa:2048 -subj $CA_SUBJECT -keyout ca.key -nodes -days 202002 -out ca.crt

openssl req -newkey rsa:2048 -nodes -keyout ${FILE}.key  -subj $SUBJECT -out ${FILE}.csr

openssl x509 -req -in ${FILE}.csr  -CA ca.crt -CAkey ca.key -set_serial $SERIAL  -days $EXPIRE -out ${FILE}.crt

chmod 600 ${FILE}.key ca.key

[root@localhost ssl]#bash certificate.sh
[root@localhost ssl]#ls
[root@localhost ssl]#cat dh.com.crt ca.crt >www.dh.com.crt
[root@localhost ssl]#mv dh.com.key www.dh.com.key
[root@localhost ssl]#ll www*
[root@localhost ~]#vim /apps/nginx/conf.d/dh.conf
server{
        listen 80;
        server_name www.dh.com;
        root /apps/nginx/html/;
        listen 443 ssl;
        ssl_certificate /opt/ssl/www.dh.com.crt;
        ssl_certificate_key /opt/ssl/www.dh.com.key;
        ssl_session_cache shared:sslcache:20m;
        ssl_session_timeout 10m;
}
[root@localhost ~]#nginx -s reload
客户端测试:


