官网资料:
https://github.com/QwenLM/Qwen/blob/main/README_CN.md
文章目录
- 准备数据
- 运行微调
- 设置网络代理
- 启动容器
- 执行 LoRA 微调
- 修改 finetune/finetune_lora_single_gpu.sh
- 运行微调
- 执行推理
在本篇博客中,我们将介绍如何使用 LoRA 方法微调通义千问模型,以适应特定任务或数据。首先,我们将简要介绍准备数据和运行微调所需的步骤,然后详细说明如何执行 LoRA 微调。
准备数据
首先,您需要准备您的训练数据,并将其存储为 JSON 文件。每个样本都应该是一个字典,包含 id 和对话信息。以下是一个示例:
[
  {
    "id": "identity_0",
    "conversations": [
      {
        "from": "user",
        "value": "你好"
      },
      {
        "from": "assistant",
        "value": "我是一个语言模型,我叫通义千问。"
      }
    ]
  }
]
运行微调
设置网络代理
在开始微调之前,请确保设置好网络代理,以确保能够顺利访问所需资源。
export http_proxy=http://10.20.31.16:10811
export https_proxy=http://10.20.31.16:10811
启动容器
您可以通过以下命令启动容器:
docker run --gpus all -e LANG=C.UTF-8 -it zhenhengdong/nlp:qwenllm_cu121_V1_finetuning bash
执行 LoRA 微调
我们将使用 LoRA 方法进行微调。首先,修改 finetune_lora_single_gpu.sh 脚本以配置微调参数。
修改 finetune/finetune_lora_single_gpu.sh
vim finetune/finetune_lora_single_gpu.sh
以下是脚本的修改说明:
- 设置 CUDA 设备的最大连接数为 1。
- 定义了模型路径和数据路径两个变量,用户可以通过命令行参数指定,否则将使用默认值。
- 使用
CUDA_VISIBLE_DEVICES指定使用的 GPU 设备编号。 - 调用 Python 脚本
finetune.py进行微调,设置了微调所需的各种参数,包括模型名称、数据路径、微调 epoch 数等。
#!/bin/bash
export CUDA_DEVICE_MAX_CONNECTIONS=1

MODEL="Qwen/Qwen-1_8B-Chat" # 如果您不想直接从 huggingface 加载模型,请设置路径
DATA="/data/shared/Qwen/data.json" # 请指定训练数据的路径

function usage() {
    echo '
Usage: bash finetune/finetune_lora_single_gpu.sh [-m MODEL_PATH] [-d DATA_PATH]
'
}

while [[ "$1" != "" ]]; do
    case $1 in
        -m | --model )
            shift
            MODEL=$1
            ;;
        -d | --data )
            shift
            DATA=$1
            ;;
        -h | --help )
            usage
            exit 0
            ;;
        * )
            echo "Unknown argument ${1}"
            exit 1
            ;;
    esac
    shift
done

export CUDA_VISIBLE_DEVICES=2

python finetune.py \
  --model_name_or_path $MODEL \
  --data_path $DATA \
  --bf16 True \
  --output_dir output_qwen \
  --num_train_epochs 5 \
  --per_device_train_batch_size 2 \
  --per_device_eval_batch_size 1 \
  --gradient_accumulation_steps 8 \
  --evaluation_strategy "no" \
  --save_strategy "steps" \
  --save_steps 1000 \
  --save_total_limit 10 \
  --learning_rate 3e-4 \
  --weight_decay 0.1 \
  --adam_beta2 0.95 \
  --warmup_ratio 0.01 \
  --lr_scheduler_type "cosine" \
  --logging_steps 1 \
  --report_to "none" \
  --model_max_length 512 \
  --lazy_preprocess True \
  --gradient_checkpointing \
  --use_lora

# 如果您使用的是 fp16 而不是 bf16,请使用 deepspeed
# --fp16 True --deepspeed finetune/ds_config_zero2.json
运行微调
直接执行即可:
bash finetune/finetune_lora_single_gpu.sh
通过以上步骤,您就可以成功运行 LoRA 方法对通义千问模型进行微调了。
训练结束后,adapter部分的参数就存这里:
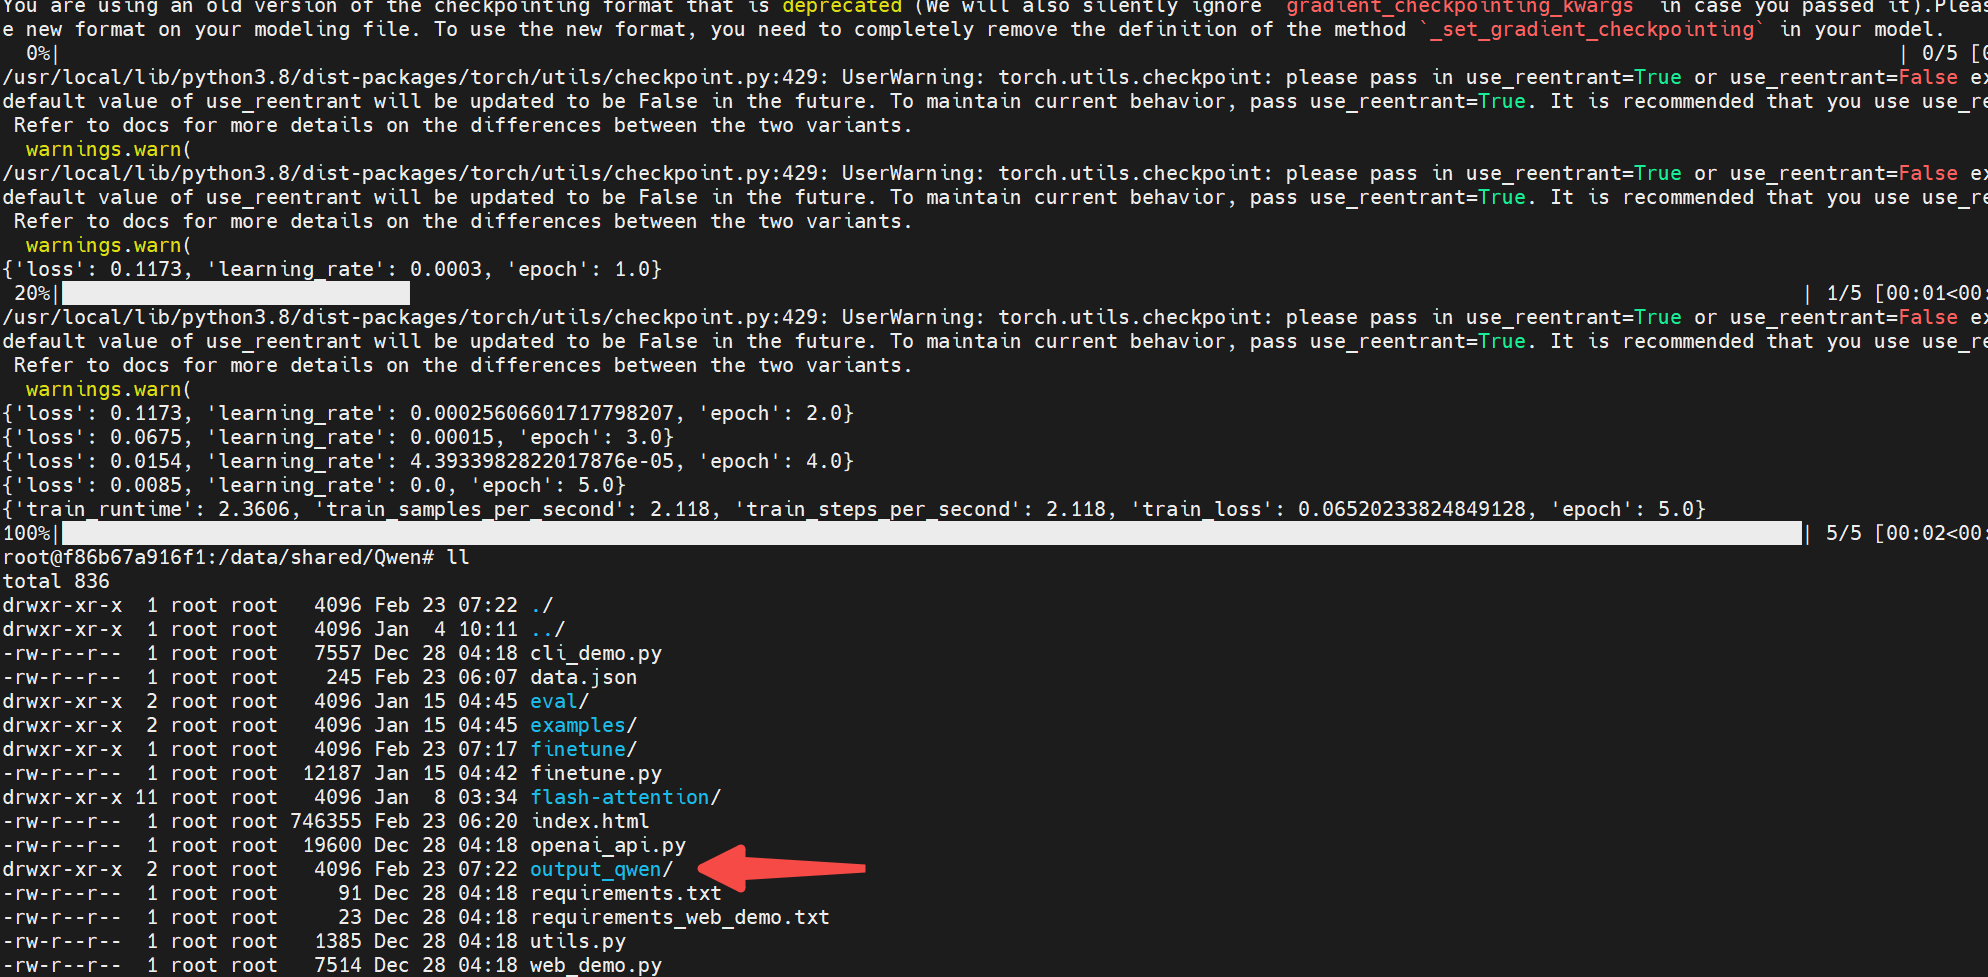
执行推理
与全参数微调不同,LoRA和Q-LoRA的训练只需存储adapter部分的参数。假如你需要使用LoRA训练后的模型,你需要使用如下方法。假设你使用Qwen1.8B训练模型,你可以用如下代码读取模型:
from transformers import AutoModelForCausalLM, AutoTokenizer
from transformers.generation import GenerationConfig

# Note: The default behavior now has injection attack prevention off.
tokenizer = AutoTokenizer.from_pretrained("Qwen/Qwen-1_8B-Chat", trust_remote_code=True)

from peft import AutoPeftModelForCausalLM

model = AutoPeftModelForCausalLM.from_pretrained(
    "/data/shared/Qwen/output_qwen", # path to the output directory
    device_map="auto",
    trust_remote_code=True
).eval()

# 第一轮对话 1st dialogue turn
response, history = model.chat(tokenizer, "你好", history=None)
print(response)
# 你好!很高兴为你提供帮助。

# 第二轮对话 2nd dialogue turn
response, history = model.chat(tokenizer, "给我讲一个年轻人奋斗创业最终取得成功的故事。", history=history)
print(response)
# 这是一个关于一个年轻人奋斗创业最终取得成功的故事。
# 故事的主人公叫李明,他来自一个普通的家庭,父母都是普通的工人。从小,李明就立下了一个目标:要成为一名成功的企业家。
# 为了实现这个目标,李明勤奋学习,考上了大学。在大学期间,他积极参加各种创业比赛,获得了不少奖项。他还利用课余时间去实习,积累了宝贵的经验。
# 毕业后,李明决定开始自己的创业之路。他开始寻找投资机会,但多次都被拒绝了。然而,他并没有放弃。他继续努力,不断改进自己的创业计划,并寻找新的投资机会。
# 最终,李明成功地获得了一笔投资,开始了自己的创业之路。他成立了一家科技公司,专注于开发新型软件。在他的领导下,公司迅速发展起来,成为了一家成功的科技企业。
# 李明的成功并不是偶然的。他勤奋、坚韧、勇于冒险,不断学习和改进自己。他的成功也证明了,只要努力奋斗,任何人都有可能取得成功。

# 第三轮对话 3rd dialogue turn
response, history = model.chat(tokenizer, "给这个故事起一个标题", history=history)
print(response)
