目录
概述
1 认识DHT11
1.1 DHT11特性
1.2 DHT11数据格式
1.3 DHT11与MCU通信
1.4 DHT11信号解析
1.4.1 起始信号
1.4.2 解析信号0
1.4.3 解析信号1
2 驱动开发
2.1 硬件接口
2.2 更新设备树
2.2.1 添加驱动节点
2.2.2 编译.dts
2.2.3 更新板卡中的.dtb
2.3 驱动程序实现
2.3.1 编写驱动程序
2.3.2 编写Makefile
3 测试程序
3.1 编写测试程序
3.2 编写Makefile
4 编译和运行
4.1 编译和安装驱动程序
4.2 编译和运行测试程序
5 波形分析
5.1 起始信号波形
5.2 信息bit = 0波形
5.3 信息bit = 1波形
概述
本文介绍platform tree下,如何设计一个单总线设备的驱动,根据datasheeet提供的波形图,使用代码来实现该驱动程序。然后用逻辑分析仪捕捉信号波形,分析其是否和datasheet中的波形一致。
1 认识DHT11
1.1 DHT11特性
DHT11数字温湿度传感器是一款含有已校准数字信号输出的温湿度复合传感器。 它应用专用的数字模块采集技术和温湿度传感技术,确保产品具有极高的可靠性与卓越的长期稳定性。

由上表可得:
温度范围: 0~ 50℃, 低于或者高于这个范围的温度不能测量
湿度范围:20~90%RH
1.2 DHT11数据格式
DATA 用于微处理器与 DHT11之间的通讯和同步,采用单总线数据格式,一次通讯时间4ms左右,读一次数据总共包括8bytes( 40 bit )具体格式如下:
Byte-0: 8bit 湿度 整数 数据
Byte-1: 8bit 湿度 小数 数据
Byte-2: 8bit 温度 整数 数据
Byte-3: 8bit 温度 小数 数据
byte-4: 8bit校验和( Byte-0 + Byte-1 + Byte-2 + Byte-3)
1.3 DHT11与MCU通信
Step-1: Master 发送起始信号------->dth11, 信号变化规律为 1 - > 0 -> 1
Step-2: dht11发出响应信号,信号特征为 0 ->1
Step-3:dht11发送数据bit位,总共40个bit

1.4 DHT11信号解析
1.4.1 起始信号
Step-1: Master 发出触发信号:1 -> 0, 该信号至少持续18ms
step-2: Master电平0 ->1,该电平持续20~40us
Step-3: dht11发送响应信号0->1,该电平持续80us
step-4: dht11发送信号1,准备发送数据信息,该电平持续时间80us

1.4.2 解析信号0
信号0特征:
1)0 ->1持续 50us
2)1->0持续26~28us

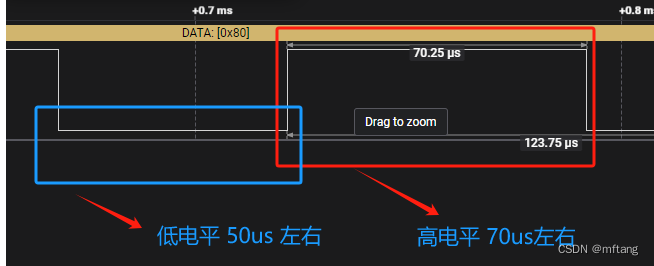
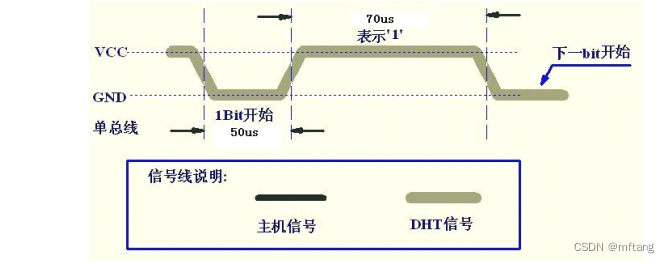
1.4.3 解析信号1
信号1特征:
1)0 ->1持续 50us
2)1->0持续70us
2 驱动开发
2.1 硬件接口
DHT-11与MCU之间的连接图:

在板卡ATK-DL6Y2C上DTH-11的对应接口:
GPIO4_19: DHT11-IO 
硬件实物图:
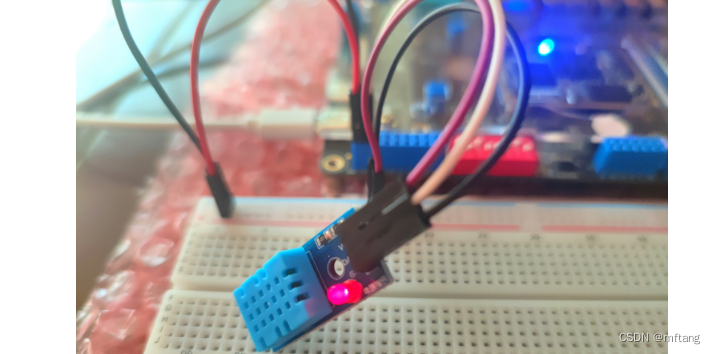
DHT11引脚说明:

2.2 更新设备树
2.2.1 添加驱动节点
DHT11引脚和IMX.6ULL引脚对应关系:
GPIO4_19: DHT11-IO .dts文件路径:
/home/mftang/linux_workspace/study_atk_dl6y2c/kernel/atk-dl6u2c/arch/arm/boot/dts/imx6ull-14x14-evk.dts在.dts文件中添加如下代码:
  //mftang: user's dht11, 2024-2-14
	// IO: GPIO-4-PIN19
	mftangdht11 {
		compatible = "atk-dl6y2c,dht11";
		pinctrl-names = "default";
		pinctrl-0 = <&pinctrl_gpio_mftang_1_wire>;
		gpios = <&gpio4 19 GPIO_ACTIVE_HIGH>;
		status = "okay";
	};
其在imx6ull-14x14-evk.dts中位置:
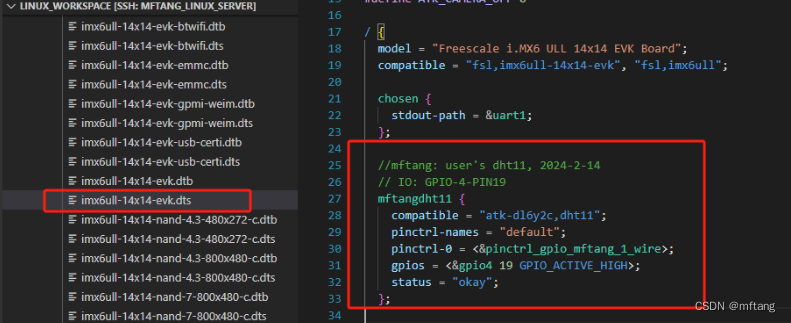
2.2.2 编译.dts
编译.dts文件,并把编译生成的.dtb文件发送到NFS共享目录下,便于在板卡中操作该文件。
1)在内核根目录下使用如下命令编译.dts文件
make dtbs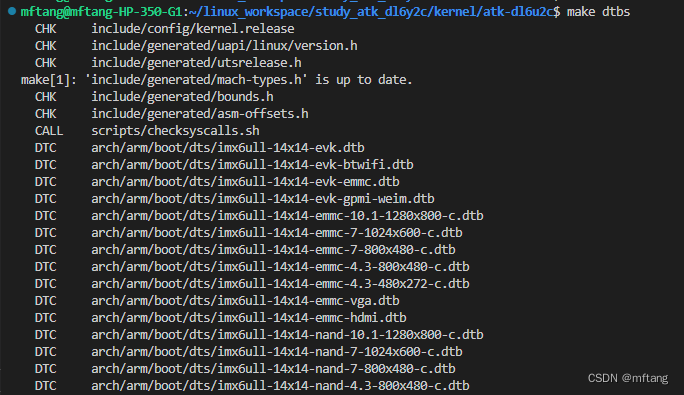
2) 复制 .dtb 文件至NFS共享目录
cp arch/arm/boot/dts/imx6ull-14x14-emmc-4.3-480x272-c.dtb /home/mftang/nfs/atk_dl6y2c/
2.2.3 更新板卡中的.dtb
复制.dtb文件到相应的运行目录,然后重新板卡
cp /mnt/atk_dl6y2c/imx6ull-14x14-emmc-4.3-480x272-c.dtb /run/media/mmcblk1p1
reboot板卡后,内核会重新读取.dtb文件。然后在/proc/device-tree目录下查看板卡device tree,使用如下命令:
cd /proc/device-tree
ls -l
运行该命令后,在该目录下可以看见sensor信息,说明device已经加载到内核:

2.3 驱动程序实现
2.3.1 编写驱动程序
创建drv_dht11.c,并在该文件中编写驱动程序,驱动程序代码地址
/***************************************************************
Copyright  2024-2029. All rights reserved.
文件名     : drv_14_dht11.c
作者       : tangmingfei2013@126.com
版本       : V1.0
描述       : dht11 驱动程序, GPIO4_PIN19-----DHT11 IO port
其他       : 无
日志       : 初版V1.0 2024/1/30

使用方法:
1) 在.dts文件中定义节点信息
    //mftang: user's dht11, 2024-2-14
    // IO: GPIO-4-PIN19
    mftangdht11 {
        compatible = "atk-dl6y2c,dht11";
        pinctrl-names = "default";
        pinctrl-0 = <&pinctrl_gpio_mftang_1_wire>;
        gpios = <&gpio4 19 GPIO_ACTIVE_HIGH>;
        status = "okay";
    };

2) 在驱动匹配列表
static const struct of_device_id dht11_of_match[] = {
    { .compatible = "atk-dl6y2c,dht11" },
    { } // Sentinel
};
***************************************************************/
#include <linux/types.h>
#include <linux/kernel.h>
#include <linux/delay.h>
#include <linux/ktime.h>
#include <linux/ide.h>
#include <linux/init.h>
#include <linux/module.h>
#include <linux/errno.h>
#include <linux/gpio.h>
#include <linux/cdev.h>
#include <linux/device.h>
#include <linux/of_gpio.h>
#include <linux/semaphore.h>
#include <linux/timer.h>
#include <linux/irq.h>
#include <linux/wait.h>
#include <linux/poll.h>
#include <linux/fs.h>
#include <linux/fcntl.h>
#include <linux/platform_device.h>
#include <asm/mach/map.h>
#include <asm/uaccess.h>
#include <asm/io.h>

#define DEVICE_NAME      "treedht11"     // dev/treedht11

/* dht11dev设备结构体 */
struct dht11stru_dev{
    dev_t   devid;                /* 设备号         */
    struct  cdev cdev;            /* cdev           */
    struct  class *class;         /* 类             */
    struct  device *device;       /* 设备           */
    int     major;                /* 主设备号       */
    struct  device_node *node;    /* dht11设备节点 */
    int     userdht11;            /* dht11 GPIO标号*/
    struct  gpio_desc *pin;
};

struct dht11stru_dev dht11dev;    /* dht11设备 */

int us_low_array[40];
int us_low_index;
int us_array[40];
int time_array[40];
int us_index;

/*
    dht11 driver
*/
static void dht11_release( void )
{
    gpiod_direction_output(dht11dev.pin, 1);
}

static void dht11_start(void)
{
    gpiod_direction_output(dht11dev.pin, 1);
    mdelay(30);

    gpiod_set_value( dht11dev.pin, 0);
    mdelay(20);

    gpiod_set_value(dht11dev.pin, 1);
    udelay(40);

    gpiod_direction_input(dht11dev.pin);
}

static int dht11_wait_ack(void)
{
    int timeout_us = 20000;

    /* 等待低电平 */
    while (gpiod_get_value(dht11dev.pin) && --timeout_us)
    {
        udelay(1);
    }
    if (!timeout_us)
    {
        printk("%s %s line %d\n", __FILE__, __FUNCTION__, __LINE__);
        return -1;
    }

    /* 现在是低电平 */
    /* 等待高电平 */
    timeout_us = 200;

    while (!gpiod_get_value(dht11dev.pin) && --timeout_us)
    {
        udelay(1);
    }

    if (!timeout_us)
    {
        printk("%s %s line %d\n", __FILE__, __FUNCTION__, __LINE__);
        return -1;
    }

    /* 现在是高电平 */
    /* 等待低电平 */
    timeout_us = 200;
    while (gpiod_get_value(dht11dev.pin) && --timeout_us)
    {
        udelay(1);
    }

    if (!timeout_us)
    {
        printk("%s %s line %d\n", __FILE__, __FUNCTION__, __LINE__);
        return -1;
    }

    return 0;
}


static int dht11_read_byte( unsigned char *datalist )
{
    int i;
    int us = 0;
    unsigned char data = 0;
    int timeout_us = 200;
    u64 pre, last;

    for (i = 0; i < 8; i++)
    {
        /* 现在是低电平 */
        /* 等待高电平 */
        timeout_us = 400;
        us = 0;
        while (!gpiod_get_value(dht11dev.pin) && --timeout_us)
        {
            udelay(1);
            us++;
        }

        if (!timeout_us)
        {
            printk("%s %s line %d\n", __FILE__, __FUNCTION__, __LINE__);
            return -1;
        }
        us_low_array[us_low_index++] = us;

        /* 现在是高电平 */
        /* 等待低电平,累加高电平的时间 */
        timeout_us = 20000000;
        us = 0;

        /* set another gpio low  */
        pre = ktime_get_boot_ns();
        while (1)
        {
            last = ktime_get_boot_ns();
            if (last - pre >= 40000)
                break;
        }

        if (gpiod_get_value(dht11dev.pin))
        {
            /* get bit 1 */
            data = (data << 1) | 1;
            /* 当前位的高电平未结束, 等待 */
            timeout_us = 400;
            us = 0;
            while (gpiod_get_value(dht11dev.pin) && --timeout_us)
            {
                udelay(1);
                us++;
            }
            if (!timeout_us)
            {
                printk("%s %s line %d\n", __FILE__, __FUNCTION__, __LINE__);
                return -1;
            }
        }
        else
        {
            /* get bit 0 */
            data = (data << 1) | 0;
        }
    }

    *datalist = data;
    return 0;
}


static int dht11_get_value( unsigned char *data )
{
    unsigned long flags;
    int i;

    local_irq_save(flags);  // 关中断
    us_index = 0;
    us_low_index = 0;

    /* 1. 发送高脉冲启动DHT11 */
    dht11_start();

    /* 2. 等待DHT11就绪 */
    if (dht11_wait_ack())
    {
        local_irq_restore(flags); // 恢复中断
        printk("%s %s line %d\n", __FILE__, __FUNCTION__, __LINE__);
        return -EAGAIN;
    }

    /* 3. 读5字节数据 */
    for (i = 0; i < 5; i++)
    {
        if (dht11_read_byte(&data[i]))
        {
            local_irq_restore(flags); // 恢复中断
            printk("%s %s line %d\n", __FILE__, __FUNCTION__, __LINE__);
            return -EAGAIN;
        }
    }

    /* 4. 释放总线 */
    dht11_release();
    local_irq_restore(flags); // 恢复中断

    /* 5. 根据校验码验证数据 */
    if (data[4] != (data[0] + data[1] + data[2] + data[3]))
    {
        printk("%s %s line %d\n", __FILE__, __FUNCTION__, __LINE__);
        return -1;
    }

    return 0;
}


/*
    linux driver 驱动接口:
    实现对应的open/read/write等函数,填入file_operations结构体
*/
static ssize_t dht11_drv_read ( struct file *file, char __user *buf,
                                size_t size, loff_t *offset)
{
    unsigned char data[4];
    int err;

    if( !dht11_get_value( data ) ){
        printk(" %s line %d \r\n",  __FUNCTION__, __LINE__);
        err = copy_to_user(buf, data, 4);
        return 4;
    }

    return -1;
}

static int dht11_drv_close(struct inode *node, struct file *file)
{
    printk(" %s line %d \r\n",  __FUNCTION__, __LINE__);

    return 0;
}

static int dht11_drv_open(struct inode *inode, struct file *filp)
{
    filp->private_data = &dht11dev; /* 设置私有数据  */
    return 0;
}

/*
    定义driver的file_operations结构体
*/
static struct file_operations dht11_fops = {
    .owner   = THIS_MODULE,
    .read    = dht11_drv_read,
    .open    = dht11_drv_open,

    .release = dht11_drv_close,
};


/* 1. 从platform_device获得GPIO
 * 2. gpio=>irq
 * 3. request_irq
 */
static int dht11_probe(struct platform_device *pdev)
{
    printk("dht11 driver and device was matched!\r\n");

    /* 1. 获得硬件信息 */
    dht11dev.pin = gpiod_get(&pdev->dev, NULL, 0);
    if (IS_ERR(dht11dev.pin))
    {
        printk("%s line %d get pin parameter error! \n", __FUNCTION__, __LINE__);
    }

    /* 2. device_create */
    device_create( dht11dev.class, NULL,
                   MKDEV( dht11dev.major, 0 ), NULL,
                   DEVICE_NAME);        // device name

    return 0;
}

static int dht11_remove(struct platform_device *pdev)
{
    printk("%s line %d\n", __FUNCTION__, __LINE__);

    device_destroy( dht11dev.class, MKDEV( dht11dev.major, 0));
    gpiod_put(dht11dev.pin);

    return 0;
}


static const struct of_device_id atk_dl6y2c_dht11[] = {
    { .compatible = "atk-dl6y2c,dht11" },
    { },
};

/* 1. 定义platform_driver */
static struct platform_driver dht11_driver = {
    .probe      = dht11_probe,
    .remove     = dht11_remove,
    .driver     = {
        .name   = "atk_dht11",
        .of_match_table = atk_dl6y2c_dht11,
    },
};

/*
  2. 在入口函数注册platform_driver
*/
static int __init dht11_init(void)
{
    int err;

    printk("%s line %d\n",__FUNCTION__, __LINE__);

    /* register file_operations  */
    dht11dev.major = register_chrdev( 0,
                                    DEVICE_NAME,     /* device name */
                                    &dht11_fops);

    /* create the device class  */
    dht11dev.class = class_create(THIS_MODULE, "dht11_class");

    if (IS_ERR(dht11dev.class)) {
        printk("%s line %d\n", __FUNCTION__, __LINE__);
        unregister_chrdev( dht11dev.major, DEVICE_NAME);
        return PTR_ERR( dht11dev.class );
    }

    err = platform_driver_register(&dht11_driver);

    return err;
}

/* 3. 有入口函数就应该有出口函数:卸载驱动程序时,就会去调用这个出口函数
 *    卸载platform_driver
 */
static void __exit dht11_exit(void)
{
    printk("%s line %d\n", __FUNCTION__, __LINE__);

    platform_driver_unregister(&dht11_driver);
    class_destroy(dht11dev.class);
    unregister_chrdev(dht11dev.major, DEVICE_NAME);
}

/*
 4. 驱动入口和出口函数
*/
module_init(dht11_init);
module_exit(dht11_exit);

MODULE_LICENSE("GPL");
MODULE_AUTHOR("tangmingfei2013@126.com");
2.3.2 编写Makefile
在驱动程序同级目录中创建Makefile,然后编写如下代码
PWD := $(shell pwd)

KERNEL_DIR=/home/mftang/linux_workspace/study_atk_dl6y2c/kernel/atk-dl6u2c
ARCH=arm
CROSS_COMPILE=/home/ctools/gcc-linaro-4.9.4-arm-linux-gnueabihf/bin/arm-linux-gnueabihf-

export  ARCH  CROSS_COMPILE

obj-m:= drv_14_dht11.o

all:
	$(MAKE) -C $(KERNEL_DIR) M=$(PWD) modules


clean:
	rm -rf .*.cmd *.o *.mod.c *.ko .tmp_versions *.order *.symvers
3 测试程序
3.1 编写测试程序
编写一个测试程序,目的是验证驱动程序是否能正常工作
/***************************************************************
Copyright  2024-2029. All rights reserved.
文件名     : test_14_dht11.c
作者       : tangmingfei2013@126.com
版本       : V1.0
描述       : 测试dth11驱动程序
其他       : 无
日志       : 初版V1.0 2024/02/15

***************************************************************/
#include <sys/types.h>
#include <sys/stat.h>
#include <linux/types.h>
#include <linux/i2c-dev.h>
#include <linux/i2c.h>
#include <sys/ioctl.h>
#include <unistd.h>
#include <stdio.h>
#include <string.h>
#include <fcntl.h>
#include <stdlib.h>
#include <linux/fs.h>
#include <errno.h>
#include <assert.h>
#include <string.h>
#include <time.h>

#define DEV_FILE                              "/dev/treedht11"


int main(void)
{
    int fd;
    int count_run = 0;
    unsigned char data[4];

    fd = open(DEV_FILE, 0);
    if (fd == -1){
        printf("can not open file: %s \n", DEV_FILE);
        return -1;
    }

    while( count_run < 10000)
    {
        count_run++;
        if (read(fd, data, 4) == 4) {
            printf("get humidity  : %d.%d\n", data[0], data[1]);
            printf("get temprature: %d.%d\n", data[2], data[3]);
        }
        else {
           perror("read dht11 device fail!\n");
        }
        sleep(1);
    }

    close(fd);

    return 0;
}
3.2 编写Makefile
CFLAGS= -Wall -O2
CC=/home/ctools/gcc-linaro-4.9.4-arm-linux-gnueabihf/bin/arm-linux-gnueabihf-gcc
STRIP=/home/ctools/gcc-linaro-4.9.4-arm-linux-gnueabihf/bin/arm-linux-gnueabihf-strip


test_14_dht11: test_14_dht11.o
	$(CC) $(CFLAGS) -o test_14_dht11 test_14_dht11.o
	$(STRIP) -s test_14_dht11

clean:
	rm -f test_14_dht11 test_14_dht11.o
4 编译和运行
4.1 编译和安装驱动程序
1) 编译驱动程序,并将其copy到NFS的共享目录中,方便在板卡中安装该程序

2) 在板卡中安装该驱动程序 , 使用命令
insmod dev_14_dth11.ko
安装成功后,使用命令查看驱动
ls /dev -l
4.2 编译和运行测试程序
1) 编译测试程序,并将其copy到NFS的共享目录中,方便在板卡中运行该程序

2)在板卡中运行测试程序
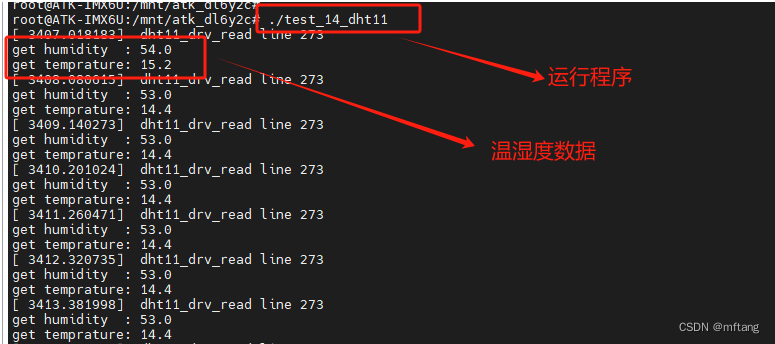
5 波形分析
在板卡上运行测试程序,然后使用逻辑分析仪捕捉DHT11-IO上的波形,分析其信号特征,以更好的理解驱动程序。

5.1 起始信号波形
datasheet 上提供的波形

逻辑分析仪上捕捉的波形:

查看电平持续时间:

5.2 信息bit = 0波形
datasheet 上提供的波形

逻辑分析仪上捕捉的波形:

5.3 信息bit = 1波形
datasheet 上提供的波形

逻辑分析仪上捕捉的波形:
