3.13 风格与主题、国际化
1、应用国际化
应用国际化,通过修改系统语言,应用显示语言跟着改变。
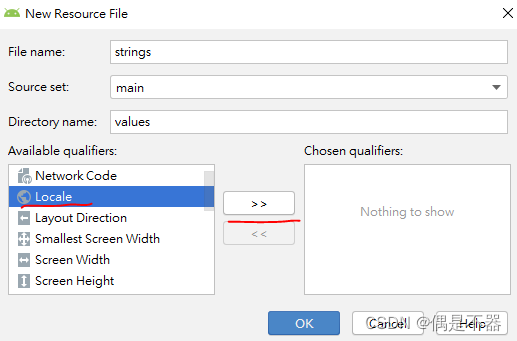
选择Locale,点击>>符号。


创建多个国家,地区strings.xml文件,有一个默认strings.xml文件,各个stirngs.xml中<string>标签中保持一致。
示例:
创建t_language.xml文件,
<?xml version="1.0" encoding="utf-8"?>

<LinearLayout xmlns:android="http://schemas.android.com/apk/res/android"

    android:orientation="vertical" android:layout_width="match_parent"

    android:layout_height="match_parent">

    <TextView

        android:text="@string/header"

        android:layout_width="match_parent"

        android:layout_height="wrap_content">

    </TextView>

</LinearLayout>
默认strings.xml文件:
<?xml version="1.0" encoding="utf-8"?>

<resources>

    <string name="app_name">app name</string>

    <string name="header">Local English</string>

</resources>
国际化中文:
<?xml version="1.0" encoding="utf-8"?>

<resources>

<string name="app_name">应用名</string>

<string name="header">简体中文</string>

</resources>
国际化繁体中文:
<?xml version="1.0" encoding="utf-8"?>

<resources>

    <string name="app_name">應用名</string>

    <string name="header">繁体中文</string>

</resources>
在Activity中直接更新语言,最好在执行setContentView方法之前。
//在Activity中设置语言

//获取资源对象

Resources resources=getResources();

//获取设置对象

Configuration configuration= resources.getConfiguration();

//获取屏幕参数

DisplayMetrics display=resources.getDisplayMetrics();

//设置语言

configuration.locale=Locale.CHINA;

//configuration.locale=Locale.ENGLISH;

//configuration.locale=Locale.TAIWAN;

resources.updateConfiguration(configuration,display);
设置风格,将layout中重复的样式,整合成一种风格,直接设置。
在src/values/styles.xml中创建<style>
<style name="back">

    <item name="android:background">#FF003377</item>

</style>
在layout中设置style,设置style属性,将我们配置的style设置给组件。
<TextView

    android:text="@string/header"

    android:layout_width="match_parent"

    android:layout_height="wrap_content"

    style="@style/back">

</TextView>
2、风格与主题
设置应用主题
在src/values/styles.xml文件创建
<!-- Base application theme. -->

<style name="AppTheme" parent="Theme.AppCompat.Light.DarkActionBar">

    <!-- Customize your theme here. -->

    <item name="colorPrimary">@color/colorPrimary</item>

    <item name="colorPrimaryDark">@color/colorPrimaryDark</item>

    <item name="colorAccent">@color/colorAccent</item>

</style>
修改配置文件AndroidManifest.xml
android:theme="@style/AppTheme"3、弹出对话框
使用AlertDialog.Builder类,建造者模式创建dialog。
示例1:
//创建open Dialog,

public void openDialog(){

    //AlertDialog.Builder:构建弹窗

    AlertDialog.Builder builder=new AlertDialog.Builder(this);

    //设置title

    builder.setTitle("提示");

    //设置提示信息

    builder.setMessage("是否退出");

    //设置确定按钮

    builder.setPositiveButton("是", new DialogInterface.OnClickListener() {

        @Override

        public void onClick(DialogInterface dialog, int which) {

            //关闭Acitivity

            LanguageActivity.this.finish();

            //关闭dialog

            //dialog.dismiss();

        }

    });

    //设置取消按钮

    builder.setNegativeButton("否",null);

    //创建弹窗

    AlertDialog alertDialog=builder.create();

    //显示弹窗

    alertDialog.show();

}
示例2:
带单选项的弹窗
//单选项弹窗

public void openSingleChoiceDialog(){

    String[] choices=new String[]{"选项1","选项2","选项3"};

    //创建弹窗

    //setSingleChoiceItems方法,设置单选项,checkedItem:设置默认选择Item;

    AlertDialog.Builder builder= new AlertDialog.Builder(this)

            .setTitle("单选")

            .setSingleChoiceItems(choices, 1, new DialogInterface.OnClickListener() {

                @Override

                public void onClick(DialogInterface dialog, int which) {

                    Toast.makeText(mContext,"选择"+which,Toast.LENGTH_SHORT).show();

                }

            })

            .setPositiveButton("确认",null);

    AlertDialog alertDialog= builder.create();

    alertDialog.show();

}
示例3:
带多选项的弹窗
//多选框弹窗

public void openMultiChoiceDialog(){

    final String[] choices=new String[]{"选项1","选项2","选项3"};

    final boolean[] checkeds=new boolean[]{false,false,false};

    //创建弹窗

    //setSingleChoiceItems方法,设置单选项,checkedItem:设置默认选择Item;

    AlertDialog.Builder builder= new AlertDialog.Builder(this);

    builder.setTitle("多选");

    builder.setMultiChoiceItems(choices, checkeds, new DialogInterface.OnMultiChoiceClickListener() {

        @Override

        public void onClick(DialogInterface dialog, int which, boolean isChecked) {

            checkeds[which]=isChecked;

        }

    });

    builder.setPositiveButton("确认", new DialogInterface.OnClickListener() {

        @Override

        public void onClick(DialogInterface dialog, int which) {

            String text="";

            for (int i=0;i<choices.length;i++){

                if (checkeds[i]){

                    text +=choices[i];

                }

            }

            Toast.makeText(mContext,text,Toast.LENGTH_SHORT).show();

        }

    });

    AlertDialog alertDialog= builder.create();

    alertDialog.show();

}

