- 基于OpenCV灰度图像转GCode的双向扫描实现
- 引言
- 激光雕刻简介
- OpenCV简介
- 实现步骤
- 1.导入必要的库
- 2. 读取灰度图像
- 3. 图像预处理
- 4. 生成GCode
- 1. 简化版的双向扫描
- 2. 优化版的双向扫描
- 5. 保存生成的GCode
- 6. 灰度图像双向扫描代码示例
- 总结
系列文章
- ⭐深入理解G0和G1指令:C++中的实现与激光雕刻应用
- ⭐基于二值化图像转GCode的单向扫描实现
- ⭐基于二值化图像转GCode的双向扫描实现
- ⭐基于二值化图像转GCode的斜向扫描实现
- ⭐基于二值化图像转GCode的螺旋扫描实现
- ⭐基于OpenCV灰度图像转GCode的单向扫描实现
- ⭐基于OpenCV灰度图像转GCode的双向扫描实现
- 基于OpenCV灰度图像转GCode的斜向扫描实现
- 基于OpenCV灰度图像转GCode的螺旋扫描实现
⭐系列文章GitHub仓库地址
基于OpenCV灰度图像转GCode的双向扫描实现
引言
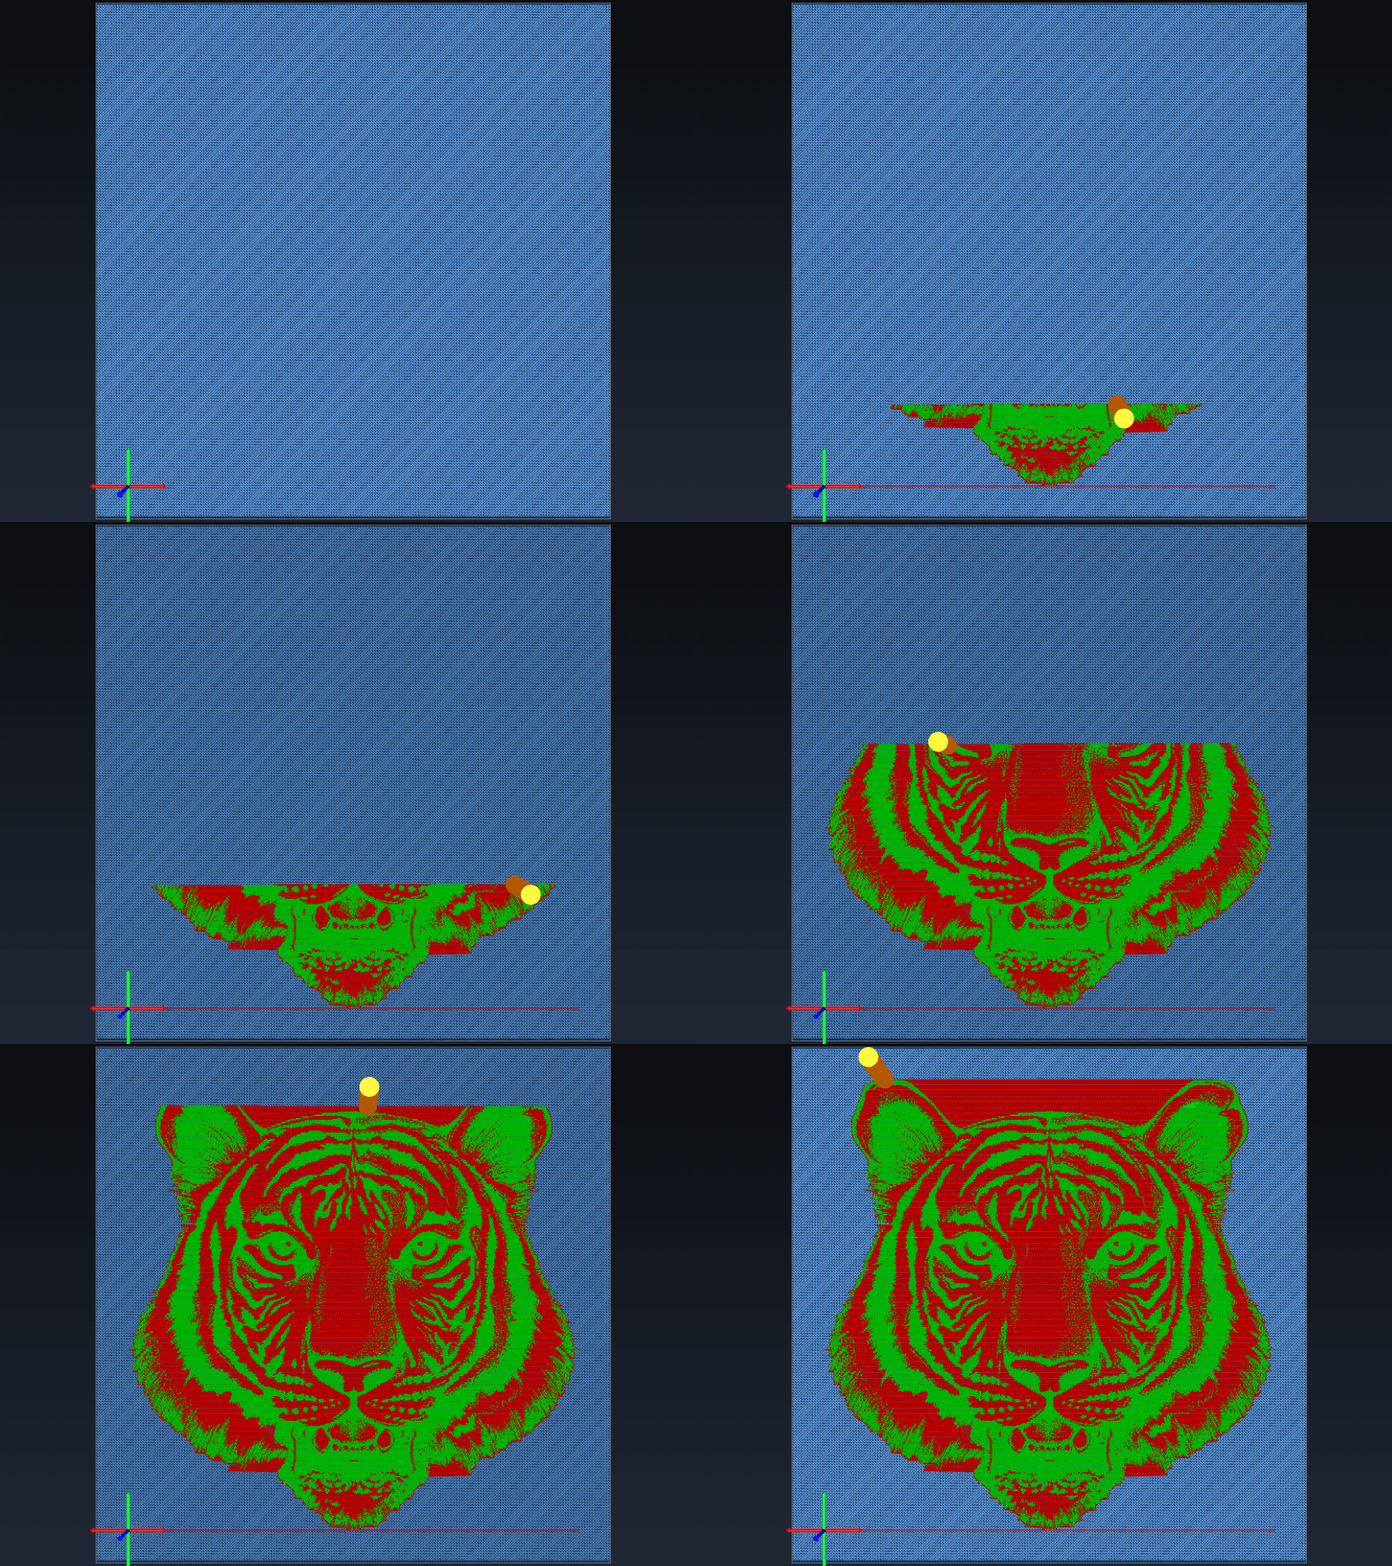
激光雕刻技术作为一种创新的制造方法,近年来在艺术、制作和教育领域崭露头角。本文将介绍如何使用OpenCV库实现灰度图像到GCode的双向扫描,为激光雕刻提供更灵活、更精细的图案生成方法。同时,我们将分享关键的代码片段,帮助读者理解并应用这一技术。
激光雕刻简介
激光雕刻是一种通过激光束切割或去除材料表面的工艺,通常用于制作艺术品、装饰品和原型。通过控制激光束的运动路径,可以在各种材料上创造出精细而复杂的图案。在这篇博客中,我们将使用OpenCV实现一种激光雕刻的图案生成方法,具体来说是灰度图像到GCode的双向扫描。
OpenCV简介
OpenCV是一个开源的计算机视觉库,广泛应用于图像处理、机器学习和计算机视觉领域。其强大的功能和易用性使得它成为实现图像处理任务的理想选择。在本文中,我们将使用OpenCV来处理灰度图像,并将其转换为GCode。
实现步骤
1.导入必要的库
首先,我们需要导入必要的库,包括OpenCV和一些用于图像处理的辅助库。以下是关键的CMake代码片段:
# 指向 OpenCV cmake 目录
list(APPEND CMAKE_PREFIX_PATH "~/opencv/build/x64/vc16/lib")

find_package(OpenCV REQUIRED)
include_directories(${OpenCV_INCLUDE_DIRS})
link_libraries(${OpenCV_LIBS})
把上述内容添加到 cmake 中,此时我们已经可以在 C++ 中使用 OpenCV 库
2. 读取灰度图像
使用OpenCV读取一张灰度图像,我们将其用于后续的处理。以下是代码片段:
cv::Mat mat = cv::imread(R"(~/ImageToGCode/image/tigger.jpg)", cv::IMREAD_GRAYSCALE);
确保替换 ~/ImageToGCode/image/tigger.jpg 为你自己的图像文件路径。
3. 图像预处理
在进行激光雕刻之前,我们需要对图像进行一些预处理,以确保得到清晰而准确的结果。这可能包括图像平滑、二值化、边缘检测等步骤,具体取决于你的图像和需求。以下是一个简单的翻转和二值化处理的代码片段:
cv::flip(mat, mat, 0);
cv::threshold(mat,mat,128,255,cv::ThresholdTypes::THRESH_BINARY);
4. 生成GCode
有了预处理后的图像,我们可以开始生成GCode了。GCode是一种机器语言,用于控制激光雕刻、数控机床和3D打印机等设备。
1. 简化版的双向扫描
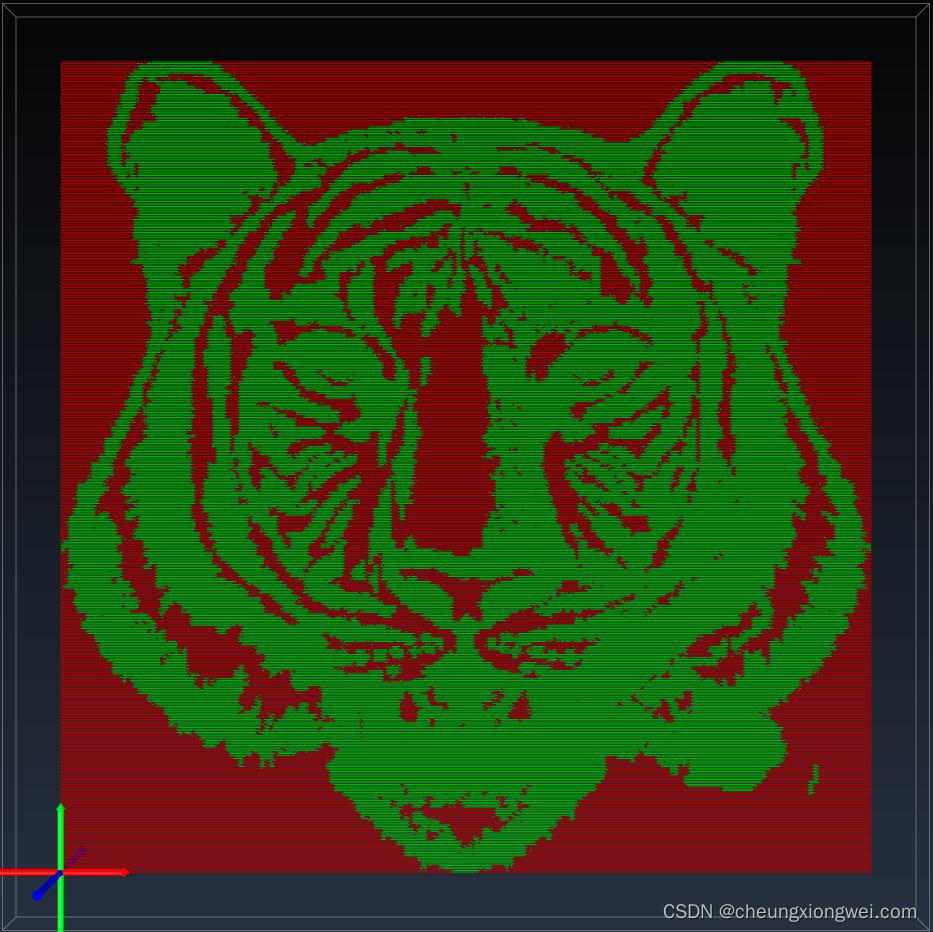
以下是简化版的双向扫描生成GCode的代码片段:
cv::Mat image;
cv::resize(mat, image, cv::Size(static_cast<int>(width * resolution), static_cast<int>(height * resolution)));
for(int y = 0; y < image.rows; ++y) {
    bool isEven = !(y & 1);
    int start   = isEven ? 0 : image.cols - 1;
    int end     = isEven ? image.cols : -1;
    int step    = isEven ? 1 : -1;
    command.emplace_back(G0 {std::nullopt, y / resolution, std::nullopt});
    for(int x = start; x != end; x += step) {
        if(auto const pixel = image.at<cv::uint8_t>(y, x); pixel == 255) {
            command.emplace_back(G0 {x / resolution, std::nullopt, std::nullopt});
        } else {
            auto power = static_cast<int>((1.0 - static_cast<double>(pixel) / 255.0) * 1000.0);
            command.emplace_back(G1(x / resolution, std::nullopt, power));
        }
    }
}
这个函数将生成一个包含GCode指令的列表,你可以将其保存到文件中,用于控制激光雕刻机器。
2. 优化版的双向扫描
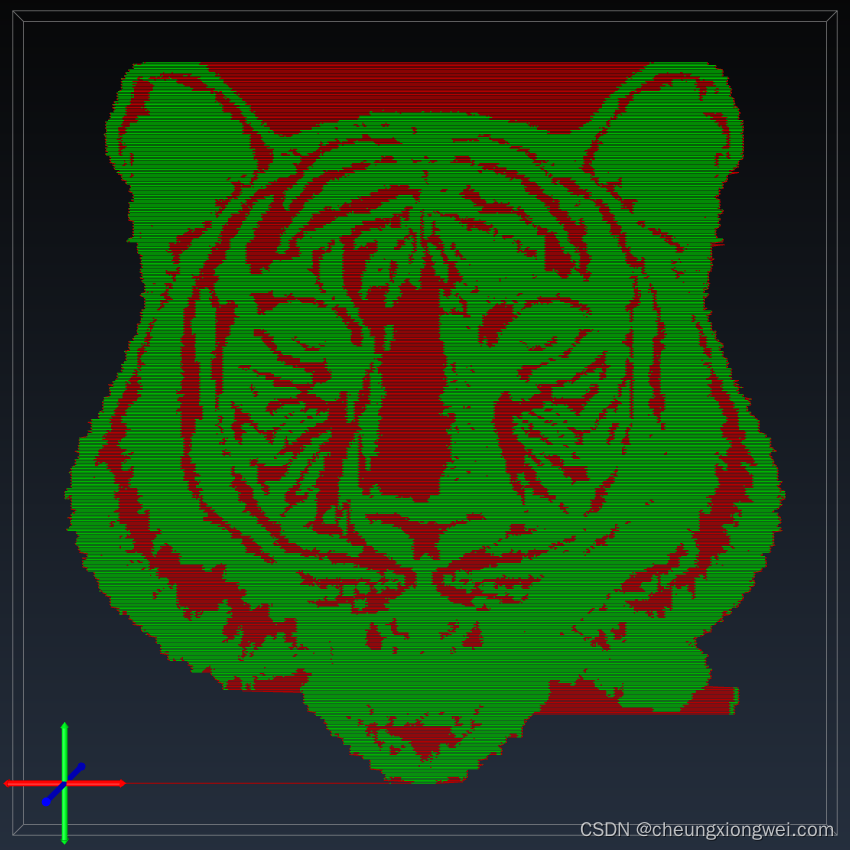
以下是优化版的双向扫描生成GCode的代码片段:
cv::Mat image;
cv::resize(mat, image, cv::Size(static_cast<int>(width * resolution), static_cast<int>(height * resolution)));

bool leftToRight {false};
bool rightToLeft {false};

for(int y = 0; y < image.rows; ++y) {
    bool isEven = !(y & 1);
    int start   = isEven ? 0 : image.cols - 1;
    int end     = isEven ? image.cols : -1;
    int step    = isEven ? 1 : -1;

    for(int x = start; x != end; x += step) {
        if(auto const pixel = image.at<cv::uint8_t>(y, x); pixel == 255) {
            // 偶数从左到右扫描
            // 奇数从右到左扫描
            if(isEven) {
                // 从左到右寻找连续的G0
                // |----->
                int length {0};
                while(++x < end && image.at<cv::uint8_t>(y, x) == 255) {
                    length++;
                }
                --x;

                // 使用 do{}while(false) 结构,最后统一判断是否会更好
                // find
                if(length) {
                    // 起点存在连续G0
                    if(x - length == 0) {
                    // 此时需要把奇数行延迟的Y轴移动进行上移操作
                    if(rightToLeft) {
                        command.emplace_back(G0(x / resolution, y / resolution, std::nullopt));
                        rightToLeft = false;
                    } else {
                        // 偶数从左到右在起点永远不会向上移动,所以这里不需要 y
                        command.emplace_back(G0 {x / resolution, std::nullopt, std::nullopt});
                    }
                        continue;
                    }

                    // 终点存在连续G0
                    if(x == image.cols - 1) {
                        // 终点需要向上移动,但这个移动我们放在奇数行处理,所以这里只需要做好标记即可。
                        leftToRight = true;
                        command.emplace_back(G0((x - length) / resolution, std::nullopt, std::nullopt));
                        continue;
                    }

                    // 中间段存在连续从左到右方向的G0
                    // 中间段不需要向上移动
                    command.emplace_back(G0(x / resolution, std::nullopt, std::nullopt));
                    } else {
                        // 没有找到连续的G0
                        // 终点唯一的G0,需要向上移动,这里做标记放到奇数行移动。
                        if(x == image.cols - 1) {
                            leftToRight = true;
                        } else if(x == start) {
                            command.emplace_back(G0(x / resolution, y / resolution, std::nullopt));
                            rightToLeft = false;
                            continue;
                        }
                        command.emplace_back(G0(x / resolution, std::nullopt, std::nullopt));
                    }
                } else {
                    // <-----|
                    // 从右到左寻找连续的G0 此时起点在右边,终点在左边
                    int length {0};
                    while(--x > end && image.at<cv::uint8_t>(y, x) == 255) {
                        length++;
                    }
                    ++x;

                    if(length) {
                        // 起点存在连续的G0
                        if(x + length == start) {
                        // 此时需要把偶数行延迟的Y轴移动进行上移操作
                        if(leftToRight) {
                            command.emplace_back(G0(x / resolution, y / resolution, std::nullopt));
                            leftToRight = false;
                        } else {
                            // 标记
                            command.emplace_back(G0(x / resolution, std::nullopt, std::nullopt));
                        }
                        continue;
                    }

                    // 终点存在连续的G0
                    if(x == 0) {
                        rightToLeft = true;
                        continue;
                    }
                    command.emplace_back(G0(x / resolution, std::nullopt, std::nullopt));
                    } else {
                    // 没有找到连续的G0
                    // 终点需要向上移动
                    if(x == 0) {
                         rightToLeft = true;
                    } else if(x == start) {
                        // 起点也需要处理上一行的y轴移动
                        if(leftToRight) {
                            command.emplace_back(G0(x / resolution, y / resolution, std::nullopt));
                            leftToRight = false;
                        }
                        continue;
                    }
                    command.emplace_back(G0(x / resolution, std::nullopt, std::nullopt));
                    }
                }
            } else {
                auto power = static_cast<int>((1.0 - static_cast<double>(pixel) / 255.0) * 1000.0);
                // 处理G1 开头和结尾情况
                if(isEven) {
                    // 从左到右
                    if(x == start) {
                        if(rightToLeft) {
                            command.emplace_back(G0 {x / resolution, y / resolution, power});  // 最大激光功率 S=1000
                            rightToLeft = false;
                            continue;
                        }
                    } else if(x == image.cols - 1) {
                        // 终点需要标记
                        leftToRight = true;
                    }
                command.emplace_back(G1 {x / resolution, std::nullopt, power});  // 最大激光功率 S=1000
                } else {
                    // 从右到左
                    if(x == start) {
                        if(leftToRight) {
                            command.emplace_back(G0 {x / resolution, y / resolution, power});  // 最大激光功率 S=1000
                            leftToRight = false;
                            continue;
                        }
                } else if(x == 0) {
                    // 终点需要标记
                    rightToLeft = true;
                }
                command.emplace_back(G1 {x / resolution, std::nullopt, power});  // 最大激光功率 S=1000
            }
        }  // end if G0
    }      // end for x
}          // end for y
这个函数将生成一个包含GCode指令的列表同时不包含非必要G0,你可以将其保存到文件中,用于控制激光雕刻机器。
5. 保存生成的GCode
最后,我们将生成的GCode保存到文件中:
std::fstream file;
file.open(fileName, std::ios_base::out | std::ios_base::trunc);
if(!file.is_open()) {
    return;
}
for(auto &&v: command | std::views::transform([](auto item) { return item += "\n"; })) {
    file.write(v.c_str(), v.length());
}
return;
确保替换 ‘fileName’ 为你自己想要保存的文件路径。
6. 灰度图像双向扫描代码示例
#pragma once
#include <opencv2/opencv.hpp>
#include <fstream>
#include <print>
#include <vector>
#include <optional>
#include <ranges>
struct G0 {
std::optional<float> x, y;
std::optional<int> s;
std::string toString() {
std::string command = "G0";
if(x.has_value()) {
command += std::format(" X{:.3f}", x.value());
}
if(y.has_value()) {
command += std::format(" Y{:.3f}", y.value());
}
if(s.has_value()) {
command += std::format(" S{:d}", s.value());
}
return command;
}
explicit operator std::string() const {
std::string command = "G0";
if(x.has_value()) {
command += std::format(" X{:.3f}", x.value());
}
if(y.has_value()) {
command += std::format(" Y{:.3f}", y.value());
}
if(s.has_value()) {
command += std::format(" S{:d}", s.value());
}
return command;
}
};
struct G1 {
std::optional<float> x, y;
std::optional<int> s;
std::string toString() {
std::string command = "G1";
if(x.has_value()) {
command += std::format(" X{:.3f}", x.value());
}
if(y.has_value()) {
command += std::format(" Y{:.3f}", y.value());
}
if(s.has_value()) {
command += std::format(" S{:d}", s.value());
}
return command;
}
explicit operator std::string() const {
std::string command = "G1";
if(x.has_value()) {
command += std::format(" X{:.3f}", x.value());
}
if(y.has_value()) {
command += std::format(" Y{:.3f}", y.value());
}
if(s.has_value()) {
command += std::format(" S{:d}", s.value());
}
return command;
}
};
class ImageToGCode
{
public:
// 激光模式
enum class LaserMode {
Cutting, // 切割 M3 Constant Power
Engraving, // 雕刻 M4 Dynamic Power
};
// 扫描方式
enum class ScanMode {
Unidirection, // 单向
Bidirection, // 双向
Diagonal, // 斜向
Spiral, // 螺旋
Block, // 分块 根据像素的灰度级别进行扫描,例如255像素分8个级别,那么0-32就是一个级别,32-64就是另外一个级别,以此类推。
// (Block scanning is performed based on the gray level of the pixels. For example, 255 pixels are divided into 8 levels, then 0-32 is one level, 32-64 is another level, and so on.)
};
struct kEnumToStringLaserMode {
constexpr std::string_view operator[](const LaserMode mode) const noexcept {
switch(mode) {
case LaserMode::Cutting: return "M3";
case LaserMode::Engraving: return "M4";
}
return {};
}
constexpr LaserMode operator[](const std::string_view mode) const noexcept {
if(mode.compare("M3")) {
return LaserMode::Cutting;
}
if(mode.compare("M4")) {
return LaserMode::Engraving;
}
return {};
}
};
ImageToGCode() = default;
~ImageToGCode() = default;
auto &setInputImage(const cv::Mat &mat) {
this->mat = mat;
return *this;
}
auto &setOutputTragetSize(double width, double height, double resolution = 10.0 /* lin/mm */) {
this->width = width;
this->height = height;
this->resolution = resolution;
return *this;
}
auto &builder() {
command.clear();
try {
matToGCode();
} catch(cv::Exception &e) {
std::println("cv Exception {}", e.what());
}
std::vector<std::string> header;
header.emplace_back("G17G21G90G54"); // XY平面;单位毫米;绝对坐标模式;选择G54坐标系(XY plane; unit mm; absolute coordinate mode; select G54 coordinate system)
header.emplace_back(std::format("F{:d}", 30000)); // 移动速度 毫米/每分钟(Moving speed mm/min)
header.emplace_back(std::format("G0 X{:.3f} Y{:.3f}", 0.f, 0.f)); // 设置工作起点及偏移(Set the starting point and offset of the work)
header.emplace_back(std::format("{} S0", kEnumToStringLaserMode()[laserMode])); // 激光模式(laser mode)
if(airPump.has_value()) {
header.emplace_back(std::format("M16 S{:d}", 300)); // 打开气泵(Turn on the air pump)
}
std::vector<std::string> footer;
footer.emplace_back("M5");
if(airPump.has_value()) {
footer.emplace_back("M9"); // 关闭气泵,保持 S300 功率(Turn off air pump and maintain S300 power)
}
command.insert_range(command.begin(), header);
command.append_range(footer);
return *this;
}
bool exportGCode(const std::string &fileName) {
std::fstream file;
file.open(fileName, std::ios_base::out | std::ios_base::trunc);
if(!file.is_open()) {
return false;
}
for(auto &&v: command | std::views::transform([](auto item) { return item += "\n"; })) {
file.write(v.c_str(), v.length());
}
return true;
}
auto setLaserMode(LaserMode mode) {
laserMode = mode;
return *this;
}
auto setScanMode(ScanMode mode) {
scanMode = mode;
return *this;
}
private:
void matToGCode() {
assert(mat.channels() == 1);
assert(std::isgreaterequal(resolution, 1e-5f));
assert(!((width * resolution < 1.0) || (height * resolution < 1.0)));
// different conversion strategy functions are called here
bidirectionOptStrategy();
}
// 双向扫描
// Bidirectional scanning
void bidirectionStrategy() {
cv::Mat image;
cv::resize(mat, image, cv::Size(static_cast<int>(width * resolution), static_cast<int>(height * resolution)));
for(int y = 0; y < image.rows; ++y) {
bool isEven = !(y & 1);
int start = isEven ? 0 : image.cols - 1;
int end = isEven ? image.cols : -1;
int step = isEven ? 1 : -1;
command.emplace_back(G0 {std::nullopt, y / resolution, std::nullopt});
for(int x = start; x != end; x += step) {
if(auto const pixel = image.at<cv::uint8_t>(y, x); pixel == 255) {
command.emplace_back(G0 {x / resolution, std::nullopt, std::nullopt});
} else {
auto power = static_cast<int>((1.0 - static_cast<double>(pixel) / 255.0) * 1000.0);
command.emplace_back(G1(x / resolution, std::nullopt, power));
}
}
}
}
// 双向扫描优化
// Bidirectional scanning optimization
void bidirectionOptStrategy() {
cv::Mat image;
cv::resize(mat, image, cv::Size(static_cast<int>(width * resolution), static_cast<int>(height * resolution)));
bool leftToRight {false};
bool rightToLeft {false};
// 可以使用 C++ 迭代器查找距离
// https://en.cppreference.com/w/cpp/iterator/advance
// https://en.cppreference.com/w/cpp/iterator/prev
for(int y = 0; y < image.rows; ++y) {
bool isEven = !(y & 1);
int start = isEven ? 0 : image.cols - 1;
int end = isEven ? image.cols : -1;
int step = isEven ? 1 : -1;
for(int x = start; x != end; x += step) {
if(auto const pixel = image.at<cv::uint8_t>(y, x); pixel == 255) {
// 偶数从左到右扫描
// 奇数从右到左扫描
if(isEven) {
// 从左到右寻找连续的G0
// |----->
int length {0};
while(++x < end && image.at<cv::uint8_t>(y, x) == 255) {
length++;
}
--x;
// 使用 do{}while(false) 结构,最后统一判断是否会更好
// find
if(length) {
// 起点存在连续G0
if(x - length == 0) {
// 此时需要把奇数行延迟的Y轴移动进行上移操作
if(rightToLeft) {
command.emplace_back(G0(x / resolution, y / resolution, std::nullopt));
rightToLeft = false;
} else {
// 偶数从左到右在起点永远不会向上移动,所以这里不需要 y
command.emplace_back(G0 {x / resolution, std::nullopt, std::nullopt});
}
continue;
}
// 终点存在连续G0
if(x == image.cols - 1) {
// 终点需要向上移动,但这个移动我们放在奇数行处理,所以这里只需要做好标记即可。
leftToRight = true;
command.emplace_back(G0((x - length) / resolution, std::nullopt, std::nullopt));
continue;
}
// 中间段存在连续从左到右方向的G0
// 中间段不需要向上移动
command.emplace_back(G0(x / resolution, std::nullopt, std::nullopt));
} else {
// 没有找到连续的G0
// 终点唯一的G0,需要向上移动,这里做标记放到奇数行移动。
if(x == image.cols - 1) {
leftToRight = true;
} else if(x == start) {
command.emplace_back(G0(x / resolution, y / resolution, std::nullopt));
rightToLeft = false;
continue;
}
command.emplace_back(G0(x / resolution, std::nullopt, std::nullopt));
}
} else {
// <-----|
// 从右到左寻找连续的G0 此时起点在右边,终点在左边
int length {0};
while(--x > end && image.at<cv::uint8_t>(y, x) == 255) {
length++;
}
++x;
if(length) {
// 起点存在连续的G0
if(x + length == start) {
// 此时需要把偶数行延迟的Y轴移动进行上移操作
if(leftToRight) {
command.emplace_back(G0(x / resolution, y / resolution, std::nullopt));
leftToRight = false;
} else {
// 标记
command.emplace_back(G0(x / resolution, std::nullopt, std::nullopt));
}
continue;
}
// 终点存在连续的G0
if(x == 0) {
rightToLeft = true;
;
continue;
}
command.emplace_back(G0(x / resolution, std::nullopt, std::nullopt));
} else {
// 没有找到连续的G0
// 终点需要向上移动
if(x == 0) {
rightToLeft = true;
} else if(x == start) {
// 起点也需要处理上一行的y轴移动
if(leftToRight) {
command.emplace_back(G0(x / resolution, y / resolution, std::nullopt));
leftToRight = false;
}
continue;
}
command.emplace_back(G0(x / resolution, std::nullopt, std::nullopt));
}
}
} else {
auto power = static_cast<int>((1.0 - static_cast<double>(pixel) / 255.0) * 1000.0);
// 处理G1 开头和结尾情况
if(isEven) {
// 从左到右
if(x == start) {
if(rightToLeft) {
command.emplace_back(G0 {x / resolution, y / resolution, power}); // 最大激光功率 S=1000
rightToLeft = false;
continue;
}
} else if(x == image.cols - 1) {
// 终点需要标记
leftToRight = true;
}
command.emplace_back(G1 {x / resolution, std::nullopt, power}); // 最大激光功率 S=1000
} else {
// 从右到左
if(x == start) {
if(leftToRight) {
command.emplace_back(G0 {x / resolution, y / resolution, power}); // 最大激光功率 S=1000
leftToRight = false;
continue;
}
} else if(x == 0) {
// 终点需要标记
rightToLeft = true;
}
command.emplace_back(G1 {x / resolution, std::nullopt, power}); // 最大激光功率 S=1000
}
} // end if G0
} // end for x
} // end for y
}
// // Define additional strategy functions here
private:
cv::Mat mat; // 灰度图像
double width {0}; // 工作范围 x 轴
double height {0}; // 工作范围 y 轴
double resolution {0}; // 精度 lin/mm
ScanMode scanMode {ScanMode::Bidirection}; // 默认双向
LaserMode laserMode {LaserMode::Engraving}; // 默认雕刻模式
std::optional<int> airPump; // 自定义指令 气泵 用于吹走加工产生的灰尘 范围 [0,1000]
// add more custom cmd
std::vector<std::string> command; // G 代码
};
int main() {
cv::Mat mat = cv::imread(R"(~\ImageToGCode\image\tigger.jpg)", cv::IMREAD_GRAYSCALE);
cv::flip(mat, mat, 0);
cv::threshold(mat,mat,128,255,cv::ThresholdTypes::THRESH_BINARY);
ImageToGCode handle;
// 50x50 mm 1.0 line/mm
handle.setInputImage(mat).setOutputTragetSize(50,50,2).builder().exportGCode(R"(~\ImageToGCode\output\001.nc)");
}
总结
通过使用OpenCV库,我们成功实现了从灰度图像到GCode的双向扫描方法。这为激光雕刻提供了一种更加灵活、精细的图案生成方式。通过理解和应用上述代码片段,你可以根据自己的需求进一步调整和优化,实现更复杂的图案生成。激光雕刻的应用不仅仅局限于艺术品制作,还可以在教育和创客领域发挥巨大的创造力。希望这篇博客能够为你在激光雕刻领域的探索提供一些有用的指导。

