vue3 对 vue2 有什么优势
- 性能更好(编译优化、使用
proxy等) - 体积更小
- 更好的
TS支持 - 更好的代码组织
- 更好的逻辑抽离
- 更多新功能
vue3 和 vue2 的生命周期有什么区别
Options API生命周期
beforeDestroy改为beforeUnmountdestroyed改为umounted- 其他沿用
vue2生命周期
Composition API生命周期
import { onBeforeMount, onMounted, onBeforeUpdate, onUpdated, onBeforeUnmount, onUnmounted } from 'vue'

export default {
    name: 'LifeCycles',
    props: {
      msg: String
    },
    // setup等于 beforeCreate 和 created
    setup() {
        console.log('setup')

        onBeforeMount(() => {
            console.log('onBeforeMount')
        })
        onMounted(() => {
            console.log('onMounted')
        })
        onBeforeUpdate(() => {
            console.log('onBeforeUpdate')
        })
        onUpdated(() => {
            console.log('onUpdated')
        })
        onBeforeUnmount(() => {
            console.log('onBeforeUnmount')
        })
        onUnmounted(() => {
            console.log('onUnmounted')
        })
    },

    // 兼容vue2生命周期 options API和composition API生命周期二选一
    beforeCreate() {
        console.log('beforeCreate')
    },
    created() {
        console.log('created')
    },
    beforeMount() {
        console.log('beforeMount')
    },
    mounted() {
        console.log('mounted')
    },
    beforeUpdate() {
        console.log('beforeUpdate')
    },
    updated() {
        console.log('updated')
    },
    // beforeDestroy 改名
    beforeUnmount() {
        console.log('beforeUnmount')
    },
    // destroyed 改名
    unmounted() {
        console.log('unmounted')
    }
}
如何理解Composition API和Options API
composition API对比Option API
-
Composition API带来了什么
- 更好的代码组织
- 更好的逻辑复用
- 更好的类型推导
-
Composition API和Options API如何选择
- 不建议共用,会引起混乱
- 小型项目、业务逻辑简单,用
Option API成本更小一些 - 中大型项目、逻辑复杂,用
Composition API
ref如何使用
ref
- 生成值类型的响应式数据
- 可用于模板和
reactive - 通过
.value修改值
<template>
    <p>ref demo {{ageRef}} {{state.name}}</p>
</template>

<script>
import { ref, reactive } from 'vue'

export default {
    name: 'Ref',
    setup() {
        const ageRef = ref(20) // 值类型 响应式
        const nameRef = ref('test')

        const state = reactive({
            name: nameRef
        })

        setTimeout(() => {
            console.log('ageRef', ageRef.value)

            ageRef.value = 25 // .value 修改值
            nameRef.value = 'testA'
        }, 1500);

        return {
            ageRef,
            state
        }
    }
}
</script>
<!-- ref获取dom节点 -->
<template>
    <p ref="elemRef">我是一行文字</p>
</template>

<script>
import { ref, onMounted } from 'vue'

export default {
    name: 'RefTemplate',
    setup() {
        const elemRef = ref(null)

        onMounted(() => {
            console.log('ref template', elemRef.value.innerHTML, elemRef.value)
        })

        return {
            elemRef
        }
    }
}
</script>
toRef和toRefs如何使用和最佳方式
toRef
- 针对一个响应式对象(
reactive封装的)的一个属性,创建一个ref,具有响应式 - 两者保持引用关系
toRefs
- 将响应式对象(
reactive封装的)转化为普通对象 - 对象的每个属性都是对象的
ref - 两者保持引用关系
合成函数返回响应式对象
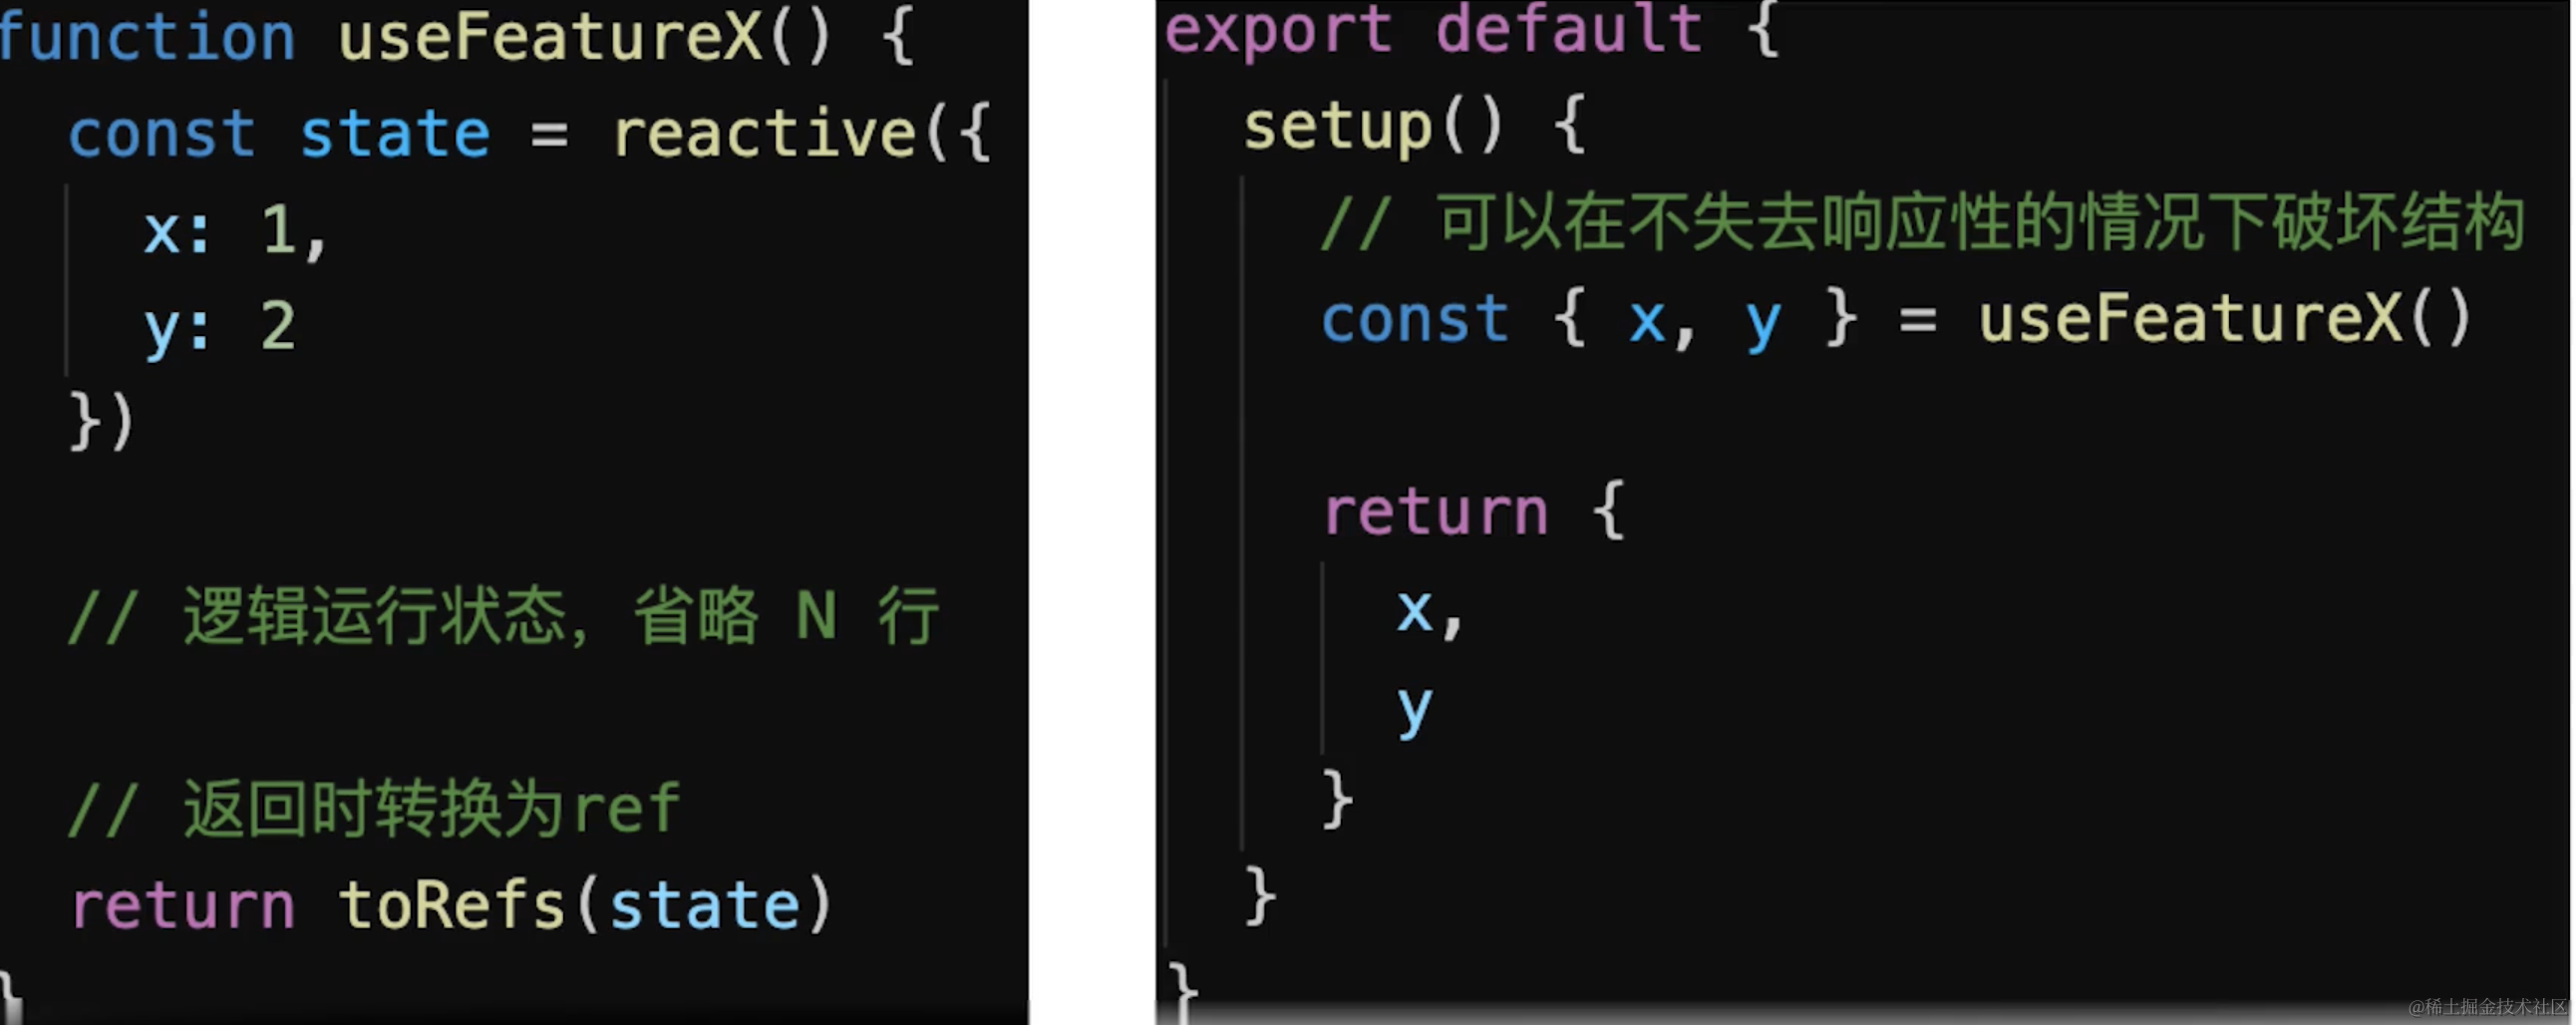
最佳使用方式
- 用
reactive做对象的响应式,用ref做值类型响应式(基本类型) setup中返回toRefs(state),或者toRef(state, 'prop')ref的变量命名都用xxRef- 合成函数返回响应式对象时,使用
toRefs,有助于使用方对数据进行解构时,不丢失响应式
<template>
    <p>toRef demo - {{ageRef}} - {{state.name}} {{state.age}}</p>
</template>

<script>
import { ref, toRef, reactive } from 'vue'

export default {
    name: 'ToRef',
    setup() {
        const state = reactive({
            age: 20,
            name: 'test'
        })

        const age1 = computed(() => {
            return state.age + 1
        })

        // toRef 如果用于普通对象(非响应式对象),产出的结果不具备响应式
        // const state = {
        //     age: 20,
        //     name: 'test'
        // }
        // 一个响应式对象state其中一个属性要单独拿出来实现响应式用toRef
        const ageRef = toRef(state, 'age')

        setTimeout(() => {
            state.age = 25
        }, 1500)

        setTimeout(() => {
            ageRef.value = 30 // .value 修改值
        }, 3000)

        return {
            state,
            ageRef
        }
    }
}
</script>
<template>
    <p>toRefs demo {{age}} {{name}}</p>
</template>

<script>
import { ref, toRef, toRefs, reactive } from 'vue'

export default {
    name: 'ToRefs',
    setup() {
        const state = reactive({
            age: 20,
            name: 'test'
        })

        const stateAsRefs = toRefs(state) // 将响应式对象,变成普通对象

        // const { age: ageRef, name: nameRef } = stateAsRefs // 每个属性,都是 ref 对象
        // return {
        //     ageRef,
        //     nameRef
        // }

        setTimeout(() => {
            state.age = 25
        }, 1500)

        return stateAsRefs
    }
}
</script>
深入理解为什么需要ref、toRef、toRefs
为什么需要用 ref
- 返回值类型,会丢失响应式
- 如在
setup、computed、合成函数,都有可能返回值类型 Vue如不定义ref,用户将制造ref,反而更混乱
为何ref需要.value属性
ref是一个对象(不丢失响应式),value存储值- 通过
.value属性的get和set实现响应式 - 用于模板、
reactive时,不需要.value,其他情况都要
为什么需要toRef和toRefs
- 初衷:不丢失响应式的情况下,把对象数据
分解/扩散 - 前端:针对的是响应式对象(
reactive封装的)非普通对象 - 注意:不创造响应式,而是延续响应式
<template>
    <p>why ref demo {{state.age}} - {{age1}}</p>
</template>

<script>
import { ref, toRef, toRefs, reactive, computed } from 'vue'

function useFeatureX() {
    const state = reactive({
        x: 1,
        y: 2
    })

    return toRefs(state)
}

export default {
    name: 'WhyRef',
    setup() {
        // 解构不丢失响应式
        const { x, y } = useFeatureX()

        const state = reactive({
            age: 20,
            name: 'test'
        })

        // computed 返回的是一个类似于 ref 的对象,也有 .value
        const age1 = computed(() => {
            return state.age + 1
        })

        setTimeout(() => {
            state.age = 25
        }, 1500)

        return {
            state,
            age1,
            x,
            y
        }
    }
}
</script>
vue3升级了哪些重要功能
1. createApp
// vue2
const app = new Vue({/**选项**/})
Vue.use(/****/)
Vue.mixin(/****/)
Vue.component(/****/)
Vue.directive(/****/)

// vue3
const app = createApp({/**选项**/})
app.use(/****/)
app.mixin(/****/)
app.component(/****/)
app.directive(/****/)
2. emits属性
// 父组件
<Hello :msg="msg" @onSayHello="sayHello">

// 子组件
export default {
    name: 'Hello',
    props: {
        msg: String
    },
    emits: ['onSayHello'], // 声明emits
    setup(props, {emit}) {
        emit('onSayHello', 'aaa')
    }
}
3. 多事件
<!-- 定义多个事件 -->
<button @click="one($event),two($event)">提交</button>
4. Fragment
<!-- vue2 -->
<template>
    <div>
        <h2>{{title}}</h2>
        <p>test</p>
    </div>
</template>

<!-- vue3:不在使用div节点包裹 -->
<template>
    <h2>{{title}}</h2>
    <p>test</p>
</template>
5. 移除.sync
<!-- vue2 -->
<MyComponent :title.sync="title" />

<!-- vue3 简写 -->
<MyComponent v-model:title="title" />
<!-- 非简写 -->
<MyComponent :title="title" @update:title="title = $event" />
.sync用法
父组件把属性给子组件,子组件修改了后还能同步到父组件中来
<template>
  <button @click="close">关闭</button>
</template>
<script>
export default {
    props: {
        isVisible: {
            type: Boolean,
            default: false
        }
    },
    methods: {
        close () {
            this.$emit('update:isVisible', false);
        }
    }
};
</script>
<!-- 父组件使用 -->
<chlid-component :isVisible.sync="isVisible"></chlid-component>
<text-doc :title="doc.title" @update:title="doc.title = $event"></text-doc>

<!-- 为了方便期间,为这种模式提供一个简写 .sync -->
<text-doc :title.sync="doc.title" />
6. 异步组件的写法
// vue2写法
new Vue({
    components: {
        'my-component': ()=>import('./my-component.vue')
    }
})
// vue3写法
import {createApp, defineAsyncComponent} from 'vue'

export default {
    components: {
        AsyncComponent: defineAsyncComponent(()=>import('./AsyncComponent.vue'))
    }
}
7. 移除filter
<!-- 以下filter在vue3中不可用了 -->

<!-- 在花括号中 -->
{message | capitalize}

<!-- 在v-bind中 -->
<div v-bind:id="rawId | formatId"></div>
8. Teleport
<button @click="modalOpen = true">
 open
</button>

<!-- 通过teleport把弹窗放到body下 -->
<teleport to="body">
 <div v-if="modalOpen" classs="modal">
   <div>
     teleport弹窗,父元素是body
     <button @click="modalOpen = false">close</button>
   </div>
 </div>
</teleport>
9. Suspense
<Suspense>
 <template>
    <!-- 异步组件 -->
   <Test1 />
 </template>
 <!-- fallback是一个具名插槽,即Suspense内部有两个slot,一个具名插槽fallback -->
 <template #fallback>
    loading...
 </template>
</Suspense>
10. Composition API
reactiverefreadonlywatch和watchEffectsetup- 生命周期钩子函数
Composition API 如何实现逻辑复用
- 抽离逻辑代码到一个函数
- 函数命名约定为
useXx格式(React Hooks也是) - 在
setup中引用useXx函数
<template>
    <p>mouse position {{x}} {{y}}</p>
</template>

<script>
import { reactive } from 'vue'
import useMousePosition from './useMousePosition'
// import useMousePosition2 from './useMousePosition'

export default {
    name: 'MousePosition',
    setup() {
        const { x, y } = useMousePosition()
        return {
            x,
            y
        }

        // const state = useMousePosition2()
        // return {
        //     state
        // }
    }
}
</script>
import { reactive, ref, onMounted, onUnmounted } from 'vue'

function useMousePosition() {
    const x = ref(0)
    const y = ref(0)

    function update(e) {
        x.value = e.pageX
        y.value = e.pageY
    }

    onMounted(() => {
        console.log('useMousePosition mounted')
        window.addEventListener('mousemove', update)
    })

    onUnmounted(() => {
        console.log('useMousePosition unMounted')
        window.removeEventListener('mousemove', update)
    })

    // 合成函数尽量返回ref或toRefs(state)  state = reactive({})
    // 这样在使用的时候可以解构但不丢失响应式
    return {
        x,
        y
    }
}

// function useMousePosition2() {
//     const state = reactive({
//         x: 0,
//         y: 0
//     })

//     function update(e) {
//         state.x = e.pageX
//         state.y = e.pageY
//     }

//     onMounted(() => {
//         console.log('useMousePosition mounted')
//         window.addEventListener('mousemove', update)
//     })

//     onUnmounted(() => {
//         console.log('useMousePosition unMounted')
//         window.removeEventListener('mousemove', update)
//     })

//     return state
// }

export default useMousePosition
// export default useMousePosition2
Vue3如何实现响应式
-
回顾
vue2的Object.defineProperty -
缺点
- 深度监听对象需要一次性递归
- 无法监听新增属性、删除属性(
Vue.set、Vue.delete) - 无法监听原生数组,需要特殊处理
-
学习
proxy语法 -
Vue3中如何使用proxy实现响应式
Proxy 基本使用
// const data = {
//     name: 'zhangsan',
//     age: 20,
// }
const data = ['a', 'b', 'c']

const proxyData = new Proxy(data, {
    get(target, key, receiver) {
        // 只处理本身(非原型的)属性
        const ownKeys = Reflect.ownKeys(target)
        if (ownKeys.includes(key)) {
            console.log('get', key) // 监听
        }

        const result = Reflect.get(target, key, receiver)
        return result // 返回结果
    },
    set(target, key, val, receiver) {
        // 重复的数据,不处理
        if (val === target[key]) {
            return true
        }

        const result = Reflect.set(target, key, val, receiver)
        console.log('set', key, val)
        // console.log('result', result) // true
        return result // 是否设置成功
    },
    deleteProperty(target, key) {
        const result = Reflect.deleteProperty(target, key)
        console.log('delete property', key)
        // console.log('result', result) // true
        return result // 是否删除成功
    }
})
vue3用Proxy 实现响应式
- 深度监听,性能更好(获取到哪一层才触发响应式
get,不是一次性递归) - 可监听
新增/删除属性 - 可监听数组变化
// 创建响应式
function reactive(target = {}) {
    if (typeof target !== 'object' || target == null) {
        // 不是对象或数组,则返回
        return target
    }

    // 代理配置
    const proxyConf = {
        get(target, key, receiver) {
            // 只处理本身(非原型的)属性
            const ownKeys = Reflect.ownKeys(target)
            if (ownKeys.includes(key)) {
                console.log('get', key) // 监听
            }

            const result = Reflect.get(target, key, receiver)

            // 深度监听
            // 性能如何提升的?获取到哪一层才触发响应式get,不是一次性递归
            return reactive(result)
        },
        set(target, key, val, receiver) {
            // 重复的数据,不处理
            if (val === target[key]) {
                return true
            }

            const ownKeys = Reflect.ownKeys(target)
            if (ownKeys.includes(key)) {
                console.log('已有的 key', key)
            } else {
                console.log('新增的 key', key)
            }

            const result = Reflect.set(target, key, val, receiver)
            console.log('set', key, val)
            // console.log('result', result) // true
            return result // 是否设置成功
        },
        deleteProperty(target, key) {
            const result = Reflect.deleteProperty(target, key)
            console.log('delete property', key)
            // console.log('result', result) // true
            return result // 是否删除成功
        }
    }

    // 生成代理对象
    const observed = new Proxy(target, proxyConf)
    return observed
}

// 测试数据
const data = {
    name: 'zhangsan',
    age: 20,
    info: {
        city: 'shenshen',
        a: {
            b: {
                c: {
                    d: {
                        e: 100
                    }
                }
            }
        }
    }
}

const proxyData = reactive(data)
v-model参数的用法
<!-- UserInfo组件 -->
<template>
    <input :value="name" @input="$emit('update:name', $event.target.value)"/>
    <input :value="age" @input="$emit('update:age', $event.target.value)"/>
</template>

<script>
export default {
    name: 'UserInfo',
    props: {
        name: String,
        age: String
    }
}
</script>
<!-- 使用 -->
<user-info
    v-model:name="name"
    v-model:age="age"
></user-info>
watch和watchEffect的区别
- 两者都可以监听
data属性变化 watch需要明确监听哪个属性watchEffect会根据其中的属性,自动监听其变化
<template>
    <p>watch vs watchEffect</p>
    <p>{{numberRef}}</p>
    <p>{{name}} {{age}}</p>
</template>

<script>
import { reactive, ref, toRefs, watch, watchEffect } from 'vue'

export default {
    name: 'Watch',
    setup() {
        const numberRef = ref(100)
        const state = reactive({
            name: 'test',
            age: 20
        })

        watchEffect(() => {
            // 初始化时,一定会执行一次(收集要监听的数据)
            console.log('hello watchEffect')
        })
        watchEffect(() => {
            console.log('state.name', state.name)
        })
        watchEffect(() => {
            console.log('state.age', state.age)
        })
        watchEffect(() => {
            console.log('state.age', state.age)
            console.log('state.name', state.name)
        })
        setTimeout(() => {
            state.age = 25
        }, 1500)
        setTimeout(() => {
            state.name = 'testA'
        }, 3000)


        // ref直接写
        // watch(numberRef, (newNumber, oldNumber) => {
        //     console.log('ref watch', newNumber, oldNumber)
        // }
        // // , {
        // //     immediate: true // 初始化之前就监听,可选
        // // }
        // )

        // setTimeout(() => {
        //     numberRef.value = 200
        // }, 1500)

        // watch(
        //     // 第一个参数,确定要监听哪个属性
        //     () => state.age,

        //     // 第二个参数,回调函数
        //     (newAge, oldAge) => {
        //         console.log('state watch', newAge, oldAge)
        //     },

        //     // 第三个参数,配置项
        //     {
        //         immediate: true, // 初始化之前就监听,可选
        //         // deep: true // 深度监听
        //     }
        // )

        // setTimeout(() => {
        //     state.age = 25
        // }, 1500)
        // setTimeout(() => {
        //     state.name = 'PoetryA'
        // }, 3000)

        return {
            numberRef,
            ...toRefs(state)
        }
    }
}
</script>
setup中如何获取组件实例
- 在
setup和其他composition API中没有this - 通过
getCurrentInstance获取当前实例 - 若使用
options API可以照常使用this
import { onMounted, getCurrentInstance } from 'vue'

export default {
    name: 'GetInstance',
    data() {
        return {
            x: 1,
            y: 2
        }
    },
    setup() { // setup是beforeCreate created合集 组件还没正式初始化
        console.log('this1', this) // undefined

        onMounted(() => {
            console.log('this in onMounted', this) // undefined
            console.log('x', instance.data.x) // 1  onMounted中组件已经初始化了
        })

        const instance = getCurrentInstance()
        console.log('instance', instance)
    },
    mounted() {
        console.log('this2', this)
        console.log('y', this.y)
    }
}
Vue3为何比Vue2快
proxy响应式:深度监听,性能更好(获取到哪一层才触发响应式get,不是一次性递归)PatchFlag动态节点做标志HoistStatic将静态节点的定义,提升到父作用域,缓存起来。多个相邻的静态节点,会被合并起来CacheHandler事件缓存SSR优化: 静态节点不走vdom逻辑,直接输出字符串,动态节点才走Tree-shaking根据模板的内容动态import不同的内容,不需要就不import
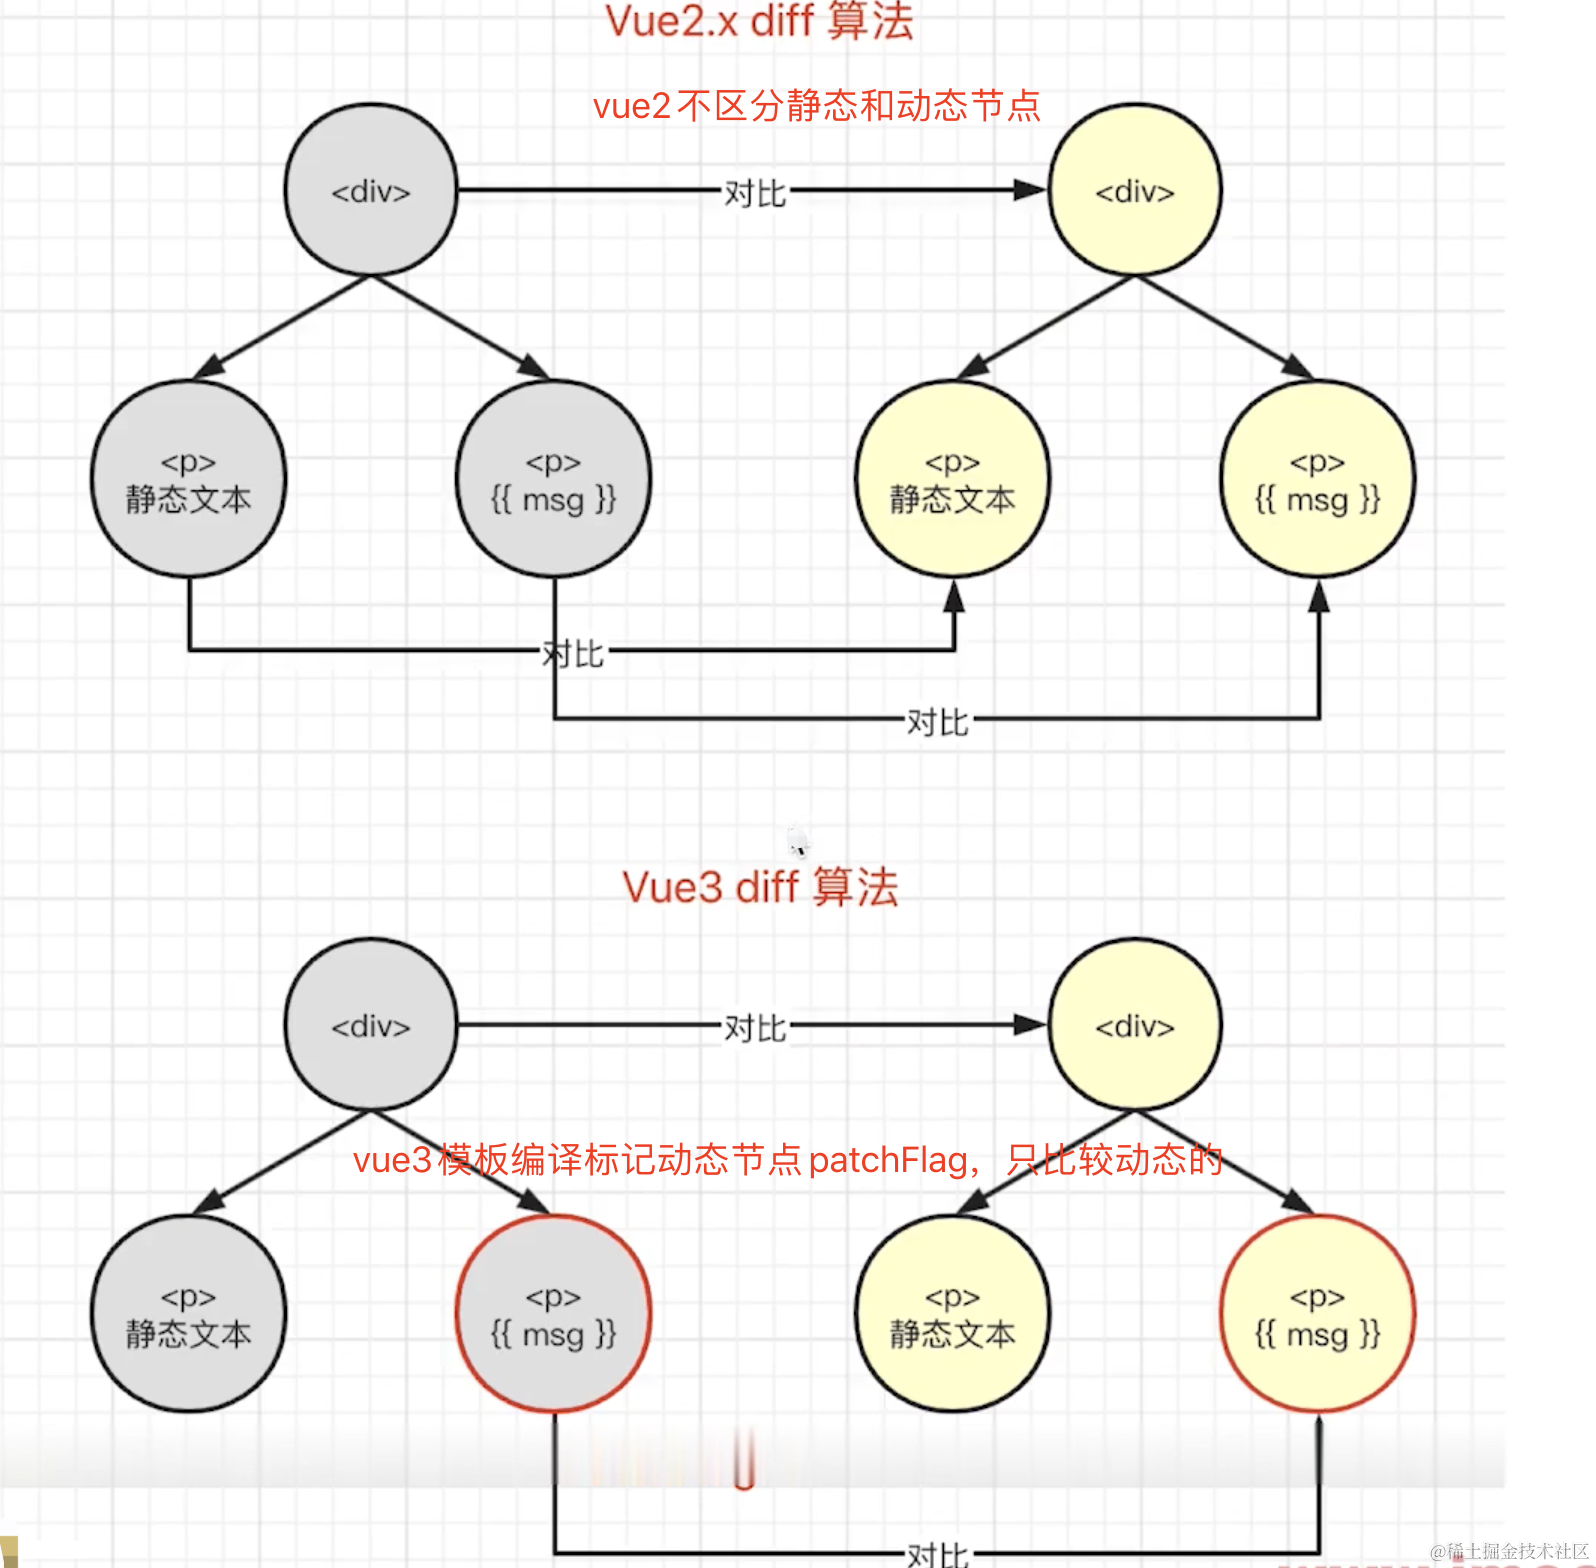
什么是PatchFlag
- 模板编译时,动态节点做标记
- 标记,分为不同类型,如
Text、PROPS、CLASS diff算法时,可区分静态节点,以及不同类型的动态节点
<!-- https://vue-next-template-explorer.netlify.app 中打开查看编译结果 -->

<div>
  <span>hello vue3</span>
  <span>{{msg}}</span>
  <span :class="name">poetry</span>
  <span :id="name">poetry</span>
  <span :id="name">{{msg}}</span>
  <span :id="name" :msg="msg">poetry</span>
</div>
// 编译后结果

import { createElementVNode as _createElementVNode, toDisplayString as _toDisplayString, normalizeClass as _normalizeClass, openBlock as _openBlock, createElementBlock as _createElementBlock } from "vue"

export function render(_ctx, _cache, $props, $setup, $data, $options) {
  return (_openBlock(), _createElementBlock("div", null, [
    _createElementVNode("span", null, "hello vue3"),
    _createElementVNode("span", null, _toDisplayString(_ctx.msg), 1 /* TEXT */), // 文本标记1
    _createElementVNode("span", {
      class: _normalizeClass(_ctx.name)
    }, "poetry", 2 /* CLASS */), // class标记2
    _createElementVNode("span", { id: _ctx.name }, "poetry", 8 /* PROPS */, ["id"]), // 属性props标记8
    _createElementVNode("span", { id: _ctx.name }, _toDisplayString(_ctx.msg), 9 /* TEXT, PROPS */, ["id"]), // 文本和属性组合标记9
    _createElementVNode("span", {
      id: _ctx.name,
      msg: _ctx.msg
    }, "poetry", 8 /* PROPS */, ["id", "msg"]) // 属性组合标记
  ]))
}
什么是HoistStatic和CacheHandler
HoistStatic
- 将静态节点的定义,提升到父作用域,缓存起来
- 多个相邻的静态节点,会被合并起来
- 典型的拿空间换时间的优化策略
<!-- https://vue-next-template-explorer.netlify.app 中打开查看编译结果:options开启hoistStatic -->
<div>
  <span>hello vue3</span>
  <span>hello vue3</span>
  <span>hello vue3</span>
  <span>{{msg}}</span>
</div>
// 编译结果

import { createElementVNode as _createElementVNode, toDisplayString as _toDisplayString, openBlock as _openBlock, createElementBlock as _createElementBlock } from "vue"

// 之后函数怎么执行,这些变量都不会被重复定义一遍
const _hoisted_1 = /*#__PURE__*/_createElementVNode("span", null, "hello vue3", -1 /* HOISTED */)
const _hoisted_2 = /*#__PURE__*/_createElementVNode("span", null, "hello vue3", -1 /* HOISTED */)
const _hoisted_3 = /*#__PURE__*/_createElementVNode("span", null, "hello vue3", -1 /* HOISTED */)

export function render(_ctx, _cache, $props, $setup, $data, $options) {
  return (_openBlock(), _createElementBlock("div", null, [
    _hoisted_1,
    _hoisted_2,
    _hoisted_3,
    _createElementVNode("span", null, _toDisplayString(_ctx.msg), 1 /* TEXT */)
  ]))
}
<!-- https://vue-next-template-explorer.netlify.app 中打开查看编译结果:options开启hoistStatic -->
<!-- 当相同的节点达到一定阈值后会被vue3合并起来 -->
<div>
  <span>hello vue3</span>
  <span>hello vue3</span>
  <span>hello vue3</span>
  <span>hello vue3</span>
  <span>hello vue3</span>
  <span>hello vue3</span>
  <span>hello vue3</span>
  <span>hello vue3</span>
  <span>hello vue3</span>
  <span>hello vue3</span>
  <span>{{msg}}</span>
</div>
// 编译之后

import { createElementVNode as _createElementVNode, toDisplayString as _toDisplayString, createStaticVNode as _createStaticVNode, openBlock as _openBlock, createElementBlock as _createElementBlock } from "vue"

// 多个相邻的静态节点,会被合并起来
const _hoisted_1 = /*#__PURE__*/_createStaticVNode("<span>hello vue3</span><span>hello vue3</span><span>hello vue3</span><span>hello vue3</span><span>hello vue3</span><span>hello vue3</span><span>hello vue3</span><span>hello vue3</span><span>hello vue3</span><span>hello vue3</span>", 10)

export function render(_ctx, _cache, $props, $setup, $data, $options) {
  return (_openBlock(), _createElementBlock("div", null, [
    _hoisted_1,
    _createElementVNode("span", null, _toDisplayString(_ctx.msg), 1 /* TEXT */)
  ]))
}
CacheHandler 缓存事件
<!-- https://vue-next-template-explorer.netlify.app 中打开查看编译结果:options开启cacheHandler -->
<div>
  <span @click="clickHandler">hello vue3</span>
</div>
// 编译之后

import { createElementVNode as _createElementVNode, openBlock as _openBlock, createElementBlock as _createElementBlock } from "vue"

export function render(_ctx, _cache, $props, $setup, $data, $options) {
  return (_openBlock(), _createElementBlock("div", null, [
    _createElementVNode("span", {
      onClick: _cache[0] || (_cache[0] = (...args) => (_ctx.clickHandler && _ctx.clickHandler(...args)))
    }, "hello vue3")
  ]))
}
SSR和Tree-shaking的优化
SSR优化
- 静态节点直接输出,绕过了
vdom - 动态节点,还是需要动态渲染
<!-- https://vue-next-template-explorer.netlify.app 中打开查看编译结果:options开启ssr -->
<div>
  <span>hello vue3</span>
  <span>hello vue3</span>
  <span>hello vue3</span>
  <span>{{msgs}}</span>
</div>
// 编译之后

import { mergeProps as _mergeProps } from "vue"
import { ssrRenderAttrs as _ssrRenderAttrs, ssrInterpolate as _ssrInterpolate } from "vue/server-renderer"

export function ssrRender(_ctx, _push, _parent, _attrs, $props, $setup, $data, $options) {
  const _cssVars = { style: { color: _ctx.color }}
  _push(`<div${
    _ssrRenderAttrs(_mergeProps(_attrs, _cssVars))
  }><span>hello vue3</span><span>hello vue3</span><span>hello vue3</span><span>${ // 静态节点直接输出
    _ssrInterpolate(_ctx.msgs)
  }</span></div>`)
}
Tree Shaking优化
编译时,根据不同的情况,引入不同的
API,不会全部引用
<!-- https://vue-next-template-explorer.netlify.app 中打开查看编译结果 -->
<div>
  <span v-if="msg">hello vue3</span>
  <input v-model="msg" />
</div>
// 编译之后

// 模板编译会根据模板写法 指令 插值以及用了特别的功能去动态的import相应的接口,需要什么就import什么,这就是tree shaking
import { openBlock as _openBlock, createElementBlock as _createElementBlock, createCommentVNode as _createCommentVNode, vModelText as _vModelText, createElementVNode as _createElementVNode, withDirectives as _withDirectives } from "vue"

export function render(_ctx, _cache, $props, $setup, $data, $options) {
  return (_openBlock(), _createElementBlock("div", null, [
    (_ctx.msg)
      ? (_openBlock(), _createElementBlock("span", { key: 0 }, "hello vue3"))
      : _createCommentVNode("v-if", true),
    _withDirectives(_createElementVNode("input", {
      "onUpdate:modelValue": $event => ((_ctx.msg) = $event)
    }, null, 8 /* PROPS */, ["onUpdate:modelValue"]), [
      [_vModelText, _ctx.msg]
    ])
  ]))
}
Vite 为什么启动非常快
- 开发环境使用
Es6 Module,无需打包,非常快 - 生产环境使用
rollup,并不会快很多
ES Module 在浏览器中的应用
<p>基本演示</p>
<script type="module">
    import add from './src/add.js'

    const res = add(1, 2)
    console.log('add res', res)
</script>
<script type="module">
    import { add, multi } from './src/math.js'
    console.log('add res', add(10, 20))
    console.log('multi res', multi(10, 20))
</script>
<p>外链引用</p>
<script type="module" src="./src/index.js"></script>
<p>远程引用</p>
<script type="module">
    import { createStore } from 'https://unpkg.com/redux@latest/es/redux.mjs' // es module规范mjs
    console.log('createStore', createStore)
</script>
<p>动态引入</p>
<button id="btn1">load1</button>
<button id="btn2">load2</button>

<script type="module">
    document.getElementById('btn1').addEventListener('click', async () => {
        const add = await import('./src/add.js')
        const res = add.default(1, 2)
        console.log('add res', res)
    })
    document.getElementById('btn2').addEventListener('click', async () => {
        const { add, multi } = await import('./src/math.js')
        console.log('add res', add(10, 20))
        console.log('multi res', multi(10, 20))
    })
</script>
Composition API 和 React Hooks 的对比
- 前者
setup(相当于created、beforeCreate的合集)只会调用一次,而React Hooks函数在渲染过程中会被多次调用 Composition API无需使用useMemo、useCallback,因为setup只会调用一次,在setup闭包中缓存了变量Composition API无需顾虑调用顺序,而React Hooks需要保证hooks的顺序一致(比如不能放在循环、判断里面)Composition API的ref、reactive比useState难理解


![[k8s系列]:kubernetes·概念入门](https://img-blog.csdnimg.cn/e34214888d2d44e8bccad59f0a36dfbb.png)