SSM
- 前言
- 整合

前言
在完成 Spring 、Spring MVC 与 MyBatis 基础知识的学习后,下面简单介绍 SSM 框架的整合使用。
整合
SSM,是 Java 开发中常用的一个 Web 框架组合,用于构建基于 Spring 和 MyBatis 的 Web 应用( Spring MVC 是 Spring 框架的扩展)。
简单示例:
首先,创建一个 Maven 工程( Web 项目)后,在 pom.xml 中添加依赖
<dependencies>
  <dependency>
    <groupId>junit</groupId>
    <artifactId>junit</artifactId>
    <version>4.12</version>
    <scope>compile</scope>
  </dependency>

  <!-- https://mvnrepository.com/artifact/org.springframework/spring-context -->
  <dependency>
    <groupId>org.springframework</groupId>
    <artifactId>spring-context</artifactId>
    <version>5.3.25</version>
  </dependency>

  <!-- https://mvnrepository.com/artifact/org.springframework/spring-web -->
  <dependency>
    <groupId>org.springframework</groupId>
    <artifactId>spring-web</artifactId>
    <version>5.3.25</version>
  </dependency>

  <!-- https://mvnrepository.com/artifact/org.springframework/spring-webmvc -->
  <dependency>
    <groupId>org.springframework</groupId>
    <artifactId>spring-webmvc</artifactId>
    <version>5.3.25</version>
  </dependency>

  <!-- https://mvnrepository.com/artifact/org.springframework/spring-tx -->
  <dependency>
    <groupId>org.springframework</groupId>
    <artifactId>spring-tx</artifactId>
    <version>5.3.25</version>
  </dependency>

  <!-- https://mvnrepository.com/artifact/org.springframework/spring-aspects -->
  <dependency>
    <groupId>org.springframework</groupId>
    <artifactId>spring-aspects</artifactId>
    <version>5.3.25</version>
  </dependency>

  <!-- https://mvnrepository.com/artifact/org.springframework/spring-orm -->
  <dependency>
    <groupId>org.springframework</groupId>
    <artifactId>spring-orm</artifactId>
    <version>5.3.25</version>
  </dependency>

  <!-- https://mvnrepository.com/artifact/javax.servlet/javax.servlet-api -->
  <dependency>
    <groupId>javax.servlet</groupId>
    <artifactId>javax.servlet-api</artifactId>
    <version>3.1.0</version>
    <scope>provided</scope>
  </dependency>

  <!-- https://mvnrepository.com/artifact/javax.servlet.jsp/javax.servlet.jsp-api -->
  <dependency>
    <groupId>javax.servlet.jsp</groupId>
    <artifactId>javax.servlet.jsp-api</artifactId>
    <version>2.3.3</version>
    <scope>provided</scope>
  </dependency>

  <!-- https://mvnrepository.com/artifact/org.slf4j/slf4j-api -->
  <dependency>
    <groupId>org.slf4j</groupId>
    <artifactId>slf4j-api</artifactId>
    <version>2.0.6</version>
  </dependency>

  <!-- https://mvnrepository.com/artifact/org.slf4j/slf4j-nop -->
  <dependency>
    <groupId>org.slf4j</groupId>
    <artifactId>slf4j-nop</artifactId>
    <version>2.0.6</version>
    <type>jar</type>
  </dependency>

  <!-- https://mvnrepository.com/artifact/commons-logging/commons-logging -->
  <dependency>
    <groupId>commons-logging</groupId>
    <artifactId>commons-logging</artifactId>
    <version>1.2</version>
  </dependency>

  <!-- https://mvnrepository.com/artifact/org.apache.taglibs/taglibs-standard-impl -->
  <dependency>
    <groupId>org.apache.taglibs</groupId>
    <artifactId>taglibs-standard-impl</artifactId>
    <version>1.2.5</version>
  </dependency>

  <!-- https://mvnrepository.com/artifact/org.apache.taglibs/taglibs-standard-spec -->
  <dependency>
    <groupId>org.apache.taglibs</groupId>
    <artifactId>taglibs-standard-spec</artifactId>
    <version>1.2.5</version>
  </dependency>

  <!-- https://mvnrepository.com/artifact/mysql/mysql-connector-java -->
  <dependency>
    <groupId>mysql</groupId>
    <artifactId>mysql-connector-java</artifactId>
    <version>8.0.25</version>
  </dependency>

  <!-- https://mvnrepository.com/artifact/com.mchange/c3p0 -->
  <dependency>
    <groupId>com.mchange</groupId>
    <artifactId>c3p0</artifactId>
    <version>0.9.5.2</version>
  </dependency>

  <!-- https://mvnrepository.com/artifact/org.mybatis/mybatis -->
  <dependency>
    <groupId>org.mybatis</groupId>
    <artifactId>mybatis</artifactId>
    <version>3.5.6</version>
  </dependency>

  <!-- https://mvnrepository.com/artifact/org.mybatis.generator/mybatis-generator-core -->
  <dependency>
    <groupId>org.mybatis.generator</groupId>
    <artifactId>mybatis-generator-core</artifactId>
    <version>1.4.0</version>
  </dependency>

  <!-- https://mvnrepository.com/artifact/org.mybatis/mybatis-spring -->
  <dependency>
    <groupId>org.mybatis</groupId>
    <artifactId>mybatis-spring</artifactId>
    <version>2.0.6</version>
  </dependency>

  <!-- https://mvnrepository.com/artifact/org.mybatis.caches/mybatis-ehcache -->
  <dependency>
    <groupId>org.mybatis.caches</groupId>
    <artifactId>mybatis-ehcache</artifactId>
    <version>1.2.1</version>
  </dependency>

  <dependency>
    <groupId>com.github.pagehelper</groupId>
    <artifactId>pagehelper</artifactId>
    <version>5.3.2</version>
  </dependency>
</dependencies>

<!--   UserMapper.xml 配置文件写在 src 找不到问题解决方案     -->
<build>
  <resources>
    <resource>
      <!-- directory:指定资源文件的位置 -->
      <directory>src/main/java</directory>
      <includes>
        <!-- “**”:表示任意级目录    “*”:表示任意任意文件 -->
        <!-- mvn resources:resources :对资源做出处理,先于 compile 阶段  -->
        <include>**/*.properties</include>
        <include>**/*.xml</include>
      </includes>
      <!--  filtering:开启过滤,用指定的参数替换 directory 下的文件中的参数(eg. ${name}) -->
      <filtering>false</filtering>
    </resource>
    <resource>
      <directory>src/main/resources</directory>
    </resource>
  </resources>
</build>
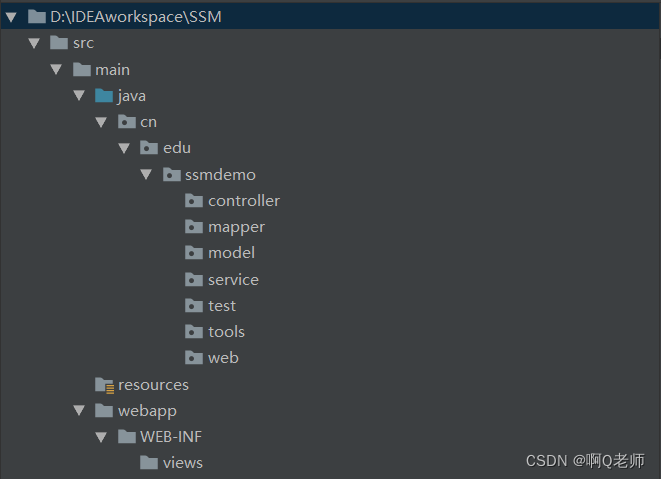
项目结构如图:
接着,在 webapp/WEB-INF 目录下的 web.xml 配置文件中,对 spring 和 springmvc 进行初始化配置
<?xml version="1.0" encoding="UTF-8"?>
<web-app xmlns="http://xmlns.jcp.org/xml/ns/javaee"
         xmlns:xsi="http://www.w3.org/2001/XMLSchema-instance"
         xsi:schemaLocation="http://xmlns.jcp.org/xml/ns/javaee http://xmlns.jcp.org/xml/ns/javaee/web-app_4_0.xsd"
         version="4.0">

  <!-- 配置整个 web 应用的初始化参数,指定 spring 的配置文件所在位置 -->
  <context-param>
    <param-name>contextConfigLocation</param-name>
    <param-value>classpath:spring.xml</param-value>
  </context-param>
  <!-- spring 与 javaweb 应用的整合 -->
  <listener>
    <listener-class>org.springframework.web.context.ContextLoaderListener</listener-class>
  </listener>

  <!-- 配置前端控制器 dispatcherServlet -->
  <servlet>
    <servlet-name>dispatcherServlet</servlet-name>
    <servlet-class>org.springframework.web.servlet.DispatcherServlet</servlet-class>

    <!-- 配置 springmvc 的配置文件所在位置 -->
    <init-param>
      <param-name>contextConfigLocation</param-name>
      <param-value>classpath:springmvc.xml</param-value>
    </init-param>
    <!-- 配置初始化参数,启动时创建 servlet 对象 -->
    <load-on-startup>1</load-on-startup>
  </servlet>

  <!-- 配置url地址 -->
  <servlet-mapping>
    <servlet-name>dispatcherServlet</servlet-name>
    <!-- 根目录下所有地址,其他 servlet 除外 -->
    <url-pattern>/</url-pattern>
  </servlet-mapping>
</web-app>
同时,在 resources 目录下创建 spring.xml 和 springmvc.xml 配置文件,并且进行相关配置
<?xml version="1.0" encoding="UTF-8"?>
<beans xmlns="http://www.springframework.org/schema/beans"
       xmlns:xsi="http://www.w3.org/2001/XMLSchema-instance"
       xmlns:context="http://www.springframework.org/schema/context" xmlns:tx="http://www.springframework.org/schema/tx"
       xmlns:aop="http://www.springframework.org/schema/aop"
       xmlns:mybatis-spring="http://mybatis.org/schema/mybatis-spring"
       xsi:schemaLocation="http://www.springframework.org/schema/beans
       http://www.springframework.org/schema/beans/spring-beans.xsd
       http://www.springframework.org/schema/context
       https://www.springframework.org/schema/context/spring-context.xsd http://www.springframework.org/schema/tx http://www.springframework.org/schema/tx/spring-tx.xsd http://www.springframework.org/schema/aop https://www.springframework.org/schema/aop/spring-aop.xsd http://mybatis.org/schema/mybatis-spring http://mybatis.org/schema/mybatis-spring.xsd">

    <!-- spring.xml -->
    <!-- 指定排除扫描 Controller 和 ControllerAdvice 包,避免与 springmvc 扫描重复 -->
    <context:component-scan base-package="cn.edu.ssmdemo">
        <context:exclude-filter type="annotation" expression="org.springframework.stereotype.Controller" />
        <context:exclude-filter type="annotation" expression="org.springframework.web.bind.annotation.ControllerAdvice" />
    </context:component-scan>

    <!-- 在 Bean 的外部属性文件的使用中有所提及 -->
    <!-- 使用context命名空间,通过 location 属性指定 properties 文件位置 -->
    <context:property-placeholder location="classpath:jdbc.properties" />
    <bean id="dataSource" class="com.mchange.v2.c3p0.ComboPooledDataSource">
        <!-- 连接MySQL数据库的基本信息的配置 -->
        <!-- 驱动程序类名:com.mysql.jdbc.Driver -->
        <property name="driverClass" value="${jdbc.driverClass}" />
        <!-- JDBC URL:jdbc:mysql://<host>:<port>/<database_name> -->
        <property name="jdbcUrl" value="${jdbc.url}" />
        <!-- 数据库用户名 -->
        <property name="user" value="${jdbc.user}" />
        <!-- 数据库用户密码 -->
        <property name="password" value="${jdbc.password}" />
        <!-- 若数据库中的连接数量不足时,向数据库申请的连接数量 -->
        <property name="acquireIncrement" value="${acquireIncrement}" />
        <!-- 初始化数据库连接池时连接的数量 -->
        <property name="initialPoolSize" value="${initialPoolSize}" />
        <!-- 数据库连接池最小的数据库连接数 -->
        <property name="minPoolSize" value="${minPoolSize}" />
        <!-- 数据库连接池最大的数据库连接数 -->
        <property name="maxPoolSize" value="${maxPoolSize}" />
        <!-- C3P0数据库连接池可以维护的Statement数量 -->
        <property name="maxStatements" value="${maxStatements}" />
        <!-- 每个连接同时可以使用Statement的数量 -->
        <property name="maxStatementsPerConnection" value="${maxStatementsPerConnection}" />
    </bean>

    <!-- 配置事务管理器 -->
    <bean id="dataSourceTransactionManager" class="org.springframework.jdbc.datasource.DataSourceTransactionManager" >
        <!-- 配置dataSource -->
        <property name="dataSource" ref="dataSource"></property>
    </bean>

    <!-- 配置事务属性 -->
    <tx:advice id="txAdvice" transaction-manager="dataSourceTransactionManager" >
        <tx:attributes>
            <tx:method name="get*" read-only="true"/>
            <tx:method name="load*" read-only="true"/>
            <tx:method name="find*" read-only="true"/>
            <tx:method name="select*" read-only="true"/>
            <tx:method name="*" read-only="false"/>
        </tx:attributes>
    </tx:advice>

    <!-- 配置事务切入点 -->
    <aop:config>
        <aop:pointcut id="txPointcut" expression="execution(* cn.edu.ssmdemo.service.*.*(..))" />
        <aop:advisor advice-ref="txAdvice" pointcut-ref="txPointcut" />
    </aop:config>

    <!-- 配置 mybatis 整合 -->
    <bean id="sessionFactory" class="org.mybatis.spring.SqlSessionFactoryBean" >
        <property name="dataSource" ref="dataSource" />
        <property name="configLocation" value="classpath:mybatis.xml" />
        <property name="mapperLocations" value="classpath:cn/edu/ssmdemo/mapper/*.xml" />
    </bean>

    <mybatis-spring:scan base-package="cn.edu.ssmdemo.mapper" />
</beans>
<?xml version="1.0" encoding="UTF-8"?>
<beans xmlns="http://www.springframework.org/schema/beans"
       xmlns:xsi="http://www.w3.org/2001/XMLSchema-instance"
       xmlns:context="http://www.springframework.org/schema/context"
       xmlns:mvc="http://www.springframework.org/schema/mvc"
       xsi:schemaLocation="http://www.springframework.org/schema/beans
       http://www.springframework.org/schema/beans/spring-beans.xsd
       http://www.springframework.org/schema/context
       https://www.springframework.org/schema/context/spring-context.xsd
       http://www.springframework.org/schema/mvc
       https://www.springframework.org/schema/mvc/spring-mvc.xsd">

    <!-- springmvc.xml -->
    <!-- 指定只扫描 Controller 和 ControllerAdvice 包 -->
    <context:component-scan base-package="cn.edu.ssmdemo" use-default-filters="false">
        <context:include-filter type="annotation" expression="org.springframework.stereotype.Controller" />
        <context:include-filter type="annotation" expression="org.springframework.web.bind.annotation.ControllerAdvice" />
    </context:component-scan>

    <mvc:annotation-driven />

    <!-- 配置 springmvc 视图解析器 -->
    <bean class="org.springframework.web.servlet.view.InternalResourceViewResolver">
        <!-- 配置视图页面 -->
        <property name="prefix" value="/WEB-INF/views/"></property>
        <property name="suffix" value=".jsp"></property>
    </bean>

    <!-- 配置自动识别静态资源 -->
    <mvc:default-servlet-handler />
</beans>
另外,在 spring.xml 配置文件中,还要相应文件的创建与配置。在 resources 目录下再创建 jdbc.properties 资源文件和 mybatis.xml 配置文件,并且进行相关配置
jdbc.driverClass=com.mysql.cj.jdbc.Driver
jdbc.url=jdbc:mysql://localhost:3306/ssmdemo?useSSL=false&serverTimezone=UTC
jdbc.user=root
jdbc.password=0123
acquireIncrement=5
initialPoolSize=10
minPoolSize=5
maxPoolSize=100
maxStatements=2
maxStatementsPerConnection=5
<?xml version="1.0" encoding="UTF-8" ?>
<!DOCTYPE configuration PUBLIC
        "-//mybatis.org//DTD Config 3.0//EN"
        "https://mybatis.org/dtd/mybatis-3-config.dtd">

<!-- mybatis.xml 配置文件 -->
<configuration>

    <settings>
        <!-- 懒加载配置 -->
        <setting name="lazyLoadingEnabled" value="true"/>
        <setting name="aggressiveLazyLoading" value="false"/>

        <!-- 开启二级缓存 -->
        <setting name="cacheEnabled" value="true"/>
    </settings>

    <!-- typeAliases:设置别名,简化类型名称的书写。用一个别名代替一个类全名 -->
    <typeAliases>
        <package name="cn.edu.ssmdemo.model" />
    </typeAliases>

    <!-- plugins 标签需要在 environments 标签前 -->
    <plugins>
        <plugin interceptor="com.github.pagehelper.PageInterceptor"></plugin>
    </plugins>
</configuration>
然后,在 resources 目录下创建一个 Generator 的配置文件 mybatis_generator.xml ,并且进行相关配置
<?xml version="1.0" encoding="UTF-8"?>
<!DOCTYPE generatorConfiguration
PUBLIC "-//mybatis.org//DTD MyBatis Generator Configuration 1.0//EN"
"http://mybatis.org/dtd/mybatis-generator-config_1_0.dtd">
<generatorConfiguration>
<context id="DB2Tables" targetRuntime="MyBatis3">
<commentGenerator>
<!-- 是否去除自动生成的注释 -->
<property name="suppressAllComments" value="true" />
</commentGenerator>
<!-- MySQL数据库连接的信息:驱动类、连接地址、用户名、密码 -->
<jdbcConnection driverClass="com.mysql.cj.jdbc.Driver"
connectionURL="jdbc:mysql://localhost:3306/ssmdemo?useUnicode=true&characterEncoding=utf8&useSSL=false&serverTimezone=UTC"
userId="root"
password="0123" >
<property name="nullCatalogMeansCurrent" value="true" />
</jdbcConnection>
<!-- Java 类型解析器,一般默认为 false -->
<javaTypeResolver>
<property name="forceBigDecimals" value="false" />
</javaTypeResolver>
<!-- Domain 生成器:生成实体类。属性 targetProject :生成 POJO 类的位置;其余默认 -->
<javaModelGenerator targetPackage="cn.edu.ssmdemo.model" targetProject=".\src\main\java" />
<!-- Mapping 生成器:生成映射文件。属性 targetProject :mapper 映射文件生成的位置;其余默认 -->
<sqlMapGenerator targetPackage="cn.edu.ssmdemo.mapper" targetProject=".\src\main\java">
<!-- enableSubPackages :是否让 schema 作为包的后缀 -->
<property name="enableSubPackages" value="true" />
</sqlMapGenerator>
<!-- Mapper 生成器:生成接口。targetProject 属性:mapper 接口生成的的位置 -->
<javaClientGenerator type="XMLMAPPER" targetPackage="cn.edu.ssmdemo.mapper" targetProject=".\src\main\java">
<!-- enableSubPackages :是否让 schema 作为包的后缀 -->
<property name="enableSubPackages" value="true" />
</javaClientGenerator>
<!-- 指定数据表。tableName 属性:指定数据库的表名;domainObjectName 属性:生成对应实体类的名字;...Example 属性:设置关闭即可 -->
<table tableName="user"
domainObjectName="User"
enableCountByExample="false"
enableUpdateByExample="false"
enableDeleteByExample="false"
enableSelectByExample="false"
selectByExampleQueryId="false" />
</context>
</generatorConfiguration>
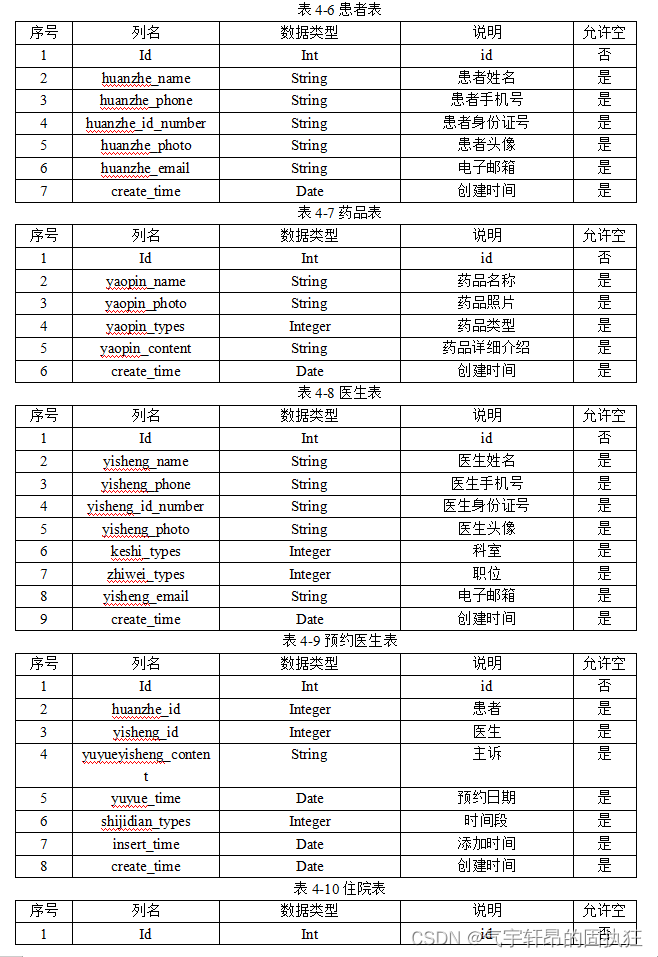
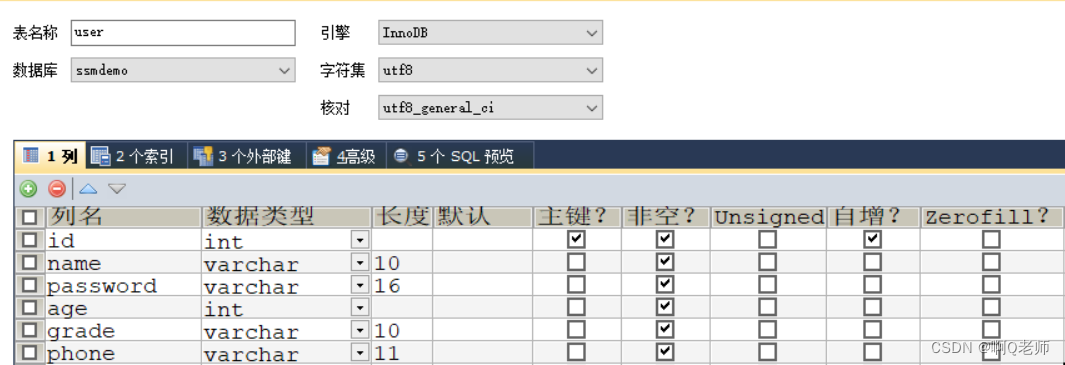
再在 MySQL 数据库 ssmdemo 中,创建数据表 user
表结构信息如图:
随之,在 test 目录下创建 RunSSMGenerator 类,通过数据库表结构自动生成对应的实体类、DAO 接口和 SQL 映射文件
package cn.edu.ssmdemo.test;

import org.junit.Test;
import org.mybatis.generator.api.MyBatisGenerator;
import org.mybatis.generator.config.Configuration;
import org.mybatis.generator.config.xml.ConfigurationParser;
import org.mybatis.generator.exception.InvalidConfigurationException;
import org.mybatis.generator.exception.XMLParserException;
import org.mybatis.generator.internal.DefaultShellCallback;

import java.io.File;
import java.io.IOException;
import java.sql.SQLException;
import java.util.ArrayList;
import java.util.List;

public class RunSSMGenerator {
    @Test
    public void mbgTest() throws IOException, XMLParserException, InvalidConfigurationException, SQLException, InterruptedException {
        List<String> warnings = new ArrayList<String>();
        boolean overwrite = true;

        // 只需修改 Generator 的配置文件名称即可
        String path = this.getClass().getClassLoader().getResource("mybatis_generator.xml").getPath();
        File configFile = new File(path);

        ConfigurationParser cp = new ConfigurationParser(warnings);
        Configuration config = cp.parseConfiguration(configFile);
        DefaultShellCallback callback = new DefaultShellCallback(overwrite);
        MyBatisGenerator myBatisGenerator = new MyBatisGenerator(config, callback, warnings);
        myBatisGenerator.generate(null);
    }
}
运行生成实体类、DAO 接口和 SQL 映射文件后,接下来只实现 selectByPrimaryKey(Integer id) 方法作为简单的演示:
1.在 service 层创建接口 UserService
package cn.edu.ssmdemo.service;

import cn.edu.ssmdemo.model.User;

//简单示例
public interface UserService {
    User selectByPrimaryKey(Integer id);
}
2.在 service 层创建接口实现类 UserServiceImpl
package cn.edu.ssmdemo.service;

import cn.edu.ssmdemo.mapper.UserMapper;
import cn.edu.ssmdemo.model.User;
import org.springframework.beans.factory.annotation.Autowired;
import org.springframework.stereotype.Service;

@Service("userService")
public class UserServiceImpl implements UserService {

    @Autowired
    private UserMapper userMapper;

    @Override
    public User selectByPrimaryKey(Integer id) {
        return userMapper.selectByPrimaryKey(id);
    }
}
3.在 controller 层创建 UserController 类获取指定用户信息并放在视图上
package cn.edu.ssmdemo.controller;

import cn.edu.ssmdemo.model.User;
import cn.edu.ssmdemo.service.UserService;
import org.springframework.beans.factory.annotation.Autowired;
import org.springframework.stereotype.Controller;
import org.springframework.ui.Model;
import org.springframework.web.bind.annotation.RequestMapping;

@Controller
public class UserController {
    @Autowired
    private UserService userService;

    @RequestMapping("/user")
    public String user(Model model){
        User user = userService.selectByPrimaryKey(20230903);
        model.addAttribute("user",user);
        System.out.println("用户信息:" + user);
        return "user";
    }
}
4.在 webapp/WEB-INF/views 目录下创建对应的视图 user.jsp
<%--
  Created by IntelliJ IDEA.
  User: dell
  Date: 2023/9/3
  Time: 18:18
  To change this template use File | Settings | File Templates.
--%>
<%@ page contentType="text/html;charset=UTF-8" language="java" %>
<html>
<body>
    用户信息:${user}
</body>
</html>
最后,启动 JRebel ,测试结果

结果如图: