文章目录
- 算子
- 矩形算子
- 弧形算子
- 移动到新的参考点
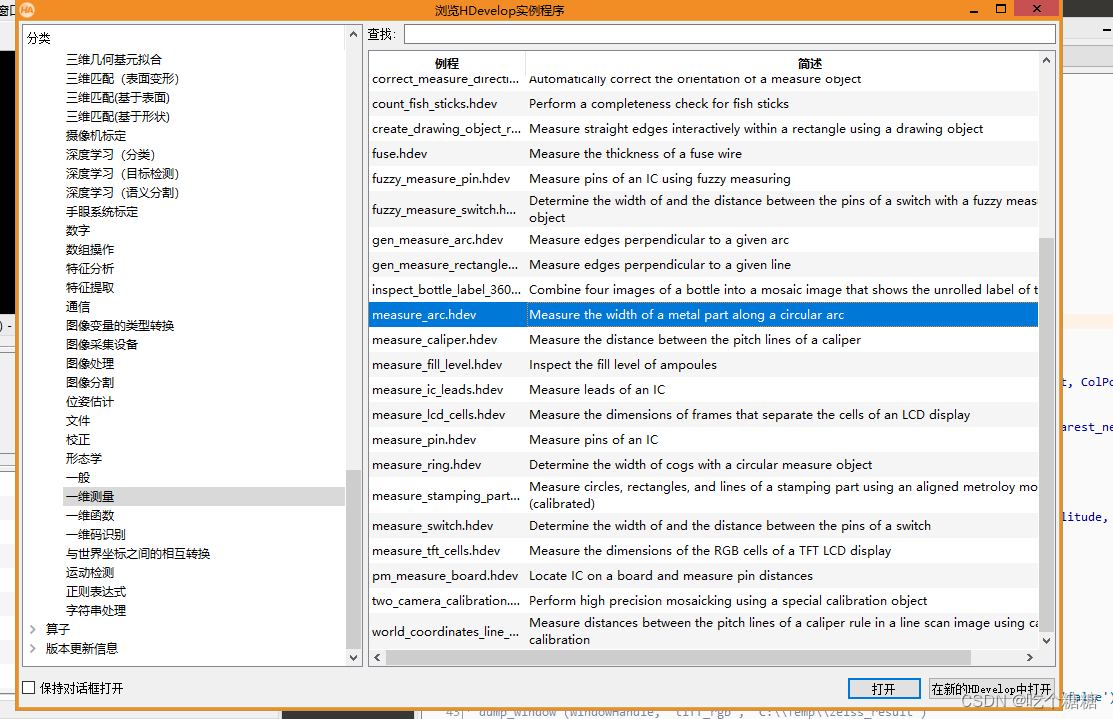
- Halcon 案例测量保险丝的宽度(边缘对测量)
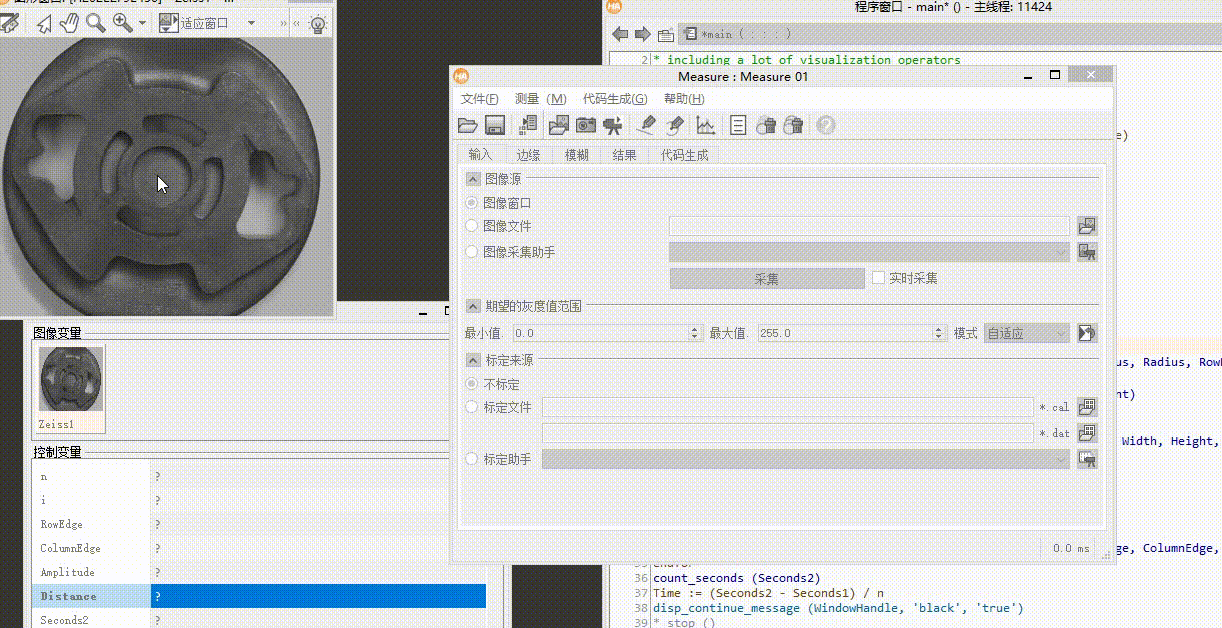
- 使用助手进行测量
- halcon 案例获取芯片引脚的个数平均宽度距离,连续两个边缘的距离(measure_pos )
- halcon 定位测量
- Halcon 测量弧形
- Halcon 水平测量检测
算子
矩形算子
gen_measure_rectangle2 形成一个测量矩形
gen_measure_rectangle2( : : Row, Column, Phi, Length1, Length2, Width, Height, Interpolation : MeasureHandle)

Row (input_control)   rectangle2.center.y → (real / integer)
  矩形中心的Row坐标。
  Default value: 300.0
  Suggested values: 10.0, 20.0, 50.0, 100.0, 200.0, 300.0, 400.0, 500.0
  Typical range of values: 0.0 ≤ Row ≤ 511.0 (lin)
  Minimum increment: 1.0
  Recommended increment: 10.0

Column (input_control)    rectangle2.center.x → (real / integer)
  矩形中心的Column坐标。.
  Default value: 200.0
  Suggested values: 10.0, 20.0, 50.0, 100.0, 200.0, 300.0, 400.0, 500.0
  Typical range of values: 0.0 ≤ Column ≤ 511.0 (lin)
  Minimum increment: 1.0
  Recommended increment: 10.0

Phi (input_control)    rectangle2.angle.rad → (real / integer)
  矩形的纵轴与水平的角度(弧度)。
  Default value: 0.0
  Suggested values: -1.178097, -0.785398, -0.392699, 0.0, 0.392699, 0.785398, 1.178097
  Typical range of values: -1.178097 ≤ Phi ≤ 1.178097 (lin)
  Minimum increment: 0.001
  Recommended increment: 0.1
  Restriction: (- pi < Phi) && (Phi <= pi)

Length1 (input_control)    rectangle2.hwidth → (real / integer)
  矩形的半宽。
  Default value: 100.0
  Suggested values: 3.0, 5.0, 10.0, 15.0, 20.0, 50.0, 100.0, 200.0, 300.0, 500.0
  Typical range of values: 1.0 ≤ Length1 ≤ 511.0 (lin)
  Minimum increment: 1.0
  Recommended increment: 10.0
  Restriction: Length1 >= 1.0

Length2 (input_control)    rectangle2.hheight → (real / integer)
  矩形的半高。
  Default value: 20.0
  Suggested values: 1.0, 2.0, 3.0, 5.0, 10.0, 15.0, 20.0, 50.0, 100.0, 200.0
  Typical range of values: 0.0 ≤ Length2 ≤ 511.0 (lin)
  Minimum increment: 1.0
  Recommended increment: 10.0

Restriction: Length2 >= 0.0

Width (input_control)    extent.x → (integer)
  随后要处理的图像的宽度。
  Default value: 512
  Suggested values: 128, 160, 192, 256, 320, 384, 512, 640, 768
  Typical range of values: 0 ≤ Width ≤ 1024 (lin)
  Minimum increment: 1
  Recommended increment: 16

Height (input_control)    extent.y → (integer)
  随后要处理的图像的高度。
  Default value: 512
  Suggested values: 120, 128, 144, 240, 256, 288, 480, 512, 576
  Typical range of values: 0 ≤ Height ≤ 1024 (lin)
  Minimum increment: 1
  Recommended increment: 16

Interpolation (input_control)    string → (string)
  要使用的插值类型。
  Default value: ‘nearest_neighbor’
  List of values: ‘bicubic’, ‘bilinear’, ‘nearest_neighbor’

MeasureHandle (output_control)    measure_id → (integer)
  measure对象句柄
measure_pairs 测量边缘对算子
measure_pairs(Image : : MeasureHandle,Sigma,Threshold,Transition,Select :RowEdgeFirst,ColumnEdgeFirst,AmplitudeFirst,RowEdgeSecond,ColumnEdgeSecond,AmplitudeSecond,IntraDistance,InterDistance)

Image (input_object)  singlechannelimage → object (byte / uint2 / real)

     输入图像

MeasureHandle (input_control)  measure_id → (integer)

     测量对象句柄

Sigma (input_control)  number → (real)
	 平滑的越厉害找的边数越少,平滑的越不厉害找的边数越多
    高斯平滑的Sigma。
    默认值:1.0
    建议值:0.4,0.6,0.8,1.0,1.5,2.0,3.0,4.0,5.0,7.0,10.0
    典型值范围:0.4≤Sigma≤100(lin)
    最小增量:0.01
    推荐增量:0.1
    限制:Sigma> = 0.4

Threshold (input_control)  number → (real)
      最小边缘幅度。
      默认值:30.0
      建议值:5.0,10.0,20.0,30.0,40.0,50.0,60.0,70.0,90.0,110.0
      典型值范围:1≤阈值≤255(lin)
      最小增量:0.5
      推荐增量:2
Transition (input_control)  string → (string)
      确定边缘如何分组到边缘对的灰度值转换类型。
       默认值:'all'
       值列表:'all','positive','negative','all_strongest','positive_strongest','negative_strongest'
Select (input_control)  string → (string)
      选择边缘对。
       默认值:'all'
        值列表:'all','first','last'
RowEdgeFirst (output_control)  point.y-array → (real)
        第一个边缘中心的行坐标。
ColumnEdgeFirst (output_control)  point.x-array → (real)
        第一个边缘中心的列坐标。
AmplitudeFirst (output_control)  real-array → (real)
        第一边缘的边缘幅度(边缘的导数值)。
RowEdgeSecond (output_control)  point.y-array → (real)
         第二边缘中心的行坐标。
ColumnEdgeSecond (output_control)  point.x-array → (real)
         第二边缘中心的列坐标。
AmplitudeSecond (output_control)  real-array → (real)
          第二边缘的边缘幅度(带符号)。
IntraDistance (output_control)  real-array → (real)
         边缘对内边缘之间的距离。
InterDistance (output_control)  real-array → (real)
       连续边缘对之间的距离。(第一个边缘对到第二个边缘对的距离)
measure_pos 连续两个边缘之间的距离
measure_pos(Image : : MeasureHandle, Sigma, Threshold, Transition, Select : RowEdge, ColumnEdge, Amplitude, Distance)
Image (input_object) 单通道图像→ object (byte / uint2 / real)
  输入图像。

MeasureHandle (input_control) measure_id → (integer)
  Measure对象句柄。

Sigma (input_control) number → (real)
平滑的越厉害找的边数越少,平滑的越不厉害找的边数越多
  高斯模糊的Sigma值
  Default value: 1.0
  Suggested values: 0.4, 0.6, 0.8, 1.0, 1.5, 2.0, 3.0, 4.0, 5.0, 7.0, 10.0
  Typical range of values: 0.4 ≤ Sigma ≤ 100 (lin)
  Minimum increment: 0.01
  Recommended increment: 0.1
  Restriction: Sigma >= 0.4

Threshold (input_control) number → (real)
  最小边缘幅度。
  Default value: 30.0
  Suggested values: 5.0, 10.0, 20.0, 30.0, 40.0, 50.0, 60.0, 70.0, 90.0, 110.0
  Typical range of values: 1 ≤ Threshold ≤ 255 (lin)
  Minimum increment: 0.5
  Recommended increment: 2

Transition (input_control) string → (string)
  亮到暗(负边缘)或者暗到亮(正边缘)的边缘。
  Default value: ‘all’
  List of values: ‘all’, ‘negative’, ‘positive’

Select (input_control) string → (string)
  要选择返回的点。
  Default value: ‘all’
  List of values: ‘all’, ‘first’, ‘last’

RowEdge (output_control) point.y-array → (real)
  边缘中心的Row坐标。

ColumnEdge (output_control) point.x-array → (real)
  边缘中心的Column坐标。

Amplitude (output_control) real-array → (real)
  边缘的边缘幅度(带符号)。

Distance (output_control) real-array → (real)
  连续边之间的距离。
halcon measure_pos和measure_pairs详解
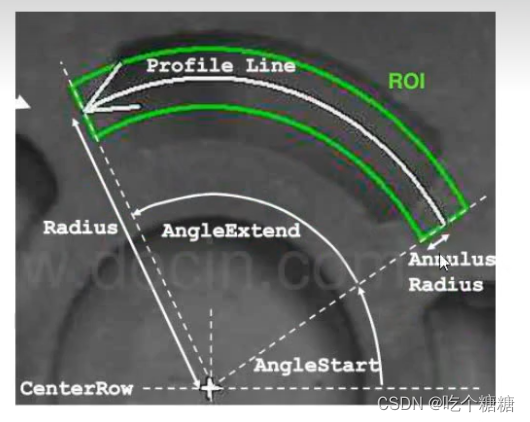
弧形算子
gen_measure_arc 准备提取垂直于圆弧的直边
gen_measure_arc( : : CenterRow, CenterCol, Radius, AngleStart, AngleExtent, AnnulusRadius, Width, Height, Interpolation : MeasureHandle)

CenterRow (input_control)   point.y → (real / integer)
  圆弧中心的Row坐标。
  Default value: 100.0
  Suggested values: 10.0, 20.0, 50.0, 100.0, 200.0, 300.0, 400.0, 500.0
  Typical range of values: 0.0 ≤ CenterRow ≤ 511.0 (lin)
  Minimum increment: 1.0
  Recommended increment: 10.0

CenterCol (input_control)    point.x → (real / integer)
  圆弧中心的Column坐标。
  Default value: 100.0
  Suggested values: 10.0, 20.0, 50.0, 100.0, 200.0, 300.0, 400.0, 500.0
  Typical range of values: 0.0 ≤ CenterCol ≤ 511.0 (lin)
  Minimum increment: 1.0
  Recommended increment: 10.0

Radius (input_control)    number → (real / integer)
  弧的半径。
  Default value: 50.0
  Suggested values: 10.0, 20.0, 50.0, 100.0, 200.0, 300.0, 400.0, 500.0
  Typical range of values: 0.0 ≤ Radius ≤ 511.0 (lin)
  Minimum increment: 1.0
  Recommended increment: 10.0

AngleStart (input_control)    angle.rad → (real / integer)
  圆弧的开始角度,按弧度表示。
  Default value: 0.0
  Suggested values: -3.14159, -2.35619, -1.57080, -0.78540, 0.0, 0.78540, 1.57080, 2.35619, 3.14159
  Typical range of values: -3.14159 ≤ AngleStart ≤ 3.14159 (lin)
  Minimum increment: 0.03142
  Recommended increment: 0.31416

AngleExtent (input_control)    angle.rad → (real / integer)
  圆弧的角度范围,以弧度表示。
  Default value: 6.28318
  Suggested values: -6.28318, -5.49779, -4.71239, -3.92699, -3.14159, -2.35619, -1.57080, -0.78540, 0.78540, 1.57080, 2.35619, 3.14159, 3.92699, 4.71239, 5.49779, 6.28318
  Typical range of values: -6.28318 ≤ AngleExtent ≤ 6.28318 (lin)
  Minimum increment: 0.03142
  Recommended increment: 0.31416
  Restriction: AngleExtent != 0.0

AnnulusRadius (input_control)    number → (real / integer)
  环的半径(半宽)。
  Default value: 10.0
  Suggested values: 10.0, 20.0, 50.0, 100.0, 200.0, 300.0, 400.0, 500.0
  Typical range of values: 0.0 ≤ AnnulusRadius ≤ 511.0 (lin)
  Minimum increment: 1.0
  Recommended increment: 10.0
  Restriction: AnnulusRadius <= Radius

Width (input_control)    extent.x → (integer)
  要处理的图像的宽度。
  Default value: 512
  Suggested values: 128, 160, 192, 256, 320, 384, 512, 640, 768
  Typical range of values: 0 ≤ Width ≤ 1024 (lin)
  Minimum increment: 1
  Recommended increment: 16
Height (input_control)    extent.y → (integer)

要处理的图像的高度。
  Default value: 512
  Suggested values: 120, 128, 144, 240, 256, 288, 480, 512, 576
  Typical range of values: 0 ≤ Height ≤ 1024 (lin)
  Minimum increment: 1
  Recommended increment: 16

Interpolation (input_control)    string → (string)
  要使用的插值类型。
  Default value: ‘nearest_neighbor’
  List of values: ‘bicubic’, ‘bilinear’, ‘nearest_neighbor’

MeasureHandle (output_control)    measure_id → (integer)
  Measure对象的句柄
移动到新的参考点
translate_measure( : : MeasureHandle, Row, Column : )

MeasureHandle (input_control, state is modified)   measure_id → (integer)
  Measure对象句柄。

Row (input_control)    point.y → (real / integer)
  新参考点的Row坐标。
  Default value: 50.0
  Suggested values: 10.0, 20.0, 50.0, 100.0, 200.0, 300.0, 400.0, 500.0
  Typical range of values: 0.0 ≤ Row ≤ 511.0 (lin)
  Minimum increment: 1.0
  Recommended increment: 10.0

Column (input_control)    point.x → (real / integer)
  新参考点的Column坐标。
  Default value: 100.0
  Suggested values: 10.0, 20.0, 50.0, 100.0, 200.0, 300.0, 400.0, 500.0
  Typical range of values: 0.0 ≤ Column ≤ 511.0 (lin)
  Minimum increment: 1.0
  Recommended increment: 10.0
关闭测量
close_measure (句柄)
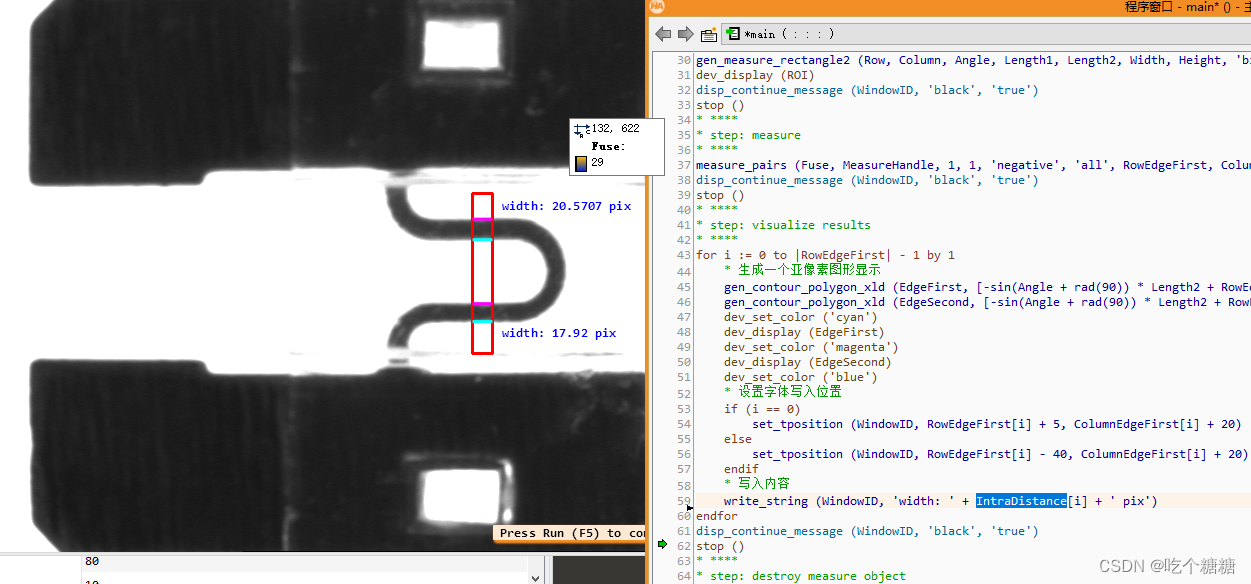
Halcon 案例测量保险丝的宽度(边缘对测量)
显示图片
* fuse.hdev: measuring the width of a fuse wire
*
dev_update_window ('off')
dev_close_window ()
* ****
* step: acquire image
* ****
read_image (Fuse, 'fuse')
get_image_size (Fuse, Width, Height)
dev_open_window_fit_image (Fuse, 0, 0, Width, Height, WindowID)
set_display_font (WindowID, 12, 'mono', 'true', 'false')
dev_set_draw ('margin')
dev_set_line_width (3)
dev_display (Fuse)
set_display_font (WindowID, 12, 'mono', 'true', 'false')
disp_continue_message (WindowID, 'black', 'true')
stop ()
产生识别矩形和测量
Row := 297
Column := 545
Length1 := 80
Length2 := 10
Angle := rad(90)
gen_rectangle2 (ROI, Row, Column, Angle, Length1, Length2)
* -> create measure object
* 产生一个测量矩形
gen_measure_rectangle2 (Row, Column, Angle, Length1, Length2, Width, Height, 'bilinear', MeasureHandle)
dev_display (ROI)
disp_continue_message (WindowID, 'black', 'true')
stop ()
* 测量
measure_pairs (Fuse, MeasureHandle, 1, 1, 'negative', 'all', RowEdgeFirst, ColumnEdgeFirst, AmplitudeFirst, RowEdgeSecond, ColumnEdgeSecond, AmplitudeSecond, IntraDistance, InterDistance)
disp_continue_message (WindowID, 'black', 'true')
识别显示
gen_contour_polygon_xld( : Contour : Row, Col : )
功能:根据一个多边形(polygon)(以元组形式给出)创建一个XLD轮廓(contour)。
(输出)contour:输出创建的XLD轮廓;
(输入)Row:输入的行数组;
(输入)Col:输入的列数组;
gen_contour_polygon_xld 的意思
for i := 0 to |RowEdgeFirst| - 1 by 1
    * 生成一个亚像素图形显示
    gen_contour_polygon_xld (EdgeFirst, [-sin(Angle + rad(90)) * Length2 + RowEdgeFirst[i],-sin(Angle - rad(90)) * Length2 + RowEdgeFirst[i]], [cos(Angle + rad(90)) * Length2 + ColumnEdgeFirst[i],cos(Angle - rad(90)) * Length2 + ColumnEdgeFirst[i]])
    gen_contour_polygon_xld (EdgeSecond, [-sin(Angle + rad(90)) * Length2 + RowEdgeSecond[i],-sin(Angle - rad(90)) * Length2 + RowEdgeSecond[i]], [cos(Angle + rad(90)) * Length2 + ColumnEdgeSecond[i],cos(Angle - rad(90)) * Length2 + ColumnEdgeSecond[i]])
    dev_set_color ('cyan')
    dev_display (EdgeFirst)
    dev_set_color ('magenta')
    dev_display (EdgeSecond)
    dev_set_color ('blue')
    * 设置字体写入位置
    if (i == 0)
        set_tposition (WindowID, RowEdgeFirst[i] + 5, ColumnEdgeFirst[i] + 20)
    else
        set_tposition (WindowID, RowEdgeFirst[i] - 40, ColumnEdgeFirst[i] + 20)
    endif
    * 写入内容
    write_string (WindowID, 'width: ' + IntraDistance[i] + ' pix')
endfor
disp_continue_message (WindowID, 'black', 'true')
stop ()
* ****
* step: destroy measure object
* ****
* 关闭测量
close_measure (MeasureHandle)
dev_update_window ('on')
dev_clear_window ()
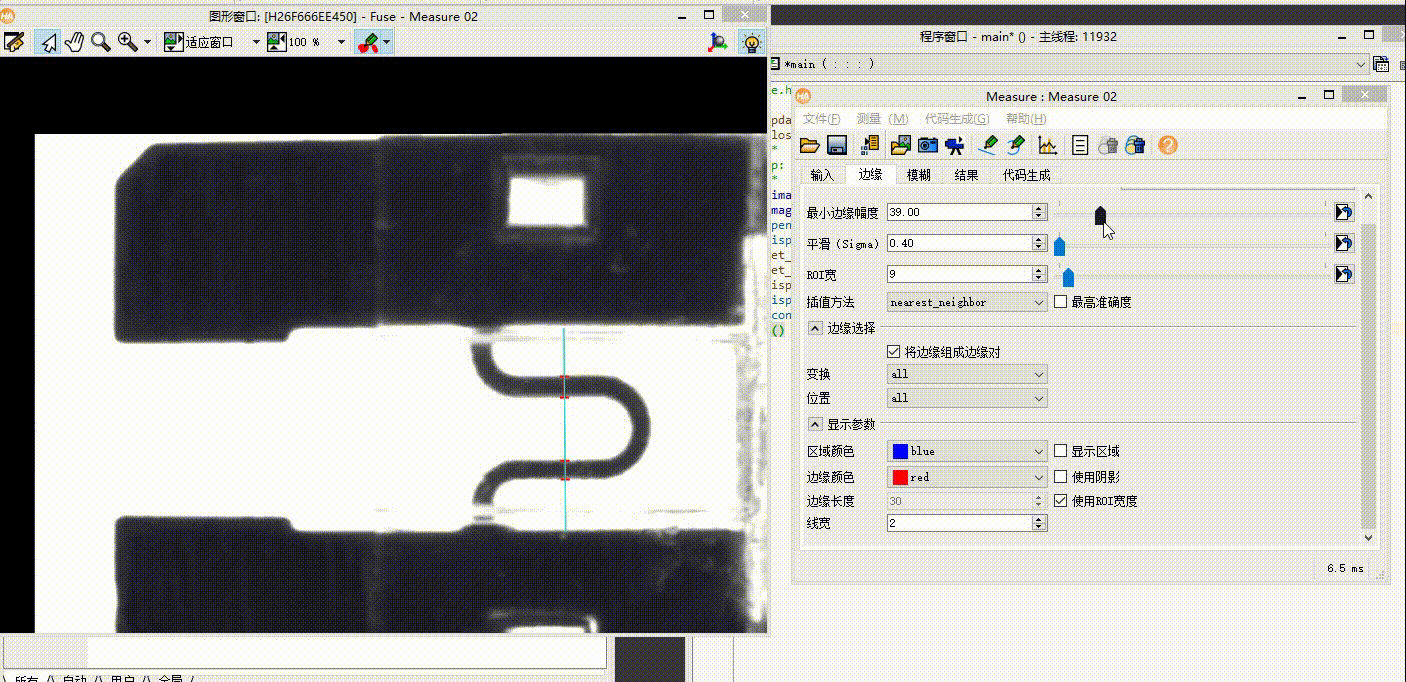
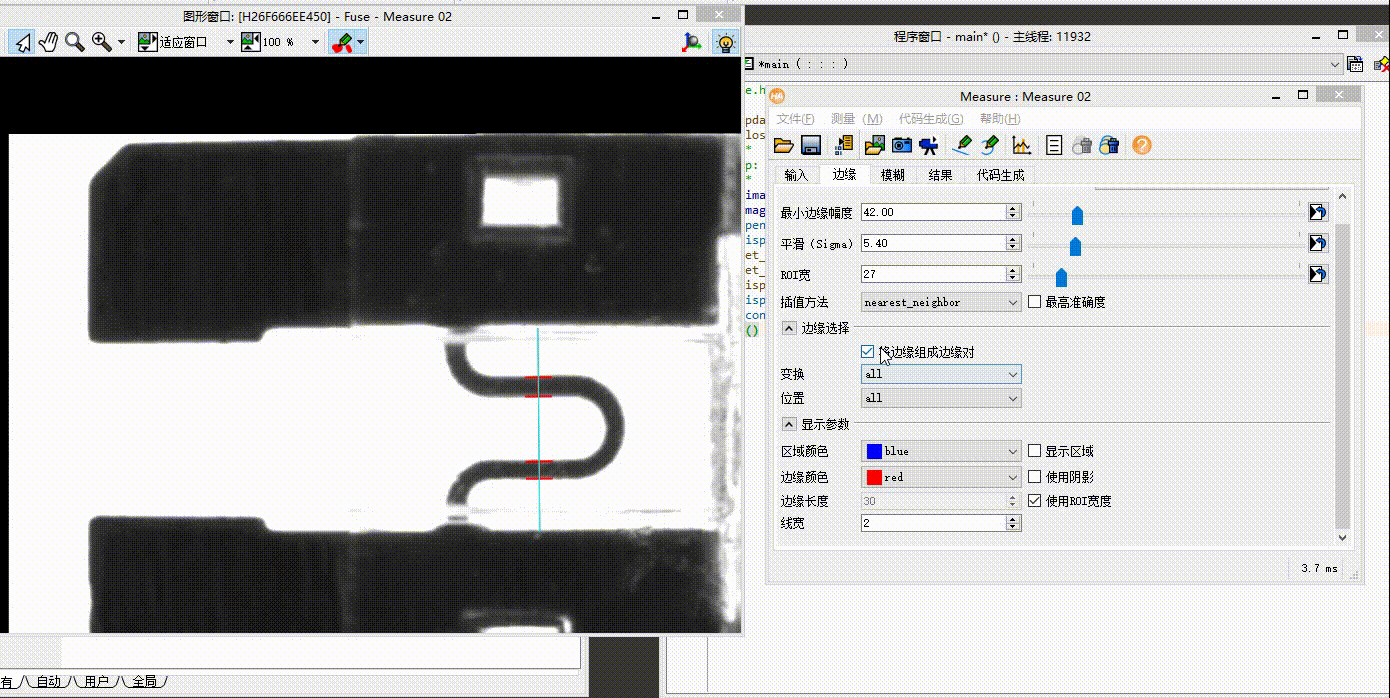
使用助手进行测量
读取图片
* fuse.hdev: measuring the width of a fuse wire
*
dev_update_window ('off')
dev_close_window ()
* ****
* step: acquire image
* ****
read_image (Fuse, 'fuse')
get_image_size (Fuse, Width, Height)
dev_open_window_fit_image (Fuse, 0, 0, Width, Height, WindowID)
set_display_font (WindowID, 12, 'mono', 'true', 'false')
dev_set_draw ('margin')
dev_set_line_width (3)
dev_display (Fuse)
set_display_font (WindowID, 12, 'mono', 'true', 'false')
disp_continue_message (WindowID, 'black', 'true')
stop ()
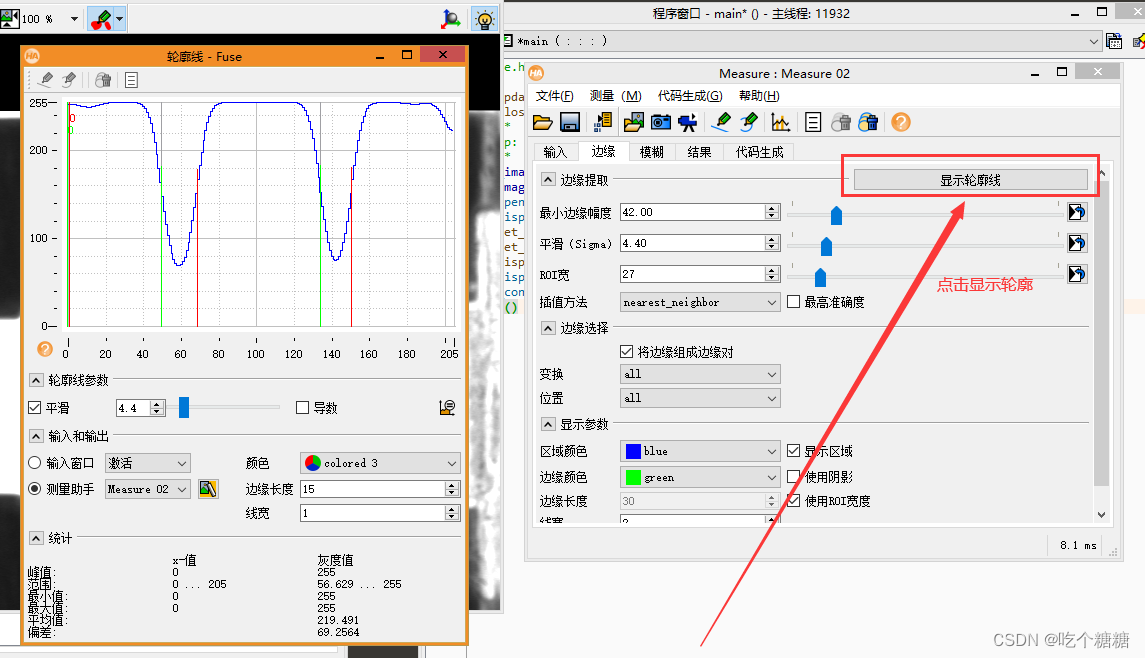
打开测量助手助手
鼠标右键停止画线

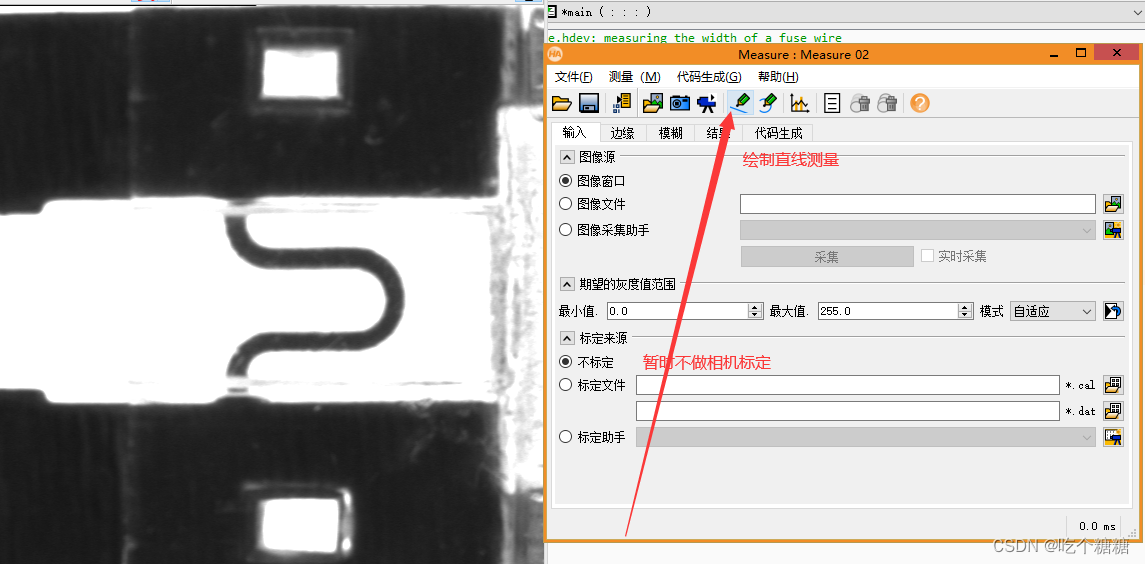
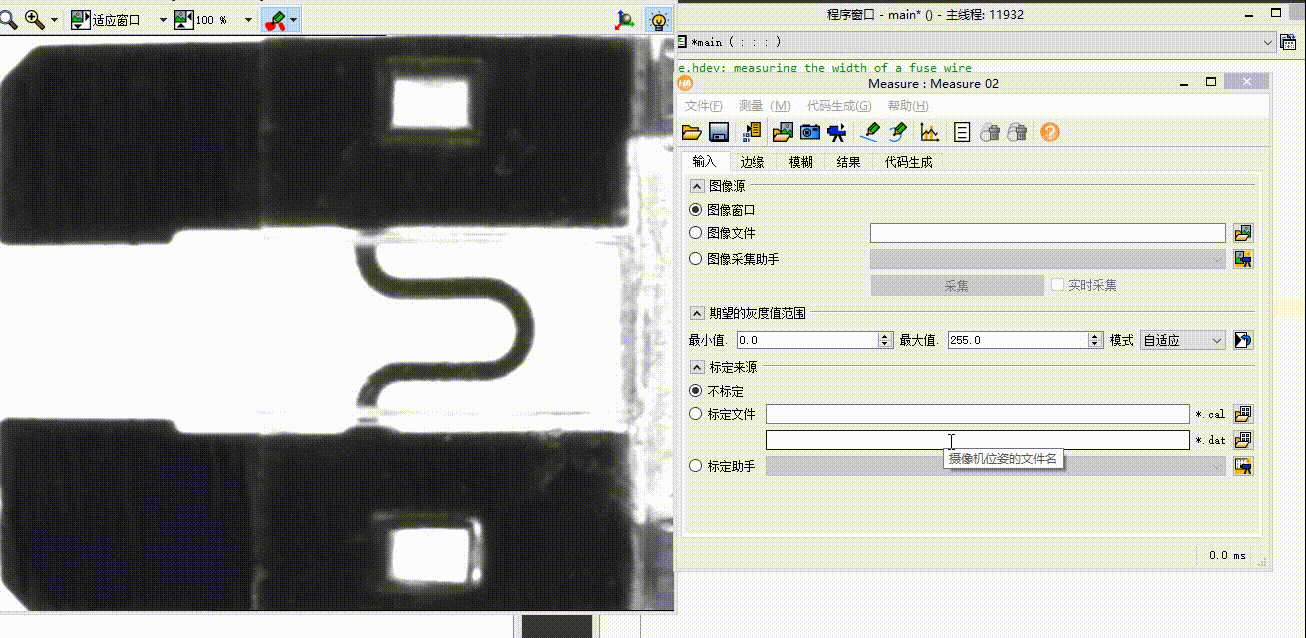
边缘设置
如果不选中:将边缘组成边缘对将使用measure_pos 算子选中使用measure_pairs算子
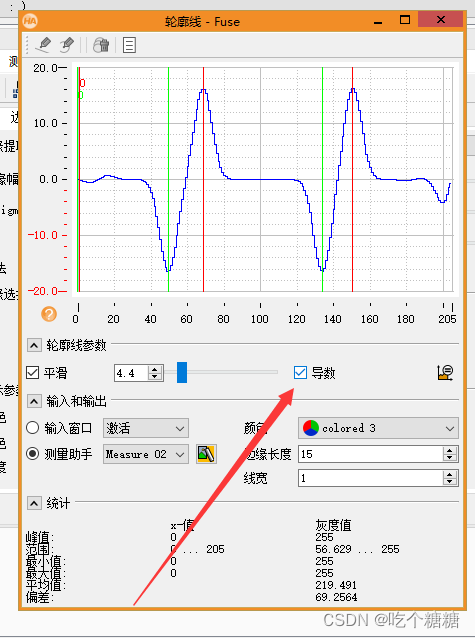
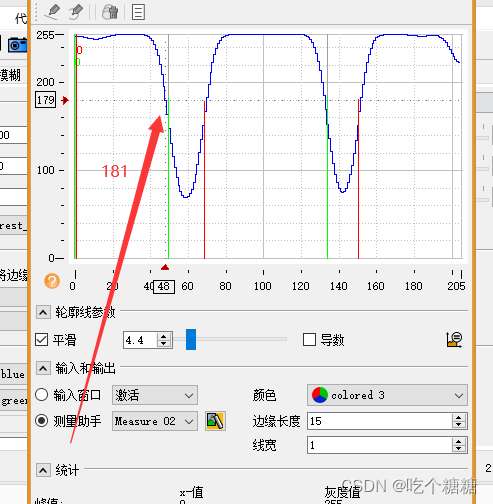
点击导数 一阶导数表示斜率(导数的最小值),导数的极值点表示发现边缘,从亮到暗为导数的极小值点,从暗到亮为导数的极大值点,亮到暗为负,暗到亮为正
如果选择相机标定就可以设置结果单位
代表的宽度为竖直方向上的

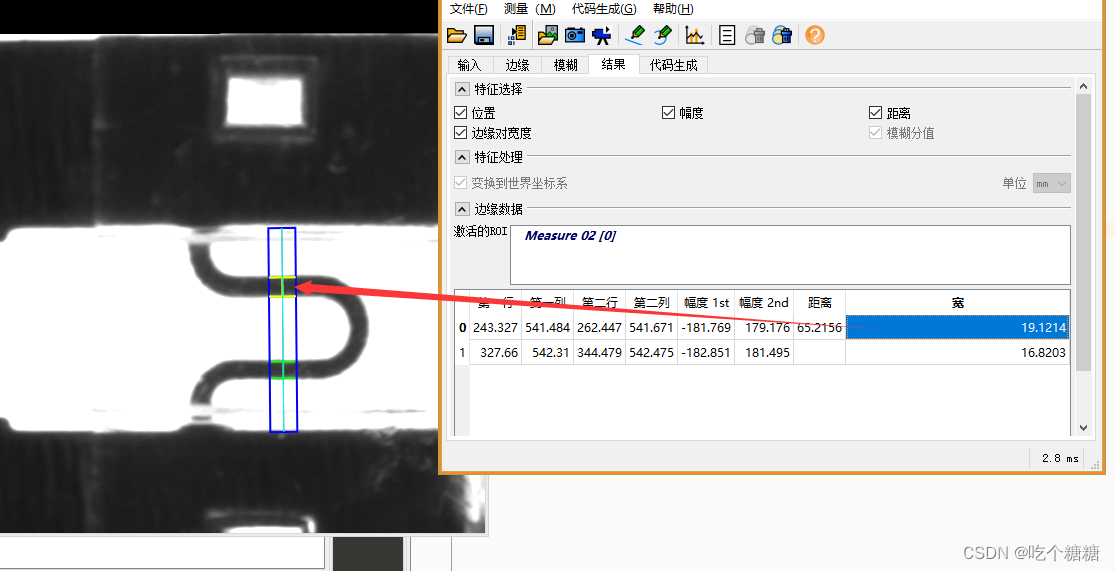
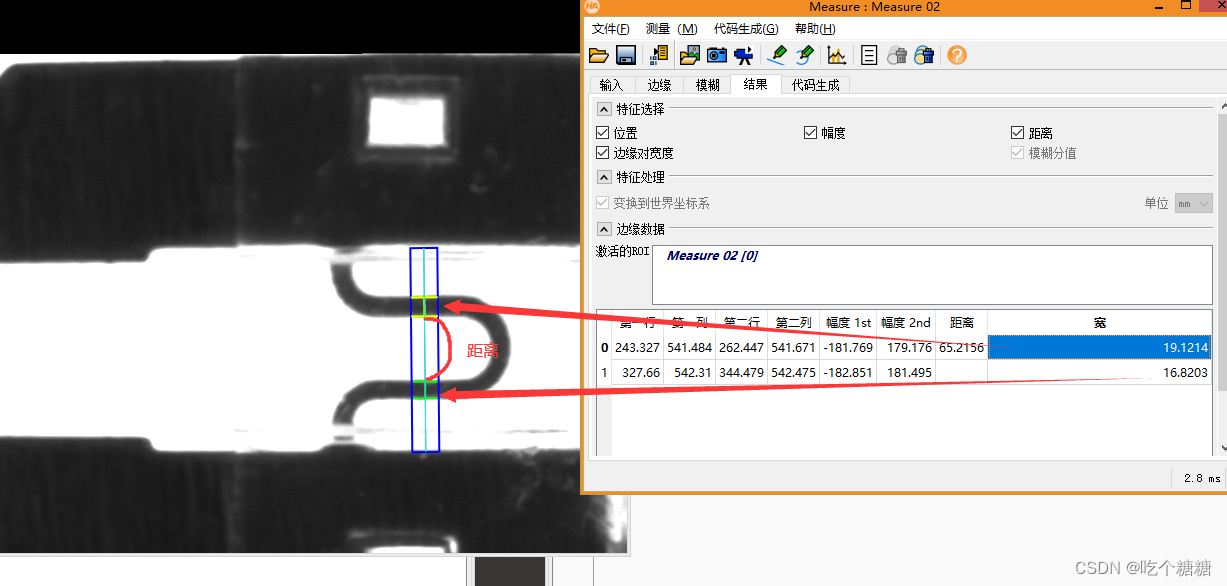
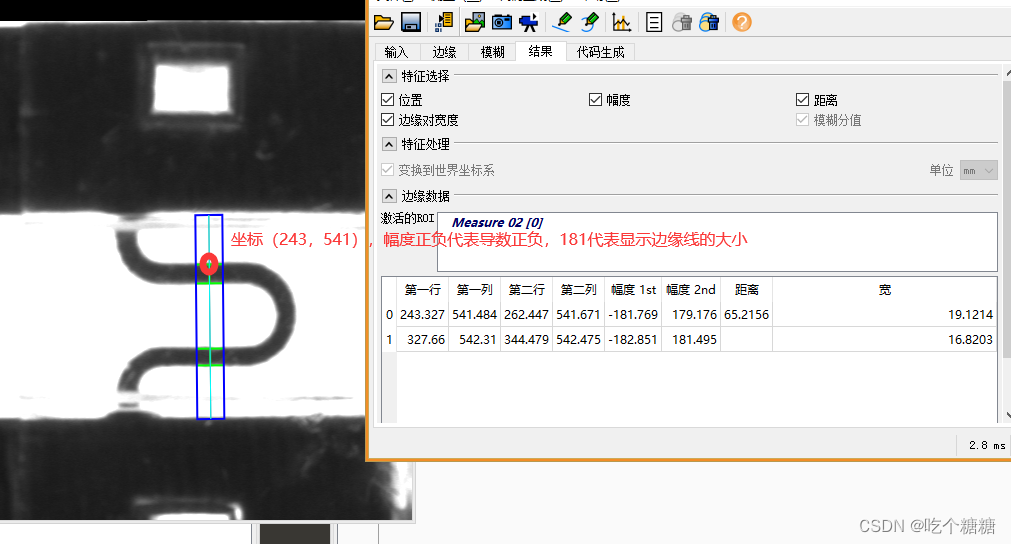
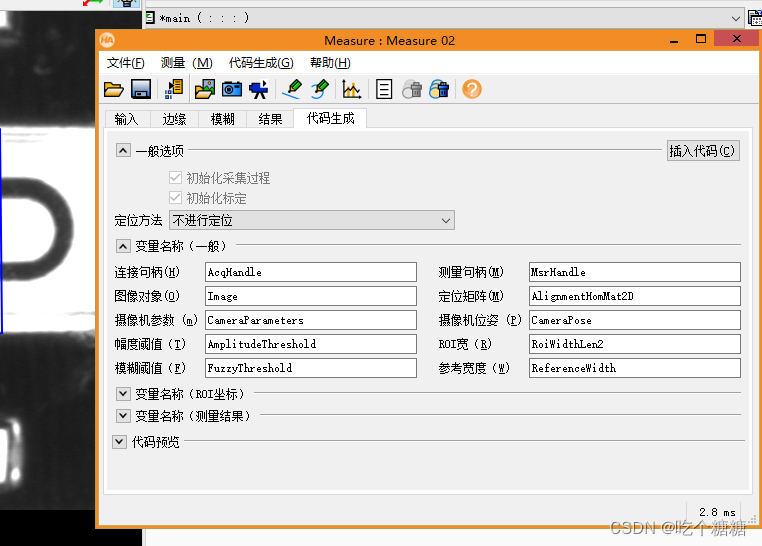
点击插入代码即可(定位可以选择放射或者进行平移)
halcon 案例获取芯片引脚的个数平均宽度距离,连续两个边缘的距离(measure_pos )
读取图片
dev_close_window ()
read_image (Image, 'ic_pin')
get_image_size (Image, Width, Height)
dev_open_window (0, 0, Width / 2, Height / 2, 'black', WindowHandle)
set_display_font (WindowHandle, 14, 'mono', 'true', 'false')
dev_display (Image)
disp_continue_message (WindowHandle, 'black', 'true')
stop ()
产生测量矩形
* 手动绘制矩形
draw_rectangle2 (WindowHandle, Row, Column, Phi, Length1, Length2)
* 下面是官方精准位置
*Row := 47
*Column := 485
*Phi := 0
*Length1 := 420
*Length2 := 10
dev_set_color ('green')
dev_set_draw ('margin')
dev_set_line_width (3)
* 形成一个矩形
gen_rectangle2 (Rectangle, Row, Column, Phi, Length1, Length2)
* 产生测量矩形
gen_measure_rectangle2 (Row, Column, Phi, Length1, Length2, Width, Height, 'nearest_neighbor', MeasureHandle)
disp_continue_message (WindowHandle, 'black', 'true')
stop ()

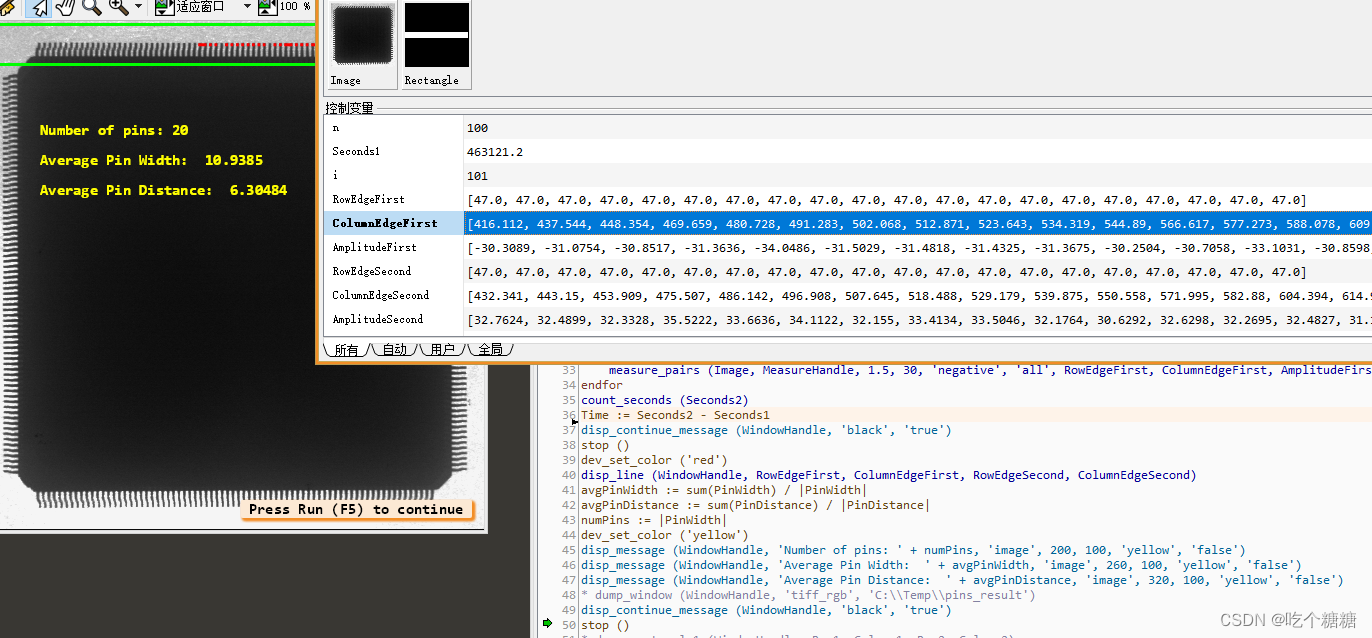
进行测量
dev_update_pc ('off')
dev_update_var ('off')
n := 100
* 计算秒数
count_seconds (Seconds1)
* 测量100次
for i := 1 to n by 1
    * 进行测量
    measure_pairs (Image, MeasureHandle, 1.5, 30, 'negative', 'all', RowEdgeFirst, ColumnEdgeFirst, AmplitudeFirst, RowEdgeSecond, ColumnEdgeSecond, AmplitudeSecond, PinWidth, PinDistance)
endfor
count_seconds (Seconds2)
Time := Seconds2 - Seconds1
disp_continue_message (WindowHandle, 'black', 'true')
stop ()
显示测量结果
dev_set_color ('red')
disp_line (WindowHandle, RowEdgeFirst, ColumnEdgeFirst, RowEdgeSecond, ColumnEdgeSecond)
* 平均贞的宽度
avgPinWidth := sum(PinWidth) / |PinWidth|
* 平均贞的距离
avgPinDistance := sum(PinDistance) / |PinDistance|
* 贞的距离数量
numPins := |PinWidth|
dev_set_color ('yellow')
disp_message (WindowHandle, 'Number of pins: ' + numPins, 'image', 200, 100, 'yellow', 'false')
disp_message (WindowHandle, 'Average Pin Width:  ' + avgPinWidth, 'image', 260, 100, 'yellow', 'false')
disp_message (WindowHandle, 'Average Pin Distance:  ' + avgPinDistance, 'image', 320, 100, 'yellow', 'false')
* dump_window (WindowHandle, 'tiff_rgb', 'C:\\Temp\\pins_result')
disp_continue_message (WindowHandle, 'black', 'true')
stop ()
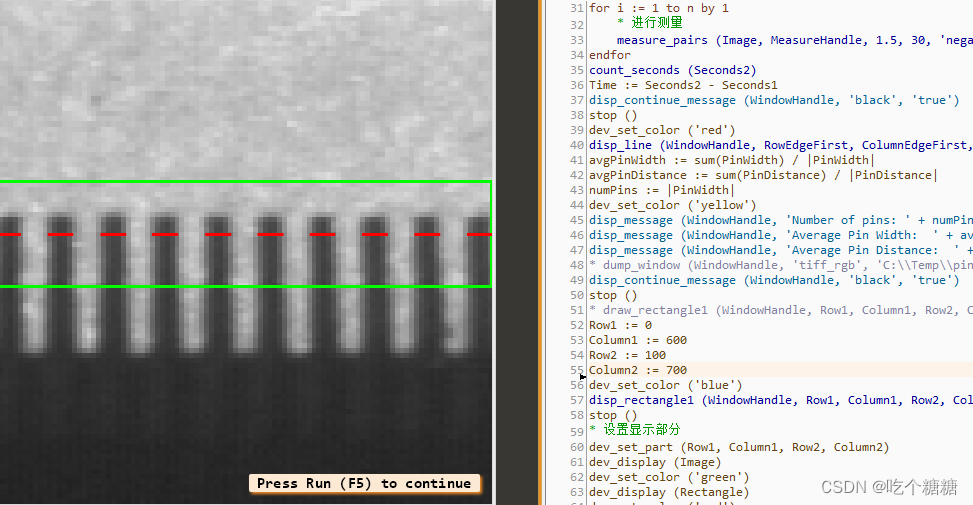
显示矩形
stop ()
* draw_rectangle1 (WindowHandle, Row1, Column1, Row2, Column2)
Row1 := 0
Column1 := 600
Row2 := 100
Column2 := 700
dev_set_color ('blue')
disp_rectangle1 (WindowHandle, Row1, Column1, Row2, Column2)
stop ()

放大显示
* 设置显示部分
dev_set_part (Row1, Column1, Row2, Column2)
dev_display (Image)
dev_set_color ('green')
dev_display (Rectangle)
dev_set_color ('red')
disp_line (WindowHandle, RowEdgeFirst, ColumnEdgeFirst, RowEdgeSecond, ColumnEdgeSecond)
disp_continue_message (WindowHandle, 'black', 'true')
stop ()
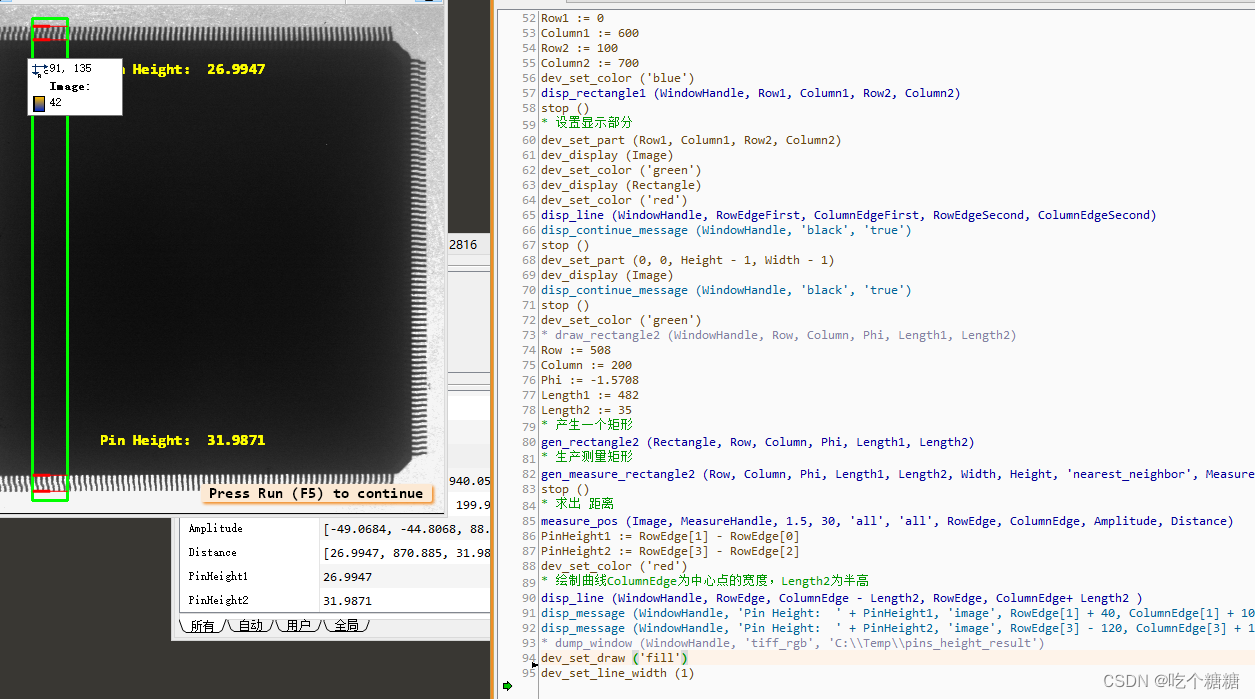
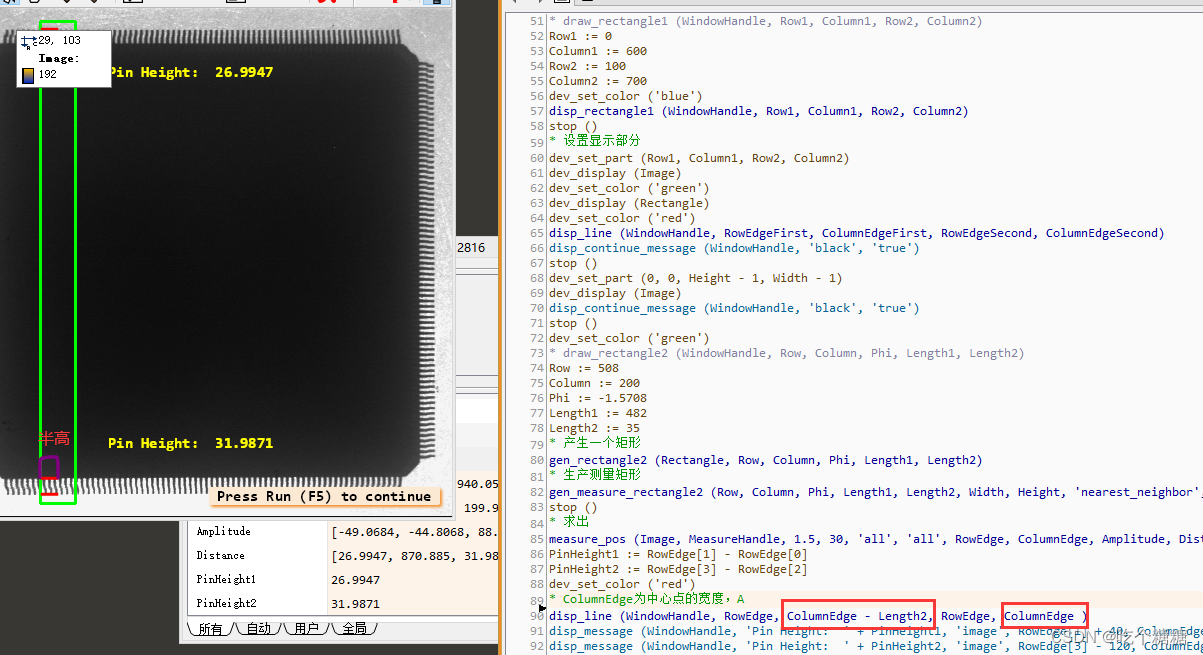
求连续两个边缘的距离
dev_set_color ('green')
* draw_rectangle2 (WindowHandle, Row, Column, Phi, Length1, Length2)
Row := 508
Column := 200
Phi := -1.5708
Length1 := 482
Length2 := 35
* 产生一个矩形
gen_rectangle2 (Rectangle, Row, Column, Phi, Length1, Length2)
* 生产测量矩形
gen_measure_rectangle2 (Row, Column, Phi, Length1, Length2, Width, Height, 'nearest_neighbor', MeasureHandle)
stop ()
* 求出 距离
measure_pos (Image, MeasureHandle, 1.5, 30, 'all', 'all', RowEdge, ColumnEdge, Amplitude, Distance)
PinHeight1 := RowEdge[1] - RowEdge[0]
PinHeight2 := RowEdge[3] - RowEdge[2]
dev_set_color ('red')
* 绘制曲线ColumnEdge为中心点的宽度,Length2为半高
disp_line (WindowHandle, RowEdge, ColumnEdge - Length2, RowEdge, ColumnEdge+ Length2 )
disp_message (WindowHandle, 'Pin Height:  ' + PinHeight1, 'image', RowEdge[1] + 40, ColumnEdge[1] + 100, 'yellow', 'false')
disp_message (WindowHandle, 'Pin Height:  ' + PinHeight2, 'image', RowEdge[3] - 120, ColumnEdge[3] + 100, 'yellow', 'false')
* dump_window (WindowHandle, 'tiff_rgb', 'C:\\Temp\\pins_height_result')
dev_set_draw ('fill')
dev_set_line_width (1)
注意
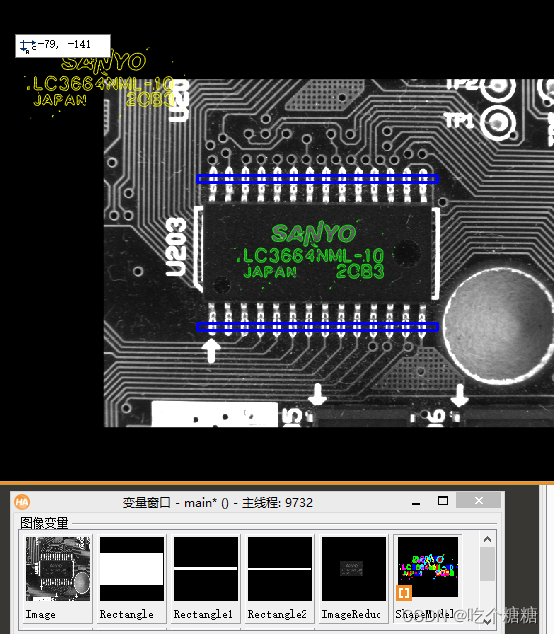
halcon 定位测量
读取图片创建匹配模板显示
* This example program shows the use of pattern matching with shape models
* to locate an object.  Furthermore, it shows how to use the detected position
* and rotation of the object to construct search spaces for inspection tasks.
* In this particular example, the print on an IC is used to find the IC.  From the
* found position and rotation, two measurement rectangles are constructed to
* measure the spacing between the leads of the IC.  Because of the lighting
* used in this example, the leads have the saturated gray value of 255 at several
* positions and rotations, which enlarges the apparent width of the leads, and
* hence seems to reduce the spacing between the leads, although the same
* board is used in all images.
dev_update_pc ('off')
dev_update_window ('off')
dev_update_var ('off')
* 从文件中读取图片
open_framegrabber ('File', 1, 1, 0, 0, 0, 0, 'default', -1, 'default', -1, 'default', 'board/board.seq', 'default', -1, 1, FGHandle)
* 获取图片
grab_image (Image, FGHandle)
get_image_size (Image, Width, Height)
dev_close_window ()
dev_open_window (0, 0, Width, Height, 'black', WindowHandle)
dev_open_window (Height + 70, 0, Width, 120, 'black', WindowHandleText)
dev_set_window (WindowHandle)
set_display_font (WindowHandle, 16, 'mono', 'true', 'false')
set_display_font (WindowHandleText, 16, 'mono', 'true', 'false')
dev_set_color ('red')
dev_display (Image)
Row1 := 188
Column1 := 182
Row2 := 298
Column2 := 412
* 生产一个矩形(中心矩形)
gen_rectangle1 (Rectangle, Row1, Column1, Row2, Column2)
* 获取矩形的中心
area_center (Rectangle, Area, Row, Column)
Rect1Row := -102
Rect1Col := 5
Rect2Row := 107
Rect2Col := 5
RectPhi := 0
RectLength1 := 170
RectLength2 := 5
* 产生一个测量贞脚的矩形(上贞脚)
gen_rectangle2 (Rectangle1, Row + Rect1Row, Column + Rect1Col, RectPhi, RectLength1, RectLength2)
* 产生一个测量贞脚的矩形(下贞脚)
gen_rectangle2 (Rectangle2, Row + Rect2Row, Column + Rect2Col, RectPhi, RectLength1, RectLength2)
* 裁剪中心矩形
reduce_domain (Image, Rectangle, ImageReduced)
* 创建形状模板
create_shape_model (ImageReduced, 4, 0, rad(360), rad(1), 'none', 'use_polarity', 30, 10, ModelID)
* 获取形状模型的轮廓
get_shape_model_contours (ShapeModel, ModelID, 1)
* 形成一个单位矩形
hom_mat2d_identity (HomMat2DIdentity)
* 将单位矩阵进行平移到合适的位置
hom_mat2d_translate (HomMat2DIdentity, Row, Column, HomMat2DTranslate)
* 亚像素仿射运算
affine_trans_contour_xld (ShapeModel, ShapeModelTrans, HomMat2DTranslate)
* 显示
dev_display (Image)
dev_set_color ('green')
dev_display (ShapeModelTrans)
dev_set_color ('blue')
dev_set_draw ('margin')
dev_set_line_width (3)
dev_display (Rectangle1)
dev_display (Rectangle2)
dev_set_draw ('fill')
dev_set_line_width (1)
dev_set_color ('yellow')
disp_message (WindowHandle, ['Press left button to start','and stop the demo'], 'window', 12, 12, 'black', 'true')
get_mbutton (WindowHandle, Row3, Column3, Button1)
wait_seconds (0.5)
Button := 0
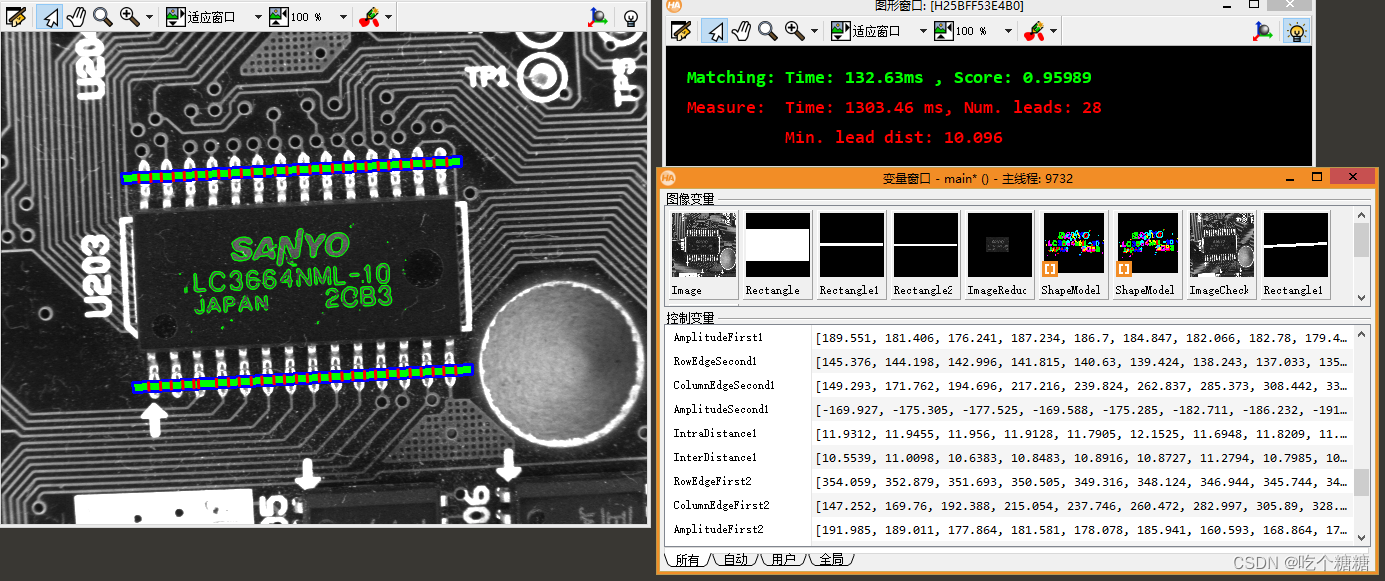
定位与测量
while (Button != 1)
    dev_set_window (WindowHandle)
    dev_set_part (0, 0, Height - 1, Width - 1)
    * 获取图片
    grab_image (ImageCheck, FGHandle)
    dev_display (ImageCheck)
    count_seconds (S1)
    * 找到模板
    find_shape_model (ImageCheck, ModelID, 0, rad(360), 0.7, 1, 0.5, 'least_squares', 4, 0.7, RowCheck, ColumnCheck, AngleCheck, Score)
    count_seconds (S2)
    dev_display (ImageCheck)
    * 如果找到匹配对象
    if (|Score| > 0)
        * 显示匹配结果
        dev_set_color ('green')
        * 形成单位矩阵
        hom_mat2d_identity (HomMat2DIdentity)
        * 形成平移矩阵
        hom_mat2d_translate (HomMat2DIdentity, RowCheck, ColumnCheck, HomMat2DTranslate)
        * 形成旋转矩阵
        hom_mat2d_rotate (HomMat2DTranslate, AngleCheck, RowCheck, ColumnCheck, HomMat2DRotate)
        * 仿射运算
        affine_trans_contour_xld (ShapeModel, ShapeModelTrans, HomMat2DRotate)
        dev_display (ShapeModelTrans)
        * 作用在像素点上 affine_trans_pixel(矩阵,输入的像素点的行,列,输出的像素点的行,列)
        affine_trans_pixel (HomMat2DRotate, Rect1Row, Rect1Col, Rect1RowCheck, Rect1ColCheck)
        affine_trans_pixel (HomMat2DRotate, Rect2Row, Rect2Col, Rect2RowCheck, Rect2ColCheck)
        * 绘制贞的上下脚矩形
        gen_rectangle2 (Rectangle1Check, Rect1RowCheck, Rect1ColCheck, AngleCheck, RectLength1, RectLength2)
        gen_rectangle2 (Rectangle2Check, Rect2RowCheck, Rect2ColCheck, AngleCheck, RectLength1, RectLength2)
        dev_set_color ('blue')
        dev_set_draw ('margin')
        dev_set_line_width (3)
        dev_display (Rectangle1Check)
        dev_display (Rectangle2Check)
        dev_set_draw ('fill')
        count_seconds (S3)
        * 形成测量矩形上下贞脚
        gen_measure_rectangle2 (Rect1RowCheck, Rect1ColCheck, AngleCheck, RectLength1, RectLength2, Width, Height, 'bilinear', MeasureHandle1)
        gen_measure_rectangle2 (Rect2RowCheck, Rect2ColCheck, AngleCheck, RectLength1, RectLength2, Width, Height, 'bilinear', MeasureHandle2)
        * 进行边缘对测量
        measure_pairs (ImageCheck, MeasureHandle1, 2, 90, 'positive', 'all', RowEdgeFirst1, ColumnEdgeFirst1, AmplitudeFirst1, RowEdgeSecond1, ColumnEdgeSecond1, AmplitudeSecond1, IntraDistance1, InterDistance1)
        measure_pairs (ImageCheck, MeasureHandle2, 2, 90, 'positive', 'all', RowEdgeFirst2, ColumnEdgeFirst2, AmplitudeFirst2, RowEdgeSecond2, ColumnEdgeSecond2, AmplitudeSecond2, IntraDistance2, InterDistance2)
        count_seconds (S4)
        dev_set_color ('red')
        * 绘制直线
        disp_line (WindowHandle, RowEdgeFirst1 - RectLength2 * cos(AngleCheck), ColumnEdgeFirst1 - RectLength2 * sin(AngleCheck), RowEdgeFirst1 + RectLength2 * cos(AngleCheck), ColumnEdgeFirst1 + RectLength2 * sin(AngleCheck))
        disp_line (WindowHandle, RowEdgeSecond1 - RectLength2 * cos(AngleCheck), ColumnEdgeSecond1 - RectLength2 * sin(AngleCheck), RowEdgeSecond1 + RectLength2 * cos(AngleCheck), ColumnEdgeSecond1 + RectLength2 * sin(AngleCheck))
        disp_line (WindowHandle, RowEdgeFirst2 - RectLength2 * cos(AngleCheck), ColumnEdgeFirst2 - RectLength2 * sin(AngleCheck), RowEdgeFirst2 + RectLength2 * cos(AngleCheck), ColumnEdgeFirst2 + RectLength2 * sin(AngleCheck))
        disp_line (WindowHandle, RowEdgeSecond2 - RectLength2 * cos(AngleCheck), ColumnEdgeSecond2 - RectLength2 * sin(AngleCheck), RowEdgeSecond2 + RectLength2 * cos(AngleCheck), ColumnEdgeSecond2 + RectLength2 * sin(AngleCheck))
        dev_set_line_width (1)
        * 计算贞的数量,数组的大小
        NumLeads := |IntraDistance1| + |IntraDistance2|
        * 计算贞的最小距离
        MinDistance := min([InterDistance1,InterDistance2])
        dev_set_window (WindowHandleText)
        dev_set_part (0, 0, 119, Width - 1)
        dev_clear_window ()
        disp_message (WindowHandleText, 'Matching: Time: ' + ((S2 - S1) * 1000)$'5.2f' + 'ms , Score: ' + Score$'7.5f', 'image', 20, 20, 'green', 'false')
        disp_message (WindowHandleText, 'Measure:  Time: ' + ((S4 - S3) * 1000)$'5.2f' + ' ms, Num. leads: ' + NumLeads$'2d', 'image', 50, 20, 'red', 'false')
        disp_message (WindowHandleText, '          Min. lead dist: ' + MinDistance$'6.3f', 'image', 80, 20, 'red', 'false')
    endif
    dev_error_var (Error, 1)
    dev_set_check ('~give_error')
    get_mposition (WindowHandle, R, C, Button)
    dev_error_var (Error, 0)
    dev_set_check ('give_error')
    if (Error != H_MSG_TRUE)
        Button := 0
    endif
endwhile
dev_set_window (WindowHandleText)
dev_close_window ()
close_framegrabber (FGHandle)
Halcon 测量弧形
显示
read_image (Zeiss1, 'zeiss1')
get_image_size (Zeiss1, Width, Height)
dev_close_window ()
dev_open_window (0, 0, Width / 2, Height / 2, 'black', WindowHandle)
set_display_font (WindowHandle, 14, 'mono', 'true', 'false')
dev_display (Zeiss1)
disp_continue_message (WindowHandle, 'black', 'true')
stop ()
产生弧度测量矩形
* 绘制圆获取行列坐标半径
* draw_circle (WindowHandle, Row, Column, Radius)
Row := 275
Column := 335
Radius := 107
AngleStart := -rad(55)
AngleExtent := rad(170)
dev_set_draw ('fill')
dev_set_color ('green')
dev_set_line_width (1)
* 获取圆弧的起点终点角度
get_points_ellipse (AngleStart + AngleExtent, Row, Column, 0, Radius, Radius, RowPoint, ColPoint)
* 显示圆弧
disp_arc (WindowHandle, Row, Column, AngleExtent, RowPoint, ColPoint)
dev_set_line_width (3)
* 产生圆弧测量矩形
gen_measure_arc (Row, Column, Radius, AngleStart, AngleExtent, 10, Width, Height, 'nearest_neighbor', MeasureHandle)
disp_continue_message (WindowHandle, 'black', 'true')
stop ()
测量以及显示
count_seconds (Seconds1)
n := 10
for i := 1 to n by 1
    * 获取边缘距离
    measure_pos (Zeiss1, MeasureHandle, 1, 10, 'all', 'all', RowEdge, ColumnEdge, Amplitude, Distance)
endfor
count_seconds (Seconds2)
Time := (Seconds2 - Seconds1) / n
disp_continue_message (WindowHandle, 'black', 'true')
* stop ()
*验证求点到底的距离
distance_pp (RowEdge[1], ColumnEdge[1], RowEdge[2], ColumnEdge[2], IntermedDist)
* dev_display (Zeiss1)
dev_set_color ('red')
* disp_circle (WindowHandle, RowEdge, ColumnEdge, RowEdge - RowEdge + 1)
* 显示距离线
disp_line (WindowHandle, RowEdge[1], ColumnEdge[1], RowEdge[2], ColumnEdge[2])
dev_set_color ('yellow')
* 显示信息
disp_message (WindowHandle, 'Distance: ' + IntermedDist, 'image', 250, 80, 'yellow', 'false')
* dump_window (WindowHandle, 'tiff_rgb', 'C:\\Temp\\zeiss_result')
dev_set_line_width (1)
* disp_continue_message (WindowHandle, 'black', 'true')
stop ()
dev_clear_window ()

使用助手同理
Halcon 水平测量检测
* In this example a fill level check for the
* pharmaceutical industry is demonstrated. The task is
* to check for the fill level of each single nose drop ampoule.
* To do so, we first locate each ampoule head by applying
* shape-based matching, then we find the fill level
* by measuring the gray level change using a 1D Measuring.
*
*
dev_close_window ()
dev_update_off ()
read_image (Image, 'ampoules/ampoules_01')
get_image_size (Image, Width, Height)
dev_open_window_fit_image (Image, 0, 0, -1, -1, WindowHandle)
dev_set_line_width (2)
dev_set_draw ('margin')
set_display_font (WindowHandle, 16, 'mono', 'true', 'false')
*
* Create a model for the ampoule head to align the measure handle
gen_rectangle1 (Rectangle, 230, 280, 317, 330)
reduce_domain (Image, Rectangle, ImageModel)
* 创建模板
create_shape_model (ImageModel, 'auto', 0, 0, 'auto', 'auto', 'use_polarity', 'auto', 'auto', ModelID)
*
* Initialize the measure handle
* 初始化测量矩形
gen_measure_rectangle2 (0, 0, rad(90), 75, 20, Width, Height, 'bilinear', MeasureHandle)
Tolerance := 15
*
* Determine the fill level
NumImages := 8
for Index := 1 to NumImages by 1
    * 读取图片
    read_image (Image, 'ampoules/ampoules_' + Index$'.2d')
    ColumnEdges := []
    FillLevelHeight := []
    * 查找模板
    find_shape_model (Image, ModelID, 0, 0, 0.7, 0, 0.1, 'least_squares', 0, 0.9, Row, Column, Angle, Score)
    * 平均行
    MeanRow := mean(Row)
    * 平均水平
    RefLevel := MeanRow - 160
    * Display tolerance area
    dev_display (Image)
    dev_set_line_width (1)
    dev_set_color ('white')
    * 产生一个矩形
    gen_rectangle2 (AcceptLevel, RefLevel, mean(Column), 0, 30 + (max(Column) - min(Column)) / 2, Tolerance)
    * 绘制矩形
    dev_display (AcceptLevel)
    dev_set_line_width (2)
    *
    *  Determine fill level of each ampoule
    Errors := 0
    for Idx := 0 to |Score| - 1 by 1
        * 移动到测量点
        translate_measure (MeasureHandle, MeanRow - 135, Column[Idx])
        * Search for the topmost edge
        * 测量边
        measure_pos (Image, MeasureHandle, 2, 7, 'all', 'first', RowEdge, ColumnEdge, Amplitude, Distance)
        FillLevelHeight := [FillLevelHeight,RowEdge]
        ColumnEdges := [ColumnEdges,ColumnEdge]
        * 生成亚像素轮廓
        gen_cross_contour_xld (Cross, RowEdge, ColumnEdge, 15, 0)
        * 绘制矩形
        gen_rectangle2 (FillLevel, RowEdge, ColumnEdge, 0, 28, 20)
        * 判断是否合格
        if (abs(FillLevelHeight[Idx] - RefLevel) >= Tolerance)
            gen_rectangle2 (ChamberSingle, MeanRow - 133, Column[Idx], 0, 35, 90)
            gen_cross_contour_xld (Cross, FillLevelHeight[Idx], ColumnEdges[Idx], 15, 0)
            gen_rectangle2 (FillLevel, FillLevelHeight[Idx], ColumnEdges[Idx], 0, 28, 20)
            Errors := Errors + 1
            dev_set_color ('red')
            dev_display (ChamberSingle)
            disp_message (WindowHandle, 'NG', 'image', FillLevelHeight[Idx] - 50, ColumnEdges[Idx] - 10, 'red', 'false')
        else
            disp_message (WindowHandle, 'OK', 'image', FillLevelHeight[Idx] - 50, ColumnEdges[Idx] - 10, 'green', 'false')
            dev_set_color ('green')
        endif
        dev_display (FillLevel)
        dev_display (Cross)
    endfor
    *
    * Check, whether the fill level is within the allowed range - does not deviate too much
    * from average fill level
    *
    * Display statistics
    if (Errors > 0)
        disp_message (WindowHandle, Errors + ' BAD', 'window', 10, 12, 'red', 'true')
    else
        disp_message (WindowHandle, 'All OK', 'window', 10, 12, 'forest green', 'true')
    endif
    if (Index < NumImages)
        disp_continue_message (WindowHandle, 'black', 'true')
        stop ()
    endif
endfor


![[足式机器人]Part2 Dr. CAN学习笔记- Kalman Filter卡尔曼滤波器Ch05-1+2](https://img-blog.csdnimg.cn/direct/1eb0c3c819a841db808d26d9f452f2ab.png#pic_center)
![[力扣 Hot100]Day7 接雨水](https://img-blog.csdnimg.cn/direct/31cfe09692c34bdfa031bd7fe5323b7c.png)