< ! -- webservice-- >
< dependency> < groupId> . xml. bind< / groupId>
< artifactId> - api< / artifactId>
< version> 2.3 .0 < / version>
< / dependency>
< dependency> < groupId> . sun. xml. bind< / groupId>
< artifactId> - impl< / artifactId>
< version> 2.3 .0 < / version>
< / dependency>
< dependency> < groupId> . sun. xml. bind< / groupId>
< artifactId> - core< / artifactId>
< version> 2.3 .0 .1 < / version>
< / dependency>
< dependency> < groupId> . activation< / groupId>
< artifactId> < / artifactId>
< version> 1.1 .1 < / version>
< / dependency>
< dependency> < groupId> . springframework. boot< / groupId>
< artifactId> - boot- starter- web- services< / artifactId>
< / dependency>
< dependency> < groupId> . apache. cxf< / groupId>
< artifactId> - spring- boot- starter- jaxws< / artifactId>
< version> 3.3 .4 < / version>
< / dependency>
< dependency> < groupId> . apache. cxf< / groupId>
< artifactId> - rt- transports- http< / artifactId>
< version> 3.2 .2 < / version>
< / dependency>
< dependency> < groupId> . codehaus. woodstox< / groupId>
< artifactId> - api< / artifactId>
< version> 4.1 < / version>
< / dependency>
< dependency> < groupId> . codehaus. woodstox< / groupId>
< artifactId> - core- asl< / artifactId>
< version> 4.4 .1 < / version>
< / dependency>
< ! -- 这个主要是client访问的,但是问题多多-- >
< dependency> < groupId> . apache. axis< / groupId>
< artifactId> < / artifactId>
< version> 1.4 < / version>
< / dependency>
< dependency> < groupId> < / groupId>
< artifactId> - jaxrpc< / artifactId>
< version> 1.4 < / version>
< / dependency>
< dependency> < groupId> - discovery< / groupId>
< artifactId> - discovery< / artifactId>
< version> 0.2 < / version>
< / dependency>
< dependency> < groupId> < / groupId>
< artifactId> < / artifactId>
< version> 1.6 .3 < / version>
< / dependency>
package com. flow. mongodb. wsconfig ;
import com. flow. mongodb. service. WbceshijkService ;
import org. apache. cxf. Bus ;
import org. apache. cxf. jaxws. EndpointImpl ;
import org. apache. cxf. transport. servlet. CXFServlet ;
import org. springframework. beans. factory. annotation. Autowired ;
import org. springframework. boot. web. servlet. ServletRegistrationBean ;
import org. springframework. context. annotation. Bean ;
import org. springframework. context. annotation. Configuration ;
import javax. xml. ws. Endpoint ;
@Configuration
public class CxfConfig {
@Autowired
private Bus bus;
@Autowired
private WbceshijkService busBuildService;
@Bean
public ServletRegistrationBean disServlet ( ) {
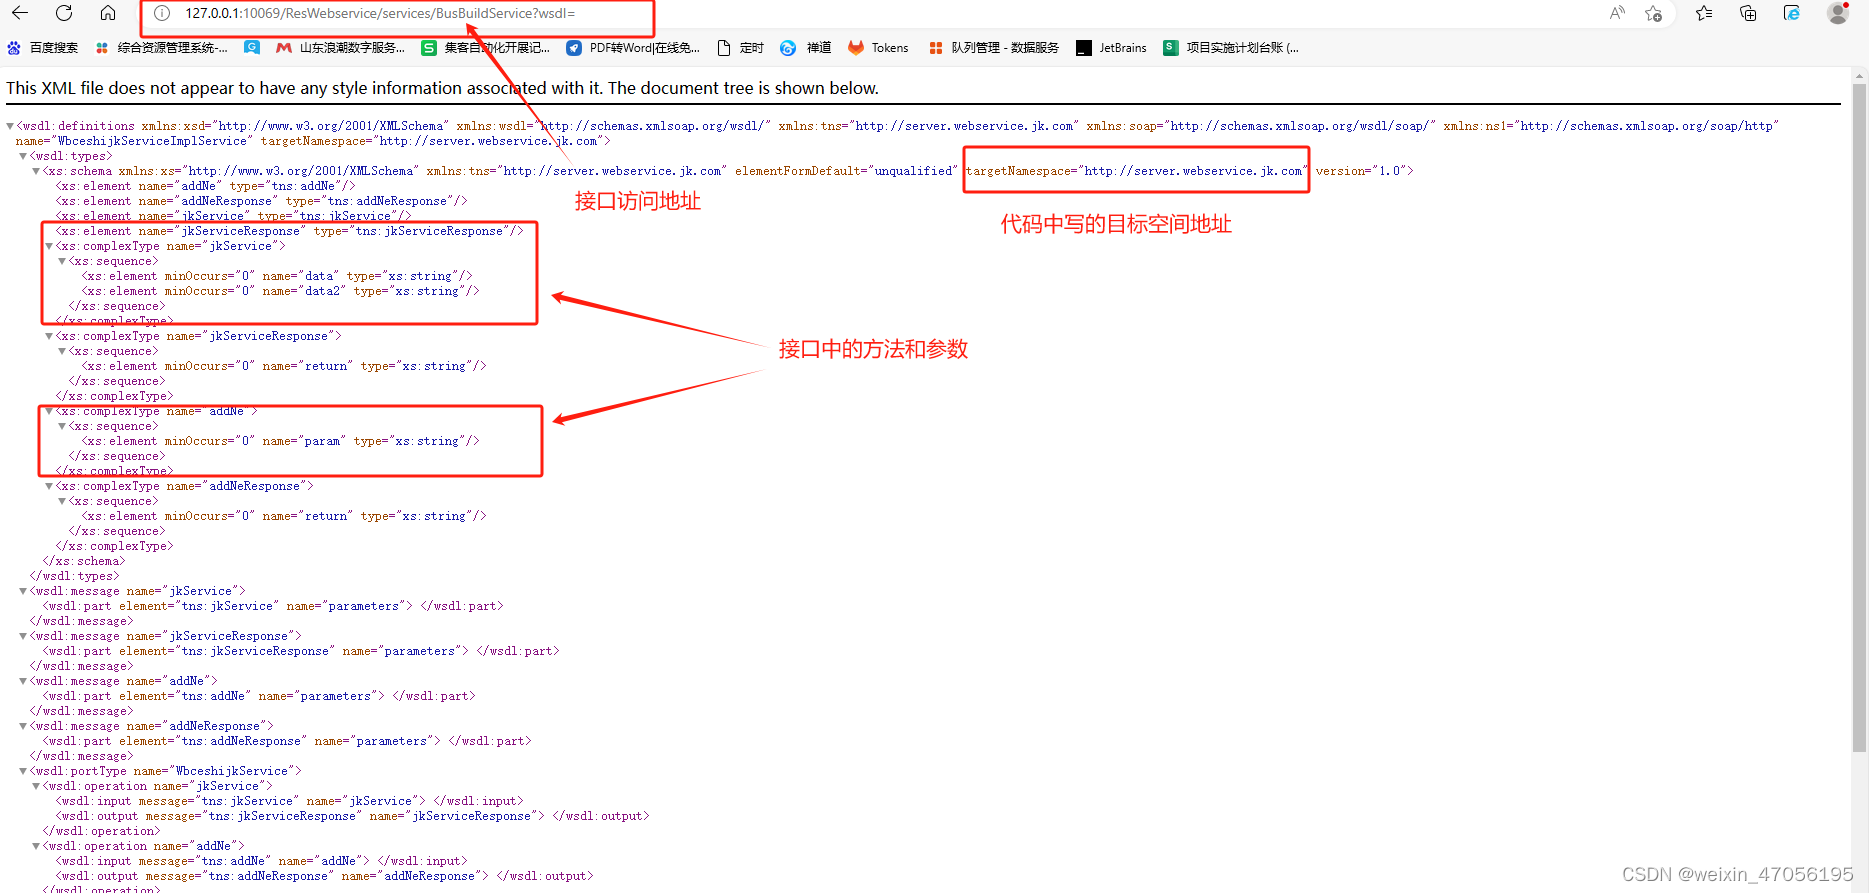
return new ServletRegistrationBean ( new CXFServlet ( ) , "/ResWebservice/services/*" ) ;
}
@Bean
public Endpoint buildOrderEndpoint ( ) {
EndpointImpl endpoint = new EndpointImpl ( bus, busBuildService) ;
endpoint. publish ( "/BusBuildService" ) ;
return endpoint;
}
}
package com. flow. mongodb. service ;
import javax. jws. WebMethod ;
import javax. jws. WebParam ;
import javax. jws. WebService ;
@WebService ( name = "WbceshijkService" , targetNamespace = "http://server.webservice.jk.com" )
public interface WbceshijkService {
@WebMethod
String jkService ( @WebParam ( name = "data" ) String data, @WebParam ( name = "data2" ) String data2) ;
@WebMethod
String addNe ( @WebParam ( name= "param" ) String param) ;
}
package com. flow. mongodb. service. impl ;
import com. flow. mongodb. service. WbceshijkService ;
import lombok. extern. slf4j. Slf4j ;
import org. springframework. stereotype. Component ;
import javax. jws. WebService ;
@Slf4j
@Component
@WebService ( targetNamespace = "http://server.webservice.jk.com" ,
name = "WbceshijkService" )
public class WbceshijkServiceImpl implements WbceshijkService {
@Override
public String jkService ( String data, String data2) {
log. info ( "======emrService===111====" + data) ;
log. info ( "======emrService==222=====" + data2) ;
return "操作成功" ;
}
@Override
public String addNe ( String param) {
log. info ( "======student===111====\n" + param) ;
return "操作成功" ;
}
}
< ? xml version= "1.0" encoding= "UTF-8" ? >
< soapenv: Envelope xmlns: soapenv= "http://schemas.xmlsoap.org/soap/envelope/" xmlns: test= "http://server.webservice.jk.com" >
< soapenv: Body >
< test: addNe>
< param> < ! [ CDATA [ < ? xml version= "1.0" encoding= "UTF-8" ? > < Data > < Params > < name> < / crm_order_id>
< address> < / address>
< age> 2000 < / age>
< / Params >
< / Data > ] ] >
< / param>
< / test: addNe>
< / soapenv: Body >
< / soapenv: Envelope >
< soap: Envelope xmlns: soap= "http://schemas.xmlsoap.org/soap/envelope/" > < soap: Body > < ns2: addNeResponse xmlns: ns2= "http://server.webservice.jk.com" > < return > < / return > < / ns2: addNeResponse> < / soap: Body > < / soap: Envelope >
