文章目录
- 一、Vuex
- 1)理解vuex
- 2)优点
- 3)何时使用?
- 4)使用步骤
- ① 安装vuex
- ② 创建vuex
- ③ 导入vuex
- ④ 创建仓库Store
- ⑤ 基本使用
- 5)五个模块介绍
- 1.State
- 2.mutations
- 3.actions
- 4.Getter
- 5.Modules
- 6)购物车跨组件通信案例
- 二、Vue-router
- 1)路由跳转
- 基础跳转
- 路由跳转携带数据
- 1.在地址栏中携带数据
- 2.在路径中解析数据
- 2)相关API
- 3)路由嵌套
- 3)路由守卫
- 全局前置守卫
- 三、LocalStorage与SessionStorage、cookie的使用
- 四、路由两种工作模式
一、Vuex
1)理解vuex
Vuex是一个专为Vue.js应用程序开发的
状态管理系统+库。它采用集中式存储管理应用的所有组件的状态,并以相应的规则保证状态以一种可预测的方式发生变化
解读
在Vue中实现集中式状态(数据)管理的一个Vue插件,对vue应用中多个组件的共享状态进行集中式的管理(读/写),也是一种组件间通信的方式,且适用于任意组件间通信。
2)优点
Vuex状态管理跟使用传统全局变量的不同之处:
-
Vuex的状态存储是响应式的: 就是当你的组件使用到了这个 Vuex
的状态,一旦它改变了,所有关联的组件都会自动更新相对应的数据,这样开发者省事很多。 -
不能直接修改Vuex的状态: 如果是个全局对象变量,要修改很容易,但是在 Vuex 中不能这样做,想修改就得使用 Vuex。提供的唯一途径:显示地提交(commint)mutations来实现修改。这样做的好处就是方便我们跟踪每一个状态的变化,在开发过程中调试的时候,非常实用。
3)何时使用?
当你无法很好的进行数据管理的时候,多个组件需要共享数据时,你就需要用Vuex,即:
- 多个组件依赖于同一状态
- 来自不同组件的行为需要变更为同一状态
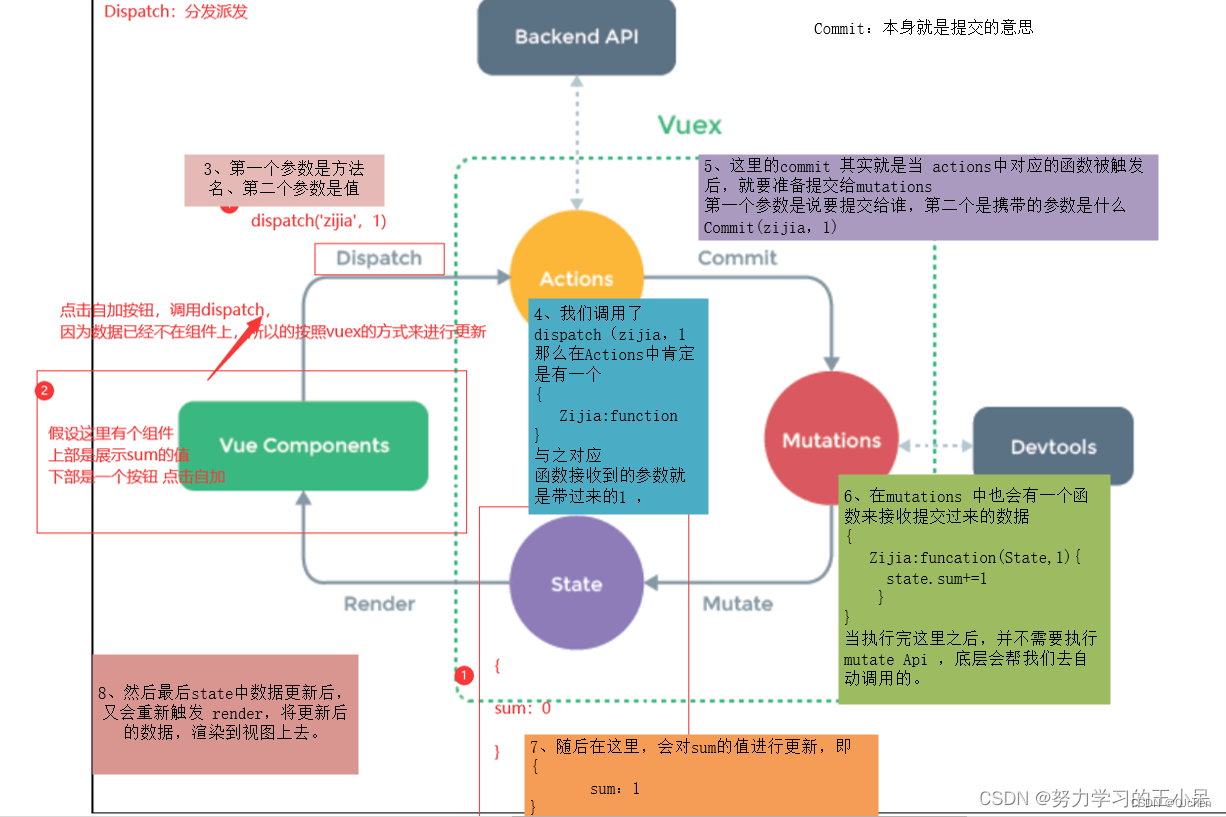
Vuex 背后的基本思想.
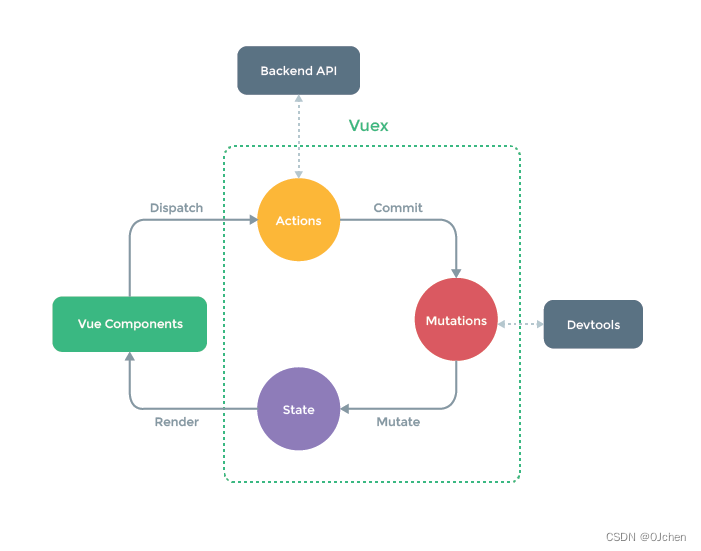
进行注解
4)使用步骤
因为我是通过命令创建vue项目的,当时已经选配好了,所以下面前四个步骤都不用自己配置
与router一样,当我们在项目中使用vuex之后,为了方便代码维护,我们一般需要做特殊的目录调整,约定的结构如下:
	根组件
	└── src
	    ├── main.js
	    ├── router
	    │   └── index.js   # 路由
	    └── store
	        └── index.js   # vuex
① 安装vuex
npm install vuex --save
② 创建vuex
在src文件夹下新建store/index.js,并初始化下列代码
	import Vue from 'vue'  		//引入Vue核心库
	import Vuex from 'vuex'		//引入Vuex
	Vue.use(Vuex)				//应用Vuex插件
③ 导入vuex
在main.js中导入
	import Vue from 'vue'
	import App from './App.vue'
	import store from './store'  //导入

	Vue.config.productionTip = false

	new Vue({
	  store,  //挂载
	  render: h => h(App)
	}).$mount('#app')
④ 创建仓库Store
要使用 Vuex,我们要创建一个实例 store,我们称之为仓库,利用这个仓库 store 来对我们的状态进行管理。
	//创建一个 store
	export default new Vuex.Store({
		state:{
		   //存放状态
		},
		getters:{
		  //state的计算属性
		},
		mutations: {
		 //更改state中状态的逻辑,同步操作
		},
		actions: {
		  //提交mutation,异步操作
		},
		//如果将store分成一个个的模块的话,则需要用到modules.
		//然后在每一个module中的state,getters,mutations,actions等
		modules: {
		 a: moduleA,
		 b: moduleB,
		 //...
		}
	})
⑤ 基本使用
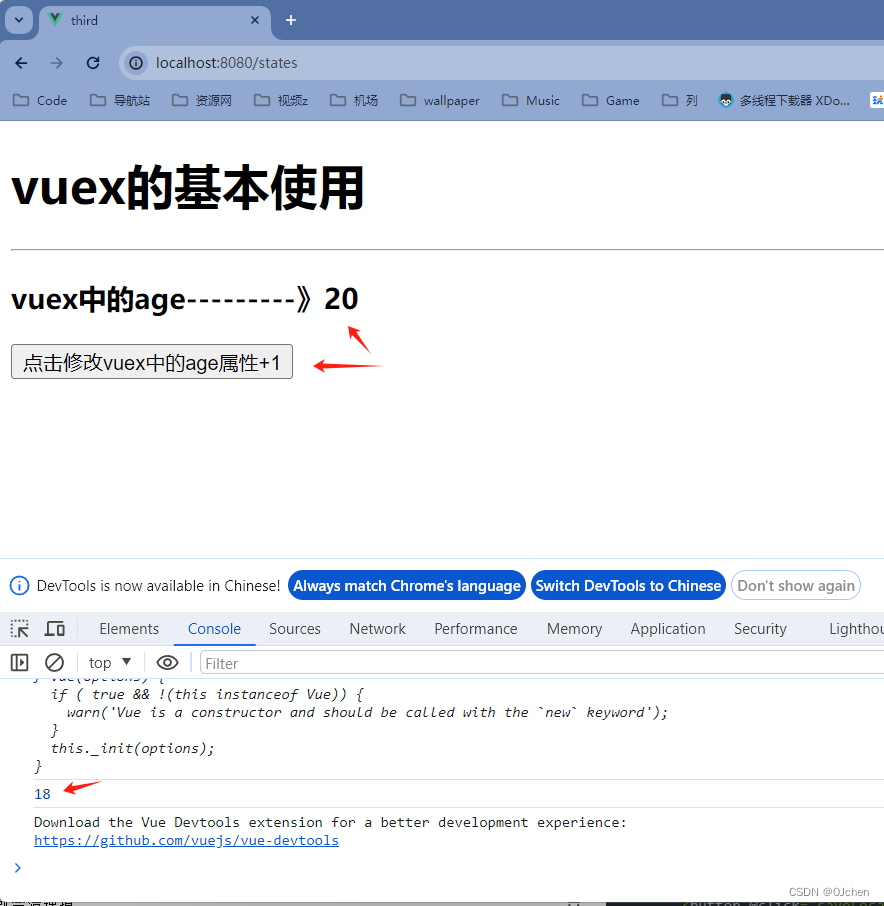
修改state中的年龄
store/index.js
	import Vue from 'vue'
	import Vuex from 'vuex'  //安装过直接导入

	Vue.use(Vuex)  //使用vuex插件
	export default new Vuex.Store({
	  state: {
	    age:18,
	  },
	  mutations: {
	    addAgeMutation(state){
	        state.age++
	    }
	  },
	  actions: {
	    addAgeAction(context){
	    	console.log(context)  //第一个采纳数传入context,内部有commit和dispatch
	        context.commit('addAgeMutation') //调用commit会触发mutations中函数的执行
	    }						//封装性很强,这里可以做出判断,是否有权限改值,如果有权限就通过
	  },
	})
组件中使用修改
	<script>
	export default {
	  name: 'StatesView',
	  created() {
	    console.log(this.$store.state.age)
	  },
	  methods: {
	    handleClick() {
	      //this.$store.state.age++   可以直接修改但是不建议这样使用
	      this.$store.dispatch('addAgeAction') //按照流程 触发Vuex中的actions得函数执行 使用dispatch
	    }
	  },

	}
	</script>

	<template>
	  <div>
	    <h1>vuex的基本使用</h1>
	    <hr>
	    <h3>vuex中的age---------》{{ $store.state.age }}</h3>
	    <button @click="handleClick">点击修改vuex中的age属性+1</button>
	  </div>
	</template>
5)五个模块介绍
State:定义了应用状态的数据结构,可以在这里设置默认的初始状态。Getter:允许组件从 store 中获取数据,mapGetters 辅助函数仅仅是将 store 中的 getter映射到局部计算属性(state的计算属性)。Mutation:是唯一更改 store 中状态的方法,且必须是同步函数。Action:用于提交 mutation,而不是直接变更状态,可以包含任意异步操作。Module:可以将 store 分割成模块(module)。每个模块拥有自己的state、mutation、action、getter、甚至是嵌套子模块(将store模块化)
1.State
概念:State 本质上就是 Object 对象
state的作用是:保存公共数据(多组件中共用的数据)
state是响应式的: 如果修改了数据,相应的在视图上的值也会变化。
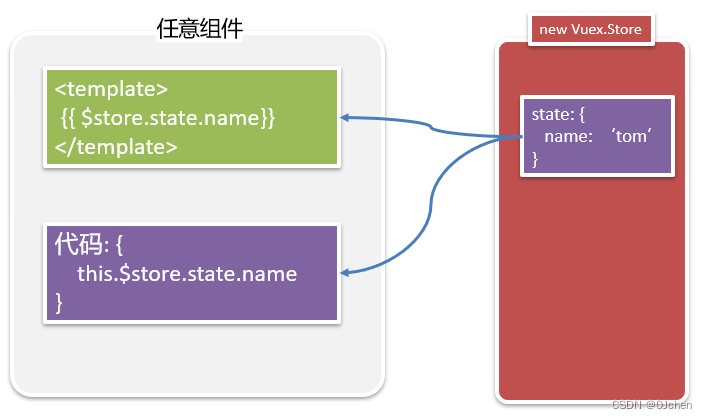
组件访问 State 数据
在每个 Vue 组件中,可以通过
this.$store.state全局数据名称 访问 Store 中的数据。
定义公共数据格式
	export default new Vuex.Store({
	  state: {
	    属性名:属性值,
	  },
	})
使用公共数据
	在组件中,通过this.$store.state.属性名来访问。
	在模板标签中,则可以省略this而直接写成: {{$store.state.属性名}}
2.mutations
Mutation 本质上是JavaScript 函数,专门用来变更Store 中的数据
特点:想要修改State 中的数据,只能调用Mutation 方法,它是Vuex中用来修改公共数据的唯一入口。好处:能够确保修改来源的唯一性,方便调试和后期维护。在定义时:它的第一个参数是state,第二个参数是载荷在调用时:用this.$store.commit('mutation名', 载荷)来调用注意:Mutation 必须是同步函数,Mutation 里面不能放异步代码
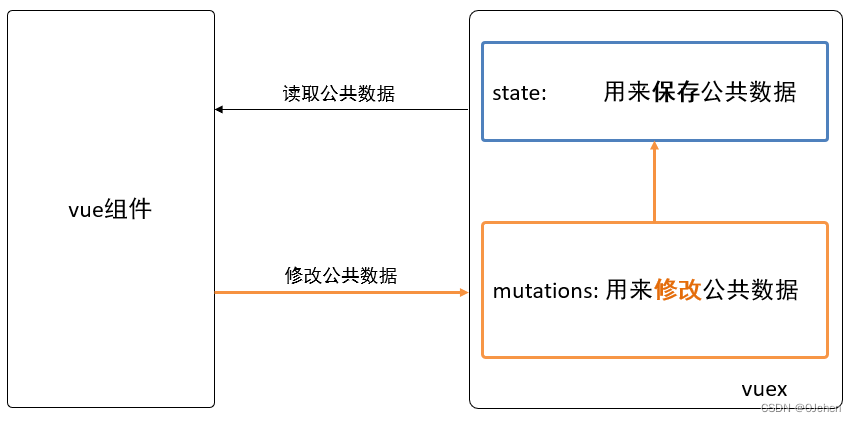
更改 Vuex 的 store 中的状态的唯一方法是提交 mutation。Vuex 中的 mutation 非常类似于事件:每个 mutation 都有一个字符串的事件类型 (type)和一个回调函数 (handler)。这个回调函数就是我们实际进行状态更改的地方,并且它会接受 state 作为第一个参数:
在vuex中定义:
其中参数state参数是必须的,也可以自己传递一个参数,如下代码,进行计数器的加减操作,加法操作时可以根据所传递参数大小进行相加,减法操作没有传参每次减一
	'注意:mutation必须是同步函数,不能是异步的,这是为了后期调试的方便。'
	export default new Vuex.Store({
	  state: {
	    count:0,
	  },
	  //里面定义方法,操作state方法
	  mutations: {
	  	//第一个参数是必须的,表示当前的state。在使用时不需要传入
		//第二个参数是可选的,表示载荷,是可选的。在使用时要传入的数据
	    addCount(state,num){
	    	state.count+=(state.count+num)
	    },
	    reduce(state){
			state.count--
		}
	  },
	})
在组件中使用
定义两个按钮进行加减操作,组件中使用格式:
this.$store.commit('mutation名', 实参)第二个参数可选的
<script>
export default {
  name: 'StatesView',
  methods: {
    btnAdd(){
      //注意:使用commit触发Mutation操作
      this.$store.commit('addCount',10)  //每次加10
      console.log('执行了mutations给count+10了')
    },
    btnDel(){
      console.log('执行了mutations给count-1了')
      this.$store.commit('reduce')
    }
  }
 }

}
</script>

<template>
  <div>
    <p>store中count数据值:{{$store.state.count}}</p>
    <p><button @click="btnAdd">点击增加store中count数据值+10</button></p>
    <p><button @click="btnDel">点击减少store中count数据值-1</button></p>
  </div>
</template>

3.actions
Action 本质上是 JavaScript 函数,专门用来处理 Vuex 中的异步操作
actions是vuex的一个配置项作用:发异步请求获取数据,调用mutations来保存数据,将整个ajax操作封装到Vuex的内部要点:- action 内部可以发异步请求操作
- action是间接修改state的:是通过调用 mutation来修改state
因为mutations中只能是同步操作,但是在实际的项目中,会有异步操作,那么action中提交mutation,然后在组件的methods中去提交action。只是提交actions的时候使用的是dispatch函数,而mutations则是用commit函数。
在vuex中定义:
将上面的减法操作改为异步操作
	export default new Vuex.Store({
	    state: {
	        count: 0,
	    },
	    mutations: {
	        addCount(state, num) {
	            state.count += (state.count + num)
	        },
	        reduce(state) {
	            state.count--
	        }
	    },
	    actions: {
	    	//action函数接受一个context函数,这个context具有与store实例相同的方法和属性
	        // context对象会自动传入,它与store实例具有相同的方法和属性
	        // 1. 异步操作
	        // 2. commit调用mutation来修改数据
	        asyncReduce(context){
	            setTimeout(()=>{
	                context.commit('reduce')
	            },2000)
	        }
	        //格式: context.commit('mutation名', 载荷)

	    },
	})
在组件中使用:
	<script>
	export default {
	  name: 'StatesView',
	  methods: {
	    btnAdd(){
	      //注意:使用commit触发Mutation操作
	      this.$store.commit('addCount',10)  //每次加10
	      console.log('执行了mutations给count+10了')
	    },
	    btnDel(){
		//直接使用:在组件中通过this.$store.dispatch('actions的名字', 参数)来调用action
	      console.log('执行了actions的异步操作--等待2秒执行了')
	      this.$store.dispatch('asyncReduce')
	    }
	  },
	}
	</script>

	<template>
	  <div>
	    <p>store中count数据值:{{$store.state.count}}</p>
	    <p><button @click="btnAdd">点击增加store中count数据值+10</button></p>
	    <p><button @click="btnDel">点击减少store中count数据值-1</button></p>
	  </div>
	</template>

小结
action一般用来发异步请求,数据回来之后,在去调用mutations来保存数据
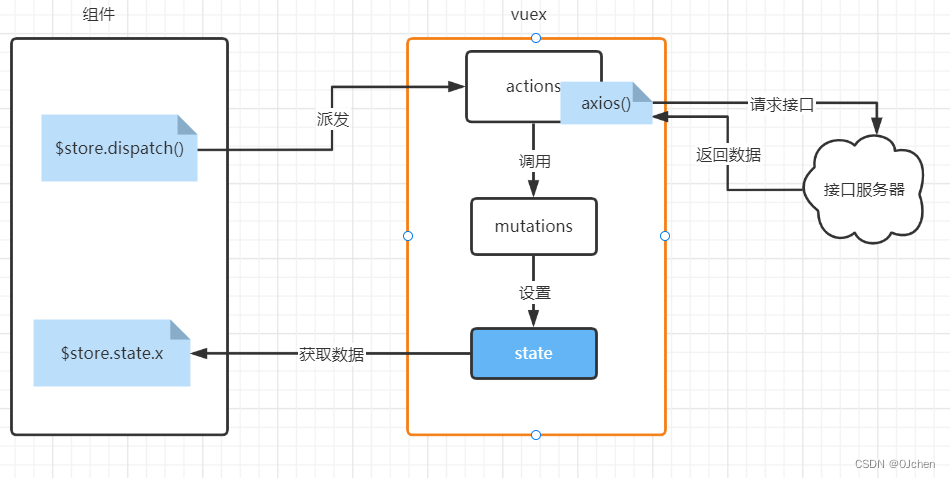
将ajax请求放在actions中有两个好处:
- 代码得到了进一步封装。将发ajax和保存数据到vuex绑定在一起。
- 逻辑更通顺。如果数据需要保存在Vuex的state中,那从接口处获取数据的操作就定义在Vuex的actions中。
4.Getter
类似于vue中的computed,进行缓存,对于Store中的数据进行加工处理形成新的数据
具体操作类似于前几种,这里不做具体说明
5.Modules
当遇见大型项目时,数据量大,store就会显得很臃肿
为了解决以上问题,Vuex 允许我们将 store 分割成模块(module)。每个模块拥有自己的 state、mutation、action、getter、甚至是嵌套子模块——从上至下进行同样方式的分割
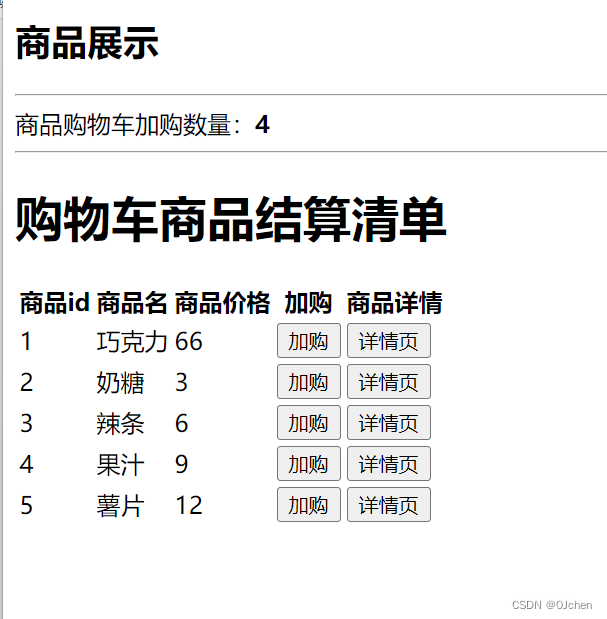
6)购物车跨组件通信案例
src文件夹下的store/index.js
	import Vue from 'vue'
	import Vuex from 'vuex'
	Vue.use(Vuex)

	export default new Vuex.Store({
	  state: {
	    count:0,
	  },
	  mutations: {
	    addCountMutation(state){
	      state.count++;
	    }
	  },
	  actions: {
	    addCountAction(context){
	      context.commit('addCountMutation')
	    }
	  },
	})
components/ShoppingCard.vue
	<script>
	export default {
	  name:'ShoppingCard',
	}
	</script>

	<template>
	  <div>
	    <span>商品购物车加购数量:<strong>{{$store.state.count}}</strong></span>
	  </div>
	</template>
views/HomeView
	<template>
	  <div class="home">
	    <h2>商品展示</h2>
	    <hr>
	    <ShoppingCard></ShoppingCard>
	    <hr>
	    <div id="div" class="container">
	      <div class="row">
	        <div class="col-md-10 col-md-offset-1">
	          <h1 class="text-center" id="table">购物车商品结算清单</h1>
	          <table class="table table-hover table-bordered">
	            <thead>
	            <tr>
	              <th class="text-center">商品id</th>
	              <th class="text-center">商品名</th>
	              <th class="text-center">商品价格</th>
	              <th class="text-center">加购</th>
	              <th class="text-center">商品详情</th>
	            </tr>
	            </thead>
	            <tbody>
	            <tr v-for="data in shoplist">
	              <td class="text-center">{{ data.id }}</td>
	              <td class="text-center">{{ data.name }}</td>
	              <td class="text-center">{{ data.price }}</td>
	              <td class="text-center">
	                <button class="btn btn-danger" @click="CheckAdd(data)">加购</button>
	              </td>
	              <td class="text-center">
	                <button class="btn btn-danger" @click="CheckDetail(data)">详情页</button>
	              </td>
	            </tr>
	            </tbody>
	          </table>
	        </div>

	      </div>
	    </div>

	  </div>
	</template>

	<script>
	import ShoppingCard from "@/components/ShoppingCard.vue";

	export default {
	  name: 'HomeView',
	  components: {ShoppingCard},
	  data() {
	    return {
	      shoplist: [
	        {id: 1, name: '巧克力', price: 66, count: 5},
	        {id: 2, name: '奶糖', price: 3, count: 8},
	        {id: 3, name: '辣条', price: 6, count: 4},
	        {id: 4, name: '果汁', price: 9, count: 55},
	        {id: 5, name: '薯片', price: 12, count: 33},
	      ],
	    }
	  },
	  methods: {
	    CheckAdd(data) {
	      this.$store.dispatch('addCountAction')
	    },
	    CheckDetail(data){
	      this.$router.push({
	        path:'/detail',
	        query:data
	      })
	    }
	  }
	}
	</script>
二、Vue-router
在这里我就不继续写Vue-router的基础知识了,在上一篇博客中已经介绍过了Vue-router基础
1)路由跳转
基础跳转
使用
js实现路由跳转,以及标签实现路由跳转
任意一个页面组件
	<template>
	  <div class="home">
	    <h1>首页</h1>
	    <hr>
	    <h2>通过js实现跳转页面</h2>
	    <button @click="handlerClick">点击跳转到about页面</button>
	    <br>
	    <hr>
	    <h2>通过标签实现跳转页面</h2>
	    '标签跳转可以通过在router/index.js文件中创建的路由path或者路由的别名进行跳转'
	    <router-link to="/about"><button>点击跳转到about页面</button></router-link>
	    <router-link to="about"><button>点击跳转到about页面</button></router-link>
	    <br>
	    <hr>
	    <h2>通过js实现跳转页面----传入对象</h2>
	    <button @click="handlerSkip">点击跳转到about页面</button>
	  </div>
	</template>

	<script>
	export default {
	  name: 'HomeView',
	  methods:{
	    handlerClick(){
	      //使用router的一个方法进行跳转
	      //this.$router  表示路由对象,导出的
	      //this.$route   表示当前路由对象
	      this.$router.push('/about')
	    },
	   handlerSkip(){
	      //根据router/index.js中注册的路由的path去跳转
	      // this.$router.push({
	      //   path:'/about',
	      // })
	      //根据router/index.js中注册的路由的name别名去跳转
	      this.$router.push({
	        name:'about',
	      })
    	}
	  }
	}
</script>

路由跳转携带数据
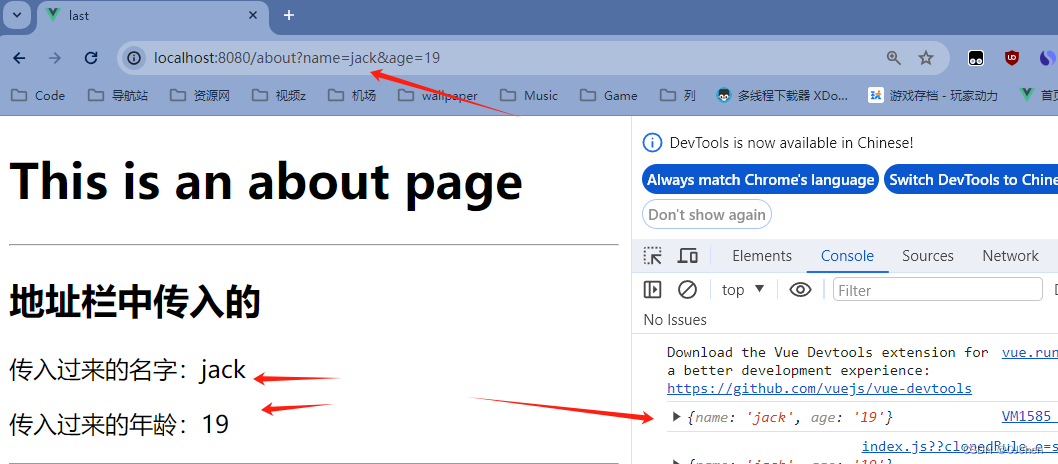
1.在地址栏中携带数据
	-使用js的方式
		1.this.$router.push({
			path:'/about',
			query:{'name':this.name,age:18}
		})
		2.直接在地址栏中使用字符串拼接的形式
		this.$router.push(`/about?name=${this.name}&age=19`)

	-使用标签的方式
		'问号前面加不加斜杠都不影响'
		1.<router-link to="/about?name=jack&age=18">跳转</router-link>

	-取出方式:this.$route.query

	-还可以在标签中使用属性指令来设置例如
	<router-link :to="url">跳转</router-link>
	data中:url:{'name':'about',query:{'age':18},params:{}}
例子
	'HomeView.vue'
	<template>
	  <div class="home">
	    <h1>路由跳转功能</h1>
	    <hr>
	    <h2>通过js实现跳转页面----传入对象并携带数据</h2>
	    <button @click="handlerObject">点击跳转到about页面</button>
	  </div>
	</template>

	<script>
	export default {
	  name: 'HomeView',
	  data(){
	    return{
	      name:'jack',
	    }
	  },
	  methods:{
	    //携带数据在地址栏中
	    handlerObject(){
	      this.$router.push({
	      	//方式一:
	        path:'/about',
	        query:{'name':this.name,'age':19}
	      })
	      //方式二:this.$router.push(`/about?name=${this.name}&age=19`)
	    }
	  }
	}
	</script>
	'============================================'

	'AboutView.vue'
	<template>
	  <div class="about">
	    <h1>This is an about page</h1>
	    <p>传入过来的名字:{{in_name}}</p>
	    <p>传入过来的年龄:{{in_age}}</p>
	  </div>
	</template>
	<script>
	export default {
	  name:'AboutView',
	  data(){
	    return {
	      in_name:'',
	      in_age:'',
	    }
	  },
	  created() {
	    console.log(this.$route.query)
	    this.in_name=this.$route.query.name
	    this.in_age=this.$route.query.age
	  }
	}
	</script>
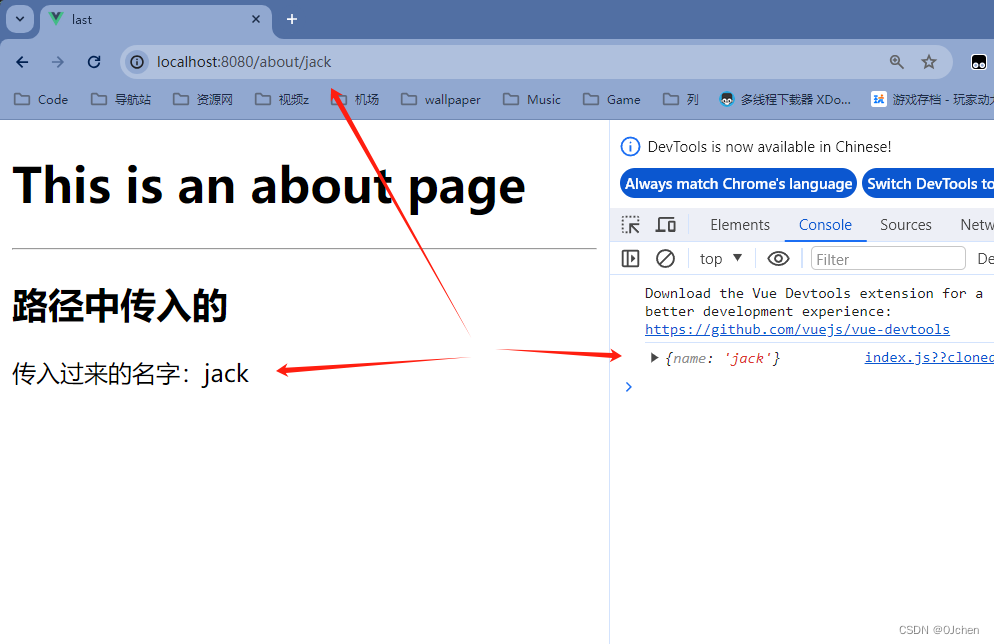
2.在路径中解析数据
	'使用在路径中解析数据,需要修改跳转到的页面的路由'
	-router/index.js中
	  {
	    path: '/about/:name',  //类似于python路由中的转换器写法 <int:id>
	    name: 'about',
	    component: AboutView
	  },

	-使用js的方式
		1.this.$router.push({
			name:'about',
			params:{'name':'oscar'}  //这样也可以直接填写data数据中有的值例如this.name
		})
		2.直接在路径中使用字符串拼接的形式
		this.$router.push(/about/'+this.name)  //这里的this.name前提是你设置了,可以使用字符串形式

	-使用标签的方式
		'问号前面一定要斜杠,否则没效果-------这里也是使用别名的方式'
		1.<router-link to="/about/jack">跳转</router-link>

	-取出方式:this.$route.params

	-还可以在标签中使用属性指令来设置例如
	<router-link :to="url">跳转</router-link>
	data中:url:{'name':'about',query:{'age':18},params:{}}
例子
	'HomeView.vue'
	<template>
	  <div class="home">
	    <h1>路由跳转功能</h1>
	    <hr>
	    <h2>通过js实现跳转页面----传入对象并携带数据----路径</h2>
	    <button @click="handlerObject1">点击跳转到about页面</button>
	  </div>
	</template>

	<script>
	export default {
	  name: 'HomeView',
	  data(){
	    return{
	      name:'jack',
	    }
	  },
	  methods:{
	    //携带数据在路径中
	    handlerObject1(){
	      //方式一:
	      this.$router.push({
	        name:'about',  //因为path后面加了/:name不好凑,所以可以直接使用name重命名的
	        params:{'name':'oscar'}
	      })
	      // 方式二:this.$router.push('/about/'+this.name)
	    }
	  }
	}
	</script>

	'============================================'

	'AboutView.vue'
	<template>
	  <div class="about">
	    <h1>This is an about page</h1>
	    <hr>
	    <h2>路径中传入的</h2>
	    <p>传入过来的名字:{{in_name1}}</p>
	  </div>
	</template>
	<script>
	export default {
	  name:'AboutView',
	  data(){
	    return {
	      in_name1:'',
	    }
	  },
	  created() {
	    console.log(this.$route.params)
	    //两种获取路径中的数据方法
	    this.in_name1=this.$route.params.name
	    //this.in_name1=this.$route.params['name']
	  }
	}
	</script>
2)相关API
	this.$router.push(path): 相当于点击路由链接(可以返回到当前路由界面)
	this.$router.replace(path): 用新路由替换当前路由(不可以返回到当前路由界面)
	this.$router.back(): 请求(返回)上一个记录路由
	this.$router.go(-1): 请求(返回)上一个记录路由
	this.$router.go(1): 请求下一个记录路由
3)路由嵌套
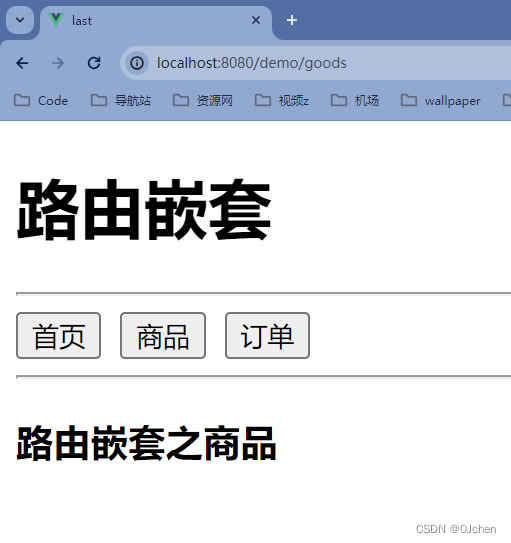
通过路由实现组件的嵌套展示,叫做嵌套路由。
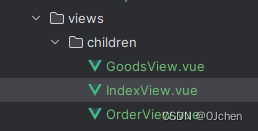
1.在views/children下创建三个组件,这个children是随意命名
2.然后在创建一个组件作为父组件
<script>
export default {
name:'RouterDemoView'
}
</script>
<template>
<div>
<h1>路由嵌套</h1>
<hr>
<router-link to="/demo/index"><button>首页</button> </router-link>
<router-link to="/demo/goods"><button>商品</button> </router-link>
<router-link to="/demo/order"><button>订单</button></router-link>
<hr>
<router-view></router-view>
</div>
</template>
<style scoped>
a{text-decoration:none;}
</style>
3.最后也是最重要的在router/index.js中导入
通过
children属性声明子路由规则,在src/router/index.js路由模块中,导入需要的组件,并使用children属性声明子路由规则:
	import Vue from 'vue'
	import VueRouter from 'vue-router'
	import RouterDemoView from '@/views/RouterDemoView.vue'
	import IndexView from "@/views/children/IndexView.vue";
	import GoodsView from "@/views/children/GoodsView.vue";
	import OrderView from "@/views/children/OrderView.vue";
	Vue.use(VueRouter)

	const routes = [
	    {	// demo 页面的路由规则(父级路由规则)
	        path: '/demo',
	        name: 'demo',
	        component: RouterDemoView,
	        children:[ //通过children配置子级路由,嵌套声明子级路由规则
	            {
	                path:'index', //此处一定不要写成 /index
	                component:IndexView,
	            },
	            {
	                path:'goods',  //此处一定不要写成 /goods
	                component:GoodsView,
	            },
	            {
	                path:'order',  //此处一定不要写成 /order
	                component:OrderView,
	            },
	        ]
	    },
	]

	const router = new VueRouter({
	    mode: 'history',
	    base: process.env.BASE_URL,
	    routes
	})

	export default router
3)路由守卫
全局前置守卫
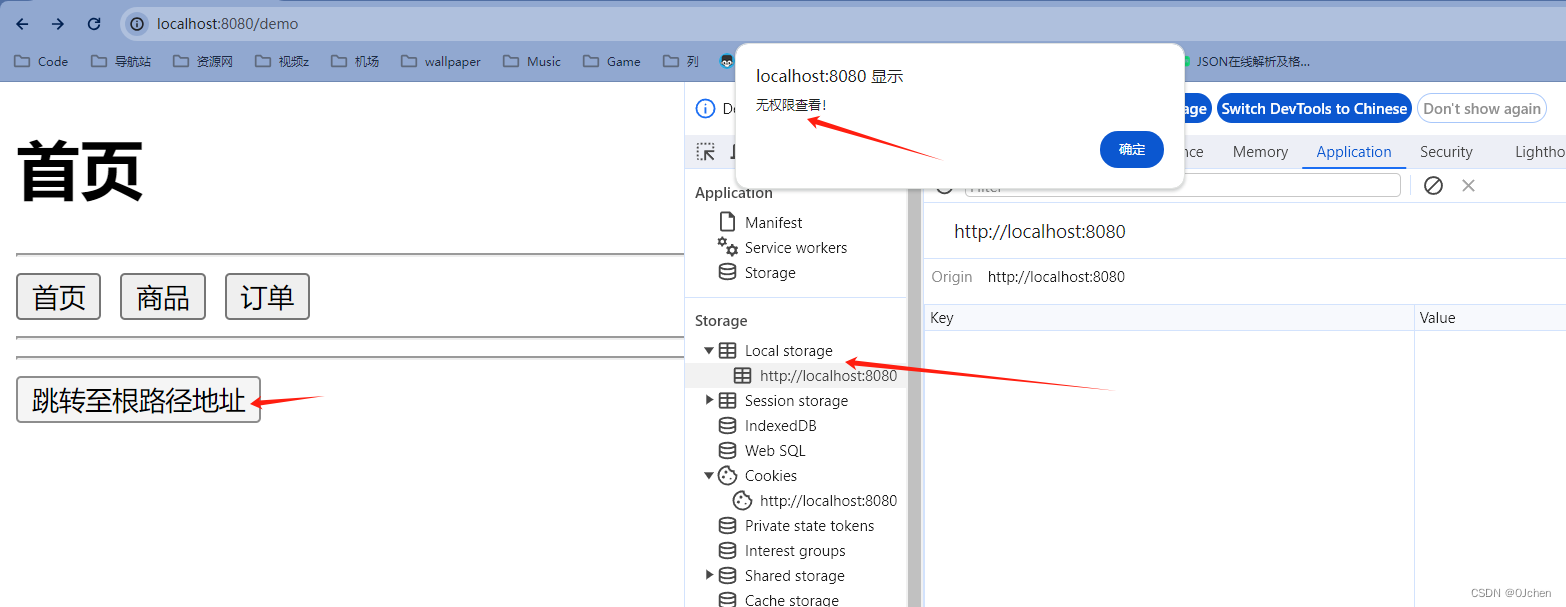
每次发生路由的导航跳转时,都会触发全局前置守卫。因此,在全局前置守卫中,程序员可以对每个路由进行访问权限的控制:
编写一个子路由被嵌套 然后进行路由守卫 看当前用户是否登录(查看localStorage里面是否有name) 登录则可以查看
首先需要先在src文件夹下的router/index.js中配置前置路由守卫
	//创建路由实例对象
	const router = new VueRouter({
	    mode: 'history',
	    base: process.env.BASE_URL,
	    routes
	})

	//全局前置路由守卫————初始化的时候被调用、每次路由切换之前被调用
	'''
	调用路由实例对象的 beforeEach方法,即可声明 全局前置路由守卫
	每次发生路由导航跳转的时候,都会自动触发回调函数
	'''
	router.beforeEach((to,from,next)=>{
		'''
		to ----是将要访问的路由的信息对象
		from ----是将要离开的路由的信息对象
		next ----是一个函数,调用next()表示方形,运行这次路由导航
		'''
		console.log('前置路由守卫',to,from)
	    if(to.name == 'demo' || localStorage.getItem('name')){
	        next()
	    }else{
	        alert('无权限查看!')
	    }
	})

	//注意必须在导出之前执行
	export default router
在首页中添加localStorage
<script>
export default {
name:'RouterDemoView',
methods:{
//当前没有启用添加localStorage
// localAdd(){
// localStorage.setItem('name','jack')
// }
}
}
</script>
<template>
<div>
<h1>首页</h1>
<hr>
<router-link to="/demo/index"><button>首页</button> </router-link>
<router-link to="/demo/goods"><button>商品</button> </router-link>
<router-link to="/demo/order"><button>订单</button></router-link>
<hr>
<router-view></router-view>
<hr>
<router-link to="/"><button>跳转至根路径地址</button></router-link>
</div>
</template>
<style scoped>
a{text-decoration:none;}
</style>
三、LocalStorage与SessionStorage、cookie的使用
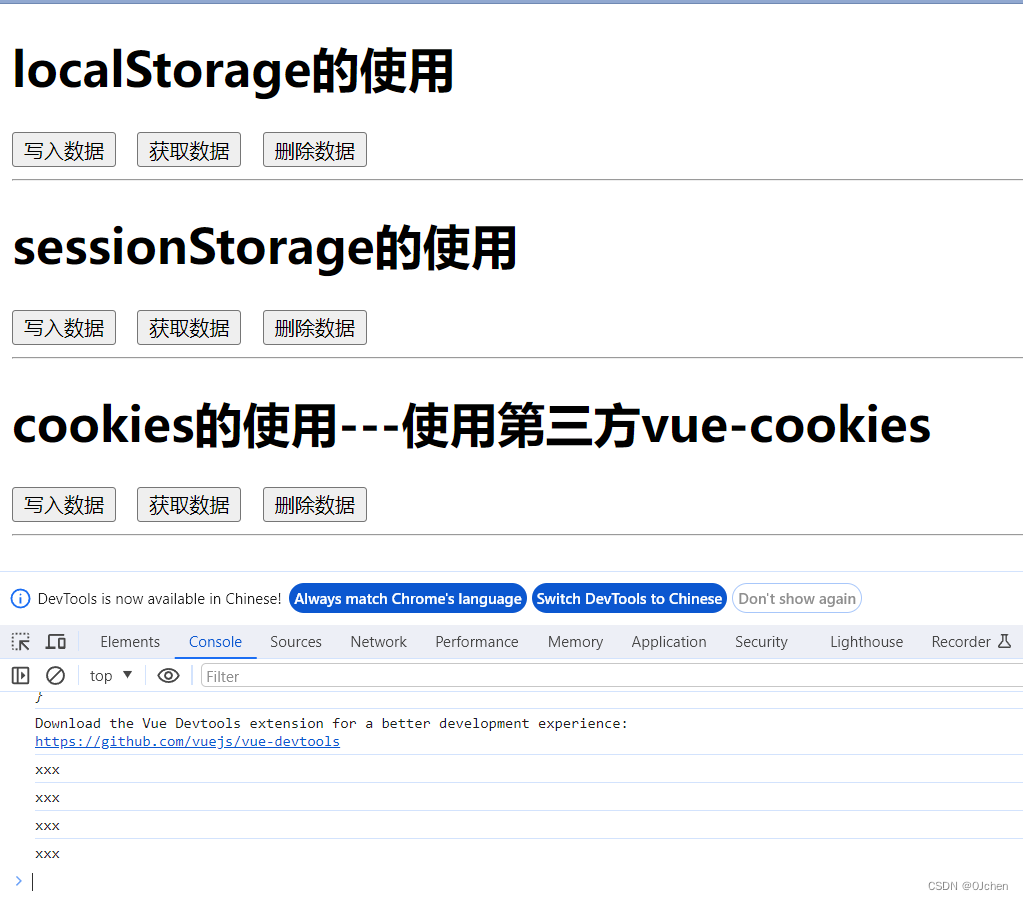
	浏览器可以存数据
		1.cookie中:有过期时间,一旦过期,就会清理掉
		2.localStorage中:永久有效,即便浏览器重启也有效,只能手动或代码删除
		3.sessionStorage中:当次有效,关闭浏览器,就清理掉了
<template>
<div>
<h1>localStorage的使用</h1>
<button @click="saveLocalStorage">写入数据</button>
<button @click="getLocalStorage">获取数据</button>
<button @click="delLocalStorage">删除数据</button>
<hr>
<h1>sessionStorage的使用</h1>
<button @click="saveSessionStorage">写入数据</button>
<button @click="getSessionStorage">获取数据</button>
<button @click="delSessionStorage">删除数据</button>
<hr>
<h1>cookies的使用---使用第三方vue-cookies</h1>
'需先安装cnpm install vue-cookies -S'
<button @click="saveCookie">写入数据</button>
<button @click="getCookie">获取数据</button>
<button @click="delCookie">删除数据</button>
<hr>
</div>
</template>
<script>
import cookie from 'vue-cookies' //cookies需要安装第三方,导入后使用
export default {
name:'IndexView',
methods:{
saveLocalStorage(){
localStorage.setItem('name','xxx')
},
getLocalStorage(){
console.log(localStorage.getItem('name'))
},
delLocalStorage(){
//localStorage.clear() //清空所有的localStorage数据
localStorage.removeItem('name') //指定清除
},
saveSessionStorage(){
sessionStorage.setItem('name','xxx')
},
getSessionStorage(){
console.log(sessionStorage.getItem('name'))
},
delSessionStorage(){
sessionStorage.removeItem('name') //同localStorage一样指定清除
},
saveCookie(){
cookie.set('name','xxx','7d') //按天算
},
getCookie(){
console.log(cookie.get('name'))
},
delCookie(){
cookie.remove('name')
},
}
}
</script>
四、路由两种工作模式
- 1 对于一个url来说,什么是hash值?—— #及其后面的内容就是hash值。
- 2 hash值不会包含在 HTTP 请求中,即:hash值不会带给服务器。
hash模式:
- 地址中永远带着#号,不美观 。192.168.1.1#login 192.168.1.1#home
- 若以后将地址通过第三方手机app分享,若app校验严格,则地址会被标记为不合法。
- 兼容性较好。
history模式:
- 地址干净,美观 。 192.168.1.1/login 192.168.1.1/home
- 兼容性和hash模式相比略差。
- 应用部署上线时需要后端人员支持,解决刷新页面服务端404的问题
