spring-boot集成mybait-plus+shareding实现分表分库,多数据源
- 1. Spring-boot集成shareding + Mybatis-plus
- 依赖引用
- yaml 配置
- 示例
- 2. 引用 dynamic实现分表+动态数据源
- 依赖引用
- yaml配置
- 数据源注入配置
- 示例
说明: 以下内容为两部分:
1、springboot+shareding+mybatis-plus 集成接入单库,进行分表查询,等操作
2、在springboot+shareding+mybatis-plus 集成接入单库,进行分表查询的基础上,增加dynamic动态数据源依赖,接入动态多数据源
即:shareding分表的数据源 1个 ,需要操作的其他数据源(不进行分表)的数据源 1个
若是集成shareding的基础上进行分表分库(即shareding分表的数据源多个),或者是多数据源的基础上,再进行多库分表分库的(即shareding分表数据源多个 + 其他不分表的动态数据源),可以跳过,暂时未研究
1. Spring-boot集成shareding + Mybatis-plus
-
依赖引用
依赖包引用尽量能用最新的就用最新的,能使用spring-boot集成过的就使用集成过的,没必要一个项目引用多版本,导致某些莫名奇妙的问题
<parent> <groupId>org.springframework.boot</groupId> <artifactId>spring-boot-starter-parent</artifactId> <version>2.3.7.RELEASE</version> </parent> <!-- spring boot版本--> <dependencyManagement> <dependencies> <dependency> <groupId>org.springframework.boot</groupId> <artifactId>spring-boot-dependencies</artifactId> <version>2.3.7.RELEASE</version> <type>pom</type> </dependency> </dependencies> </dependencyManagement> <dependency><!-- mybatis-plus依赖器 --> <groupId>com.baomidou</groupId> <artifactId>mybatis-plus-boot-starter</artifactId> <version>3.5.3.1</version> </dependency> <dependency><!-- 继承spring-boot中的版本 --> <groupId>mysql</groupId> <artifactId>mysql-connector-java</artifactId> </dependency> <dependency> <groupId>org.apache.shardingsphere</groupId> <artifactId>sharding-jdbc-spring-boot-starter</artifactId> <version>4.1.1</version> </dependency> <dependency> <groupId>com.alibaba</groupId> <artifactId>druid</artifactId> <version>1.2.16</version> </dependency> <dependency> <groupId>org.apache.shardingsphere</groupId> <artifactId>sharding-core-common</artifactId> <version>4.1.1</version> </dependency> -
yaml 配置
spring: main: allow-bean-definition-overriding: true shardingsphere: datasource: names: ds01 ds01: type: com.alibaba.druid.pool.DruidDataSource driver-class-name: com.mysql.jdbc.Driver url: jdbc:mysql://xxxxx?characterEncoding=utf8&connectTimeout=1000&socketTimeout=3000&autoReconnect=true&serverTimezone=UTC username: xxxx password: xxx props: sql: show:true sharding: tables: #分表数据表找寻规则配置 t_order: #分表策略,同分库策略 key-generator: column: user_id type: SNOWFLAKE actual-data-nodes: ds01.t_order_$->{0..19} # 指定分片策略 约定id值除20取余 table-strategy: inline: sharding-column: user_id algorithm-expression: t_order_$->{user_id % 20} #Sharding Sphere 不支持数据库健康检查,关闭actuate 的数据库健康检查即可启动不会报错 management: health: db: enabled: false #mybatis配置 mybatis-plus: mapper-locations: - classpath*:mapper/**/*.xml global-config: #主键类型 0:"数据库ID自增", 1:"用户输入ID",2:"全局唯一ID (数字类型唯一ID)", 3:"全局唯一ID UUID"; id-type: 0 #字段策略 0:"忽略判断",1:"非 NULL 判断"),2:"非空判断" field-strategy: 1 #驼峰下划线转换 db-column-underline: true #刷新mapper 调试神器 refresh-mapper: true #数据库大写下划线转换 #capital-mode: true #序列接口实现类配置 #key-generator: com.baomidou.springboot.xxx #逻辑删除配置 logic-delete-value: 1 logic-not-delete-value: 0 configuration: map-underscore-to-camel-case: true cache-enabled: false call-setters-on-nulls: true log-impl: org.apache.ibatis.logging.stdout.StdOutImpl -
示例
pom依赖引入好了之后,配置好mybatis-plus相关配置,以及mapper映射等。使用mybatis提供的generator代码生成器生成文件,手敲也行。
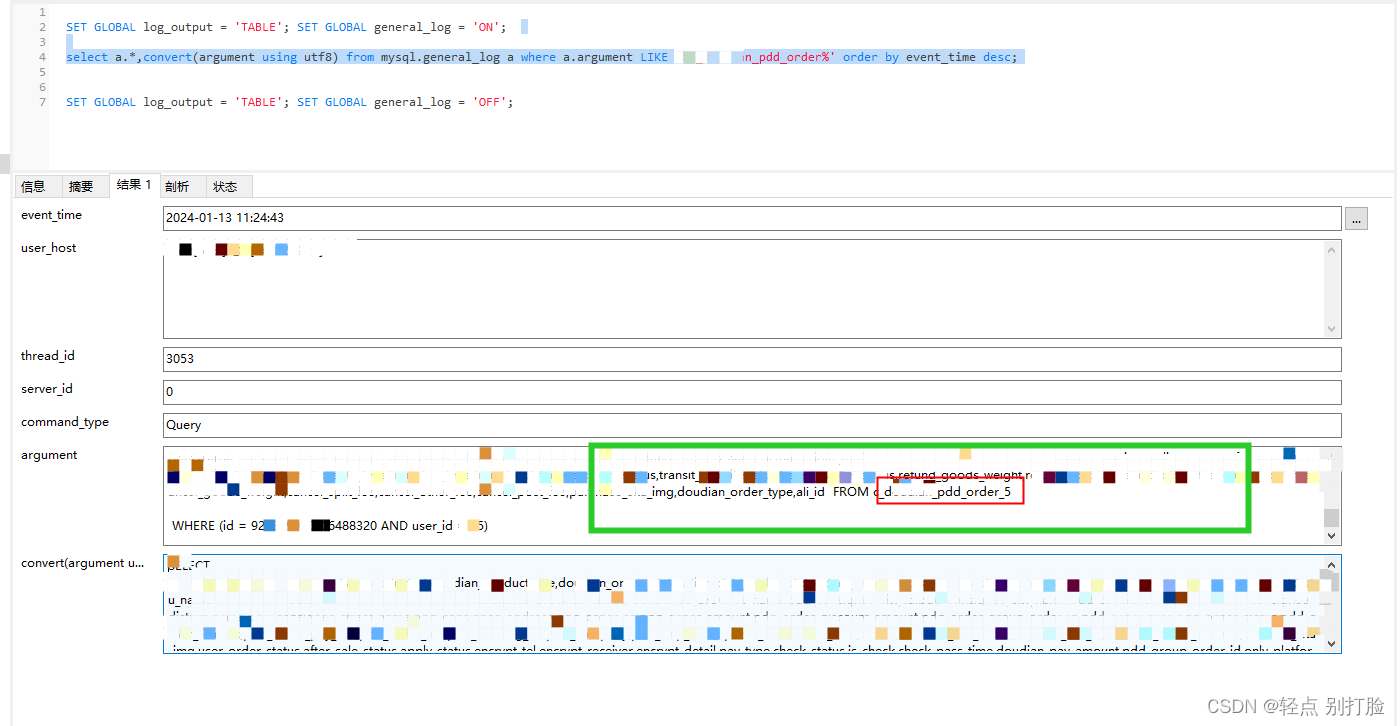
注意: @TableName中的表名与数据库保持一致即可,无需后面添加_f,否则会报错,如下图2可以看到,框架自动给我们根据分表字段,计算好的要查询的表。这里贴出查看Mysql执行记录的查询语句,大家可以自己验证
SET GLOBAL log_output = 'TABLE'; SET GLOBAL general_log = 'ON';
select a.*,convert(argument using utf8) from mysql.general_log a where a.argument LIKE '%c_doudian_pdd_order%' order by event_time desc;

SET GLOBAL log_output = 'TABLE'; SET GLOBAL general_log = 'OFF';
2. 引用 dynamic实现分表+动态数据源
-
依赖引用
在第一步的基础上,增加 dynamic-datasource-spring-boot-starter 依赖,这里引用3.6.1版本,如果是使用的3.3左右版本的,下面步骤中,会给出3.3左右版本的注入实例方式
<dependency> <groupId>com.baomidou</groupId> <artifactId>dynamic-datasource-spring-boot-starter</artifactId> <version>3.6.1</version> </dependency> -
yaml配置
在第一步配置的基础上,增加动态数据源配置即可
配置示例spring: main: allow-bean-definition-overriding: true shardingsphere: datasource: names: ds01 ds01: type: com.alibaba.druid.pool.DruidDataSource driver-class-name: com.mysql.jdbc.Driver url: jdbc:mysql://xxxxx?characterEncoding=utf8&connectTimeout=1000&socketTimeout=3000&autoReconnect=true&serverTimezone=UTC username: xxxx password: xxx props: sql: show:true sharding: tables: #分表数据表找寻规则配置 t_order: #分表策略,同分库策略 key-generator: column: user_id type: SNOWFLAKE actual-data-nodes: ds01.t_order_$->{0..19} # 指定分片策略 约定id值除20取余 table-strategy: inline: sharding-column: user_id algorithm-expression: t_order_$->{user_id % 20} datasource: dynamic: # 未分库分表的动态数据源配置 primary: ds01 #设置默认的数据源或者数据源组,默认值即为master strict: false #严格匹配数据源,默认false. true未匹配到指定数据源时抛异常,false使用默认数据源 datasource: ds02: type: com.alibaba.druid.pool.DruidDataSource driver-class-name: com.mysql.jdbc.Driver url: jdbc:mysql://xxxxxx/xx?characterEncoding=utf8&connectTimeout=1000&socketTimeout=3000&autoReconnect=true&serverTimezone=UTC username: xx password: xxxx -
数据源注入配置
以下是引用3.6.1版本的注入方式
@Configuration
@AutoConfigureBefore({DynamicDataSourceAutoConfiguration.class,
        SpringBootConfiguration.class})
public class DataSourceConfiguration {

    /**
     * 分表数据源名称
     */
    private static final String SHARDING_DATA_SOURCE_NAME = "ds01";

    /**
     * 动态数据源配置项
     */
    @Resource
    private DynamicDataSourceProperties properties;

    /**
     * shardingjdbc有四种数据源,需要根据业务注入不同的数据源
     *
     * <p>1. 未使用分片, 脱敏的名称(默认): shardingDataSource;
     * <p>2. 主从数据源: masterSlaveDataSource;
     * <p>3. 脱敏数据源:encryptDataSource;
     * <p>4. 影子数据源:shadowDataSource
     */
    @Lazy
    @Resource
    DataSource shardingDataSource;

    /**
     * 将动态数据源设置为首选的
     * 当spring存在多个数据源时, 自动注入的是首选的对象
     * 设置为主要的数据源之后,就可以支持shardingjdbc原生的配置方式了
     *
     * @return
     */
    @Primary
    @Bean
    public DataSource dataSource() {
        DynamicRoutingDataSource dataSource = new DynamicRoutingDataSource();
        dataSource.setPrimary(properties.getPrimary());
        dataSource.setStrict(properties.getStrict());
        dataSource.setStrategy(properties.getStrategy());
        dataSource.addDataSource(SHARDING_DATA_SOURCE_NAME, shardingDataSource);
        dataSource.setP6spy(properties.getP6spy());
        dataSource.setSeata(properties.getSeata());
        return dataSource;
    }
}
如果依赖引用的是 3.3.2左右的版本DataSource 注入时,变更一下即可,如下
@Configuration @AutoConfigureBefore({DynamicDataSourceAutoConfiguration.class, SpringBootConfiguration.class}) public class DataSourceConfiguration { /** * 分表数据源名称 */ private static final String SHARDING_DATA_SOURCE_NAME = "ds01"; /** * 动态数据源配置项 */ @Resource private DynamicDataSourceProperties properties; /** * shardingjdbc有四种数据源,需要根据业务注入不同的数据源 * * <p>1. 未使用分片, 脱敏的名称(默认): shardingDataSource; * <p>2. 主从数据源: masterSlaveDataSource; * <p>3. 脱敏数据源:encryptDataSource; * <p>4. 影子数据源:shadowDataSource */ @Lazy @Resource DataSource shardingDataSource; @Bean public DynamicDataSourceProvider dynamicDataSourceProvider() { final Map<String, DataSourceProperty> datasourceMap = properties.getDatasource(); return new AbstractDataSourceProvider() { @Override public Map<String, DataSource> loadDataSources() { Map<String, DataSource> dataSourceMap = createDataSourceMap(datasourceMap); // 将 shardingjdbc 管理的数据源也交给动态数据源管理 dataSourceMap.put(SHARDING_DATA_SOURCE_NAME, shardingDataSource); return dataSourceMap; } }; } /** * 将动态数据源设置为首选的 * 当spring存在多个数据源时, 自动注入的是首选的对象 * 设置为主要的数据源之后,就可以支持shardingjdbc原生的配置方式了 * * @return */ @Primary @Bean public DataSource dataSource() { DynamicRoutingDataSource dataSource = new DynamicRoutingDataSource(); dataSource.setPrimary(properties.getPrimary()); dataSource.setStrict(properties.getStrict()); dataSource.setStrategy(properties.getStrategy()); dataSource.setProvider(dynamicDataSourceProvider); dataSource.setP6spy(properties.getP6spy()); dataSource.setSeata(properties.getSeata()); return dataSource; } } -
示例
按照以上配置,配置完成既可,在所需要的服务层上加上@DS注解,指定访问副数据源,未指定则会访问默认的主数据源,主数据源具体是哪个,在yaml配置中dynamic.primary属性指定主数据源即可

