任务描述
知识点:
- 天气数据进行ETL
重 点:
- 掌握MapReduce程序的运行流程
- 熟练编写MapReduce程序
- 使用MapReduce进行ETL
内 容:
- 编写MapReduce程序
- 编写Shell脚本,获取MapReduce程序的inputPath
- 将生成的inputPath文件传入到Windows环境
- 运行MapReduce程序对天气数据进行ETL处理
任务指导
1. 准备2000-2022年气象数据
(如在任务12中,按照手册已自行处理好2000-2022年的所有气象数据,也可跳过此步骤,使用自己处理好的数据文件即可,但需要在后续步骤中注意数据路径的问题)
先前按照任务12处理了2021-2022年数据,在后续气象预测部分任务需要2000-2022年的数据作为支持,所以现将处理后的(解压后)2000年-2022年的气象数据进行提供,可通过下述的URL下载地址进行下载
数据集路径:
格式:url/dataSet/systemLib/b3084be184684ee18f3b00b048bab0cc.zip,url参见实验窗口右侧菜单“实验资源下载”。
例如:https://staticfile.eec-cn.com/dataSet/systemLib/b3084be184684ee18f3b00b048bab0cc.zip
- 在master机器的/home路径下载数据集
- 解压数据集
- 在/home/china_data目录中包含了2000-2022年,22年间的中国各个基站的气象数据
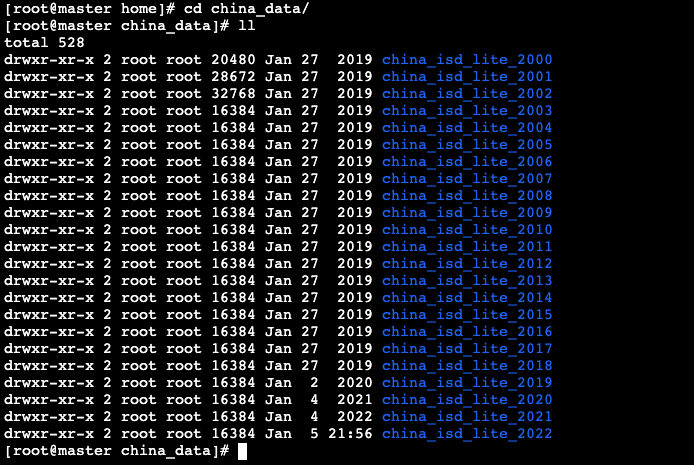
- 在每个文件夹下均已将气象数据文件解压完成

使用MapReduce对天气数据进行预处理,并在数据文件中添加对应基站ID,并将原来字段间的分隔符改为使用逗号分隔,以便于大Hive中使用该数据集。
2. 使用MapReduce对数据进行ETL
当前在数据集中不包含基站编号字段,每个基站的编号体现在各个文件名的前5位,例如在“450010-99999-2000”文件中包含的是编号为“45001”的基站数据,所以需要将各个基站的编号添加到对应的数据文件中,并且在各个文件中每个字段之间的分隔符也是不一致的,所以也需要对数据进行清理,由于数据量较大,可以考虑使用MapReduce进行数据清理的工作。
- 创建Maven项目:china_etl
- 编写MapReduce程序
- ChinaMapper:读取数据,对数据添加stn(基站ID)字段,并进行格式化处理
- ChinaReducer:对处理后的数据进行输出
- ChinaDriver:MapReduce程序的驱动类
- 在master机器编写Shell脚本获取MapReduce程序的inputPath
- 将生成的inputPath文件传入到Windows环境
- 在Windows运行MapReduce程序
- 程序运行完成,进入master机器查看结果

- 数据格式说明:
| 基站编号 | 年 | 月 | 日 | 时间 | 温度 | 露点温度 | 气压 | 风向 | 风速 | 云量 | 1小时雨量 | 6小时雨量 |
|---|---|---|---|---|---|---|---|---|---|---|---|---|
| 59997 | 2022 | 12 | 31 | 21 | 274 | 250 | 10133 | 70 | 20 | 5 | -9999 | -9999 |
任务实现
1. 准备2000-2022年气象数据
(如在任务12中,按照手册已自行处理好2000-2022年的所有气象数据,也可跳过此步骤,使用自己处理好的数据文件即可,但需要在后续步骤中注意数据路径的问题)
先前按照任务12处理了2021-2022年数据,在后续气象预测部分任务需要2000-2022年的数据作为支持,所以现将处理后的(解压后)2000年-2022年的气象数据进行提供,可通过下述的URL下载地址进行下载
数据集路径:
格式:url/dataSet/systemLib/b3084be184684ee18f3b00b048bab0cc.zip,url参见实验窗口右侧菜单“实验资源下载”。
例如:https://staticfile.eec-cn.com/dataSet/systemLib/b3084be184684ee18f3b00b048bab0cc.zip
- 在master机器的/home路径下载数据集
# cd /home
# wget https://staticfile.eec-cn.com/dataSet/systemLib/b3084be184684ee18f3b00b048bab0cc.zip- 解压数据集
# unzip /home/b3084be184684ee18f3b00b048bab0cc.zip- 在/home/china_data目录中包含了2000-2022年,22年间的中国各个基站的气象数据

- 在每个文件夹下均已将气象数据文件解压完成

- 将下载后的数据集上传至HDFS中
- 将2000-2022年的所有气象数据上传至HDFS的/china目录中
# hadoop fs -mkdir /china
# hadoop fs -put /home/china_data/* /china
天气的格式如下:
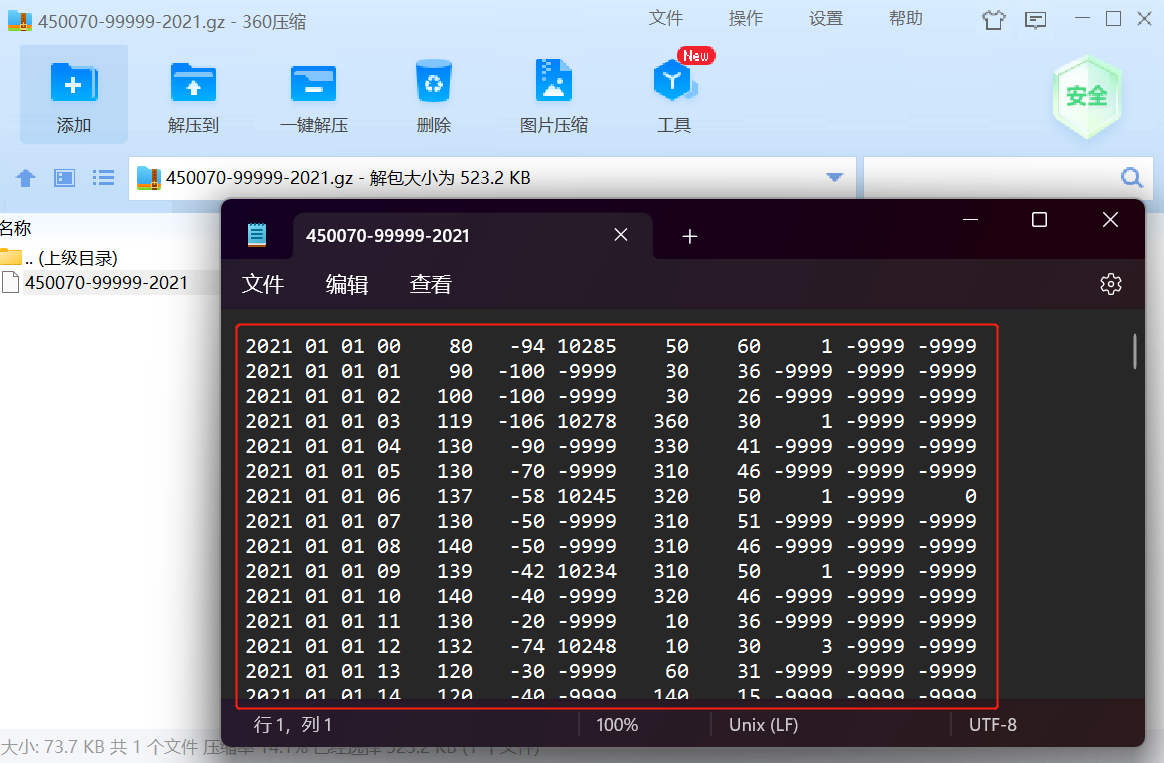
NCDC天气的格式说明:
气象要素包括:气温、气压、露点、风向风速、云量、降水量等。
- 例如:

- 各字段的含义如下:
| 年 | 月 | 日 | 时间 | 温度 | 露点温度 | 气压 | 风向 | 风速 | 云量 | 1小时雨量 | 6小时雨量 |
|---|---|---|---|---|---|---|---|---|---|---|---|
| 2021 | 01 | 01 | 00 | 80 | -94 | 10285 | 50 | 60 | 1 | -9999 | -9999 |
当前在数据集中不包含基站编号字段,每个基站的编号体现在各个文件名的前5位,例如在“450010-99999-2000”文件中包含的是编号为“45001”的基站数据,所以需要将各个基站的编号添加到对应的数据文件中,并且在各个文件中每个字段之间的分隔符也是不一致的,所以也需要对数据进行清理,由于数据量较大,可以考虑使用MapReduce进行数据清理的工作。
2. 使用MapReduce对数据进行ETL
使用MapReduce对天气数据进行ETL流程如下:
- 打开IDEA,如先前创建过项目,需点击File --> Close Project返回IDEA初始界面

- 点击New Project新建项目

- 创建Maven项目:china_etl
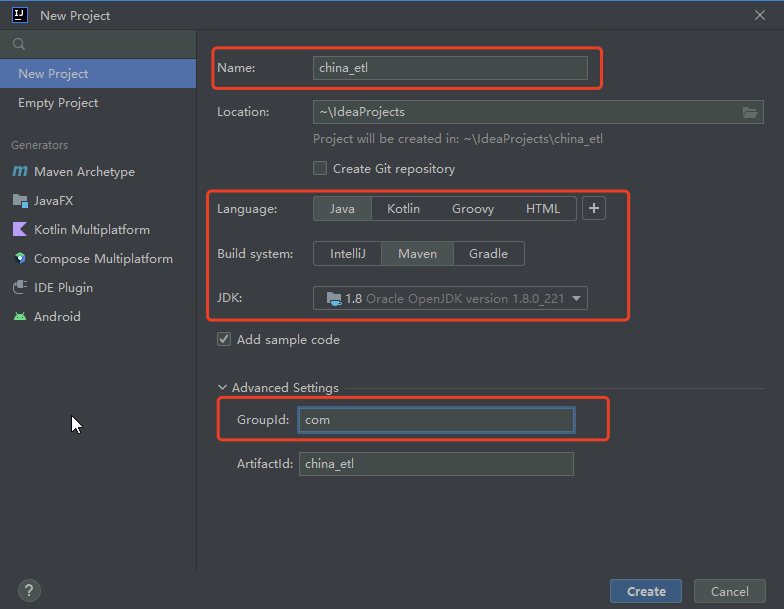
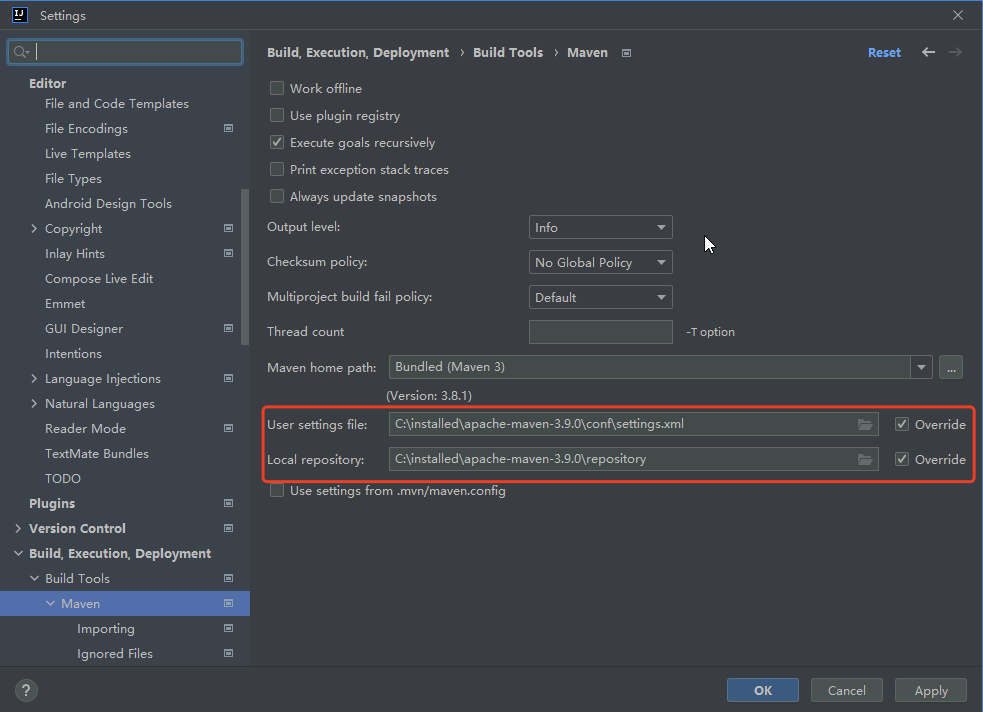
- 打开File --> Settings,按照之前的方式配置Maven
- 修改pom.xml文件,在标识位置填写<dependencies>标签中的内容,下载项目所需依赖
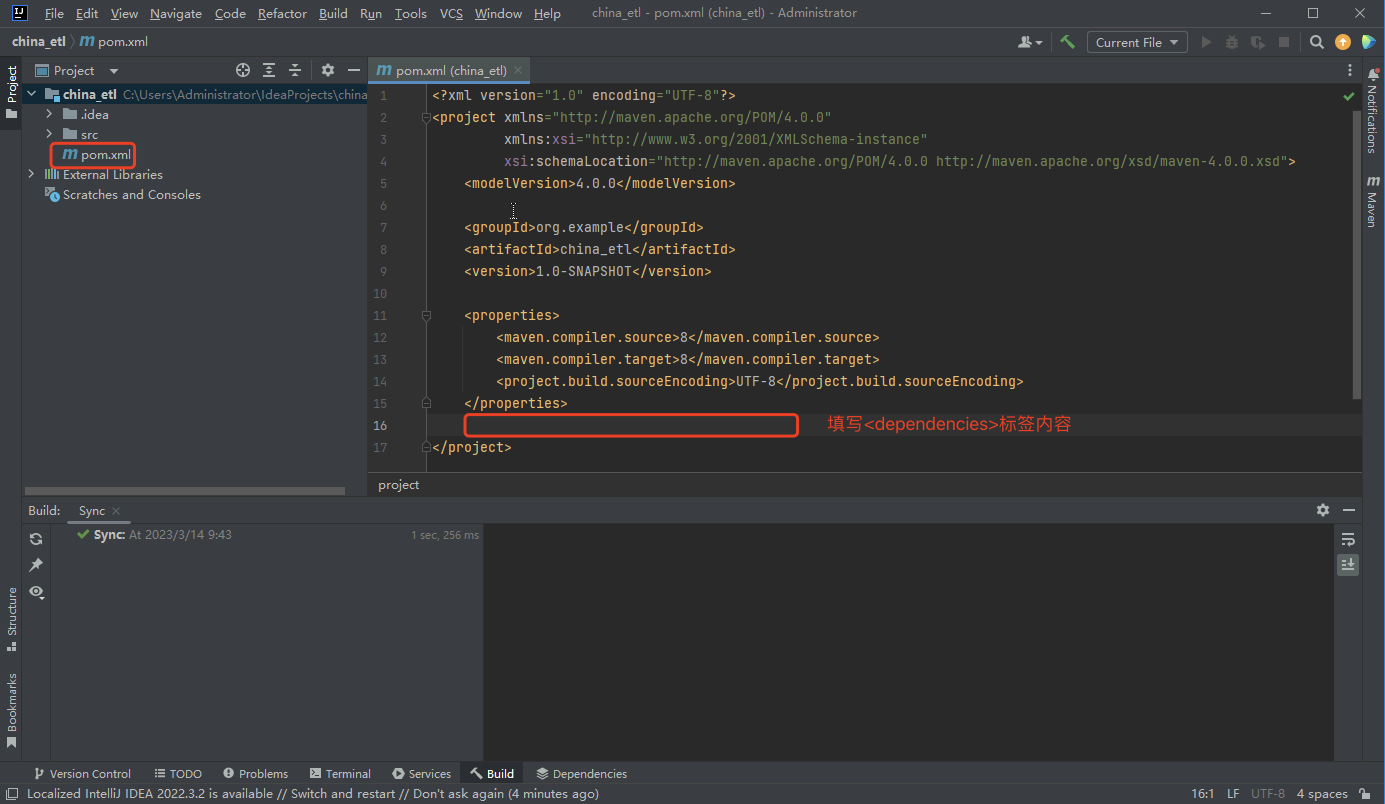
- <dependencies>标签内容如下:
<dependencies>
	<dependency>
	<groupId>org.apache.hadoop</groupId>
	<artifactId>hadoop-client</artifactId>
	<version>2.9.2</version>
	</dependency>
</dependencies>- 依赖下载完成后,将默认生成在src/main/java/com的Main类删除

- 在src/main/java/com包下创建Mapper类:ChinaMapper.java
本次MapReduce任务的主要处理逻辑在Map函数中,在Map中获取当前正在处理的文件信息,通过文件信息获取相应的文件名,然后获取到文件名的前五位,前五位则是每个基站对应的基站编号,然后获取到数据文件中的每条数据并进行分割,分割后根据索引获取所需的数据,最后通过","对数据进行分隔,作为每个字段数据的新分隔符,根据所需重新将数据进行拼接
package com;

import org.apache.hadoop.io.LongWritable;
import org.apache.hadoop.io.NullWritable;
import org.apache.hadoop.io.Text;
import org.apache.hadoop.mapred.FileSplit;
import org.apache.hadoop.mapreduce.InputSplit;
import org.apache.hadoop.mapreduce.Mapper;

import java.io.IOException;

public class ChinaMapper extends Mapper<LongWritable, Text,Text, NullWritable> {
    @Override
    protected void map(LongWritable key, Text value, Context context) throws IOException, InterruptedException {
//         获取当前map正在处理的文件信息
        InputSplit inputSplit = (InputSplit) context.getInputSplit();
//         获取文件名,例如:当前获取到“450010-99999-2000”
        String fileName = inputSplit.toString().split("/")[5];
        NullWritable val = NullWritable.get();
//        取出基站编号,例如:“45001”
        String stn = fileName.substring(0,5);
//     System.out.println(stn);

/**     获取所需字段
        year=[]   #年
        month=[]  #月
        day=[]    #日
        hour=[]   #时间
        temp=[]   #温度
        dew_point_temp=[]  #露点温度
        pressure=[]        #气压
        wind_direction=[]   #风向
        wind_speed=[]       #风速
        clouds=[]          #云量
        precipitation_1=[]   #1小时降水量
        precipitation_6=[]   #6小时降水量
*/
//     获取输入的每一条数据
        String values = value.toString();
//     通过分隔符进行分割
        String[] lines = values.split("\\s+");
        String year = lines[0];
        String month = lines[1];
        String day = lines[2];
        String hour = lines[3];
        String temp = lines[4];
        String dew_point_temp = lines[5];
        String pressure = lines[6];
        String wind_direction = lines[7];
        String wind_speed = lines[8];
        String cloud=lines[9];
        String precipitation_1 = lines[10];
        String precipitation_6 = lines[11];
//     使用“,”对每条数据进行拼接,每条数据的分隔符设置为","
        String line = stn+","+year+","+month+","+day+","+hour+","+temp+","+dew_point_temp
                +","+pressure+","+wind_direction+","+wind_speed+","+cloud+","+precipitation_1+","+precipitation_6;
        System.out.println(line);
//     每条数据作为key进行输出
        context.write(new Text(line),val);
    }
}- 在src/main/java/com包下创建Reducer类:ChinaReducer.java
package com;

import org.apache.hadoop.io.NullWritable;
import org.apache.hadoop.io.Text;
import org.apache.hadoop.mapreduce.Reducer;

import java.io.IOException;

public class ChinaReducer extends Reducer<Text,NullWritable,Text,NullWritable> {
    @Override
    protected void reduce(Text key, Iterable<NullWritable> values, Context context) throws IOException, InterruptedException {
        NullWritable val = NullWritable.get();
        // 获取key
        Text outLine = key;
        context.write(outLine,val);
    }
}- 在src/main/java/com包下创建Driver类: ChinaDriver.java
package com;

import org.apache.hadoop.conf.Configuration;
import org.apache.hadoop.fs.Path;
import org.apache.hadoop.io.NullWritable;
import org.apache.hadoop.io.Text;
import org.apache.hadoop.mapreduce.Job;
import org.apache.hadoop.mapreduce.lib.input.FileInputFormat;
import org.apache.hadoop.mapreduce.lib.output.FileOutputFormat;

import java.io.BufferedReader;
import java.io.FileReader;
import java.io.IOException;
import java.util.ArrayList;

public class ChinaDriver {
    public static void main(String[] args) {
        Configuration conf = new Configuration();
        Job job = null;

        try {
            // 读取filename文件内容获取inputpath
            BufferedReader br = new BufferedReader(new FileReader("C:\\installed\\filename.txt"));
            String line = null;
            ArrayList list = new ArrayList();
            while((line=br.readLine())!=null){
                list.add(line);
            }
            Path[] inputPath = new Path[list.size()];
            for(int i = 0;i< inputPath.length;i++){
                inputPath[i] = new Path(list.get(i).toString());
                System.out.println(inputPath[i]);
            }

            job = Job.getInstance(conf);

            job.setJarByClass(ChinaDriver.class);
            job.setJobName("ChinaDriver");
//         设置Mapper类
            job.setMapperClass(ChinaMapper.class);
//         设置Reducer类
            job.setReducerClass(ChinaReducer.class);
            job.setMapOutputKeyClass(Text.class);
            job.setMapOutputValueClass(NullWritable.class);

            job.setOutputKeyClass(Text.class);
            job.setOutputValueClass(NullWritable.class);
//         设置输入路径
            FileInputFormat.setInputPaths(job, inputPath);
//         设置输出路径
            FileOutputFormat.setOutputPath(job, new Path("hdfs://master:9000/china_all/"));
            System.exit(job.waitForCompletion(true) ? 0 : 1);
        } catch (IOException e) {
            e.printStackTrace();
        } catch (ClassNotFoundException e) {
            e.printStackTrace();
        } catch (InterruptedException e) {
            e.printStackTrace();
        }
    }
}- 编写完成后,进入master机器
由于本次MapRedcue任务需要处理2000-2022年的数据,每个年份的数据都保存在一个以年份命名的文件夹下,所以MapReduce需要读取22个文件夹下的所有数据,因此在运行MapReduce程序前,需要编写一个Shell脚本以生成MapReduce的inputPath文件,在该文件中包含所有需要处理的数据路径(该操作类似任务12中的generate_input_list.sh脚本)
- 在master机器的/home/shell目录下,编写getHDFSfile.sh脚本,以生成MapReduce的inputPath文件
# vim /home/shell/getHDFSfile.sh- 脚本内容如下:
#/bin/bash
rm -rf /home/filename.txt
# file = echo `hdfs dfs -ls /china | awk -F ' ' '{print $8}'`
for line in `hdfs dfs -ls /china | awk -F ' ' '{print $8}'`
do
	filename="hdfs://master:9000$line"
	echo -e "$filename" >> /home/filename.txt
done- 为Shell脚本赋予执行权限
# chmod u+x /home/shell/getHDFSfile.sh- 运行Shell脚本,生成inputPath
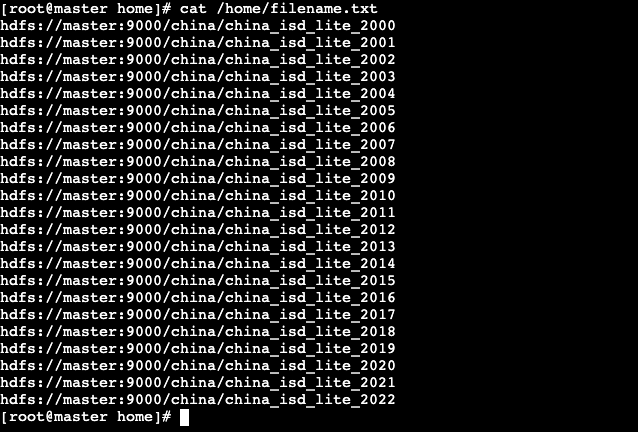
# /home/shell/getHDFSfile.sh- 脚本运行完成,在/home目录下会生成一个filename.txt文件,在文件中包含所有需要处理的路径信息
- 查看/home/filename.txt文件
# cat /home/filename.txt 
- filename.txt文件生成后,将其通过filezilla工具传入到Windows环境的C:\installed目录
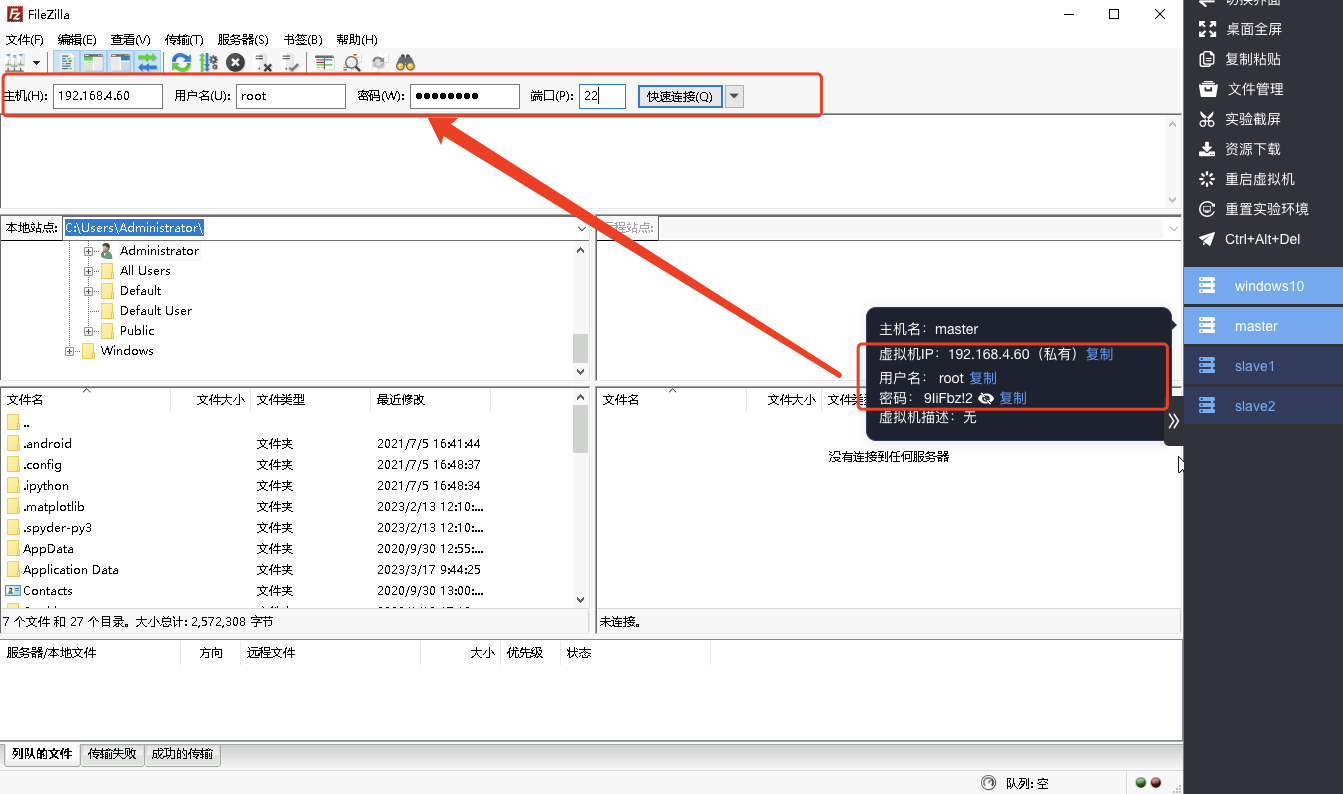
- 进入Windows环境,打开filezilla工具,filezilla需要配置master的主机名(IP地址)、用户名、密码以及端口;
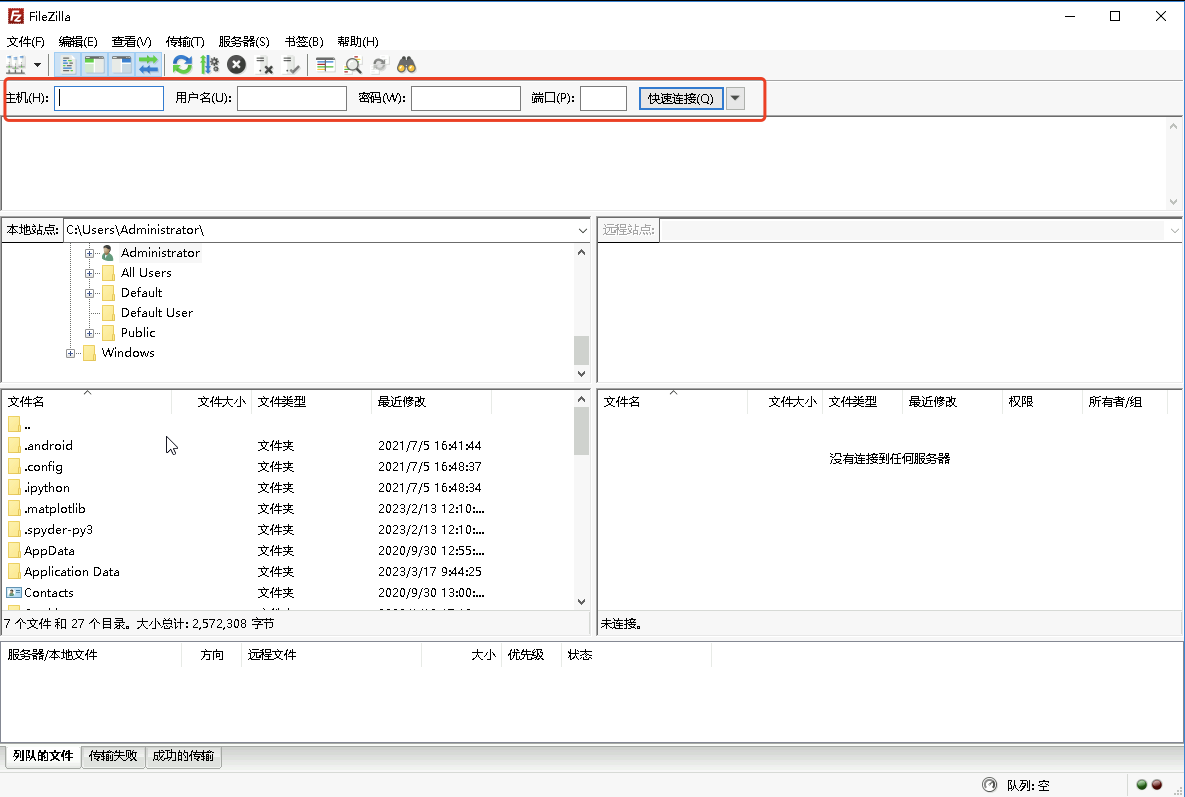
- 可通过右侧工具栏,获取master机器的相关信息并将其进行填入
- 配置完成后,点击快速连接master机器
- 在左侧拦中是本地Windows环境的文件管理器,右侧是连接的远程Linux(master)机器文件管理器
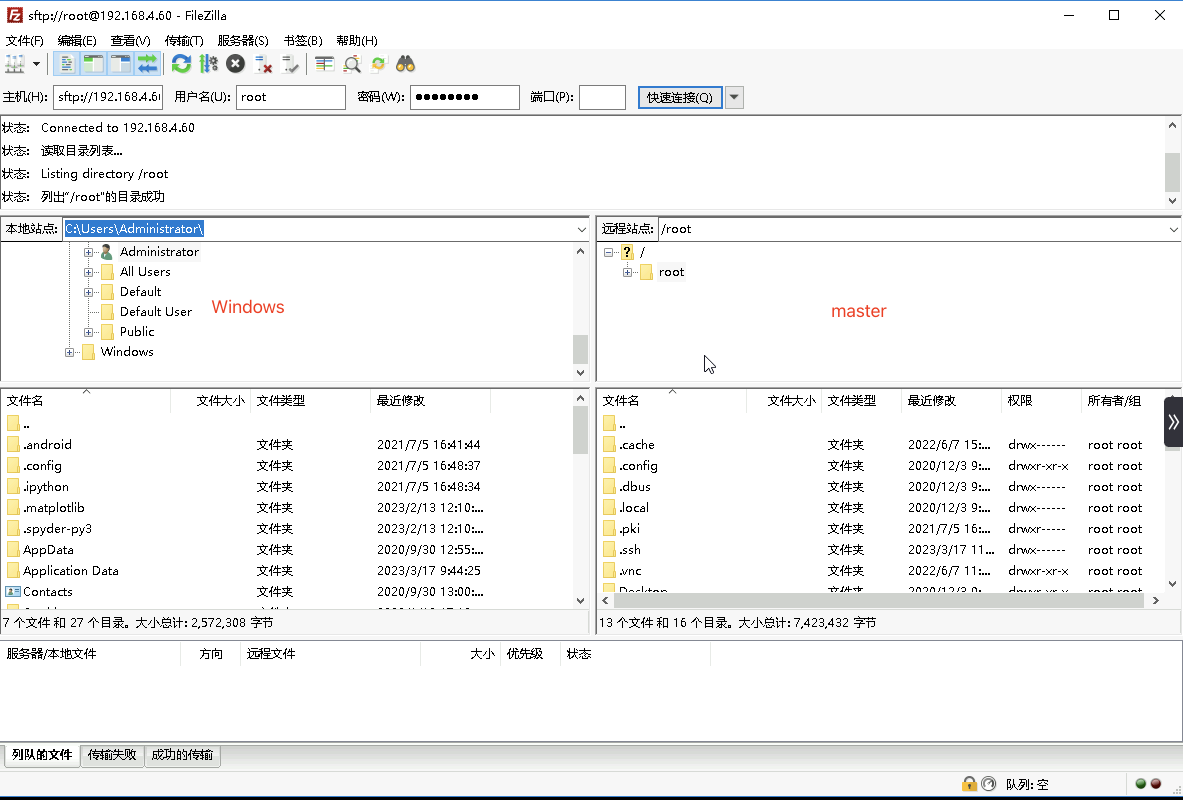
- 在Windows文件管理器,进入C:\installed目录,在右侧master机器中进入/home目录,找到生成的filename.txt文件,将其从master机器中拖拽到Windows机器

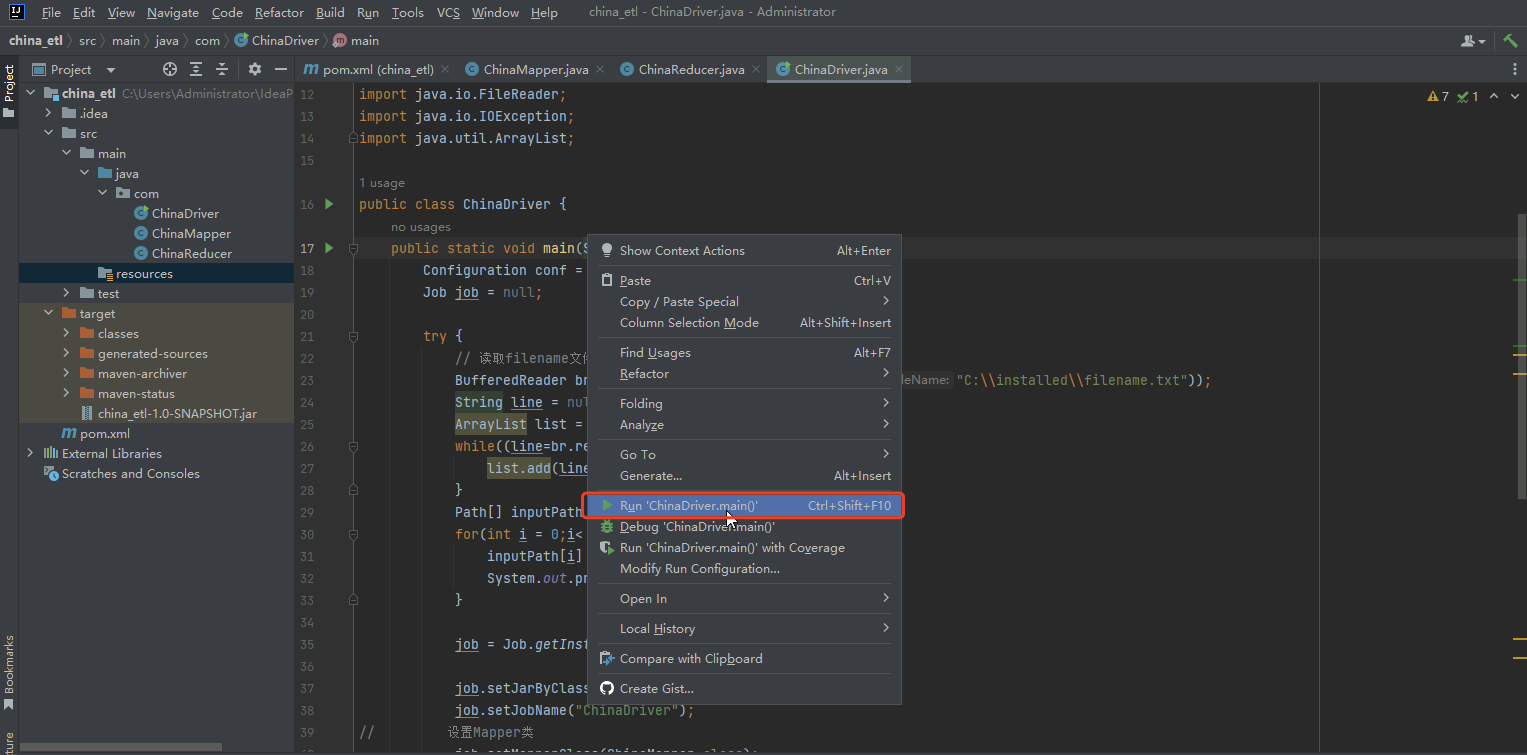
- 右键ChinaDriver,点击Run 'ChinaDriver.main()'运行MapReduce程序
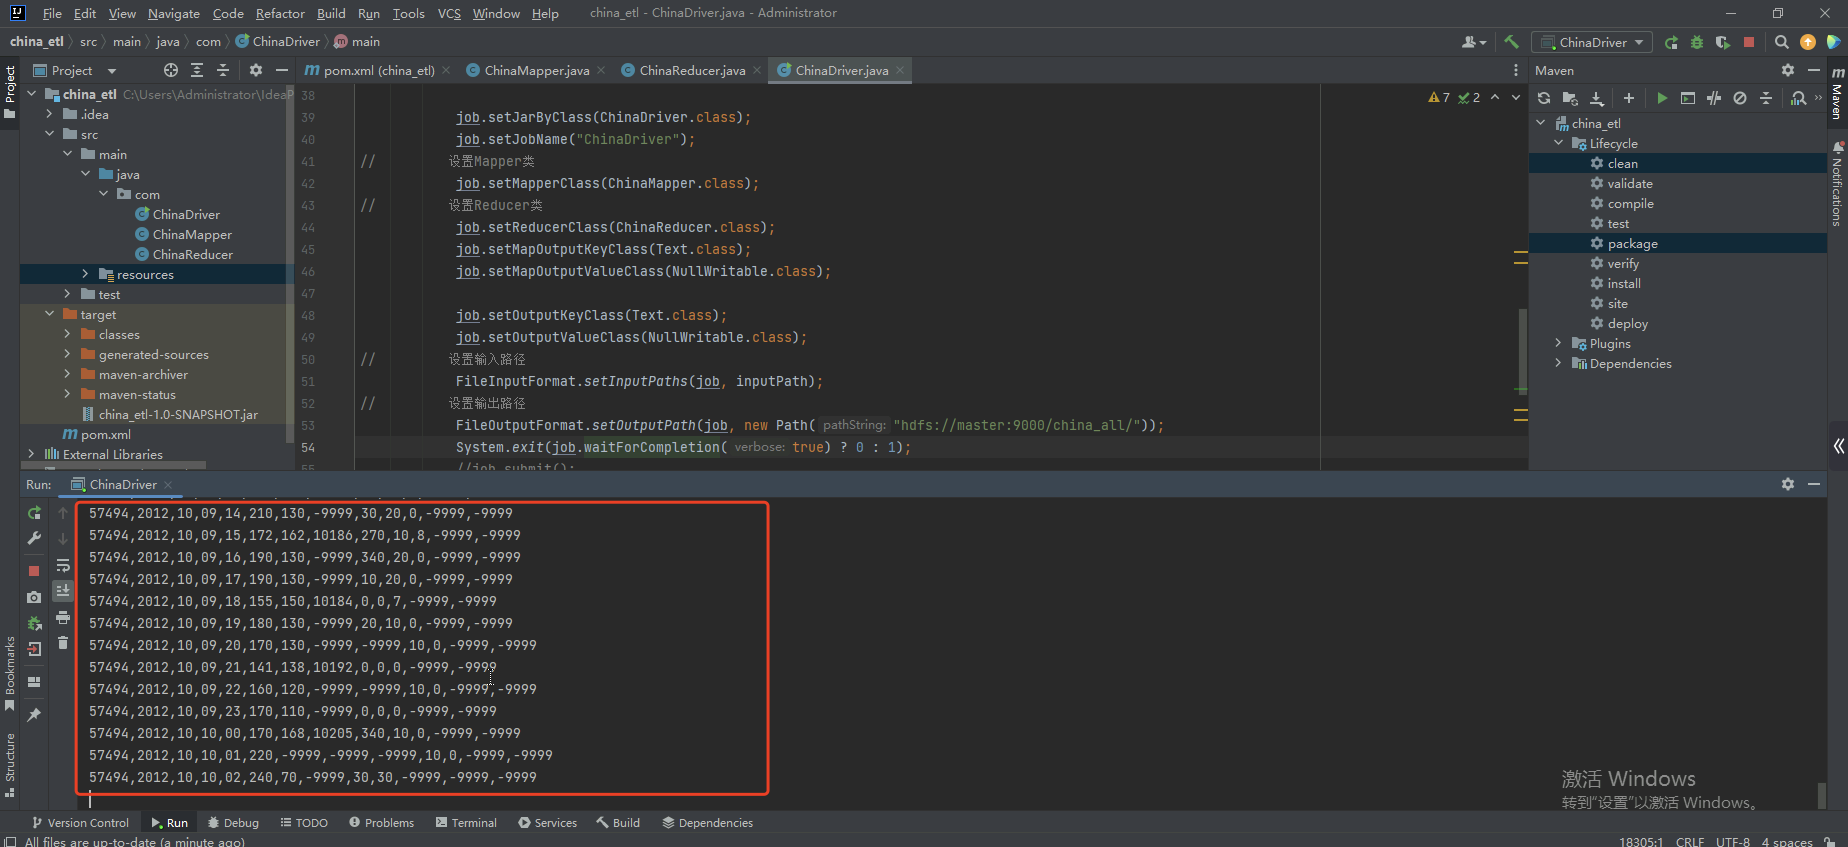
- 控制台显示数据
进入master机器,查看运行结果最后5行数据:
# hadoop fs -cat /china_all/* | tail -5
数据格式说明:
| 基站编号 | 年 | 月 | 日 | 时间 | 温度 | 露点温度 | 气压 | 风向 | 风速 | 云量 | 1小时雨量 | 6小时雨量 |
|---|---|---|---|---|---|---|---|---|---|---|---|---|
| 59997 | 2022 | 12 | 31 | 21 | 274 | 250 | 10133 | 70 | 20 | 5 | -9999 | -9999 |
上一个任务下一个任务


