神经网络学习小记录77——深入浅出Self-Attention自注意力机制与Transformer模块
- 学习前言
- 代码下载
- Self-Attention自注意力机制详解
- 一、Self-attention结构解析
- 二、Self-attention的矩阵运算
- 三、Multi-Head多头注意力机制
- TransformerBlock的构建
- 一、视觉部分的TransformerBlock(VisionTransformer)
- 1、自注意力机制
- 2、TransformerBlock
- 二、文本部分的TransformerBlock(Bert encoder)
- 1、自注意力机制
- 2、TransformerBlock
- 三、文本部分的TransformerBlock(Transformer Decoder)
- 1、自注意力机制
- 2、TransformerBlock
学习前言
Self-Attention自注意力机制是Transformer模块的重要组成部分,是截至到现在(2024年1月6日)大大小小网络的标配,无论是LLM还是StableDiffusion,内部都有Self-Attention与Transformer,因此,一起来学学哈哈。

代码下载
Github源码下载地址为:
https://github.com/bubbliiiing/blip-pytorch
复制该路径到地址栏跳转。
Self-Attention自注意力机制详解
一、Self-attention结构解析
看懂Self-attention结构,其实看懂下面这一系列图就可以了,首先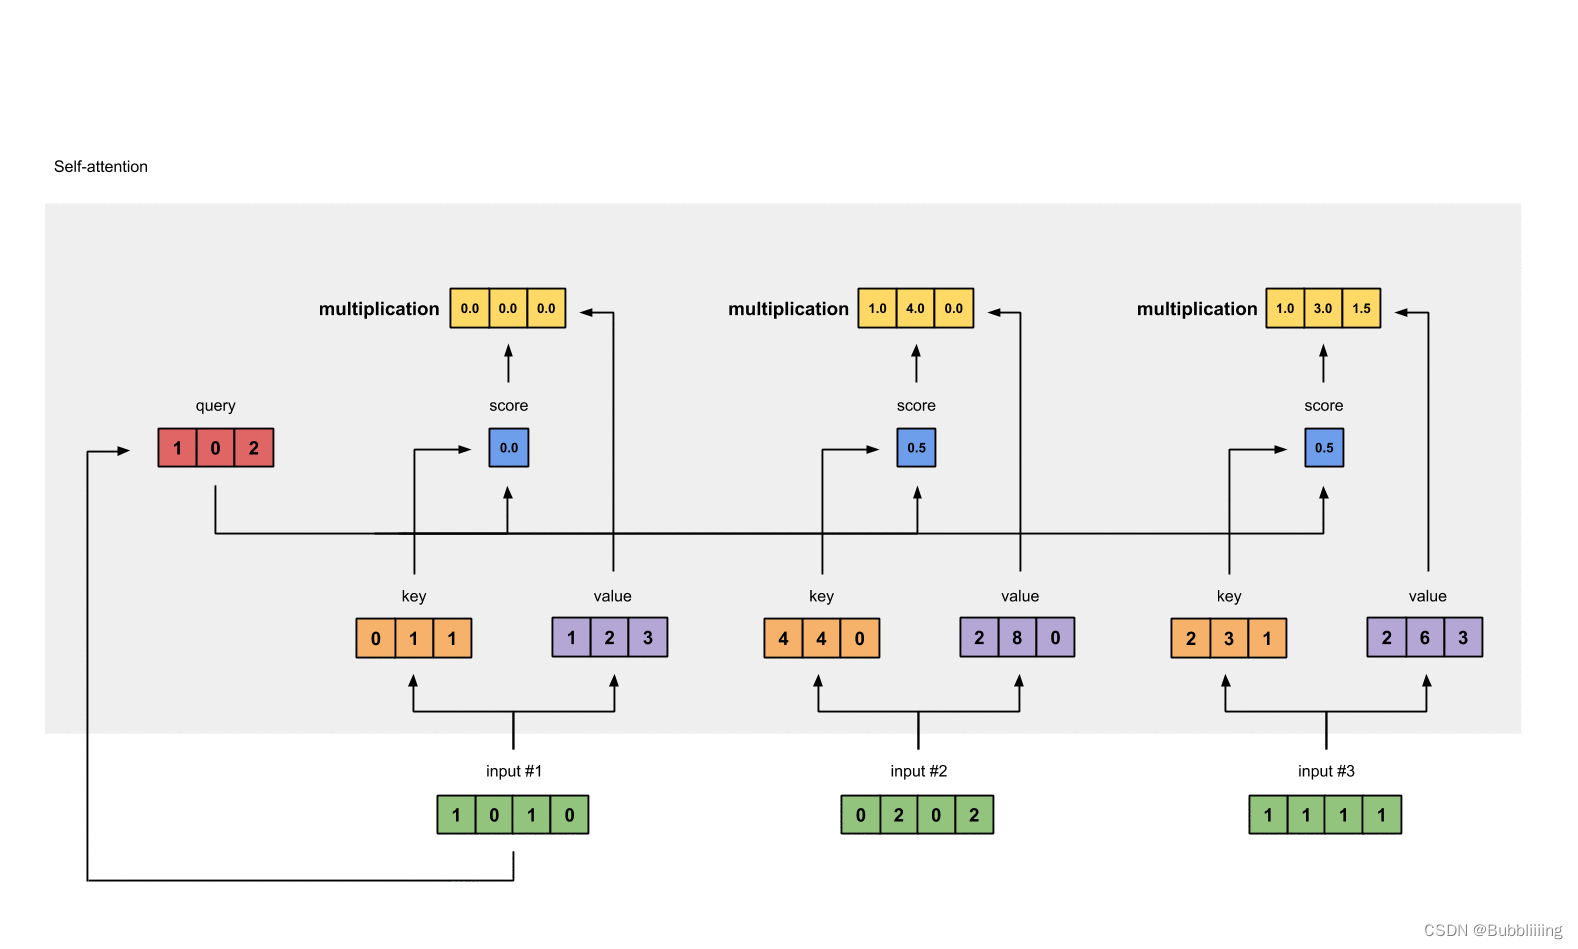
存在一个序列的三个单位的输入,
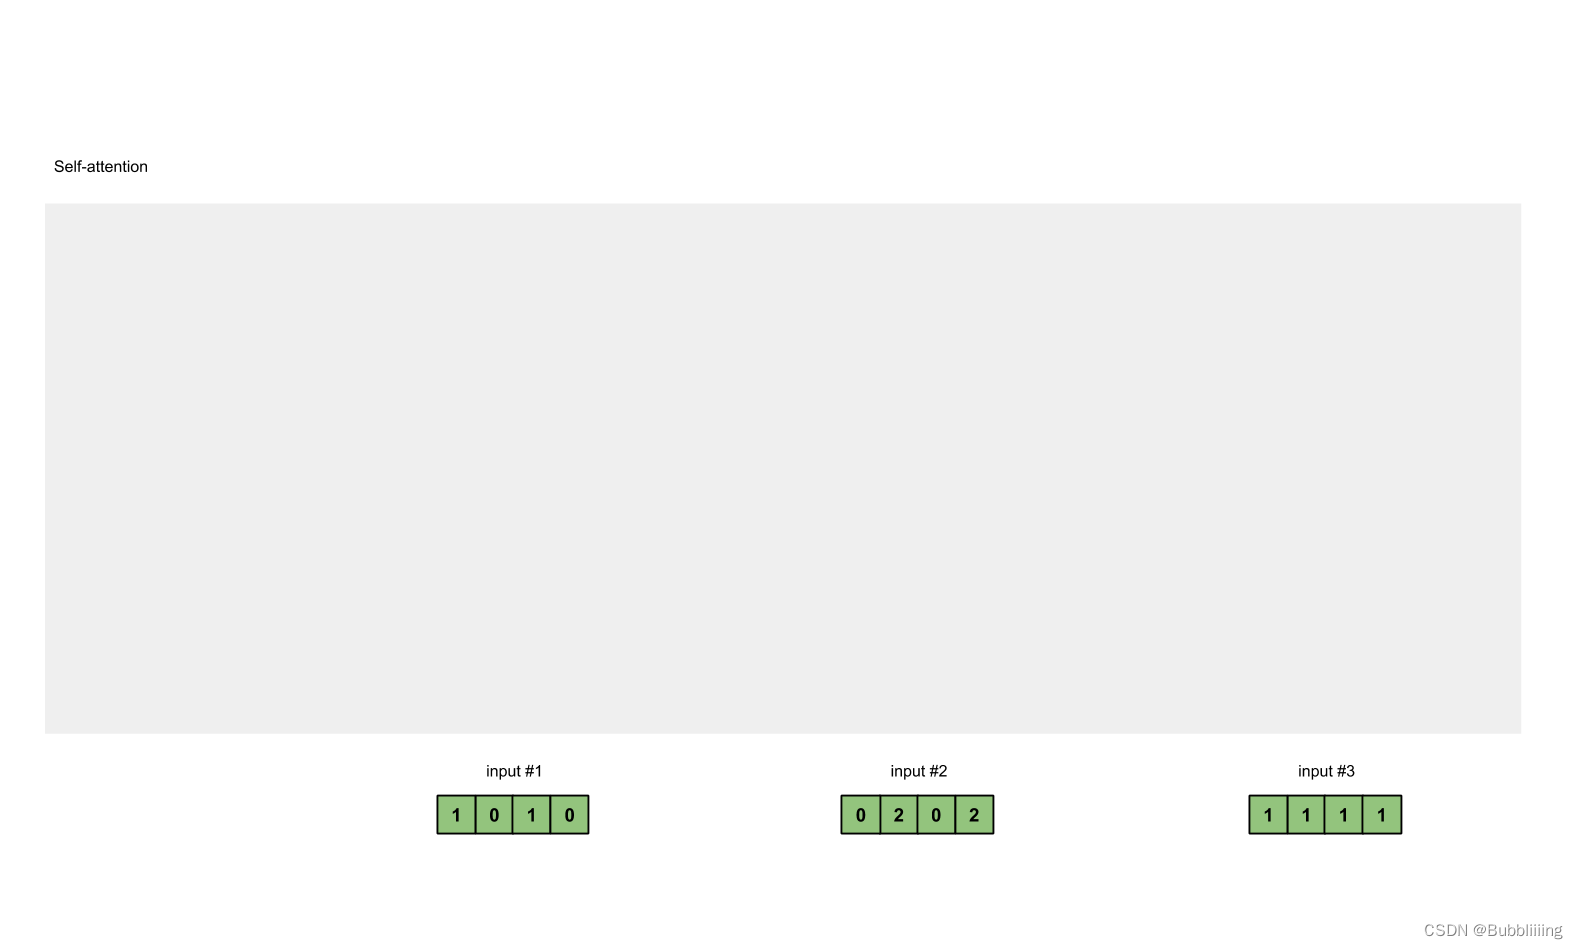
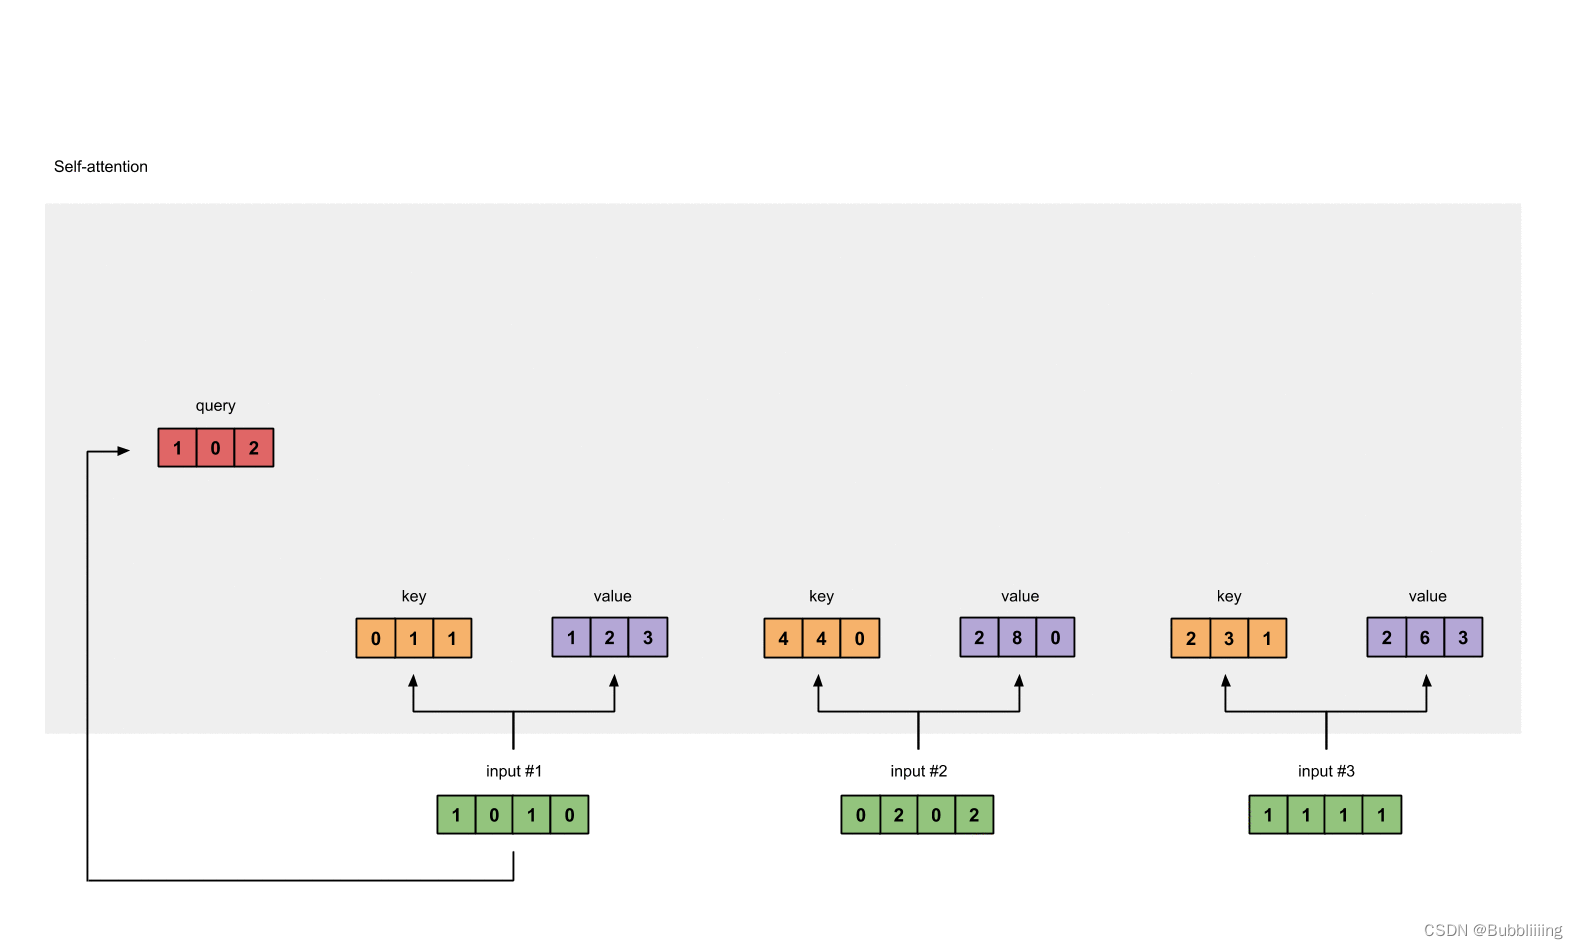
每一个序列单位的输入都可以通过三个处理(比如全连接)获得Query、Key、Value,Query是查询向量、Key是键向量、Value值向量。
如果我们想要获得input-1的输出,那么我们进行如下几步:
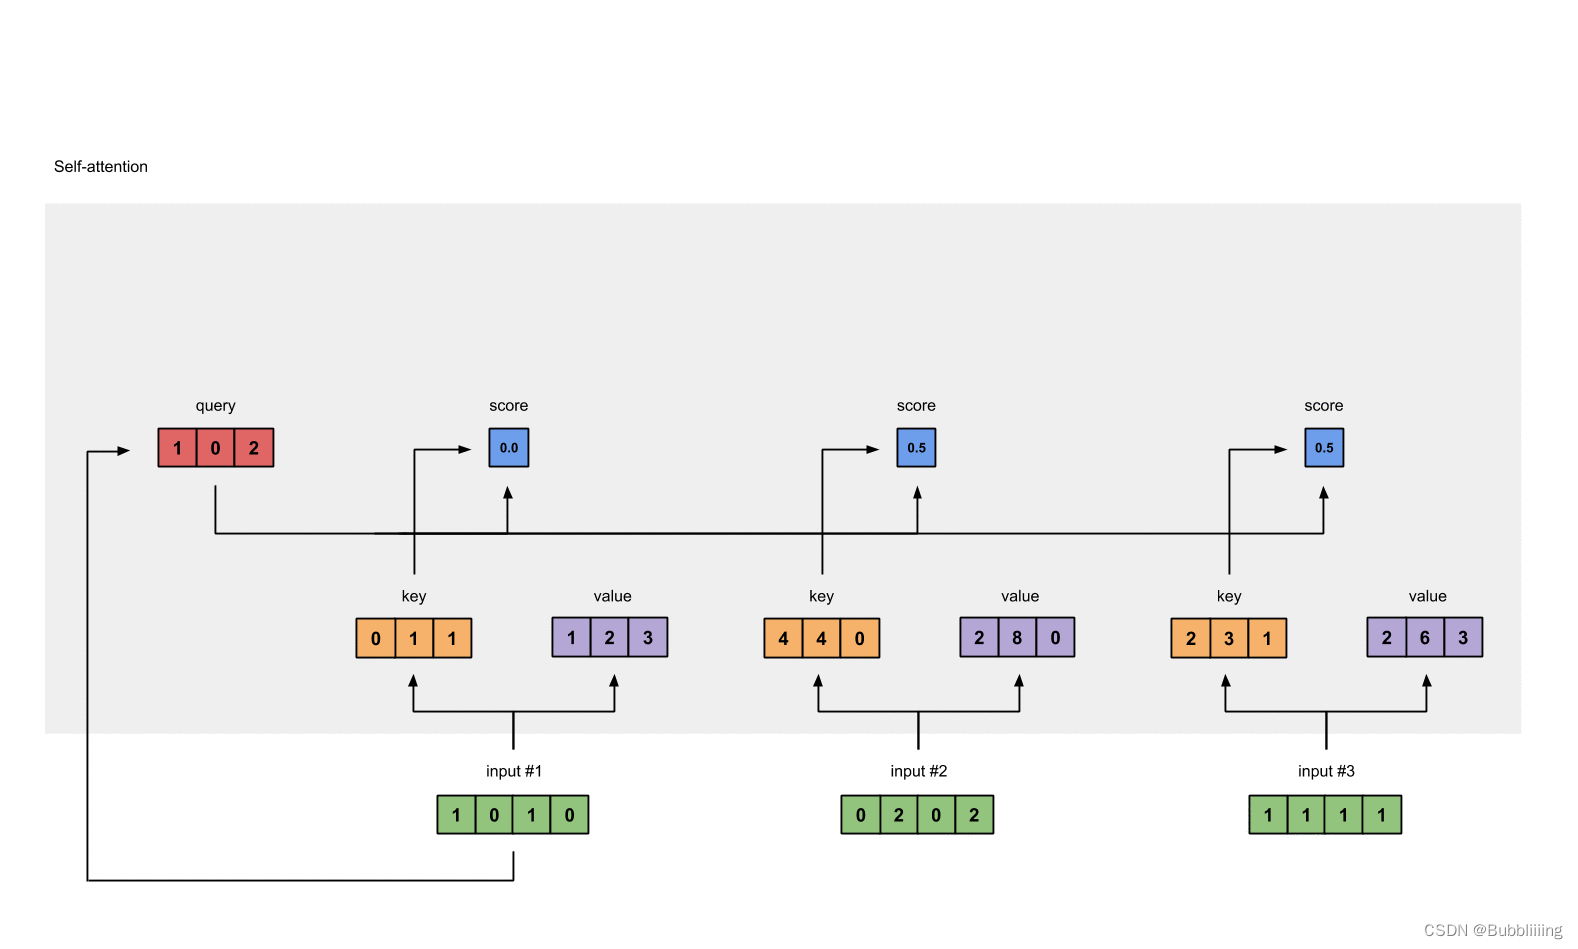
1、利用input-1的查询向量,分别乘上input-1、input-2、input-3的键向量,此时我们获得了三个score。
2、然后对这三个score取softmax,获得了input-1、input-2、input-3各自的重要程度。
3、然后将这个重要程度乘上input-1、input-2、input-3的值向量,求和。
4、此时我们获得了input-1的输出。
如图所示,我们进行如下几步:
1、input-1的查询向量为[1, 0, 2],分别乘上input-1、input-2、input-3的键向量,获得三个score为2,4,4。
2、然后对这三个score取softmax,获得了input-1、input-2、input-3各自的重要程度,获得三个重要程度为0.0,0.5,0.5。
3、然后将这个重要程度乘上input-1、input-2、input-3的值向量,求和,即
0.0
∗
[
1
,
2
,
3
]
+
0.5
∗
[
2
,
8
,
0
]
+
0.5
∗
[
2
,
6
,
3
]
=
[
2.0
,
7.0
,
1.5
]
0.0 * [1, 2, 3] + 0.5 * [2, 8, 0] + 0.5 * [2, 6, 3] = [2.0, 7.0, 1.5]
0.0∗[1,2,3]+0.5∗[2,8,0]+0.5∗[2,6,3]=[2.0,7.0,1.5]。
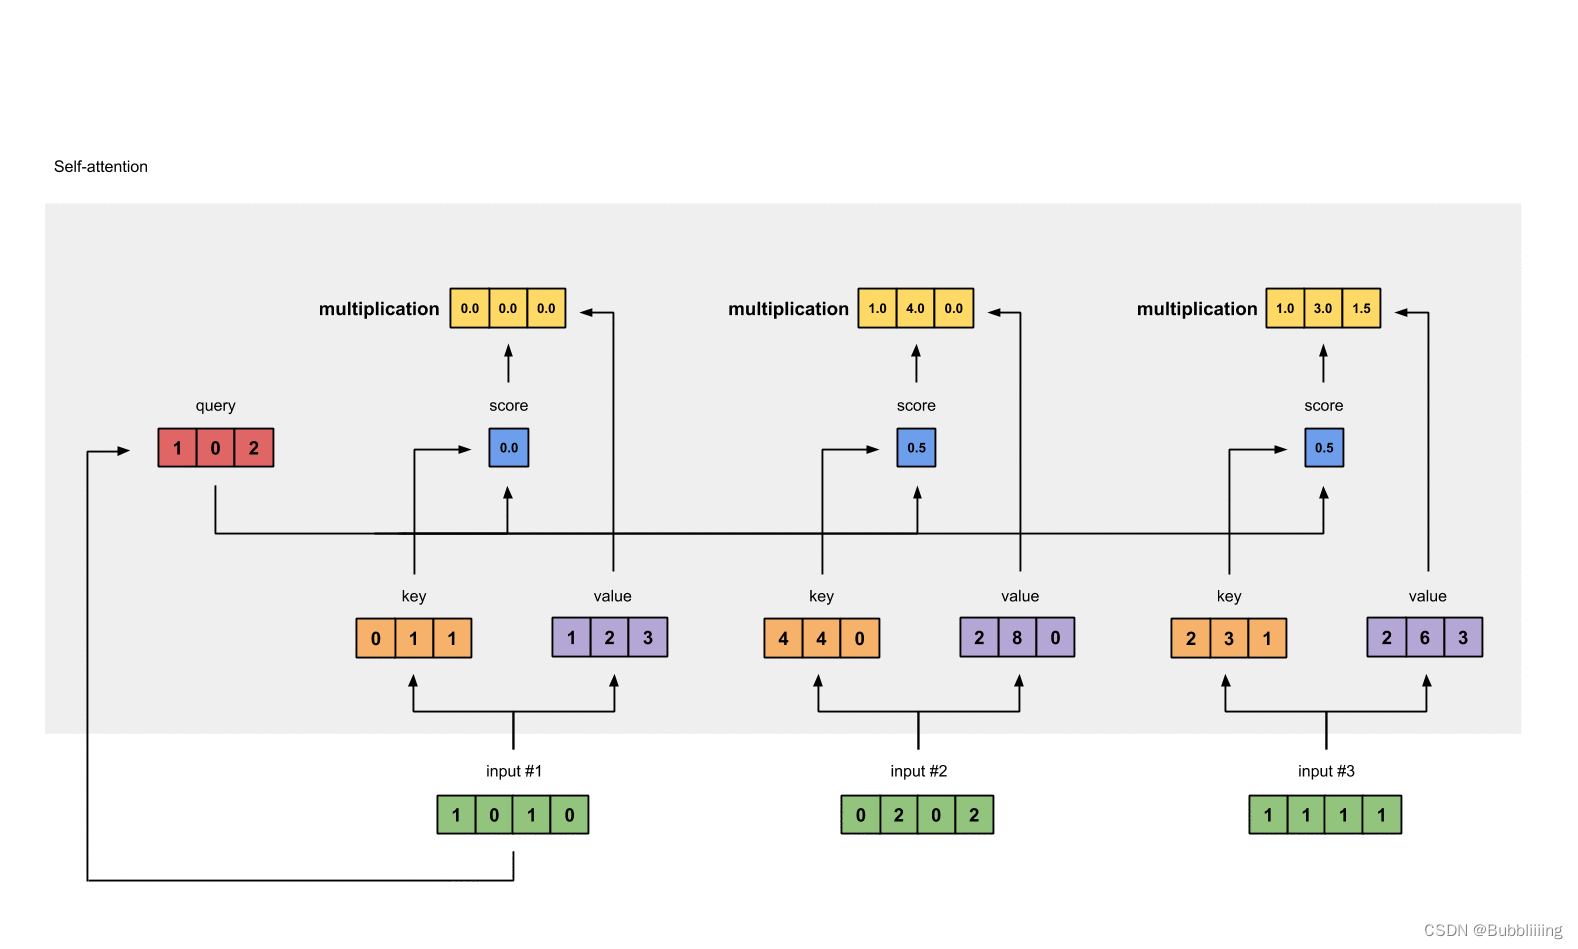
4、此时我们获得了input-1的输出 [2.0, 7.0, 1.5]。
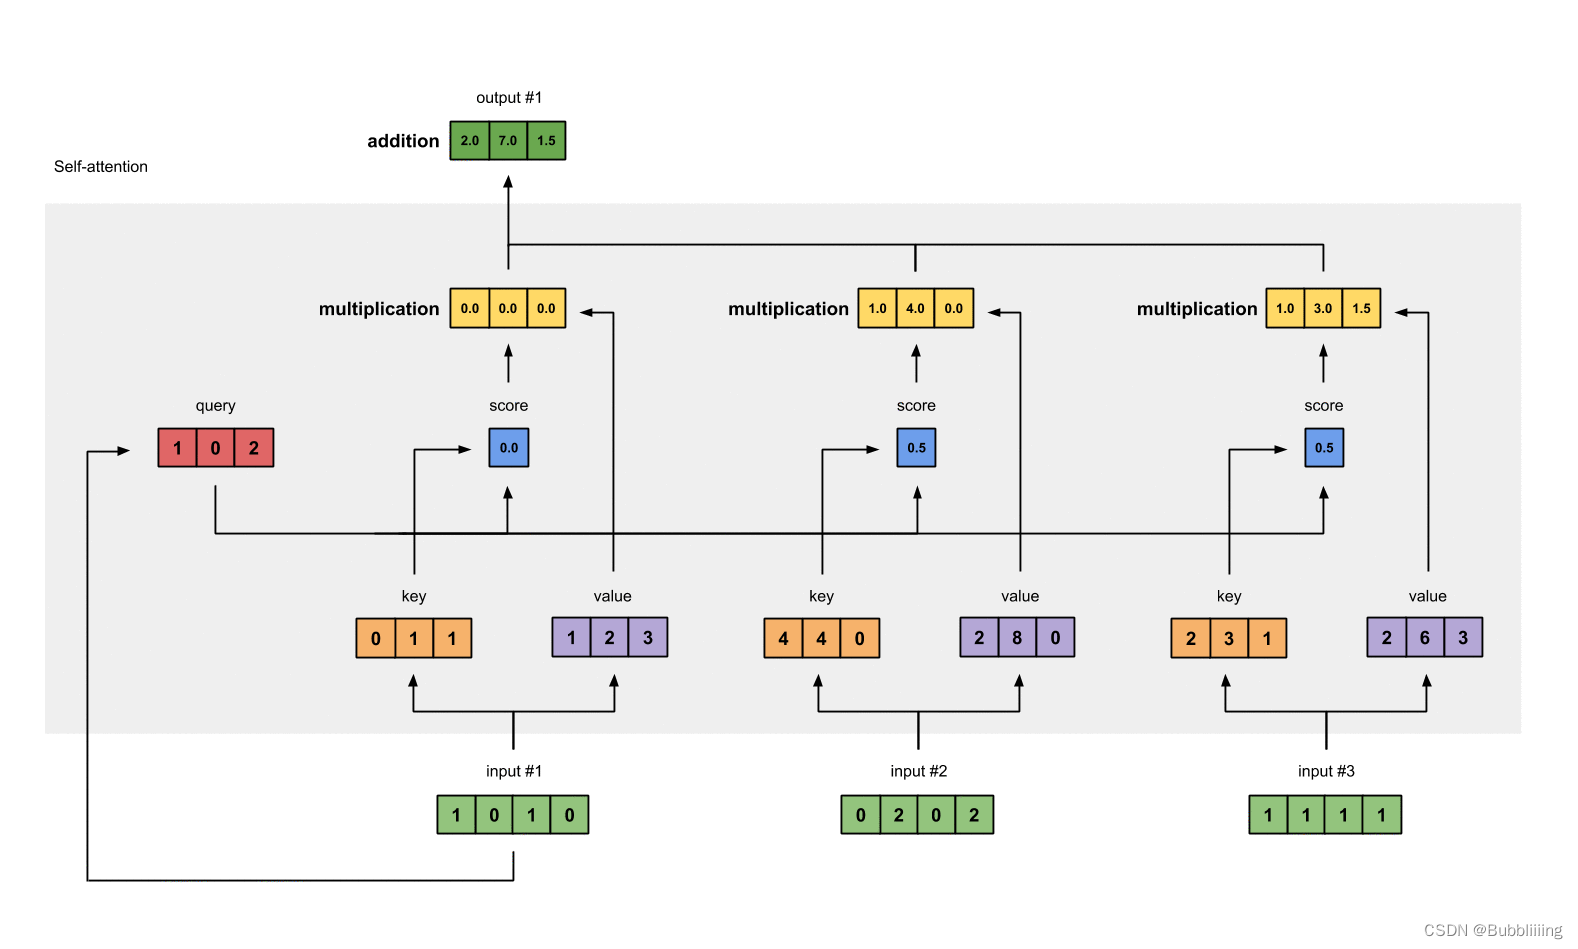
上述的例子中,序列长度仅为3,在实际使用时,序列长度远不仅仅为3,但计算过程是一样的。在实际运算时,我们采用矩阵进行运算。
二、Self-attention的矩阵运算
实际的矩阵运算过程如下图所示。我以实际矩阵为例子给大家解析:
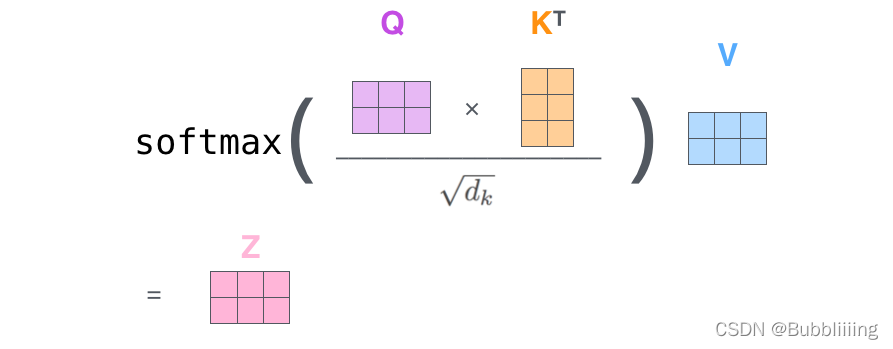
输入的Query、Key、Value如下图所示:

首先利用 查询向量query 叉乘 转置后的键向量key,这一步可以通俗的理解为,利用查询向量去查询序列的特征,获得序列每个部分的重要程度score。
输出的每一行,都代表input-1、input-2、input-3,对当前input的贡献,我们对这个贡献值取一个softmax。


然后利用 score 叉乘 value,这一步可以通俗的理解为,将序列每个部分的重要程度重新施加到序列的值上去。

这个矩阵运算的代码如下所示,各位同学可以自己试试。
import numpy as np

def soft_max(z):
    t = np.exp(z)
    a = np.exp(z) / np.expand_dims(np.sum(t, axis=1), 1)
    return a

Query = np.array([
    [1,0,2],
    [2,2,2],
    [2,1,3]
])

Key = np.array([
    [0,1,1],
    [4,4,0],
    [2,3,1]
])

Value = np.array([
    [1,2,3],
    [2,8,0],
    [2,6,3]
])

scores = Query @ Key.T
print(scores)
scores = soft_max(scores)
print(scores)
out = scores @ Value
print(out)
三、Multi-Head多头注意力机制
多头注意力机制的示意图如图所示:

这幅图给人的感觉略显迷茫,我们跳脱出这个图,直接从矩阵的shape入手会清晰很多。
假设我们现在有一个特征序列的shape为[3, 768],也就意味着序列长度为3,每一个单位序列的特征大小为768。
在施加多头的时候,我们直接对[3, 768]的最后一维度进行分割,比如我们想分割成12个头,那么矩阵的shepe就变成了[3, 12, 64]。
然后我们将[3, 12, 64]进行转置,将12放到前面去,获得的特征层为[12, 3, 64]。之后我们忽略这个12,把它和batch维度同等对待,只对3, 64进行处理,其实也就是上面的注意力机制的过程了。
下列代码是VisionTransformer的Attention注意力机制。
import numpy as np

def soft_max(z):
    t = np.exp(z)
    a = np.exp(z) / np.expand_dims(np.sum(t, axis=-1), -1)
    return a

values_length = 3
num_attention_heads = 8
hidden_size = 768
attention_head_size = hidden_size // num_attention_heads

Query = np.random.rand(values_length, hidden_size)
Key = np.random.rand(values_length, hidden_size)
Value = np.random.rand(values_length, hidden_size)

Query = np.reshape(Query, [values_length, num_attention_heads, attention_head_size])
Key = np.reshape(Key, [values_length, num_attention_heads, attention_head_size])
Value = np.reshape(Value, [values_length, num_attention_heads, attention_head_size])

Query = np.transpose(Query, [1, 0, 2])
Key = np.transpose(Key, [1, 0, 2])
Value = np.transpose(Value, [1, 0, 2])

scores = Query @ np.transpose(Key, [0, 2, 1])
print(np.shape(scores))
scores = soft_max(scores)
print(np.shape(scores))
out = scores @ Value
print(np.shape(out))
out = np.transpose(out, [1, 0, 2])
print(np.shape(out))
out = np.reshape(out, [values_length , 768])
print(np.shape(out))
TransformerBlock的构建
一、视觉部分的TransformerBlock(VisionTransformer)
1、自注意力机制
VisionTransformer中的自注意力机制与上文的构建方法一样,是最简单的,由于一张图片划分区域后,Attention的长度固定,无需考虑遮罩,是一个比较简单干净的代码。
将输入的特征qkv特征进行划分,首先生成query, key, value。query是查询向量、key是键向量、v是值向量。
然后利用 查询向量query 叉乘 转置后的键向量key,这一步可以通俗的理解为,利用查询向量去查询序列的特征,获得序列每个部分的重要程度score。
然后利用 score 叉乘 value,这一步可以通俗的理解为,将序列每个部分的重要程度重新施加到序列的值上去。
class Attention(nn.Module):
    def __init__(self, dim, num_heads=8, qkv_bias=False, attn_drop=0., proj_drop=0.):
        super().__init__()
        self.num_heads  = num_heads
        self.scale      = (dim // num_heads) ** -0.5

        self.qkv = nn.Linear(dim, dim * 3, bias=qkv_bias)
        self.attn_drop  = nn.Dropout(attn_drop)
        self.proj       = nn.Linear(dim, dim)
        self.proj_drop  = nn.Dropout(proj_drop)

    def forward(self, x):
        B, N, C     = x.shape
        qkv         = self.qkv(x).reshape(B, N, 3, self.num_heads, C // self.num_heads).permute(2, 0, 3, 1, 4)
        q, k, v     = qkv[0], qkv[1], qkv[2]

        attn = (q @ k.transpose(-2, -1)) * self.scale
        attn = attn.softmax(dim=-1)
        attn = self.attn_drop(attn)

        x = (attn @ v).transpose(1, 2).reshape(B, N, C)
        x = self.proj(x)
        x = self.proj_drop(x)
        return x
2、TransformerBlock
我们可以参考下图,通过上述提到的自注意力机制模块构建TransformerBlock。

在完成SelfAttention的构建后,我们需要在其后加上两个全连接。就构建了TransformerBlock。
class Mlp(nn.Module):
    """ MLP as used in Vision Transformer, MLP-Mixer and related networks
    """
    def __init__(self, in_features, hidden_features=None, out_features=None, act_layer=GELU, drop=0.):
        super().__init__()
        out_features    = out_features or in_features
        hidden_features = hidden_features or in_features
        drop_probs      = (drop, drop)

        self.fc1    = nn.Linear(in_features, hidden_features)
        self.act    = act_layer()
        self.drop1  = nn.Dropout(drop_probs[0])
        self.fc2    = nn.Linear(hidden_features, out_features)
        self.drop2  = nn.Dropout(drop_probs[1])

    def forward(self, x):
        x = self.fc1(x)
        x = self.act(x)
        x = self.drop1(x)
        x = self.fc2(x)
        x = self.drop2(x)
        return x

class Block(nn.Module):
    def __init__(self, dim, num_heads, mlp_ratio=4., qkv_bias=False, drop=0., attn_drop=0.,
                 drop_path=0., act_layer=GELU, norm_layer=nn.LayerNorm):
        super().__init__()
        self.norm1      = norm_layer(dim)
        self.attn       = Attention(dim, num_heads=num_heads, qkv_bias=qkv_bias, attn_drop=attn_drop, proj_drop=drop)
        self.norm2      = norm_layer(dim)
        self.mlp        = Mlp(in_features=dim, hidden_features=int(dim * mlp_ratio), act_layer=act_layer, drop=drop)
        self.drop_path  = DropPath(drop_path) if drop_path > 0. else nn.Identity()

    def forward(self, x):
        x = x + self.drop_path(self.attn(self.norm1(x)))
        x = x + self.drop_path(self.mlp(self.norm2(x)))
        return x
二、文本部分的TransformerBlock(Bert encoder)
1、自注意力机制
Bert中的TransformerBlock取自Transformer论文的Encoder部分,相比于VisionTransformer,Bert中的TransformerBlock会稍微复杂一些,因为我们需要考虑输入并非定长的,有些部分的特征要被屏蔽掉,此时Bert的Encoder需要传入一个mask,代表哪些特征要被屏蔽。
为了减少未来同学们的学习成本,我复现的代码来自于huggingface的transfomers库,该库实现的代码非常规范,且很多仓库都基于该代码进行修改,工作中也有很多公司基于此代码开发,未来的学习成本会更低。
从Multi-Head多头注意力机制分析可以知道,在多头注意力机制施加时,scores矩阵加上bs的shape为[bs, num_attention_heads, values_length, values_length],最后一维度的values_length代表的就是每个value的重要程度。
因此,如果要使得某些value无用,那么就只需要构建一个shape为[bs, values_length]的矩阵,在最后一维度的values_length中,将需要忽略的值设置为-10000即可,此时计算softmax时近乎为0,即某个value的重要程度为0。
该矩阵在中间运算时拓展维度成为[bs, 1, 1, values_length],与scores相加,会自动进行矩阵广播。
class BertSelfAttention(nn.Module):
    def __init__(self, config, is_cross_attention):
        super().__init__()
        self.config = config
        if config.hidden_size % config.num_attention_heads != 0 and not hasattr(config, "embedding_size"):
            raise ValueError(
                "The hidden size (%d) is not a multiple of the number of attention "
                "heads (%d)" % (config.hidden_size, config.num_attention_heads)
            )

        self.num_attention_heads = config.num_attention_heads
        self.attention_head_size = int(config.hidden_size / config.num_attention_heads)
        self.all_head_size = self.num_attention_heads * self.attention_head_size

        self.query = nn.Linear(config.hidden_size, self.all_head_size)
        if is_cross_attention:
            self.key = nn.Linear(config.encoder_width, self.all_head_size)
            self.value = nn.Linear(config.encoder_width, self.all_head_size)
        else:
            self.key = nn.Linear(config.hidden_size, self.all_head_size)
            self.value = nn.Linear(config.hidden_size, self.all_head_size)

        self.dropout = nn.Dropout(config.attention_probs_dropout_prob)
        self.position_embedding_type = getattr(config, "position_embedding_type", "absolute")
        if self.position_embedding_type == "relative_key" or self.position_embedding_type == "relative_key_query":
            self.max_position_embeddings = config.max_position_embeddings
            self.distance_embedding = nn.Embedding(2 * config.max_position_embeddings - 1, self.attention_head_size)
        self.save_attention = False

    def save_attn_gradients(self, attn_gradients):
        self.attn_gradients = attn_gradients

    def get_attn_gradients(self):
        return self.attn_gradients

    def save_attention_map(self, attention_map):
        self.attention_map = attention_map

    def get_attention_map(self):
        return self.attention_map

    def transpose_for_scores(self, x):
        new_x_shape = x.size()[:-1] + (self.num_attention_heads, self.attention_head_size)
        x = x.view(*new_x_shape)
        return x.permute(0, 2, 1, 3)

    def forward(
        self,
        hidden_states,
        attention_mask=None,
        head_mask=None,
        encoder_hidden_states=None,
        encoder_attention_mask=None,
        past_key_value=None,
        output_attentions=False,
    ):
        # query特征来自于本Blocks的hidden_states
        mixed_query_layer = self.query(hidden_states)

        # 如果我们使用了来自于其它Blocks的特征进行特征融合(Transformer Decoder中常用)
        # key和value来自于其它Blocks的特征
        is_cross_attention = encoder_hidden_states is not None

        # 根据输入的特征情况选择对不同的特征进行处理
        # 如果使用了来自于其它Blocks的特征进行特征融合
        if is_cross_attention:
            key_layer = self.transpose_for_scores(self.key(encoder_hidden_states))
            value_layer = self.transpose_for_scores(self.value(encoder_hidden_states))
            attention_mask = encoder_attention_mask
        elif past_key_value is not None:
            key_layer = self.transpose_for_scores(self.key(hidden_states))
            value_layer = self.transpose_for_scores(self.value(hidden_states))
            key_layer = torch.cat([past_key_value[0], key_layer], dim=2)
            value_layer = torch.cat([past_key_value[1], value_layer], dim=2)
        else:
            key_layer = self.transpose_for_scores(self.key(hidden_states))
            value_layer = self.transpose_for_scores(self.value(hidden_states))

        query_layer = self.transpose_for_scores(mixed_query_layer)

        # 保留past_key_value
        past_key_value = (key_layer, value_layer)

        # query x key
        #   bs, num_attention_heads, values_length, attention_head_size (query_layer)
        # x bs, num_attention_heads, attention_head_size, values_length (key_layer.transpose(-1, -2))
        # => bs, num_attention_heads, values_length, values_length (attention_scores)
        attention_scores = torch.matmul(query_layer, key_layer.transpose(-1, -2))

        if self.position_embedding_type == "relative_key" or self.position_embedding_type == "relative_key_query":
            seq_length = hidden_states.size()[1]
            position_ids_l = torch.arange(seq_length, dtype=torch.long, device=hidden_states.device).view(-1, 1)
            position_ids_r = torch.arange(seq_length, dtype=torch.long, device=hidden_states.device).view(1, -1)
            distance = position_ids_l - position_ids_r
            positional_embedding = self.distance_embedding(distance + self.max_position_embeddings - 1)
            positional_embedding = positional_embedding.to(dtype=query_layer.dtype)  # fp16 compatibility

            if self.position_embedding_type == "relative_key":
                relative_position_scores = torch.einsum("bhld,lrd->bhlr", query_layer, positional_embedding)
                attention_scores = attention_scores + relative_position_scores
            elif self.position_embedding_type == "relative_key_query":
                relative_position_scores_query = torch.einsum("bhld,lrd->bhlr", query_layer, positional_embedding)
                relative_position_scores_key = torch.einsum("bhrd,lrd->bhlr", key_layer, positional_embedding)
                attention_scores = attention_scores + relative_position_scores_query + relative_position_scores_key

        # 除以head size
        attention_scores = attention_scores / math.sqrt(self.attention_head_size)
        if attention_mask is not None:
            # 将得分加上mask,需要忽略的mask是-10000,此时attention_scores会很低,计算softmax时近乎为0
            # Apply the attention mask is (precomputed for all layers in BertModel forward() function)
            attention_scores = attention_scores + attention_mask

        # 根据得分计算比率
        # Normalize the attention scores to probabilities.
        attention_probs = nn.Softmax(dim=-1)(attention_scores)

        if is_cross_attention and self.save_attention:
            self.save_attention_map(attention_probs)
            attention_probs.register_hook(self.save_attn_gradients)

        # 增加了dropout
        # This is actually dropping out entire tokens to attend to, which might
        # seem a bit unusual, but is taken from the original Transformer paper.
        attention_probs_dropped = self.dropout(attention_probs)

        # Mask heads if we want to
        if head_mask is not None:
            attention_probs_dropped = attention_probs_dropped * head_mask

        # 根据得分叉乘上value矩阵,获得结果
        #   bs, num_attention_heads, values_length, values_length (attention_probs_dropped)
        # x bs, num_attention_heads, values_length, attention_head_size (value_layer)
        # => bs, num_attention_heads, values_length, attention_head_size (context_layer)
        context_layer = torch.matmul(attention_probs_dropped, value_layer)

        #    bs, num_attention_heads, values_length, attention_head_size (context_layer)
        # => bs, values_length, num_attention_heads, attention_head_size
        # => bs, values_length, hidden_size (context_layer)
        context_layer = context_layer.permute(0, 2, 1, 3).contiguous()
        new_context_layer_shape = context_layer.size()[:-2] + (self.all_head_size,)
        context_layer = context_layer.view(*new_context_layer_shape)

        outputs = (context_layer, attention_probs) if output_attentions else (context_layer,)

        outputs = outputs + (past_key_value,)
        return outputs


class BertSelfOutput(nn.Module):
    def __init__(self, config):
        super().__init__()
        self.dense = nn.Linear(config.hidden_size, config.hidden_size)
        self.LayerNorm = nn.LayerNorm(config.hidden_size, eps=config.layer_norm_eps)
        self.dropout = nn.Dropout(config.hidden_dropout_prob)

    def forward(self, hidden_states, input_tensor):
        hidden_states = self.dense(hidden_states)
        hidden_states = self.dropout(hidden_states)
        hidden_states = self.LayerNorm(hidden_states + input_tensor)
        return hidden_states


class BertAttention(nn.Module):
    def __init__(self, config, is_cross_attention=False):
        super().__init__()
        self.self = BertSelfAttention(config, is_cross_attention)
        self.output = BertSelfOutput(config)
        self.pruned_heads = set()

    def forward(
        self,
        hidden_states,
        attention_mask=None,
        head_mask=None,
        encoder_hidden_states=None,
        encoder_attention_mask=None,
        past_key_value=None,
        output_attentions=False,
    ):
        self_outputs = self.self(
            hidden_states,
            attention_mask,
            head_mask,
            encoder_hidden_states,
            encoder_attention_mask,
            past_key_value,
            output_attentions,
        )
        attention_output = self.output(self_outputs[0], hidden_states)
        outputs = (attention_output,) + self_outputs[1:]  # add attentions if we output them
        return outputs
2、TransformerBlock
还是以此图为例构建TransformerBlock。

在完成SelfAttention的构建后,我们需要在其后加上两个全连接。就构建了TransformerBlock。
class BertOutput(nn.Module):
    def __init__(self, config):
        super().__init__()
        self.dense = nn.Linear(config.intermediate_size, config.hidden_size)
        self.LayerNorm = nn.LayerNorm(config.hidden_size, eps=config.layer_norm_eps)
        self.dropout = nn.Dropout(config.hidden_dropout_prob)

    def forward(self, hidden_states, input_tensor):
        hidden_states = self.dense(hidden_states)
        hidden_states = self.dropout(hidden_states)
        hidden_states = self.LayerNorm(hidden_states + input_tensor)
        return hidden_states


class BertLayer(nn.Module):
    def __init__(self, config, layer_num):
        super().__init__()
        self.config = config
        self.chunk_size_feed_forward = config.chunk_size_feed_forward
        self.seq_len_dim = 1
        self.attention = BertAttention(config)
        self.layer_num = layer_num
        if self.config.add_cross_attention:
            self.crossattention = BertAttention(config, is_cross_attention=self.config.add_cross_attention)
        self.intermediate = BertIntermediate(config)
        self.output = BertOutput(config)

    def forward(
        self,
        hidden_states,
        attention_mask=None,
        head_mask=None,
        encoder_hidden_states=None,
        encoder_attention_mask=None,
        past_key_value=None,
        output_attentions=False,
        mode=None,
    ):
        # decoder uni-directional self-attention cached key/values tuple is at positions 1,2
        self_attn_past_key_value = past_key_value[:2] if past_key_value is not None else None
        # 对输入的hidden_states进行
        self_attention_outputs = self.attention(
            hidden_states,
            attention_mask,
            head_mask,
            output_attentions=output_attentions,
            past_key_value=self_attn_past_key_value,
        )
        attention_output = self_attention_outputs[0]

        outputs = self_attention_outputs[1:-1]
        present_key_value = self_attention_outputs[-1]

        # 这个在Bert中用不到,在Decoder中用到
        if mode=='multimodal':
            assert encoder_hidden_states is not None, "encoder_hidden_states must be given for cross-attention layers"

            cross_attention_outputs = self.crossattention(
                attention_output,
                attention_mask,
                head_mask,
                encoder_hidden_states,
                encoder_attention_mask,
                output_attentions=output_attentions,
            )
            attention_output = cross_attention_outputs[0]
            outputs = outputs + cross_attention_outputs[1:-1]  # add cross attentions if we output attention weights

        # feed_forward_chunk等价于MLP,进行了两次的全连接
        layer_output = apply_chunking_to_forward(
            self.feed_forward_chunk, self.chunk_size_feed_forward, self.seq_len_dim, attention_output
        )
        outputs = (layer_output,) + outputs

        outputs = outputs + (present_key_value,)

        return outputs

    def feed_forward_chunk(self, attention_output):
        intermediate_output = self.intermediate(attention_output)
        layer_output = self.output(intermediate_output, attention_output)
        return layer_output
三、文本部分的TransformerBlock(Transformer Decoder)
1、自注意力机制
Decoder和Encoder在结构上基本一样,不一样的地方是Decoder的Key和Value来自于其它地方而非自身。
在经典Transformer结构中,Key和Value来自于Encoder,而在深度学习技术不断发展后,Decoder的Key和Value可以来自于更多的地方,比如多模态融合时,Key和Value可以来自于Vision Transformer。本文以BLIP中的Decoder为例进行解析,该Decoder用于结合文本提示词与视觉特征获得图片的描述。
该结构与Encoder类似,仅有少量的不同,首先接受提示词"a picture of"作为Decoder的query输入,然后使用视觉的特征作为Key和Value。
在Encoder实现时,已经保留了特征融合的参数,我们需要关注的是其中的encoder_hidden_states。

在输入该特征后,我们会进行两个不同长度的特征序列的自注意力机制。在这里我给同学们模拟一下使用numpy进行不同长度的特征序列自注意力机制。
下述代码中Query和Key,Value的序列长度并不同,分别是3和6,此时通过Query叉乘Key计算出的得分矩阵的shape为[num_attention_heads, 3, 6]。然后将该得分矩阵与Value叉乘得到输出,输出的shape与query相符,输出特征序列长度为3。
import numpy as np

def soft_max(z):
    t = np.exp(z)
    a = np.exp(z) / np.expand_dims(np.sum(t, axis=-1), -1)
    return a

values_length_q = 3
values_length_kv = 6
num_attention_heads = 8
hidden_size = 768
attention_head_size = hidden_size // num_attention_heads

Query = np.random.rand(values_length_q, hidden_size)
Key = np.random.rand(values_length_kv, hidden_size)
Value = np.random.rand(values_length_kv, hidden_size)

Query = np.reshape(Query, [values_length_q, num_attention_heads, attention_head_size])
Key = np.reshape(Key, [values_length_kv, num_attention_heads, attention_head_size])
Value = np.reshape(Value, [values_length_kv, num_attention_heads, attention_head_size])

Query = np.transpose(Query, [1, 0, 2])
Key = np.transpose(Key, [1, 0, 2])
Value = np.transpose(Value, [1, 0, 2])

scores = Query @ np.transpose(Key, [0, 2, 1])
print(np.shape(scores))
scores = soft_max(scores)
print(np.shape(scores))
out = scores @ Value
print(np.shape(out))
out = np.transpose(out, [1, 0, 2])
print(np.shape(out))
out = np.reshape(out, [values_length_q, 768])
print(np.shape(out))
2、TransformerBlock
此处构建方式与Encoder的TransformerBlock基本一致,有些许不同,我们同样关注encoder_hidden_states。


![[Flutter] extends、implements、mixin和 abstract、extension的使用介绍说明](https://img-blog.csdnimg.cn/direct/ad1ffa9f8dc84b44908e1018be08a57d.png)


