1、中断基础概念
1.1 什么是中断
CPU在正常运行期间,由外部或者内部引起的时间,让CPU停下当前正在运行的程序,转而去执行触发他的中断所对应的程序,这就是中断。
响应中断的过程:
<1>中断请求
<2>中断响应
<3>保护现场
<4>中断处理
<5>恢复现场
<6>中断返回
如果不响应中断,就是中断屏蔽。
1.2 什么是中断上下文,为什么会有中断上下文?
中断的存在可以极大的提高CPU的运行效率,但是中断会打断内核进程中的正常调度和运行,所以为保证系统实时性,中断服务程序必须足够简短,但实际应用中某些时候发生中断时需要处理大量的事务,这时候如果都在中断服务程序中完成,则会严重降低中断的实时性,基于这个原因,Linux系统提出一个概念:把中断服务程序分为两部分:中断上文和中断下文。
中断上文:完成尽可能少却比较急的任务,中断上文的特点就是响应速度快。
中断下文:处理中断剩余的大量比较耗时间的任务,而且可以被中断打断。
总之:中断上文越快也好,中断下文可以做比较耗时间的事情,但是不能死循环。
1.3 Linux中断可以嵌套吗?
以前可以,现在不可以。
2、设备树上的中断节点以及相关函数
2.1 设备树中的中断节点
如果一个设备需要用到中断功能,开发人员就需要在设备树中配置好中断属性信息,因为设备树是用来描述硬件信息的,然后Linux内核通过设备树配置的中断属性来配置中断功能。
设备树中断的参考绑定文档:
Documentation\devicetree\bindings\arm\gic.txt中断实际上是非常复杂,但是作为开发人员,只需要关心怎么在设备树中指定中断,怎么在代码中获得中断就可以。其他的事情,比如设备树中的中断控制器,这些都是由原厂的BSP工程师帮我们写好了,不需要我们修改。
比如在imx6ull,dtsi文件,其中的inc节点就是imx6ull的中断控制器节点,如下:
intc: interrupt-controller@00a01000 {
    compatible = "arm,cortex-a7-gic";
    #interrupt-cells = <3>;
    interrupt-controller;
    reg = <0x00a01000 0x1000>,
    <0x00a02000 0x100>;
};
比如,对于GPIO来说,GPIO的节点也可以作为中断控制器,在imx6ull.dtsi中GPIO1是节点如下所示:
gpio1: gpio@0209c000 {
    compatible = "fsl,imx6ul-gpio", "fsl,imx35-gpio";
    reg = <0x0209c000 0x4000>;
    interrupts = <GIC_SPI 66 IRQ_TYPE_LEVEL_HIGH>,
    <GIC_SPI 67 IRQ_TYPE_LEVEL_HIGH>;
    gpio-controller;
    #gpio-cells = <2>;
    interrupt-controller;
    #interrupt-cells = <2>;
};
这些工作都是由原厂的BSP工程师来帮我我们写好的,并不需要我们来写,除非将来你有机会去原厂工作,否则不会从头开始写一个设备树文件的,分工是非常明确的,我们需要关注的点是怎么在设备树里面 描述一个外设的中断节点,下面请看一下例子。
key {
    #address-cells = <1>,
    #size-cells = <1>,
    compatible = "key";
    pinctrl-name = "default";
    pinctrl-0 = <&pinctrl_key>;
    key-gpio = <&gpio1 18 GPIO_ACTIVE_LOW>;
    interrupt-parent = <&gpio1>;
    interrupts = <18 IRQ_TYPE_EDOGE_BOTH>;
    status = "okay";
}
在上面这个例子中,先使用pinctrl和gpio子系统把这个引脚设置为gpio功能,因为在使用中断功能的时候需要把引脚设置为输入,然后使用interrupt-parent和interrupts属性来描述中断。 interrupt-parent属性值为gpio1,也就是要使用gpio1这个中断控制器,为什么是gpio1呢,因为我们引脚使用的是gpio1里面的io18,所以我们使用的是gpio1这个中断控制器。 interrupts属性设置的是中断源,为啥里面有两个中断源呢,因为gpio1这个中断控制器里面#interrupts-cells的值为2。例子中的第一个cells的18表示GPIO1组的18号,IRQ_TYPE_EDOGE_BOTH表示上升沿和下降沿都有效。IRQ_TYPE_EDOGE_BOTH定义在include/linux/irq.h中。
所以在设备树里面配置中断的时候只需要两个步骤即可,第一个就是把管脚设置为功能。第一个步骤就是使用 interrupt-parent 和 interrupts 属性来描述中断。
2.2 中断相关函数
<1>获取中断号的相关函数
编写驱动的时候需要用到中断号,每一个中断都有一个中断号,我们用到中断号,中断信息已经写到了设备树里面,因此可以通过irq_of_parse_and_map函数从interupts属性中提取到对应的设备号,函数原型在include/linux/of_irq.h,如下:
unsigned int irq_of_parse_and_map(struct device_node *node, int index);
参数:
node:设备节点。
index:索引号,interrupts属性可能包含多条中毒啊您西,通过index指定要获取的信息。
返回值:中断号。
如果使用GPIO的话,可以使用gpio_to_irq函数来获取gpio对应的中断号,函数原型在include/linux/gpio.h,如下:
int gpio_to_irq(unsigned int gpio);
参数:
gpio:要获取的GPIO编号。
返回值:GPIO对应的中断号。
<2>申请中断函数
同GPIO一样,在Linux内核里面,如果我们要使用某个中断也是需要申请的,申请中断我们使用的函数是requst_irq,其在include/linux/interrupt.h中,如下:
int request_irq(unsigned int irq, irq_handler_t handler, unsigned long flags,
        const char *name, void *dev);
参数:
irq:要申请的中断号。
handler:中断处理函数,当中断发生以后酒后执行此中断处理函数。
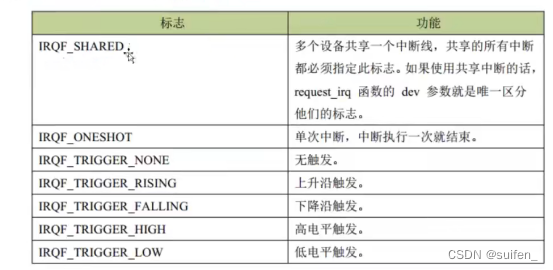
flags:中断标志。中断标志可以在include/linux/interrupt.h里面查看所有中断标志,这里我们介绍几个常用的中断标志,如下图所示:
name:中断名字,设置以后可以在/proc/interrupts文件中看到对应的中断名字。
dev:如果将flags设置为IRQ_SHARED的话,dev用来区分不同的中断,一般情况下将dev设置为设备结构体,dev将传递给中断函数irq_handler_t的第二个人参数。
返回值:0中断申请成功,其他负值申请失败,如果返回-EBUSY的话表示中断已经被申请了。
<3>中断处理函数
使用给request_irq函数申请中断的时候需要设置中断处理函数,中断处理函数格式如下所示:
typedef irqreturn_t (*irq_handler_t)(int, void *);
//第一个参数是要申请的中断处理函数要对应的中断号。第二个参数是一个指向void的指针,也就是个通用指针,需要与request_irq函数的dev参数保持一致。用于区分共享中断的不同设备,dev也可以指向设备数据结构。中断 处理函数的返回值比为irqreturn_t类型,irqreturn_t类型如下所示,
其在include\linux\irqreturn.h
enum irqreturn {
IRQ_NONE = (0 << 0),
IRQ_HANDLED = (1 << 0),
IRQ_WAKE_THREAD = (1 << 1),
};
可以看出irqreturn_t是个枚举类型,一共有三种返回值。一般中断服务函数返回值如下形式:
return IRQ_RETVAL(IRQ_HANDLED);<4> free_irq函数
中断使用完成以后就要通过free_irq函数释放掉相应的中断。如果中断不是共享的,那么free_irq会删除中断处理函数并且禁止中断。free_irq函数原型:在include/linux/interrupt.h
void free_irq(unsigned int, void *);
函数:
irq:要释放的中断号。
dev:如果中断设置为共享的话,此参数用来区分具体的中断,共享中断只有在释放最后中断处理函数的时候才会被禁止掉。
返回值:无。
3、按键中断实验
3.1 设备树中不加intrrupt-parent和interrupts属性
由于使用的是GPIO中断,所以可以不用intrrupt-parent和interrupts属性这两个属性,设备树添加节点如下:
test_key{
compatible = "keys";
pinctrl-names = "default";
pinctrl-0 = <&pinctrl_gpio_keys>;
gpios = <&gpio1 18 GPIO_ACTIVE_LOW>;
}
pinctrl-gpio_keys:gpio-keys{
fsl,pins = <
MX6UL_PAD_UART1_CTS_B__GPIO1_IO18 0x80000000
>;
}注意:下面 这两个地方的值要一致,因为匹配成功才会进入probe函数。


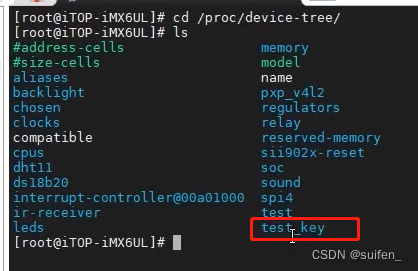
将这个改动的设备树文件编译,然后烧写到开发板上,在/proc/devive-tree/上查询到设备树添加的节点:
#include <linux/init.h>
#include <linux/module.h>
#include <linux/platform_device.h>
#include <linux/of.h>
#include <linux/of_address.h>
#include <linux/gpio.h>
#include <linux/of_gpio.h>
#include <linux/interrupt.h>
struct device_node *test_device_node;
struct property *test_node_property;
int gpio_num;
int irq = 0;
static const of_device_id of_match_table_test[] = {//匹配表
{.compatible = "keys"},
};
static const platform_device_id beep_id_table ={
.name = "beep_test",
};
irqreturn_t test_key(int irq, void *args)
{
printk("test_key\n");
return IRQ_HANDLED;
}
/*设备树节点compatible属性与of_match_table_test的compatible相匹配就会进入该函数,pdev是匹配成功后传入的设备树节点*/
int beep_probe(struct platform_device *pdev)
{
int ret = 0;
printk("beep_probe\n");
//查找要查找的节点
test_device_node = of_find_node_by_path("/test_key");
if (test_device_node == NULL) {
printk("test_device_node find error\n");
return -1;
}
printk("test_device_node name is %s\n",test_device_node->name);//test_key
gpio_num = of_get_named_gpio(test_device_node, "gpios", 0);
if (gpio_num < 0) {
printk("of_get_named_gpio error\n");
return -1;
}
printk("gpio_num name is %d\n",gpio_num);
gpio_direction_input(gpio_num);
irq = gpio_to_irq(gpio_num);
printk("irq is %d\n",irq);
ret = request_irq(irq, test_key, IRQF_TRIGGER_RISING, "test_key", NULL);//
if (ret < 0) {
printk("request_irq error\n");
return -1;
}
return 0;
}
int beep_remove(struct platform_device *pdev)
{
pritnk("beep_remove \n");
return 0;
}
strcut platform_driver beep_device = {
.probe = beep_probe,
.remove = beep_remove,
.driver = {
.owner = THIS_MODULE,
.name = "123",
.of_match_table = of_match_table_test,//匹配表
},
.id_table = &beep_id_table,
};
static int beep_driver_init(void)
{
int ret = -1;
ret = platform_driver_register(&beep_device);
if(ret < 0) {
printk("platform_driver_register error \n");
}
printk("platform_driver_register ok\n");
return 0;
}
static void beep_driver_exit(void)
{
free_irq(irq, NULL);
platform_driver_unregister(&beep_device);
printk("beep_driver_exit \n");
}
module_init(beep_driver_init);
module_exit(beep_driver_exit);
MODULE_LICENSE("GPL");编译加载驱动:
 、
、
怎么看成功申请了中断呢?下图可以看到申请成功了,中断号是48.
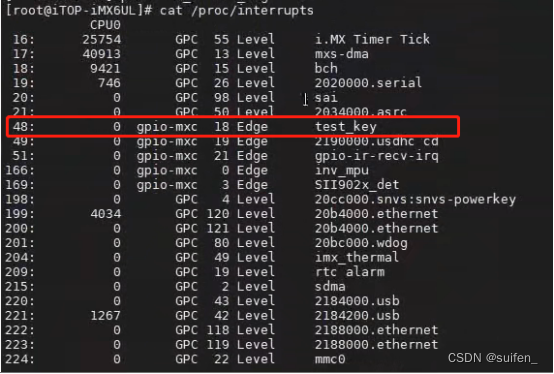
按下开发板的按键,会打印对应的信息:

怎么看中断发生了几次呢?
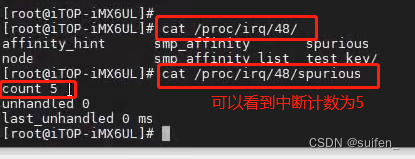

上图也打印了五次信息.
3.2 设备树中加intrrupt-parent和interrupts属性
设备树中加intrrupt-parent和interrupts属性,下面修改dts,改成边沿触发都可以,即上升沿和下降沿都可以:
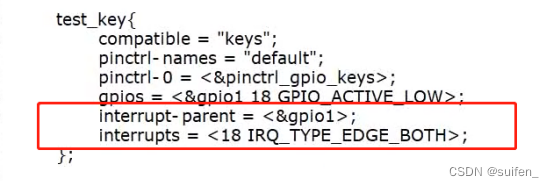
修改驱动:
主要区别就是获取中断号的函数你变了,改成irq_of_parse_and_map获取。
#include <linux/init.h>
#include <linux/module.h>
#include <linux/platform_device.h>
#include <linux/of.h>
#include <linux/of_address.h>
#include <linux/gpio.h>
#include <linux/of_gpio.h>
#include <linux/interrupt.h>
#include <linux/of_irq.h>
struct device_node *test_device_node;
struct property *test_node_property;
int gpio_num;
int irq = 0;
static const of_device_id of_match_table_test[] = {//匹配表
{.compatible = "keys"},
};
static const platform_device_id beep_id_table ={
.name = "beep_test",
};
irqreturn_t test_key(int irq, void *args)
{
printk("test_key\n");
return IRQ_HANDLED;
}
/*设备树节点compatible属性与of_match_table_test的compatible相匹配就会进入该函数,pdev是匹配成功后传入的设备树节点*/
int beep_probe(struct platform_device *pdev)
{
int ret = 0;
printk("beep_probe\n");
//查找要查找的节点
test_device_node = of_find_node_by_path("/test_key");
if (test_device_node == NULL) {
printk("test_device_node find error\n");
return -1;
}
printk("test_device_node name is %s\n",test_device_node->name);//test_key
gpio_num = of_get_named_gpio(test_device_node, "gpios", 0);
if (gpio_num < 0) {
printk("of_get_named_gpio error\n");
return -1;
}
printk("gpio_num name is %d\n",gpio_num);
gpio_direction_input(gpio_num);
//获取中断号
//irq = gpio_to_irq(gpio_num);
irq = irq_of_parse_and_map(test_device_node, 0);
printk("irq is %d\n",irq);
ret = request_irq(irq, test_key, IRQF_TRIGGER_RISING, "test_key", NULL);//
if (ret < 0) {
printk("request_irq error\n");
return -1;
}
return 0;
}
int beep_remove(struct platform_device *pdev)
{
pritnk("beep_remove \n");
return 0;
}
strcut platform_driver beep_device = {
.probe = beep_probe,
.remove = beep_remove,
.driver = {
.owner = THIS_MODULE,
.name = "123",
.of_match_table = of_match_table_test,//匹配表
},
.id_table = &beep_id_table,
};
static int beep_driver_init(void)
{
int ret = -1;
ret = platform_driver_register(&beep_device);
if(ret < 0) {
printk("platform_driver_register error \n");
}
printk("platform_driver_register ok\n");
return 0;
}
static void beep_driver_exit(void)
{
free_irq(irq, NULL);
platform_driver_unregister(&beep_device);
printk("beep_driver_exit \n");
}
module_init(beep_driver_init);
module_exit(beep_driver_exit);
MODULE_LICENSE("GPL"); 编译加载驱动:

按下按键:

4、中断上下文之tasklet
4.1 什么是tasklet
tasklet是中断处理中断下文的常用的一种方法,tasklet是一种特殊的软中断。处理中断下文的机制还有工作队列和软中断。
4.2怎么使用tasklet来设计中断下文
框图如下:
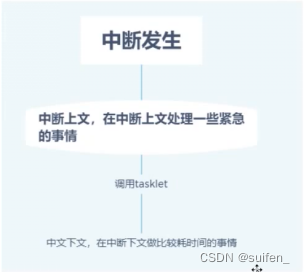
Linux把中断分成两个部分,一个是上半部分,一个是下半部分,在上半部分我们只处理紧急的事情,同时我们可以调用tasklet来启动中断下文,比较耗时间的就要放到下文来处理,调用tasklet以后,tasklet绑定的函数并不会立马执行,而是出中断以后,经过一个很短的不确定时间来执行。
4.3 tasklet定义
tasklet由tasklet_struct结构表示,每个结构体单独代表一个tasklet。在<linux/intrrupt.h>中定义为:
struct tasklet_struct
{
    struct tasklet_struct *next;//链表中的下一个tasklet,方便管理和设置tasklet;
    unsigned long state;//tasklet的状态
    atomic_t count;//表示tasklet是否在激活状态,如果是0,就处在激活状态,如果非0,就处在非激活状态。
    void (*func)(unsigned long);//结构体中的func成员是tasklet的绑定哈桑农户,data是它唯一的参数。
    unsigned long data;//函数执行的时候传递的参数,第五个参数data可以区分不同结构体之间传过来的参数。
};
4.4 tasklet相关函数
<1> tasklet_schdule函数
作用:调度tasklet.
void __tasklet_schedule(struct tasklet_struct *t);
参数:指向tasklet_struct结构的指针。
<2>tasklet_init函数
作用:动态初始化tasklet
tasklet_init(struct tasklet_struct *t,
             void (*func)(unsigned long), unsigned long data);
参数:
*t:指向tasklet_struct结构的指针。
func:tasklet绑定的函数。
data:函数执行的时候传递的函数。
<3>tasklet_kill函数
作用:删除一个tasklet
void tasklet_kill(struct tasklet_struct *t);
参数:指向tasklet_struct结构的指针
4.5 使用tasklet设备及中断下文步骤
<1>步骤一:定义一个tasklet结构体
<2>步骤二:动态初始化tasklet
<3>步骤三:编写tasklet绑定的函数
<4>步骤四:在中断上文调用tasklet
<5>步骤五:卸载模块的时候删除tasklet
4.6 实验代码
在3.2的基础上修改。
#include <linux/init.h>
#include <linux/module.h>
#include <linux/platform_device.h>
#include <linux/of.h>
#include <linux/of_address.h>
#include <linux/gpio.h>
#include <linux/of_gpio.h>
#include <linux/interrupt.h>
#include <linux/of_irq.h>
struct device_node *test_device_node;
struct property *test_node_property;
int gpio_num;
int irq = 0;
struct tasklet_struct key_test;
static const of_device_id of_match_table_test[] = {//匹配表
{.compatible = "keys"},
};
static const platform_device_id beep_id_table ={
.name = "beep_test",
};
irqreturn_t test_key(int irq, void *args)
{
printk("start\n");
tasklet_schedule(&key_test);
printk("end\n");
return IRQ_HANDLED;
}
void test(void)
{
int i = 100;
while (i--) {
printk("teat_key is %d\n",i);//中断下文打印一百次
}
}
/*设备树节点compatible属性与of_match_table_test的compatible相匹配就会进入该函数,pdev是匹配成功后传入的设备树节点*/
int beep_probe(struct platform_device *pdev)
{
int ret = 0;
printk("beep_probe\n");
//查找要查找的节点
test_device_node = of_find_node_by_path("/test_key");
if (test_device_node == NULL) {
printk("test_device_node find error\n");
return -1;
}
printk("test_device_node name is %s\n",test_device_node->name);//test_key
gpio_num = of_get_named_gpio(test_device_node, "gpios", 0);
if (gpio_num < 0) {
printk("of_get_named_gpio error\n");
return -1;
}
printk("gpio_num name is %d\n",gpio_num);
gpio_direction_input(gpio_num);
//获取中断号
//irq = gpio_to_irq(gpio_num);
irq = irq_of_parse_and_map(test_device_node, 0);
printk("irq is %d\n",irq);
ret = request_irq(irq, test_key, IRQF_TRIGGER_RISING, "test_key", NULL);//
if (ret < 0) {
printk("request_irq error\n");
return -1;
}
tasklet_init(&kety_test, test, 0);
return 0;
}
int beep_remove(struct platform_device *pdev)
{
pritnk("beep_remove \n");
return 0;
}
strcut platform_driver beep_device = {
.probe = beep_probe,
.remove = beep_remove,
.driver = {
.owner = THIS_MODULE,
.name = "123",
.of_match_table = of_match_table_test,//匹配表
},
.id_table = &beep_id_table,
};
static int beep_driver_init(void)
{
int ret = -1;
ret = platform_driver_register(&beep_device);
if(ret < 0) {
printk("platform_driver_register error \n");
}
printk("platform_driver_register ok\n");
return 0;
}
static void beep_driver_exit(void)
{
free_irq(irq, NULL);
testlet_kill(&key_test);
platform_driver_unregister(&beep_device);
printk("beep_driver_exit \n");
}
module_init(beep_driver_init);
module_exit(beep_driver_exit);
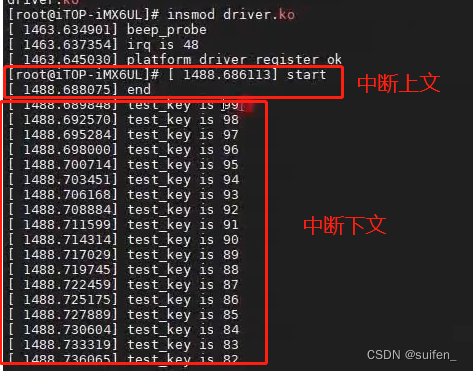
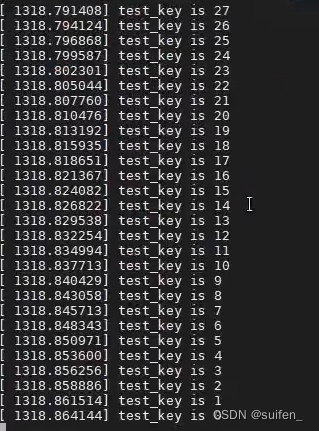
MODULE_LICENSE("GPL"); 加载驱动,按下按键:
4.6.1 修改代码,看看第tasklet结构体五个参数data的值能不能传进来
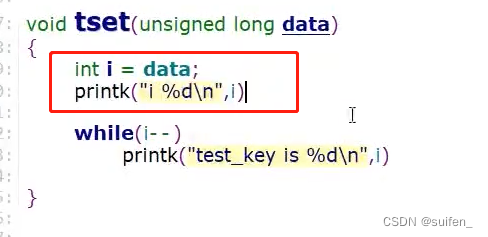

编译加载驱动,按下按键:
5、等待队列
5.1 阻塞和非阻塞的概念
阻塞:当前设备如果不可读或不可写时,也就是不能获得资源的时候,那么当前进程会被挂起。只有当设备满足条件的时候才可以返回。默认情况下,文件都是以这种方式打开。
非阻塞:当前设备不可读或不可写时,该函数不糊阻塞当前进程,要么放弃,要么不停的查询,直到可以操作为止。
读写函数是否阻塞可以通过参数来指定:
fd = open(filepath, O_RDWR);    //默认阻塞打开
fd = open(filepath, O_RDWR|O_NONBLOCK); //非阻塞方式打开
5.2 等待队列基础知识
当我们进程去访问设备的时候,经常需要等待有特定事件发生以后在继续往下运行,这个时候就需要在驱动里面实现当条件不满足的时候进程休眠,当条件满足的时候在由内核唤醒进程。那么等待队列就实现了在事件上的条件等待。
<1>等待队列头
等待队列头就是一个等待队列的头部,每个访问设备的进程都是一个队列项,当设备不可用的时候就要将这些进程对应的等待队列添加到等待队列里面。
等待队列头使用结构体wait_queue_head_t来表示,这个结构体定义在文件include/linux/wait.h里面,结构体内容如下:
struct __wait_queue_head {
    spinlock_t      lock;//自旋锁
    struct list_head    task_list;//链表头
};
typedef struct __wait_queue_head wait_queue_head_t;
类型名是wait_queue_head_t,只要记住这个即可。
定义一个等待队列头:wait_queue_head_t test_wq;
定义等待队列头以后需要初始话,可以使用init_wait_queue_head宏初始化等待队列头,函数原型如下:
extern void __init_waitqueue_head(wait_queue_head_t *q, const char *name, struct lock_class_key *);
#define init_waitqueue_head(q) \
do { \
static struct lock_class_key __key; \
\
__init_waitqueue_head((q), #q, &__key); \
} while (0)也可以使用宏DECLARE_WAIT_QUEUE_HEAD来一次性完成等待队列头的定义和初始化。
extern void __init_waitqueue_head(wait_queue_head_t *q, const char *name, struct lock_class_key *);
#define DECLARE_WAIT_QUEUE_HEAD(name) \
    wait_queue_head_t name = __WAIT_QUEUE_HEAD_INITIALIZER(name)
5.3 等待队列相关函数
<1>init_waitqueue_head宏
作用:动态初始化等待队列头结构。
extern void __init_waitqueue_head(wait_queue_head_t *q, const char *name, struct lock_class_key *);
#define init_waitqueue_head(q)              \
    do {                        \
        static struct lock_class_key __key; \
                            \
        __init_waitqueue_head((q), #q, &__key); \
    } while (0)
<2>wait_event宏
作用:不可中断的阻塞等待,让调用进程不可中断的睡眠状态,在等待队列里面睡眠知道condition变成真,被内核唤醒。
long prepare_to_wait_event(wait_queue_head_t *q, wait_queue_t *wait, int state);
#define ___wait_event(wq, condition, state, exclusive, ret, cmd) \
({ \
__label__ __out; \
wait_queue_t __wait; \
long __ret = ret; /* explicit shadow */ \
\
init_wait_entry(&__wait, exclusive ? WQ_FLAG_EXCLUSIVE : 0); \
for (;;) { \
long __int = prepare_to_wait_event(&wq, &__wait, state);\
\
if (condition) \
break; \
\
if (___wait_is_interruptible(state) && __int) { \
__ret = __int; \
goto __out; \
} \
\
cmd; \
} \
finish_wait(&wq, &__wait); \
__out: __ret; \
})
参数:
wq:wait_queue_head_t 指针
condition:为等待的条件,为假时才可以进入休眠。
注意:调用的时候要确认condition的值是真还是假,如果调用condition为真,则不会休眠。<3> wait_event_interruptible宏
功能:可中断的阻塞等待,让调用的 进程进入可中断的睡眠状态,知道condition变成真被内核唤醒或信号打断唤醒。
#define wait_event_interruptible(wq, condition)             \
({                                  \
    int __ret = 0;                          \
    might_sleep();                          \
    if (!(condition))                       \
        __ret = __wait_event_interruptible(wq, condition);  \
    __ret;                              \
})
参数:
wq:wait_queue_head_t 指针
condition:为等待的条件,为假时才可以进入休眠。
返回:判断condition是否为真,如果为真则返回,反则检查如果进程是被信号唤醒会返回-ERESTARTSYS错误码。如果是condition为真,则返回0。
<4>wake_up宏
功能:唤醒所有休眠进程。
#define wake_up(x)          __wake_up(x, TASK_NORMAL, 1, NULL)
参数:
x:等待队列头结构指针
<5>wake_up_interruptible宏
功能:唤醒可中断 的休眠进程
#define wake_up_interruptible(x)    __wake_up(x, TASK_INTERRUPTIBLE, 1, NULL)
参数:
x:等待队列头结构指针
5.4 实验:为什么需要等待队列
5.4.1 不使用等待队列
#include <stdio.h>
#include <sys/types.h>
#include <sys/stat.h>
#include <fcntl.h>
#incldue <unistd.h>
int main(int argc, char *argv[])
{
int fd;
int value;
fd = open("/dev/test_wq",O_RDWD);
if (fd < 0) {
perror("open error");
return fd;
}
while (1) {
read(fd, &value, sizeof(value));
printf("value is %d\n",value);
}
return 0;
}
#include <linux/init.h>
#include <linux/module.h>
#include <linux/platform_device.h>
#include <linux/of.h>
#include <linux/of_address.h>
#include <linux/gpio.h>
#include <linux/of_gpio.h>
#include <linux/interrupt.h>
#include <linux/of_irq.h>
struct device_node *test_device_node;
struct property *test_node_property;
int value = 0;//用来模拟管脚的状态
//struct tasklet_struct key_test;
static const of_device_id of_match_table_test[] = {//匹配表
{.compatible = "keys"},
};
static const platform_device_id beep_id_table ={
.name = "beep_test",
};
irqreturn_t test_key(int irq, void *args)
{
value != value;
return IRQ_HANDLED;
}
int misc_open(struct inode *inode, struct file *file)
{
printk("misc_open\n");
return 0;
}
int misc_release(struct inode *inode, struct file *file)
{
printk("misc_relese\n");
return 0;
}
ssize_t misc_read(struct file *file,char __user *ubuf, size_t size, loff_t *loff_t)
{
if(copy_to_user(ubuf, &value, sizeof(value)) != 0) {
printk("copy_to_user error\n");
return -1;
}
return 0;
}
ssize_t misc_wirie(struct file *file,char __user *ubuf, size_t size, loff_t *loff_t)
{
char kbuf[64] = {0};
if(copy_form_user(kbuf, ubuf, strlen(kbuf)) != 0) {
printk("copy_form_user error\n");
return -1;
}
printk("kbuf is %s\n",kbuf);
if(kbuf[0] == 1)
get_set_value(beep_gpio, 1);
else if(kbuf[0] == 0)
get_set_value(beep_gpio, 0);
return 0;
}
struct file_operations misc_fops = {
.owner = THIS_MODULE,
.open = misc_open,
.release = misc_release,
.write = misc_wirie,
.read = misc_read
};
struct miscdevice misc_dev = {
.minor = MISC_DYNAMIC_MINOR,
.name = "test_wq",
.fops = &misc_fops
};
/*设备树节点compatible属性与of_match_table_test的compatible相匹配就会进入该函数,pdev是匹配成功后传入的设备树节点*/
int beep_probe(struct platform_device *pdev)
{
int ret = 0;
printk("beep_probe\n");
//查找要查找的节点
test_device_node = of_find_node_by_path("/test_key");
if (test_device_node == NULL) {
printk("test_device_node find error\n");
return -1;
}
printk("test_device_node name is %s\n",test_device_node->name);//test_key
gpio_num = of_get_named_gpio(test_device_node, "gpios", 0);
if (gpio_num < 0) {
printk("of_get_named_gpio error\n");
return -1;
}
printk("gpio_num name is %d\n",gpio_num);
gpio_direction_input(gpio_num);
//获取中断号
//irq = gpio_to_irq(gpio_num);
irq = irq_of_parse_and_map(test_device_node, 0);
printk("irq is %d\n",irq);
ret = request_irq(irq, test_key, IRQF_TRIGGER_RISING, "test_key", NULL);//
if (ret < 0) {
printk("request_irq error\n");
return -1;
}
//tasklet_init(&key_test, test, 0);
ret = misc_register(&misc_dev);
return 0;
}
int beep_remove(struct platform_device *pdev)
{
pritnk("beep_remove \n");
return 0;
}
strcut platform_driver beep_device = {
.probe = beep_probe,
.remove = beep_remove,
.driver = {
.owner = THIS_MODULE,
.name = "123",
.of_match_table = of_match_table_test,//匹配表
},
.id_table = &beep_id_table,
};
static int beep_driver_init(void)
{
int ret = -1;
ret = platform_driver_register(&beep_device);
if(ret < 0) {
printk("platform_driver_register error \n");
}
printk("platform_driver_register ok\n");
return 0;
}
static void beep_driver_exit(void)
{
free_irq(irq, NULL);
misc_deregister(&misc_dev);
platform_driver_unregister(&beep_device);
printk("beep_driver_exit \n");
}
module_init(beep_driver_init);
module_exit(beep_driver_exit);
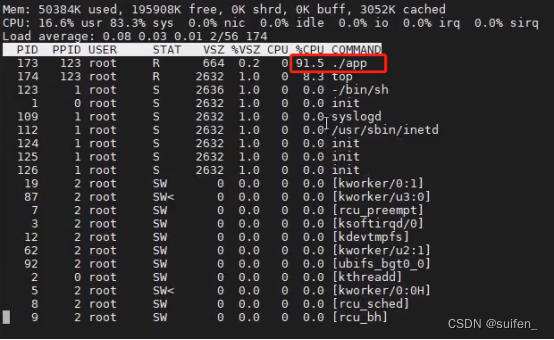
MODULE_LICENSE("GPL"); 后台运行app,可以使用top命令查看cpu占用率:

5.4.2 使用等待队列
对上面的驱动进行修改:
#include <linux/init.h>
#include <linux/module.h>
#include <linux/platform_device.h>
#include <linux/of.h>
#include <linux/of_address.h>
#include <linux/gpio.h>
#include <linux/of_gpio.h>
#include <linux/interrupt.h>
#include <linux/of_irq.h>
#include <linux/wait.h>
#inlcude <linux/sched.h>
struct device_node *test_device_node;
struct property *test_node_property;
DECLARE_WAIT_QUEUE_HEAD(key_wq);//这种方法是一次性的初始化等待队列头的定义和初始化,还有一种方法是下面这种:
//wait_queue_head_t key_wq;
//#define init_waitqueue_head(key_wq);
int wq_flags = 0;
int value = 0;//用来模拟管脚的状态
//struct tasklet_struct key_test;
static const of_device_id of_match_table_test[] = {//匹配表
{.compatible = "keys"},
};
static const platform_device_id beep_id_table ={
.name = "beep_test",
};
irqreturn_t test_key(int irq, void *args)
{
value != value;
wq_flags = 1;
wake_up(&key_wq);
return IRQ_HANDLED;
}
int misc_open(struct inode *inode, struct file *file)
{
printk("misc_open\n");
return 0;
}
int misc_release(struct inode *inode, struct file *file)
{
printk("misc_relese\n");
return 0;
}
ssize_t misc_read(struct file *file,char __user *ubuf, size_t size, loff_t *loff_t)
{
wait_event_interruptible(key_wq, wq_flags);
if(copy_to_user(ubuf, &value, sizeof(value)) != 0) {
printk("copy_to_user error\n");
return -1;
}
wq_flags = 0;
return 0;
}
ssize_t misc_wirie(struct file *file,char __user *ubuf, size_t size, loff_t *loff_t)
{
char kbuf[64] = {0};
if(copy_form_user(kbuf, ubuf, strlen(kbuf)) != 0) {
printk("copy_form_user error\n");
return -1;
}
printk("kbuf is %s\n",kbuf);
if(kbuf[0] == 1)
get_set_value(beep_gpio, 1);
else if(kbuf[0] == 0)
get_set_value(beep_gpio, 0);
return 0;
}
struct file_operations misc_fops = {
.owner = THIS_MODULE,
.open = misc_open,
.release = misc_release,
.write = misc_wirie,
.read = misc_read
};
struct miscdevice misc_dev = {
.minor = MISC_DYNAMIC_MINOR,
.name = "test_wq",
.fops = &misc_fops
};
/*设备树节点compatible属性与of_match_table_test的compatible相匹配就会进入该函数,pdev是匹配成功后传入的设备树节点*/
int beep_probe(struct platform_device *pdev)
{
int ret = 0;
printk("beep_probe\n");
//查找要查找的节点
test_device_node = of_find_node_by_path("/test_key");
if (test_device_node == NULL) {
printk("test_device_node find error\n");
return -1;
}
printk("test_device_node name is %s\n",test_device_node->name);//test_key
gpio_num = of_get_named_gpio(test_device_node, "gpios", 0);
if (gpio_num < 0) {
printk("of_get_named_gpio error\n");
return -1;
}
printk("gpio_num name is %d\n",gpio_num);
gpio_direction_input(gpio_num);
//获取中断号
//irq = gpio_to_irq(gpio_num);
irq = irq_of_parse_and_map(test_device_node, 0);
printk("irq is %d\n",irq);
ret = request_irq(irq, test_key, IRQF_TRIGGER_RISING, "test_key", NULL);//
if (ret < 0) {
printk("request_irq error\n");
return -1;
}
//tasklet_init(&key_test, test, 0);
ret = misc_register(&misc_dev);
return 0;
}
int beep_remove(struct platform_device *pdev)
{
pritnk("beep_remove \n");
return 0;
}
strcut platform_driver beep_device = {
.probe = beep_probe,
.remove = beep_remove,
.driver = {
.owner = THIS_MODULE,
.name = "123",
.of_match_table = of_match_table_test,//匹配表
},
.id_table = &beep_id_table,
};
static int beep_driver_init(void)
{
int ret = -1;
ret = platform_driver_register(&beep_device);
if(ret < 0) {
printk("platform_driver_register error \n");
}
printk("platform_driver_register ok\n");
return 0;
}
static void beep_driver_exit(void)
{
free_irq(irq, NULL);
misc_deregister(&misc_dev);
platform_driver_unregister(&beep_device);
printk("beep_driver_exit \n");
}
module_init(beep_driver_init);
module_exit(beep_driver_exit);
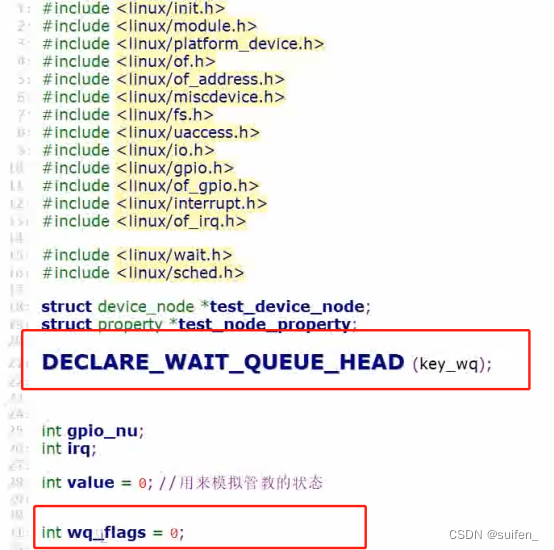
MODULE_LICENSE("GPL"); 主要改动如下:
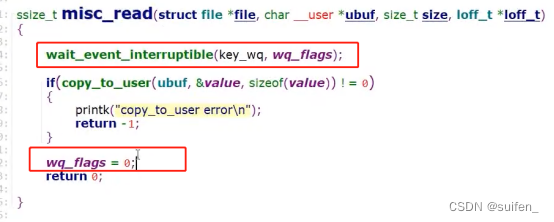

编译代码并加载驱动:
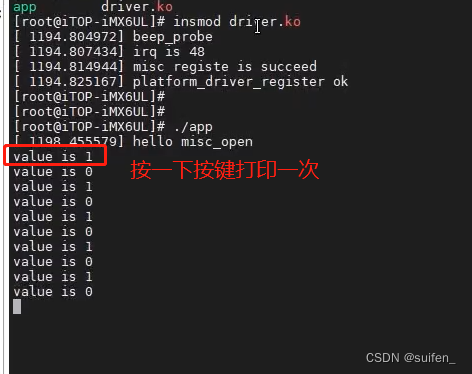
再一次后台运行,看看cpu运行率咋样:

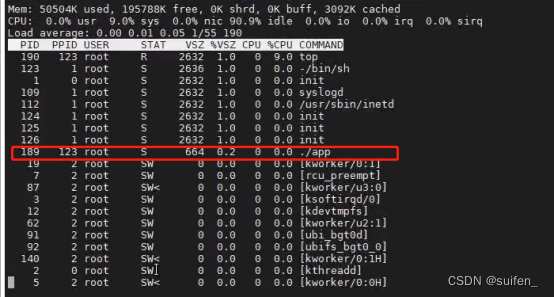
6、工作队列
6.1 什么是工作队列
工作队列(workqueue)是实现中断下文的机制之一,是一种将工作退后执行的形式。那工作队列和我们之前学习的tasklet有什么不同呢?tasklet也是实现中断下文的机制。他们两个最主要的区别是tasklet不能休眠,二工作队列可以休眠。所以,tasklet可以用来处理比较耗时间的事情,二工作队列可以处理非常复杂的并且更耗时间的事情。
6.2 工作队列(workqueue)的工作原理
LInux系统在启动期间会创建内核线程,该线程创建以后就处于sleep状态,然后这个线程会一直去队列里面读,看看有没有任务,如果有就执行,如果没有就休眠。工作队列的实现机制实际上是非常复杂的,初学阶段只需要了解这些基本概念接口。可以类比理解为:
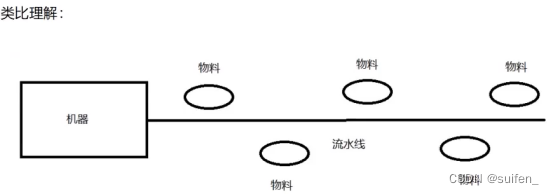
流水线的机械:Linux系统自动会创建一个。多种不同的无聊使用同一个流水线机械,那么这个就是共享工作队列的概念。
如果当前的流水线机械不能满足我们加工的无聊,我们是不是就需要重新定制一台流水线机器呢,这个就是自定义工作队列的概念。
共享工作队列有什么缺点呢?
不需要自己 创建,但是如果前面的工作比较耗时间,就会影响后面的工作。
自定义工作队列有什么优缺点呢?
需要自己创建,系统开销大。一抔点是不会受到其他工作的影响。(因为这个流水线就是专门加工这一种零件的。
6.3 工作队列相关API
尽管工作队列的实现机制非常复杂,但是我们使用工作队列其实就是在这个流水线上添加自己的无聊,然后等待自己执行即可。
一个具体的工作(类比就是流水线上的物料)我们使用work_struct来描述的,定义在include\linux\workqueue.h里面。所以我们使用工作队列的第一步就是先定义个工作队列。
struct work_struct {
    atomic_long_t data;
    struct list_head entry;
    work_func_t func;
#ifdef CONFIG_LOCKDEP
    struct lockdep_map lockdep_map;
#endif
};
在这个结构体里面只需要关注func这个成员就可以了,他是一个函数指针,以为我们要把我们需要完成的工作写在这个函数里面。
<1>宏DECLARE_WORK
作用:静态定义并且初始化工作队列。
#define DECLARE_WORK(n, f)                      \
    struct work_struct n = __WORK_INITIALIZER(n, f)
<2>宏INIT_WORK
作用:动态定义并初始化工作结构。
#define INIT_WORK(_work, _func)                     \
    __INIT_WORK((_work), (_func), 0)
参数:
work:工作队列地址。
func:工作函数
举例:
struct work_struct test;
在模块初始化函数中:INIT_WORK(&test, func);
相当于:DECLARE_WORK(test,func);
<3>schedule_work
作用:调度工作,把work_struct挂到CPU相关的工作结构队列链表上,等待工作者线程处理。
static inline bool schedule_work(struct work_struct *work);
参数:
work:工作队列结构体地址
需要注意的是,如果调度完工作,并不会马上执行,只是加到了共享的工作队列里面去,等轮到他才会执行。
如果我们多次调用相同的任务,假如上一次的任务还没有处理完成,那么多次调度相同的任务是无效的。
6.4实验代码
例程在tasklet实验代码上改:
#include <linux/init.h>
#include <linux/module.h>
#include <linux/platform_device.h>
#include <linux/of.h>
#include <linux/of_address.h>
#include <linux/gpio.h>
#include <linux/of_gpio.h>
#include <linux/interrupt.h>
#include <linux/of_irq.h>
#include <linux/workqueue.h>
struct device_node *test_device_node;
struct property *test_node_property;
int gpio_num;
int irq = 0;
//struct tasklet_struct key_test;
struct work_struct key_test;
static const of_device_id of_match_table_test[] = {//匹配表
{.compatible = "keys"},
};
static const platform_device_id beep_id_table ={
.name = "beep_test",
};
irqreturn_t test_key(int irq, void *args)
{
printk("start\n");
tasklet_schedule(&key_test);
printk("end\n");
return IRQ_HANDLED;
}
void test(void)
{
int i = 100;
while (i--) {
printk("teat_key is %d\n",i);//中断下文打印一百次
}
}
/*设备树节点compatible属性与of_match_table_test的compatible相匹配就会进入该函数,pdev是匹配成功后传入的设备树节点*/
int beep_probe(struct platform_device *pdev)
{
int ret = 0;
printk("beep_probe\n");
//查找要查找的节点
test_device_node = of_find_node_by_path("/test_key");
if (test_device_node == NULL) {
printk("test_device_node find error\n");
return -1;
}
printk("test_device_node name is %s\n",test_device_node->name);//test_key
gpio_num = of_get_named_gpio(test_device_node, "gpios", 0);
if (gpio_num < 0) {
printk("of_get_named_gpio error\n");
return -1;
}
printk("gpio_num name is %d\n",gpio_num);
gpio_direction_input(gpio_num);
//获取中断号
//irq = gpio_to_irq(gpio_num);
irq = irq_of_parse_and_map(test_device_node, 0);
printk("irq is %d\n",irq);
ret = request_irq(irq, test_key, IRQF_TRIGGER_RISING, "test_key", NULL);//
if (ret < 0) {
printk("request_irq error\n");
return -1;
}
//tasklet_init(&kety_test, test, 0);
INIT_WORK(&key_test, test);
return 0;
}
int beep_remove(struct platform_device *pdev)
{
pritnk("beep_remove \n");
return 0;
}
strcut platform_driver beep_device = {
.probe = beep_probe,
.remove = beep_remove,
.driver = {
.owner = THIS_MODULE,
.name = "123",
.of_match_table = of_match_table_test,//匹配表
},
.id_table = &beep_id_table,
};
static int beep_driver_init(void)
{
int ret = -1;
ret = platform_driver_register(&beep_device);
if(ret < 0) {
printk("platform_driver_register error \n");
}
printk("platform_driver_register ok\n");
return 0;
}
static void beep_driver_exit(void)
{
free_irq(irq, NULL);
//testlet_kill(&key_test);
platform_driver_unregister(&beep_device);
printk("beep_driver_exit \n");
}
module_init(beep_driver_init);
module_exit(beep_driver_exit);
MODULE_LICENSE("GPL"); 加载驱动,按下按键:



![cube生成电机库,启用了RTOS,编译报错[0xc43ed8:5050106] in osSignalWait](https://img-blog.csdnimg.cn/direct/15fe9f721670494eafb802ad51243b2a.png)
