1.Spring工厂类的继承方式
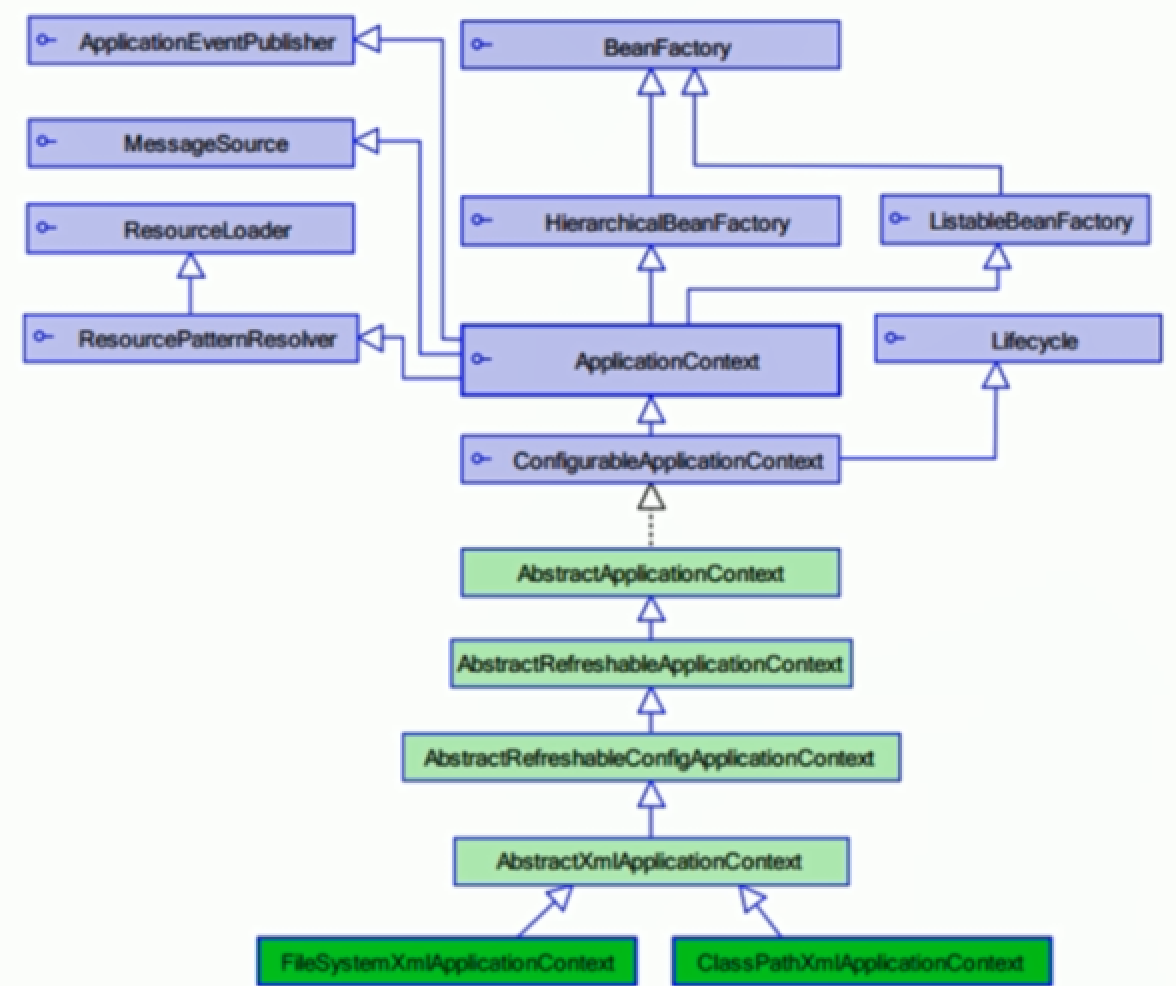
从上面可以看出,创建工厂类,可以通过ClassPathXmlApplicationContext和FileSystemXmlApplicationContext这两种方式:
FileSystemXmlApplicationContext从磁盘加载配置文件,此时就需要使用绝对路径。
public void demo3(){
    //创建Spring的工厂类
    ApplicationContext applicationContext = new FileSystemXmlApplicationContext("C:\\applicationContext.xml");
    //通过工厂获得类
    UserService userService = (UserService) applicationContext.getBean("userService");
    userService.sayHello();
}
在之前老的版本中,同时通过BeanFactory来创建工厂类,这种方式虽然已经被弃用,但是依然可以使用:
@Test
public void demo4(){
    BeanFactory beanFactory = new XmlBeanFactory(new ClassPathResource("applicationContext.xml"));
    UserService userService = (UserService) beanFactory.getBean("userService");
    userService.sayHello();
}
2.Bean的实例化三种方式
(1)使用类构造器实例化
public class Bean1 {
    public Bean1(){
        System.out.println("Bean1被实例化...");
    }
}

<bean id="bean1" class="com.imooc.ioc.demo2.Bean1"></bean>

@Test
public void demo1(){
    ApplicationContext applicationContext = new ClassPathXmlApplicationContext("applicationContext.xml");
    Bean1 bean1 = (Bean1) applicationContext.getBean("bean1");
}
(2)使用构造工厂实例化
public class Bean2 {
}

public class Bean2Factory {
    public static Bean2 createBean2(){
        System.out.println("Bean2Facyory方法已经执行");
        return new Bean2();
    }
}

<bean id="bean2" class="com.imooc.ioc.demo2.Bean2Factory" factory-method="createBean2"></bean>

@Test
public void demo2(){
    ApplicationContext applicationContext = new ClassPathXmlApplicationContext("applicationContext.xml");
    Bean2 bean2 = (Bean2) applicationContext.getBean("bean2");
}
new ClassPathXmlApplicationContext("applicationContext.xml")会实例化applicationContext.xml配置文件中所有的构造类。
(3)使用实例工厂方法实例化
public class Bean3 {
}

public class Bean3Factory {
    public Bean3 createBean3(){
        System.out.println("Bean3Factory已经实例化");
        return new Bean3();
    }
}

<bean id="bean3Factory" class="com.imooc.ioc.demo2.Bean3Factory"/>
<bean id="bean3" factory-bean="bean3Factory" factory-method="createBean3"/>

@Test
public void demo3() {
    ApplicationContext applicationContext = new ClassPathXmlApplicationContext("applicationContext.xml");
    Bean3 bean3 = (Bean3) applicationContext.getBean("bean3");
}
一般默认情况,我们会采用无参数的构造方法的方式。如果类的构造特别复杂,我们会使用第二种或者第三种方式。
3.Bean的配置
(1)id和name
一般情况下,装配一个Bean时,通过指定一个id属性作为Bean的名称。
id属性在IOC容器中必须是唯一的。
如果Bean的名称中含有特殊字符,就需要使用name属性。
(2)class
class用于设置一个类的完全路径名称,主要作用是IOC容器生成类的实例。
(3)scope
用于控制bean的作用域
scope常用的选项:

request和session是针对web开发来说。
默认采用singleton模式:
<bean id="person" class="com.imooc.ioc.demo3.Person" />

public void demo1(){
    ApplicationContext applicationContext = new ClassPathXmlApplicationContext("applicationContext.xml");
    Person person1 = (Person) applicationContext.getBean("person");
    Person person2 = (Person) applicationContext.getBean("person");
    System.out.println(person1);  //com.imooc.ioc.demo3.Person@544a2ea6
    System.out.println(person2);  //com.imooc.ioc.demo3.Person@544a2ea6
}
可以看到,每次创建的对象都指向一个实例。
<bean id="person" class="com.imooc.ioc.demo3.Person" scope="prototype"/>

public void demo1(){
    ApplicationContext applicationContext = new ClassPathXmlApplicationContext("applicationContext.xml");
    Person person1 = (Person) applicationContext.getBean("person");
    Person person2 = (Person) applicationContext.getBean("person");
    System.out.println(person1);  //com.imooc.ioc.demo3.Person@544a2ea6
    System.out.println(person2);  //com.imooc.ioc.demo3.Person@2e3fc542
}
如果采用prototype模式,每次都会生成一个新的对象。
4.Bean的生命周期
Spring初始化bean或销毁bean时,有时需要做一些处理工作,
因此spring可以在创建和销毁bean的时候调用bean的两个生命周期方法。
在创建的时候可以使用init-method参数来指定创建方法。
在销毁的时候可以使用destory-method参数来指定销毁方法,同时必须scope="singleton"
public class Man {
    public Man(){
        System.out.println("Man被实例化");
    }

    public void setup(){
        System.out.println("Man被初始化了");
    }

    public void teardown(){
        System.out.println("Man被销毁了");
    }
}

<bean id="man" class="com.imooc.ioc.demo3.Man" init-method="setup" destroy-method="teardown"/>

public void demo2(){
    ClassPathXmlApplicationContext applicationContext = new ClassPathXmlApplicationContext("applicationContext.xml");
    Man man = (Man) applicationContext.getBean("man");
    applicationContext.close();
}
打印结果:
Man被实例化
Man被初始化了
Man被销毁了
5.Bean的生命周期的完整过程
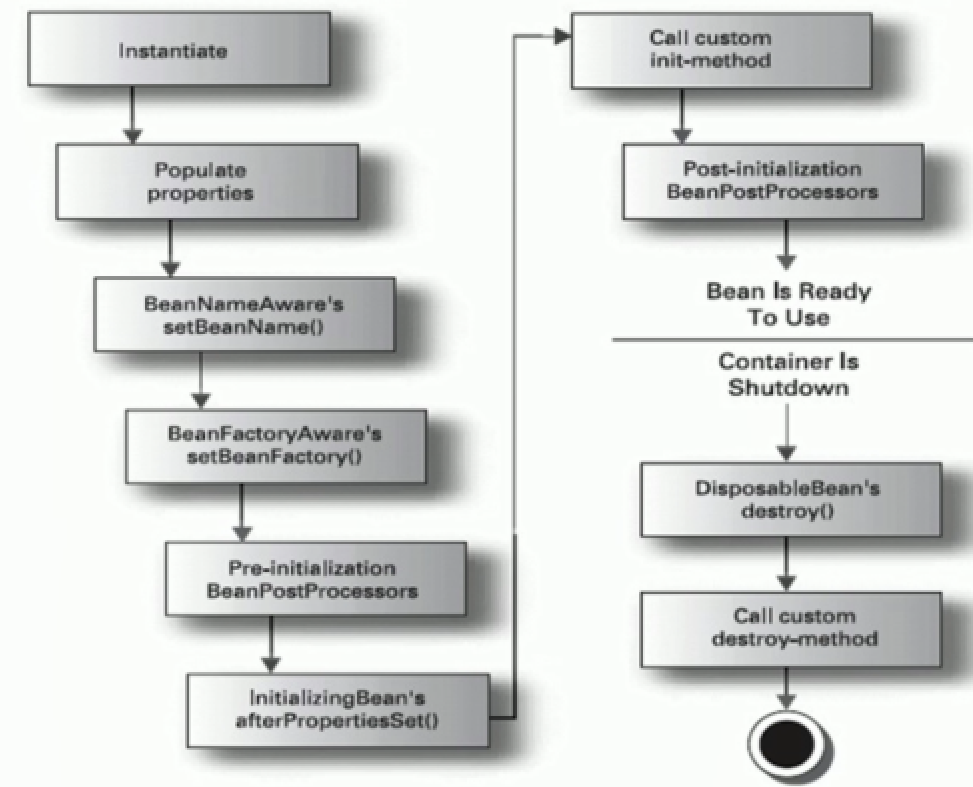
(1)instantiate bean对象实例化
(2)populate properties封装属性
(3)如果Bean实现BeanNameAware执行setBeanName(获取当前类在spring中的配置名称,也就是id值)
(4)如果Bean实现BeanFactoryAware或者ApplicationContextAware,
设置工厂setBeanFactory或者上下文对象setApplicationContext。(了解工厂信息)
(5)如果存在类实现BeanPostProcessor(后处理Bean),执行postProcessBeforeInitialization
(6)如果Bean实现了InitializingBean执行afterPropertiesSet
(7)调用<bean init-method="init">指定初始化方法init
(8)如果存在类实现BeanPostProcessor(处理Bean),执行postProcessAfterInitialization
(9)执行业务处理
(10)如果Bean实现了DisposableBean执行destroy
(11)调用<bean destroy-method="customerDestroy">指定销毁方法customerDestroy,这个是用户自定义的销毁方法
<bean id="man" class="com.imooc.ioc.demo3.Man" init-method="setup" destroy-method="teardown">
    <property name="name" value="ming"/>
</bean>
<!--这个类不需要定义id,因为这是spring帮我们自动定义-->
<bean class="com.imooc.ioc.demo3.MyBeanPostProcessor"/>
package com.imooc.ioc.demo3;

import org.springframework.beans.BeansException;
import org.springframework.beans.factory.BeanNameAware;
import org.springframework.beans.factory.DisposableBean;
import org.springframework.beans.factory.InitializingBean;
import org.springframework.context.ApplicationContext;
import org.springframework.context.ApplicationContextAware;

public class Man implements BeanNameAware, ApplicationContextAware, InitializingBean, DisposableBean {
    private String name;

    public void setName(String name) {
        System.out.println("第二步:设置属性");
        this.name = name;
    }

    public Man(){
        System.out.println("第一步:初始化...");
    }

    public void setup(){
        System.out.println("第七步:Man被初始化了");
    }

    public void teardown(){
        System.out.println("第十一步:Man被销毁了");
    }

    public void setBeanName(String s) {
        System.out.println("第三步:设置Bean的名称" + s);
    }

    public void setApplicationContext(ApplicationContext applicationContext) throws BeansException {
        System.out.println("第四步:了解工厂信息");
    }

    public void afterPropertiesSet() throws Exception {
        System.out.println("第六步:属性设置后");
    }

    public void run(){
        System.out.println("第九步:执行业务方法");
    }

    public void destroy() throws Exception {
        System.out.println("第十步:执行Spring的销毁方法");
    }
}
package com.imooc.ioc.demo3;
import org.springframework.beans.BeansException;
import org.springframework.beans.factory.config.BeanPostProcessor;
public class MyBeanPostProcessor implements BeanPostProcessor {
public Object postProcessBeforeInitialization(Object bean, String beanName) throws BeansException {
System.out.println("第五步:初始化前方法...");
return bean;
}
public Object postProcessAfterInitialization(Object bean, String beanName) throws BeansException {
System.out.println("第八步:初始化后方法...");
return bean;
}
}
public void demo2(){
ClassPathXmlApplicationContext applicationContext = new ClassPathXmlApplicationContext("applicationContext.xml");
Man man = (Man) applicationContext.getBean("man");
man.run();
applicationContext.close();
}6.BeanPostProcessor——增强类方法
实现接口类:
public interface UserDao {
    public void findAll();

    public void save();

    public void update();

    public void delete();
}
创建实现类:
public class UserDaoImpl implements UserDao {
    public void findAll() {
        System.out.println("查询用户");
    }

    public void save() {
        System.out.println("保存用户");
    }

    public void update() {
        System.out.println("修改用户");
    }

    public void delete() {
        System.out.println("删除用户");
    }
}
调用类方法
<bean class="com.imooc.ioc.demo3.MyBeanPostProcessor"/>
<bean id="userDao" class="com.imooc.ioc.demo3.UserDaoImpl"/>

public void demo3(){
    ApplicationContext applicationContext = new ClassPathXmlApplicationContext("applicationContext.xml");
    UserDao userDao= (UserDao)applicationContext.getBean("userDao");
    userDao.findAll();
    userDao.save();
    userDao.update();
    userDao.delete();
}
方法增强:
如果我们想增强一个方法,当然我们单独再定义一个方法,再此之前调用,
但是如果调用的次数非常多,这样就非常麻烦,这样我们可以使用BeanPostProcessor
public Object postProcessAfterInitialization(final Object bean, String beanName) throws BeansException {
    System.out.println("第八步:初始化后方法...");
    if ("userDao".equals(beanName)){  //匹配到对应的类
        Object proxy = Proxy.newProxyInstance(bean.getClass().getClassLoader(), bean.getClass().getInterfaces(), new InvocationHandler() {
            public Object invoke(Object proxy, Method method, Object[] args) throws Throwable {
                if ("save".equals(method.getName())){  //对于sava方法添加一点配置
                    System.out.println("权限校验");
                    return method.invoke(bean,args);
                }
                return method.invoke(bean,args);
            }
        });
        return proxy;
    }
    return bean;
}
7.属性注入方法及构造方法的属性注入
(1)构造方法注入
package com.imooc.ioc.demo4;

public class User {
    private String name;
    private Integer age;

    public User() {}

    public User(String name, Integer age) {
        this.name = name;
        this.age = age;
    }

    @Override
    public String toString() {
        return "User{" +
                "name='" + name + '\'' +
                ", age=" + age +
                '}';
    }
}

<bean id="user" class="com.imooc.ioc.demo4.User">
    <constructor-arg name="name" value="ming"/>
    <constructor-arg name="age" value="18"/>
</bean>

@Test
public void demo1(){
    ApplicationContext applicationContext = new ClassPathXmlApplicationContext("applicationContext.xml");
    User user = (User) applicationContext.getBean("user");
    System.out.println(user);
}
(2)Set方法注入
使用set方法注入,在Spring配置文件中,通过<property>设置注入的属性。
public class Person {
    private String name;
    private Integer age;

    public String getName() {
        return name;
    }

    public void setName(String name) {
        this.name = name;
    }

    public Integer getAge() {
        return age;
    }

    public void setAge(Integer age) {
        this.age = age;
    }

    @Override
    public String toString() {
        return "Person{" +
                "name='" + name + '\'' +
                ", age=" + age +
                '}';
    }

<bean id="person" class="com.imooc.ioc.demo4.Person">
    <property name="name" value="ming"/>
    <property name="age" value="18"/>
</bean>

public void demo1(){
    ApplicationContext applicationContext = new ClassPathXmlApplicationContext("applicationContext.xml");
    Person person = (Person) applicationContext.getBean("person");
    System.out.println(person);
}
如果我现在将注入一个关联类,该如何处理了?
比如我现在给人添加一只宠物吗?
public class Cat {
    private String name;
}

public class Person {
    private String name;
    private Integer age;
    private Cat cat;

    @Override
    public String toString() {
        return "Person{" +
                "name='" + name + '\'' +
                ", age=" + age +
                ", cat=" + cat.getName() +
                '}';
    }
}
在属性注入的时候,使用关联注入即可。
<bean id="person" class="com.imooc.ioc.demo4.Person">
    <property name="name" value="ming"/>
    <property name="age" value="18"/>
    <property name="cat" ref="cat"/>
</bean>
<bean id="cat" class="com.imooc.ioc.demo4.Cat">
    <property name="name" value="huahua"/>
</bean>
(3)P名称空间的属性注入
使用P命名空间。
为了简化XML文件配置,Spring从2.5开始引入一个新的P名称空间。
如果是一般属性,这样书写:
p:<属性名>="xxx" 引入常量值
p:<属性名>-ref="xxx"引入其他Bean对象
上面实例就可以这样些:
<bean id="person" class="com.imooc.ioc.demo4.Person" p:name="ming" p:age="18" p:cat-ref="cat"/>
<bean id="cat" class="com.imooc.ioc.demo4.Cat" p:name="huahua"/>
(4)SpEL属性注入
SpEL:spring expression language,spring表达式语言,对依赖注入进行简化的语法:#{表达式}
<bean id="" value="#{表达式}">
SpEL表达式语言:
语法:#{}
#{ ‘hello’ }:使用字符串
#{beanId}:使用另一个bean
#{beanId.content.toUpperCase()}:使用指定名属性,并使用方法
#{T(java.lang.Math).PI}:使用静态字段或方法
创建关联类:
public class Category {
    private String name;

    public String getName() {
        return name;
    }
    public void setName(String name) {
        this.name = name;
    }

    @Override
    public String toString() {
        return name;
    }
}
创建实例类:
public class ProductInfo {
    public Double discountPrice(){
        return 188.8;
    }
}

public class Product {
    private String name;
    private Double price;
    private Category category;

    public String getName() {
        return name;
    }

    public void setName(String name) {
        this.name = name;
    }

    public Double getPrice() {
        return price;
    }

    public void setPrice(Double price) {
        this.price = price;
    }

    public Category getCategory() {
        return category;
    }

    public void setCategory(Category category) {
        this.category = category;
    }

    @Override
    public String toString() {
        return "Product{" +
                "name='" + name + '\'' +
                ", price=" + price +
                ", category=" + category +
                '}';
    }
}
Bean管理:
<bean id="category" class="com.imooc.ioc.demo4.Category">
    <property name="name" value="#{'服装'}"/>
</bean>
<bean id="productInfo" class="com.imooc.ioc.demo4.ProductInfo"/>
<bean id="product" class="com.imooc.ioc.demo4.Product">
    <property name="name" value="#{'男装'}"/>
    <property name="price" value="#{productInfo.discountPrice()}"/>  引用工厂类的方法
    <property name="category" value="#{category}"/>
</bean>
调用:
public void demo1(){
    ApplicationContext applicationContext = new ClassPathXmlApplicationContext("applicationContext.xml");
    Product product = (Product) applicationContext.getBean("product");
    System.out.println(product);
}
(5)负责类型的属性注入
数组类型的属性注入
List集合类型的属性注入
Set集合类型的属性注入
Map集合类型的属性注入
Properties类型的属性注入
创建实例类:
public class CollectionBean {
    private String[] arrs;  //数组类型
    private List<String> list;  //List集合类型
    private Set<String> set; //Set集合类型
    private Map<String,Integer> map;  //Map集合类型
    private Properties properties;  //属性类型

    public String[] getArrs() {
        return arrs;
    }

    public void setArrs(String[] arrs) {
        this.arrs = arrs;
    }

    public List<String> getList() {
        return list;
    }

    public void setList(List<String> list) {
        this.list = list;
    }

    public Set<String> getSet() {
        return set;
    }

    public void setSet(Set<String> set) {
        this.set = set;
    }

    public Map<String, Integer> getMap() {
        return map;
    }

    public void setMap(Map<String, Integer> map) {
        this.map = map;
    }

    public Properties getProperties() {
        return properties;
    }

    public void setProperties(Properties properties) {
        this.properties = properties;
    }

    @Override
    public String toString() {
        return "CollectionBean{" +
                "arrs=" + Arrays.toString(arrs) +
                ", list=" + list +
                ", set=" + set +
                ", map=" + map +
                ", properties=" + properties +
                '}';
    }
}
Bean管理:
<bean id="collectionBean" class="com.imooc.ioc.demo5.CollectionBean">
    <!--数组类型的属性注入-->
    <property name="arrs">
        <list>
            <value>a</value>
            <value>b</value>
            <value>c</value>
        </list>
    </property>
    <!--List集合类型的属性注入-->
    <property name="list">
        <list>
            <value>11</value>
            <value>22</value>
            <value>33</value>
        </list>
    </property>
    <!--Set集合类型的属性注入-->
    <property name="set">
        <set>
            <value>10</value>
            <value>20</value>
            <value>30</value>
        </set>
    </property>
    <!--map集合类型的属性注入-->
    <property name="map">
        <map>
            <entry key="a" value="1"></entry>
            <entry key="b" value="2"></entry>
            <entry key="c" value="3"></entry>
        </map>
    </property>
    <!--properties属性注入-->
    <property name="properties">
        <props>
            <prop key="username">ming</prop>
            <prop key="password">123456</prop>
        </props>
    </property>
</bean>
调用:
public void demo1(){
    ApplicationContext applicationContext = new ClassPathXmlApplicationContext("applicationContext.xml");
    CollectionBean collectionBean = (CollectionBean) applicationContext.getBean("collectionBean");
    System.out.println(collectionBean);
    //CollectionBean{arrs=[a, b, c], list=[11, 22, 33], set=[10, 20, 30], map={a=1, b=2, c=3}, properties={password=123456, username=ming}}
}
8.Bean管理的注解方式
(1)简单使用
Spring2.5引入使用注解去定义Bean。
@Component 描述Spring框架中Bean,这样就无需在XML文件中进行配置
除了@Component外,Spring提供了3个基本功能和@Component等效的注解:
@Repository 用于对DAO实现类进行标注
@Service 用于对Service实现类进行标注
@Controller 用于对Controller实现类进行标注
比如:
import org.springframework.stereotype.Component;

@Component("userService")
public class UserService {
    public String sayHello(String name){
        return "Hello" + name;
    }
}

public void demo1(){
    ApplicationContext applicationContext = new ClassPathXmlApplicationContext("applicationContext.xml");
    UserService userService = (UserService) applicationContext.getBean("userService");
    System.out.println(userService.sayHello("ming"));
}
注解会帮我们完成XML的Bean配置。
(2)属性注入
使用@Autowored进行自动注入
@Autowired默认按照类型进行注入
如果存在两个相同Bean,则按照名称注入
@Autowired注入时可以针对成员变量或者set方法
通过@Autowired的required属性,设置一定要找到匹配的Bean。
使用@Qualifier指定注入Bean的名称
@Component("userService")
public class UserService {
    @Value("鱼")  //常规属性注入
    private String food;

    @Autowired  //对象注入
    private UserDao userDao;
    public String sayHello(String name){
        return "Hello" + name;
    }

    public void eat(){
        System.out.println("eat: " + food);
    }
    public void save(){
        System.out.println("Service中保存用户");
        userDao.save();  //将对象注入之后,才能调用其中的方法
    }
}
使用@Qualifier按照名称才能完成注入
@Autowired  //对象注入
@Qualifier("userDao")
private UserDao userDao;
@Resource相当于@Autowired+@Qualifier的功能。
类中如果有setter方法,那么注解需要加到setter方法上边。
(3)生命周期的注解
Spring初始化bean或销毁bean时,有时候需要一些处理工作,
因此Spring可以在创建和拆卸bean的时候,调用bean的两个生命周期方法。
那么如何使用注解的方式来完成了?
init-method初始化的时候,可以用@PostConstruct来代替。
destory-method销毁对象时,可以使用@PreDestroy
@Component("bean1")
public class Bean1 {
    @PostConstruct
    public void init(){
        System.out.println("initBean...");
    }

    public void say(){
        System.out.println("say...");
    }

    @PreDestroy
    public void destory(){
        System.out.println("destroyBean...");
    }
}

public void demo2() {
    ClassPathXmlApplicationContext classPathXmlApplicationContext = new ClassPathXmlApplicationContext("applicationContext.xml");
    Bean1 bean1 = (Bean1) classPathXmlApplicationContext.getBean("bean1");
    bean1.say();
    classPathXmlApplicationContext.close();
}
(4)注入范围的注解
使用注解配置的Bean和<bean>配置的一样,默认作用范围都是singleton。
使用@Scope注解用于指定Bean的作用范围。
@Component("bean2")
public class Bean2 {
}

public void demo2() {
    ClassPathXmlApplicationContext classPathXmlApplicationContext = new ClassPathXmlApplicationContext("applicationContext.xml");
    Bean2 bean1 = (Bean2) classPathXmlApplicationContext.getBean("bean2");
    Bean2 bean2 = (Bean2) classPathXmlApplicationContext.getBean("bean2");
    System.out.println(bean1);  //com.imooc.demo2.Bean2@79ca92b9
    System.out.println(bean2);  //com.imooc.demo2.Bean2@79ca92b9
}
如果指定作用范围:
@Component("bean2")
@Scope("prototype")
public class Bean2 {
}
结果将完全不同:
public void demo2() {
    ClassPathXmlApplicationContext classPathXmlApplicationContext = new ClassPathXmlApplicationContext("applicationContext.xml");
    Bean2 bean1 = (Bean2) classPathXmlApplicationContext.getBean("bean2");
    Bean2 bean2 = (Bean2) classPathXmlApplicationContext.getBean("bean2");
    System.out.println(bean1);  //com.imooc.demo2.Bean2@1198b989
    System.out.println(bean2);  //com.imooc.demo2.Bean2@7ff95560
}
9.传统XML配置和注解整合开发
XML方式的优势:
结构清晰,易于阅读
注解方式的优势:
开发便捷,属性注入方便
XML与注解和整合开发
1.引入context命名空间
2.在配置文件中添加context:annotation-config标签
(1)传统方式
public class CategoryDao {
    public void save(){
        System.out.println("CategoryDao中sava方法执行了");
    }
}
public class ProductDao {
    public void save(){
        System.out.println("ProductDao中sava方法执行了");
    }
}

public class ProductService {
    private CategoryDao categoryDao;
    private ProductDao productDao;

    public CategoryDao getCategoryDao() {
        return categoryDao;
    }

    public void setCategoryDao(CategoryDao categoryDao) {
        this.categoryDao = categoryDao;
    }

    public ProductDao getProductDao() {
        return productDao;
    }

    public void setProductDao(ProductDao productDao) {
        this.productDao = productDao;
    }

    public void save(){
        System.out.println("ProductService的save方法");
        categoryDao.save();
        productDao.save();
    }
}

<bean id="productService" class="com.imooc.demo3.ProductService">
    <property name="categoryDao" ref="categoryDao"/>
    <property name="productDao" ref="productDao"/>
</bean>
<bean id="categoryDao" class="com.imooc.demo3.CategoryDao"/>
<bean id="productDao" class="com.imooc.demo3.ProductDao"/>

public void demo1(){
    ApplicationContext applicationContext = new ClassPathXmlApplicationContext("applicationContext.xml");
    ProductService productService = (ProductService) applicationContext.getBean("productService");
    productService.save();
}
(2)混合开发
如果此时属性注入想使用注解方式,那么可以这样:
<context:annotation-config/>
<bean id="productService" class="com.imooc.demo3.ProductService">
</bean>
<bean id="categoryDao" class="com.imooc.demo3.CategoryDao"/>
<bean id="productDao" class="com.imooc.demo3.ProductDao"/>

public class ProductService {
    @Resource(name="categoryDao")  //属性注入
    private CategoryDao categoryDao;
    @Resource(name="productDao")
    private ProductDao productDao;

    public void save(){
        System.out.println("ProductService的save方法");
        categoryDao.save();
        productDao.save();
    }
}

public void demo1(){
    ApplicationContext applicationContext = new ClassPathXmlApplicationContext("applicationContext.xml");
    ProductService productService = (ProductService) applicationContext.getBean("productService");
    productService.save();
}
