一、ref创建基本类型的响应式数据
vue3可以使用ref、reactive去定义响应式数数据。
知识点汇总
- 使用ref需要先引入ref,
import {ref} from 'vue' - 在模板
template中使用了添加ref的响应式数据,变量的后面不用添加.value - 所有js代码里面,去操作res包裹的东西,必须要加上
.value - 使用ref包裹的变量,都变成了对象,其中不带下划线的
value是提供我们自己使用的。 - ref可以定义基本类型、对象类型的响应式数据。


这个value中就是真正的变量数据。
Person.vue组件中的代码:
<template>
    <div class="person">
        <!-- 模板里面不用 name.value,自动帮你加上.value -->
        <h2>姓名:{{name}}</h2>
        <h2>年龄:{{age}}</h2>
        <h2>地址:{{address}}</h2>
        <button @click="changeName">修改名字</button>
        <button @click="changeAge">增加年龄</button>
        <button @click="showTel">查看联系方式</button>
    </div>
</template>

<script setup lang="ts" name="Person">
    //引入ref,所有js代码里面,去操作res包裹的东西,必须要加上 .value
    import {ref} from 'vue'

    //数据
    let name = ref('张三') // 注意ref是函数
    let age = ref(18)
    let tel = 13888888888
    let address = '河北 . 邯郸'
    console.log(1,name)
    console.log(2,age)

    //方法
    function changeName(){
        name.value = 'zhang-san'
        console.log(1,name.value)
    }
    function changeAge(){
        age.value += 1
        console.log(2,age.value)
    }
    function showTel(){
        alert(tel)
    }
</script>

<style scoped>
    .person{
        background-color: skyblue;
        box-shadow: 0 0 10px;
        border-radius: 10px;
        padding: 20px;
    }
    button{
        margin: 0 5px;
    }
</style>
二、reactive创建对象类型的响应式数据
reactive用于定义对象类型的数据
知识点汇总:
- 使用reactive()可以把对象类型的数据变成响应式的。
- 数组也是对象,也可以使用reactive()去包裹数组。
- reactive定义的对象类型的响应式数据是深层次的。
- reactive只能定义对象类型的响应式数据。
<template>
    <div class="person">

       <h2>一辆{{car.brand}}价值{{car.price}}万</h2>
       <button @click="changePrice">修改汽车的价格</button>
        <hr>
        <ul>                        <!-- “:” 就是把 “g.id” 当成js表达式去解析-->
            <li v-for="g in games" :key="g.id">{{g.name}}</li>
        </ul>
        <button @click="changeFirstGame">修改第一个游戏的名字</button>

        <hr>
        <h2>测试:{{obj.a.b.c}}</h2>
        <button @click="changeC">修改第一个 c 的数字</button>
    </div>
</template>

<script setup lang="ts" name="Person">
    //引入reactive
    import {reactive} from 'vue'

    //使用 reactive 把car对象 变成响应式的
    //使用reactive(对象类型) 将对象类型的数据  变成响应式的
    let car = reactive({brand:'奔驰',price:100})
    console.log(car) //打印出来对象类型的数据存放在 Target 中

    //定义数组,数组也是对象
    //使用reactive(数组) 将数组类型的数据 变成响应式的
    let games = reactive([
        {id:'hjhdjshj01',name:'穿越火线'},
        {id:'hjhdjshj02',name:'王者荣耀'},
        {id:'hjhdjshj03',name:'原神'},
    ])

    //reactive定义的对象类型的响应式数据是深层次的
    let obj = reactive({
        a:{
            b:{
                c:666
            }
        }
    })

    //方法
    function changePrice(){
        car.price += 10
    }

    function changeFirstGame(){
        games[0].name = '恐龙快打'
    }

    //reactive定义的对象类型的响应式数据是深层次的
    function changeC(){
        obj.a.b.c = 777
    }
</script>

<style scoped>
    .person{
        background-color: skyblue;
        box-shadow: 0 0 10px;
        border-radius: 10px;
        padding: 20px;
    }
    button{
        margin: 0 5px;
    }
</style>
三、ref创建对象类型的响应式数据
注意: 使用ref处理对象类型的数据时在js代码中不要忘了加上 .value
ref处理对象类型的数据底层用的是reactive
<script setup lang="ts" name="Person">
    let car = ref({brand:'奔驰',price:100})
    let car1 = reactive({brand:'奔驰',price:100})
    console.log(car)
    console.log(car1)
</script>

<template>
    <div class="person">

       <h2>一辆{{car.brand}}价值{{car.price}}万</h2>
       <button @click="changePrice">修改汽车的价格</button>
        <hr>
        <ul>
            <li v-for="g in games" :key="g.id">{{g.name}}</li>
        </ul>
        <button @click="changeFirstGame">修改第一个游戏的名字</button>
    </div>
</template>

<script setup lang="ts" name="Person">
    //引入 ref
    import {ref} from 'vue'

    //使用 ref 把car对象 变成响应式的
    let car = ref({brand:'奔驰',price:100})

    //定义数组,数组也是对象
    let games = ref([
        {id:'hjhdjshj01',name:'穿越火线'},
        {id:'hjhdjshj02',name:'王者荣耀'},
        {id:'hjhdjshj03',name:'原神'},
    ])


    //方法
    function changePrice(){
        car.value.price += 10
    }

    function changeFirstGame(){
        games.value[0].name = '恐龙快打'
    }

</script>

<style scoped>
    .person{
        background-color: skyblue;
        box-shadow: 0 0 10px;
        border-radius: 10px;
        padding: 20px;
    }
    button{
        margin: 0 5px;
    }
</style>
四、ref对比reactive
通过Volar插件自动添加 .value

勾选上 Dot Value
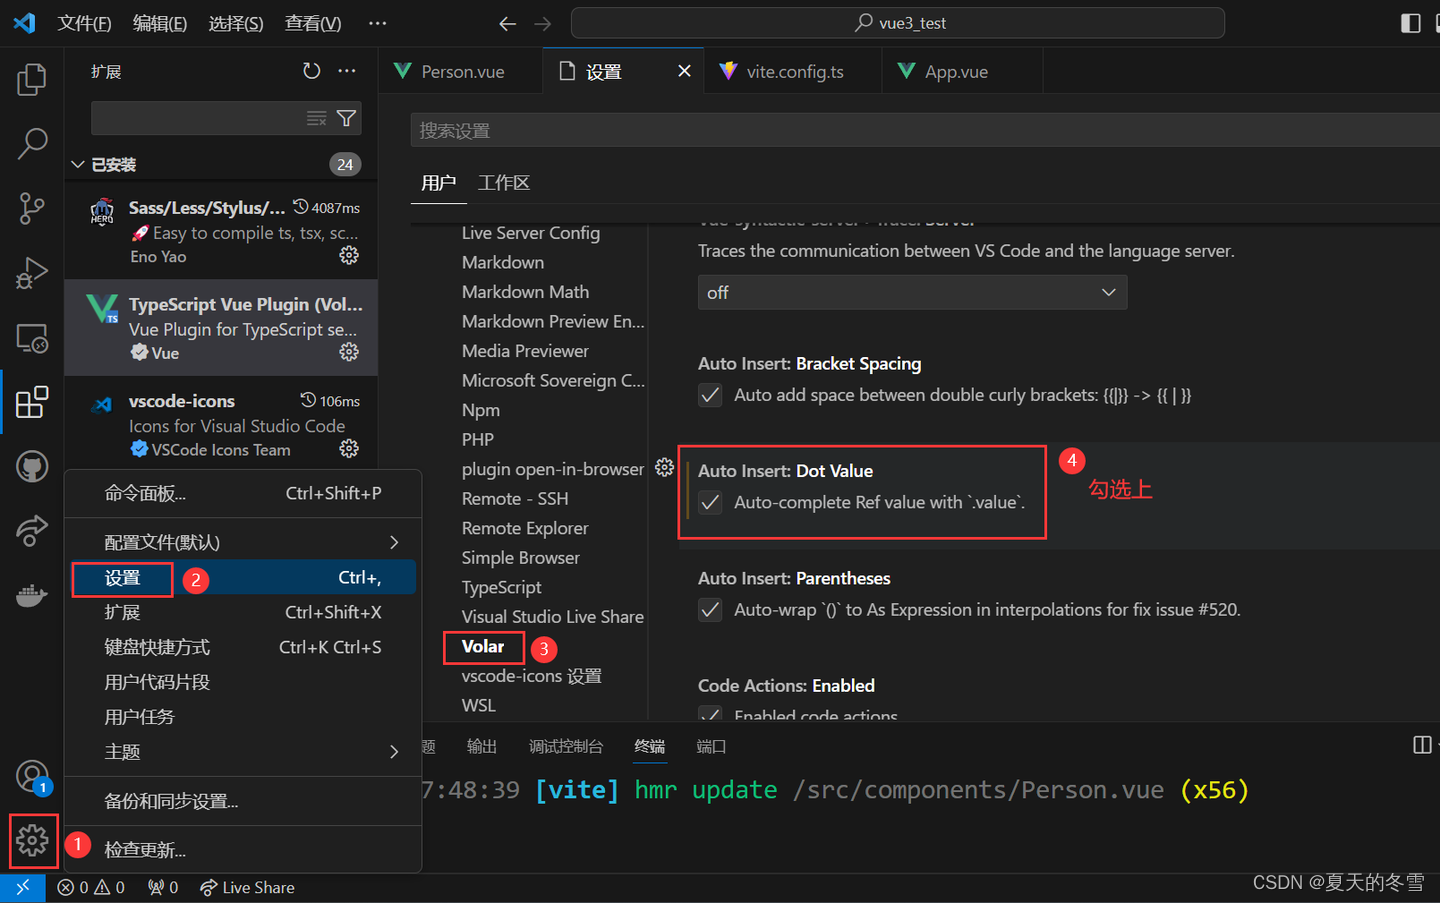
如果sum是被 ref() 包裹的数据赋予的,输入sum 便会自动填充.value

知识总结:
reactive重新分配一个新对象,会失去响应式(可以使用Object.assign去整体替换)。- Object.assign(obj1,obj2,obj3),表示把 obj2、obj3 中的每一组key-value组合都加在 obj1上,obj1原先的内容会被覆盖。
- 对于用 reactive 包裹的对象,如果要整体修改对象需要使用Object.assign(obj1,obj2,obj3)
- 如果用的是 ref 包裹的对象,可以直接使用对象进行赋值。也是响应式的。
- ref 带 .value 必然是响应式的。
代码示例:
<template>
    <div class="person">

       <h2>一辆{{car.brand}}价值{{car.price}}万</h2>
       <button @click="changeBrand">修改汽车的品牌</button>
       <button @click="changePrice">修改汽车的价格</button>
       <button @click="changeCar">修改汽车</button>

       <hr>
       <h2>当前求和为:{{sum}}</h2>
       <button @click="changeSum">点我sum+1</button>
    </div>
</template>

<script setup lang="ts" name="Person">
    //引入 ref、reactive
    import {ref,reactive} from 'vue'

    //数据
    let car = ref({brand:'奔驰',price:100})
    let sum = ref(0)

    //方法
    function changePrice(){
        car.value.price += 10
    }

    function changeBrand(){
        car.value.brand = '宝马'
    }

    function changeCar(){
      // 对于 reactive 来说
      // car = {brand:'奥拓',price:1}  //这样修改不了
      // car = reactive({brand:'奥拓',price:1}) //这样也是修改不了的。

      // 只有这种写法,才能响应式的修改 car 对象中的内容
      // Object.assign(obj1,obj2,obj3)
      // 把 obj2、obj3 中的每一组key-value组合都加在 obj1,obj1原先的内容会被覆盖
      // Object.assign(car,{brand:'奥拓',price:1}) //reactive的写法
      // 如果用的是 ref 可以直接修改
      car.value = {brand:'奥拓',price:1}
      // ref 带 .value 必然是响应式的。

    }

    function changeSum(){
        sum.value += 1
       // sum = ref(9)  //这样是不行的
    }

</script>

<style scoped>
    .person{
        background-color: skyblue;
        box-shadow: 0 0 10px;
        border-radius: 10px;
        padding: 20px;
    }
    button{
        margin: 0 5px;
    }
</style>
ref 和 reactive 的使用建议
- 若需要一个基本类型的响应式数据,必须使用
ref。 - 若需要一个响应式对象,层级不深,
ref、reactive都可以。 - 若需要一个响应式对象,且层级较深,推荐使用
reactive。
五、toRefs与toRef
toRefs()、toRef(),就是把一个响应式对象给解构出来,并且解构出来的数据也具备响应式。
代码示例:
<template>
    <div class="person">
        <h2>姓名:{{name}}</h2>
        <h2>年龄:{{age}},{{nl}}</h2>
        <button @click="changeName">修改姓名</button>
        <button @click="changeAge">修改年龄</button>
    </div>
</template>

<script setup lang="ts" name="Person">
    import {reactive,toRefs,toRef} from 'vue'

    //数据
    let person = reactive({
        name:'张三',
        age:18
    })

    //toRefs 的作用: 就是 把一个reactive定义的对象 变成 一个ref定义的对象
    //toRefs(person):此时的 name 和 age 就是响应式的了。
    let {name,age} = toRefs(person)

    // let {name,age} = person 相当于以下代码
    // let name = person.name
    // let age = person.age
    // 此时自定义的 name、age 不是响应式的 而 person.name、person.age 这两个是响应式

    //toRef
    // 第一个参数是响应式对象,第二个参数是变量名
    let nl = toRef(person,'age')
    console.log(nl) //nl 也是一个 响应式 数据

    // 方法
    function changeName(){
        name.value += '~'
        //自定义 name 里面的值 和 person.name里面的值都会发生改变
        console.log(name.value,person.name)
    }

    function changeAge(){
        age.value += 1
        console.log(age)
    }

</script>

<style scoped>
    .person{
        background-color: skyblue;
        box-shadow: 0 0 10px;
        border-radius: 10px;
        padding: 20px;
    }
    button{
        margin: 0 5px;
    }
</style>
power by 尚硅谷




](https://img-blog.csdnimg.cn/direct/e936552296ba40a3a2abfaa4e43f0c30.png#pic_center)

