QT应用篇
一、QT上位机串口编程
二、QML用Image组件实现Progress Bar 的效果
三、QML自定义显示SpinBox的加减按键图片及显示值效果
文章目录
- QT应用篇
- 前言
- 一、qml需求
- 二、使用组件
- 1.SpinBox组件
- 2.SpinBox中QML的使用
- 总结
前言
记录自己学习QML的一些小技巧方便日后查找
QT的 qml 使用SpinBox来自定义图片来达到花里胡哨的效果
一、qml需求
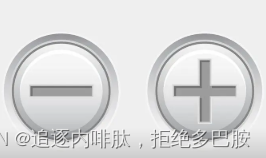
上位机需要用到SpinBox并需要一些特别的效果及位置的调整
例如:
二、使用组件
1.SpinBox组件
原始代码如下:
import QtQuick 2.12
import QtQuick.Controls 2.12
import QtQuick.Shapes 1.12
import QtMultimedia 5.12
...
...
...
         SpinBox {
            id: spinBox
            x: -164
            y: 393
            from: 0
            to:outFlowSpinBox.value
            stepSize: 2


        }
原始代码效果:

2.SpinBox中QML的使用
SpinBox允许用户通过单击向上或向下指示按钮,或通过按键盘上的向上或向下来选择一个整数值。另外,SpinBox也可以是可编辑的,这样用户就可以在输入字段中输入文本值。默认情况下,SpinBox提供[0-99]范围内的整数值,步数stepSize为1。
属性:
●
down.pressed : bool,只读属性,返回true,表示向下指示按钮被点击了.
●down.indicator : Item,向下指示按钮指标器,可以重写它自定义样式
●down.hovered : bool,只读属性,返回true,表示鼠标徘徊在向下指示按钮的上方
●editable : bool,输入字段是否可以编辑,默认为false
●from : int,此属性保存范围的起始值。默认值为0。
●inputMethodHints : flags,用来提示QML键盘应该输入的类型的值
●stepSize: int,步长
●textFromValue: 由整数值切换为显示文本时的函数,函数可以有一个或两个参数,第一个参数是要转换的值,第二个可选参数是用于转换的区域设置,可以重写它,让我们显示自定义数值文本
●to : int,此属性保存范围的结束值。默认值为99。
●up.pressed : bool,只读属性,返回true,表示向上指示按钮被点击了.
●up.indicator : Item,向上指示按钮指标器,可以重写它自定义样式
●up.hovered : bool,只读属性,返回true,表示鼠标徘徊在向上指示按钮的上方
●validator : Validator,输入字段编辑的验证器,必须editable为true,并且SpinBox默认是用IntValidator来接受整数的输入,我们也可以改为DoubleValidator,这样就可以写浮点数了
●value : int,当前值,默认值为0。
●valueFromText : function,由当前显示的内容切换为整数值的函数,函数可以有一个或两个参数,第一个参数是要转换的text,第二个可选参数是用于转换的区域设置,可以重写它,来获取显示的自定义文本对应的数值
代码示例:(仅显示组件关键代码)
Rectangle {
                x: 101
                y: 85
                width: 86
                height: 109
                color: "#00e7eff4"
                radius: 4

                TextBase {
                    x: -90
                    y: -91
                    color: "#1e2a64"
                    text: {
                        if (SpinBox1.value < 10 )
                        {
                            return qsTr("0") + SpinBox1.value
                        }
                        else
                        {
                            return SpinBox1.value
                        }

                    }
                    font.bold: true
                    anchors.fill: parent
                    font.pixelSize: 75
                }
            }
			SpinBox {
                id: SpinBox1
                x: -11
                y: 6
                down.indicator: Rectangle {
                    x: 39
                    y: 125
                    width: 50
                    height: 43
                    color: "#00000000"
                    Image {
                        x: 0
                        y: 0
                        width: 35
                        height: 43
                        source: {
                            if (SpinBox1.down.pressed == true)
                            {
                                return resourcesPath + "minus_pressed.png"
                            }
                            else
                            {
                                return resourcesPath + "minus.png"
                            }

                        }
                    }
                }
                up.indicator: Rectangle {
                    x: 213
                    y: 125
                    width: 50
                    height: 43
                    color: "#00000000"
                    Image {
                        x: 0
                        y: 0
                        width: 35
                        height: 43
                        source: {
                            if (SpinBox1.up.pressed == true)
                            {
                                return resourcesPath + "plus_pressed.png"
                            }
                            else
                            {
                                return resourcesPath + "plus.png"
                            }

                        }
                    }
                }
                enabled:  true

                }
                to: 10
                anchors.fill: parent
                editable: true
                from: 1
                background: Rectangle {
                    color: "#0007263a"
                    anchors.fill: parent
                }
                stepSize: 1
                contentItem: TextBase {
                    x: 0
                    y: 0
                    visible: false
                    anchors.fill: parent
                }
                value: 5
            }
实际效果:

总结
通过使用Image组件的fillMode来实现想要的功能

