文章目录
- 前言
- 一、@Value注解
- Product类
- spring配置文件
- 测试程序
- 运行结果
- 二、@Autowired与@Qualifier注解
- 1.创建OrderDao接口
- 2.创建OrderDao接口实现类
- 3.创建OrderService类
- 4.配置文件
- 5.测试程序
- 6.运行结果
- 三、@Resource注解(重要)
- 1、创建StudentDao接口
- 2、创建接口实现类
- 3、创建StudentService类
- 4、测试程序
- 5、运行结果
- 四、全注解式开发
前言
IoC是控制反转,指的是①、把创建对象的权利交出去,让别人创建,②、创建之后两个对象之间关系的维护也不管了,交给Spring去管理。spring去依赖注入。
@Component、@Controller、@Service、@Repository
这四个注解是用来声明Bean的,声明后这些Bean将被实例化。如何给Bean的属性赋值?
一、@Value注解
当属性的类型是简单类型时。可以使用@Value注解进行注入,用这个注解的前提是先声明Bean,交给Spring容器来管理。
Product类
使用@Value注解的注入的话,可以用在属性上,并且可以不提供setter方法
@Component
public class Product {
    @Value("亲亲虾条")
    private String name;
    @Value("3")
    private int price;

    @Override
    public String toString() {
        return "Product{" +
                "name='" + name + '\'' +
                ", price=" + price +
                '}';
    }
}
spring配置文件
<?xml version="1.0" encoding="UTF-8"?>
<beans xmlns="http://www.springframework.org/schema/beans"
       xmlns:xsi="http://www.w3.org/2001/XMLSchema-instance"
       xmlns:context="http://www.springframework.org/schema/context"
       xsi:schemaLocation="http://www.springframework.org/schema/beans http://www.springframework.org/schema/beans/spring-beans.xsd
                            http://www.springframework.org/schema/context  http://www.springframework.org/schema/context/spring-context.xsd">
<context:component-scan base-package="com.powernode.bean3"></context:component-scan>
</beans>
测试程序
    @Test
    public void testValue(){
        ApplicationContext context = new ClassPathXmlApplicationContext("spring-Di.xml");
        Product product = (Product) context.getBean("product");
        System.out.println(product);

    }
运行结果

@Value注解也可以用在set方法上
@Component
public class Product {
    private String name;
    private int price;

    @Value("盼盼虾条")
    public void setName(String name) {
        this.name = name;
    }
    @Value("5")
    public void setPrice(int price) {
        this.price = price;
    }

    @Override
    public String toString() {
        return "Product{" +
                "name='" + name + '\'' +
                ", price=" + price +
                '}';
    }
}

@Value注解也可以用在构造方法的形参上
@Component
public class Product {
    private String name;
    private int price;

    public Product(@Value("达利园虾条") String name, @Value("4") int price) {
        this.name = name;
        this.price = price;
    }

    @Override
    public String toString() {
        return "Product{" +
                "name='" + name + '\'' +
                ", price=" + price +
                '}';
    }
}

二、@Autowired与@Qualifier注解
@Autowired注解可以用来注入非简单类型
单独使用@Autowire注解,默认根据类型类型装配
1.创建OrderDao接口
public interface OrderDao {
    void insert();
}
2.创建OrderDao接口实现类
@Repository
public class OrderDaoImpl implements OrderDao {
    @Override
    public void insert() {
        System.out.println("正在保存订单信息");
    }
}
3.创建OrderService类
OrderService类中有OrderDao 属性
在属性上添加@Autowired注解
不需要指定任何属性,直接使用这个注解即可
这个注解的作用的根据类型byType进行自动装配
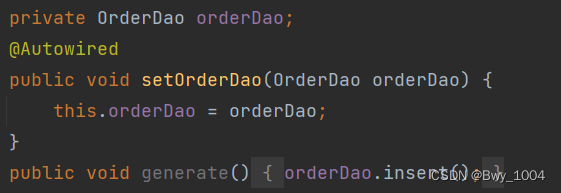
这里给属性添加set方法 并且在set方法上添加@Autowired注解也是可以的
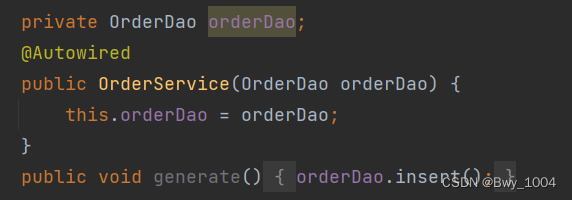
给带有参数的构造方法上添加@Autowired注解也是可以的
给带有参数的构造方法的参数上添加@Autowired注解也是可以的
只有一个构造方法,并且构造方法的一个参数要和属性对应上,这种情况下@Autowired可以省略
@Service
public class OrderService {

    //不需要指定任何属性,直接使用这个注解即可
    //这个注解的作用的根据类型byType进行自动装配
    @Autowired
    private OrderDao orderDao;
    public void generate(){
        orderDao.insert();
    }
}
4.配置文件
<?xml version="1.0" encoding="UTF-8"?>
<beans xmlns="http://www.springframework.org/schema/beans"
       xmlns:xsi="http://www.w3.org/2001/XMLSchema-instance"
       xmlns:context="http://www.springframework.org/schema/context"
       xsi:schemaLocation="http://www.springframework.org/schema/beans http://www.springframework.org/schema/beans/spring-beans.xsd
                            http://www.springframework.org/schema/context  http://www.springframework.org/schema/context/spring-context.xsd">


    <context:component-scan base-package="org.powernode"></context:component-scan>

</beans>
5.测试程序
    @Test
    public void testAutowired(){
        ApplicationContext context = new ClassPathXmlApplicationContext("spring-autowired.xml");
        OrderService orderService = context.getBean("orderService", OrderService.class);
        orderService.generate();
    }
6.运行结果

但是当impl包下有两个实现类时,只靠@Autowired注解完成不了给属性赋值的操作

如果使用@Autowired注解,一定是根据类型进行装配的
如果想解决以上问题,只能根据名字进行装配。
@Autowired和@Qualifier联合使用就可解决以上问题
@Autowired
@Qualifier(“orderDaoImpl2”)
指定是哪个Bean
@Service
public class OrderService {

    //不需要指定任何属性,直接使用这个注解即可
    //这个注解的作用的根据类型byType进行自动装配
    @Autowired
    @Qualifier("orderDaoImpl2")
    private OrderDao orderDao;
    public void generate(){
        orderDao.insert();
    }
}

三、@Resource注解(重要)
@Resource注解也可以完成非简单类型的注入,那它和@Autowired注解有什么区别?
- @Resource注解是JDK扩展包中的,也就是说属于JDK的一部分。所以该注解是标准注解,更加具有通用性
- @Autowired注解是spring框架自己的
- @Resource注解默认根据名称来装配byName,未指定name时,使用属性名作为name,通过name找不到的话会自动启动通过类型byType装配
- @Autowired注解默认根据类型装配byType,如果想根据名称装配,需要配合@Qualifier注解一起用
- @Resource注解用在属性上、setter方法上
- @Autowirede注解用在属性上、setter方法上、构造方法上、构造方法参数上。
1、创建StudentDao接口
public interface StudentDao {
    void deleteById();
}
2、创建接口实现类
StudentDaoImpl:
@Repository
public class StudentDaoImpl implements StudentDao {
    @Override
    public void deleteById() {
        System.out.println("mysql数据库正在删除学生信息");
    }
}
3、创建StudentService类
使用@Resource注解
这里给属性添加set方法 并且在set方法上添加@Resource注解也是可以的
不能出现在构造方法上
@Service
public class StudentService {
    @Resource(name ="studentDaoImpl")//根据名字进行装配
    private StudentDao studentDao;
    public void deleteStudent(){
        studentDao.deleteById();
    }
}
4、测试程序
   @Test
    public void testResource(){
        ApplicationContext context = new ClassPathXmlApplicationContext("spring-resource.xml");
        StudentService service = context.getBean("studentService", StudentService.class);
        service.deleteStudent();
    }
5、运行结果

@Resource注解默认根据名称来装配byName,未指定name时,使用属性名作为name,通过name找不到的话会自动启动通过类型byType装配
未指定name时,使用属性名作为name
Resource注解没有指定name属性的值时,就默认将当前的属性名(studentDao)作为name的值进行查找,此时需要对StudentDaoImpl类中的@Repository注解name值也得为属性值才行(@Repository(“studentDao”)):
StudentService:
@Service
public class StudentService {
    @Resource//根据名字进行装配
    private StudentDao studentDao;
    public void deleteStudent(){
        studentDao.deleteById();
    }
}
StudentDaoImpl:
@Repository("studentDao")
public class StudentDaoImpl implements StudentDao {
    @Override
    public void deleteById() {
        System.out.println("mysql数据库正在删除学生信息");
    }
}
四、全注解式开发
所谓全注解式开发就是不再使用spring配置文件了。写一个配置类来代替配置文件。
编写一个类代替spring框架的配置文件
@Configuration
@ComponentScan({"cn.powernode.dao","cn.powernode.service"})
public class SpringConfig {
}
测试程序:
注意:测试程序中不能再写
ApplicationContext context = new ClassPathXmlApplicationContext(“spring-resource.xml”);
应该如下:
AnnotationConfigApplicationContext context = new AnnotationConfigApplicationContext(SpringConfig.class);
