在Jetpack Compose中使用ExoPlayer实现直播流和音频均衡器
背景
ExoPlayer与Media3的能力结合,为Android应用程序播放多媒体内容提供了强大的解决方案。在本教程中,我们将介绍如何设置带有Media3的ExoPlayer来支持使用M3U8 URL进行直播流。此外,我们还将探讨如何集成音频均衡器,为用户提供个性化的音频体验。
使用ExoPlayer进行直播流涉及到利用ExoPlayer库的强大能力,在互联网上实时播放多媒体内容。
在这个探索中,我们将深入了解ExoPlayer如何实现无缝播放直播流URL的复杂性,为用户提供沉浸式体验。
ExoPlayer如何处理直播流?
使用ExoPlayer进行直播流主要围绕着有效地处理音频和视频内容的实时传输。该过程包括几个关键阶段:
- 内容源(
Content Source):使用摄像机和麦克风捕获直播内容,然后将此直播流可用于流媒体。 - 编码(
Encoding):捕获的内容被编码为适用于流媒体的数字格式。这涉及将原始音频和视频数据压缩并转换为与流媒体协议兼容的格式。 - 流媒体服务器(
Streaming Server):编码数据发送到充当中央枢纽的流媒体服务器。该服务器通过向用户设备发送数据包来管理多个观众的直播内容分发。 - ExoPlayer集成(
ExoPlayer Integration):将具有强大能力的ExoPlayer集成到应用程序中,以处理直播流的播放。应用程序获取直播流URL,并配置ExoPlayer以处理流媒体协议(例如HLS或DASH)。 - 观众设备(
Viewer’s Device):用户通过各种设备访问直播流,包括智能手机、平板电脑、计算机或智能电视。观众设备上的ExoPlayer实例解码接收到的数据,使他们可以实时观看或收听直播内容。
设置ExoPlayer以进行直播流
要将ExoPlayer集成到我们的应用程序中以进行直播流,我们需要遵循以下关键步骤:
1.添加依赖项
在项目的build.gradle文件中包含必要的依赖项:
// Exoplayer dependencies
implementation("androidx.media3:media3-exoplayer:1.2.0")
implementation("androidx.media3:media3-ui:1.2.0")
implementation("androidx.media3:media3-exoplayer-hls:1.2.0")
这些依赖项确保应用程序可以利用ExoPlayer的功能进行直播流。
- 创建ExoPlayerManager
我们将创建一个管理器类来处理ExoPlayer实例。这可以确保应用程序的整个生命周期中只有一个播放器实例。
object ExoPlayerManager {
    private var exoPlayer: ExoPlayer? = null

    fun getExoPlayer(context: Context): ExoPlayer {
        if (exoPlayer == null) {
            exoPlayer = ExoPlayer.Builder(context).build()
        }
        return exoPlayer!!
    }

    fun releaseExoPlayer() {
        exoPlayer?.release()
        exoPlayer = null
    }
}
- 初始化ExoPlayer
在您的Composable函数中,使用示例HLS流URL初始化ExoPlayer:
@Composable
fun LiveStreamingScreen() {

    // Obtain the current context and lifecycle owner using LocalContext and LocalLifecycleOwner
    val context = LocalContext.current
    val lifecycleOwner = LocalLifecycleOwner.current

    // Remember the ExoPlayer instance to persist across recompositions
    val exoPlayer = remember { ExoPlayerManager.getExoPlayer(context) }

    // Launch an effect to initialize ExoPlayer and set up the media source
    LaunchedEffect(key1 = Unit) {

        // Create a data source factory for handling media requests
        val dataSourceFactory = DefaultHttpDataSource.Factory()

        // Define the URI for the sample HLS stream
        val uri = Uri.Builder()
            .encodedPath("http://sample.vodobox.net/skate_phantom_flex_4k/skate_phantom_flex_4k.m3u8")
            .build()
        val mediaItem = MediaItem.Builder().setUri(uri).build()

        // Create an HlsMediaSource from the media item for handling HTTP Live Streaming (HLS) content
        val internetVideoSource =
            HlsMediaSource.Factory(dataSourceFactory).createMediaSource(mediaItem)

        exoPlayer.setMediaSource(internetVideoSource)
        exoPlayer.prepare()

        // Will be used in later implementation for Equalizer
        viewModel.onStart(exoPlayer.audioSessionId)
    }

    // ...
}
- 显示ExoPlayer视图
将ExoPlayer视图集成到您的Composable函数中
// ...
Box(modifier = Modifier.fillMaxSize()) {
    AndroidView(
        modifier =
            Modifier.fillMaxWidth()
                .aspectRatio(1.4f)
                .padding(top = 16.dp)
                .background(Color.Black),
        factory = {
            PlayerView(context).apply {
                // Connect the ExoPlayer instance to the PlayerView
                player = exoPlayer
                // Configure ExoPlayer settings
                exoPlayer.repeatMode = Player.REPEAT_MODE_ONE
                exoPlayer.playWhenReady = false
                useController = true
            }
        }
    )
}
// ...
- 观察生命周期事件并释放资源
设置DisposableEffects来观察生命周期事件,并在组合函数被释放时释放ExoPlayer:
// ...
// Observe lifecycle events (e.g., app resume and pause)
// and adjust ExoPlayer's playback state accordingly.
DisposableEffect(key1 = lifecycleOwner) {
    val observer = LifecycleEventObserver { _, event ->
        if (event == Lifecycle.Event.ON_RESUME) {
            exoPlayer.playWhenReady = true
        } else if (event == Lifecycle.Event.ON_PAUSE) {
            exoPlayer.playWhenReady = false
        }
    }
    lifecycleOwner.lifecycle.addObserver(observer)
    onDispose {
        lifecycleOwner.lifecycle.removeObserver(observer)
    }
}

// Release the ExoPlayer when the composable is disposed
// This helps in proper resource management
DisposableEffect(key1 = Unit) {
    onDispose { ExoPlayerManager.releaseExoPlayer() }
}
// ...
设置音频均衡器
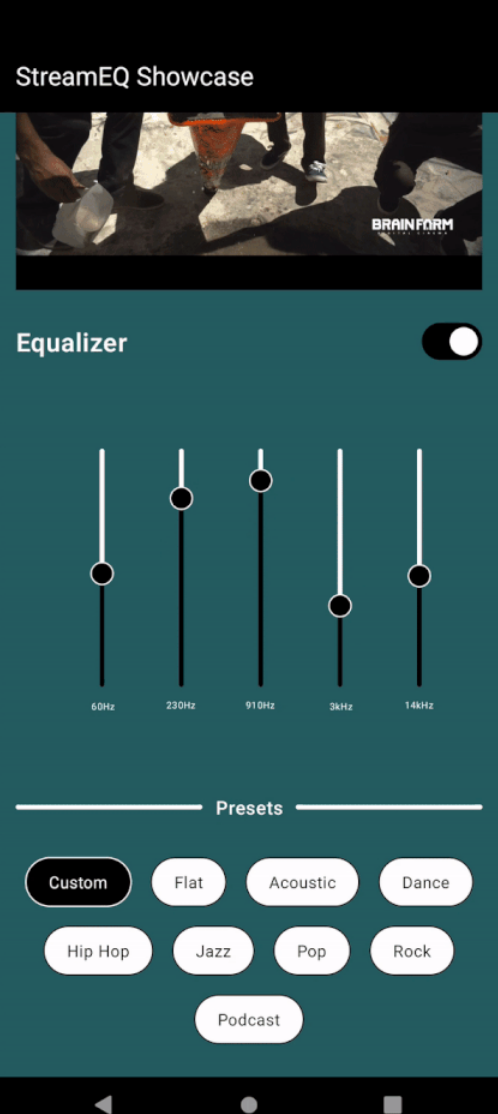
现在,让我们探讨如何在使用Jetpack Compose的Exoplayer设置中集成音频均衡器。这将允许用户通过调整预设均衡器设置或创建自定义均衡器配置来自定义音频体验。
音频均衡器通过提供对音频输出的细粒度控制来增强用户体验。
- 添加依赖项
在项目的build.gradle文件中包含必要的依赖项:
    implementation("com.google.dagger:hilt-android:2.48")
    kapt("com.google.dagger:hilt-android-compiler:2.47")
    implementation("androidx.hilt:hilt-navigation-compose:1.1.0")

    //Gson
    implementation("com.google.code.gson:gson:2.9.1")
以上是示例依赖项,您可以根据您的项目需要进行相应的更改。
这些依赖项确保您的应用程序可以利用Hilt进行依赖注入和Gson以高效地将复杂数据存储在首选项中。
- 定义均衡器预设和增益值
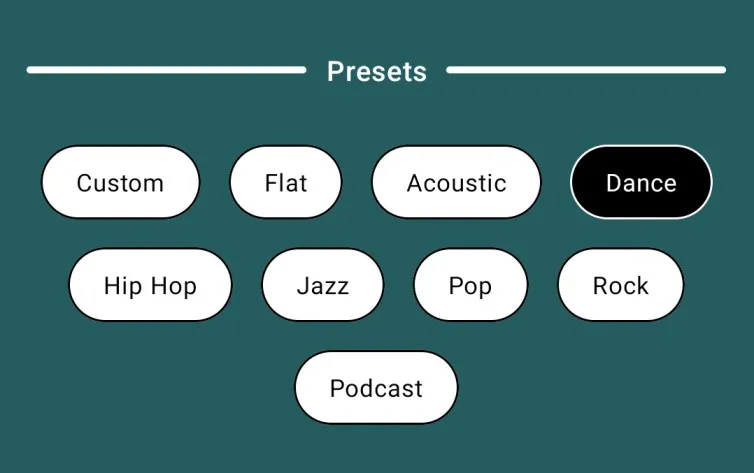
我们定义了一组预设,例如Flat,Acoustic,和Rock,每个预设都有相应的增益值来控制音频频率。这些预设将作为用户自定义其音频体验的起点。
// Equalizer presets and gain values
val effectType = arrayListOf(
    "Custom", "Flat", "Acoustic", "Dance",
    "Hip Hop", "Jazz", "Pop", "Rock", "Podcast"
)

// Constants for presets
const val PRESET_CUSTOM = 0
const val PRESET_FLAT = 1
const val PRESET_ACOUSTIC = 2
const val PRESET_DANCE_LOUNGE = 3
const val PRESET_HIP_HOP = 4
const val PRESET_JAZZ_BLUES = 5
const val PRESET_POP = 6
const val PRESET_ROCK = 7
const val PRESET_PODCAST = 8

// Gain values for each preset
val FLAT = arrayListOf(0.0, 0.0, 0.0, 0.0, 0.0)
val ACOUSTIC = arrayListOf(0.44, 0.12, 0.12, 0.34, 0.2)
val DANCE = arrayListOf(0.52, 0.08, 0.28, 0.48, 0.06)
val HIP_HOPE = arrayListOf(0.44, 0.06, -0.14, 0.1, 0.38)
val JAZZ = arrayListOf(0.32, 0.0, 0.22, 0.1, 0.2)
val POP = arrayListOf(-0.14, 0.28, 0.38, 0.22, -0.2)
val ROCK = arrayListOf(0.38, 0.2, -0.04, 0.02, 0.34)
val PODCAST = arrayListOf(-0.12, 0.26, 0.36, 0.16, -0.2)
在上面的代码中,我们定义了一个EqualizerConfiguration数据类,它包含了预设设置和自定义频段设置的列表。EqualizerPreset类表示一个均衡器预设,包括名称和增益值的列表。CustomEqualizerBand类表示自定义的均衡器频段,包括频率和增益值。通过使用这些数据结构,我们可以轻松地管理和应用均衡器配置。
- 创建音频效果数据类
音频效果数据类包含了关于所选效果类型及其相应增益值的重要信息。这个数据类充当用户偏好与音频均衡器实际实现之间的桥梁。
// 表示音频效果配置的数据类
data class AudioEffects(
    var selectedEffectType: Int = 0,
    var gainValues: ArrayList<Double>
)
在这里,selectedEffectType表示所选的音频预设,而gainValues则存储了不同频段的自定义增益值。这个数据类封装了用户的音频偏好设置。
- 创建AppModule进行依赖注入
为了实现清晰模块化的依赖注入,我们引入了AppModule。这个模块使用@InstallIn(SingletonComponent::class)进行标注,提供了诸如Gson和SharedPreferences等必要的依赖项。
@Module
@InstallIn(SingletonComponent::class)
class AppModule {
    @Provides
    @Singleton
    fun provideGson(): Gson {
        val gsonBuilder = GsonBuilder()
        return gsonBuilder.create()
    }

    @Named(AUDIO_EFFECT_PREFERENCES)
    @Provides
    fun provideAudioEffectPreferences(application: Application): SharedPreferences {
        return application.getSharedPreferences(AUDIO_EFFECT_PREFERENCES, Context.MODE_PRIVATE)
    }
}
在这个模块中,provideGson提供了一个Gson的单例实例,而provideAudioEffectPreferences则提供了一个特定用于音频效果偏好设置的SharedPreferences实例。这个模块对于管理整个应用程序的依赖项非常重要。
- 使用
SharedPreferences和Gson实现均衡器偏好设置
为了提供无缝的用户体验,我们将利用SharedPreferences来持久化与音频均衡器相关的用户偏好设置。此外,我们使用Gson进行高效的数据序列化,使我们能够将复杂的数据结构转换为易于存储和检索的格式。通过创建一个EqualizerPreferences类,我们确保用户不必重复设置他们的均衡器偏好设置。
const val AUDIO_EFFECT_PREFERENCES = "audio_effect_preferences"

private const val AUDIO_EFFECT_IS_EQUALIZER_ENABLED = "is_equalizer_enabled"
private const val AUDIO_EFFECT_EQUALIZER_SETTING = "equalizer_audio_effect"
private const val AUDIO_EFFECT_LOWEST_BAND_LEVEL = "equalizer_lowest_band_level"

@Singleton
class EqualizerPreferences
@Inject constructor(
    @param:Named(AUDIO_EFFECT_PREFERENCES) private val sharedPreferences: SharedPreferences,
    private val gson: Gson
) {

    var isEqualizerEnabled: Boolean
        get() = sharedPreferences.getBoolean(AUDIO_EFFECT_IS_EQUALIZER_ENABLED, false)
        set(isEnable) = sharedPreferences.edit()
            .putBoolean(AUDIO_EFFECT_IS_EQUALIZER_ENABLED, isEnable).apply()

    // Getting and setting the user's audio preferences
    var audioEffects: AudioEffects?
        get() {
            val json = sharedPreferences.getString(AUDIO_EFFECT_EQUALIZER_SETTING, null)
            if (json != null) {
                try {
                    return gson.fromJson(json, AudioEffects::class.java)
                } catch (t: Throwable) {
                    t.printStackTrace()
                }
            }
            return null
        }
        set(audioEffects) {
            var json: String? = null
            if (audioEffects != null) {
                json = gson.toJson(audioEffects)
            }
            sharedPreferences.edit().putString(AUDIO_EFFECT_EQUALIZER_SETTING, json).apply()
        }

    var lowestBandLevel: Int
        get() = sharedPreferences.getInt(AUDIO_EFFECT_LOWEST_BAND_LEVEL, 0)
        set(value) = sharedPreferences.edit().putInt(AUDIO_EFFECT_LOWEST_BAND_LEVEL, value).apply()
}
上述代码展示了如何使用SharedPreferences和Gson来保存和加载音频效果配置。saveAudioEffects方法将AudioEffects对象转换为JSON字符串,并将其保存在SharedPreferences中。loadAudioEffects方法从SharedPreferences中获取JSON字符串,并将其转换回AudioEffects对象。通过使用EqualizerPreferences类,我们可以方便地管理和访问均衡器偏好设置。
在这里,Gson在将我们的AudioEffects数据类转换为JSON字符串以存储在SharedPreferences中方面起着至关重要的作用。这确保了一种无缝且高效的方式来存储和检索复杂的数据结构。
- 创建一个音频均衡器ViewModel
创建一个强大的AudioEqualizerViewModel,负责管理音频均衡器逻辑。这个ViewModel初始化均衡器,处理预设选择,并根据用户交互更新设置。
@HiltViewModel
class AudioEqualizerViewModel @Inject constructor(
    private val equalizerPreferences: EqualizerPreferences
) : ViewModel() {

    // MutableStateFlow to observe and emit changes in audio effects
    val audioEffects = MutableStateFlow<AudioEffects?>(null)

    // Instance of the Equalizer class from the Android system library
    private var equalizer: Equalizer? = null

    // MutableStateFlow to observe and emit changes in the equalizer's enable/disable state
    val enableEqualizer = MutableStateFlow(false)

    // Unique audio session ID associated with the Exoplayer
    private var audioSessionId = 0

    init {
        // Retrieve and set the initial equalizer enable/disable state and audio effects from preferences
        enableEqualizer.value = equalizerPreferences.isEqualizerEnabled
        audioEffects.tryEmit(equalizerPreferences.audioEffects)

        if (audioEffects.value == null) {
            audioEffects.tryEmit(AudioEffects(PRESET_FLAT, FLAT))
        }
    }

    // Will be called when exoplayer instance is created and we have audioSessionId
    fun onStart(sessionId: Int) {
        audioSessionId = sessionId
        equalizer?.enabled = enableEqualizer.value
        equalizer = Equalizer(Int.MAX_VALUE, audioSessionId)

        // Set the lowest band level based on the equalizer's capabilities
        equalizerPreferences.lowestBandLevel = equalizer?.bandLevelRange?.get(0)?.toInt() ?: 0

        // Apply gain values to the equalizer based on the stored audio effects
        audioEffects.value?.gainValues?.forEachIndexed { index, value ->
            val bandLevel = (value * 1000).toInt().toShort()
            equalizer?.setBandLevel(index.toShort(), bandLevel)
        }
    }

    // Method called when a preset is selected
    fun onSelectPreset(presetPosition: Int) {

        // Return if no audio effects are available
        if (audioEffects.value == null) return

        // Determine the gain values based on the selected preset
        val gain = if (presetPosition == PRESET_CUSTOM) {
            ArrayList(audioEffects.value!!.gainValues)
        } else {
            ArrayList(getPresetGainValue(presetPosition))
        }

        // Update the audio effects with the selected preset and gain values
        audioEffects.tryEmit(AudioEffects(presetPosition, gain))
        equalizerPreferences.audioEffects = audioEffects.value

        // Apply the gain values to the equalizer
        equalizer?.apply {
            gain.forEachIndexed { index, value ->
                val bandLevel = (value * 1000).toInt().toShort()
                setBandLevel(index.toShort(), bandLevel)
            }
        }
    }

    // Method called when a specific band level is changed by the user
    fun onBandLevelChanged(changedBand: Int, newGainValue: Int) {
        // Retrieve the lowest band level from preferences
        val lowest = equalizerPreferences.lowestBandLevel

        // Calculate the new band level
        val bandLevel = newGainValue.plus(lowest)

        // Apply the new band level to the equalizer
        equalizer?.setBandLevel(changedBand.toShort(), bandLevel.toShort())
        val list = ArrayList(audioEffects.value!!.gainValues)
        list[changedBand] = (newGainValue.toDouble() / 1000)
        audioEffects.tryEmit(
            AudioEffects(
                PRESET_CUSTOM,
                list
            )
        )
        equalizerPreferences.audioEffects = audioEffects.value
    }

    // Method called to toggle the equalizer's enable/disable state
    fun toggleEqualizer() {
        enableEqualizer.tryEmit(!enableEqualizer.value)
        equalizer?.enabled = enableEqualizer.value
        equalizerPreferences.isEqualizerEnabled = enableEqualizer.value
        if (!enableEqualizer.value) {
            audioEffects.tryEmit(AudioEffects(PRESET_FLAT, FLAT))
            equalizerPreferences.audioEffects = audioEffects.value
        }
    }

    // Method to retrieve gain values for a specific preset
    private fun getPresetGainValue(index: Int): List<Double> {
        return when (index) {
            PRESET_FLAT -> FLAT
            PRESET_ACOUSTIC -> ACOUSTIC
            PRESET_DANCE_LOUNGE -> DANCE
            PRESET_HIP_HOP -> HIP_HOPE
            PRESET_JAZZ_BLUES -> JAZZ
            PRESET_POP -> POP
            PRESET_ROCK -> ROCK
            PRESET_PODCAST -> PODCAST
            else -> FLAT
        }
    }
}
这个ViewModel高效地管理音频均衡器的状态,处理用户交互,并确保使用SharedPreferences持久化用户偏好设置。
- 开发均衡器开关视图、预设视图和均衡器视图组件
设计一个用户友好的均衡器开关、均衡器视图和预设视图组件,让用户可以可视化和调整均衡器设置。开关允许用户使用均衡器启用/禁用音频设置,而均衡器视图将包含不同频率带的滑块,提供高度可定制的音频体验。预设视图将包含一些预定义的效果类型,可以直接应用到均衡器上。
Switch View
Row(
    modifier = Modifier.fillMaxWidth(),
    horizontalArrangement = Arrangement.SpaceBetween,
    verticalAlignment = Alignment.CenterVertically
) {
    Text(
        text = stringResource(R.string.equalizer_title_text),
        fontSize = MaterialTheme.typography.titleLarge.fontSize,
        fontWeight = FontWeight.SemiBold,
        color = Color.White
    )

    Switch(
        checked = enableEqualizer,
        onCheckedChange = {
            // Toggle the equalizer's enable/disable state
            viewModel.toggleEqualizer()
        },
        colors =
            SwitchDefaults.colors(
                checkedTrackColor = Color.Black,
                checkedIconColor = Color.Black,
                uncheckedTrackColor = Color.White,
                uncheckedBorderColor = Color.Black,
            )
    )
}

EqualizerView
@OptIn(ExperimentalMaterial3Api::class)
@Composable
fun EqualizerView(viewModel: AudioEqualizerViewModel) {

    // Frequency labels for the equalizer bands
    val xAxisLabels = listOf("60Hz", "230Hz", "910Hz", "3kHz", "14kHz")

    // Collect the current state of audio effects from the ViewModel
    val audioEffects by viewModel.audioEffects.collectAsState()

    // Column layout to arrange UI elements vertically
    Column(
        modifier = Modifier
            .fillMaxWidth()
            .fillMaxHeight()
            .graphicsLayer {
                // Rotate the entire column to display frequency labels/sliders vertically
                rotationZ = 270f
            },
        verticalArrangement = Arrangement.SpaceEvenly,
        horizontalAlignment = Alignment.CenterHorizontally
    ) {
        // Iterate through frequency labels and create corresponding UI elements
        for (index in xAxisLabels.indices) {
            Row(
                modifier = Modifier
                    .padding(top = 20.dp)
                    .width(220.dp)
            ) {
                // Each frequency label and its corresponding slider are placed in a Box
                Box {
                    // Display the frequency label with rotation
                    Text(
                        text = xAxisLabels[index],
                        modifier = Modifier
                            .wrapContentWidth()
                            .align(Alignment.CenterStart)
                            .rotate(90f),
                        color = Color.White,
                        fontSize = 8.sp,
                        textAlign = TextAlign.Start
                    )

                    // Slider component for adjusting the gain value of each frequency band
                    Slider(
                        modifier = Modifier
                            .offset(x = 20.dp),
                        // Bind the slider value to the corresponding gain value from the ViewModel
                        value = audioEffects!!.gainValues[index].times(1000f).toFloat()
                            .coerceIn(-3000f, 3000f),
                        onValueChange = {
                            // Notify the ViewModel when a slider value changes
                            viewModel.onBandLevelChanged(index, it.toInt())
                        },
                        valueRange = -3000f..3000f,
                        colors = SliderDefaults.colors(
                            thumbColor = Color.Black,
                            activeTrackColor = Color.Black,
                            inactiveTrackColor = Color.White
                        ),
                        thumb = {
                            // Customized appearance of the slider's thumb
                            Box(
                                modifier = Modifier
                                    .size(20.dp)
                                    .border(
                                        1.dp,
                                        Color.White,
                                        CircleShape
                                    )
                                    .clip(CircleShape)
                                    .background(Color.Black, CircleShape)
                            )
                        }
                    )
                }
            }
        }
    }
}

PresetsView
@Composable
fun PresetsView(viewModel: AudioEqualizerViewModel) {
    // Collect the current state of audio effects from the ViewModel
    val audioEffects by viewModel.audioEffects.collectAsState()

    // Group the effect types into chunks of 4 for layout
    val groupedList = effectType.chunked(4)

    // Row containing the title and dividers
    Row(
        verticalAlignment = Alignment.CenterVertically
    ) {
        Divider(
            modifier = Modifier
                .weight(1f)
                .height(4.dp)
                .clip(RoundedCornerShape(4.dp)),
            color = Color.White,
            thickness = 1.dp
        )

        // Title text
        Text(
            text = stringResource(R.string.presets_title_text),
            fontSize = MaterialTheme.typography.titleMedium.fontSize,
            fontWeight = FontWeight.Medium,
            color = Color.White,
            modifier = Modifier
                .wrapContentWidth()
                .weight(0.5f)
                .padding(4.dp)
                .zIndex(1f),
            textAlign = TextAlign.Center
        )

        Divider(
            modifier = Modifier
                .weight(1f)
                .height(4.dp)
                .clip(RoundedCornerShape(4.dp)),
            color = Color.White,
            thickness = 1.dp
        )
    }

    Spacer(modifier = Modifier.height(20.dp))

    // Iterate through grouped effect types and create UI elements
    for (itemList in groupedList) {
        BoxWithConstraints(
            modifier = Modifier
                .fillMaxWidth()
        ) {
            // Calculate padding and spacing based on screen width
            val horizontalPadding =
                if (maxWidth < 320.dp) 8.dp else if (maxWidth > 400.dp) 40.dp else 20.dp
            val horizontalSpacing = if (maxWidth > 400.dp) 24.dp else 16.dp

            // Row containing individual preset items
            Row(
                modifier = Modifier
                    .fillMaxWidth()
                    .padding(vertical = 8.dp),
                horizontalArrangement = Arrangement.spacedBy(
                    space = horizontalSpacing,
                    alignment = Alignment.CenterHorizontally
                ),
                verticalAlignment = Alignment.CenterVertically
            ) {
                for (item in itemList) {
                    // Get the index of the current item
                    val index by remember {
                        mutableIntStateOf(
                            effectType.indexOf(
                                item
                            )
                        )
                    }

                    // Create a clickable preset item
                    BoxWithConstraints(
                        modifier = Modifier
                            .wrapContentSize()
                            .border(
                                1.dp,
                                if (index == audioEffects?.selectedEffectType) Color.White else Color.Black,
                                RoundedCornerShape(40.dp)
                            )
                            .clip(RoundedCornerShape(40.dp))
                            .clickable {
                                // Notify the ViewModel when a preset is selected
                                viewModel.onSelectPreset(index)
                            }
                            .background(if (index == audioEffects?.selectedEffectType) Color.Black else Color.White),
                        contentAlignment = Alignment.Center
                    ) {
                        // Display the preset item text
                        Text(
                            text = item,
                            style = MaterialTheme.typography.bodySmall,
                            modifier = Modifier
                                .padding(
                                    horizontal = horizontalPadding,
                                    vertical = 12.dp
                                ),
                            fontSize = 14.sp,
                            color = if (index == audioEffects?.selectedEffectType) Color.White else Color.Black,
                            maxLines = 1,
                            overflow = TextOverflow.Ellipsis
                        )
                    }
                }
            }
        }
    }
}
现在,让我们使用AnimatedVisibility从父组件中调用上述函数!
@Composable
fun AudioEqualizerScreen() {
    val viewModel = hiltViewModel<AudioEqualizerViewModel>()

    val enableEqualizer by viewModel.enableEqualizer.collectAsState()

    Column {
        Row(
            modifier = Modifier.fillMaxWidth(),
            horizontalArrangement = Arrangement.SpaceBetween,
            verticalAlignment = Alignment.CenterVertically
        ) {
            Text(
                text = stringResource(R.string.equalizer_title_text),
                fontSize = MaterialTheme.typography.titleLarge.fontSize,
                fontWeight = FontWeight.SemiBold,
                color = Color.White
            )

            Switch(
                checked = enableEqualizer,
                onCheckedChange = { viewModel.toggleEqualizer() },
                colors =
                    SwitchDefaults.colors(
                        checkedTrackColor = Color.Black,
                        checkedIconColor = Color.Black,
                        uncheckedTrackColor = Color.White,
                        uncheckedBorderColor = Color.Black,
                    )
            )
        }

        AnimatedVisibility(
            visible = enableEqualizer,
            enter = fadeIn() + slideInVertically { fullHeight -> -fullHeight / 2 },
            exit = fadeOut() + slideOutVertically { fullHeight -> -fullHeight / 3 }
        ) {
            EqualizerView(viewModel = viewModel)
        }

        AnimatedVisibility(
            visible = enableEqualizer,
            enter = fadeIn() + slideInVertically { fullHeight -> -fullHeight / 2 },
            exit = fadeOut() + slideOutVertically { fullHeight -> -fullHeight / 2 }
        ) {
            PresetsView(viewModel)
        }
    }
}
结论
在本篇博客中,我们为在Jetpack Compose应用程序中设置ExoPlayer进行实时流式传输和集成音频均衡器打下了基础。这个组合为带有可定制均衡器设置的音频流提供了无缝的用户体验。
Github
https://github.com/cp-megh-l/audio-equalizer-compose



![2024 年 22 款顶级免费数据恢复软件比较 [Windows 和 Mac]](https://img-blog.csdnimg.cn/img_convert/5c825d3eda0556ce40d6f726f701ebf6.jpeg)
