three.js模拟太阳系

news2025/1/11 3:03:04

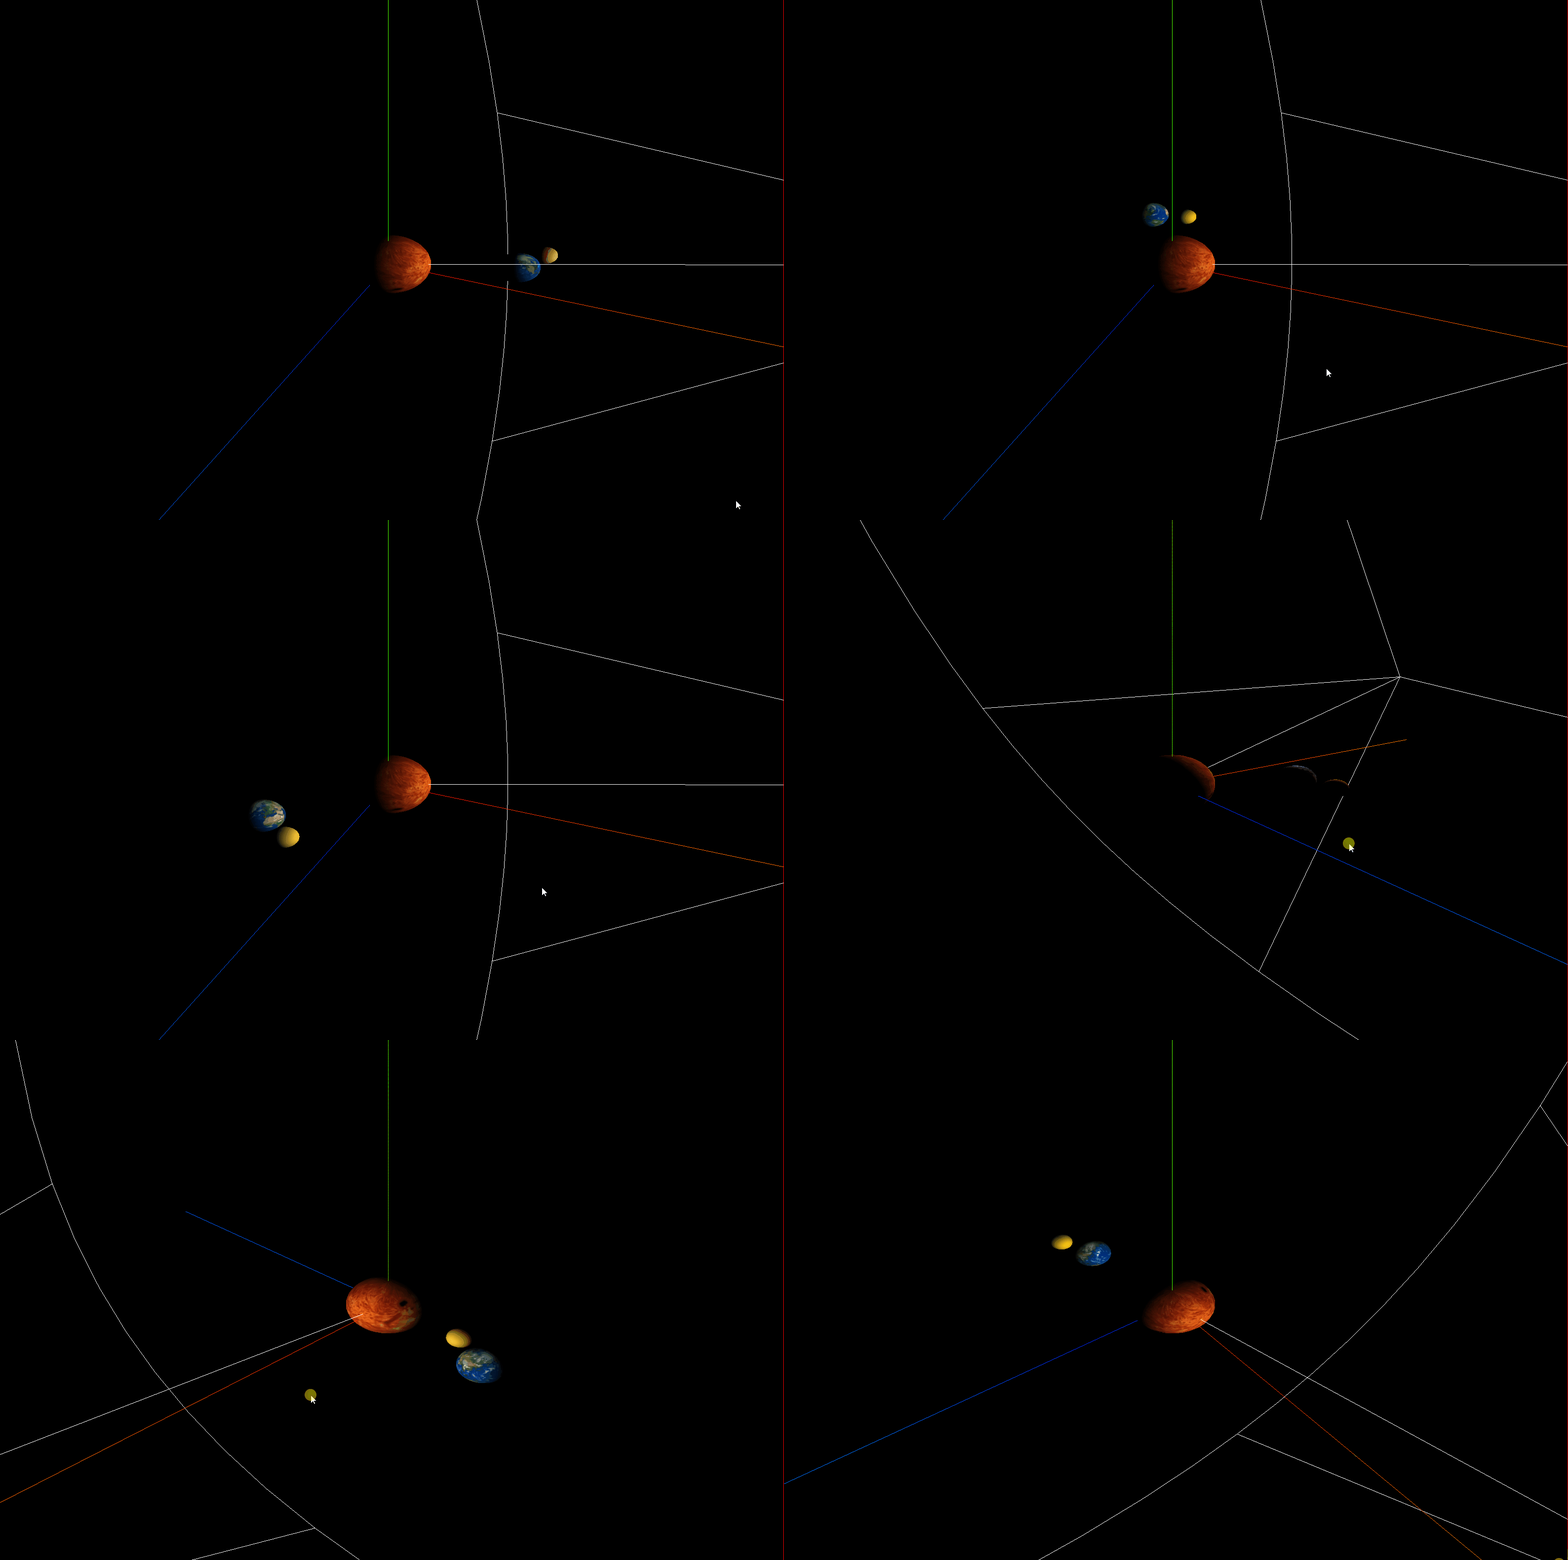
地球的旋转轨迹目前设置为了圆形,效果:

<template>
  <div>
    <el-container>
      <el-main>
        <div class="box-card-left">
          <div id="threejs" style="border: 1px solid red"></div>
          <div class="box-right">
          </div>
        </div>
      </el-main>
    </el-container>
  </div>
</template>
<script>
// 引入轨道控制器扩展库OrbitControls.js
import { OrbitControls } from "three/examples/jsm/controls/OrbitControls.js";
import { GLTFLoader } from "three/examples/jsm/loaders/GLTFLoader.js";
export default {
  data() {
    return {
      name: "",
      scene: null,
      camera: null,
      renderer: null,
      mesh: null,
      mesh_moon: null,
      geometry: null,
      group: null,
      group2: null,
      material: null,
      texture: null,
    };
  },
  created() {},
  mounted() {
    this.name = this.$route.query.name;
    this.init();
  },
  methods: {
    goBack() {
      this.$router.go(-1);
    },
    init() {
      /**
       * 本案例的思路:创建了三个球缓存几何体,分别进行了纹理贴图,创建组group1, group2,
       * 将地球和月球添加到一个group1中,设置group1的位置让其离开原点,
       * 将group1进行绕Y轴旋转,再将group1 添加到 group2中,将group2添加到场景对象中并进行绕Y轴旋转
       *  */
      // 1,创建场景对象
      this.scene = new this.$three.Scene();
      // 5,创建辅助坐标轴对象
      const axesHelper = new this.$three.AxesHelper(1000);
      this.scene.add(axesHelper);
      this.group = new this.$three.Group();
      this.group2 = new this.$three.Group();
      // 创建纹理贴图加载器对象
      this.createTextureLoader({imgName: 'sun.png', spotLight: true, camera: true, controls: true});
      this.createTextureLoader2({r:50});
    },
    // 创建纹理加载器  加载地球
    createTextureLoader2({imgName="earth.png", r=100, l1=32, l2=16}) {
       // 创建纹理贴图加载器对象
      const textureLoader = new this.$three.TextureLoader();
      textureLoader.load(require("../../assets/eleven/" + imgName), e => {
          // 3,创建网格材质对象
        let mesh = this.createGeometry( r, l1, l2, e);
        mesh.position.set(0,0,0);
        const worldPosition = new this.$three.Vector3();
        mesh.getWorldPosition(worldPosition);
        this.group.add(mesh);
        this.group.position.set(300,0,0);
        this.scene.add(this.group);
        this.createTextureLoader3({r:30});
        this.createCamera();
        this.createControls();
        this.renderFun();
      })
    },
    // 创建纹理加载器  加载月球
    createTextureLoader3({imgName="moon.jpeg", r=100, l1=32, l2=16}) {
       // 创建纹理贴图加载器对象
      const textureLoader = new this.$three.TextureLoader();
      textureLoader.load(require("../../assets/eleven/" + imgName), e => {
          // 3,创建网格材质对象
        this.mesh_moon = this.createGeometry( r, l1, l2, e);
        this.mesh_moon.position.set(100,0,0);
        this.group.add(this.mesh_moon);
        this.group2.add(this.group);
        this.scene.add(this.group2);
      })
    },
    // 创建纹理加载器  加载太阳
    createTextureLoader({imgName="earth.png", r=100, l1=32, l2=16, spotLight=false, camera=false,controls=false}) {
       // 创建纹理贴图加载器对象
      const textureLoader = new this.$three.TextureLoader();
      textureLoader.load(require("../../assets/eleven/" + imgName), e => {
          // 3,创建网格材质对象
        let mesh = this.createGeometry( r, l1, l2, e);
        this.scene.add(mesh);
        if(spotLight) {
          // 创建聚光源对象
          const spot_light = new this.$three.SpotLight(0xffffff, 1);
          // 设置聚光源位置
          spot_light.position.set(1000, 300, -100);
          // 设置聚光源指向的目标位置
          spot_light.target = mesh;
          this.scene.add(spot_light);
          // 创建聚光源辅助对象
          const spotLightHelper = new this.$three.SpotLightHelper(spot_light,0xffffff);
          this.scene.add(spotLightHelper);
        }
      })
    },
    // 6,创建透视投影相机对象
    createCamera() {
      this.camera = new this.$three.PerspectiveCamera(90, 1, 0.01,9000);
      this.camera.position.set(500,500,600); 
      // this.camera.updateProjectionMatrix();
      // 相机看向的是模型的位置
      this.camera.lookAt(0,0,0);
      // 7,创建渲染器对象
      this.renderer = new this.$three.WebGLRenderer();
      // 设置渲染器尺寸:宽度 1600, 高度:1000
      this.renderer.setSize(1600,1100);
      // 调用渲染方法
      this.renderer.render(this.scene, this.camera);
      document.getElementById("threejs").appendChild(this.renderer.domElement);
    },
    // 创建相机空间轨道控制器对象
    createControls() {
      const controls = new OrbitControls(this.camera, this.renderer.domElement);
      controls.addEventListener("change", () => {
        this.renderer.render(this.scene, this.camera);
      })
    },
    // 创建网格对象
    createGeometry(r, l1, l2, e) {
      let geometry = new this.$three.SphereGeometry(r, l1, l2);
      let material = new this.$three.MeshLambertMaterial({
          map: e
        });
      let mesh = new this.$three.Mesh(geometry, material);
      // this.scene.add(mesh);
      return mesh;
    },
    renderFun() {
      this.group.rotateY(0.02);
      this.group2.rotateY(0.01);
      if(this.mesh_moon) {
        this.mesh_moon.rotateY(0.02);
      }
      this.renderer.render(this.scene, this.camera);
      window.requestAnimationFrame(this.renderFun);
    }
  },
};
</script>
//
<style lang="less" scoped>
.msg {
  padding: 20px;
  text-align: left;
  display: flex;
  justify-content: flex-start;
  flex-wrap: wrap;
  .span {
    margin: 0 30px 30px 0;
    // white-space: nowrap;
  }
  .p {
    text-align: left;
  }
}
.box-card-left {
  display: flex;
  align-items: flex-start;
  flex-direction: row;

  width: 100%;
  .box-right {
    text-align: left;
    padding: 10px;
    .xyz {
      width: 100px;
      margin-left: 20px;
    }
    .box-btn {
      margin-left: 20px;
    }
  }
}
</style>

本文来自互联网用户投稿,该文观点仅代表作者本人,不代表本站立场。本站仅提供信息存储空间服务,不拥有所有权,不承担相关法律责任。如若转载,请注明出处:http://www.coloradmin.cn/o/1316338.html

如若内容造成侵权/违法违规/事实不符,请联系多彩编程网进行投诉反馈,一经查实,立即删除!

相关文章

实操Nginx(七层代理)+Tomcat多实例部署,实现负载均衡和动静分离

目录 Tomcat多实例部署&#xff08;192.168.17.27&#xff09; 1.安装jdk&#xff0c;设置jdk的环境变量 2.安装tomcat在一台已经部署了tomcat的机器上复制tomcat的配置文件取名tomcat1 ​编辑 编辑配置文件更改端口号&#xff0c;将端口号改为8081 启动 tomcat&#xff…

【机器学习】libsvm 简单使用示例(C++)

libsvm简单使用demo 一、libsvm使用说明 二、svm.h源码 #ifndef _LIBSVM_H //如果没有定义 _LIBSVM_H 宏 #define _LIBSVM_H //则定义 _LIBSVM_H 宏&#xff0c;用于防止重复包含#define LIBSVM_VERSION 317 //定义一个宏&#xff0c;表示 libsvm 的版本号#ifdef __cplusplus /…

uniapp之屏幕右侧出现滚动条去掉、隐藏、删除【好用!】

目录 问题解决大佬地址最后 问题 解决 在最外层view上加上class“content”;输入以下样式。注意&#xff1a;两个都必须存在在生效。 .content {/* 跟屏幕高度一样高,不管view中有没有内容,都撑开屏幕高的高度 */height: 100vh; overflow: auto; } .content::-webkit-scrollb…

计算机网络考研辨析(后续整理入笔记)

文章目录 体系结构物理层速率辨析交换方式辨析编码调制辨析 链路层链路层功能介质访问控制&#xff08;MAC&#xff09;信道划分控制之——CDMA随机访问控制轮询访问控制 扩展以太网交换机 网络层网络层功能IPv4协议IP地址IP数据报分析ICMP 网络拓扑与转发分析&#xff08;重点…

软件设计师——计算机网络(三)

&#x1f4d1;前言 本文主要是【计算机网络】——软件设计师——计算机网络的文章&#xff0c;如果有什么需要改进的地方还请大佬指出⛺️ &#x1f3ac;作者简介&#xff1a;大家好&#xff0c;我是听风与他&#x1f947; ☁️博客首页&#xff1a;CSDN主页听风与他 &#x1…

Mac安装Typora实现markdown自由

一、什么是markdown Markdown 是一种轻量级标记语言&#xff0c;创始人为约翰格鲁伯&#xff08;John Gruber&#xff09;。 它允许人们使用易读易写的纯文本格式编写文档&#xff0c;然后转换成有效的 XHTML&#xff08;或者HTML&#xff09;文档。这种语言吸收了很多在电子邮…

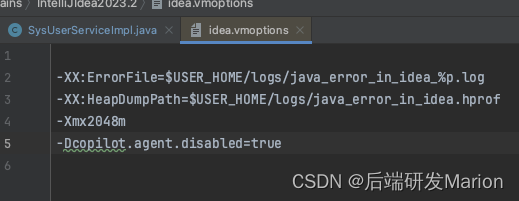
【AI工具】GitHub Copilot IDEA安装与使用

GitHub Copilot是一款AI编程助手&#xff0c;它可以帮助开发者编写代码&#xff0c;提供代码建议和自动完成功能。以下是GitHub Copilot在IDEA中的安装和使用步骤&#xff1a; 安装步骤&#xff1a; 打开IDEA&#xff0c;点击File -> Settings -> Plugins。在搜索框中输…

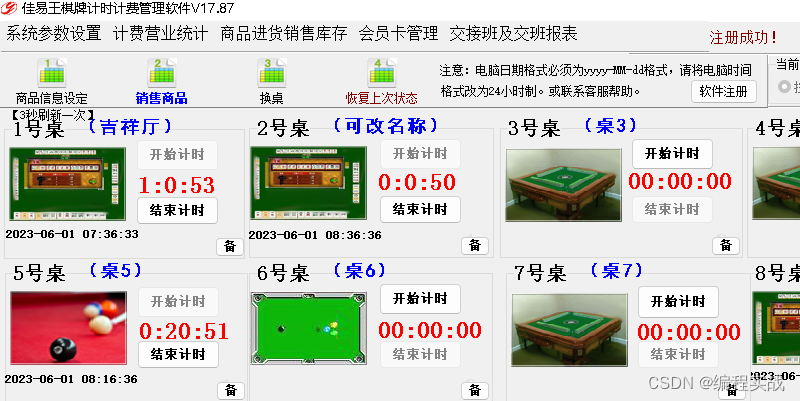
棋牌的电脑计时计费管理系统教程,棋牌灯控管理软件操作教程

一、前言 有的棋牌室在计时的时候&#xff0c;需要使用灯控管理&#xff0c;在开始计时的时候打开灯&#xff0c;在结账后关闭灯&#xff0c;也有的不需要用灯控&#xff0c;只用来计时。 下面以 佳易王棋牌计时计费管理系统软件为例说明&#xff1a; 软件试用版下载或技术支…

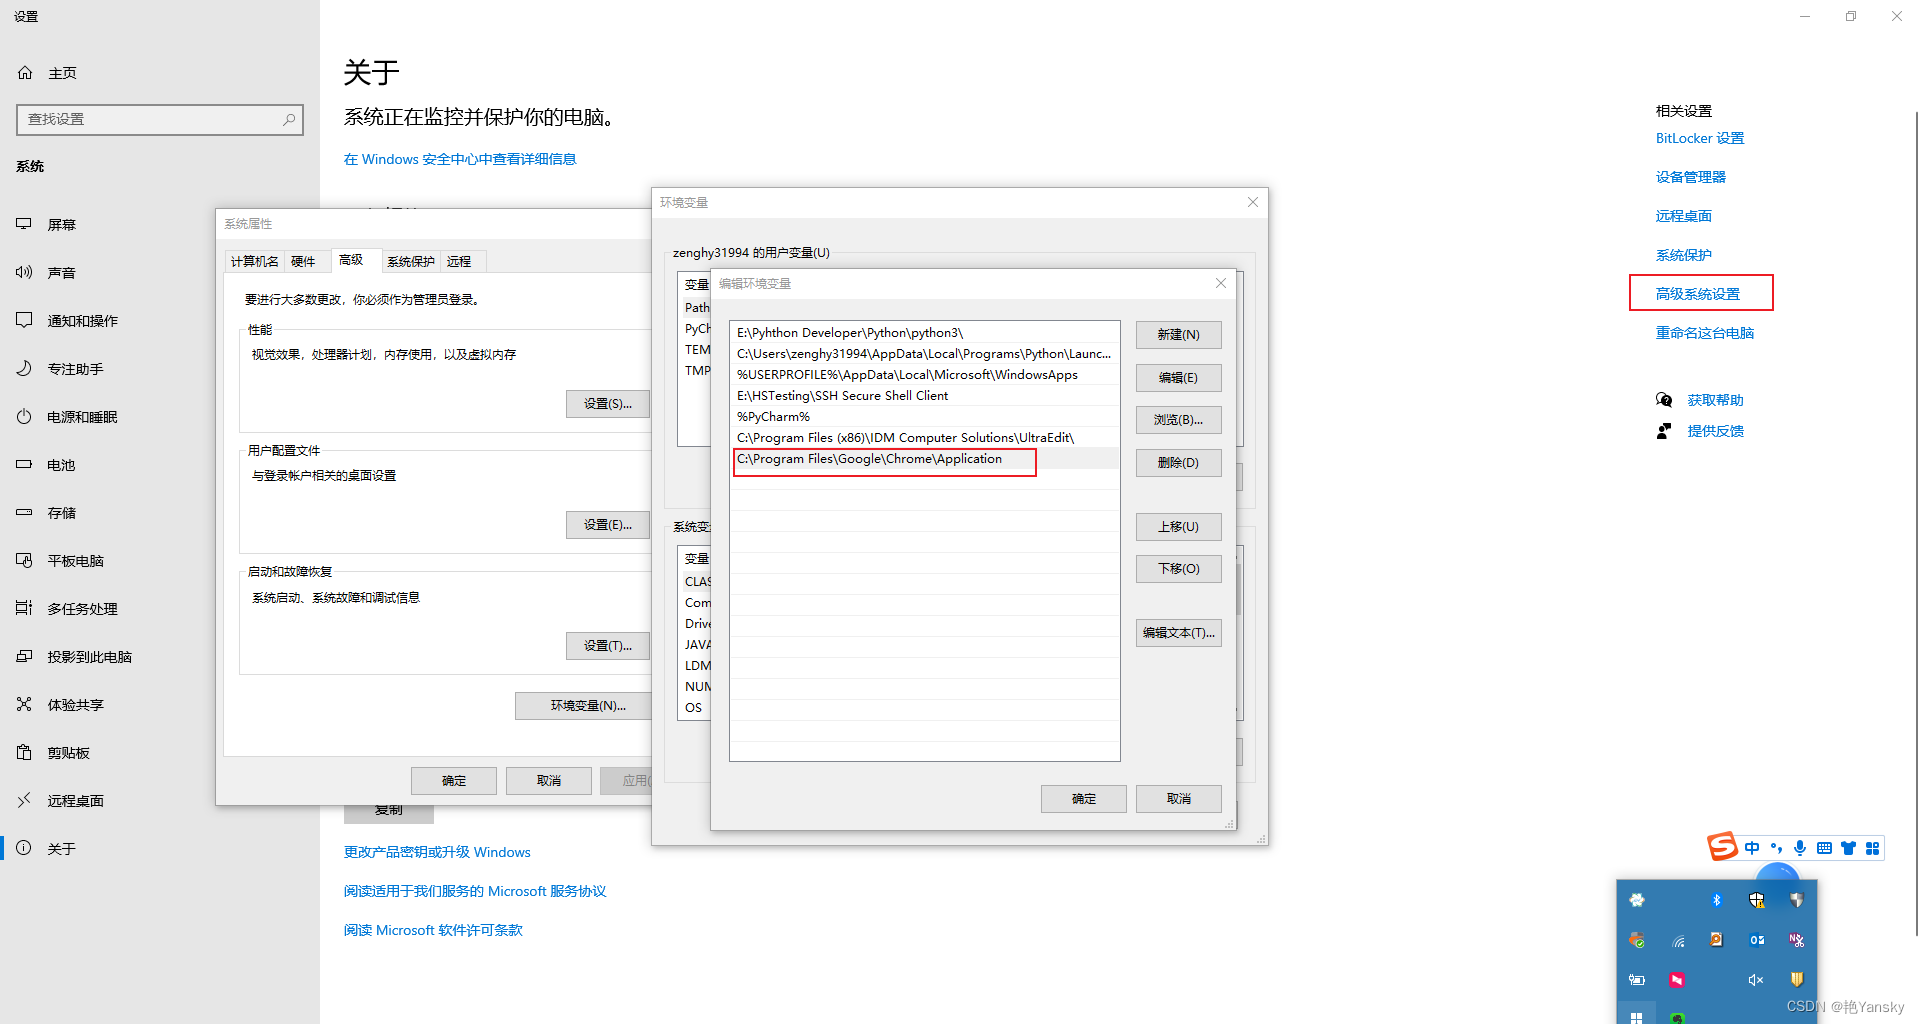
Selenium安装WebDriver:ChromeDriver与谷歌浏览器版本快速匹配_最新版120

最近在使用通过selenium操作Chrome浏览器时&#xff0c;安装中遇到了Chrome版本与浏览器驱动不匹配的的问题&#xff0c;在此记录安装下过程&#xff0c;如何快速找到与谷歌浏览器相匹配的ChromeDriver驱动版本。 1. 确定Chrome版本 我们首先确定自己的Chrome版本 Chrome设置…

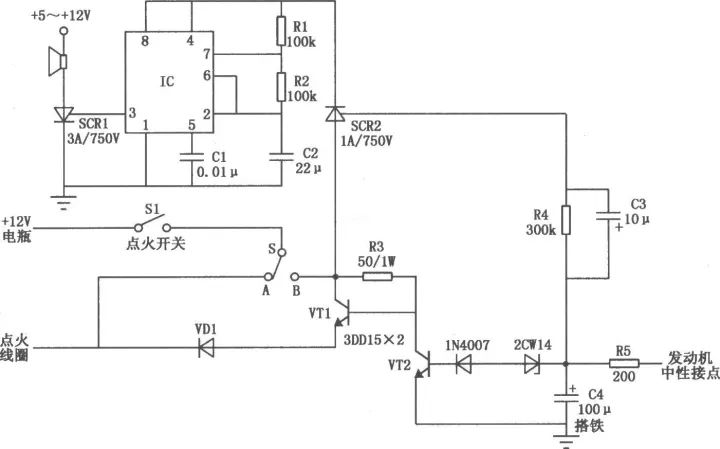
NE555汽车防盗报警电路图

实用汽车防盗报警电路如图所示。它主要由防盗部分和报警两大部分电路组成。防盗电路&#xff1a;当汽车主人离开汽车时&#xff0c;将防盗开关S置于“B”位置&#xff0c;使汽车进入防盗状态。当有窃贼进入驾驶室企图发动汽车将其盗走时&#xff0c;只要拧动点火开关&#xff0…

python+requests+pytest 接口自动化实现

最近工作之余拿公司的项目写了一个接口测试框架&#xff0c;功能还不是很完善&#xff0c;算是抛砖引玉了&#xff0c;欢迎各位来吐槽。 主要思路&#xff1a; ①对 requests 进行二次封装&#xff0c;做到定制化效果 ②使用 excel 存放接口请求数据&#xff0c;作为数据驱动 ③…

PhpStorm下载、安装、配置教程

前面的文章中&#xff0c;都是把.php文件放在WampServer的www目录下&#xff0c;通过浏览器访问运行。这篇文章就简单介绍一下PhpStorm这个php集成开发工具的使用。 目录 下载PhpStorm 安装PhpStorm 配置PhpStorm 修改个性化设置 修改字符编码 配置php的安装路径 使用Ph…

MySQL 常用数据类型总结

面试&#xff1a; 为什么建表时,加not null default ‘’ / default 0 答:不想让表中出现null值. 为什么不想要的null的值 答:&#xff08;1&#xff09;不好比较,null是一种类型,比较时,只能用专门的is null 和 is not null来比较. 碰到运算符,一律返回null &#xff08…

【Spring】06 生命周期之销毁回调

文章目录 1. 回调是什么2. 销毁回调2.1 实现 DisposableBean 接口2.2 配置 destroy-method 3. 执行顺序4. 应用场景总结 在 Spring 框架中&#xff0c;生命周期回调&#xff08;Lifecycle Callbacks&#xff09;是一种强大的机制&#xff0c;它允许我们在 Spring 容器中的 Bean…

Mybatis-Spring整合原理:MapperFactoryBean和MapperScannerConfigurer的区别及源码剖析

文章目录 引言MapperFactoryBean的用法和优缺点MapperScannerConfigurer的用法和优缺点MapperFactoryBean源码分析MapperScannerConfigurer源码分析Spring容器初始化流程回顾核心方法&#xff1a;postProcessBeanDefinitionRegistryBeanDefinitionRegistryPostProcessor和BeanF…

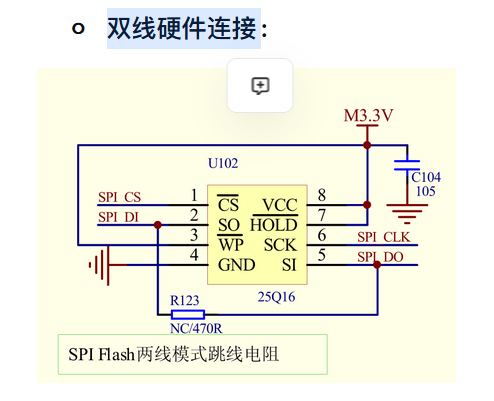
杰理-音箱-flash配置

杰理-音箱-flash配置 注意配置io&#xff0c;双线或者4线的硬件连接方式&#xff0c;否则无法烧录UI资源

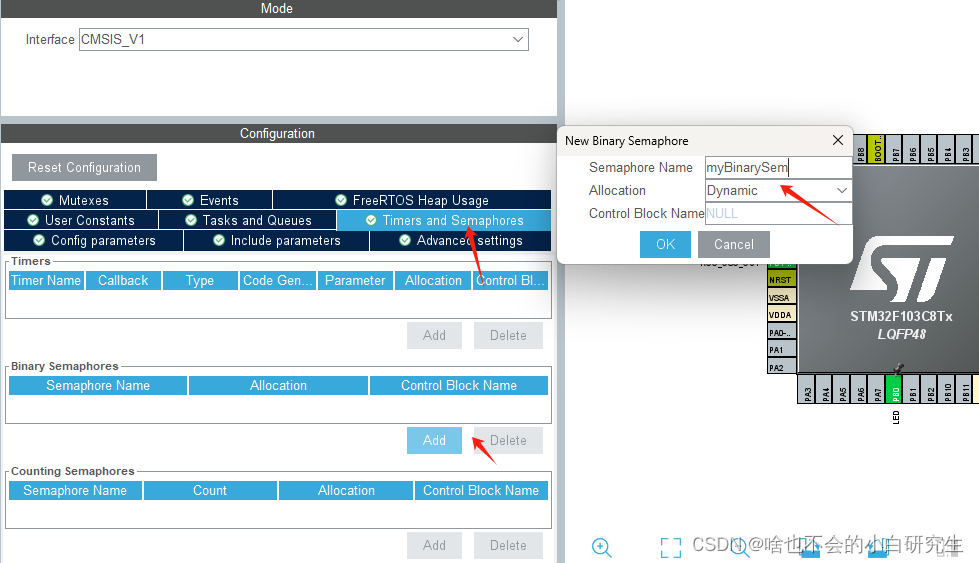
STM32与Freertos入门(七)信号量

1、简介 FreeRTOS提供了二值信号&#xff08;Binary Semaphore&#xff09;作为一种同步机制&#xff0c;用于在任务之间进行简单的通信和同步操作。二值信号是一种特殊类型的信号量&#xff0c;只能有两种状态&#xff1a;0&#xff08;未触发&#xff09;和1&#xff08;已触…

PAT 乙级 1019 数字黑洞

解法思路,我用c语言和python 做了这道题&#xff0c;这里面有一个小坑就是没说一定是4位整数&#xff0c;有可能是3位&#xff0c;2,1&#xff0c;位&#xff0c;用python排序时候需要注意&#xff0c;我c语言用的hash反而无所谓。。代码如下&#xff1a; c语言代码: #includ…

CTFHub | 反射型

0x00 前言 CTFHub 专注网络安全、信息安全、白帽子技术的在线学习&#xff0c;实训平台。提供优质的赛事及学习服务&#xff0c;拥有完善的题目环境及配套 writeup &#xff0c;降低 CTF 学习入门门槛&#xff0c;快速帮助选手成长&#xff0c;跟随主流比赛潮流。 0x01 题目描述…

腾讯云服务器优惠活动大全页面_全站搜优惠合集

腾讯云推出优惠全站搜页面 https://curl.qcloud.com/PPrF9NFe 在这个页面可以一键查询所需云服务器、轻量应用服务器、数据库、存储、CDN、网络、安全、大数据等云产品优惠活动大全&#xff0c;活动打开如下图&#xff1a; 腾讯云优惠全站搜 腾讯云优惠全站搜页面 txybk.com/go…