接前一篇文章:
本文内容参考:
《趣谈Linux操作系统》 —— 刘超,极客时间
《QEMU/KVM》源码解析与应用 —— 李强,机械工业出版社
特此致谢!
上一回以virtio balloon设备为例概述了具体的virtio设备、virtio PCI代理设备、virtio公共设备的关系,如下图所示:
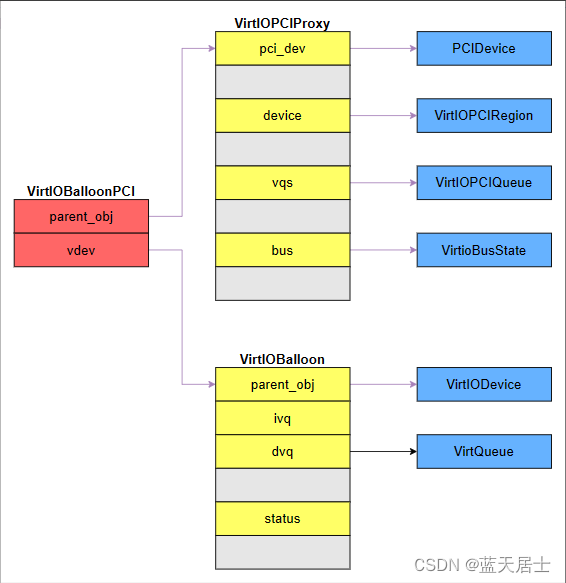
本回讲解代码细节。
仍以virtio balloon设备为例分析virtio设备的初始化过程。再次贴出之前的相关代码:
- virtio balloon PCI设备
virtio balloon PCI设备的定义在hw/virtio/virtio-balloon-pci.c中,代码如下:
static const VirtioPCIDeviceTypeInfo virtio_balloon_pci_info = {
    .base_name             = TYPE_VIRTIO_BALLOON_PCI,
    .generic_name          = "virtio-balloon-pci",
    .transitional_name     = "virtio-balloon-pci-transitional",
    .non_transitional_name = "virtio-balloon-pci-non-transitional",
    .instance_size = sizeof(VirtIOBalloonPCI),
    .instance_init = virtio_balloon_pci_instance_init,
    .class_init    = virtio_balloon_pci_class_init,
};

static void virtio_balloon_pci_register(void)
{
    virtio_pci_types_register(&virtio_balloon_pci_info);
}

type_init(virtio_balloon_pci_register)- virtual balloon设备
virtual balloon设备的定义在hw/virtio/virtio-balloon.c中,代码如下:
static const TypeInfo virtio_balloon_info = {
    .name = TYPE_VIRTIO_BALLOON,
    .parent = TYPE_VIRTIO_DEVICE,
    .instance_size = sizeof(VirtIOBalloon),
    .instance_init = virtio_balloon_instance_init,
    .class_init = virtio_balloon_class_init,
};

static void virtio_register_types(void)
{
    type_register_static(&virtio_balloon_info);
}

type_init(virtio_register_types)
创建virtio balloon设备时只需要创建其PCI代理设备(即TYPE_VIRTIO_BALOON_PCI)即可,在命令行指定“-device virtio-balloon-pci”。先来看实例化函数virtio_balloon_pci_instance_init,其在hw/virtio/virtio-balloon-pci.c中(就在virtio_balloon_pci_info的定义上边),代码如下:
static void virtio_balloon_pci_instance_init(Object *obj)
{
    VirtIOBalloonPCI *dev = VIRTIO_BALLOON_PCI(obj);

    virtio_instance_init_common(obj, &dev->vdev, sizeof(dev->vdev),
                                TYPE_VIRTIO_BALLOON);
    object_property_add_alias(obj, "guest-stats", OBJECT(&dev->vdev),
                                  "guest-stats");
    object_property_add_alias(obj, "guest-stats-polling-interval",
                              OBJECT(&dev->vdev),
                              "guest-stats-polling-interval");
}
TYPE_VIRTIO_BALLOON_PCI的实例化函数是virtio_balloon_pci_instance_init,在该函数中会调用virtio_instance_init_common,并将VirtIOBalloonPCI结构体的vdev成员地址以及TYPE_VIRTIO_BALLOON作为参数传递给该函数。
virtio_instance_init_common函数在hw/virtio/virtio.c中,代码如下:
void virtio_instance_init_common(Object *proxy_obj, void *data,
                                 size_t vdev_size, const char *vdev_name)
{
    DeviceState *vdev = data;

    object_initialize_child_with_props(proxy_obj, "virtio-backend", vdev,
                                       vdev_size, vdev_name, &error_abort,
                                       NULL);
    qdev_alias_all_properties(vdev, proxy_obj);
}
object_initialize_child_with_props函数在qom/object.c中,代码如下:
bool object_initialize_child_with_props(Object *parentobj,
                                        const char *propname,
                                        void *childobj, size_t size,
                                        const char *type,
                                        Error **errp, ...)
{
    va_list vargs;
    bool ok;

    va_start(vargs, errp);
    ok = object_initialize_child_with_propsv(parentobj, propname,
                                             childobj, size, type, errp,
                                             vargs);
    va_end(vargs);
    return ok;
}
object_initialize_child_with_propsv函数在同文件中(就在下边),代码如下:
bool object_initialize_child_with_propsv(Object *parentobj,
                                         const char *propname,
                                         void *childobj, size_t size,
                                         const char *type,
                                         Error **errp, va_list vargs)
{
    bool ok = false;
    Object *obj;
    UserCreatable *uc;

    object_initialize(childobj, size, type);
    obj = OBJECT(childobj);

    if (!object_set_propv(obj, errp, vargs)) {
        goto out;
    }

    object_property_add_child(parentobj, propname, obj);

    uc = (UserCreatable *)object_dynamic_cast(obj, TYPE_USER_CREATABLE);
    if (uc) {
        if (!user_creatable_complete(uc, errp)) {
            object_unparent(obj);
            goto out;
        }
    }

    ok = true;

out:
    /*
     * We want @obj's reference to be 1 on success, 0 on failure.
     * On success, it's 2: one taken by object_initialize(), and one
     * by object_property_add_child().
     * On failure in object_initialize() or earlier, it's 1.
     * On failure afterwards, it's also 1: object_unparent() releases
     * the reference taken by object_property_add_child().
     */
    object_unref(obj);
    return ok;
}
由代码可知,virtio_instance_init_common函数经过virtio_instance_init_common() -> object_initialize_child_with_props() -> object_initialize_child_with_propsv(),最终会调用object_initialize函数初始化TYPE_VIRTIO_BALLOON的实例对象VirtIOBalloon,并添加一些属性。由此可见,virtio设备在实例创建过程中并没有做很多事情,大部分的工作是在设备的具现化过程中做的。
在本回结束前,仍然要重点看一下object_initialize_child_with_props函数的说明,在include/qom/object.h中,如下:
/**
 * object_initialize_child_with_props:
 * @parentobj: The parent object to add a property to
 * @propname: The name of the property
 * @childobj: A pointer to the memory to be used for the object.
 * @size: The maximum size available at @childobj for the object.
 * @type: The name of the type of the object to instantiate.
 * @errp: If an error occurs, a pointer to an area to store the error
 * @...: list of property names and values
 *
 * This function will initialize an object. The memory for the object should
 * have already been allocated. The object will then be added as child property
 * to a parent with object_property_add_child() function. The returned object
 * has a reference count of 1 (for the "child<...>" property from the parent),
 * so the object will be finalized automatically when the parent gets removed.
 *
 * The variadic parameters are a list of pairs of (propname, propvalue)
 * strings. The propname of %NULL indicates the end of the property list.
 * If the object implements the user creatable interface, the object will
 * be marked complete once all the properties have been processed.
 *
 * Returns: %true on success, %false on failure.
 */
bool object_initialize_child_with_props(Object *parentobj,
                             const char *propname,
                             void *childobj, size_t size, const char *type,
                             Error **errp, ...) G_GNUC_NULL_TERMINATED;
object_initialize_child_with_props:
参数:
parentobj:要向其中添加属性的父对象。
propname:属性名称。
childobj:指向要用于对象的内存的指针。
size:childobj参数可用于对象的最大大小。
type:要实例化的对象的类型的名称。
errp:如果发生错误,则是一个指向存储错误的区域的指针。
...:属性名称和值得列表。
此函数将初始化一个对象。应该已经为对象分配了内存。然后,该对象将作为子属性添加到具有object_property_add_child()函数的父对象中。返回的对象的引用计数为1(对于父对象的“child<…>”属性),因此,当父对象被移除时,该对象将自动完成。
可变参数是一对(propname,propvalue)字符串的列表。属性名为NULL则表示属性列表的末尾。如果该对象实现了用户可创建的接口,则在处理完所有属性后,该对象将被标记为完成。
返回值:
成功时为true,失败时为false。
预知后事如何,且看下回分解。



![微服务中如何保证接口的安全性?[基于DDD和微服务的开发实战]](https://img-blog.csdnimg.cn/img_convert/82c853a8bdc86e1d7bb031d3dbe4af47.png)


