1 框架结构雏形
返回
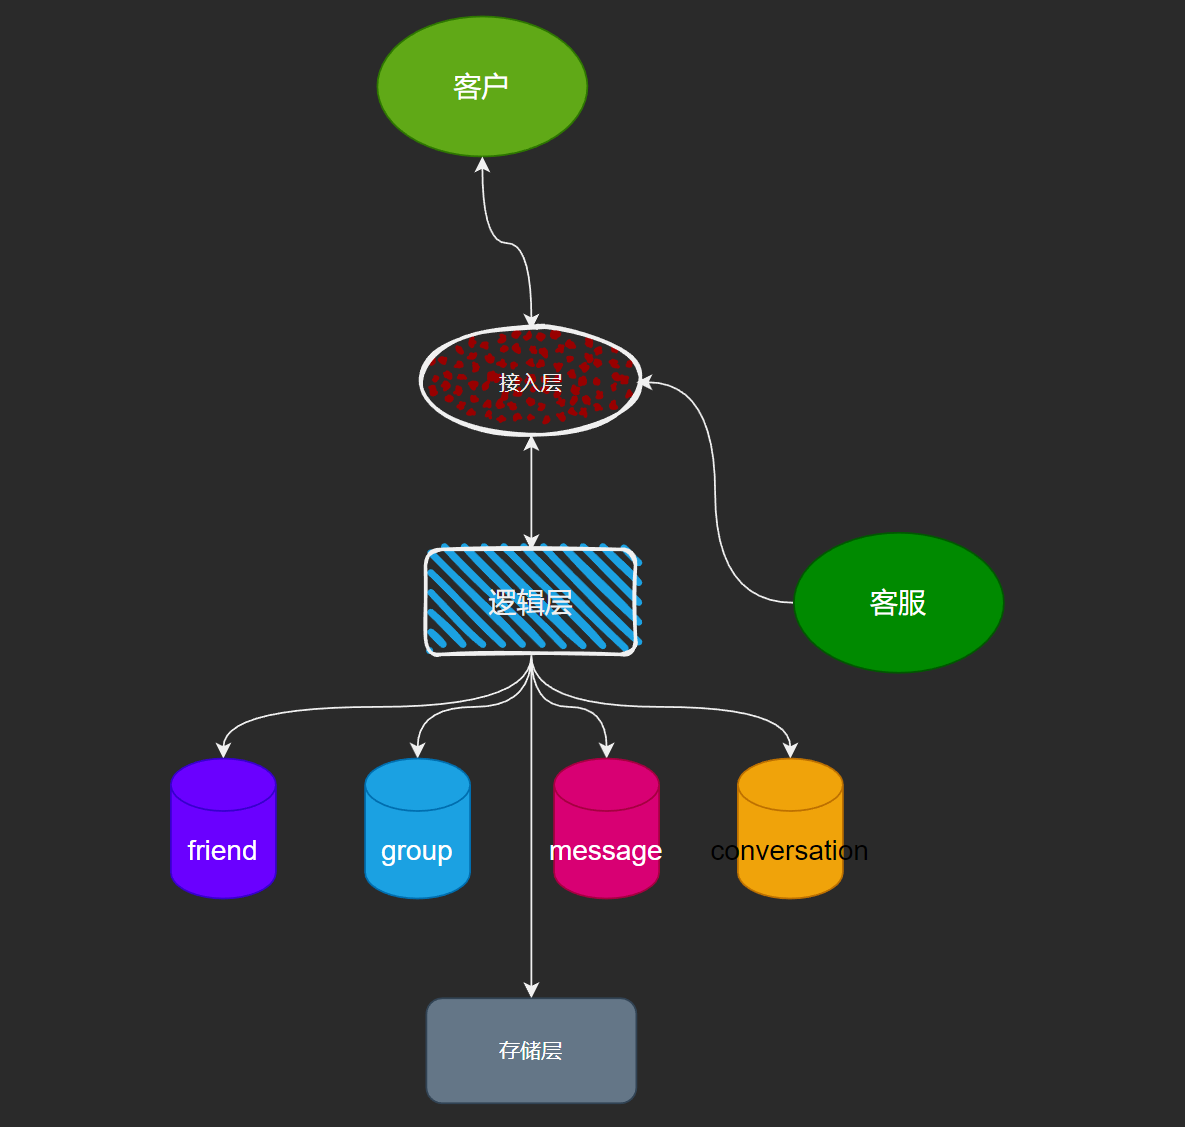
新建的一个java project,项目名为autotest,创建如下结构
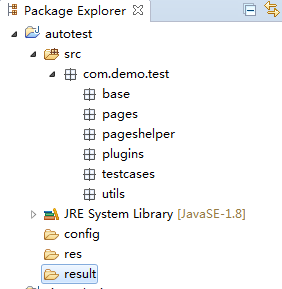
图1 框架结构雏形
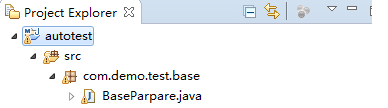
- base:里面有个基类 (BaseParpare.java),这个类的主要作用是启动(启动浏览器使用了TetsNG的@BeforeClass)和关闭浏览器的作用(关闭浏览器使用了TetsNG的@AftereClass)
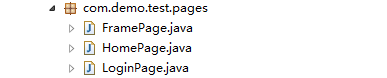
- pages:页面元素类,每一个java类,都是一个页面,存放的都是对应页面的所有元素定位值。
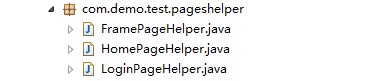
- pageshelper:这个包主要存放的是对应页面的帮助类
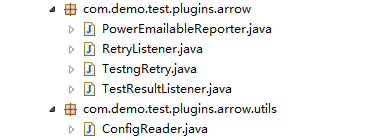
- plugins:主要存放的是arrow插件以及第三方插件。
- testcases:顾名思义就是存放测试用例的地方
- utils:这个包主要是封装了各种工具类,Selenium api封装类,读取属性文件类和选择浏览器类等
- config目录:存储框架类所需的所有属性文件,比如arrow的配置文件以及自定义的一些属性文件。
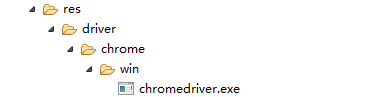
- res目录:主要存放的是driver
- result目录:存储测试框架运行测试用例生成的报告(包含log,截图等)
2 把Java项目转变成Maven项目
返回
右击项目->configure->covert to maven project,修改属性groupId=com.demo,
图2 Creat new POM
生成pom.xml如下所示:
![]()
![]()
<project xmlns="http://maven.apache.org/POM/4.0.0" xmlns:xsi="http://www.w3.org/2001/XMLSchema-instance" xsi:schemaLocation="http://maven.apache.org/POM/4.0.0 http://maven.apache.org/xsd/maven-4.0.0.xsd">
  <modelVersion>4.0.0</modelVersion>
  <groupId>com.demo</groupId>
  <artifactId>autotest</artifactId>
  <version>0.0.1-SNAPSHOT</version>
  <build>
    <sourceDirectory>src</sourceDirectory>
    <plugins>
      <plugin>
        <artifactId>maven-compiler-plugin</artifactId>
        <version>3.1</version>
        <configuration>
          <source>1.8</source>
          <target>1.8</target>
        </configuration>
      </plugin>
    </plugins>
  </build>
</project>
![]()
其中:
- Group Id:填写你组织机构,比如我这里就写的com.demo,例如要是百度可以写成com.baidu
- Artifact Id:可以理解成为项目打包成jar包的ID 或者说 jar包名字,一般以项目名命名。
3 加入TestNG配置文件
返回
右击项目->TestNG->Convert to TestNG,生成testng.xml如下所示:
![]()
<?xml version="1.0" encoding="UTF-8"?>
<!DOCTYPE suite SYSTEM "http://testng.org/testng-1.0.dtd">
<suite name="Suite">
  <test name="Test">
  </test> <!-- Test -->
</suite> <!-- Suite -->
4 Eclipse编码修改
返回
为了统一编码和以后为了避免乱码的出现,我们整个环境都使用UTF-8编码模式
Window-> Preferences,在弹出窗口Preferences中general->workspace, text file encoding 选择other 选项为UTF-8
5 编写代码
返回
| 名称 | 描述 | 链接 |
|
| 这个类的主要作用是启动和关闭浏览器 | 5.6 |
|
| 这个包存放的都是对应页面的所有元素 | 5.7 |
|
| 这个包主要存放的是对应页面的帮助类 | 5.8 |
|
| 主要存放的是arrow插件以及第三方插件 | 5.5 |
|
| 存放测试用例的地方。在这个包下,还会有很多子包,子包的个数根据你测试的系统的模块来划分 | 5.9 |
|
| 这个类配置了log | 5.2 |
|
| 5.4 | |
|
| 封装测试平台和测试浏览器选择工具类 | 5.3 |
|
| 这个类封装了Selenium API | 5.1 |
|
| Java Application默认带的library | |
|
| 项目依赖的jar | |
|
| 项目编译生成class文件存放目录,Eclipse会自动控制。 | |
|
| arrow的配置文件 | 5.5.1 |
|
| driver的配置文件 | 5.4 |
|
| 用ie浏览器测试所需要的driver | |
|
| 存储测试框架运行测试用例生成的报告(包含log,截图等) | |
|
| 可以不用管,由maven控制即可 | |
|
| maven的配置文件,项目核心配置,用于构建项目、自动下载项目依赖以及后续的和testng、jenkins配合持续集成等 | 5.10 |
|
| 5.10 |

5.1 封装Selenium操作
SeleniumUtil.java:封装一下selenium的api (会调用SelectBrowser.java,后面补上这个类),代码如下:
![]()
![]()
package com.demo.test.utils;

import java.io.File;
import java.util.List;
import java.util.Set;
import java.util.concurrent.TimeUnit;

import org.apache.log4j.Logger;
import org.openqa.selenium.Alert;
import org.openqa.selenium.By;
import org.openqa.selenium.Cookie;
import org.openqa.selenium.Dimension;
import org.openqa.selenium.JavascriptExecutor;
import org.openqa.selenium.Keys;
import org.openqa.selenium.NoAlertPresentException;
import org.openqa.selenium.NoSuchElementException;
import org.openqa.selenium.StaleElementReferenceException;
import org.openqa.selenium.TimeoutException;
import org.openqa.selenium.WebDriver;
import org.openqa.selenium.WebElement;
import org.openqa.selenium.interactions.Actions;
import org.openqa.selenium.support.ui.ExpectedCondition;
import org.openqa.selenium.support.ui.Select;
import org.openqa.selenium.support.ui.WebDriverWait;
import org.testng.Assert;
import org.testng.ITestContext;
import org.testng.ITestResult;


/**
 * @Description 包装所有selenium的操作以及通用方法,简化用例中代码量
 * */
public class SeleniumUtil {
    /** 使用Log4j,第一步就是获取日志记录器,这个记录器将负责控制日志信息 */
    public static Logger logger = Logger.getLogger(SeleniumUtil.class.getName());
    public ITestResult it = null;
    public WebDriver driver = null;
    public WebDriver window = null;

    /***
     * 启动浏览器并打开页面
     * */
    public void launchBrowser(String browserName, ITestContext context,String webUrl,int timeOut) {
        SelectBrowser select = new SelectBrowser();
        driver = select.selectExplorerByName(browserName, context);
        try {
            maxWindow(browserName);
            waitForPageLoading(timeOut);
            get(webUrl);
        } catch (TimeoutException e) {
            logger.warn("注意:页面没有完全加载出来,刷新重试!!");
            refresh();
             JavascriptExecutor js = (JavascriptExecutor)driver;
            String status= (String)js.executeScript("return document.readyState");


            logger.info("打印状态:"+status);
        }

    }

    // ------------------------------- 对窗口进行操作  -----------------------------------
    /**
     * 最大化浏览器操作
     * */
    public void maxWindow(String browserName) {
        logger.info("最大化浏览器:" + browserName);
        driver.manage().window().maximize();
    }

    /**
     * 设定浏览器窗口大小: 设置浏览器窗口的大小有下面两个比较常见的用途:<br>
     * 1、在统一的浏览器大小下运行用例,可以比较容易的跟一些基于图像比对的工具进行结合
     * ,提升测试的灵活性及普遍适用性。比如可以跟sikuli结合,使用sikuli操作flash;<br>
     * 2、在不同的浏览器大小下访问测试站点,对测试页面截图并保存,然后观察或使用图像比对工具对被测页面的前端样式进行评测。
     * 比如可以将浏览器设置成移动端大小(320x480),然后访问移动站点,对其样式进行评估;<br>
     * */
    public void setBrowserSize(int width, int height) {
        driver.manage().window().setSize(new Dimension(width, height));
    }

    /**
     * get方法包装
     * */
    public void get(String url) {
        driver.get(url);
        logger.info("打开测试页面:[" + url + "]");
    }

    /**
     * close方法包装
     * */
    public void close() {
        driver.close();
    }

    /**
     * 退出
     * */
    public void quit() {
        driver.quit();
    }

    /**
     * 刷新方法包装
     * */
    public void refresh() {
        driver.navigate().refresh();
        logger.info("页面刷新成功!");
    }

    /**
     * 后退方法包装
     * */
    public void back() {
        driver.navigate().back();
    }

    /**
     * 前进方法包装
     * */
    public void forward() {
        driver.navigate().forward();
    }

    /**
     * 获得页面的标题
     * */
    public String getTitle() {
        return driver.getTitle();
    }

    /**
     * 等待alert出现
     * */
    public Alert switchToPromptedAlertAfterWait(long waitMillisecondsForAlert) throws NoAlertPresentException {
        final int ONE_ROUND_WAIT = 200;
        NoAlertPresentException lastException = null;

        long endTime = System.currentTimeMillis() + waitMillisecondsForAlert;

        for (long i = 0; i < waitMillisecondsForAlert; i += ONE_ROUND_WAIT) {

            try {
                Alert alert = driver.switchTo().alert();
                return alert;
            } catch (NoAlertPresentException e) {
                lastException = e;
            }
            pause(ONE_ROUND_WAIT);

            if (System.currentTimeMillis() > endTime) {
                break;
            }
        }
        throw lastException;
    }

    /**
     * @Description 对于windows GUI弹出框,要求输入用户名和密码时,
     *              seleniumm不能直接操作,需要借助http://modifyusername:modifypassword@yoururl 这种方法
     *
     * */
    public void loginOnWinGUI(String username, String password, String url) {
        driver.get(username + ":" + password + "@" + url);
    }

    //============================== 对窗口进行操作   ==================================

    //------------------------------ 查找元素 -------------------------------------
    /**
     * 包装查找元素的方法 element
     * */
    public WebElement findElementBy(By by) {
        return driver.findElement(by);
    }

    /**
     * 包装查找元素的方法 elements
     * */
    public List<WebElement> findElementsBy(By by) {
        return driver.findElements(by);
    }

    /**
     * 这是一堆相同的elements中 选择 其中方的 一个 然后在这个选定的中 继续定位
     * */
    public WebElement getOneElement(By bys, By by, int index) {
        return findElementsBy(bys).get(index).findElement(by);
    }

    //============================= 查找元素 =========================================

    //--------------------------- 判断元素状态 ----------------------------------------
    /**
     * 判断文本是不是和需求要求的文本一致
     * **/
    public void isTextCorrect(String actual, String expected) {
        try {
            Assert.assertEquals(actual, expected);
        } catch (AssertionError e) {
            logger.error("期望的文字是 [" + expected + "] 但是找到了 [" + actual + "]");
            Assert.fail("期望的文字是 [" + expected + "] 但是找到了 [" + actual + "]");

        }
        logger.info("找到了期望的文字: [" + expected + "]");
    }

    /**
     * 判断编辑框是不是可编辑
     * */
    public void isInputEdit(WebElement element) {

    }

    /** 检查元素是否可用 */
    public boolean isEnabled(WebElement element) {
        boolean isEnable = false;
        if (element.isEnabled()) {
            logger.info("The element: [" + getLocatorByElement(element, ">") + "] is enabled");
            isEnable = true;
        } else if (element.isDisplayed() == false) {
            logger.warn("The element: [" + getLocatorByElement(element, ">") + "] is not enable");
            isEnable = false;
        }
        return isEnable;
    }


    /** 检查元素是否显示 */
    public boolean isDisplayed(WebElement element) {
        boolean isDisplay = false;
        if (element.isDisplayed()) {
            logger.info("The element: [" + getLocatorByElement(element, ">") + "] is displayed");
            isDisplay = true;
        } else if (element.isDisplayed() == false) {
            logger.warn("The element: [" + getLocatorByElement(element, ">") + "] is not displayed");

            isDisplay = false;
        }
        return isDisplay;
    }

    /**检查元素是不是存在*/
    public  boolean isElementExist(By byElement){
        try{
        findElementBy(byElement);
        return true;
        }catch(NoSuchElementException nee){
            return false;
        }
    }

    /** 检查元素是否被勾选 */
    public boolean isSelected(WebElement element) {
        boolean flag = false;
        if (element.isSelected() == true) {
            logger.info("The element: [" + getLocatorByElement(element, ">") + "] is selected");
            flag = true;
        } else if (element.isSelected() == false) {
            logger.info("The element: [" + getLocatorByElement(element, ">") + "] is not selected");
            flag = false;
        }
        return flag;
    }

    /**
     * 判断实际文本时候包含期望文本
     *
     * @param actual
     *            实际文本
     * @param expect
     *            期望文本
     */
    public void isContains(String actual, String expect) {
        try {
            Assert.assertTrue(actual.contains(expect));
        } catch (AssertionError e) {
            logger.error("The [" + actual + "] is not contains [" + expect + "]");
            Assert.fail("The [" + actual + "] is not contains [" + expect + "]");
        }
        logger.info("The [" + actual + "] is contains [" + expect + "]");
    }

    /** 检查checkbox是不是勾选 */
    public boolean isCheckboxSelected(By elementLocator) {
        if (findElementBy(elementLocator).isSelected() == true) {
            logger.info("CheckBox: " + getLocatorByElement(findElementBy(elementLocator), ">") + " 被勾选");
            return true;
        } else
            logger.info("CheckBox: " + getLocatorByElement(findElementBy(elementLocator), ">") + " 没有被勾选");
        return false;

    }

    /**
     * 在给定的时间内去查找元素,如果没找到则超时,抛出异常
     * */
    public void waitForElementToLoad(int timeOut, final By By) {
        logger.info("开始查找元素[" + By + "]");
        try {
            (new WebDriverWait(driver, timeOut)).until(new ExpectedCondition<Boolean>() {

                public Boolean apply(WebDriver driver) {
                    WebElement element = driver.findElement(By);
                    return element.isDisplayed();
                }
            });
        } catch (TimeoutException e) {
            logger.error("超时!! " + timeOut + " 秒之后还没找到元素 [" + By + "]");
            Assert.fail("超时!! " + timeOut + " 秒之后还没找到元素 [" + By + "]");

        }
        logger.info("找到了元素 [" + By + "]");
    }

    /**
     * pageLoadTimeout。页面加载时的超时时间。因为webdriver会等页面加载完毕在进行后面的操作,
     * 所以如果页面在这个超时时间内没有加载完成,那么webdriver就会抛出异常
     */
    public void waitForPageLoading(int pageLoadTime) {
        driver.manage().timeouts().pageLoadTimeout(pageLoadTime, TimeUnit.SECONDS);
    }
    //========================== 判断元素状态  =======================================

    //-------------------------- 对元素操作 ----------------------------------------
    /**
     * 获得元素的文本
     * */
    public String getText(By elementLocator) {
        return driver.findElement(elementLocator).getText().trim();
    }

    /**
     * 获得当前select选择的值
     * */
    public List<WebElement> getCurrentSelectValue(By by){
        List<WebElement> options = null;
        Select s = new Select(driver.findElement(by));
            options =  s.getAllSelectedOptions();
            return options;
    }

    /**
     * 获得输入框的值 这个方法 是针对某些input输入框 没有value属性,但是又想取得input的 值得方法
     * */
    public String getInputValue(String chose,String choseValue) {
        String value = null;
        switch(chose.toLowerCase()){
        case "name":
             String jsName = "return document.getElementsByName('"+choseValue+"')[0].value;"; //把JS执行的值 返回出去
             value = (String)((JavascriptExecutor) driver).executeScript(jsName);
             break;

        case "id":
             String jsId = "return document.getElementById('"+choseValue+"').value;"; //把JS执行的值 返回出去
             value = (String)((JavascriptExecutor) driver).executeScript(jsId);
             break;

            default:
                logger.error("未定义的chose:"+chose);
                Assert.fail("未定义的chose:"+chose);
        }
        return value;

    }

    /** 获得CSS value */
    public String getCSSValue(WebElement e, String key) {

        return e.getCssValue(key);
    }

    /**
     * 获得元素 属性的文本
     * */
    public String getAttributeText(By elementLocator, String attribute) {
        return driver.findElement(elementLocator).getAttribute(attribute).trim();
    }

    /** 根据元素来获取此元素的定位值 */
    public String getLocatorByElement(WebElement element, String expectText) {
        String text = element.toString();
        String expect = null;
        try {
            expect = text.substring(text.indexOf(expectText) + 1, text.length() - 1);
        } catch (Exception e) {
            e.printStackTrace();
            logger.error("failed to find the string [" + expectText + "]");
        }
        return expect;
    }

    /**
     * 包装点击操作
     * */
    public void click(By byElement) {

        try {
            clickTheClickable(byElement, System.currentTimeMillis(), 2500);
        } catch (StaleElementReferenceException e) {
            logger.error("The element you clicked:[" + byElement + "] is no longer exist!");
            Assert.fail("The element you clicked:[" + byElement + "] is no longer exist!");
        } catch (Exception e) {
            logger.error("Failed to click element [" + byElement + "]");
            Assert.fail("Failed to click element [" + byElement + "]",e);
        }
        logger.info("点击元素 [" + byElement + "]");
    }

    /**
     * 包装清除操作
     * */
    public void clear(By byElement) {
        try {
            findElementBy(byElement).clear();
        } catch (Exception e) {
            logger.error("清除元素 [" + byElement + "] 上的内容失败!");
        }
        logger.info("清除元素 [" + byElement  + "]上的内容");
    }

    /**
     * 向输入框输入内容
     * */
    public void type(By byElement, String key) {
        try {
            findElementBy(byElement).sendKeys(key);
        } catch (Exception e) {
            e.printStackTrace();
            logger.error("输入 [" + key + "] 到 元素[" + byElement + "]失败");
            Assert.fail("输入 [" + key + "] 到 元素[" + byElement + "]失败");
        }
        logger.info("输入:[" + key + "] 到 [" + byElement + "]");
    }

    /**
     * 模拟键盘操作的,比如Ctrl+A,Ctrl+C等 参数详解:<br>
     * 1、WebElement element - 要被操作的元素 <br>
     * 2、Keys key- 键盘上的功能键 比如ctrl ,alt等 <br>
     * 3、String keyword - 键盘上的字母
     * */
    public void pressKeysOnKeyboard(WebElement element, Keys key, String keyword) {

        element.sendKeys(Keys.chord(key, keyword));
    }

    /**
     * 切换frame - 根据String类型(frame名字)
     * */
    public void inFrame(String frameId) {
        driver.switchTo().frame(frameId);
    }

    /**
     * 切换frame - 根据frame在当前页面中的顺序来定位
     * */
    public void inFrame(int frameNum) {
        driver.switchTo().frame(frameNum);
    }

    /**
     * 切换frame - 根据页面元素定位
     * */
    public void switchFrame(WebElement element) {
        try {
            logger.info("正在跳进frame:[" + getLocatorByElement(element, ">") + "]");
            driver.switchTo().frame(element);
        } catch (Exception e) {
            logger.info("跳进frame: [" + getLocatorByElement(element, ">") + "] 失败");
            Assert.fail("跳进frame: [" + getLocatorByElement(element, ">") + "] 失败");
        }
        logger.info("进入frame: [" + getLocatorByElement(element, ">") +"]成功 ");
    }

    /** 跳出frame */
    public void outFrame() {
        driver.switchTo().defaultContent();
    }

    /**
     * 选择下拉选项 -根据value
     * */
    public void selectByValue(By by, String value) {
        Select s = new Select(driver.findElement(by));
        s.selectByValue(value);
    }

    /**
     * 选择下拉选项 -根据index角标
     * */
    public void selectByIndex(By by, int index) {
        Select s = new Select(driver.findElement(by));
        s.selectByIndex(index);
    }

    /**
     * 选择下拉选项 -根据文本内容
     * */
    public void selectByText(By by, String text) {
        Select s = new Select(driver.findElement(by));
        s.selectByVisibleText(text);
    }

    /**
     * 执行JavaScript 方法
     * */
    public void executeJS(String js) {
        ((JavascriptExecutor) driver).executeScript(js);
        logger.info("执行JavaScript语句:[" + js + "]");
    }

    /**
     * 执行JavaScript 方法和对象
     * 用法:seleniumUtil.executeJS("arguments[0].click();", seleniumUtil.findElementBy(MyOrdersPage.MOP_TAB_ORDERCLOSE));
     * */
    public void executeJS(String js, Object... args) {
        ((JavascriptExecutor) driver).executeScript(js, args);
        logger.info("执行JavaScript语句:[" + js + "]");
    }

    /**
     * 包装selenium模拟鼠标操作 - 鼠标移动到指定元素
     * */
    public void mouseMoveToElement(By by) {
        Actions builder = new Actions(driver);
        Actions mouse = builder.moveToElement(driver.findElement(by));
        mouse.perform();
    }

    /**
     * 包装selenium模拟鼠标操作 - 鼠标移动到指定元素
     * */
    public void mouseMoveToElement(WebElement element) {
        Actions builder = new Actions(driver);
        Actions mouse = builder.moveToElement(element);
        mouse.perform();
    }

    /**
     * 包装selenium模拟鼠标操作 - 鼠标右击
     * */
    public void mouseRightClick(By element) {
        Actions builder = new Actions(driver);
        Actions mouse = builder.contextClick(findElementBy(element));
        mouse.perform();
    }

    /**
     * 上传文件,需要点击弹出上传照片的窗口才行
     *
     * @param brower
     *            使用的浏览器名称
     * @param file
     *            需要上传的文件及文件名
     */
    public void handleUpload(String browser, File file) {
        String filePath = file.getAbsolutePath();
        String executeFile = "res/script/autoit/Upload.exe";
        String cmd = "\"" + executeFile + "\"" + " " + "\"" + browser + "\"" + " " + "\"" + filePath + "\"";
        try {
            Process p = Runtime.getRuntime().exec(cmd);
            p.waitFor();
        } catch (Exception e) {
            e.printStackTrace();
        }
    }
    // ===================== 对元素进行操作 ============================

    /**
     * 添加cookies,做自动登陆的必要方法
     * */
    public void addCookies(int sleepTime) {
        pause(sleepTime);
        Set<Cookie> cookies = driver.manage().getCookies();
        for (Cookie c : cookies) {
            System.out.println(c.getName() + "->" + c.getValue());
            if (c.getName().equals("logisticSessionid")) {
                Cookie cook = new Cookie(c.getName(), c.getValue());
                driver.manage().addCookie(cook);
                System.out.println(c.getName() + "->" + c.getValue());
                System.out.println("添加成功");
            } else {
                System.out.println("没有找到logisticSessionid");
            }

        }

    }

    // webdriver中可以设置很多的超时时间
    /** implicitlyWait。识别对象时的超时时间。过了这个时间如果对象还没找到的话就会抛出NoSuchElement异常 */
    public void implicitlyWait(int timeOut) {
        driver.manage().timeouts().implicitlyWait(timeOut, TimeUnit.SECONDS);
    }

    /** setScriptTimeout。异步脚本的超时时间。webdriver可以异步执行脚本,这个是设置异步执行脚本脚本返回结果的超时时间 */
    public void setScriptTimeout(int timeOut) {
        driver.manage().timeouts().setScriptTimeout(timeOut, TimeUnit.SECONDS);
    }

    /** 获得屏幕的分辨率 - 宽 */
    public static double getScreenWidth() {
        return java.awt.Toolkit.getDefaultToolkit().getScreenSize().getWidth();
    }


    /**
     * 暂停当前用例的执行,暂停的时间为:sleepTime
     * */
    public void pause(int sleepTime) {
        if (sleepTime <= 0) {
            return;
        }
        try {
            Thread.sleep(sleepTime);
        } catch (InterruptedException e) {
            e.printStackTrace();
        }
    }

    /** 不能点击时候重试点击操作 */
    private void clickTheClickable(By byElement, long startTime, int timeOut) throws Exception {
        try {
            findElementBy(byElement).click();
        } catch (Exception e) {
            if (System.currentTimeMillis() - startTime > timeOut) {
                logger.warn(byElement+ " is unclickable");
                throw new Exception(e);
            } else {
                Thread.sleep(500);
                logger.warn(byElement + " is unclickable, try again");
                clickTheClickable(byElement, startTime, timeOut);
            }
        }
    }

}
![]()
在pom.xml中添加代码如下:
![]()
![]()
        <dependency>
            <groupId>org.seleniumhq.selenium</groupId>
            <artifactId>selenium-java</artifactId>
            <version>LATEST</version>
        </dependency>
        <dependency>
            <groupId>log4j</groupId>
            <artifactId>log4j</artifactId>
            <version>1.2.16</version>
            <scope>provided</scope>
        </dependency>
        <dependency>
            <groupId>org.testng</groupId>
            <artifactId>testng</artifactId>
            <version>LATEST</version>
        </dependency>
        <dependency>
            <groupId>org.seleniumhq.selenium</groupId>
            <artifactId>selenium-remote-driver</artifactId>
            <version>LATEST</version>
        </dependency>
![]()
5.2 使用log4j进行日志输出
LogConfiguration.java:配置了log的输出等级,以及如何显示,如何输出,输出的日志保存到哪里等配置,代码如下:
![]()
![]()
package com.demo.test.utils;
import java.util.Properties;
import org.apache.log4j.PropertyConfigurator;
/**
 * @author young
 * @decription 动态生成各个模块中的每条用例的日志,运行完成用例之后请到result/log目录下查看
 * */
public class LogConfiguration {

        public static void initLog(String fileName){
            //获取到模块名字
            String founctionName = getFunctionName(fileName);
            //声明日志文件存储路径以及文件名、格式
            final String logFilePath  = "./result/log/"+founctionName+"/"+fileName+".log";
            Properties prop = new Properties();
            //配置日志输出的格式
            prop.setProperty("log4j.rootLogger","info, toConsole, toFile");
            prop.setProperty("log4j.appender.file.encoding","UTF-8" );
            prop.setProperty("log4j.appender.toConsole","org.apache.log4j.ConsoleAppender");
            prop.setProperty("log4j.appender.toConsole.Target","System.out");
            prop.setProperty("log4j.appender.toConsole.layout","org.apache.log4j.PatternLayout ");
            prop.setProperty("log4j.appender.toConsole.layout.ConversionPattern","[%d{yyyy-MM-dd HH:mm:ss}] [%p] %m%n");
            prop.setProperty("log4j.appender.toFile", "org.apache.log4j.DailyRollingFileAppender");
            prop.setProperty("log4j.appender.toFile.file", logFilePath);
            prop.setProperty("log4j.appender.toFile.append", "false");
            prop.setProperty("log4j.appender.toFile.Threshold", "info");
            prop.setProperty("log4j.appender.toFile.layout", "org.apache.log4j.PatternLayout");
            prop.setProperty("log4j.appender.toFile.layout.ConversionPattern", "[%d{yyyy-MM-dd HH:mm:ss}] [%p] %m%n");
            //使配置生效
            PropertyConfigurator.configure(prop);

        }


        /**取得模块名字*/
        public static String getFunctionName(String fileName){
            String functionName = null;
            int firstUndelineIndex = fileName.indexOf("_");
            functionName = fileName.substring(0, firstUndelineIndex-4);
            return functionName;

    }


}
![]()
5.3 封装测试平台和测试浏览器选择工具类
SelectBrowser.java:(会调用PropertiesDataProvider.java,后面补上这个类),代码如下:
![]()
![]()
package com.demo.test.utils;
import java.util.Properties;
import org.apache.log4j.Logger;
import org.openqa.selenium.WebDriver;
import org.openqa.selenium.chrome.ChromeDriver;
import org.openqa.selenium.firefox.FirefoxDriver;
import org.openqa.selenium.ie.InternetExplorerDriver;
import org.openqa.selenium.phantomjs.PhantomJSDriver;
import org.openqa.selenium.phantomjs.PhantomJSDriverService;
import org.openqa.selenium.remote.DesiredCapabilities;
import org.testng.Assert;
import org.testng.ITestContext;

/**
 * @author young
 * @decription 在不同的平台上选择对应的浏览器,系统平台程序自动判断是什么平台
 * */
public class SelectBrowser {
    static Logger logger = Logger.getLogger(SelectBrowser.class.getName());

    public WebDriver selectExplorerByName(String browser, ITestContext context) {
        Properties props = System.getProperties(); // 获得系统属性集
        String currentPlatform = props.getProperty("os.name"); // 操作系统名称
        logger.info("当前操作系统是:[" + currentPlatform + "]");
        logger.info("启动测试浏览器:[" + browser + "]");
        //从testNG的配置文件读取参数driverConfgFilePath的值
        String driverConfgFilePath = context.getCurrentXmlTest().getParameter("driverConfgFilePath");
        /** 声明好驱动的路径 */
        String chromedriver_win = PropertiesDataProvider.getTestData(driverConfgFilePath, "chromedriver_win");
        String chromedriver_linux = PropertiesDataProvider.getTestData(driverConfgFilePath, "chromedriver_linux");
        String chromedriver_mac = PropertiesDataProvider.getTestData(driverConfgFilePath, "chromedriver_mac");
        String ghostdriver_win = PropertiesDataProvider.getTestData(driverConfgFilePath, "ghostdriver_win");
        String iedriver = PropertiesDataProvider.getTestData(driverConfgFilePath, "iedriver");
        if (currentPlatform.toLowerCase().contains("win")) { //如果是windows平台

            if (browser.equalsIgnoreCase("ie")) {
                System.setProperty("webdriver.ie.driver", iedriver);
                //IE的常规设置,便于执行自动化测试
                DesiredCapabilities ieCapabilities = DesiredCapabilities.internetExplorer();
                ieCapabilities.setCapability(InternetExplorerDriver.INTRODUCE_FLAKINESS_BY_IGNORING_SECURITY_DOMAINS, true);
                //返回ie浏览器对象
                return new InternetExplorerDriver(ieCapabilities);
            } else if (browser.equalsIgnoreCase("chrome")) {
                System.setProperty("webdriver.chrome.driver", chromedriver_win);
                //返回谷歌浏览器对象
                 return new ChromeDriver();
            } else if (browser.equalsIgnoreCase("firefox")) {
                //返回火狐浏览器对象
                return new FirefoxDriver();

            } else if(browser.equalsIgnoreCase("ghost")){
                DesiredCapabilities ghostCapabilities = new DesiredCapabilities();
                ghostCapabilities.setJavascriptEnabled(true);
                ghostCapabilities.setCapability(PhantomJSDriverService.PHANTOMJS_EXECUTABLE_PATH_PROPERTY, ghostdriver_win);
                //返回ghost对象
                return new PhantomJSDriver(ghostCapabilities);

            }else {

                logger.error("The [" + browser + "]" + " explorer is not applicable  for  [" + currentPlatform + "] OS");
                Assert.fail("The [" + browser + "]" + " explorer does not apply to  [" + currentPlatform + "] OS");

            }

        } else if (currentPlatform.toLowerCase().contains("linux")) { //如果是linux平台

            if (browser.equalsIgnoreCase("chrome")) {
                System.setProperty("webdriver.chrome.driver", chromedriver_linux);
                return new ChromeDriver();

            } else if (browser.equalsIgnoreCase("firefox")) {
                return new FirefoxDriver();
            } else {
                logger.error("The [" + browser + "]" + " explorer does not apply to  [" + currentPlatform + "] OS");
                Assert.fail("The [" + browser + "]" + " explorer does not apply to  [" + currentPlatform + "] OS");
            }

        } else if (currentPlatform.toLowerCase().contains("mac")) { //如果是mac平台
            if (browser.equalsIgnoreCase("chrome")) {
                System.setProperty("webdriver.chrome.driver", chromedriver_mac);
                return new ChromeDriver();
            } else if (browser.equalsIgnoreCase("firefox")) {
                return new FirefoxDriver();
            } else {
                logger.error("The [" + browser + "]" + " explorer does not apply to  [" + currentPlatform + "] OS");
                Assert.fail("The [" + browser + "]" + " explorer does not apply to  [" + currentPlatform + "] OS");
            }

        } else
            logger.error("The [" + currentPlatform + "] is not supported for this automation frame,please change the OS(Windows,MAC or LINUX)");

        Assert.fail("The [" + currentPlatform + "] is not supported for this automation frame,please change the OS(Windows,MAC or LINUX)");
        return null;
    }
}
![]()
在pom.xml中添加代码如下:
![]()
        <dependency>
            <groupId>com.codeborne</groupId>
            <artifactId>phantomjsdriver</artifactId>
            <version>1.2.1</version>
        </dependency>
在testng.xml中添加代码如下:
<parameter name="driverConfgFilePath" value="config/driver.properties" />
5.4 根据key读取属性文件里面的value值
PropertiesDataProvider.java:从.properties文件中读取相关测试数据,代码如下:
![]()
![]()
package com.demo.test.utils;

import org.apache.commons.configuration.Configuration;
import org.apache.commons.configuration.ConfigurationException;
import org.apache.commons.configuration.PropertiesConfiguration;

/**
 * @Desription 从.properties文件中读取相关测试数据<br>
 *
 * */
public class PropertiesDataProvider {

    public static String getTestData(String configFilePath, String key) {
        Configuration config = null;
        try {
            config = new PropertiesConfiguration(configFilePath);
        } catch (ConfigurationException e) {
            e.printStackTrace();
        }
        return String.valueOf(config.getProperty(key));

    }
}
自动化测试相关教程推荐:
2023最新自动化测试自学教程新手小白26天入门最详细教程,目前已有300多人通过学习这套教程入职大厂!!_哔哩哔哩_bilibili
2023最新合集Python自动化测试开发框架【全栈/实战/教程】合集精华,学完年薪40W+_哔哩哔哩_bilibili
测试开发相关教程推荐
2023全网最牛,字节测试开发大佬现场教学,从零开始教你成为年薪百万的测试开发工程师_哔哩哔哩_bilibili
postman/jmeter/fiddler测试工具类教程推荐
讲的最详细JMeter接口测试/接口自动化测试项目实战合集教程,学jmeter接口测试一套教程就够了!!_哔哩哔哩_bilibili
2023自学fiddler抓包,请一定要看完【如何1天学会fiddler抓包】的全网最详细视频教程!!_哔哩哔哩_bilibili
2023全网封神,B站讲的最详细的Postman接口测试实战教学,小白都能学会_哔哩哔哩_bilibili
总结:
光学理论是没用的,要学会跟着一起敲,要动手实操,才能将自己的所学运用到实际当中去,这时候可以搞点实战案例来学习。


如果对你有帮助的话,点个赞收个藏,给作者一个鼓励。也方便你下次能够快速查找。
如有不懂还要咨询下方小卡片,博主也希望和志同道合的测试人员一起学习进步
在适当的年龄,选择适当的岗位,尽量去发挥好自己的优势。
我的自动化测试开发之路,一路走来都离不每个阶段的计划,因为自己喜欢规划和总结,
测试开发视频教程、学习笔记领取传送门!!


![[湖湘杯 2021 final]MultistaeAgency](https://img-blog.csdnimg.cn/direct/ffb15481c9494d578a59613fe35777de.png)