1、移动端适配
1.1、设置meta缩放比例,将设备窗口调整为设计图大小。
<!DOCTYPE html>
<html lang="en">
<head>
  <meta charset="UTF-8">
  <meta name="viewport" content="width=device-width,
 initial-scale=1, maximum-scale=1, user-scalable=no">
  <title>Your Page Title</title>
  <!-- 其他 head 元素 -->
</head>
<body>
  <!-- 页面内容 -->
</body>
</html>
在这里,<meta name="viewport" content="width=device-width, initial-scale=1, maximum-scale=1, user-scalable=no"> 的设置起到了关键作用:
width=device-width: 将页面的宽度设置为设备宽度。initial-scale=1: 初始缩放比例为 1,即不缩放。maximum-scale=1: 最大缩放比例为 1,防止用户手动放大。user-scalable=no: 禁止用户手动缩放。
这样设置后,页面将按照设备宽度来布局,而且用户将无法手动缩放。
1.2、媒体查询设置根节点字号 + rem
第一种:js动态计算屏幕宽度设置根节点字号 + rem+弹性布局(Flexbox)
第二种:js动态计算屏幕宽度设置根节点字号 + rem
字体相对单位: 使用相对单位(em、rem)定义字体大小,以确保在不同屏幕尺寸上的可读性。
// 屏幕大于 1440px 时应用该样式
@media screen and (min-width: 1441px) {
  html{font-size: 16px;}
}

// 屏幕大于 1024px 或小于 1440px 时应用该样式
@media screen and (min-width: 1024px) and (max-width: 1440px) {
   html{font-size: 14px;}
}
图片适配: 使用响应式图片或者通过 CSS 的 max-width 属性来确保图片在不同屏幕尺寸上适应
/* 示例图片适应 */
img {
  max-width: 100%;
  height: auto;
}
优点:rem 布局能很好的实现在不同尺寸的屏幕横向填满屏幕,且在不同屏幕元素大小比例一致
缺点:在大屏设备(Pad)上,元素尺寸会很大,页面显示更少的内容。需要限制内容最大宽度
最大宽度限制: 对于一些容器或元素,可以设置最大宽度,防止在大屏幕上显示过宽。
1.3、postcss-px-to-viewport插件,将px转为vw,需要webpack配置
1、安装 postcss-px-to-viewport 插件和相应的 loader:
npm install postcss-px-to-viewport postcss-loader --save-dev
2、在项目根目录下创建 postcss.config.js 文件,配置 postcss-px-to-viewport 插件:
// postcss.config.js

module.exports = {
  plugins: {
    'postcss-px-to-viewport': {
      viewportWidth: 375,  // 设计稿宽度
      viewportHeight: 667, // 设计稿高度
      unitPrecision: 5,    // 单位精度
      viewportUnit: 'vw',  // 转换成的视口单位
      selectorBlackList: [], // 需要忽略的CSS选择器
      minPixelValue: 1,    // 小于或等于 1px 不转换为视口单位
      mediaQuery: false,   // 是否允许在媒体查询中转换为vw
    },
  },
};
3、 在 webpack 配置中使用 postcss-loader:
// webpack.config.js

module.exports = {
  // 其他配置项...

  module: {
    rules: [
      // 其他 loader 配置...
      {
        test: /\.(css|postcss)$/,
        use: [
          'style-loader',
          'css-loader',
          'postcss-loader', // 添加 postcss-loader
        ],
      },
    ],
  },
};
1.5、流式布局:
使用相对单位(百分比、vw、vh)和相对单位来创建流式布局,使页面能够随着屏幕尺寸的变化而自适应。比较麻烦
-
子元素width、height的百分比:子元素的width或height中使用百分比,是相对于子元素的直接父元素
-
margin和padding的百分比:在垂直方向和水平方向都是相对于直接父亲元素的width,而与父元素的height无关
-
border-radius、
border-radius、background-size、transform: translate()、transform-origin的百分比:他们的百分比是相对于自身宽度,与父元素无关
2、瀑布流
参考:2022年了!再来手撕一下前端瀑布流代码吧!-阿里云开发者社区
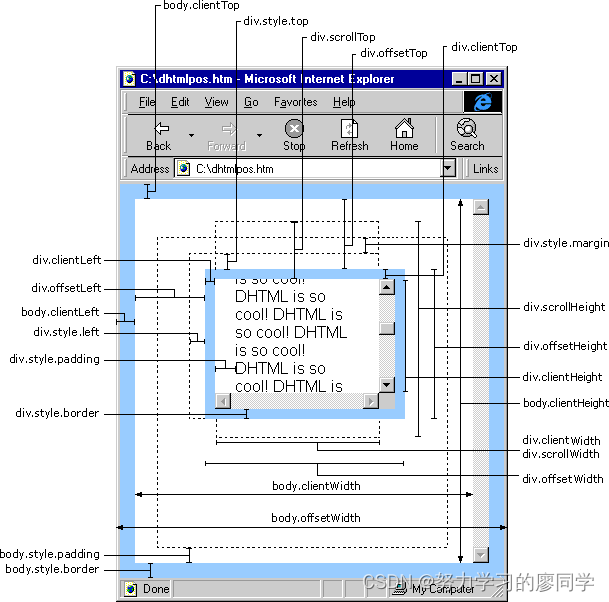
理解offsetleft offsetwidth: offsetLeft,Left,clientLeft的区别 - 小顾问 - 博客园 (cnblogs.com)
<!DOCTYPE html>
<html lang="en">

<head>
    <meta charset="UTF-8">
    <meta name="viewport" content="width=device-width, initial-scale=1.0">
    <meta http-equiv="X-UA-Compatible" content="ie=edge">
    <title>瀑布流</title>
    <style>
        * {
            margin: 0;
            padding: 0;
        }

        .item {
            font-size: 30px;
            font-weight: 700;
            color: aliceblue;
            width: 205px;
            position: absolute;
        }

        .item-1 {
            background-color: rgb(206, 169, 169);
            height: 300px;
        }

        .item-2 {
            background-color: rgb(131, 226, 174);
            height: 150px;
        }

        .item-3 {
            background-color: rgb(77, 30, 30);
            height: 350px;
        }

        .item-4 {
            background-color: rgb(49, 62, 134);
            height: 300px;
        }

        .item-5 {
            background-color: rgb(230, 99, 99);
            height: 200px;
        }

        .item-6 {
            background-color: rgb(206, 169, 169);
            height: 300px;
        }

        .item-7 {
            background-color: rgb(124, 126, 145);
            height: 400px;
        }

        .item-8 {
            background-color: rgb(169, 199, 38);
            height: 230px;
        }

        .item-9 {
            background-color: rgb(114, 128, 53);
            height: 300px;
        }

        .item-10 {
            background-color: rgb(48, 54, 18);
            height: 260px;
        }

        .item-11 {
            background-color: rgb(118, 122, 96);
            height: 230px;
        }

        .item-12 {
            background-color: rgb(118, 122, 96);
            height: 240px;
        }

        .item-13 {
            background-color: rgb(118, 122, 96);
            height: 250px;
        }

        .item-14 {
            background-color: rgb(118, 122, 96);
            height: 270px;
        }

        .item-15 {
            background-color: rgb(118, 122, 96);
            height: 330px;
        }

        .item-16 {
            background-color: rgb(118, 122, 96);
            height: 200px;
        }

        .item-17 {
            background-color: rgb(118, 122, 96);
            height: 100px;
        }

        .item-18 {
            background-color: rgb(118, 122, 96);
            height: 400px;
        }

        .item-19 {
            background-color: rgb(118, 122, 96);
            height: 340px;
        }

        .item-20 {
            background-color: rgb(118, 122, 96);
            height: 350px;
        }

        .item-21 {
            background-color: rgb(118, 122, 96);
            height: 360px;
        }

        .item-22 {
            background-color: rgb(118, 122, 96);
            height: 370px;
        }
    </style>
</head>

<body>
    <div id="box">
        <div class="item item-1">1</div>
        <div class="item item-2">2</div>
        <div class="item item-3">3</div>
        <div class="item item-4">4</div>
        <div class="item item-5">5</div>
        <div class="item item-6">6</div>
        <div class="item item-7">7</div>
        <div class="item item-8">8</div>
        <div class="item item-9">9</div>
        <div class="item item-10">10</div>
        <div class="item item-11">11</div>
        <div class="item item-12">12</div>
        <div class="item item-13">13</div>
        <div class="item item-14">14</div>
        <div class="item item-15">15</div>
        <div class="item item-16">16</div>
        <div class="item item-17">17</div>
        <div class="item item-18">18</div>
        <div class="item item-19">19</div>
        <div class="item item-20">20</div>
        <div class="item item-21">21</div>
        <div class="item item-22">22</div>
    </div>
</body>
<script>
    var items = document.getElementsByClassName('item');
    //定义间隙10像素
    var gap = 10;
    //进页面执行函数
    window.onload = function() {
        waterFall();
    }

    function waterFall() {
        //首先确定列数 = 页面的宽度 / 图片的宽度
        var pageWidth = getClient().width;
        var itemWidth = items[0].offsetWidth;
        var columns = parseInt(pageWidth / (itemWidth + gap));
        var arr = []; //定义一个数组,用来存储元素的高度
        console.log(columns)
        for (var i = 0; i < items.length; i++) {
            if (i < columns) {
                //满足这个条件则说明在第一行,文章里面有提到
                items[i].style.top = 0;
                items[i].style.left = (itemWidth + gap) * i + 'px';
                arr.push(items[i].offsetHeight);
            } else {
                //其他行,先找出最小高度列,和索引
                //假设最小高度是第一个元素
                var minHeight = arr[0];
                var index = 0;
                for (var j = 0; j < arr.length; j++) { //找出最小高度
                    if (minHeight > arr[j]) {
                        minHeight = arr[j];
                        index = j;
                    }
                }
                //设置下一行的第一个盒子的位置
                //top值就是最小列的高度+gap
                items[i].style.top = arr[index] + gap + 'px';
                items[i].style.left = items[index].offsetLeft + 'px';

                //修改最小列的高度
                //最小列的高度 = 当前自己的高度 + 拼接过来的高度 + 间隙的高度
                arr[index] = arr[index] + items[i].offsetHeight + gap;
            }
        }
    }

    //当页面尺寸发生变化时,触发函数,实现响应式
    window.onresize = function() {
        waterFall();
    }

    // clientWidth 处理兼容性
    function getClient() {
        return {
            width: window.innerWidth || document.documentElement.clientWidth || document.body.clientWidth,
            height: window.innerHeight || document.documentElement.clientHeight || document.body.clientHeight
        }
    }
    // scrollTop兼容性处理
    function getScrollTop() {
        return window.pageYOffset || document.documentElement.scrollTop;
    }
</script>

</html>
3、vue原理解读,ele组件源码解读
4、canvas

