背景
项目中用到 keycloak,因此其他所有管理页面要集成 keycloak 做统一登录认证。
Keycloak 侧配置
容器方式启动 keycloak 服务端
docker run -d --name mykeycloak -p 8080:8080 -e KEYCLOAK_ADMIN=admin -e KEYCLOAK_ADMIN_PASSWORD=admin keycloak start-dev
注意如果不能联网的话需要要提前下载好镜像。
创建域
启动后,浏览器登录 http://ip:8080,默认用户名密码:admin/admin
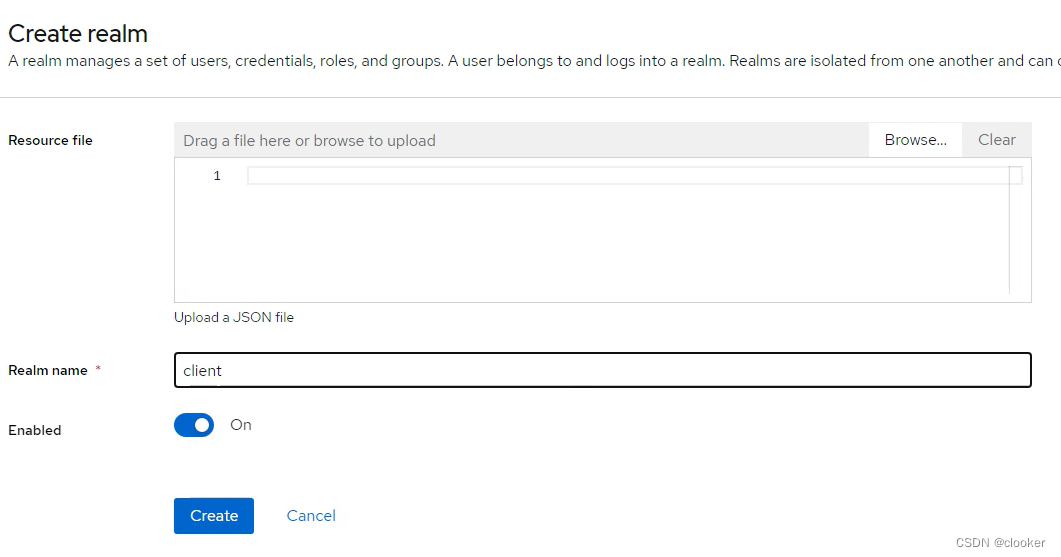
创建域:client

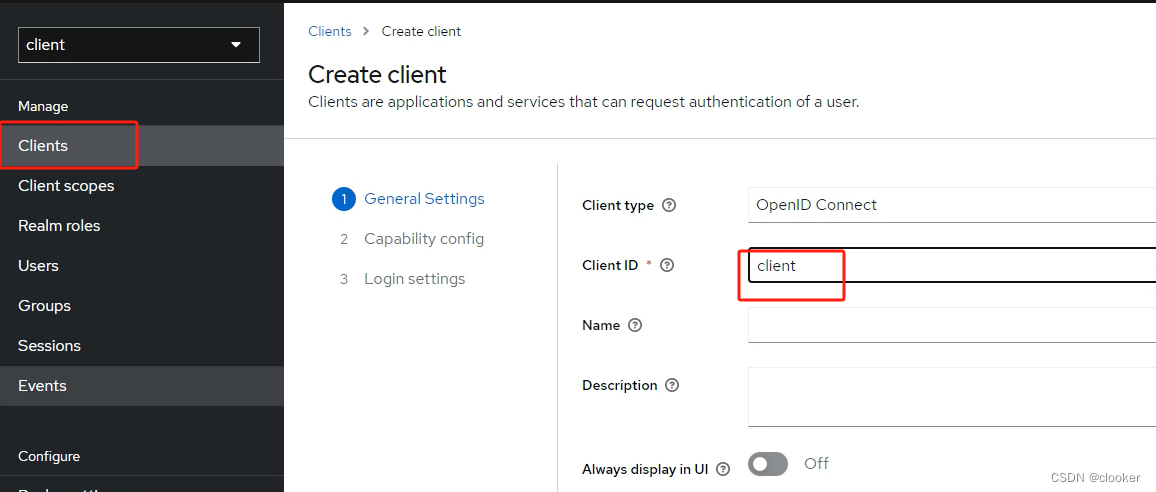
创建客户端
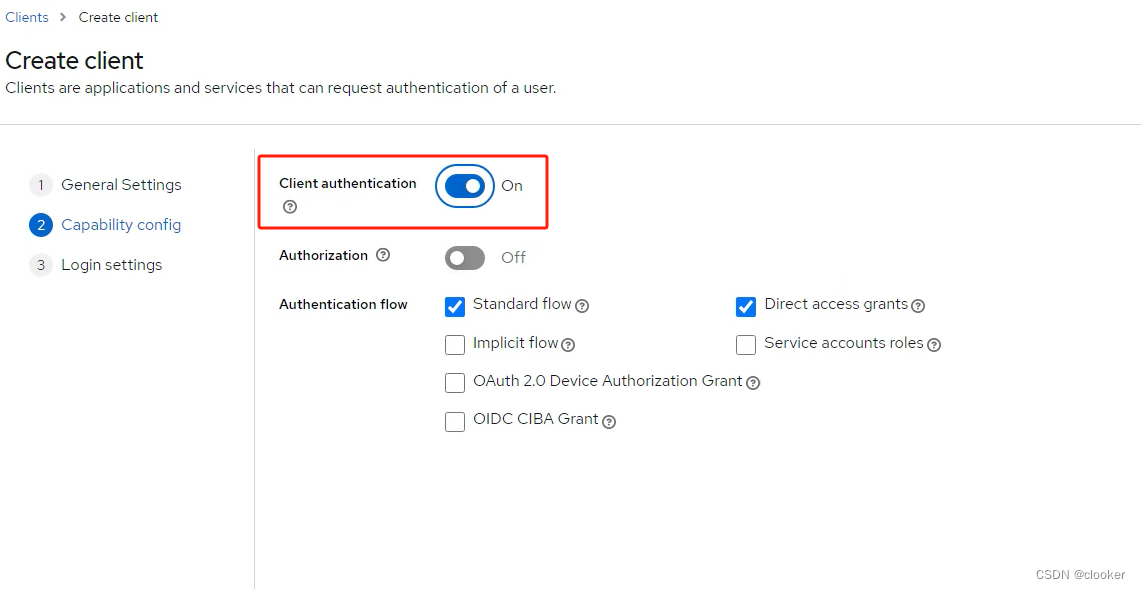
打开客户端认证
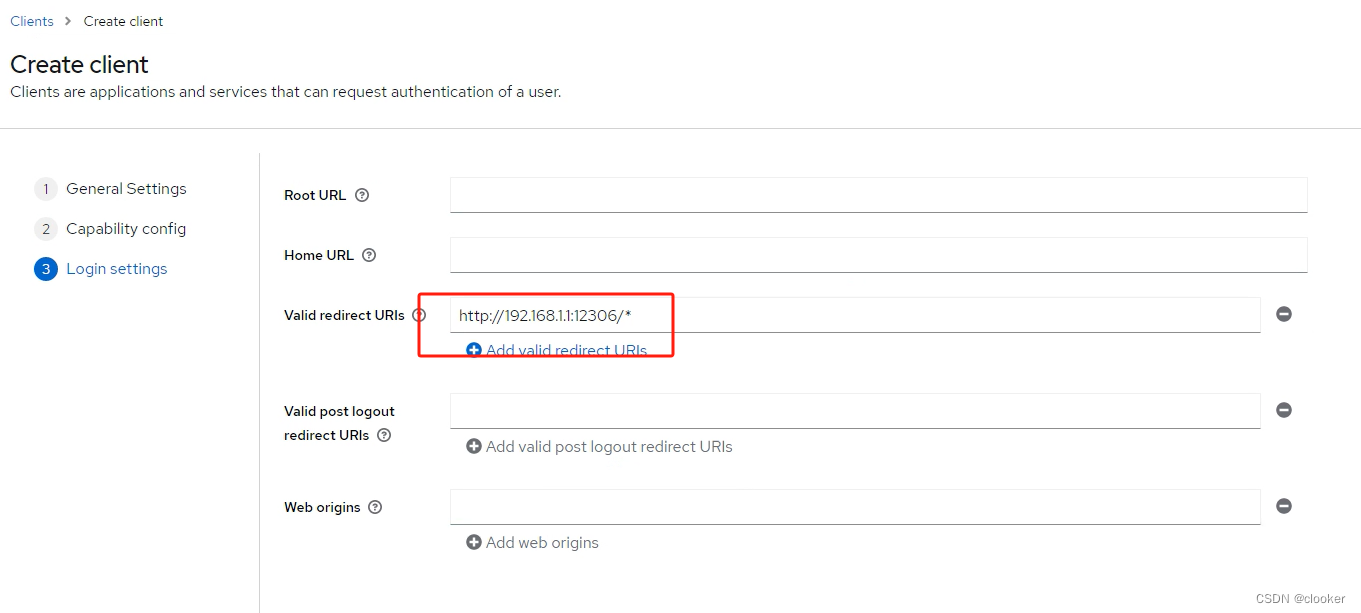
设置登录成功后的重定向地址(这里可以添加多个)
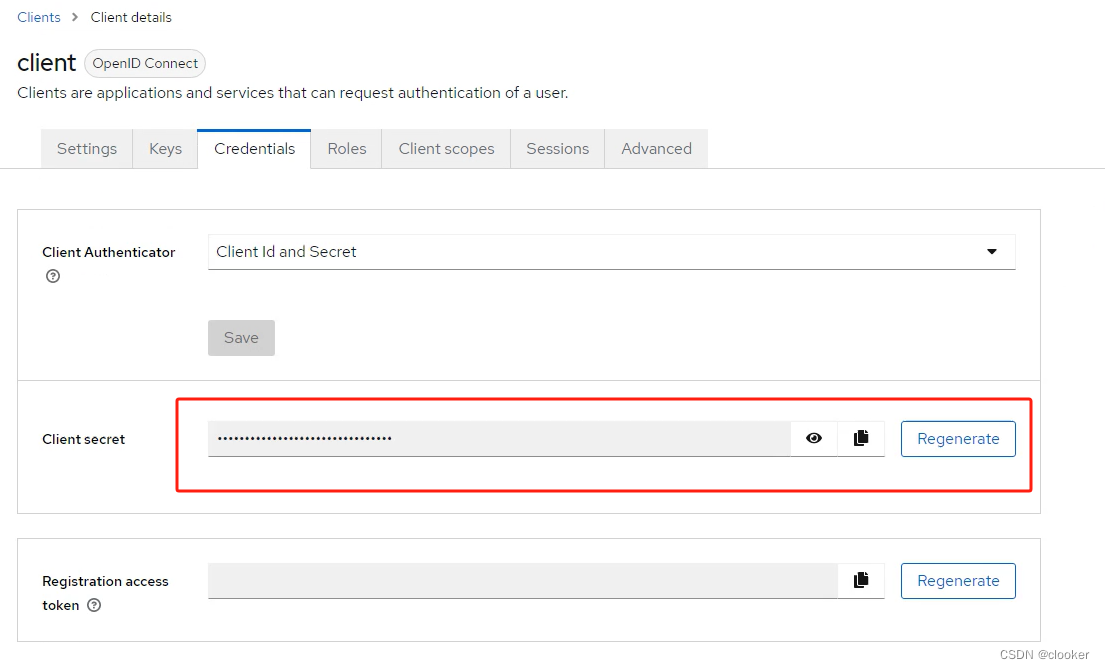
获取密钥,这个在配置 spring boot 时需要
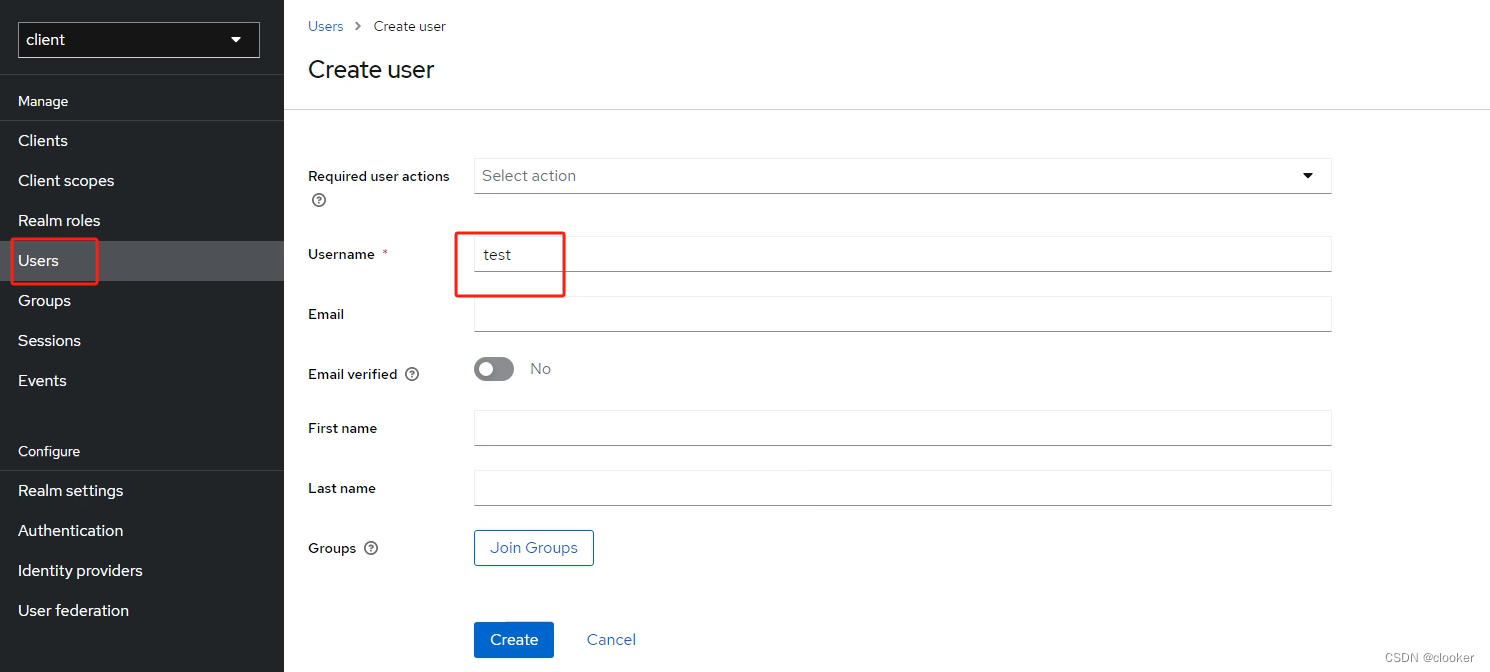
创建用户
这里的用户用于统一认证。
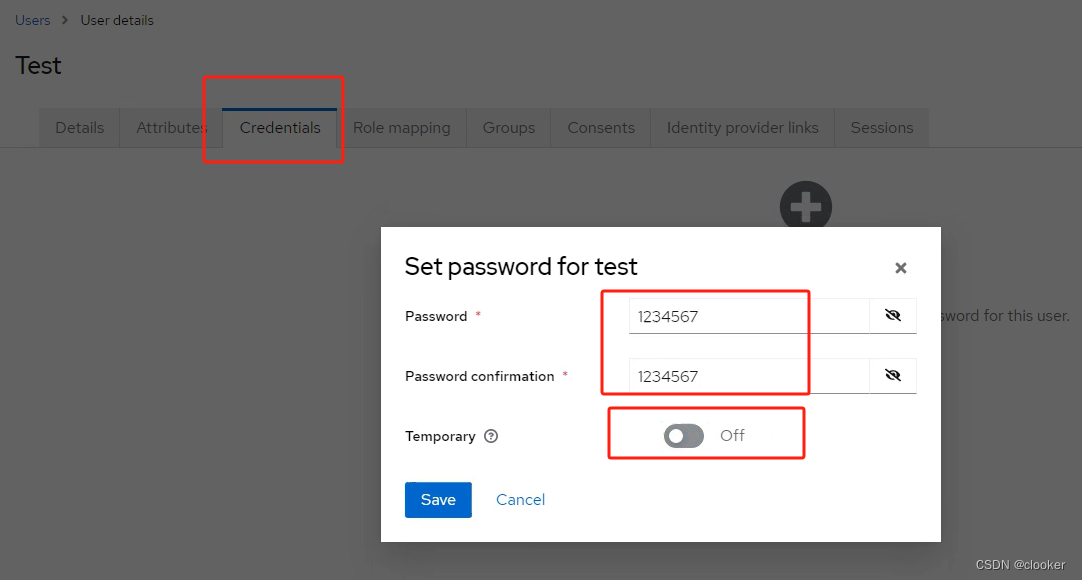
设置登录密码
Spring boot 侧实现
keycloak 有好几种方式集成 spring boot,例如(https://www.keycloak.org/docs/latest/securing_apps/index.html):
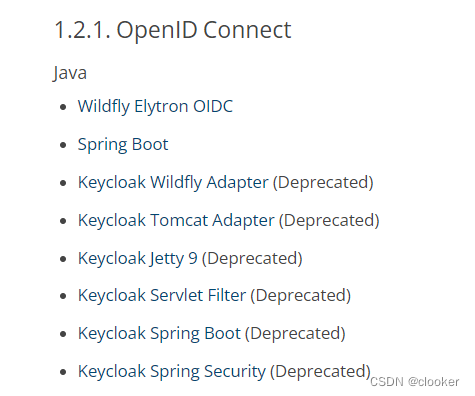
之前使用的是 Adapter 方式,但是官方已经废弃了,现在统一用 oauth2。
引入依赖
<dependency>
  <groupId>org.springframework.boot</groupId>
  <artifactId>spring-boot-starter-oauth2-client</artifactId>
</dependency>
<dependency>
	<groupId>org.springframework.boot</groupId>
	<artifactId>spring-boot-starter-web</artifactId>
</dependency>
<dependency>
	<groupId>org.springframework.boot</groupId>
	<artifactId>spring-boot-starter-security</artifactId>
</dependency>
如果没有特殊要求,则直接使用 spring boot 中配置的版本即可,不用单独设置版本。
添加 Security Filter
package casuallc.github.io;

import static casuallc.github.io.global.Constants.IGNORE_AUTHENTICATION_RESOURCES;
import lombok.extern.slf4j.Slf4j;
import org.apache.commons.lang3.StringUtils;
import org.springframework.beans.factory.annotation.Value;
import org.springframework.context.annotation.Bean;
import org.springframework.context.annotation.Configuration;
import org.springframework.security.config.Customizer;
import org.springframework.security.config.annotation.web.builders.HttpSecurity;
import org.springframework.security.config.annotation.web.configuration.EnableWebSecurity;
import org.springframework.security.config.annotation.web.configurers.AbstractHttpConfigurer;
import org.springframework.security.config.annotation.web.configurers.HeadersConfigurer;
import org.springframework.security.web.SecurityFilterChain;
import org.springframework.security.web.csrf.CookieCsrfTokenRepository;

@Configuration
@EnableWebSecurity
@Slf4j
public class CustomSecurityConfiguration {

    @Value("${security.enabled}")
    private boolean securityEnabled;
    @Value("${security.same-site.enabled}")
    private boolean securitySameSiteEnabled;
    @Value("${security.keycloak.enabled:false}")
    private boolean keyCloakEnabled;
    @Value("${security.oauth2.enabled:false}")
    private boolean oauth2Enabled;
    @Value("${security.oauth2.logout.url:}")
    private String oauth2LogoutUrl;

    @Bean
    public SecurityFilterChain filterChain(HttpSecurity http) throws Exception {
        if (!securitySameSiteEnabled) {
            http.headers(AbstractHttpConfigurer::disable);
        } else {
            http.headers(header -> header.frameOptions(HeadersConfigurer.FrameOptionsConfig::sameOrigin));
        }

        if (securityEnabled) {
            CookieCsrfTokenRepository csrfTokenRepository = new CookieCsrfTokenRepository();
            csrfTokenRepository.setCookieCustomizer(cookie -> cookie.secure(true)
                    .maxAge(86400));
            http.csrf(csrf -> csrf.ignoringRequestMatchers(IGNORE_AUTHENTICATION_RESOURCES)
                    .csrfTokenRepository(csrfTokenRepository));
            return http.build();
        }

        // 使用其他方式认证时关闭 csrf
        http.csrf(AbstractHttpConfigurer::disable);

        if (keyCloakEnabled || oauth2Enabled) {
            http.authorizeHttpRequests(a -> a
                            .requestMatchers(IGNORE_AUTHENTICATION_RESOURCES)
                            .permitAll()
                            .anyRequest()
                            .authenticated())
                    .oauth2Login(Customizer.withDefaults());
            if (StringUtils.isNotBlank(oauth2LogoutUrl)) {
                http.logout(r -> r.logoutSuccessUrl(oauth2LogoutUrl));
            }
            log.info("{} enabled ...", keyCloakEnabled ? "Keycloak" : "Oauth2");
            return http.build();
        }

        log.info("Security CSRF disabled ...");
        return http.build();
    }
}
IGNORE_AUTHENTICATION_RESOURCES 配置了哪些请求不需要认证,比如登录地址。
添加认证配置
### --- 认证配置(需要关闭security.same-site.enabled和security.enabled) --- ###
security.keycloak.enabled=true
spring.security.oauth2.client.provider.external.issuer-uri=http://keycloak:8080/realms/test

spring.security.oauth2.client.registration.external.provider=external
# 客户端名称
spring.security.oauth2.client.registration.external.client-name=client
# 客户端名称
spring.security.oauth2.client.registration.external.client-id=client
spring.security.oauth2.client.registration.external.client-secret=配置在 keycloak client 页面获取的密钥
spring.security.oauth2.client.registration.external.scope=openid,offline_access,profile
spring.security.oauth2.client.registration.external.authorization-grant-type=authorization_code
获取登录用户
在使用 keycloak 登录后,在 request 中可以获取到用户信息
public static String getUserFromOauth2(HttpServletRequest request) {
	OAuth2AuthenticationToken token = (OAuth2AuthenticationToken) request.getUserPrincipal();
	if (token == null) {
		log.warn("Can not get keycloak user from request.");
		return null;
	}
	OAuth2User user = token.getPrincipal();
	if (user instanceof DefaultOidcUser oidcUser) {
		return oidcUser.getPreferredUsername();
	}
	if (user instanceof DefaultOAuth2User oAuth2User) {
		return oAuth2User.getName();
	}
	return user.getName();
}
最后
以上操作完成后,可以访问 spring boot 项目,会自动跳转到 keycloak 登录页面,登录成功后重定向到 spring boot 项目页面。
