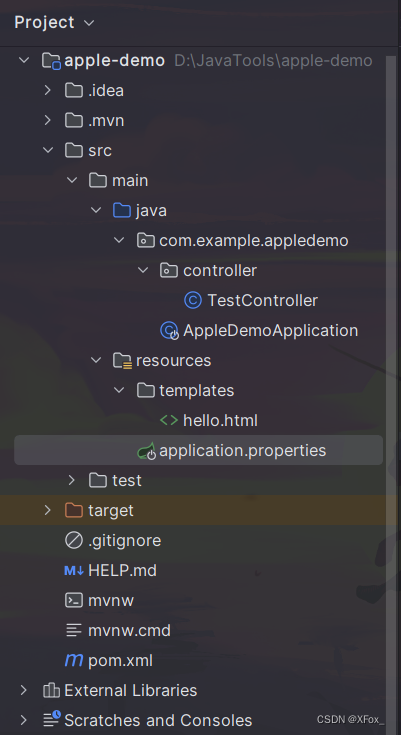
简洁一些:两个重要文件
1.controller指定html文件:我们访问http://localhost:8080/test
package com.example.appledemo.controller;

import org.springframework.stereotype.Controller;
import org.springframework.web.bind.annotation.RequestMapping;
import org.springframework.web.servlet.ModelAndView;

import java.util.ArrayList;
import java.util.List;

@Controller
public class TestController {

    @RequestMapping("/test")
    public ModelAndView test(){
        ModelAndView modelAndView=new ModelAndView();
        modelAndView.setViewName("hello");
        List<String> list=new ArrayList<String>();
        list.add("yyy");
        list.add("aaa");
        list.add("bbb");
        modelAndView.addObject("list",list);
        return modelAndView;
    }
}
2.templates下创建html文件
<!DOCTYPE html>
<html xmlns:th="http://www.thymeleaf.org">   <!--需要添加此行标注为thymeleaf模板 -->
<html lang="en">
<head>
    <meta charset="UTF-8">
    <title>Title</title>
</head>
<body>
<table>
    <tr>
        <th>name</th>
    </tr>
    <tr th:each="name:${list}">
        <td th:text="${name}"></td>
    </tr>

</table>
</body>
</html>
注意:如果创建文件的时候引入了数据库依赖就必须在配置文件中设置url,否则不能成功开启服务器
#路径
spring.thymeleaf.prefix=classpath:/templates/
#后缀
spring.thymeleaf.suffix=.html
#编码
spring.thymeleaf.encoding=UTF-8
spring.thymeleaf.mode=HTML5
spring.datasource.driver-class-name=com.mysql.cj.jdbc.Driver
spring.datasource.url=jdbc:mysql://localhost:3306/apple?characterEncoding=utf8
spring.datasource.username=root
spring.datasource.password=root
#server.servlet.context-path=/demo1
mybatis.mapper-locations=classpath:mapper/*.xml
#mybatis.mapper-locations=classpath:com/demo/cha6_ch7_refactor/dao/*.xml
给出运行结果:
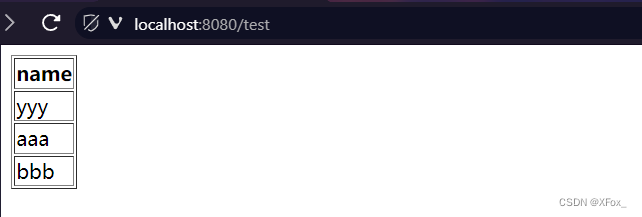
最后给出文件目录
