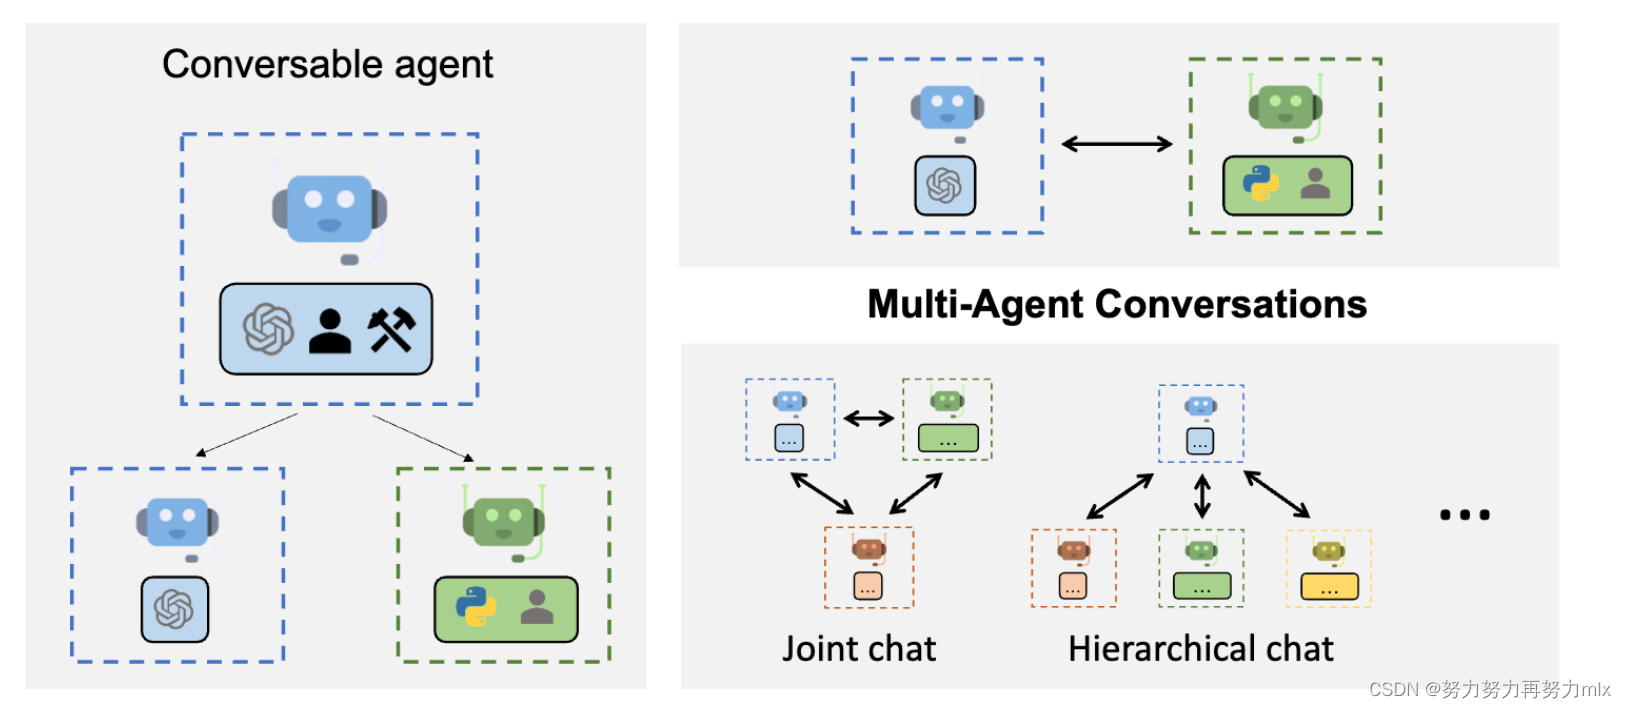
什么是autogen?
AutoGen 是一个框架,支持使用多个代理来开发 LLM 应用程序,这些代理可以相互对话来解决任务。AutoGen 代理是可定制的、可对话的,并且无缝地允许人类参与。他们可以采用法学硕士、人力投入和工具组合的各种模式运作。简单来说,就是设置不同的聊天代理对象来的相互对话交互来实现用户想要实现的目标和任务
基于chatgpt模型来构建,除了以下的几个chatgpt4的模型以外,它还支持fine-Truning模型
import autogen

config_list = autogen.config_list_from_json(
    "OAI_CONFIG_LIST",
    filter_dict={
        "model": ["gpt-4", "gpt4", "gpt-4-32k", "gpt-4-32k-0314", "gpt-4-32k-v0314"],
    },
)
如何使用autogen?
autogen的安装需要依赖于python>=3.8的版本,这点我们可以通过anaconda来进行环境配置和管理
pip install pyautogen
配置好环境之后,我们就可以使用autogen了
需要说明的是:autogen作用的实现主要是基于助手代理和用户代理两种对象,我们可以进行不同的配置实现代理对象对话场景的多样化:
助理代理的参数设置
def __init__(name: str,
             system_message: Optional[str] = DEFAULT_SYSTEM_MESSAGE,
             llm_config: Optional[Union[Dict, bool]] = None,
             is_termination_msg: Optional[Callable[[Dict], bool]] = None,
             max_consecutive_auto_reply: Optional[int] = None,
             human_input_mode: Optional[str] = "NEVER",
             code_execution_config: Optional[Union[Dict, bool]] = False,
             **kwargs)
name str - 代理名称。
system_message str - ChatCompletion 推理的系统消息。如果您想重新编程代理,请覆盖此属性。
llm_config dict - llm 推理配置。
is_termination_msg function - 一个函数,它接受字典形式的消息并返回一个布尔值,指示收到的消息是否是终止消息。该字典可以包含以下键:“content”、“role”、“name”、“function_call”。
max_consecutive_auto_reply int - 连续自动回复的最大数量。默认为 None (没有提供限制,类属性 MAX_CONSECUTIVE_AUTO_REPLY 将在这种情况下用作限制)。该限制仅在 human_input_mode 不是“ALWAYS”时起作用。用户代理的参数设置
def __init__(name: str,
             is_termination_msg: Optional[Callable[[Dict], bool]] = None,
             max_consecutive_auto_reply: Optional[int] = None,
             human_input_mode: Optional[str] = "ALWAYS",
             function_map: Optional[Dict[str, Callable]] = None,
             code_execution_config: Optional[Union[Dict, bool]] = None,
             default_auto_reply: Optional[Union[str, Dict, None]] = "",
             llm_config: Optional[Union[Dict, bool]] = False,
             system_message: Optional[str] = "")
name str - 代理的名称。
is_termination_msg function - 一个函数,它接受字典形式的消息并返回一个布尔值,指示收到的消息是否是终止消息。该字典可以包含以下键:“content”、“role”、“name”、“function_call”。
max_consecutive_auto_reply int - 连续自动回复的最大数量。默认为 None (没有提供限制,类属性 MAX_CONSECUTIVE_AUTO_REPLY 将在这种情况下用作限制)。该限制仅在 human_input_mode 不是“ALWAYS”时起作用。
human_input_mode str - 每次收到消息时是否要求人工输入。可能的值为“始终”、“终止”、“从不”。(1) 当“ALWAYS”时,代理每次收到消息时都会提示人工输入。在此模式下,当人工输入为“exit”时,或者当 is_termination_msg 为 True 并且没有人工输入时,对话停止。(2) 当“TERMINATE”时,只有当收到终止消息或自动回复次数达到 max_consecutive_auto_reply 时,代理才会提示人工输入。(3) 当“NEVER”时,代理将永远不会提示人工输入。该模式下,当自动回复次数达到 max_consecutive_auto_reply 或 is_termination_msg 为 True 时,会话停止。
function_map dict [str, callable] - 将函数名称(传递给 openai)映射到可调用函数。
code_execution_config dict 或 False - 代码执行的配置。要禁用代码执行,请设置为 False。否则,设置为具有以下键的字典:
work_dir(可选,str):代码执行的工作目录。如果没有,将使用默认工作目录。默认工作目录是“path_to_autogen”下的“extensions”目录。
use_docker (可选、list、str 或 bool):用于执行代码的 docker 映像。如果提供了图像名称的列表或字符串,则代码将在 docker 容器中执行,并成功拉取第一个图像。如果 None、False 或空,则代码将在当前环境中执行。默认为 True,将转换为列表。如果代码在当前环境中执行,则该代码必须是可信的。
timeout (可选,int):最大执行时间(以秒为单位)。
last_n_messages(实验性,可选,int):要回顾代码执行的消息数。默认为 1。
default_auto_reply str 或 dict 或 None - 当未生成代码执行或基于 llm 的回复时默认的自动回复消息。
llm_config dict 或 False - llm 推理配置。
system_message str - 用于 ChatCompletion 推理的系统消息。仅当 llm_config 不为 False 时使用。用它来重新编程代理。autogen能做什么
1.多主体对话和任务执行
任务事例1:
今天是几号?比较一下META和特斯拉今年迄今的收益,将收益变化保存stock_price_ytd.png文件,并将该文件打开
import autogen
import openai
openai.api_key="your-api-key"
coder = autogen.AssistantAgent(
    name="coder",
    llm_config={
        "seed": 42,  # seed for caching and reproducibility
        "temperature": 0,  # temperature for sampling
    },  # configuration for autogen's enhanced inference API which is compatible with OpenAI AP
                               )
user_proxy = autogen.UserProxyAgent(
    name="user_proxy",
    human_input_mode="NEVER",
    max_consecutive_auto_reply=10,
    is_termination_msg=lambda x: x.get("content", "").rstrip().endswith("TERMINATE"),
)
# executor = autogen.AssistantAgent("executor",system_message="Executes the code generated by the coder and returns the data result")
task = "What date is today? Compare the year-to-date gain for META and TESLA"

user_proxy.initiate_chat(coder, message=task)
user_proxy.send(
    recipient=coder,
    message="""Plot a chart of their stock price change YTD and save to stock_price_ytd.png.""",
)
user_proxy.send(
    recipient= coder,
    message="open stock_price_ytd.png"
)
# print("nihao")
结果逻辑:
他会按照以下逻辑输出任务的执行逻辑1.编写并执行python代码计算今天日期
2.使用 `yfinance ` 获取股票价格的库,如果没有安装,将对其进行安装
3.计算 META 和 TESLA 的年初至今收益
4.在当前目录加载文件
5.打开该文件,可视化结果如下:
任务实例2:
让autogen对百度首页总结功能测试点并进行自动化测试
import autogen
import openai
openai.api_key="your api key"
coder = autogen.AssistantAgent(
    name="coder",
    llm_config={
        "seed": 42,  # seed for caching and reproducibility
        "temperature": 0,  # temperature for sampling
    },  # configuration for autogen's enhanced inference API which is compatible with OpenAI AP
                               )
user_proxy = autogen.UserProxyAgent(
    name="user_proxy",
    human_input_mode="NEVER",
    max_consecutive_auto_reply=10,
    is_termination_msg=lambda x: x.get("content", "").rstrip().endswith("TERMINATE"),
)
# executor = autogen.AssistantAgent("executor",system_message="Executes the code generated by the coder and returns the data result")
task = "From the point of view of functional testing, analyze what test points Baidu home page has"
user_proxy.initiate_chat(coder, message=task)
# 生成对应的测试脚本
user_proxy.send("Generate automated test scripts based on these test points",coder)
From the point of view of functional testing, analyze what test points Baidu home page has
--------------------------------------------------------------------------------
coder (to user_proxy):
Functional testing is a type of software testing that validates the software system against the functional requirements/specifications. The purpose of functional tests is to test each function of the software application by providing appropriate input, verifying the output against the functional requirements.
When it comes to testing the Baidu home page, we can consider the following test points:
1. **Search Functionality**: This is the primary function of Baidu. We need to ensure that the search functionality works as expected. This includes testing with different types of input (e.g., text, numbers, special characters), checking the search results are relevant, and testing the performance of the search.
2. **Language Selection**: Baidu offers multiple language options. We need to test if the language selection works correctly and if the page content changes accordingly.
3. **Navigation Links**: The home page contains various navigation links (e.g., News, Maps, Images). We need to test if these links are working correctly and lead to the correct pages.
4. **Login Functionality**: If there is a login option, we need to test the login functionality with valid and invalid inputs.
5. **Accessibility**: We need to test if the website is accessible and usable, including testing for mobile responsiveness, browser compatibility, and accessibility for users with disabilities.
6. **Ads Display**: If there are ads on the home page, we need to test if they are displayed correctly and if they lead to the correct websites when clicked.
7. **Privacy and Security**: We need to test if the website is secure and if it respects user privacy. This includes testing for secure connections (HTTPS), checking if cookies are used appropriately, and testing the privacy settings.
8. **Performance**: We need to test the performance of the website, including load times and how the website handles high traffic.
Please note that this is a high-level analysis and the actual test points may vary based on the specific requirements and functionality of the Baidu home page.
TERMINATE
--------------------------------------------------------------------------------
user_proxy (to coder):
Generate automated test scripts based on these test points
--------------------------------------------------------------------------------
coder (to user_proxy):
To generate automated test scripts, we can use Selenium, a popular tool for automating web browsers. Here's a basic Python script using Selenium WebDriver to test some of the points mentioned above.
Please note that this is a simplified example and real-world test scripts would be more complex. Also, you need to have Selenium and the appropriate WebDriver installed on your system to run these scripts.
```python
# filename: baidu_test.py
from selenium import webdriver
from selenium.webdriver.common.keys import Keys
import time
# Create a new instance of the Firefox driver
driver = webdriver.Firefox()
# Go to the Baidu home page
driver.get("https://www.baidu.com")
# Test the search functionality
search_box = driver.find_element_by_name("wd")
search_box.send_keys("Selenium")
search_box.send_keys(Keys.RETURN)
time.sleep(2) # Wait for the page to load
# Check if the search results contain "Selenium"
assert "Selenium" in driver.page_source
# Test the navigation links
news_link = driver.find_element_by_link_text("新闻")
news_link.click()
time.sleep(2) # Wait for the page to load
# Check if the News page is loaded
assert "新闻" in driver.title
# Close the browser
driver.quit()
```
To run this script, save it to a file named `baidu_test.py` and run it with Python.
Please note that this script only tests two points: the search functionality and one of the navigation links. Testing other points like language selection, login functionality, accessibility, ads display, privacy and security, and performance would require more complex scripts and possibly other tools in addition to Selenium.
Also, please note that the actual identifiers (like the name of the search box and the text of the navigation link) may vary, and you need to inspect the Baidu home page to get the correct identifiers.
--------------------------------------------------------------------------------
>>>>>>>> EXECUTING CODE BLOCK 0 (inferred language is python)...
execute_code was called without specifying a value for use_docker. Since the python docker package is not available, code will be run natively. Note: this fallback behavior is subject to change
user_proxy (to coder):
exitcode: 1 (execution failed)
Code output:
Traceback (most recent call last):
File "baidu_test.py", line 3, in <module>
from selenium import webdriver
ModuleNotFoundError: No module named 'selenium'
--------------------------------------------------------------------------------
coder (to user_proxy):
It seems like the Selenium module is not installed in your Python environment. You can install it using pip, which is a package manager for Python. Here is the command to install Selenium:
```sh
pip install selenium
```
After installing Selenium, you should be able to run the test script without the ModuleNotFoundError. Please try running the test script again after installing Selenium.
--------------------------------------------------------------------------------
>>>>>>>> EXECUTING CODE BLOCK 0 (inferred language is sh)...
execute_code was called without specifying a value for use_docker. Since the python docker package is not available, code will be run natively. Note: this fallback behavior is subject to change
user_proxy (to coder):
exitcode: 0 (execution succeeded)
Code output:
Collecting selenium
Downloading selenium-4.14.0-py3-none-any.whl.metadata (6.9 kB)
Requirement already satisfied: urllib3<3,>=1.26 in /opt/anaconda3/envs/python3/lib/python3.9/site-packages (from urllib3[socks]<3,>=1.26->selenium) (2.0.7)
Collecting trio~=0.17 (from selenium)
Downloading trio-0.22.2-py3-none-any.whl.metadata (4.7 kB)
Collecting trio-websocket~=0.9 (from selenium)
Downloading trio_websocket-0.11.1-py3-none-any.whl.metadata (4.7 kB)
Requirement already satisfied: certifi>=2021.10.8 in /opt/anaconda3/envs/python3/lib/python3.9/site-packages (from selenium) (2023.7.22)
Requirement already satisfied: attrs>=20.1.0 in /opt/anaconda3/envs/python3/lib/python3.9/site-packages (from trio~=0.17->selenium) (23.1.0)
Collecting sortedcontainers (from trio~=0.17->selenium)
Downloading sortedcontainers-2.4.0-py2.py3-none-any.whl (29 kB)
Requirement already satisfied: idna in /opt/anaconda3/envs/python3/lib/python3.9/site-packages (from trio~=0.17->selenium) (3.4)
Collecting outcome (from trio~=0.17->selenium)
Downloading outcome-1.3.0.post0-py2.py3-none-any.whl.metadata (2.6 kB)
Collecting sniffio (from trio~=0.17->selenium)
Downloading sniffio-1.3.0-py3-none-any.whl (10 kB)
Collecting exceptiongroup>=1.0.0rc9 (from trio~=0.17->selenium)
Downloading exceptiongroup-1.1.3-py3-none-any.whl.metadata (6.1 kB)
Collecting wsproto>=0.14 (from trio-websocket~=0.9->selenium)
Downloading wsproto-1.2.0-py3-none-any.whl (24 kB)
Collecting pysocks!=1.5.7,<2.0,>=1.5.6 (from urllib3[socks]<3,>=1.26->selenium)
Downloading PySocks-1.7.1-py3-none-any.whl (16 kB)
Collecting h11<1,>=0.9.0 (from wsproto>=0.14->trio-websocket~=0.9->selenium)
Downloading h11-0.14.0-py3-none-any.whl (58 kB)
━━━━━━━━━━━━━━━━━━━━━━━━━━━━━━━━━━━━━━━━ 58.3/58.3 kB 1.6 MB/s eta 0:00:00
Downloading selenium-4.14.0-py3-none-any.whl (9.9 MB)
━━━━━━━━━━━━━━━━━━━━━━━━━━━━━━━━━━━━━━━━ 9.9/9.9 MB 1.7 MB/s eta 0:00:00
Downloading trio-0.22.2-py3-none-any.whl (400 kB)
━━━━━━━━━━━━━━━━━━━━━━━━━━━━━━━━━━━━━━━━ 400.2/400.2 kB 1.5 MB/s eta 0:00:00
Downloading trio_websocket-0.11.1-py3-none-any.whl (17 kB)
Downloading exceptiongroup-1.1.3-py3-none-any.whl (14 kB)
Downloading outcome-1.3.0.post0-py2.py3-none-any.whl (10 kB)
Installing collected packages: sortedcontainers, sniffio, pysocks, outcome, h11, exceptiongroup, wsproto, trio, trio-websocket, selenium
Successfully installed exceptiongroup-1.1.3 h11-0.14.0 outcome-1.3.0.post0 pysocks-1.7.1 selenium-4.14.0 sniffio-1.3.0 sortedcontainers-2.4.0 trio-0.22.2 trio-websocket-0.11.1 wsproto-1.2.0
--------------------------------------------------------------------------------
coder (to user_proxy):
Great! Now that Selenium is installed, you can run the test script again. Here is the script for your convenience:
```python
# filename: baidu_test.py
from selenium import webdriver
from selenium.webdriver.common.keys import Keys
import time
# Create a new instance of the Firefox driver
driver = webdriver.Firefox()
# Go to the Baidu home page
driver.get("https://www.baidu.com")
# Test the search functionality
search_box = driver.find_element_by_name("wd")
search_box.send_keys("Selenium")
search_box.send_keys(Keys.RETURN)
time.sleep(2) # Wait for the page to load
# Check if the search results contain "Selenium"
assert "Selenium" in driver.page_source
# Test the navigation links
news_link = driver.find_element_by_link_text("新闻")
news_link.click()
time.sleep(2) # Wait for the page to load
# Check if the News page is loaded
assert "新闻" in driver.title
# Close the browser
driver.quit()
```
Please run this script and let me know the result.
--------------------------------------------------------------------------------
结果分析:
1.生成测试点
2.编写python脚本
3.执行自动化测试
2.增强推理:所谓的逻辑增强,就是我们为助手代理设置不同的参数来模拟不同的对话场景从而实现更复杂的逻辑对话
可调节的超参数包括:
- model - 这是必需的输入,指定要使用的模型 ID。
- 提示/消息 - 模型的输入提示/消息,为文本生成任务提供上下文。
- max_tokens - 在输出中生成的标记(单词或单词片段)的最大数量。
- temperature - 0 到 1 之间的值,控制生成文本的随机性。较高的温度将导致更加随机和多样化的文本,而较低的温度将导致更加可预测的文本。
- top_p - 0 到 1 之间的值,控制每个令牌生成的采样概率质量。较低的 top_p 值将使其更有可能根据最可能的标记生成文本,而较高的值将允许模型探索更广泛的可能标记。
- n - 针对给定提示生成的响应数。生成多个响应可以提供更多样化且可能更有用的输出,但它也会增加请求的成本。
- stop - 一个字符串列表,当在生成的文本中遇到该字符串时,将导致生成停止。这可用于控制输出的长度或有效性。
- Presence_penalty、Frequency_penalty - 控制生成文本中某些单词或短语的存在和频率的相对重要性的值。
- best_of - 为给定提示选择“最佳”(每个标记具有最高日志概率的响应)响应时生成服务器端的响应数。
autogen与chatgpt的对比
Autogen的优势:
1. 自动化:用户可以通过代理给autogen颁布任务,这个任务可能需要划分为不同的步骤去实现,用户可以通过参数的设置使用户全程0参与,autogen生成的代理助手和用户代理可以帮我们分步骤自动化实现任务
2. 代码生成与执行:Autogen可以根据特定需求生成代码,这对需要快速创建原型或实现功能的开发人员很有帮助;除此之外,autogen因为内置了python解释器,你可以命令它执行它生成的python代码
3.面向任务:Autogen被设计为执行特定的任务,这可以使它在某些用例中更有效。
Autogen的缺点:
1. 有限的范围:Autogen是为特定任务设计的,所以它可能不像其他人工智能模型那样通用。
2. 复杂性:根据任务的不同,Autogen可能需要大量的设置和配置。
3.依赖于用户输入:Autogen依赖于用户输入来执行任务,因此如果用户输入不清楚或不正确,它可能不那么有效。4.autogen没有像chatgpt那样如此稳定,虽然官方文档没有说明这一点,但是当我在本机使用autogen进行个性化提问时,有时会因为超时导致接口调用失败
5.使用chatgpt4作为模型,数据交互成本太高(太贵了)
autogen对测试QA测试效率的优化
1.autogen可以帮我们生成一定的测试用例,完善case生成
2.autogen可以自主生成脚本并执行自动化测试,执行自动化测试时可以根据场景配合使用
3.相对于chatgpt,它能够检查并运行我们的脚本,如果出现错误,给出可能的错误原因并尝试纠正代码逻辑,提高QA效率




![[vue3] 使用 vite 创建vue3项目的详细流程](https://img-blog.csdnimg.cn/direct/4c7294755eb74506b4d4bc37c30270d2.png)
